
You also want an ePaper? Increase the reach of your titles
YUMPU automatically turns print PDFs into web optimized ePapers that Google loves.
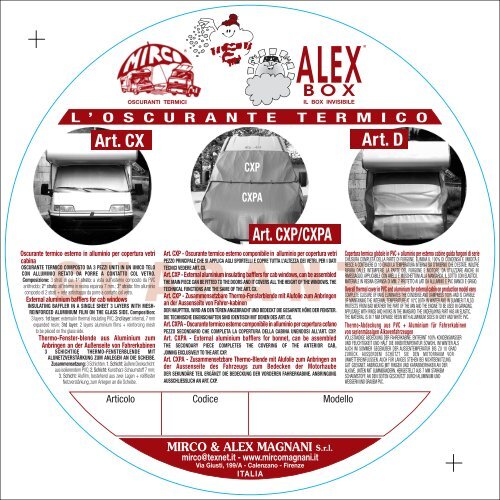
L’OSCURANTE TERMICOArt. CXOscurante termico esterno <strong>in</strong> allum<strong>in</strong>io per copertura vetricab<strong>in</strong>aOSCURANTE TERMICO COMPOSTO DA 3 PEZZI UNITI IN UN UNICO TELOCON ALLUMINIO RETATO DA PORRE A CONTATTO COL VETRO.Composizione: 3 strati di cui: 1° strato: a vista sull'esterno composto da PVCantifreddo; 2° strato: all'<strong>in</strong>terno <strong>in</strong> res<strong>in</strong>a espansa 7 mm.; 3° strato: film allum<strong>in</strong>iocomposto di 2 strati + rete antistrappo da porre a contatto col vetro.External alum<strong>in</strong>ium bafflers for cab w<strong>in</strong>dowsCXPCXPAArt. CXP/CXPAArt. CXP - Oscurante termico esterno componibile <strong>in</strong> allum<strong>in</strong>io per copertura vetriPEZZO PRINCIPALE CHE SI APPLICA AGLI SPORTELLI E COPRE TUTTA L’ALTEZZA DEI VETRI. PER I DATITECNICI VEDERE ART. CX.Art. CXP - External alum<strong>in</strong>ium <strong>in</strong>sulat<strong>in</strong>g bafflers for cab w<strong>in</strong>dows, can be assembledTHE MAIN PIECE CAN BE FITTED TO THE DOORS AND IT COVERS ALL THE HEIGHT OF THE WINDOWS. THETECHNICAL FUNCTIONS ARE THE SAME OF THE ART. CX.Art. CXP - Zusammensetzbare Thermo-Fensterblende mit Alufolie zum Anbr<strong>in</strong>genan der Aussenseite von Fahrer-kab<strong>in</strong>enDER HAUPTTEIL WIRD AN DEN TÜREN ANGEBRACHT UND BEDECKT DIE GESARNTE HÖHE DER FENSTER.DIE TECHNISCHE EIGENSCHAFTEN SIND IDENTISCH MIT DENEN DES ART. CX.Art. CXPA - Oscurante termico esterno componibile <strong>in</strong> allum<strong>in</strong>io per copertura cofanoPEZZO SECONDARIO CHE COMPLETA LA COPERTURA DELLA CABINA UNENDOSI ALL’ART. CXP.Art. CXPA - External alum<strong>in</strong>ium bafflers for bonnet, can be assembledTHE SECONDARY PIECE COMPLETES THE COVERING OF THE ANTERIOR CAB,JOINING EXCLUSIVELY TO THE ART. CXP.Art. CXPA - Zusammensetzbare Thermo-Blende mit Alufolie zum Anbr<strong>in</strong>gen ander Aussenseite des Fahrzeugs zum Bedecken der MotorhaubeDER SEKUNDÄRE TEIL ERGÄNZT DIE BEDECKUNG DER VORDEREN FAHRERKABINE. ANBRINGUNGAUSSCHLIESSLICH AN ART. CXP.Art. DCopertura termica globale <strong>in</strong> PVC + allum<strong>in</strong>io per esterno cab<strong>in</strong>e guida furgoni di serieCHIUSURA COMPLETA DELLA PARTE DI FURGONE. ELIMINA IL 100% DI CONDENSA E UMIDITÀ ERIESCE A CONTENERE DI 10 GRADI LA TEMPERATURA INTERNA SIA D’INVERNO CHE D’ESTATE. INOLTRERIPARA DALLE INTEMPERIE LA PARTE DEL FURGONE E MOTORE. DA UTILIZZARE ANCHE INRIMESSAGGIO, APPLICABILE CON ANELLI E MOSCHETTONI ALLA MANSARDA, IL SOTTO CON ELASTICO.MATERIALE IN RESINA ESPANSA DI MM. 7 PROTETTO AI LATI DA ALLUMINIO E PVC BIANCO E GRIGIO.Overall thermal cover <strong>in</strong> PVC and alum<strong>in</strong>ium for external cab<strong>in</strong> on production model vansCOMPLETE CLOSURE OF VANS ELIMINATES THE CONDENSE AND DAMPNESS 100% AND IS CAPABLEOF MAINTAINING THE INTERNAL TEMPERATURE AT 10°C BOTH IN WINTER AND IN SUMMER IT ALSOGUARANTEEINSULATING BAFFLER IN A SINGLE SHEET 3 LAYERS WITH MESH-REINFORCED ALUMINIUM FILM ON THE GLASS SIDE. Composition:3 layers. 1st layer: external <strong>in</strong> thermal <strong>in</strong>sulat<strong>in</strong>g PVC; 2nd layer: <strong>in</strong>ternal, 7 mmexpanded res<strong>in</strong>; 3rd layer: 2 layers alum<strong>in</strong>ium films + re<strong>in</strong>forc<strong>in</strong>g meshto be placed on the glass side.Thermo-Fenster-blende aus Alum<strong>in</strong>ium zumAnbr<strong>in</strong>gen an der Außenseite von Fahrerkab<strong>in</strong>en3 SCHICHTIGE THERMO-FENSTERBLENDE MITALUNETZVERSTÄRKUNG ZUM ANLEGEN AN DIE SCHEIBE.Zusammensetzung: 3 Schichten. 1. Schicht: äußere Deckschichtaus isolierendem PVC; 2. Schicht: Kunstharz-Schaumstoff 7 mm;3. Schicht: Alufilm, bestehend aus zwei Lagen + reißfesterNetzverstärkung, zum Anlegen an die Scheibe.®OSCURANTI TERMICIALEX®B O XIL BOX INVISIBILEPROTECTS FROM BAD WEATHER THE PART OF THE VAN AND THE ENGINE TO BE USED IN GARAGING,APPLICABLE WITH RINGS AND HOOKS IN THE MANSARD. THE UNDERLAYING PART HAS AN ELASTIC,THE MATERIAL IS IN 7 MM EXPANSE RESIN WITH ALUMINIUM SIDES IN GREY AND WHITE PVC.Thermo-Abdeckung aus PVC + Alum<strong>in</strong>ium für Fahrerkab<strong>in</strong>envon serienmässigen AlkovenfahrzeugenVOLLSTÄNDIGE ABDECKUNG DER FAHRERKABINE. ENTFERNT 100% KONDENSWASSERUND FEUCHTIGKEIT UND HÄLT DIE INNENTEMPERATUR SOWOHL IM WINTER ALSAUCH IM SOMMER GEGENÜBER DER AUSSENTEMPERATUR BIS ZU 10 GRADZURÜCK. AUSSERDEM SCHÜTZT SIE DEN MOTORRAUM VORUNWETTEREINFLÜSSEN. AUCH FÜR LANGES STEHEN BEI NICHTBENUTZUNGGUT GEEIGNET. ANBRIGUNG MIT RINGEN UND KARABINERHAKEN AN DERALKOVE, UNTEN MIT GUMMIBÄNDERN. HERGESTELLT AUS 7 MM STARKEMSCHAUMSTOFF, AN DEN SEITEN GESCHÜTZT DURCH ALUMINIUM UNDWEISSERN UND GRAUEM PVC.ArticoloCodiceModelloMIRCO & ALEX MAGNANI S.r.l.mirco@texnet.it - www.mircomagnani.itVia Giusti, 199/A - Calenzano - FirenzeITALIA
Art. CX-CXPMONTAGEANLEITUNGZusammensetzung neues Montagekit für AussenmattenDie Thermomatte besteht aus e<strong>in</strong>em Stück. An den beiden Türseiten ist e<strong>in</strong> elastischer Streifen angebracht, der<strong>in</strong> die Türen gezogen wird und so die Matte von <strong>in</strong>nen blockiert. An der Matte bef<strong>in</strong>den sich bereits 7 Plastikösen, die zurVerankerung an den Seitenspiegeln, den Türen oder Griffen dienen und an den Scheibenwischern, die gerade aussen auf derMatte liegen sollen. Das Kit enthält ausserdem 5 Gummibander, 5 Haken und 5 Plastikblocker. E<strong>in</strong> e<strong>in</strong>faches Ende des Gummibands <strong>in</strong>den Plastikblocker fädeln und feststellen; den Plastikblocker von aussen nach <strong>in</strong>nen durch die Plastiköse stecken, am anderen Ende des Gummibandsden Haken befestigen und diesen am ersten möglichen Befestigungspunkt e<strong>in</strong>haken. Benutzen Sie ebenso die Plastikösen an der W<strong>in</strong>dschutzscheibezur Befestigung der Matte an den Scheibenwischern und die auf der Türseite zur Befestigung am Griff. Für die 4 Ösen nahe der Seitenspiegel wird empfohlen,die Haken zwischen der der Öse der Tür und der W<strong>in</strong>dschutzscheibe zu befestigen. In e<strong>in</strong>igen Kit unserer Produktion, für alte Modelle wie Ducato Serie 1 und 2,Ford usw. unterscheidet sich die Montage, da an der oberen Türseite ke<strong>in</strong>e Klettbänder s<strong>in</strong>d, die <strong>in</strong> die Tür gesteckt werden, sondern e<strong>in</strong>e Plastiköse, <strong>in</strong> die e<strong>in</strong> Gummibandgefädelt wird-wie oben beschrieben- und der Haken wird an der Türsäule befestigt. Ausserdem fehlen die Ösen an den Seitenspiegeln und an den Scheibenwischern.FITTING’S INSTRUCTIONSThermal exterior bl<strong>in</strong>d new fitt<strong>in</strong>g’s kit.The bl<strong>in</strong>d is <strong>in</strong> a s<strong>in</strong>gle piece and has stretch fabric bands on both sides, which have to be <strong>in</strong>serted <strong>in</strong> the doors to block the bl<strong>in</strong>d from the <strong>in</strong>side of the vehicle. There are 7plastic eyelets fitted on the thermal bl<strong>in</strong>d, these have to be used to fix the bl<strong>in</strong>d to the rear-view mirrors, to the door-handles and to the w<strong>in</strong>dscreen wipers. Wiper arms must bekept ly<strong>in</strong>g on the external part of the thermal bl<strong>in</strong>d. The fitt<strong>in</strong>g’s kit is also composed by 5 elastic bands, 5 hooks and 5 ogives. One end of the s<strong>in</strong>gle elastic band must be <strong>in</strong>sertedand fixed <strong>in</strong> the ogive, than it must be threaded through the eyelet from outside to <strong>in</strong>side and f<strong>in</strong>ally knotted on the other end to the hook. Use the end with the hook to stretchthe elastic band and fix it to the nearer support. Use the eyelet on the w<strong>in</strong>dscreen to fix the bl<strong>in</strong>d to the wipers, the eyelets on the side doors to fix the bl<strong>in</strong>d to the nearer possible po<strong>in</strong>t ofanchorage, while for the other 4 eyelets placed near to the rear-view mirrors f<strong>in</strong>d po<strong>in</strong>ts of anchorage between the eyelet on the w<strong>in</strong>dscreen an the one on the side door.ISTRUZIONI DI MONTAGGIOComposizione kit montaggio nuovo tipo per articoli esterni.L’oscurante è un unico pezzo. Sui due sportelli è applicata una fascia elastica da <strong>in</strong>serire nelle portiere e bloccare gli stessi all’<strong>in</strong>terno. L’oscurante è fornito di 7 borchie già montate cheservono come ancoraggio per gli specchi laterali, la portiera o la maniglia, e per le spazzole lavavetri che è consigliabile tenere <strong>in</strong> posizione retta sull’esterno dell’oscurante. Il kit è composto<strong>in</strong>oltre da 5 elastici, 5 ganci e 5 ogive. L’elastico s<strong>in</strong>golo deve essere <strong>in</strong>filato nell’ogiva e nel gancio; si consiglia nella prima applicazione di fare la chiusura all’<strong>in</strong>izio dell’elastico poi <strong>in</strong>serendol’ogiva nella borchia dal lato esterno verso l’<strong>in</strong>terno, e usando il gancio come distanza fermandosi al primo appoggio possibile per quanto riguarda le borchie sul lato della portiera e quellosul parabrezza per le spazzole; per le altre 4 borchie vic<strong>in</strong>o agli specchi si consiglia di agganciarsi fra la borchia dello sportello e la borchia del parabrezza. In alcuni kit di nostra produzione,applicabili su modelli vecchi tipo Ducato 1ª o 2ª serie, Ford, ecc., il montaggio si differenzia dal fatto che nel lato dello sportello superiore non vi sono le fasce con velcro da <strong>in</strong>serire nellaporta ma una borchia dove verrà <strong>in</strong>serito il solito elastico come sopra e ci si aggancerà alla colonna della porta; <strong>in</strong>oltre mancheranno le borchie allo specchio e agli spazzol<strong>in</strong>i.Art. CXPAFITTING’S INSTRUCTIONSThe article untert must be coupled with the article obert of the same model. For make this it’s necessary to unit two pieces through the strap and to block with elastic.ISTRUZIONI DI MONTAGGIOQuesto articolo è un unico pezzo e viene fornito con 5 metri di corda elastica 8mm e con 6 ganci gialli. Sull’orlo del lato alto è dotato di una striscia di velcro chepermette di adattarsi all’art. CXP. Per unire gli articoli CXP e CXPA si consiglia di far passare la corda elastica fra gli anelli. Fissare <strong>in</strong>f<strong>in</strong>e all’anello <strong>in</strong> basso latocellula 1 corda per lato ed agganciarla ad una sporgenza sotto il camper.Art. DISTRUZIONI DI MONTAGGIOOscurante per mansarda liscia senza termoformati. Questo oscurante è dotato di mt. 10 di elastico; 8 ganci per elastico; 4 ponti di fissaggio con fori perviti; 8 viti <strong>in</strong> acciaio. Applicare 2 ponti di fissaggio, con le viti fornite, sotto la mansarda nell’angolo di 90° per sicurezza e sotto l’angolo di collegamentofra la mansarda e la cellula; i ponti devono essere applicati il più vic<strong>in</strong>o possibile alla carrozzeria del tetto del furgone. Gli altri due ponti di fissaggiodevono essere applicati sotto la cellula; tagliare 30/40 cm. dei 10 m. di elastico <strong>in</strong> dotazione, ancorarlo al gancio e, con l’oscurante appoggiatoal furgone, mettere <strong>in</strong> tirare il più possibile l’elastico agganciandolo all’anello nell’angolo di 90°; fatto questo l’oscurante è posizionato.Una parte del resto dell’elastico serve per collegare i due lati sul frontale del furgone ed il rimanente (circa 5 m.), utilizzando iganci, deve essere <strong>in</strong>serito nelle borchie della base bassa e agganciato ai due ponti di fissaggio applicati sotto al pianale.Oscurante per mansarda con termoformato (ultimi modelli). Questo oscurante è dotato di mt. 10 di elastico; 6 ganci perelastico; 2 ponti di fissaggio con fori per viti; 4 viti <strong>in</strong> acciaio. Questo oscurante prevede sul lato di 90° due fasce daapplicare all’<strong>in</strong>terno dello sportello da chiudere con il velcro, così l’oscurante è già fissato alla cab<strong>in</strong>a.A questo punto fissare l’oscurante al fronte e alla base bassa utilizzando i 10 m. di elasticocon i relativi ganci. Questo oscurante, a differenza dell’altro, copre esclusivamenteil furgone f<strong>in</strong>o all’altezza degli sportelli e la cornice altadel parabrezza.