

KitchenAid 20182297 PRO A71 S - Cooker - 20182297 PRO A71 S - Cooker EUR (852755901000) Istruzioni per l'Uso
KitchenAid 20182297 PRO A71 S - Cooker - 20182297 PRO A71 S - Cooker EUR (852755901000) Istruzioni per l'Uso
KitchenAid 20182297 PRO A71 S - Cooker - 20182297 PRO A71 S - Cooker EUR (852755901000) Istruzioni per l'Uso

Create successful ePaper yourself
Turn your PDF publications into a flip-book with our unique Google optimized e-Paper software.
ENGLISH 136<br />
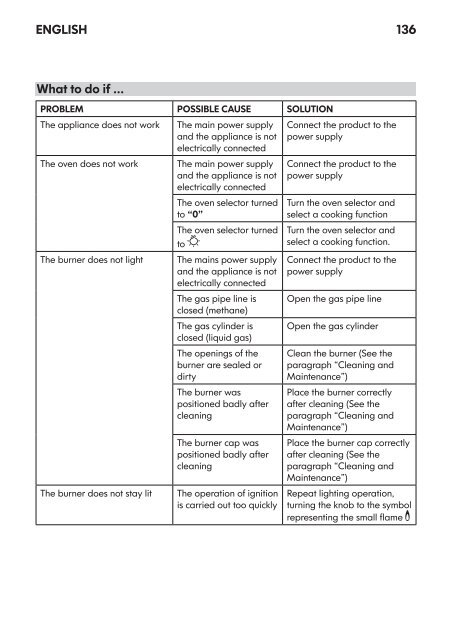
What to do if ...<br />
<strong>PRO</strong>BLEM POSSIBLE CAUSE SOLUTION<br />
The appliance does not work<br />
The oven does not work<br />
The burner does not light<br />
The burner does not stay lit<br />
The main power supply<br />
and the appliance is not<br />
electrically connected<br />
The main power supply<br />
and the appliance is not<br />
electrically connected<br />
The oven selector turned<br />
to “0”<br />
The oven selector turned<br />
to<br />
The mains power supply<br />
and the appliance is not<br />
electrically connected<br />
The gas pipe line is<br />
closed (methane)<br />
The gas cylinder is<br />
closed (liquid gas)<br />
The openings of the<br />
burner are sealed or<br />
dirty<br />
The burner was<br />
positioned badly after<br />
cleaning<br />
The burner cap was<br />
positioned badly after<br />
cleaning<br />
The o<strong>per</strong>ation of ignition<br />
is carried out too quickly<br />
Connect the product to the<br />
power supply<br />
Connect the product to the<br />
power supply<br />
Turn the oven selector and<br />
select a cooking function<br />
Turn the oven selector and<br />
select a cooking function.<br />
Connect the product to the<br />
power supply<br />
Open the gas pipe line<br />
Open the gas cylinder<br />
Clean the burner (See the<br />
paragraph “Cleaning and<br />
Maintenance”)<br />
Place the burner correctly<br />
after cleaning (See the<br />
paragraph “Cleaning and<br />
Maintenance”)<br />
Place the burner cap correctly<br />
after cleaning (See the<br />
paragraph “Cleaning and<br />
Maintenance”)<br />
Repeat lighting o<strong>per</strong>ation,<br />
turning the knob to the symbol<br />
representing the small flame


