Quality Home Appliances
Quality Home Appliances
Quality Home Appliances

You also want an ePaper? Increase the reach of your titles
YUMPU automatically turns print PDFs into web optimized ePapers that Google loves.
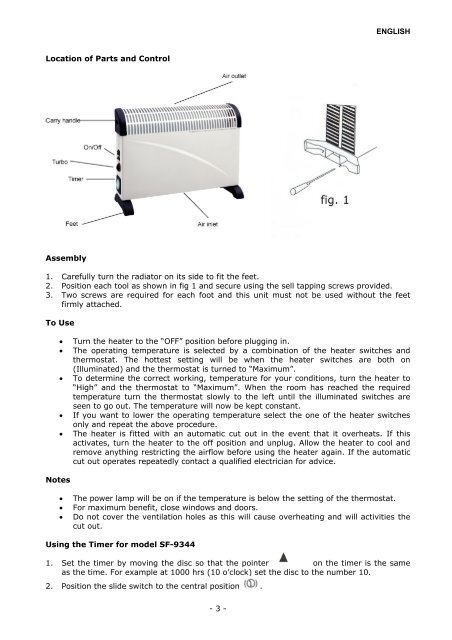
Location of Parts and Control<br />
Assembly<br />
- 3 -<br />
ENGLISH<br />
1. Carefully turn the radiator on its side to fit the feet.<br />
2. Position each tool as shown in fig 1 and secure using the sell tapping screws provided.<br />
3. Two screws are required for each foot and this unit must not be used without the feet<br />
firmly attached.<br />
To Use<br />
• Turn the heater to the “OFF” position before plugging in.<br />
• The operating temperature is selected by a combination of the heater switches and<br />
thermostat. The hottest setting will be when the heater switches are both on<br />
(Illuminated) and the thermostat is turned to “Maximum”.<br />
• To determine the correct working, temperature for your conditions, turn the heater to<br />
“High” and the thermostat to “Maximum”. When the room has reached the required<br />
temperature turn the thermostat slowly to the left until the illuminated switches are<br />
seen to go out. The temperature will now be kept constant.<br />
• If you want to lower the operating temperature select the one of the heater switches<br />
only and repeat the above procedure.<br />
• The heater is fitted with an automatic cut out in the event that it overheats. If this<br />
activates, turn the heater to the off position and unplug. Allow the heater to cool and<br />
remove anything restricting the airflow before using the heater again. If the automatic<br />
cut out operates repeatedly contact a qualified electrician for advice.<br />
Notes<br />
• The power lamp will be on if the temperature is below the setting of the thermostat.<br />
• For maximum benefit, close windows and doors.<br />
• Do not cover the ventilation holes as this will cause overheating and will activities the<br />
cut out.<br />
Using the Timer for model SF-9344<br />
1. Set the timer by moving the disc so that the pointer on the timer is the same<br />
as the time. For example at 1000 hrs (10 o’clock) set the disc to the number 10.<br />
2. Position the slide switch to the central position .