Operating Instructions - Indesit
Operating Instructions - Indesit
Operating Instructions - Indesit

You also want an ePaper? Increase the reach of your titles
YUMPU automatically turns print PDFs into web optimized ePapers that Google loves.
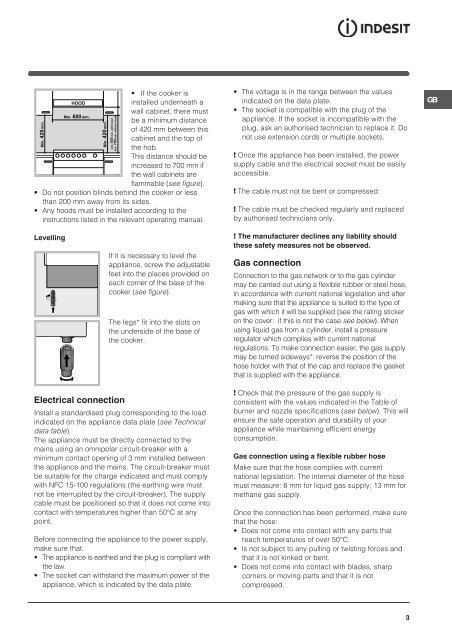
mm.<br />
420<br />
Min.<br />
HOOD<br />
Min. 600 mm.<br />
Min. 420 mm.<br />
min. 650 mm. with hood<br />
min. 700 mm. without hood<br />
• If the cooker is<br />
installed underneath a<br />
wall cabinet, there must<br />
be a minimum distance<br />
of 420 mm between this<br />
cabinet and the top of<br />
the hob.<br />
This distance should be<br />
increased to 700 mm if<br />
the wall cabinets are<br />
flammable (see figure).<br />
• Do not position blinds behind the cooker or less<br />
than 200 mm away from its sides.<br />
• Any hoods must be installed according to the<br />
instructions listed in the relevant operating manual.<br />
• The voltage is in the range between the values<br />
indicated on the data plate.<br />
• The socket is compatible with the plug of the<br />
appliance. If the socket is incompatible with the<br />
plug, ask an authorised technician to replace it. Do<br />
not use extension cords or multiple sockets.<br />
! Once the appliance has been installed, the power<br />
supply cable and the electrical socket must be easily<br />
accessible.<br />
! The cable must not be bent or compressed.<br />
! The cable must be checked regularly and replaced<br />
by authorised technicians only.<br />
GB<br />
Levelling<br />
If it is necessary to level the<br />
appliance, screw the adjustable<br />
feet into the places provided on<br />
each corner of the base of the<br />
cooker (see figure).<br />
The legs* fit into the slots on<br />
the underside of the base of<br />
the cooker.<br />
! The manufacturer declines any liability should<br />
these safety measures not be observed.<br />
Gas connection<br />
Connection to the gas network or to the gas cylinder<br />
may be carried out using a flexible rubber or steel hose,<br />
in accordance with current national legislation and after<br />
making sure that the appliance is suited to the type of<br />
gas with which it will be supplied (see the rating sticker<br />
on the cover: if this is not the case see below). When<br />
using liquid gas from a cylinder, install a pressure<br />
regulator which complies with current national<br />
regulations. To make connection easier, the gas supply<br />
may be turned sideways*: reverse the position of the<br />
hose holder with that of the cap and replace the gasket<br />
that is supplied with the appliance.<br />
Electrical connection<br />
Install a standardised plug corresponding to the load<br />
indicated on the appliance data plate (see Technical<br />
data table).<br />
The appliance must be directly connected to the<br />
mains using an omnipolar circuit-breaker with a<br />
minimum contact opening of 3 mm installed between<br />
the appliance and the mains. The circuit-breaker must<br />
be suitable for the charge indicated and must comply<br />
with NFC 15-100 regulations (the earthing wire must<br />
not be interrupted by the circuit-breaker). The supply<br />
cable must be positioned so that it does not come into<br />
contact with temperatures higher than 50°C at any<br />
point.<br />
Before connecting the appliance to the power supply,<br />
make sure that:<br />
• The appliance is earthed and the plug is compliant with<br />
the law.<br />
• The socket can withstand the maximum power of the<br />
appliance, which is indicated by the data plate.<br />
! Check that the pressure of the gas supply is<br />
consistent with the values indicated in the Table of<br />
burner and nozzle specifications (see below). This will<br />
ensure the safe operation and durability of your<br />
appliance while maintaining efficient energy<br />
consumption.<br />
Gas connection using a flexible rubber hose<br />
Make sure that the hose complies with current<br />
national legislation. The internal diameter of the hose<br />
must measure: 8 mm for liquid gas supply; 13 mm for<br />
methane gas supply.<br />
Once the connection has been performed, make sure<br />
that the hose:<br />
• Does not come into contact with any parts that<br />
reach temperatures of over 50°C.<br />
• Is not subject to any pulling or twisting forces and<br />
that it is not kinked or bent.<br />
• Does not come into contact with blades, sharp<br />
corners or moving parts and that it is not<br />
compressed.<br />
3