Handleiding Floormaster - Parket- en Laminaatsnijder

Create successful ePaper yourself
Turn your PDF publications into a flip-book with our unique Google optimized e-Paper software.
TM<br />
7051642_<strong>Floormaster</strong>:7051642 31.08.2009 8:20 Uhr Seite 1<br />
BEDIENUNGSANLEITUNG<br />
INSTRUCTION MANUAL<br />
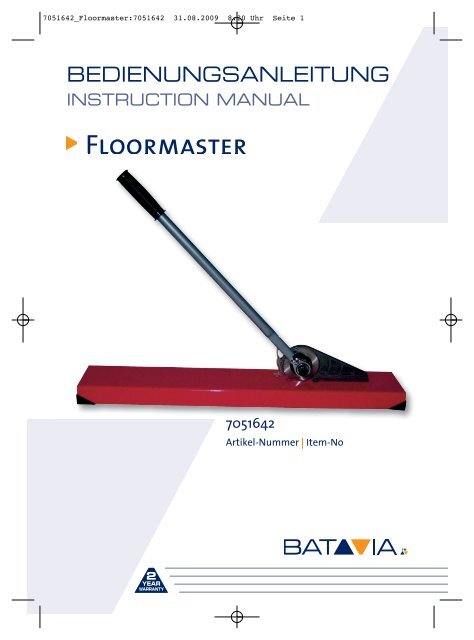
<strong>Floormaster</strong><br />
7051642<br />
Artikel-Nummer | Item-No<br />
WARRANTY
7051642_<strong>Floormaster</strong>:7051642 31.08.2009 8:20 Uhr Seite 2<br />
|H<br />
|G |F<br />
|A |B |C<br />
|D<br />
|E<br />
2 |
7051642_<strong>Floormaster</strong>:7051642 31.08.2009 8:20 Uhr Seite 3<br />
Übersicht | Overview<br />
deutsch<br />
<strong>en</strong>glish<br />
|A Fußgestell Base<br />
|B Messerachse Blade Shaft<br />
|C Ratsch<strong>en</strong>griff Ratchet Handle<br />
|D Unterlegscheibe Washer<br />
|E Schraub<strong>en</strong>knopf Screw Knob<br />
|F Richtungseinsteller Directional Switch<br />
|G Befestigungsschraub<strong>en</strong> für Messer Mounting Screws for Blade<br />
|H Fingerschutz Finger Guard<br />
Inhalt | Cont<strong>en</strong>t<br />
deutsch<br />
Sicherheitshinweise 2 |<br />
Vor der erst<strong>en</strong> B<strong>en</strong>utzung 3 |<br />
Montageanleitung 3 |<br />
Sägeblätter einsetz<strong>en</strong>/austausch<strong>en</strong> 3 |<br />
Längschnitte, Querschnitte und Diagonale Schnitte 3 |<br />
Aussparung<strong>en</strong> aussäg<strong>en</strong> 4 |<br />
Wartung und Pflege 5 |<br />
Technische Dat<strong>en</strong> V |<br />
<strong>en</strong>glish<br />
Safety Notes 6 |<br />
Before first Use 7 |<br />
Assembly Instructions 7 |<br />
Inserting/Replacing the Saw Blades 7 |<br />
Full L<strong>en</strong>gth, Cross-Cut and Diagonal Cuts 7 |<br />
Notch Cuts 8 |<br />
Maint<strong>en</strong>ance and Care 8 |<br />
Technical data V |<br />
| 3
7051642_<strong>Floormaster</strong>:7051642 31.08.2009 8:20 Uhr Seite 4<br />
D<br />
Sicherheitshinweise<br />
Der <strong>Floormaster</strong> schneidet Laminat und Vinyl / Linoleum Böd<strong>en</strong> bis zu einer Stärke von 12 mm. Er wurde<br />
für unbegr<strong>en</strong>zte Längsschnitte, unbegr<strong>en</strong>zte diagonale Schnitte und für Schnitte in Aussparung<strong>en</strong> konzipiert.<br />
Bitte mach<strong>en</strong> Sie sich in der Reih<strong>en</strong>folge der Kapitel mit dem Gerät vertraut und bewahr<strong>en</strong> Sie<br />
diese Bedi<strong>en</strong>ungsanleitung für spätere Zwecke gut auf. Diese Bedi<strong>en</strong>ungsanleitung <strong>en</strong>thält wichtige<br />
Hinweise zur Inbetriebnahme und Handhabung. Leg<strong>en</strong> Sie die Anleitung dem Produkt bei, w<strong>en</strong>n Sie es<br />
an Dritte weitergeb<strong>en</strong>!<br />
Bitte beacht<strong>en</strong> Sie die Sicherheitshinweise! Diese soll<strong>en</strong> Ihn<strong>en</strong> d<strong>en</strong> sachgemäß<strong>en</strong> Umgang erleichtern<br />
und Ihn<strong>en</strong> helf<strong>en</strong>, Missverständniss<strong>en</strong> und Schäd<strong>en</strong> vorzubeug<strong>en</strong>.<br />
!<br />
Beacht<strong>en</strong><br />
Sie bitte zur Vermeidung von Fehlfunktion<strong>en</strong>, Schäd<strong>en</strong> und gesundheitlich<strong>en</strong> Beeinträchtigung<strong>en</strong><br />
die beigefügt<strong>en</strong> Allgemein<strong>en</strong> Sicherheitshinweise sowie folg<strong>en</strong>de Hinweise:<br />
• Verw<strong>en</strong>d<strong>en</strong> Sie das Gerät mit extremer Vorsicht!<br />
• Verw<strong>en</strong>d<strong>en</strong> Sie d<strong>en</strong> <strong>Floormaster</strong> nur in Übereinstimmung mit dieser Anleitung.<br />
• Lass<strong>en</strong> Sie d<strong>en</strong> <strong>Floormaster</strong> niemals unbeaufsichtigt und halt<strong>en</strong> Sie es außerhalb der Reichweite von<br />
Kindern und von zu beaufsichtig<strong>en</strong>d<strong>en</strong> Person<strong>en</strong>. Dies ist kein Spielzeug.<br />
• Das Gerät <strong>en</strong>thält off<strong>en</strong> lieg<strong>en</strong>de, scharfe Kling<strong>en</strong>. Entfern<strong>en</strong> Sie niemals d<strong>en</strong> Fingerschutz (H). Das<br />
Entfern<strong>en</strong> des Fingerschutzes kann zu ernsthaft<strong>en</strong> Verletzung<strong>en</strong> führ<strong>en</strong>.<br />
• Auch w<strong>en</strong>n der <strong>Floormaster</strong> kein<strong>en</strong> Flugstaub verursacht, ist es ratsam bei der Arbeit<br />
eine Staubschutzmaske zu trag<strong>en</strong>.<br />
• Demontier<strong>en</strong> Sie d<strong>en</strong> Griff vom Fußgestell w<strong>en</strong>n das Gerät nicht verw<strong>en</strong>det wird.<br />
• Halt<strong>en</strong> Sie Finger und Hände immer aus dem Schnittbereich fern.<br />
• Prüf<strong>en</strong> Sie regelmäßig d<strong>en</strong> fest<strong>en</strong> Sitz aller Einzelteile.<br />
B<strong>en</strong>utzung<br />
VOR DER ERSTEN BENUTZUNG<br />
Pack<strong>en</strong> Sie d<strong>en</strong> <strong>Floormaster</strong> aus und überprüf<strong>en</strong> Sie alle Teile auf evtl. Transportschäd<strong>en</strong>. Entsorg<strong>en</strong> Sie<br />
das Verpackungsmaterial oder lagern Sie es an einem für Kinder unzugänglich<strong>en</strong> Ort. Plastikbeutel usw.<br />
könn<strong>en</strong> zu einem gefährlich<strong>en</strong> Spielzeug für Kinder werd<strong>en</strong>.<br />
MONTAGEANLEITUNG<br />
1. Stell<strong>en</strong> Sie das Fußgestell (|A) auf ein<strong>en</strong> eb<strong>en</strong><strong>en</strong> Untergrund.<br />
2. Befestig<strong>en</strong> Sie d<strong>en</strong> Ratsch<strong>en</strong>griff (|C) an der Messerachse (|B). Dabei muss der Richtungseinstellungsumschalter<br />
(|F) von dem Messer abgew<strong>en</strong>det positioniert sein.<br />
3. Setz<strong>en</strong> Sie dann die Unterlegscheibe (|D) gefolgt von dem Schraub<strong>en</strong>knopf (|E) auf die Achse, um<br />
d<strong>en</strong> Griff zu sichern.<br />
SÄGEBLÄTTER EINSETZEN/AUSTAUSCHEN<br />
1. Entfern<strong>en</strong> Sie die drei Schraub<strong>en</strong> (|G) von jedem Sägeblatt. Sei<strong>en</strong> Sie dabei extrem vorsichtig. Die<br />
scharf<strong>en</strong> Kling<strong>en</strong> könn<strong>en</strong> zu ernsthaft<strong>en</strong> Verletzung<strong>en</strong> führ<strong>en</strong>!<br />
2. Entfern<strong>en</strong> Sie die Abdeckbleche und ersetz<strong>en</strong> Sie die Sägeblätter.<br />
4 |
7051642_<strong>Floormaster</strong>:7051642 31.08.2009 8:20 Uhr Seite 5<br />
D<br />
LÄNGSCHNITTE, QUERSCHNITTE UND DIAGONALE SCHNITTE<br />
1. Stell<strong>en</strong> Sie d<strong>en</strong> <strong>Floormaster</strong> auf d<strong>en</strong><br />
Bod<strong>en</strong>. Der Untergrund muss eb<strong>en</strong><br />
sein.<br />
1. 1a.<br />
2. Markier<strong>en</strong> Sie die Schnittlinie über<br />
die komplette Länge der Laminatbohle.<br />
Die lackierte Seite (Dekor-<br />
Seite) sollte dabei nach ob<strong>en</strong> zeig<strong>en</strong><br />
(Bild 1). Hinweis: Beim Bearbeit<strong>en</strong><br />
von Laminat mit einem angebracht<strong>en</strong><br />
Trittschutzpolster sollte die lakkierte<br />
Seite nach unt<strong>en</strong> zeig<strong>en</strong> und<br />
die Polsterseite nach ob<strong>en</strong>. So kann<br />
die Bohle leichter durch die Kling<strong>en</strong><br />
bewegt werd<strong>en</strong>, ohne dass die Polsterung<br />
am Fußgestell häng<strong>en</strong>bleibt.<br />
2. 2a.<br />
3. Der <strong>Floormaster</strong> verw<strong>en</strong>det ein Zwei-<br />
Kling<strong>en</strong>-System. Positionier<strong>en</strong> Sie<br />
Ihre Markierungslinie <strong>en</strong>tlang einer<br />
der Leitlini<strong>en</strong> des Fußgestells, um<br />
d<strong>en</strong> Schnitt <strong>en</strong>tlang der Kling<strong>en</strong> auszuricht<strong>en</strong><br />
(Bild 1a). Die beid<strong>en</strong> Leitlini<strong>en</strong> am Fußgestell repräs<strong>en</strong>tier<strong>en</strong> die M<strong>en</strong>ge Material, die beim<br />
Säg<strong>en</strong> als Verschnitt anfall<strong>en</strong> wird. Diese Lini<strong>en</strong> könn<strong>en</strong> auch als Hilfe für ein<strong>en</strong> gerad<strong>en</strong> Schnitt di<strong>en</strong><strong>en</strong>.<br />
Stell<strong>en</strong> Sie sicher, dass die Seite, die später verw<strong>en</strong>det werd<strong>en</strong> soll, sich außerhalb der Leitlini<strong>en</strong><br />
mit dem Verschnitt befindet.<br />
4. Vor der Ausführung des Schnitts muss der Richtungseinsteller (|F) am Griff nach unt<strong>en</strong> eingestellt<br />
sein (Vorwärtsrichtung) (Bild 2). D<strong>en</strong>k<strong>en</strong> Sie daran, dass der Verschnitt beim Säg<strong>en</strong> zwisch<strong>en</strong> d<strong>en</strong><br />
beid<strong>en</strong> Sägeblättern vorwärtsbewegt wird und beim Schneid<strong>en</strong> verlor<strong>en</strong> geht. Zum Schneid<strong>en</strong> halt<strong>en</strong><br />
Sie das Laminat mit einer Hand fest und zieh<strong>en</strong> Sie d<strong>en</strong> Ratsch<strong>en</strong>griff mit der ander<strong>en</strong> Hand herunter.<br />
Führ<strong>en</strong> Sie diese Ziehbewegung immer wieder aus bis der Schnitt komplett durchgeführt<br />
wurde. Dabei braucht die Bohle von Ihn<strong>en</strong> nicht bewegt werd<strong>en</strong>. Das pat<strong>en</strong>tierte Zwei-Kling<strong>en</strong>-<br />
System wird die Bohle beim Schnittvorgang automatisch weiter transportier<strong>en</strong>.<br />
HINWEIS<br />
Falls sich die Bohle von der Schnittlinie wegbewegt, stopp<strong>en</strong> Sie d<strong>en</strong> Schnittvorgang. Stell<strong>en</strong> Sie d<strong>en</strong> Richtungseinsteller<br />
(|F) in die Rückwärts-Position (Bild 2a) und zieh<strong>en</strong> Sie d<strong>en</strong> Ratsch<strong>en</strong>griff, um die Bohle<br />
wieder herauszudrück<strong>en</strong>. Sobald die Bohle wieder ausgerichtet wurde, stell<strong>en</strong> Sie d<strong>en</strong> Richtungseinsteller<br />
wieder in die Vorwärts-Position und führ<strong>en</strong> Sie d<strong>en</strong> Schnitt fort. Die Schnittseite der Bohle sollte<br />
an der Wand verlauf<strong>en</strong>. So kann sie z.B. durch eine Fußbod<strong>en</strong>leiste überdeckt werd<strong>en</strong>.<br />
AUSSPARUNGEN AUSSÄGEN<br />
1. Markier<strong>en</strong> Sie die Aussparung, die Sie aussäg<strong>en</strong> möcht<strong>en</strong>. Aussparung<strong>en</strong> werd<strong>en</strong> im Tür-Bereich<br />
oder bei ander<strong>en</strong> Hinderniss<strong>en</strong> b<strong>en</strong>ötigt.<br />
2. Schneid<strong>en</strong> Sie <strong>en</strong>tlang der Markierung. Sobald das Ende der Markierung erreicht wurde stell<strong>en</strong> Sie<br />
d<strong>en</strong> Richtungseinsteller (|F) in die Rückwärts-Position und führ<strong>en</strong> Sie die Laminat Bohle wieder komplett<br />
heraus (Bild 3).<br />
3. Wiederhol<strong>en</strong> Sie dies<strong>en</strong> Vorgang für die andere Seite der Aussparung (Bild 3a).<br />
| 5
7051642_<strong>Floormaster</strong>:7051642 31.08.2009 8:20 Uhr Seite 6<br />
D<br />
3.<br />
3a.<br />
WARTUNG UND PFLEGE<br />
• Reinig<strong>en</strong> Sie d<strong>en</strong> Laminatschneider mit einem sauber<strong>en</strong> und trock<strong>en</strong><strong>en</strong> Tuch.<br />
• Bei Nichtgebrauch lagern Sie das Gerät an einem trock<strong>en</strong><strong>en</strong> Ort.<br />
• Prüf<strong>en</strong> Sie regelmäßig d<strong>en</strong> fest<strong>en</strong> Sitz aller Einzelteile<br />
• Entfern<strong>en</strong> Sie stets alle Ablagerung<strong>en</strong> an der Öffnung zwisch<strong>en</strong> d<strong>en</strong> Sägeblättern<br />
und dem Fußgestell.<br />
Technische Dat<strong>en</strong><br />
<strong>Floormaster</strong><br />
Abmessung<strong>en</strong> (L/B/H)<br />
Griff<br />
Max. Schnitttiefe<br />
Sägeblatt 1<br />
706 x 123 x 124 mm<br />
545 mm<br />
12 mm<br />
80 x 1,2 mm<br />
1 Ersatzsägeblätter könn<strong>en</strong> bei Batavia bestellt werd<strong>en</strong><br />
(Artikel Nr. 7053705).<br />
Entsorgung<br />
Werter Kunde, bitte helf<strong>en</strong> Sie mit, Abfall zu vermeid<strong>en</strong>.<br />
Sollt<strong>en</strong> Sie sich einmal von diesem Artikel tr<strong>en</strong>n<strong>en</strong> woll<strong>en</strong>, so bed<strong>en</strong>k<strong>en</strong> Sie bitte, dass viele seiner Kompon<strong>en</strong>t<strong>en</strong><br />
aus wertvoll<strong>en</strong> Rohstoff<strong>en</strong> besteh<strong>en</strong> und wiederverwertet werd<strong>en</strong> könn<strong>en</strong>. Entsorg<strong>en</strong> Sie ihn<br />
daher nicht in die Mülltonne, sondern führ<strong>en</strong> Sie ihn bitte Ihrer Sammelstelle für Wertstoffe zu.<br />
6 |
7051642_<strong>Floormaster</strong>:7051642 31.08.2009 8:20 Uhr Seite 7<br />
Safety Notes<br />
GB<br />
The <strong>Floormaster</strong> cuts laminate and vinyl/linoleum flooring up to 12 mm thickness. It is designed for unlimited<br />
rip cuts, unlimited diagonal cuts and notch-cuts. Please familiarize yourself with the proper usage<br />
of the device by reading and following each chapter of this manual, in the order pres<strong>en</strong>ted. Keep these<br />
operating instructions for further refer<strong>en</strong>ce. This operating instruction contains important details for<br />
handling the device. Please pass it on along with the unit if it is handed over to a third party!<br />
Please read the safety instructions! These instructions will make it easier for you to handle the device<br />
and help prev<strong>en</strong>t misunderstandings and possible damage or injury.<br />
!<br />
Please<br />
note the included G<strong>en</strong>eral Safety Notes and the following safety notes to avoid malfunc -<br />
tions, damage or physical injury:<br />
• Use the unit with extreme caution.<br />
• Use the <strong>Floormaster</strong> only according to this manual.<br />
• Do not leave the <strong>Floormaster</strong> unatt<strong>en</strong>ded and keep it out of reach of childr<strong>en</strong>. This is not a toy.<br />
• The unit has exposed sharp blades. Do not remove finger guard (H). Removing finger guard could<br />
cause serious injury.<br />
• Although the <strong>Floormaster</strong> does not produce airborne dust, it is recomm<strong>en</strong>ded to wear<br />
a dust mask wh<strong>en</strong> operating this tool.<br />
• Remove handle completely from base, wh<strong>en</strong> not in use.<br />
• Always keep fingers and hands away from blade cutting area.<br />
• Periodically check all assembly to <strong>en</strong>sure that hardware remains tight.<br />
Using<br />
BEFORE FIRST USE<br />
Remove the <strong>Floormaster</strong> and the accessory out of the packaging and check for any damage in transit.<br />
Keep packaging materials out of reach of childr<strong>en</strong>. There is risk of suffocation!<br />
ASSEMBLY INSTRUCTION<br />
1. Place the base (|A) on a flat surface.<br />
2. Attach the ratchet handle (|C) to the blade shaft (|B), making sure the directional switch (|F) is facing<br />
away from the blade.<br />
3. Th<strong>en</strong> place the washer (|D) followed by the screw knob (|E) on the shaft to secure the handle.<br />
INSERTING/REPLACING THE SAW BLADES<br />
1. Remove the three screws (|G) from each blade. Use extreme caution. The sharp blades could cause<br />
serious injury!<br />
2. Remove the cover plates and insert / replace the saw blades.<br />
| 7
7051642_<strong>Floormaster</strong>:7051642 31.08.2009 8:20 Uhr Seite 8<br />
GB<br />
FULL LENGTH, CROSS-CUT AND DIAGONAL CUTS<br />
1. Place the <strong>Floormaster</strong> cutter on the<br />
floor making sure it is on a level surface.<br />
1. 1a.<br />
2. Mark your cut line across the <strong>en</strong>tire<br />
l<strong>en</strong>gth of the laminate piece, with<br />
the finished side (decorative side) facing<br />
up (fig. 1). Note: Wh<strong>en</strong> using laminate<br />
with attached padding, cut<br />
with the finished side down and pad<br />
side up. This will insure the plank can<br />
move easily through the blades without<br />
having the padding stuck to the<br />
base of the laminate cutter.<br />
2. 2a.<br />
3. The <strong>Floormaster</strong> has a dual blade system.<br />
Position your marked cut line<br />
on one of the guidelines of the base<br />
to align the cut with the blades (fig.<br />
1a). Both guide lines on the base provide<br />
a refer<strong>en</strong>ce for the offcut material<br />
and can also serve as guides to keep your cut straight. Make sure to position the side to be used<br />
outside the guidelines, with the “scrap portion” betwe<strong>en</strong> the blades.<br />
4. Before cutting, make sure the ratchet directional switch (|F) on the handle is in the down (forward)<br />
position (fig. 2). Remember that the scrap will be fed through the middle of the dual blades and gets<br />
lost wh<strong>en</strong> cutting. For cutting hold the laminate firmly with one hand and pull the handle down<br />
with the other hand. Continue cranking the handle until the cut is complete. There is no need to<br />
push the plank; the pat<strong>en</strong>ted dual blade system automatically will feed the plank while cutting.<br />
Note: If the plank begins to move off the cutting line, stop. Reverse (fig. 2a) the directional switch (|F)<br />
and push the handle to back out the plank. Once you have re-aligned the plank flip the directional switch<br />
to resume cutting in a forward direction.<br />
The cut side of the plank should be placed along the wall. The cut side of the plank (unfinished) will th<strong>en</strong><br />
be covered by baseboard or finish moulding.<br />
NOTCH CUTS<br />
1. Mark the notch you want to cut out. Notches are used around door ways or other obstructions in the<br />
layout of the floor.<br />
2. Cut along the mark and once the desired notch l<strong>en</strong>gth has be<strong>en</strong> reached, flip the directional lever (|F)<br />
and completely back out the laminate plank (fig. 3).<br />
3. Repeat the process for the other side of the notch (fig. 3a).<br />
3.<br />
3a.<br />
8 |
7051642_<strong>Floormaster</strong>:7051642 31.08.2009 8:20 Uhr Seite 9<br />
GB<br />
MAINTENANCE AND CARE<br />
• Keep the <strong>Floormaster</strong> clean by using a dry clean cloth.<br />
• Store the unit in a dry place wh<strong>en</strong> not in use.<br />
• Periodically check all assembled parts and <strong>en</strong>sure firm setting.<br />
• Remove dust and debris from the op<strong>en</strong>ing betwe<strong>en</strong> the saw blades and the base.<br />
Technical Data<br />
Laminate Cutter<br />
Size<br />
Handle<br />
Max. Cutting Height<br />
Saw Blade 1<br />
706 x 123 x 124 mm<br />
545 mm<br />
12 mm<br />
80 x 1.2 mm<br />
1 Replacem<strong>en</strong>t saw blades can be ordered at Batavia<br />
(Article No. 7053705).<br />
Disposal<br />
Dear Customer, please help avoid waste materials.<br />
If you at some point int<strong>en</strong>d to dispose of this article, th<strong>en</strong> please keep in mind that many of its compon<strong>en</strong>ts<br />
consist of valuable materials, which can be recycled. Please do not dis charge it in the rubbish bin,<br />
but check with your local council for recycling facilities in your area.<br />
| 9
7051642_<strong>Floormaster</strong>:7051642 31.08.2009 8:20 Uhr Seite 10<br />
2 YEAR WARRANTY<br />
TODAYS SOLUTIONS<br />
<strong>Floormaster</strong><br />
Dieses Produkt hat<br />
2 Jahre Garantie<br />
This Product has got a<br />
2 year warranty<br />
Dit product heeft 2 jaar garantie<br />
Ce produit a 2 ans de garantie<br />
Sehr geehrter Kunde, unsere Produkte unterlieg<strong>en</strong> einer str<strong>en</strong>g<strong>en</strong> Qualitätskontrolle.<br />
Sollte dieses Gerät nicht einwandfrei sein, so w<strong>en</strong>d<strong>en</strong> Sie sich bitte immer<br />
zuerst an unser<strong>en</strong> Kund<strong>en</strong>-Service. Bitte bewahr<strong>en</strong> Sie unbedingt d<strong>en</strong> Kaufbeleg auf.<br />
Die Garantieleistung gilt nur für Material-oder Fabrikationsfehler. Ausgeschloss<strong>en</strong> sind<br />
Mängel die durch häufig<strong>en</strong> Gebrauch, missbräuchlicher und unsachgemäßer Behandlung<br />
oder Gewalteinwirkung verursacht word<strong>en</strong> sind.<br />
Dear Cli<strong>en</strong>t, if for any reason this product is not working, please <strong>en</strong>sure you contact our Cli<strong>en</strong>t<br />
Service C<strong>en</strong>tre. Ensure you have your original receipt of purchase. This warranty covers all defects<br />
in workmanship or materials in this Batavia product for a two year period from the date of<br />
purchase. The warranty does not cover any malfunction, or defect resulting from misuse, neglect,<br />
alteration, or repair.<br />
Geachte klant, onze product<strong>en</strong> ondergaan e<strong>en</strong> str<strong>en</strong>g kwaliteitscontrole proces. Wanneer dit product<br />
niet correct functioneert, w<strong>en</strong>d u zich alstublieft altijd eerst tot onze klant<strong>en</strong>service. Bewaar altijd uw<br />
aankoopbewijs. De garantieservice is alle<strong>en</strong> van toepassing op materiaal- of productiefout<strong>en</strong>. Uitgeslot<strong>en</strong><br />
zijn gebrek<strong>en</strong> veroorzaakt door int<strong>en</strong>sief gebruik, misbruik <strong>en</strong> incorrecte behandeling of extern geweld.<br />
Cher cli<strong>en</strong>t, Si pour une raison quelconque, ce produit ne fonctionne pas, veuillez contacter notre C<strong>en</strong>tre de<br />
service après-v<strong>en</strong>te. Conservez le bon d’achat original. Cette garantie couvre tous les défauts de matériau et de<br />
main d’oeuvre constatés sur ce produit BATAVIA p<strong>en</strong>dant une période de deux ans à compter de la date d’achat.<br />
Les défauts de fonctionnem<strong>en</strong>t et autres résultant d’abus ou de mauvais emploi, de néglig<strong>en</strong>ce, de modifications<br />
ou réparations non autorisées sont exclus de la garantie.<br />
✆<br />
✆<br />
✆<br />
✆<br />
Deutschland | Kund<strong>en</strong>service<br />
Montag bis Freitag von 9 bis 17 Uhr 01805 937832*<br />
Other European countries | Customer Services<br />
Monday till Friday from 8am until 4pm 00800 66477400<br />
Overige land<strong>en</strong> Europa | Klant<strong>en</strong>service<br />
Maandag t/m vrijdag van 9 tot 17 uur 00800 66477400<br />
Autres pays d'Europe | Service cli<strong>en</strong>tèle<br />
Lundi jusqu'a V<strong>en</strong>dredi de 9 – 17 heure 00800 66477400<br />
Website: www.batavia.eu | Email: service@batavia.eu<br />
WARRANTY<br />
*Nur €0,14 /Minute aus dem dt. Festnetz, max. €0,42/Minute aus d<strong>en</strong> Mobilfunknetz<strong>en</strong>.<br />
BATAVIA GmbH | Blank<strong>en</strong>stein 230-1B | 7943PG Meppel | Netherlands | Phone: +31 (0)522 820 200<br />
| Fax: +31 (0)522 820 201 | www.batavia.eu | Email: info@batavia.eu<br />
7051642/01