Bedienungsanleitung - 4mybaby AG
Bedienungsanleitung - 4mybaby AG
Bedienungsanleitung - 4mybaby AG

Create successful ePaper yourself
Turn your PDF publications into a flip-book with our unique Google optimized e-Paper software.
INT<br />
12<br />
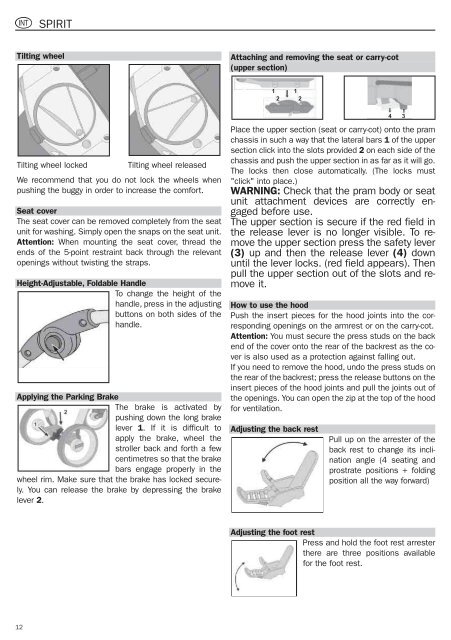
SPIRIT<br />
Tilting wheel<br />
Tilting wheel locked Tilting wheel released<br />
We recommend that you do not lock the wheels when<br />
pushing the buggy in order to increase the comfort.<br />
Seat cover<br />
The seat cover can be removed completely from the seat<br />
unit for washing. Simply open the snaps on the seat unit.<br />
Attention: When mounting the seat cover, thread the<br />
ends of the 5-point restraint back through the relevant<br />
openings without twisting the straps.<br />
Height-Adjustable, Foldable Handle<br />
To change the height of the<br />
handle, press in the adjusting<br />
buttons on both sides of the<br />
handle.<br />
Applying the Parking Brake<br />
The brake is activated by<br />
pushing down the long brake<br />
lever 1. If it is difficult to<br />
apply the brake, wheel the<br />
stroller back and forth a few<br />
centimetres so that the brake<br />
bars engage properly in the<br />
wheel rim. Make sure that the brake has locked securely.<br />
You can release the brake by depressing the brake<br />
lever 2.<br />
Attaching and removing the seat or carry-cot<br />
(upper section)<br />
1 1<br />
2 2<br />
Place the upper section (seat or carry-cot) onto the pram<br />
chassis in such a way that the lateral bars 1 of the upper<br />
section click into the slots provided 2 on each side of the<br />
chassis and push the upper section in as far as it will go.<br />
The locks then close automatically. (The locks must<br />
"click" into place.)<br />
WARNING: Check that the pram body or seat<br />
unit attachment devices are correctly engaged<br />
before use.<br />
The upper section is secure if the red field in<br />
the release lever is no longer visible. To remove<br />
the upper section press the safety lever<br />
(3) up and then the release lever (4) down<br />
until the lever locks. (red field appears). Then<br />
pull the upper section out of the slots and remove<br />
it.<br />
How to use the hood<br />
Push the insert pieces for the hood joints into the corresponding<br />
openings on the armrest or on the carry-cot.<br />
Attention: You must secure the press studs on the back<br />
end of the cover onto the rear of the backrest as the cover<br />
is also used as a protection against falling out.<br />
If you need to remove the hood, undo the press studs on<br />
the rear of the backrest; press the release buttons on the<br />
insert pieces of the hood joints and pull the joints out of<br />
the openings. You can open the zip at the top of the hood<br />
for ventilation.<br />
Adjusting the back rest<br />
4 3<br />
Pull up on the arrester of the<br />
back rest to change its inclination<br />
angle (4 seating and<br />
prostrate positions + folding<br />
position all the way forward)<br />
Adjusting the foot rest<br />
Press and hold the foot rest arrester<br />
there are three positions available<br />
for the foot rest.