
Create successful ePaper yourself
Turn your PDF publications into a flip-book with our unique Google optimized e-Paper software.
General information<br />
Our surrounds are all made of non-combustible<br />
materials. All our inserts/stoves are tested<br />
according to the latest European requirements<br />
and also to the Norwegian standard NS 3058 and<br />
NS 3059, which includes particle tests. Several<br />
European countries however have individual rules<br />
for installation of inserts, stoves and fireplaces. You<br />
as a client are totally responsible for the fulfilling<br />
of these local rules concerning the installation in<br />
your region/ country. <strong>Nordpeis</strong> (Northstar) is not<br />
responsible regarding correct installation.<br />
You should check local regulations concerning:<br />
• distance from firebox to combustible/flammable<br />
materials<br />
• insulation materials/requirements between<br />
fireplace surround and back wall<br />
• size of floor plates in front of fireplace/stove if<br />
required<br />
• fluepipe connection between firebox and chimney<br />
• insulation requirements if fluepipe goes through<br />
flammable wall such as a wood wall.<br />
Adjustment<br />
We recommend to stack the surround without glue in<br />
order to adjust the insert prior to perforating the chimney<br />
for the flue connection. Use a spirit level to ensure that<br />
the surround is mounted straight. The insert will expand<br />
with heat and for this reason the surround must not rest<br />
on the insert. (Above the insert there must be a gap<br />
of 3 to 5 mm. Laterally there is no need for gaps, but<br />
between the lower part of the insert and the surround<br />
there must be a gap of at least 2 mm.)<br />
Floorplate<br />
Please follow the instructions on floorplates in your<br />
country (NO/DK/SE/FI).<br />
Powder glue for filling<br />
This is used to repair any notches or wounds in the<br />
concrete. Mix the provided powder glue with water<br />
(the consistency of the glue should be that of tooth<br />
paste). Before you start, use a damp sponge to wet the<br />
concrete surface. This will remove dust and provide for<br />
better adhesion. Fill in any uneven surfaces.<br />
Marble/granite<br />
Clean the plates with mild soapy water and remove any<br />
residue of spilled glue.<br />
Never use acid/abrasive materials, as this will damage<br />
the surface and polishing.<br />
It is important to use detergent/sealant that is approved<br />
for marble for cleaning and sealing.<br />
Scratches in dark marble can be coloured with a pencil.<br />
A professional stone centre can help you with different<br />
products for surface treatment of the stone<br />
Fine Fissures<br />
Settlement cracks can appear during the first year of<br />
new built houses. For this reason, very thin fissures<br />
could appear in the joints between the elements, the<br />
firewall and the chimney. This is entirely normal and<br />
no reason for concern. These small fissures can be<br />
removed by renewing the joint. Scrape out the joint with<br />
a joint scraper and then vacuum clean to remove all the<br />
dirt. Inject acrylic into the joint and even out by using<br />
the fingertip with some soapy water. After about 24<br />
hours the joint can be repainted.<br />
Smaller damages<br />
These are successfully repaired with the provided<br />
powder glue. If the damage is deep, we recommend<br />
filling twice in order to avoid sinking. Fill smaller cracks<br />
and uneven surfaces with a float or a brush. Smoothen<br />
the surface with a damp sponge or sand paper.<br />
For your own safety, comply with the assembly<br />
instructions. All safety distances are minimum distances.<br />
Installation of the insert must comply with the rules and<br />
regulations of the country where installed. <strong>Nordpeis</strong> AS<br />
is not responsible for wrongly assembled inserts.<br />
We accept no liability for typographical errors and<br />
changes.<br />
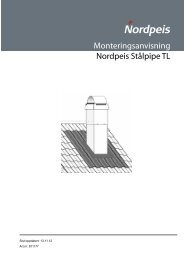
NB! See separate instructions for the insert<br />
Acrylic glue<br />
This is used for gluing the elements towards wall, gluing<br />
the elements together and for filling joints.<br />
Painting<br />
The surround can be painted 24hrs after that it has<br />
been assembled. Any surface that has been filled needs<br />
to be smoothened with fine sand paper. Use latex or<br />
acrylic based paint (emulsion paint).<br />
4 GB