Melhoria da Gestão Municipal com o Uso de Cidades Digitais e BIM
Melhoria da Gestão Municipal com o Uso de Cidades Digitais e BIM
Melhoria da Gestão Municipal com o Uso de Cidades Digitais e BIM

You also want an ePaper? Increase the reach of your titles
YUMPU automatically turns print PDFs into web optimized ePapers that Google loves.
<strong>Melhoria</strong> <strong>da</strong> <strong>Gestão</strong> <strong>Municipal</strong> <strong>com</strong> o <strong>Uso</strong> <strong>de</strong> Ci<strong>da</strong><strong>de</strong>s<strong>Digitais</strong> e <strong>BIM</strong>Wagner Bersani – Frazillio & FerroniÉ possível, <strong>de</strong> forma simples, aproveitar bases <strong>de</strong> <strong>da</strong>dos vetoriais 2D <strong>com</strong> informações <strong>de</strong> elevação eprofundi<strong>da</strong><strong>de</strong> <strong>de</strong> forma a visualizar ci<strong>da</strong><strong>de</strong>s digitais 3D realísticas. Iremos apresentar <strong>de</strong> que formainformações vetoriais 2D <strong>da</strong> Prefeitura <strong>de</strong> São Paulo <strong>com</strong>o curvas <strong>de</strong> nível, edificações, logradouros equadras, alia<strong>da</strong>s a informações do subsolo cedi<strong>da</strong>s por concessionárias <strong>de</strong> água, esgoto, telefonia egás po<strong>de</strong>m ser rapi<strong>da</strong>mente representa<strong>da</strong>s <strong>com</strong>o ci<strong>da</strong><strong>de</strong>s digitais 3D realísticas possibilitando amelhoria dos <strong>da</strong>dos ca<strong>da</strong>strais, <strong>da</strong> gestão <strong>de</strong> obras e do planejamento urbano. É possível ain<strong>da</strong><strong>com</strong>plementar análises urbanísticas através do uso <strong>de</strong> tecnologias <strong>BIM</strong> que permitem analisar o perfil<strong>de</strong> terreno e realizar análises <strong>de</strong> insolação sobre projetos propostos. Foram utilizados os softwaresAutoCAD Civil 3D, AutoCAD Map 3D, Auto<strong>de</strong>sk Revit e Auto<strong>de</strong>sk Infrastructure Mo<strong>de</strong>ler para aconstrução do mo<strong>de</strong>lo.Sobre o ApresentadorWagner Bersani - Engenheiro Civil, especializado em projetos <strong>de</strong> água e esgoto e <strong>com</strong> 20anos <strong>de</strong> experiência em soluções GIS (geoprocessamento) e consultor técnico <strong>da</strong> Frazillio &Ferroni, reven<strong>da</strong> autoriza<strong>da</strong> Gold <strong>da</strong> Auto<strong>de</strong>sk.wagner.bersani@frazillioferroni.<strong>com</strong>.br
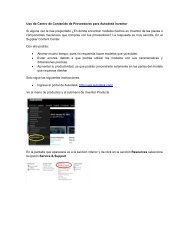
<strong>Melhoria</strong>s <strong>da</strong> <strong>Gestão</strong> <strong>Municipal</strong> <strong>com</strong> o uso <strong>de</strong> Ci<strong>da</strong><strong>de</strong>s <strong>Digitais</strong> e <strong>BIM</strong>IntroduçãoEste artigo irá apresentar os passos executados para realizar algumas <strong>da</strong>s aplicações <strong>de</strong>monstra<strong>da</strong>s nasessão.Criação do DTM no AutoCAD Civil 3DO primeiro passo para o mo<strong>de</strong>lo <strong>da</strong> Ci<strong>da</strong><strong>de</strong> digital é a criação do Mo<strong>de</strong>lo Digital do Terreno através doAutoCAD Civil 3D.1. Inserir o arquivo <strong>da</strong> topografia em um Template. É importante que os objetos <strong>da</strong> topografia <strong>com</strong>o aspolylines <strong>da</strong>s curvas <strong>de</strong> nível e as cotas do levantamento esteja <strong>com</strong> suas respectivas elevações.2. Na aba Prospector <strong>da</strong> Toolspace do AutoCAD Civil 3D, clicar <strong>com</strong> o botão direito do mouse sobreSurfaces e selecionar a opção Create Surface.2
<strong>Melhoria</strong>s <strong>da</strong> <strong>Gestão</strong> <strong>Municipal</strong> <strong>com</strong> o uso <strong>de</strong> Ci<strong>da</strong><strong>de</strong>s <strong>Digitais</strong> e <strong>BIM</strong>3. Na caixa <strong>de</strong> diálogo Create Surface, selecionar um estilo e digitar um nome para a superfície.4. Na aba Prospector <strong>da</strong> Toolspace do AutoCAD Civil 3D expandir Surfaces > Terreno Natural >Definition, clicar <strong>com</strong> o botão direito do mouse sobre Contours e selecionar a opção ADD.3
<strong>Melhoria</strong>s <strong>da</strong> <strong>Gestão</strong> <strong>Municipal</strong> <strong>com</strong> o uso <strong>de</strong> Ci<strong>da</strong><strong>de</strong>s <strong>Digitais</strong> e <strong>BIM</strong>8. Na aba Output <strong>da</strong> Ribbon do AutoCAD Civil 3D selecionar Export > Export to LandXML.9. Na caixa <strong>de</strong> diálogo Export to LandXML selecionar a superfície <strong>de</strong>seja<strong>da</strong> e clicar no botão OK.10. Digitar o nome e local para o arquivo LandXML a ser criado e clicar no botão Save na caixa <strong>de</strong>diálogo Export LandXML.5
<strong>Melhoria</strong>s <strong>da</strong> <strong>Gestão</strong> <strong>Municipal</strong> <strong>com</strong> o uso <strong>de</strong> Ci<strong>da</strong><strong>de</strong>s <strong>Digitais</strong> e <strong>BIM</strong>O próximo passo é importar as imagens <strong>da</strong>s ortofotos <strong>com</strong> a opção <strong>de</strong> ‘drape’ sobre o mo<strong>de</strong>lo doterreno.9
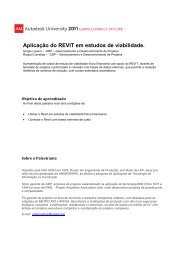
<strong>Melhoria</strong>s <strong>da</strong> <strong>Gestão</strong> <strong>Municipal</strong> <strong>com</strong> o uso <strong>de</strong> Ci<strong>da</strong><strong>de</strong>s <strong>Digitais</strong> e <strong>BIM</strong>O último passo será a importação <strong>da</strong>s edificações <strong>de</strong>senha<strong>da</strong>s em 2D <strong>com</strong> atributos <strong>de</strong> altura econfigurar os estilos <strong>de</strong> facha<strong>da</strong>s <strong>de</strong> acordo <strong>com</strong> faixas <strong>de</strong> altura <strong>da</strong>s edificações.Selecionamos o botão Data Sources, Add File Data Sourcee SDF.Como nos passos anteriores, <strong>de</strong>vemos configurar a importação, selecionando <strong>com</strong> o botãodireito sobre a feature.A seguinte tela se abrirá, e termos que entrar <strong>com</strong> os seguintes <strong>da</strong>dos:10
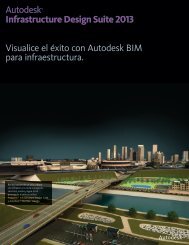
<strong>Melhoria</strong>s <strong>da</strong> <strong>Gestão</strong> <strong>Municipal</strong> <strong>com</strong> o uso <strong>de</strong> Ci<strong>da</strong><strong>de</strong>s <strong>Digitais</strong> e <strong>BIM</strong>Repare que selecionamos o atributo ALTURA_EDIFICACAO para a altura <strong>da</strong> cobertura (RoofHeight). Isso fará <strong>com</strong> que as edificações sejam <strong>de</strong>senha<strong>da</strong>s <strong>com</strong> sua geometria correta (suaárea projeta<strong>da</strong> será estru<strong>da</strong><strong>da</strong> <strong>com</strong> a altura real).Por fim, configuraremos nosso mo<strong>de</strong>lo <strong>com</strong> feições mais realísticas, colocando as facha<strong>da</strong>s <strong>de</strong>acordo <strong>com</strong> algumas regras. Selecionar no menu superior o botão .11
<strong>Melhoria</strong>s <strong>da</strong> <strong>Gestão</strong> <strong>Municipal</strong> <strong>com</strong> o uso <strong>de</strong> Ci<strong>da</strong><strong>de</strong>s <strong>Digitais</strong> e <strong>BIM</strong>A seguinte tela será aberta e entraremos <strong>com</strong> as seguintes regras:Selecionar os botões Refresh e Commit. Esta será a aparência final <strong>de</strong> nosso mo<strong>de</strong>lo:12