LEYBOLD DIDACTIC GMBH Gebrauchsanweisung 541 71 ...
LEYBOLD DIDACTIC GMBH Gebrauchsanweisung 541 71 ...
LEYBOLD DIDACTIC GMBH Gebrauchsanweisung 541 71 ...

Create successful ePaper yourself
Turn your PDF publications into a flip-book with our unique Google optimized e-Paper software.
Physik Chemie ⋅ Biologie Technik <strong>LEYBOLD</strong> <strong>DIDACTIC</strong> <strong>GMBH</strong><br />
11/96<br />
<strong>Gebrauchsanweisung</strong> <strong>541</strong> <strong>71</strong><br />
Instruction Sheet<br />
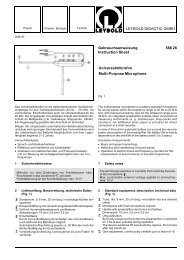
Bandgenerator 100 kV/15 µA<br />
Van de Graaff Generator<br />
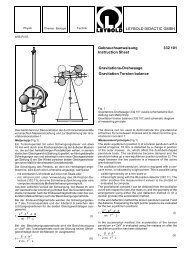
Fig. 1<br />
Der Bandgenerator ist ein elektrostatischer Ladungserzeuger<br />
für sehr hohe Spannungen (bis 100 kV bei optimalen Versuchsbedingungen),<br />
die wegen des sehr kleinen Kurzschlußstromes<br />
(bis 15 µA) nicht gefährlich sind.<br />
1 Sicherheitshinweise<br />
• Bandgenerator unter mitgelieferter Staubschutzhülle an einem<br />
trockenen Ort ohne unmittelbare Wärmeeinwirkung<br />
(Sonne, Heizung) aufbewahren!<br />
• Transportband bei längerem Nichtgebrauch abnehmen<br />
und lichtgeschützt aufbewahren!<br />
• Bandgenerator nie länger als 15 min ohne Unterbrechung<br />
betreiben, um eine Überhitzung des Motors auszuschließen.<br />
Danach mindestens 5 min abkühlen lassen!<br />
Maximale Betriebsdaten des Motors beachten!<br />
• Kunststoffrollen vor jeder Inbetriebnahme sorgfältig mit<br />
Waschbenzin reinigen.<br />
• Kunststoffteile (Isolator, Umlenkrollen, Antriebsrolle) ausschließlich<br />
mit Waschbenzin reinigen!<br />
• Vorsicht! Gefährdung empfindlicher elektronischer Geräte<br />
(Computer, Taschenrechner, Digital-Meßgeräte) durch<br />
hochfrequente Störspitzen, die durch Spannungsüberschläge<br />
erzeugt werden.<br />
2 Beschreibung, technische Daten<br />
1 Metallkugel (19 cm Ø), abnehmbar, mit 4-mm-Bohrung<br />
(1.1) zum Abgreifen der Spannung<br />
2 Obere Schneide<br />
3 Obere Umlenkrolle<br />
4 Gummiband, endlos, 5 cm breit<br />
5 Untere Schneide<br />
6 Untere Umlenkrolle<br />
7 Antriebsrolle mit Drehrichtungsangabe, fest mit der Motorwelle<br />
verbunden<br />
8 Anschlußbuchsen für die Motorspannung<br />
9 Erdungsbuchse<br />
The van de Graaff generator is an electrostatic charge generator<br />
for extremely high voltages (up to 100 kV under optimum<br />
experiment conditions), which are non-hazardous due to the<br />
extremely low short-circuit currents (to 15 µA).<br />
1 Safety notes<br />
• Always store the van de Graaff generator under the supplied<br />
dust cover in a dry place protected against direct heat<br />
sources (sunlight, heater)!<br />
• When the device is not used for longer periods, remove the<br />
transport belt and store it protected from exposure to light.<br />
• Never operate the van de Graaff generator for more than<br />
15 minutes without interruption, to prevent overheating of<br />
the motor. Be sure to allow it to cool for at least 5 minutes<br />
before restarting!<br />
Observe the maximum operating data of the motor!<br />
• Carefully clean the plastic rollers with petroleum benzine<br />
before each use.<br />
• Use only petroleum benzine to clean plastic parts (insulator,<br />
deflection roller, drive roller)!<br />
• Caution: danger to sensitive electronic devices (computers,<br />
pocket calculators, digital measuring instruments)<br />
due to high-frequency interference peaks, which can cause<br />
voltage spikes.<br />
2 Description, technical data<br />
1 Metal sphere (19 cm dia.), detachable, with 4-mm hole<br />
(1.1) for tapping the voltage<br />
2 Top edge<br />
3 Top deflection roller<br />
4 Rubber belt, endless, 5 cm wide<br />
5 Bottom edge<br />
6 Bottom deflection roller<br />
7 Drive roller with indication of rotational direction, permanently<br />
mounted on motor shaft.<br />
8 Connection sockets for motor voltage<br />
9 Ground socket
A Antriebsmotor<br />
Versorgungsspannung: 0 bis max. 24 V(<br />
Strom:<br />
1,5 A<br />
max. Betriebsdauer ohne<br />
Unterbrechung:<br />
15 min<br />
Abkühlpause:<br />
mind. 5 min<br />
B Feststehender Isolator aus Acrylglas<br />
C Halterung für Metallkugel 1<br />
D Schrauben zum Nachspannen des Bandes 4<br />
Leerlaufspannung: ca. 100 kV; abhängig von der<br />
Drehzahl des Antriebsmotors A<br />
Kurzschlußstrom: ca. 10 bis 15 µA<br />
Abmessungen:<br />
22 cm x 22 cm x 56 cm<br />
Masse:<br />
3,9 kg<br />
Im Lieferumfang: Staubschutzhülle<br />
3 Bedienung<br />
3.1 Inbetriebnahme<br />
Erforderliche Spannungsversorgung:<br />
Stellbare Gleichspannungsquelle 0 bis 24 V/1,5 A z.B. Kleinspannungsstelltrafo<br />
(521 39)<br />
Motorspannung polrichtig an Buchsen 8 anschließen (rote<br />
Buchse "+").<br />
Stellung der Schneiden 2 und 5 gemäß Fig. 1 beachten.<br />
Kugel bei ordnungsgemäßen Betriebsbedingungen positiv gegen<br />
Erde, andernfalls Hinweise unter Abschnitt 3.3 beachten.<br />
Hinweis: Eine definierte Erzeugung negativer Spannungen gegen<br />
Erde ist nicht möglich.<br />
Bandgenerator zweckmäßigerweise beim Betrieb immer erden.<br />
3.2 Polaritätsprüfung; Spannungs- und Strommessung<br />
Zur Polaritätsprüfung Kugel bei freilaufendem Bandgenerator<br />
mit Glimmlampe (z.B. 540 41) berühren: Aufleuchten der von<br />
der Kugel abgewandten Elektrode bei positiver Kugel.<br />
Empfehlenswert zur Strom- und Spannungsmessung:<br />
Demo-Multimeter, Nullpunkt Mitte (531 915) mit Hochspannungstastkopf<br />
(531 93).<br />
Zur Messung des Kurzschlußstroms Buchse (1.1) über Demo-<br />
Multimeter (Meßbereich 10 µA( oder 30 µA() mit Erdungsbuchse<br />
9 verbinden;<br />
zur Spannungsmessung (Meßbereich 100 kV( oder 300 kV()<br />
Kugel mit Hochspannungstastkopf berühren.<br />
3.3 Beseitigung von Störungen (unzureichende Spannung<br />
bzw. Ladung; negative Ladung auf der Kugel)<br />
A Drive motor<br />
Supply voltage:<br />
Current:<br />
Max. continuous operation period:<br />
Cool-down time:<br />
B Fixed acrylic glass insulator<br />
C Mount for metal sphere 1<br />
D Screws for tensioning belt 4<br />
0 up to max. 24 V DC<br />
1.5 A<br />
15 min<br />
at least 5 min<br />
No-load voltage:<br />
approx. 100 kV, depending on<br />
speed of drive motor A<br />
Short-circuit current: approx. 10 to 15 µA<br />
Dimensions:<br />
22 cm x 22 cm x 56 cm<br />
Weight:<br />
3.9 kg<br />
Included in scope of supply: Dust cover<br />
3 Operation<br />
3.1 Putting into operation<br />
Required voltage supply:<br />
adjustable DC voltage source 0 to 24 V/1.5 A e.g. variable extra-low<br />
voltage transformer (521 39)<br />
Connect the motor voltage to sockets 8 with the correct polarity<br />
(red socket "+")<br />
Make sure edges 2 and 5 are adjusted as shown in Fig. 1.<br />
For normal operating conditions connect the sphere positively<br />
to ground; otherwise observe the notes under section 3.3.<br />
Note: it is not possible to generate defined negative voltages<br />
with respect to earth.<br />
For best results, always ground (earth) the van de Graaff<br />
generator during operation.<br />
3.2 Checking the polarity; measuring current and voltage<br />
To check the polarity, touch a glow lamp (e.g. 540 41) to the<br />
sphere of the van de Graaff generator running without load;<br />
when the electrode away from the sphere lights up, the sphere<br />
is positive.<br />
Recommended for current and voltage measurement:<br />
demo-multimeter, zero-point middle (531 915) with high-tension<br />
probe (531 93).<br />
To measure the short-circuit current, connect socket (1.1) to<br />
ground socket 9 via the demo-multimeter (measuring range<br />
10 µA DC or 30 µA DC).<br />
For voltage measurement (measuring range 100 kV DC or<br />
300 kV DC), touch the sphere with the high-tension probe.<br />
3.3 Trouble-shooting problems (insufficient voltage or<br />
change, negative charge on sphere)<br />
Symptom/Ursache<br />
Feuchtigkeit<br />
Bandflattern<br />
Schneidenstellung<br />
Verschmutzung<br />
Abhilfe<br />
Bandgenerator mit Warmluft (z.B. aus einem<br />
Fön) trocknen<br />
Nach Abnahme der Kugel 1 und Lösen der<br />
Schrauben D Band nachspannen<br />
Schneiden 2 und 5 auf richtige Stellung<br />
überprüfen (siehe Fig. 1). Obere Schneide 2<br />
so nahe wie möglich an das Band<br />
heranbringen, ohne es jedoch zu berühren.<br />
Verschmutzte Antriebs- und Umlenkrollen<br />
(Bandantrieb) und den Isolator B von Zeit zu<br />
Zeit mit einem benzingetränkten Lappen<br />
säubern.<br />
Niemals Lösungsmittel (Nitroverdünnung,<br />
Aceton o.ä.) zur Reinigung verwenden!<br />
Symptom/cause<br />
Moisture<br />
Shaking belt<br />
Edge positions<br />
Dirt<br />
Remedy<br />
Dry van de Graaff generator with hot air (e.g.<br />
from a hair drier or blower)<br />
After removing sphere 1 and loosening<br />
screws D<br />
Check to be sure edges 2 and 5 are<br />
positioned correctly (see Fig. 1). Set the top<br />
edge 2 as close as possible to the belt<br />
without touching it<br />
Occasionally clean dirty drive and deflection<br />
rollers (belt drive) and the insulator B with<br />
cloth soaked in petroleum benzine.<br />
Never use solvents (thinner, acetone or<br />
similar) for cleaning!<br />
<strong>LEYBOLD</strong> <strong>DIDACTIC</strong> <strong>GMBH</strong> ⋅ Leyboldstrasse 1 ⋅ D-50354 Hürth ⋅ Phone (02233) 604-0 ⋅ Telefax (02233) 604-222 ⋅ Telex 17 223 332 LHPCGN D<br />
© by Leybold Didactic GmbH, Printed in the Federal Republic of Germany<br />
Technical alterations reserved
![[667 359] Labor-Refraktometer - LD DIDACTIC](https://img.yumpu.com/24788329/1/184x260/667-359-labor-refraktometer-ld-didactic.jpg?quality=85)