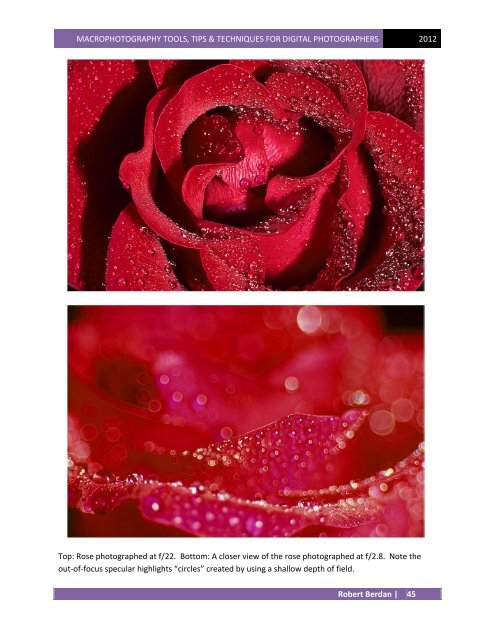
MACROPHOTOGRAPHY TOOLS, TIPS & TECHNIQUES FOR DIGITAL PHOTOGRAPHERS 2012 Depth of Field in a Photograph <strong>The</strong> depth of field in a photograph represents the region that appears to be in focus, and it depends on two factors: 1) How close you are to the subject and 2) <strong>The</strong> f-stop setting. In general, the closer you come to any subject, the smaller the depth of field becomes. In macrophotography, depth of field can become very small as you get close and magnify the specimen. In some cases, it can be measured in millimeters or microns (fractions of a millimeter). To compensate, the photographer can do one of two things. First, use a smaller aperture (higher f-stop) e.g., f/11 to f/32. Second, take a series of photographs at different focus points and then stack them together. In both of these instances at high magnification, the depth of field will still be very limited. As the aperture becomes smaller, the amount of light coming in through the lens is reduced, necessitating longer exposures or higher intensity light sources. <strong>The</strong> other thing that happens is that, as the aperture gets smaller than f/11 (e.g., f/16 to f/45), light waves begin to bend as they pass through the small opening. This causes light interference and the image appears softer. When using a wide aperture (e.g., f/2.8-4), or when the camera and lens is positioned very close to the subject, the depth of field becomes smaller and smaller (diagram courtesy of Wikipedia). Depth of field in a photograph can be used creatively to focus attention on specific elements of the picture. Some photographs are better suited to a large depth of field, e.g., a landscape, while some photographs are better suited to a shallow depth of field. In macrophotography, the best depth of field depends on the subject matter and the intent of the photographer. In some cases, a shallow depth of field can be effective, while in other instances, the photographer may want all or most of the subject in focus. When you are very close to subjects at magnifications of 1.0X or more, the depth of field will become very small, even if you use the smallest aperture available on your lens (e.g., f/16-f/22). In these instances the photographer must also pay close attention to how the camera and lens is oriented with respect to the subject. If you are photographing a butterfly the camera should be oriented perpendicular to the wings to get most of the subject in focus. To learn how depth of field photograph affects the photograph, the best thing to do is to vary the f-stop settings (e.g., f/2.8, f/8, f16) and compare the results. Robert Berdan | 44
MACROPHOTOGRAPHY TOOLS, TIPS & TECHNIQUES FOR DIGITAL PHOTOGRAPHERS 2012 Top: Rose photographed at f/22. Bottom: A closer view of the rose photographed at f/2.8. Note the out-of-focus specular highlights “circles” created by using a shallow depth of field. Robert Berdan | 45
- Page 1 and 2: +- T MACROPHOTOGRAPHY TOOLS, TIPS &
- Page 3 and 4: MACROPHOTOGRAPHY TOOLS, TIPS & TECH
- Page 5 and 6: MACROPHOTOGRAPHY TOOLS, TIPS & TECH
- Page 7 and 8: MACROPHOTOGRAPHY TOOLS, TIPS & TECH
- Page 9 and 10: MACROPHOTOGRAPHY TOOLS, TIPS & TECH
- Page 11 and 12: MACROPHOTOGRAPHY TOOLS, TIPS & TECH
- Page 13 and 14: MACROPHOTOGRAPHY TOOLS, TIPS & TECH
- Page 15 and 16: MACROPHOTOGRAPHY TOOLS, TIPS & TECH
- Page 17 and 18: MACROPHOTOGRAPHY TOOLS, TIPS & TECH
- Page 19 and 20: MACROPHOTOGRAPHY TOOLS, TIPS & TECH
- Page 21 and 22: MACROPHOTOGRAPHY TOOLS, TIPS & TECH
- Page 23 and 24: MACROPHOTOGRAPHY TOOLS, TIPS & TECH
- Page 25 and 26: MACROPHOTOGRAPHY TOOLS, TIPS & TECH
- Page 27 and 28: MACROPHOTOGRAPHY TOOLS, TIPS & TECH
- Page 29 and 30: MACROPHOTOGRAPHY TOOLS, TIPS & TECH
- Page 31 and 32: MACROPHOTOGRAPHY TOOLS, TIPS & TECH
- Page 33 and 34: MACROPHOTOGRAPHY TOOLS, TIPS & TECH
- Page 35 and 36: MACROPHOTOGRAPHY TOOLS, TIPS & TECH
- Page 37 and 38: MACROPHOTOGRAPHY TOOLS, TIPS & TECH
- Page 39 and 40: MACROPHOTOGRAPHY TOOLS, TIPS & TECH
- Page 41 and 42: MACROPHOTOGRAPHY TOOLS, TIPS & TECH
- Page 43: MACROPHOTOGRAPHY TOOLS, TIPS & TECH
- Page 47 and 48: MACROPHOTOGRAPHY TOOLS, TIPS & TECH
- Page 49 and 50: MACROPHOTOGRAPHY TOOLS, TIPS & TECH
- Page 51 and 52: MACROPHOTOGRAPHY TOOLS, TIPS & TECH
- Page 53 and 54: MACROPHOTOGRAPHY TOOLS, TIPS & TECH
- Page 55 and 56: MACROPHOTOGRAPHY TOOLS, TIPS & TECH
- Page 57 and 58: MACROPHOTOGRAPHY TOOLS, TIPS & TECH
- Page 59 and 60: MACROPHOTOGRAPHY TOOLS, TIPS & TECH
- Page 61 and 62: MACROPHOTOGRAPHY TOOLS, TIPS & TECH
- Page 63 and 64: MACROPHOTOGRAPHY TOOLS, TIPS & TECH
- Page 65 and 66: MACROPHOTOGRAPHY TOOLS, TIPS & TECH
- Page 67 and 68: MACROPHOTOGRAPHY TOOLS, TIPS & TECH
- Page 69 and 70: MACROPHOTOGRAPHY TOOLS, TIPS & TECH
- Page 71 and 72: MACROPHOTOGRAPHY TOOLS, TIPS & TECH
- Page 73 and 74: MACROPHOTOGRAPHY TOOLS, TIPS & TECH
- Page 75 and 76: MACROPHOTOGRAPHY TOOLS, TIPS & TECH
- Page 77 and 78: MACROPHOTOGRAPHY TOOLS, TIPS & TECH
- Page 79: MACROPHOTOGRAPHY TOOLS, TIPS & TECH