Download PDF - The Canadian Nature Photographer
Download PDF - The Canadian Nature Photographer
Download PDF - The Canadian Nature Photographer

You also want an ePaper? Increase the reach of your titles
YUMPU automatically turns print PDFs into web optimized ePapers that Google loves.
MACROPHOTOGRAPHY TOOLS, TIPS & TECHNIQUES FOR DIGITAL PHOTOGRAPHERS 2012<br />
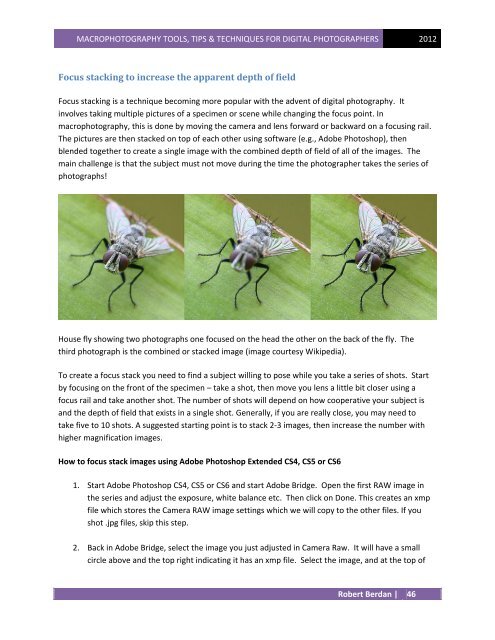
Focus stacking to increase the apparent depth of field<br />
Focus stacking is a technique becoming more popular with the advent of digital photography. It<br />
involves taking multiple pictures of a specimen or scene while changing the focus point. In<br />
macrophotography, this is done by moving the camera and lens forward or backward on a focusing rail.<br />
<strong>The</strong> pictures are then stacked on top of each other using software (e.g., Adobe Photoshop), then<br />
blended together to create a single image with the combined depth of field of all of the images. <strong>The</strong><br />
main challenge is that the subject must not move during the time the photographer takes the series of<br />
photographs!<br />
House fly showing two photographs one focused on the head the other on the back of the fly. <strong>The</strong><br />
third photograph is the combined or stacked image (image courtesy Wikipedia).<br />
To create a focus stack you need to find a subject willing to pose while you take a series of shots. Start<br />
by focusing on the front of the specimen – take a shot, then move you lens a little bit closer using a<br />
focus rail and take another shot. <strong>The</strong> number of shots will depend on how cooperative your subject is<br />
and the depth of field that exists in a single shot. Generally, if you are really close, you may need to<br />
take five to 10 shots. A suggested starting point is to stack 2-3 images, then increase the number with<br />
higher magnification images.<br />
How to focus stack images using Adobe Photoshop Extended CS4, CS5 or CS6<br />
1. Start Adobe Photoshop CS4, CS5 or CS6 and start Adobe Bridge. Open the first RAW image in<br />
the series and adjust the exposure, white balance etc. <strong>The</strong>n click on Done. This creates an xmp<br />
file which stores the Camera RAW image settings which we will copy to the other files. If you<br />
shot .jpg files, skip this step.<br />
2. Back in Adobe Bridge, select the image you just adjusted in Camera Raw. It will have a small<br />
circle above and the top right indicating it has an xmp file. Select the image, and at the top of<br />
Robert Berdan | 46