Mac OS X Security Configuration - Office of Information Technology
Mac OS X Security Configuration - Office of Information Technology
Mac OS X Security Configuration - Office of Information Technology

Create successful ePaper yourself
Turn your PDF publications into a flip-book with our unique Google optimized e-Paper software.
<strong>Mac</strong> <strong>OS</strong> X<strong>Security</strong> <strong>Configuration</strong>For Version 10.5 Leopard
K Apple Inc.© 2008 Apple Inc. All rights reserved.The owner or authorized user <strong>of</strong> a valid copy <strong>of</strong><strong>Mac</strong> <strong>OS</strong> X s<strong>of</strong>tware may reproduce this publication forthe purpose <strong>of</strong> learning to use such s<strong>of</strong>tware. No part <strong>of</strong>this publication may be reproduced or transmitted forcommercial purposes, such as selling copies <strong>of</strong> thispublication or for providing paid-for support services.Every effort has been made to ensure that theinformation in this manual is accurate. Apple is notresponsible for printing or clerical errors.Apple1 Infinite LoopCupertino, CA 95014-2084408-996-1010www.apple.comThe Apple logo is a trademark <strong>of</strong> Apple Inc., registeredin the U.S. and other countries. Use <strong>of</strong> the “keyboard”Apple logo (Option-Shift-K) for commercial purposeswithout the prior written consent <strong>of</strong> Apple mayconstitute trademark infringement and unfaircompetition in violation <strong>of</strong> federal and state laws.Apple, the Apple logo, AirPort, AppleScript, AppleShare,AppleTalk, Bonjour, Boot Camp, ColorSync, Exposé,FileVault, FireWire, iCal, iChat, i<strong>Mac</strong>, iSight, iTunes,Keychain, Leopard, <strong>Mac</strong>, <strong>Mac</strong> Book, <strong>Mac</strong>intosh, <strong>Mac</strong> <strong>OS</strong>,QuickTime, Safari, Xgrid, Xsan, and Xserve aretrademarks <strong>of</strong> Apple Inc., registered in the U.S. and othercountries.Apple Remote Desktop, Finder, <strong>Mac</strong>Book Air, QuickTimeBroadcaster, Spotlight, and Time <strong>Mac</strong>hine aretrademarks <strong>of</strong> Apple Inc.Adobe and PostScript are trademarks <strong>of</strong> Adobe SystemsIncorporated.The Bluetooth® word mark and logos are registeredtrademarks owned by Bluetooth SIG, Inc. and any use <strong>of</strong>such marks by Apple is under license.Intel, Intel Core, and Xeon are trademarks <strong>of</strong> Intel Corp.in the U.S. and other countries.Java and all Java-based trademarks and logos aretrademarks or registered trademarks <strong>of</strong> SunMicrosystems, Inc. in the U.S. and other countries.PowerPC and the PowerPC logo are trademarks <strong>of</strong>International Business <strong>Mac</strong>hines Corporation, usedunder license therefrom.UNIX is a registered trademark <strong>of</strong> The Open Group.X Window System is a trademark <strong>of</strong> the MassachusettsInstitute <strong>of</strong> <strong>Technology</strong>This product includes s<strong>of</strong>tware developed by theUniversity <strong>of</strong> California, Berkeley, FreeBSD, Inc., TheNetBSD Foundation, Inc., and their respectivecontributors.Other company and product names mentioned hereinare trademarks <strong>of</strong> their respective companies. Mention<strong>of</strong> third-party products is for informational purposesonly and constitutes neither an endorsement nor arecommendation. Apple assumes no responsibility withregard to the performance or use <strong>of</strong> these products.019-1255/2008-05-19.<strong>Mac</strong> is a service mark <strong>of</strong> Apple Inc., registered in the U.S.and other countries.
1 ContentsPreface 11 About This Guide11 Target Audience11 What’s New in Version 10.512 What’s in This Guide13 Using This Guide13 Using Onscreen Help13 <strong>Mac</strong> Help14 The <strong>Mac</strong> <strong>OS</strong> X Server Administration Guides15 Viewing PDF Guides on Screen15 Printing PDF Guides15 Getting Documentation Updates16 Getting Additional <strong>Information</strong>17 AcknowledgmentsChapter 1 19 Introduction to <strong>Mac</strong> <strong>OS</strong> X <strong>Security</strong> Architecture20 <strong>Security</strong> Architectural Overview20 UNIX Infrastructure20 Access Permissions20 <strong>Security</strong> Framework21 Layered <strong>Security</strong> Defense22 Mandatory Access Controls22 Credential Management22 Network <strong>Security</strong>22 Public Key Infrastructure (PKI)23 Authorization Versus Authentication23 <strong>Security</strong> Features in <strong>Mac</strong> <strong>OS</strong> X v10.523 Mandatory Access Controls24 Sandboxing Processes25 Parental Controls25 Quarantine Applications25 Application-Based Firewall26 Signed Applications26 Smart Card Unlock <strong>of</strong> FileVault and Encrypted Storage3
27 Sharing and Collaboration Services27 Enhanced Encrypted Disk Image Cryptography28 Enhanced VPN Compatibility and Integration28 Improved Secure ConnectivityChapter 2 29 Installing <strong>Mac</strong> <strong>OS</strong> X29 System Installation Overview29 Disabling the Firmware Password30 Installing from DVD31 Installing from the Network31 Restoring from Preconfigured Disk Images31 Initial System Setup32 Using Setup Assistant32 Creating Initial System Accounts33 Setting Correct Time Settings33 Updating System S<strong>of</strong>tware34 Updating from an Internal S<strong>of</strong>tware Update Server35 Updating from Internet S<strong>of</strong>tware Update Servers36 Updating Manually from Installer Packages37 Verifying the Integrity <strong>of</strong> S<strong>of</strong>tware37 Repairing Disk Permissions38 P<strong>OS</strong>IX Permissions Overview38 ACL Permissions Overview38 Using Disk Utility to Repair Disk PermissionsChapter 3 41 Protecting System Hardware41 Protecting Hardware42 Preventing RF Eavesdropping42 Understanding RF <strong>Security</strong> Challenges43 <strong>OS</strong> Components43 Removing Wi-Fi Support S<strong>of</strong>tware44 Removing Bluetooth Support S<strong>of</strong>tware45 Preventing Unauthorized Recording45 Removing Audio Recording Support S<strong>of</strong>tware46 Removing Video Recording Support S<strong>of</strong>tware47 Preventing Data Port Access47 Removing USB Support S<strong>of</strong>tware48 Removing FireWire Support S<strong>of</strong>tware49 System Hardware Modifications49 Authorized AppleCare Certified TechniciansChapter 4 51 Securing Global System Settings51 Securing System Startup4 Contents
52 PowerPC-Based Systems52 Using the Firmware Password Utility53 Configuring Open Firmware Settings54 Using Command-Line Tools for Secure Startup54 Intel-Based Systems55 Configuring Access Warnings55 Enabling Access Warnings for the Login Window56 Understanding the AuthPlugin Architecture57 Understanding the BannerSample Project57 Enabling Access Warnings for the Command LineChapter 5 59 Securing Accounts59 Types <strong>of</strong> User Accounts60 Guidelines for Creating Accounts60 Defining User IDs61 Securing the Guest Account62 Securing Nonadministrator Accounts62 Controlling Local Accounts with Parental Controls64 Securing External Accounts64 Protecting Data on External Volumes64 Securing Directory-Based Accounts65 Securing Administrator Accounts65 Securing the System Administrator Account67 Understanding Directory Domains68 Understanding Network Services, Authentication, and Contacts69 Configuring LDAPv3 Access69 Configuring Active Directory Access70 Using Strong Authentication70 Using Passwords71 Using Kerberos72 Using Smart Cards73 Using Tokens73 Using Biometrics74 Setting Global Password Policies74 Storing Credentials75 Using the Default User Keychain76 Creating Additional Keychains77 Securing Keychains and Their Items78 Using Smart Cards as Keychains79 Using Portable and Network-Based KeychainsChapter 6 81 Securing System Preferences81 System Preferences OverviewContents 5
83 Securing .<strong>Mac</strong> Preferences85 Securing Accounts Preferences88 Securing Appearance Preferences89 Securing Bluetooth Preferences90 Securing CDs & DVDs Preferences91 Securing Date & Time Preferences93 Securing Desktop & Screen Saver Preferences95 Securing Display Preferences95 Securing Dock Preferences96 Securing Energy Saver Preferences98 Securing Exposé & Spaces Preferences99 Securing International Preferences99 Securing Keyboard & Mouse Preferences100 Securing Network Preferences101 Securing Parental Control Preferences104 Securing Print & Fax Preferences106 Securing QuickTime Preferences107 Securing <strong>Security</strong> Preferences108 General <strong>Security</strong>109 FileVault <strong>Security</strong>110 Firewall <strong>Security</strong>112 Securing Sharing Preferences114 Securing S<strong>of</strong>tware Update Preferences115 Securing Sound Preferences116 Securing Speech Preferences118 Securing Spotlight Preferences120 Securing Startup Disk Preferences121 Securing Time <strong>Mac</strong>hine Preferences122 Securing Universal Access PreferencesChapter 7 123 Securing Data and Using Encryption123 Understanding Permissions124 Setting P<strong>OS</strong>IX Permissions124 Viewing P<strong>OS</strong>IX Permissions125 Interpreting P<strong>OS</strong>IX Permissions126 Modifying P<strong>OS</strong>IX Permissions126 Setting File and Folder Flags126 Viewing Flags126 Modifying Flags127 Setting ACL Permissions127 Modifying ACL Permissions128 Setting Global File Permissions129 Securing User Home Folders6 Contents
130 Encrypting Home Folders131 Overview <strong>of</strong> FileVault132 Managing FileVault132 Managing the FileVault Master Keychain134 Encrypting Portable Files134 Creating an Encrypted Disk Image135 Creating an Encrypted Disk Image from Existing Data136 Creating Encrypted PDFs136 Securely Erasing Data137 Configuring Finder to Always Securely Erase137 Using Disk Utility to Securely Erase a Disk or Partition138 Using Command-Line Tools to Securely Erase Files139 Using Secure Empty Trash139 Using Disk Utility to Securely Erase Free Space139 Using Command-Line Tools to Securely Erase Free SpaceChapter 8 141 Securing System Swap and Hibernation Storage141 System Swap File Overview142 Encrypting System SwapChapter 9 143 Avoiding Multiple Simultaneous Account Access143 Avoiding Fast User SwitchingChapter 10 145 Ensuring Data Integrity with Backups145 Understanding the Time <strong>Mac</strong>hine Architecture145 Deleting Permanently from Time <strong>Mac</strong>hine backups146 Storing Backups Inside Secure Storage146 Restoring Backups from Secure StorageChapter 11 147 <strong>Information</strong> Assurance with Applications147 Protecting Data While Using Apple Applications147 Mail <strong>Security</strong>148 Enabling Account <strong>Security</strong>149 Signing and Encrypting Mail Messages150 Web Browsing <strong>Security</strong> with Safari151 Verifying Server Identity152 Client-Side Authentication152 Managing Data Communication and Execution152 Opening Safe Files153 Nonsecure Forms154 Syncing Bookmarks154 AutoFill155 Controlling Web Content155 Cookie Storage or Tracking <strong>Information</strong>Contents 7
156 Proxies156 Securing File Downloads156 Instant Message <strong>Security</strong> with iChat AV157 iChat AV <strong>Security</strong>158 Enabling Privacy158 Enabling Encryption Using .<strong>Mac</strong> Identity159 Multimedia <strong>Security</strong> with iTunes159 Guest Operating Systems with Boot Camp160 Protecting Data While Using Apple Services160 Securing Remote Access Communication160 VPN <strong>Security</strong> (L2TP and PPTP)160 L2TP over IPSec161 IPSec <strong>Configuration</strong>162 Understanding PPTP162 Network Access Control (802.1x)162 Securing Internet Communication with Host-Based Firewalls162 Firewall Protection163 The Application Firewall164 Application Firewall Architecture164 Enabling Advanced Features164 Firewall Logging165 Stealth Mode165 The IPFW2 Firewall165 IPFW2 Firewall Architecture166 Managing Firewall Rules166 Protection from Unauthorized ApplicationsChapter 12 167 <strong>Information</strong> Assurance with Services167 Securing Local Services167 Managing Who Can Obtain Administrative Privileges (sudo)168 Securing Discovery Services168 Securing Bonjour (mDNS)169 Securing Application Use <strong>of</strong> Bonjour169 Address Book169 iChat AV170 iPhoto170 iTunes170 Securing iDisk Service Access170 iDisk Service Access170 Securing Public Folder Access171 Securing the Back to My <strong>Mac</strong> (BTMM) Service171 BTMM Service Architecture171 Securing BTMM Access8 Contents
172 Securing Network Sharing Services172 DVD or CD Sharing172 DVD or CD Sharing173 Screen Sharing (VNC)173 Screen Sharing173 Restricting Access to Specific Users173 File Sharing (AFP, FTP, and SMB)174 File Sharing174 Restricting Access to Specific Users175 Printer Sharing (CUPS)175 Web Sharing (HTTP)175 Web Sharing176 Remote Login (SSH)176 Restricting Access to Specific Users177 Enabling an SSH Connection178 Configuring a Key-Based SSH Connection180 Preventing Connection to Unauthorized Host Servers181 Using SSH as a Secure Tunnel182 Modifying the SSH <strong>Configuration</strong> File183 Generating Key Pairs for Key-Based SSH Connections184 Updating SSH Key Fingerprints185 Remote Management (ARD)186 Restricting Access to Specific Users186 Remote Apple Events (RAE)187 Restricting Access to Specific Users187 Xgrid Sharing188 Restricting Access to Specific Users188 Internet Sharing189 Restricting Access to Specific Users189 Bluetooth Sharing189 Restricting Access to Specified UsersChapter 13 191 Advanced <strong>Security</strong> Management191 Managing Authorization Through Rights191 Understanding the Policy Database191 The Rights Dictionary193 The Rules Dictionary194 Managing Authorization Rights194 Creating an Authorization Right194 Modifying an Authorization Right194 Example Authorization Restrictions195 Example <strong>of</strong> Authorizing for Screen Saver196 Maintaining System IntegrityContents 9
197 Validating File Integrity197 About File Integrity Checking Tools198 Using Digital Signatures to Validate Applications and Processes198 Validating Application Bundle Integrity199 Validating Running Processes199 Activity Analysis Tools199 Validating System Logging200 Configuring syslogd201 Local System Logging201 Remote System Logging202 Auditing System Activity202 <strong>Security</strong> Auditing203 Installing Auditing Tools203 Enabling <strong>Security</strong> Auditing203 Analyzing <strong>Security</strong> Audit Logs204 Antivirus Tools205 Intrusion Detection SystemsAppendix A 207 <strong>Security</strong> Checklist207 Installation Action Items208 Hardware Action Items208 Global System Action Items209 Account <strong>Configuration</strong> Action Items210 System Preferences Action Items211 Encryption (DAR) Action Items211 Backup Action Items211 Application Action Items212 Services Action Items212 Advanced Management Action ItemsAppendix B 215 <strong>Security</strong> ScriptsGlossary 223Index 23510 Contents
About This GuidePrefaceThis guide provides an overview <strong>of</strong> features in <strong>Mac</strong> <strong>OS</strong> X thatyou can use to enhance security, known as hardening yourcomputer.This guide provides instructions and recommendations for securing <strong>Mac</strong> <strong>OS</strong> X version10.5 or later, and for maintaining a secure computer.Target AudienceThis guide is for users <strong>of</strong> <strong>Mac</strong> <strong>OS</strong> X v10.5 or later. If you’re using this guide, you shouldbe an experienced <strong>Mac</strong> <strong>OS</strong> X user, be familiar with the <strong>Mac</strong> <strong>OS</strong> X user interface, andhave some experience using the Terminal application’s command-line interface. Youshould also be familiar with basic networking concepts.Some instructions in this guide are complex, and deviation could cause serious adverseeffects on the computer and its security. These instructions should only be used byexperienced <strong>Mac</strong> <strong>OS</strong> X users, and should be followed by thorough testing.What’s New in Version 10.5<strong>Mac</strong> <strong>OS</strong> X v10.5 <strong>of</strong>fers the following major security enhancements: Better Trojan horse protection. <strong>Mac</strong> <strong>OS</strong> X v10.5 marks files that are downloaded tohelp prevent users from running malicious downloaded applications. Stronger runtime security. New technologies such as library randomization andsandboxing help prevent attacks that hijack or modify the s<strong>of</strong>tware on your system. Easier network security. After you’ve activated the new <strong>Mac</strong> <strong>OS</strong> X v10.5 applicationfirewall, it configures itself so you get the benefits <strong>of</strong> firewall protection withoutneeding to understand the details <strong>of</strong> network ports and protocols. Improved secure connectivity. Virtual private network (VPN) support has beenenhanced to connect to more <strong>of</strong> the most popular VPN servers—without additionals<strong>of</strong>tware.11
 Meaningful security alerts. When users receive security alerts and questions to<strong>of</strong>requently, they may fall into reflexive mode when the system asks a security-relatedquestion, clicking OK without thought. <strong>Mac</strong> <strong>OS</strong> X v10.5 minimizes the number <strong>of</strong>security alerts that you see, so when you do see one, it gets your attention.What’s in This GuideThis guide can assist you in securing a client computer. It does not provide informationabout securing servers. For help securing computers running <strong>Mac</strong> <strong>OS</strong> X Server v10.5 orlater, see <strong>Mac</strong> <strong>OS</strong> X Server <strong>Security</strong> <strong>Configuration</strong>.This guide includes the following chapters: Chapter 1, “Introduction to <strong>Mac</strong> <strong>OS</strong> X <strong>Security</strong> Architecture,” explains theinfrastructure <strong>of</strong> <strong>Mac</strong> <strong>OS</strong> X. It also discusses the layers <strong>of</strong> security in <strong>Mac</strong> <strong>OS</strong> X. Chapter 2, “Installing <strong>Mac</strong> <strong>OS</strong> X,” describes how to securely install <strong>Mac</strong> <strong>OS</strong> X. Thechapter also discusses how to securely install s<strong>of</strong>tware updates and explainspermissions and how to repair them. Chapter 3, “Protecting System Hardware,” explains how to physically protect yourhardware from attacks. This chapter also tells you how to secure settings that affectusers <strong>of</strong> the computer. Chapter 4, “Securing Global System Settings,” describes how to secure global systemsettings such as firmware and <strong>Mac</strong> <strong>OS</strong> X startup. There is also information on settingup system logs to monitor system activity. Chapter 5, “Securing Accounts,” describes the types <strong>of</strong> user accounts and how tosecurely configure an account. This includes securing the system administratoraccount, using Open Directory, and using strong authentication. Chapter 6, “Securing System Preferences,” describes recommended settings to secure<strong>Mac</strong> <strong>OS</strong> X system preferences. Chapter 7, “Securing Data and Using Encryption,” describes how to encrypt data andhow to use Secure Erase to verify that old data is completely removed. Chapter 8, “Securing System Swap and Hibernation Storage,” describes how to secureyour system swap and hibernation space <strong>of</strong> sensitive information. Chapter 9, “Avoiding Multiple Simultaneous Account Access,” describes how to avoidfast user switching and local account access to the computer. Chapter 10, “Ensuring Data Integrity with Backups,” describes the Time <strong>Mac</strong>hinearchitecture and how to securely backup and restore your computer and data. Chapter 11, “<strong>Information</strong> Assurance with Applications,” describes how to protect yourdata while using Apple applications. Chapter 12, “<strong>Information</strong> Assurance with Services,” describes how to secure yourcomputer services. It also describes how to protect the computer by securelyconfiguring services.12 Preface About This Guide
 Chapter 13, “Advanced <strong>Security</strong> Management,” describes how to use security auditsto validate the integrity <strong>of</strong> your computer and data. Appendix A, “<strong>Security</strong> Checklist,” provides a checklist that guides you throughsecuring your computer. Appendix B, “<strong>Security</strong> Scripts,” provides a script template for creating a script tosecure your computer.In addition, the Glossary defines terms you’ll encounter as you read this guide.Note: Because Apple periodically releases new versions and updates to its s<strong>of</strong>tware,images shown in this book may be different from what you see on your screen.Using This GuideThe following list contains suggestions for using this guide: Read the guide in its entirety. Subsequent sections might build on information andrecommendations discussed in prior sections. The instructions in this guide should always be tested in a nonoperationalenvironment before deployment. This nonoperational environment should simulateas much as possible, the environment where the computer will be deployed. This information is intended for computers running <strong>Mac</strong> <strong>OS</strong> X. Before securelyconfiguring a computer, determine what function that particular computer willperform, and apply security configurations where applicable. A security checklist is provided in the appendix to track and record the settings youchoose for each security task and note what settings you change to secure yourcomputer. This information can be helpful when developing a security standardwithin your organization.Important: Any deviation from this guide should be evaluated to determine whatsecurity risks it might introduce and take measures to monitor or mitigate those risks.Using Onscreen HelpTo see the latest help topics, make sure the computer is connected to the Internetwhile you’re using Help Viewer. Help Viewer automatically retrieves and caches thelatest help topics from the Internet. When not connected to the Internet, Help Viewerdisplays cached help topics.<strong>Mac</strong> HelpYou can view instructions and other useful information and documents in the serversuite by using onscreen help.On a computer running <strong>Mac</strong> <strong>OS</strong> X, you can access onscreen help from the Finder orother applications on the computer. Use the Help menu to open Help Viewer.Preface About This Guide 13
The <strong>Mac</strong> <strong>OS</strong> X Server Administration GuidesGetting Started covers installation and setup for standard and workgroup configurations<strong>of</strong> <strong>Mac</strong> <strong>OS</strong> X Server. For advanced configurations, Server Administration covers planning,installation, setup, and general server administration. A suite <strong>of</strong> additional guides, listedbelow, covers advanced planning, setup, and management <strong>of</strong> individual services. Youcan get these guides in PDF format from the <strong>Mac</strong> <strong>OS</strong> X Server documentation website:www.apple.com/server/documentationThis guide...Getting Started andInstallation & Setup WorksheetCommand-Line AdministrationFile Services AdministrationiCal Service AdministrationiChat Service Administration<strong>Mac</strong> <strong>OS</strong> X <strong>Security</strong> <strong>Configuration</strong><strong>Mac</strong> <strong>OS</strong> X Server <strong>Security</strong><strong>Configuration</strong>Mail Service AdministrationNetwork Services AdministrationOpen Directory AdministrationPodcast Producer AdministrationPrint Service AdministrationQuickTime Streaming andBroadcasting AdministrationServer AdministrationSystem Imaging and S<strong>of</strong>twareUpdate AdministrationUpgrading and Migratingtells you how to:Install <strong>Mac</strong> <strong>OS</strong> X Server and set it up for the first time.Install, set up, and manage <strong>Mac</strong> <strong>OS</strong> X Server using UNIX commandlinetools and configuration files.Share selected server volumes or folders among server clientsusing the AFP, NFS, FTP, and SMB protocols.Set up and manage iCal shared calendar service.Set up and manage iChat instant messaging service.Make <strong>Mac</strong> <strong>OS</strong> X computers (clients) more secure, as required byenterprise and government customers.Make Product Name and the computer it’s installed on moresecure, as required by enterprise and government customers.Set up and manage IMAP, POP, and SMTP mail services on theserver.Set up, configure, and administer DHCP, DNS, VPN, NTP, IP firewall,NAT, and RADIUS services on the server.Set up and manage directory and authentication services, andconfigure clients to access directory services.Set up and manage Podcast Producer service to record, process,and distribute podcasts.Host shared printers and manage their associated queues and printjobs.Capture and encode QuickTime content. Set up and manageQuickTime streaming service to deliver media streams live or ondemand.Perform advanced installation and setup <strong>of</strong> server s<strong>of</strong>tware, andmanage options that apply to multiple services or to the server as awhole.Use NetBoot, NetInstall, and S<strong>of</strong>tware Update to automate themanagement <strong>of</strong> operating system and other s<strong>of</strong>tware used byclient computers.Use data and service settings from an earlier version <strong>of</strong> <strong>Mac</strong> <strong>OS</strong> XServer or Windows NT.14 Preface About This Guide
This guide...User ManagementWeb Technologies AdministrationXgrid Administration and HighPerformance Computing<strong>Mac</strong> <strong>OS</strong> X Server Glossarytells you how to:Create and manage user accounts, groups, and computers. Set upmanaged preferences for <strong>Mac</strong> <strong>OS</strong> X clients.Set up and manage web technologies, including web, blog,webmail, wiki, MySQL, PHP, Ruby on Rails, and WebDAV.Set up and manage computational clusters <strong>of</strong> Xserve systems and<strong>Mac</strong> computers.Learn about terms used for server and storage products.Viewing PDF Guides on ScreenWhile reading the PDF version <strong>of</strong> a guide onscreen: Show bookmarks to see the guide’s outline, and click a bookmark to jump to thecorresponding section. Search for a word or phrase to see a list <strong>of</strong> places where it appears in the document.Click a listed place to see the page where it occurs. Click a cross-reference to jump to the referenced section. Click a web link to visit thewebsite in your browser.Printing PDF GuidesIf you want to print a guide, you can take these steps to save paper and ink: Save ink or toner by not printing the cover page. Save color ink on a color printer by looking in the panes <strong>of</strong> the Print dialog for anoption to print in grays or black and white. Reduce the bulk <strong>of</strong> the printed document and save paper by printing more than onepage per sheet <strong>of</strong> paper. In the Print dialog, change Scale to 115% (155% for GettingStarted). Then choose Layout from the untitled pop-up menu. If your printer supportstwo-sided (duplex) printing, select one <strong>of</strong> the Two-Sided options. Otherwise, choose2 from the Pages per Sheet pop-up menu, and optionally choose Single Hairline fromthe Border menu. (If you’re using <strong>Mac</strong> <strong>OS</strong> X v10.4 or earlier, the Scale setting is in thePage Setup dialog and the Layout settings are in the Print dialog.)You may want to enlarge the printed pages even if you don’t print double sided,because the PDF page size is smaller than standard printer paper. In the Print dialog orPage Setup dialog, try changing Scale to 115% (155% for Getting Started, which has CDsizepages).Getting Documentation UpdatesPeriodically, Apple posts revised help pages and new editions <strong>of</strong> guides. Some revisedhelp pages update the latest editions <strong>of</strong> the guides.Preface About This Guide 15
 To view new onscreen help topics for a server application, make sure your server oradministrator computer is connected to the Internet and click “Latest help topics” or“Staying current” in the main help page for the application. To download the latest guides in PDF format, go to the <strong>Mac</strong> <strong>OS</strong> X Serverdocumentation website:www.apple.com/server/documentation An RSS feed listing the latest updates to <strong>Mac</strong> <strong>OS</strong> X Server documentation andonscreen help is available. To view the feed use an RSS reader application, such asSafari or Mail:feed://helposx.apple.com/rss/leopard/serverdocupdates.xmlGetting Additional <strong>Information</strong>For more information, consult these resources: Read Me documents—important updates and special information. Look for them onthe server discs. <strong>Mac</strong> <strong>OS</strong> X Server website (www.apple.com/server/macosx)—gateway to extensiveproduct and technology information. <strong>Mac</strong> <strong>OS</strong> X Server Support website (www.apple.com/support/macosxserver)—access tohundreds <strong>of</strong> articles from Apple’s support organization. Apple Discussions website (discussions.apple.com)—a way to share questions,knowledge, and advice with other administrators. Apple Mailing Lists website (www.lists.apple.com)—subscribe to mailing lists so youcan communicate with other administrators using email. Apple Customer Training website (train.apple.com)—instructor-led and self-pacedcourses for honing your server administration skills. Apple Certification Programs website (train.apple.com/certification/)—in-depthcertification programs designed to create a high level <strong>of</strong> competency among<strong>Mac</strong>intosh service technicians, help desk personnel, technical coordinators, systemadministrators, and other pr<strong>of</strong>essional users. Apple Product <strong>Security</strong> Mailing Lists website (lists.apple.com/mailman/listinfo/securityannounce)—mailinglists for communicating by email with other administratorsabout security notifications and announcements. Open Source website (developer.apple.com/opensource/)—access to Darwin opensource code, developer information, and FAQs. Apple Product <strong>Security</strong> website (www.apple.com/support/security/)—access tosecurity information and resources, including security updates and notifications.16 Preface About This Guide
For additional security-specific information, consult these resources: NSA security configuration guides (www.nsa.gov/snac/)—The US National <strong>Security</strong>Agency provides a wealth <strong>of</strong> information on securely configuring proprietary andopen source s<strong>of</strong>tware. NIST <strong>Security</strong> <strong>Configuration</strong> Checklists Repository (checklists.nist.gov/repository/category.html)—This is the US National Institute <strong>of</strong> Standards and <strong>Technology</strong>repository for security configuration checklists. DISA <strong>Security</strong> Technical Implementation Guide (www.disa.mil/gs/dsn/policies.html)—This is the US Defense <strong>Information</strong> Systems Agency guide for implementing securegovernment networks. A Department <strong>of</strong> Defense (DoD) PKI Certificate is required toaccess this information. CIS Benchmark and Scoring Tool (www.cisecurity.org/bench_osx.html)—The Center forInternet <strong>Security</strong> benchmark and scoring tool is used to establish CIS benchmarks.AcknowledgmentsApple would like to thank the National <strong>Security</strong> Agency, the National Institute <strong>of</strong>Standards and <strong>Technology</strong>, and the Defense <strong>Information</strong> Systems Agency for theirassistance in creating and editing the security configuration guides for <strong>Mac</strong> <strong>OS</strong> X v10.5client and server.Preface About This Guide 17
18 Preface About This Guide
1 Introductionto <strong>Mac</strong> <strong>OS</strong> X <strong>Security</strong>Architecture1Use this chapter to learn about the features in <strong>Mac</strong> <strong>OS</strong> X thatenhance security on your computer.<strong>Mac</strong> <strong>OS</strong> X delivers the highest level <strong>of</strong> security through the adoption <strong>of</strong> industrystandards, open s<strong>of</strong>tware development, and smart architectural decisions.With <strong>Mac</strong> <strong>OS</strong> X, a security strategy is implemented that is central to the design <strong>of</strong> theoperating system, ensuring that your <strong>Mac</strong> is safe and secure. To enhance security onyour computer, <strong>Mac</strong> <strong>OS</strong> X provides the following features. Open source foundation. Open source methodology makes <strong>Mac</strong> <strong>OS</strong> X a robust,secure operating system, because its core components have been subjected to peerreview for decades. Problems can be quickly identified and fixed by Apple and thelarger open source community. Secure default settings. When you take your <strong>Mac</strong> out <strong>of</strong> the box, it is securelyconfigured to meet the needs <strong>of</strong> most common environments, so you don’t need tobe a security expert to set up your computer. The default settings make it verydifficult for malicious s<strong>of</strong>tware to infect your computer. You can further configuresecurity on the computer to meet organizational or user requirements. Modern security architecture. <strong>Mac</strong> <strong>OS</strong> X includes state-<strong>of</strong>-the-art, standards-basedtechnologies that enable Apple and third-party developers to build secure s<strong>of</strong>twarefor the <strong>Mac</strong>. These technologies support all aspects <strong>of</strong> system, data, and networkingsecurity required by today’s applications. Innovative security applications. <strong>Mac</strong> <strong>OS</strong> X includes features that take the worry out<strong>of</strong> using a computer. For example, FileVault protects your documents by using strongencryption, an integrated VPN client gives you secure access to networks over theInternet, and a powerful firewall secures your home network. Rapid response. Because the security <strong>of</strong> your computer is important, Apple respondsrapidly to provide patches and updates. Apple works with worldwide partners,including the Computer Emergency Response Team (CERT), to notify users <strong>of</strong>potential threats. If vulnerabilities are discovered, the built-in S<strong>of</strong>tware Update toolnotifies users <strong>of</strong> security updates, which are available for easy retrieval andinstallation.19
<strong>Security</strong> Architectural Overview<strong>Mac</strong> <strong>OS</strong> X security services are built on two open source standards: Berkeley S<strong>of</strong>tware Distribution (BSD). BSD is a form <strong>of</strong> UNIX that providesfundamental services, including the <strong>Mac</strong> <strong>OS</strong> X file system and file access permissions. Common Data <strong>Security</strong> Architecture (CDSA). CDSA provides a wide array <strong>of</strong> securityservices, including more specific access permissions, authentication <strong>of</strong> user identities,encryption, and secure data storage.UNIX InfrastructureThe <strong>Mac</strong> <strong>OS</strong> X kernel—the heart <strong>of</strong> the operating system—is built from BSD and <strong>Mac</strong>h.Among other things, BSD provides basic file system and networking services andimplements a user and group identification scheme. BSD enforces access restrictions t<strong>of</strong>iles and system resources based on user and group IDs.<strong>Mac</strong>h provides memory management, thread control, hardware abstraction, andinterprocess communication. <strong>Mac</strong>h enforces access by controlling which tasks can senda message to a <strong>Mac</strong>h port. (A <strong>Mac</strong>h port represents a task or some other resource.) BSDsecurity policies and <strong>Mac</strong>h access permissions constitute an essential part <strong>of</strong> security in<strong>Mac</strong> <strong>OS</strong> X, and are both critical to enforcing local security.Access PermissionsAn important aspect <strong>of</strong> computer security is the granting or denying <strong>of</strong> accesspermissions (sometimes called access rights). A permission is the ability to perform aspecific operation, such as gaining access to data or to execute code.Permissions are granted at the level <strong>of</strong> folders, subfolders, files, or applications.Permissions are also granted for specific data in files or application functions.Permissions in <strong>Mac</strong> <strong>OS</strong> X are controlled at many levels, from the <strong>Mac</strong>h and BSDcomponents <strong>of</strong> the kernel through higher levels <strong>of</strong> the operating system, and—fornetworked applications—through network protocols.<strong>Security</strong> FrameworkThe security framework in <strong>Mac</strong> <strong>OS</strong> X is an implementation <strong>of</strong> the CDSA architecture. Itcontains an expandable set <strong>of</strong> cryptographic algorithms to perform code signing andencryption operations while maintaining the security <strong>of</strong> the cryptographic keys. It alsocontains libraries that allow the interpretation <strong>of</strong> X.509 certificates.The CDSA code is used by <strong>Mac</strong> <strong>OS</strong> X features such as Keychain and URL Access forprotection <strong>of</strong> login data.20 Chapter 1 Introduction to <strong>Mac</strong> <strong>OS</strong> X <strong>Security</strong> Architecture
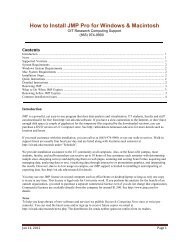
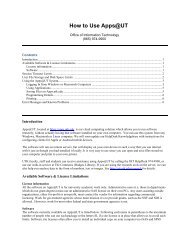
Apple built the foundation <strong>of</strong> <strong>Mac</strong> <strong>OS</strong> X and many <strong>of</strong> its integrated services with opensource s<strong>of</strong>tware—such as FreeBSD, Apache, and Kerberos, among others—that hasbeen made secure through years <strong>of</strong> public scrutiny by developers and security expertsaround the world.Strong security is a benefit <strong>of</strong> open source s<strong>of</strong>tware because anyone can inspect thesource code, identify theoretical vulnerabilities, and take steps to strengthen thes<strong>of</strong>tware.Apple actively participates with the open source community by routinely releasingupdates <strong>of</strong> <strong>Mac</strong> <strong>OS</strong> X that are subject to independent developers’ ongoing review—and by incorporating improvements. An open source s<strong>of</strong>tware development approachprovides the transparency necessary to ensure that <strong>Mac</strong> <strong>OS</strong> X is truly secure.This open approach has clear advantages and a long, well-documented history <strong>of</strong>quickly identifying and correcting source code that might contain exploitablevulnerabilities. <strong>Mac</strong> <strong>OS</strong> X users can comfortably rely on the ongoing public examinationby large numbers <strong>of</strong> security experts, which is made possible by Apple’s open approachto s<strong>of</strong>tware development. The result is an operating system that is inherently moresecure.Layered <strong>Security</strong> Defense<strong>Mac</strong> <strong>OS</strong> X security is built on a layered defense for maximum protection. <strong>Security</strong>features such as the following provide solutions for securing data at all levels, from theoperating system and applications to networks and the Internet.Secure Worldwide CommunicationInternetSecure ApplicationsApplicationsSecure Network ProtocolsNetwork<strong>Security</strong> ServicesOperating SystemSecure Boot/”Lock Down”Hardware Secure worldwide communication—Firewall and mail filtering help preventmalicious s<strong>of</strong>tware from compromising your computer. Secure applications— Encrypted Disk Images and FileVault help prevent intrudersfrom viewing data on your computer.Chapter 1 Introduction to <strong>Mac</strong> <strong>OS</strong> X <strong>Security</strong> Architecture 21
 Secure network protocols—Secure Sockets Layer (SSL) is a protocol that helpsprevent intruders from viewing information exchange across a network, andKerberos secures the authentication process. <strong>Security</strong> Services—Authentication using keychains, together with P<strong>OS</strong>IX and ACLpermissions, helps prevent intruders from using your applications and accessing yourfiles. Secure boot and lock down—The Firmware Password Utility helps prevent peoplewho can access your hardware from gaining root-level access permissions to yourcomputer files.Mandatory Access Controls<strong>Mac</strong> <strong>OS</strong> X v10.5 uses mandatory access controls that are integrated into the execsystem service to prevent the execution <strong>of</strong> unauthorized applications.Mandatory access controls enable the implementation <strong>of</strong> strong parental controls. Theyalso provide a sandboxing feature that restricts applications from accessing systemresources. This prevents a user with unrestricted access, such as root, from launching anapplication and performing a malicious task.Credential ManagementA keychain is used to store passwords, keys, certificates, and other secrets. Due to thesensitive nature <strong>of</strong> this information, keychains use cryptography to encrypt anddecrypt secrets, and they safely store secrets and related data in files.<strong>Mac</strong> <strong>OS</strong> X Keychain services enable you to create keychains and securely store keychainitems. After a keychain is created, you can add, delete, and edit keychain items, such aspasswords, keys, certificates, and notes for users.A user can unlock a keychain through authentication (by using a password, digitaltoken, smart card, or biometric reader) and applications can then use that keychain tostore and retrieve data, such as passwords.Network <strong>Security</strong>Secure Transport is used to implement SSL and Transport Layer <strong>Security</strong> (TLS) protocols.These protocols provide secure communications over a TCP/IP connection such as theInternet by using encryption and certificate exchange.Public Key Infrastructure (PKI)Certificate, key, and trust services include functions to: Create, manage, and read certificates Add certificates to a keychain Create encryption keys Manage trust policies22 Chapter 1 Introduction to <strong>Mac</strong> <strong>OS</strong> X <strong>Security</strong> Architecture
These functions are used when the services call Common <strong>Security</strong> Service Manager(CSSM) functions. This is transparent to users.Authorization Versus AuthenticationAuthorization is the process by which an entity, such as a user or a computer, obtainsthe right to perform a restricted operation. Authorization can also refer to the rightitself, as in “Anne has the authorization to run that program.” Authorization usuallyinvolves authenticating the entity and then determining whether it has the correctpermissions.Authentication is normally done as a step in the authorization process. Someapplications and operating system components perform their own authentication.Authentication might use authorization services when necessary.<strong>Security</strong> Features in <strong>Mac</strong> <strong>OS</strong> X v10.5<strong>Mac</strong> <strong>OS</strong> X v10.5 includes the following new security features and technologies toenhance the protection <strong>of</strong> your computer and your personal information. Tagging and first-run warning: <strong>Mac</strong> <strong>OS</strong> X v10.5 marks files that are downloaded tohelp prevent users from inadvertently running malicious downloaded applications. Runtime protection: New technologies such as execute disable, libraryrandomization, and sandboxing help prevent attacks that try to hijack or modify thes<strong>of</strong>tware on your system. Improved firewall: After you activate the new application firewall, the firewallconfigures itself so you get the benefits <strong>of</strong> firewall protection without needing tounderstand the details <strong>of</strong> network ports and protocols. Mandatory access control: These enforce restrictions on access to system resources. Application signing: This enables you to verify the integrity and identity <strong>of</strong>applications on your <strong>Mac</strong>.Mandatory Access Controls<strong>Mac</strong> <strong>OS</strong> X v10.5 introduces a new access control mechanism known as mandatoryaccess controls. Although the Mandatory Access Control technology is not visible tousers, it is included in <strong>Mac</strong> <strong>OS</strong> X v10.5 to protect your computer.Mandatory access controls are policies that cannot be overridden. These policies setsecurity restrictions created by the developer. This approach is different fromdiscretionary access controls that permit users to override security policies according totheir preferences.Chapter 1 Introduction to <strong>Mac</strong> <strong>OS</strong> X <strong>Security</strong> Architecture 23
Mandatory access controls in <strong>Mac</strong> <strong>OS</strong> X v10.5 aren’t visible to users, but they are theunderlying technology for several important new features, including sandboxing,parental controls, managed preferences, and a safety net feature for Time <strong>Mac</strong>hine.Time <strong>Mac</strong>hine illustrates the difference between mandatory access controls and theuser privilege model—it allows files within Time <strong>Mac</strong>hine backups to be deleted onlyby programs related to Time <strong>Mac</strong>hine. From the command line, no user— not even onelogged in as root—can delete files in a Time <strong>Mac</strong>hine backup.Time <strong>Mac</strong>hine uses this strict policy because it utilizes new file system features in <strong>Mac</strong><strong>OS</strong> X v10.5. The policy prevents corruption in the backup directory by preventing toolsfrom deleting files from backups that may not consider the new file system features.Mandatory access controls are integrated with the exec system service to prevent theexecution <strong>of</strong> unauthorized applications. This is the basis for application controls inparental controls in <strong>Mac</strong> <strong>OS</strong> X v10.5 and managed preferences in <strong>Mac</strong> <strong>OS</strong> X Server v10.5.Mandatory access controls enable strong parental controls. In the case <strong>of</strong> the newsandboxing facility, mandatory access controls restrict access to system resources asdetermined by a special sandboxing pr<strong>of</strong>ile that is provided for each sandboxedapplication. This means that even processes running as root can have extremely limitedaccess to system resources.Sandboxing ProcessesSandboxing helps ensure that applications do only what they’re intended to do byplacing controls on applications that restrict what files they can access, whether theapplications can talk to the network, and whether the applications can be used tolaunch other applications.In <strong>Mac</strong> <strong>OS</strong> X v10.5, many <strong>of</strong> the system’s helper applications that normallycommunicate with the network—such as mDNSResponder (the s<strong>of</strong>tware underlyingBonjour) and the Kerberos KDC—are sandboxed to guard them from abuse byattackers trying to access the system.In addition, other programs that routinely take untrusted input (for instance, arbitraryfiles or network connections), such as Xgrid and the Quick Look and Spotlightbackground daemons, are sandboxed.Sandboxing is based on the system’s mandatory access controls mechanism, which isimplemented at the kernel level. Sandboxing pr<strong>of</strong>iles are developed for eachapplication that runs in a sandbox, describing precisely which resources are accessibleto the application.24 Chapter 1 Introduction to <strong>Mac</strong> <strong>OS</strong> X <strong>Security</strong> Architecture
Parental ControlsParental controls provide computer administrators with the tools to enforce areasonable level <strong>of</strong> restrictions for users <strong>of</strong> the computer. Administrator users can usefeatures like Simple Finder to limit the launching <strong>of</strong> a set <strong>of</strong> applications or create awhite list <strong>of</strong> web sites that users can visit. This is the kind <strong>of</strong> simple UI administrators <strong>of</strong>a public library or computer environment can use to restrict access to applications orsites to keep users from performing malicious activities.Quarantine ApplicationsApplications that download files from the Internet or receive files from external sources(such as mail attachments) can use the Quarantine feature to provide a first line <strong>of</strong>defense against malicious s<strong>of</strong>tware such as Trojan horses. When an application receivesan unknown file, it adds metadata (quarantine attributes) to the file using newfunctions found in Launch Services.Files downloaded using Safari, Mail, and iChat are tagged with metadata indicating thatthey are downloaded files and referring to the URL, date, and time <strong>of</strong> the download.This metadata is propagated from archive files that are downloaded (such as ZIP orDMG files) so that any file extracted from an archive is also tagged with the sameinformation. This metadata is used by the download inspector to prevent dangerousfile types from being opened unexpectedly.The first time you try to run an application that has been downloaded, DownloadInspector inspects the file, prompts you with a warning asking whether you want torun the application, and displays the information on the date, time, and location <strong>of</strong> thedownload.You can continue to open the application or cancel the attempt, which is appropriate ifyou don’t recognize or trust the application. After an application has been opened, thismessage does not appear again for that application and the quarantine attributes arelifted.This new mechanism dramatically reduces the number <strong>of</strong> warnings related todownloads that you see. Such messages now appear only when you attempt to launcha downloaded application. When you do see a warning, you are given usefulinformation about the source <strong>of</strong> the download that can help you make an informeddecision about whether to proceed.Application-Based FirewallA new application-based firewall makes it easier for nonexperts to get the benefits <strong>of</strong>firewall protection. The new firewall allows or blocks incoming connections on a perapplicationbasis rather than on a per-port basis.Chapter 1 Introduction to <strong>Mac</strong> <strong>OS</strong> X <strong>Security</strong> Architecture 25
Users can restrict firewall access to essential network services (such as those needed forDHCP, BOOTP, IPSec VPNs, and Bonjour), or they can allow (or block) access to selectedapplications on an individual basis. The application firewall uses digital signatures toverify the identity <strong>of</strong> applications. If you select an unsigned application, <strong>Mac</strong> <strong>OS</strong> X v10.5signs that application to uniquely identify it.For expert users, the IPFW firewall is still available on the system. Because IPFW handlespackets at the protocol-layer <strong>of</strong> the networking stack and the application firewall is anapplication layer filter, IPFW rules take precedence.Signed ApplicationsBy signing applications, your <strong>Mac</strong> can verify the identity and integrity <strong>of</strong> an application.Applications shipped with <strong>Mac</strong> <strong>OS</strong> X v10.5 are signed by Apple. In addition, third-partys<strong>of</strong>tware developers can sign their s<strong>of</strong>tware for the <strong>Mac</strong>. Application signing doesn’tprovide intrinsic protection, but it integrates with several other features to enhancesecurity.Features such as parental controls, managed preferences, Keychain, and the firewall useapplication signing to verify that the applications they are working with are the correct,unmodified versions.With Keychain, the use <strong>of</strong> signing dramatically reduces the number <strong>of</strong> Keychain dialogspresented to users because the system can validate the integrity <strong>of</strong> an application thatuses Keychain. With parental controls and managed preferences, the system usessignatures to verify that an application runs unmodified.The application firewall uses signatures to identify and verify the integrity <strong>of</strong>applications that are granted network access. In the case <strong>of</strong> parental controls and thefirewall, unsigned applications are signed by the system on an ad hoc basis to identifythem and verify that they remain unmodified.Smart Card Unlock <strong>of</strong> FileVault and Encrypted StorageSmart cards enable you to carry your digital certificates with you. With <strong>Mac</strong> <strong>OS</strong> X, youcan use your smart card whenever an authentication dialog is presented.<strong>Mac</strong> <strong>OS</strong> X v10.5 has the following four token modules to support this robust, two-factorauthentication mechanism and Java Card 2.1 standards:Â Belgium National Identification Card (BELPIC)Â Department <strong>of</strong> Defense Common Access Card (CAC)Â Japanese government PKI (JPKI)Â U.S. Federal Government Personal Identity Verification, also called FIPS-201(PIV)26 Chapter 1 Introduction to <strong>Mac</strong> <strong>OS</strong> X <strong>Security</strong> Architecture
Other commercial smart card vendors provide token modules to support integration <strong>of</strong>their smart card with the <strong>Mac</strong> <strong>OS</strong> X Smart Card architecture.Similar to an ATM card and a PIN code, two-factor authentication relies on somethingyou have and something you know. If your smart card is lost or stolen, it cannot beused unless your PIN is also known.<strong>Mac</strong> <strong>OS</strong> X has additional functionality for smart card use, such as: Lock system on smart card removal. You can configure your <strong>Mac</strong> to lock the systemwhen you remove your smart card. Unlock keychain. When you insert a smart card, the keychain can be unlocked andthen your stored information and credentials can be used. Unlock FileVault. You can use a smart card to unlock your FileVault encrypted homedirectory. You can enable this function by using a private key on a smart card.Sharing and Collaboration ServicesIn <strong>Mac</strong> <strong>OS</strong> X v10.5, you can enable and configure sharing services to allow access onlyto users that you specify through access control lists (ACLs). You can create useraccounts for sharing based on existing user accounts on the system, and for entries inyour address book. Sharing services become more secure with ACLs.Enhanced Encrypted Disk Image CryptographyThe Disk Utility tool included in <strong>Mac</strong> <strong>OS</strong> X enables you to create encrypted diskimages—using 128-bit or even stronger 256-bit AES encryption—so you can safely mailvaluable documents, files, and folders to friends and colleagues, save the encrypteddisk image to CD or DVD, or store it on the local system or a network file server.FileVault also uses this same encrypted disk image technology to protect user folders.A disk image is a file that appears as a volume on your hard disk. It can be copied,moved, or opened. When the disk image is encrypted, files or folders placed in it areencrypted.To see the contents <strong>of</strong> the disk image, including metadata such as file name, date, size,or other properties, a user must enter the password or have a keychain with the correctpassword.The file is decrypted in real time, only as the application needs it. For example, if youopen a QuickTime movie from an encrypted disk image, <strong>Mac</strong> <strong>OS</strong> X decrypts only theportion <strong>of</strong> the movie currently playing.Chapter 1 Introduction to <strong>Mac</strong> <strong>OS</strong> X <strong>Security</strong> Architecture 27
Enhanced VPN Compatibility and Integration<strong>Mac</strong> <strong>OS</strong> X v10.5 includes a universal VPN client with support built into the Networkpreferences pane, so you have everything you need to establish a secure connection.The VPN client supports L2TP over IPSec and PPTP, which make Apple’s VPN clientcompatible with the most popular VPN servers, including those from Micros<strong>of</strong>t andCisco.You can also use digital certificates and one-time password tokens from RSA orCryptoCARD for authentication in conjunction with the VPN client. The one-timepassword tokens provide a randomly generated passcode number that must beentered with the VPN password—a great option for those who require extremelyrobust security.In addition, the L2TP VPN client can be authenticated using credentials from a Kerberosserver. In either case, you can save the settings for each VPN server you routinely use asa location, so you can reconnect without needing to reconfigure your system eachtime.Apple’s L2TP VPN client can connect you to protected networks automatically by usingits VPN-on-demand feature. VPN-on-demand can detect when you want to access anetwork that is protected by a VPN server and can start the connection process for you.This means that your security is increased because VPN connections can be closedwhen not in use, and you can work more efficiently.In <strong>Mac</strong> <strong>OS</strong> X v10.5, the VPN client includes support for Cisco Group Filtering. It alsosupports DHCP over PPP to dynamically acquire additional configuration options suchas Static Routes and Search Domains.Improved Secure ConnectivityVPN support has been enhanced to connect to more <strong>of</strong> the most popular VPNservers—without additional s<strong>of</strong>tware.28 Chapter 1 Introduction to <strong>Mac</strong> <strong>OS</strong> X <strong>Security</strong> Architecture
2 Installing<strong>Mac</strong> <strong>OS</strong> X2Use this chapter to install and initialize or update <strong>Mac</strong> <strong>OS</strong> X,to repair disk permissions, or to customize your installation tomeet your security needs.Although the default installation <strong>of</strong> <strong>Mac</strong> <strong>OS</strong> X is highly secure, you can customize it foryour network security needs. By securely configuring the stages <strong>of</strong> the installation andunderstanding <strong>Mac</strong> <strong>OS</strong> X permissions, you can harden your computer to match yoursecurity policy.System Installation OverviewIf <strong>Mac</strong> <strong>OS</strong> X was already installed on the computer, consider reinstalling it. Byreinstalling <strong>Mac</strong> <strong>OS</strong> X and reformatting the volume, you avoid vulnerabilities caused byprevious installations or settings.Because some recoverable data might remain on the computer, securely erase thepartition that you’re installing <strong>Mac</strong> <strong>OS</strong> X on. For more information, see “Using DiskUtility to Securely Erase a Disk or Partition” on page 137.If you decide against securely erasing the partition, securely erase free space afterinstalling <strong>Mac</strong> <strong>OS</strong> X. For more information, see “Using Disk Utility to Securely Erase FreeSpace” on page 139.Disabling the Firmware PasswordBefore installing <strong>Mac</strong> <strong>OS</strong> X, disable the Open Firmware password (for PowerPC-basedcomputers) or the Extensible Firmware Interface (EFI) password (for Intel-basedcomputers).If <strong>Mac</strong> <strong>OS</strong> X v10.5 is already installed, use the Firmware Password Utility to disable thefirmware password. For more information, see “Using the Firmware Password Utility” onpage 52.29
Note: If you are using an Intel-based <strong>Mac</strong>intosh computer, you cannot use thefollowing method to disable the EFI password. Use the Firmware Password Utilityinstead.To disable the Open Firmware password:1 Restart the computer while holding down the Command, Option, O, and F keys.2 When prompted, enter the Open Firmware password.If you are not prompted to enter a password, the Open Firmware password is disabled.3 Enter the following commands:reset-nvramreset-allInstalling from DVDBefore you install <strong>Mac</strong> <strong>OS</strong> X, securely erase the partition you want to install <strong>Mac</strong> <strong>OS</strong> Xon. For more information, see “Using Disk Utility to Securely Erase a Disk or Partition”on page 137.During installation, install only the packages you plan on using. Removing unusedpackages frees disk space and reduces the risk <strong>of</strong> attackers finding vulnerabilities inunused components.Also, to prevent an attacker from attempting to access your computer duringinstallation, disconnect it from your network.To install <strong>Mac</strong> <strong>OS</strong> X v10.5 from original installation discs:WARNING: When you install <strong>Mac</strong> <strong>OS</strong> X, you erase the contents <strong>of</strong> the partition you’reinstalling on. Before continuing, back up the files you want to keep.1 Insert the <strong>Mac</strong> <strong>OS</strong> X installation discs in the optical drive.2 Restart the computer while holding down the C key.The computer starts up using the disc in the optical drive.3 Proceed through the Installer panes by following the onscreen instructions.4 When the Select a Destination pane appears, select a target disk or volume (partition)and make sure it’s in the expected state.5 Choose a partition to install <strong>Mac</strong> <strong>OS</strong> X on, and click Options.6 Select “Erase and Install.”7 In “Format disk as,” choose “<strong>Mac</strong> <strong>OS</strong> Extended (Journaled).”<strong>Mac</strong> <strong>OS</strong> Extended disk formatting provides extended file characteristics that enhancemultiplatform interoperability.8 Click OK and then click Continue.30 Chapter 2 Installing <strong>Mac</strong> <strong>OS</strong> X
9 In the “Install Summary screen,” click Customize and deselect packages you do not planon using.Do not select the X11 package unless you use it. The X11 X Window system lets you runX11-based applications in <strong>Mac</strong> <strong>OS</strong> X. Although this might be useful, it also makes itharder to maintain a secure configuration. If you use X11, contact your networkadministrator to securely configure it in your environment.10 Click Install.Installing from the NetworkThere are several ways to deploy images from the network. When choosing a method,make sure you can do it securely. When retrieving the image over a network, make surethe network is isolated and can be trusted. For information about deploying imagesfrom a network, see Server Administration.In addition, verify the image to make sure it is correct. For more information aboutverifying images, see “Verifying the Integrity <strong>of</strong> S<strong>of</strong>tware” on page 37.Restoring from Preconfigured Disk ImagesOne <strong>of</strong> the most efficient ways to deploy secure computers is to configure a modelcomputer using security settings requested by your organization and then create a diskimage to deploy the image on your computers. (For information about how to use DiskUtility to create disk images, see the System Imaging and S<strong>of</strong>tware Update Administrationguide.)Thoroughly test the settings, making sure the computer meets the standards <strong>of</strong> yourorganization, and then create a disk image <strong>of</strong> the computer. You can then deploy thisimage to each computer, avoiding the need to manually configure each computer.You can use NetBoot or Apple S<strong>of</strong>tware Restore (ASR) to configure your computer froma network-based disk image: With NetBoot, you can install an image directly from the network. For informationabout how to use NetBoot, see the System Imaging and S<strong>of</strong>tware UpdateAdministration Guide. With ASR, you can install an image deployed by an ASR server, or you can save thatimage to disk. By saving the image to disk, you can verify its validity before using it. Ifyou’re configuring multiple computers simultaneously, ASR can be much moreefficient. For information about how to use ASR, enter man asr in a Terminal window.Initial System SetupAfter installing <strong>Mac</strong> <strong>OS</strong> X, the computer restarts and loads Setup Assistant, which youuse to initialize your system.Chapter 2 Installing <strong>Mac</strong> <strong>OS</strong> X 31
Using Setup AssistantSetup Assistant initially configures <strong>Mac</strong> <strong>OS</strong> X. You can use Setup Assistant to transferinformation from other computers and send registration information to Apple.Setup Assistant configures the first account on the computer as an administratoraccount. Administrator accounts should only be used for administration. Users shoulduse standard user accounts for day-to-day computer use.Note: Apple protects information submitted by Setup Assistant, but avoid enteringinformation considered sensitive by your organization.To use Setup Assistant without providing confidential information:1 Proceed to the Do You Already Own a <strong>Mac</strong> screen, select “Do not transfer myinformation now,” and click Continue.2 Proceed to the Your Internet Connection step and click Different Network Setup.If you don’t disable your network connection, an additional step, Enter Your Apple ID,appears. Don’t enter values in the provided fields. The administrator account shouldonly be used for administration, so there’s no need for an Apple ID.3 In Registration <strong>Information</strong>, press Command-Q and click “Skip to bypass the remainingregistration and setup process.”When you bypass the remaining registration and setup process, you can’t go back tochange settings. Before bypassing, you might want to go back through the steps toremove sensitive information.After you enter information in the Your Internet Connection step, you cannot go backto that step to change your network settings. You can only change network settingsafter completing installation.If you enter registration information, an additional step, Register With Apple,appears later in the installation process. Select “Register Later, but don’t register withApple.”Creating Initial System AccountsAfter completing the initial steps in Setup Assistant, you’re presented with the CreateYour Account step. In this step, you create a system administrator account. Make thisaccount as secure as possible.Note: Only use the system administrator account to perform administrative tasks.Create additional accounts for nonadministrative use. For more information, see “Types<strong>of</strong> User Accounts” on page 59.To set up a secure system administrator account:1 In the Name and Short Name fields, enter names that are not easily guessed.32 Chapter 2 Installing <strong>Mac</strong> <strong>OS</strong> X
Avoid names and short names like “administrator” and “admin.” You can use the long orshort name when you’re authenticating. The short name is <strong>of</strong>ten used by UNIXcommands and services.2 In the Password and Verify fields, enter a complex password that is at least 12 charactersand composed <strong>of</strong> mixed-cased characters, numbers, and special characters (such as ! or@).<strong>Mac</strong> <strong>OS</strong> X supports passwords that contain UTF-8 characters or any NUL-terminatedbyte sequence.For more information, see “Using Passwords” on page 70.3 In the Password Hint field, do not enter information related to your password.If a hint is provided, the user is presented with the hint after three failed authenticationattempts. Password-related information provided in the field could compromise theintegrity <strong>of</strong> the password. Adding contact information for your organization’s technicalsupport is convenient and doesn’t compromise password integrity.4 Click Continue.Setting Correct Time SettingsAfter creating the system administrator account, you configure the computer’s timesettings. You must configure the computer’s time settings correctly because severalauthentication protocols, such as Kerberos, require valid time settings to work properly.Also, security auditing tools rely on valid time settings.<strong>Mac</strong> <strong>OS</strong> X can set the time by retrieving date and time information from a NetworkTime Protocol (NTP) server. You should still set valid time settings in case you decide todisable this feature, or in case you don’t have access to a secure internal NTP server.For more information about using a secure NTP server, see “Securing Date & TimePreferences” on page 91.Updating System S<strong>of</strong>twareAfter installing <strong>Mac</strong> <strong>OS</strong> X, be sure to install the latest approved security updates. Beforeconnecting your computer to a network to obtain s<strong>of</strong>tware updates, enable the firewallin <strong>Security</strong> preferences to allow only essential services.<strong>Mac</strong> <strong>OS</strong> X includes S<strong>of</strong>tware Update, an application that downloads and installss<strong>of</strong>tware updates from Apple’s S<strong>of</strong>tware Update server or from an internal s<strong>of</strong>twareupdate server.You can configure S<strong>of</strong>tware Update to check for updates automatically. You can alsoconfigure S<strong>of</strong>tware Update to download, but not install, updates, if you want to installthem later.Chapter 2 Installing <strong>Mac</strong> <strong>OS</strong> X 33
Before installing updates, check with your organization for their policy on downloadingupdates. They might prefer that you use an internal s<strong>of</strong>tware update server, whichreduces the amount <strong>of</strong> external network traffic and lets the organization qualifys<strong>of</strong>tware updates using organization configurations before updating systems.Important: <strong>Security</strong> updates published by Apple contain fixes for security issues andare usually released in response to a specific known security problem. Applying theseupdates is essential.If S<strong>of</strong>tware Update does not install an update that you request, contact your networkadministrator. Failure to update indicates that the requested update might be amalicious file.Important: If you have not secured and validated settings for network services, do notenable your network connection to install s<strong>of</strong>tware updates. For information, seeChapter 12, “<strong>Information</strong> Assurance with Services.” Until you securely configure networkservices settings, you are limited to using the manual method <strong>of</strong> installing s<strong>of</strong>twareupdates. For more information, see “Updating Manually from Installer Packages” onpage 36.S<strong>of</strong>tware updates are obtained and installed in several ways: Using S<strong>of</strong>tware Update to download and install updates from an internal s<strong>of</strong>twareupdate server Using S<strong>of</strong>tware Update to download and install updates from Internet-baseds<strong>of</strong>tware update servers Manually downloading and installing updates as separate s<strong>of</strong>tware packagesUpdating from an Internal S<strong>of</strong>tware Update ServerYour computer looks for s<strong>of</strong>tware updates on an internal s<strong>of</strong>tware update server. Byusing an internal s<strong>of</strong>tware update server, you reduce the amount <strong>of</strong> data transferredoutside <strong>of</strong> the network. Your organization can control which updates can be installedon your computer.If you run S<strong>of</strong>tware Update on a wireless network or untrusted network, you mightdownload malicious updates from a rogue s<strong>of</strong>tware update server. However, S<strong>of</strong>twareUpdate will not install a package that has not been digitally signed by Apple. IfS<strong>of</strong>tware Update does not install a package, consider the package to be malicious anddelete it from /Library/Updates/; then download the update again.You can connect your computer to a network that manages its client computers, whichenables the network to require that the computer use a specified s<strong>of</strong>tware updateserver. Or, you can modify the /Library/Preferences/com.apple.S<strong>of</strong>twareUpdate.plist fileby entering the following command in a Terminal window to specify your s<strong>of</strong>twareupdate server:34 Chapter 2 Installing <strong>Mac</strong> <strong>OS</strong> X
From the Command Line:# Updating from an Internal S<strong>of</strong>tware Update Server# ------------------------------------------------# Specify the s<strong>of</strong>tware update server to use.# Replace swupdate.apple.com with the fully qualified domain name (FQDN)# or IP address <strong>of</strong> your s<strong>of</strong>tware update server.defaults write com.apple.S<strong>of</strong>twareUpdate CatalogURL http://swupdate.apple.com:8088/index.sucatalog# Switch your computer back to the default Apple update server.defaults delete com.apple.S<strong>of</strong>twareUpdate CatalogURLUpdating from Internet S<strong>of</strong>tware Update ServersBefore connecting to the Internet, make sure your network services are securelyconfigured. For information, see Chapter 12, “<strong>Information</strong> Assurance with Services.”If you are a network administrator, instead <strong>of</strong> using your operational computer to checkfor and install updates, consider using a test computer to download updates and verifyfile integrity before installing updates. For more information about verify file integrity,see “Verifying the Integrity <strong>of</strong> S<strong>of</strong>tware” on page 37. You can then transfer the updatepackages to your operational computer. For instructions on installing the updates, see“Updating Manually from Installer Packages” on page 36.You can also download s<strong>of</strong>tware updates for Apple products atwww.apple.com/support/downloads/.Important: Make sure updates are installed when the computer can be restartedwithout affecting users accessing the server.To download and install s<strong>of</strong>tware updates using S<strong>of</strong>tware Update:1 Choose Apple (apple) > S<strong>of</strong>tware Update.After S<strong>of</strong>tware Update looks for updates to your installed s<strong>of</strong>tware, it displays a list <strong>of</strong>updates. To get older versions <strong>of</strong> updates, go to the s<strong>of</strong>tware update website atwww.apple.com/support/downloads/.2 Select the updates you want to install, and choose Update > Install and Keep Package.When you keep the package, it is stored in the user’s Downloads folder (user_name/Downloads/). If you do not want to install updates, click Quit.3 Accept the licensing agreements to start installation.Some updates might require your computer to restart. If S<strong>of</strong>tware Update asks you torestart the computer, do so.Chapter 2 Installing <strong>Mac</strong> <strong>OS</strong> X 35
From the Command Line:# Updating from Internet S<strong>of</strong>tware Update Server# -----------------------------------# Download and install s<strong>of</strong>tware updates.s<strong>of</strong>twareupdate --download --all --installUpdating Manually from Installer PackagesYou can manually download s<strong>of</strong>tware updates for Apple products fromwww.apple.com/support/downloads/, preferably using a computer designated fordownloading and verifying updates. Perform each download separately so file integritycan be verified before installing the updates.You can review the contents <strong>of</strong> each security update before installing it. To see thecontents <strong>of</strong> a security update, go to Apple’s <strong>Security</strong> Support Page at www.apple.com/support/security/ and click the <strong>Security</strong> Updates page link.To manually download, verify, and install s<strong>of</strong>tware updates:1 Go to www.apple.com/support/downloads/ and download the s<strong>of</strong>tware updates on acomputer designated for verifying s<strong>of</strong>tware updates.Note: Updates provided through S<strong>of</strong>tware Update might sometimes appear earlierthan standalone updates.2 For each update file downloaded, review the SHA-1 digest (also known as a checksum),which should be posted online with the update package.3 Inspect downloaded updates for viruses.4 Verify the integrity <strong>of</strong> each update.For more information, see “Verifying the Integrity <strong>of</strong> S<strong>of</strong>tware” on page 37.5 Transfer the update packages from your test computer to your current computer.The default download location for update packages is /Library/Updates/. You cantransfer update packages to any location on your computer.6 Double-click the package.If the package is located in a disk image (dmg) file, double-click the dmg file and thendouble-click the package.7 Proceed through the installation steps.8 If requested, restart the computer.Install the system update and then install subsequent security updates. Install theupdates in order by release date, oldest to newest.36 Chapter 2 Installing <strong>Mac</strong> <strong>OS</strong> X
From the Command Line:# Updating Manually from Installer Packages# -----------------------------------# Download s<strong>of</strong>tware updates.s<strong>of</strong>twareupdate --download --all# Install s<strong>of</strong>tware updates.installer -pkg $Package_Path -target /Volumes/$Target_VolumeVerifying the Integrity <strong>of</strong> S<strong>of</strong>twareS<strong>of</strong>tware images and updates can include an SHA-1 digest, which is also known as acryptographic checksum. You can use this SHA-1 digest to verify the integrity <strong>of</strong> thes<strong>of</strong>tware. S<strong>of</strong>tware updates retrieved and installed automatically from S<strong>of</strong>tware Updateverify the checksum before installation.From the Command Line:# Verifying the Integrity <strong>of</strong> S<strong>of</strong>tware# -----------------------------------# Use the sha1 command to display a files a file’s SHA-1 digest.# Replace $full_path_filename with the full path filename <strong>of</strong> the update# package or image that SHA-1 digest is being checked for./usr/bin/openssl sha1 $full_path_filenameIf provided, the SHA-1 digest for each s<strong>of</strong>tware update or image should match thedigest created for that file. If not, the file was corrupted. Obtain a new copy.Repairing Disk PermissionsBefore you modify or repair disk permissions, you should understand the file and folderpermissions that <strong>Mac</strong> <strong>OS</strong> X Server supports. <strong>Mac</strong> <strong>OS</strong> X supports the followingpermissions: Portable Operating System Interface (P<strong>OS</strong>IX) permissions—standard for UNIXoperating systems. Access Control Lists (ACLs) permissions—used by <strong>Mac</strong> <strong>OS</strong> X, and compatible withMicros<strong>of</strong>t Windows Server 2003, Micros<strong>of</strong>t Windows XP, and Micros<strong>of</strong>t Windows Vista.Note: In this guide, the term “privileges” refers to the combination <strong>of</strong> ownership andpermissions. The term “permissions” refers to permission settings that each usercategory can have (Read & Write, Read Only, Write Only, and None).Chapter 2 Installing <strong>Mac</strong> <strong>OS</strong> X 37
P<strong>OS</strong>IX Permissions OverviewP<strong>OS</strong>IX permissions let you control access to files and folders. Every file or folder hasread, write, and execute permissions defined for three categories <strong>of</strong> users (Owner,Group, and Everyone). You can assign four types <strong>of</strong> standard P<strong>OS</strong>IX permissions:Read&Write, Read Only, Write Only, None.For more information, see “Setting P<strong>OS</strong>IX Permissions” on page 124.ACL Permissions OverviewAn ACL provides an extended set <strong>of</strong> permissions for a file or folder and enables you toset multiple users and groups as owners.An ACL is a list <strong>of</strong> access control entries (ACEs), each specifying the permissions to begranted or denied to a group or user and how these permissions are propagatedthroughout a folder hierarchy.In addition, ACLs are compatible with Windows Server 2003, Windows Server 2008,Windows XP, and Windows Vista, giving you added flexibility in a multiplatformenvironment.ACLs allow you to be more specific than P<strong>OS</strong>IX when granting permissions. Forexample, rather than giving a user full write permission, you can restrict the user to thecreation <strong>of</strong> folders but not files.If a file or folder has no ACEs defined for it, <strong>Mac</strong> <strong>OS</strong> X applies standard P<strong>OS</strong>IXpermissions. If a file or folder has ACEs defined for it, <strong>Mac</strong> <strong>OS</strong> X starts with the first ACEin the ACL and works its way down the list until the requested permission is satisfied ordenied.After evaluating ACEs, <strong>Mac</strong> <strong>OS</strong> X evaluates standard P<strong>OS</strong>IX permissions defined for thefile or folder. Then, based on the evaluation <strong>of</strong> ACL and standard P<strong>OS</strong>IX permissions,<strong>Mac</strong> <strong>OS</strong> X determines what type <strong>of</strong> access a user has to a shared file or folder.For more information, see “Setting ACL Permissions” on page 127.Using Disk Utility to Repair Disk PermissionsInstalling s<strong>of</strong>tware sometimes causes file permissions to become incorrectly set.Incorrect file permissions can create security vulnerabilities. You can use Disk Utility torepair P<strong>OS</strong>IX permissions and minimal ACL permissions.Most s<strong>of</strong>tware you install in <strong>Mac</strong> <strong>OS</strong> X is installed from package (.pkg) files. Each timesomething is installed from a package file, a Bill <strong>of</strong> Materials (.bom) file is created andthe installer database is updated. Each Bill <strong>of</strong> Materials file contains a list <strong>of</strong> filesinstalled by that package, along with the correct permissions for each file.38 Chapter 2 Installing <strong>Mac</strong> <strong>OS</strong> X
When you use Disk Utility to verify or repair disk permissions, it reads the Bill <strong>of</strong>Materials files from the <strong>Mac</strong> <strong>OS</strong> X installation and compares its list to the permissionson each file listed. If the permissions differ, Disk Utility can repair them.You should repair disk permissions if you experience symptoms that indicatepermission-related problems after installing s<strong>of</strong>tware, s<strong>of</strong>tware updates, or applications.Note: If you’ve modified permissions for files in accordance with organizational policies,repairing disk permissions can reset the modified permissions to those stated in the Bill<strong>of</strong> Materials file. After repairing permissions, reapply the file permission modificationsto adhere to your organizational policies.To repair disk permissions:1 Open Disk Utility.2 Select the partition you want to repair.Select a partition, not a drive. Partitions are contained in drives and are indented onelevel in the list on the left.3 Click Repair Disk Permissions.If you do not select a partition, this button is disabled.4 Choose Disk Utility > Quit Disk Utility.From the Command Line:# Using Disk Utility to Repair Disk Permissions# -----------------------------------# Repair disk permissions.diskutil repairPermissions /Volumes/$Target_Boot_DriveNote: You can also use the pkgutil command to repair specific package permissions.For more information see pkgutil man pages.Chapter 2 Installing <strong>Mac</strong> <strong>OS</strong> X 39
40 Chapter 2 Installing <strong>Mac</strong> <strong>OS</strong> X
3 ProtectingSystem Hardware3Use this chapter to learn how to protect and secure yoursystem hardware.After installing and setting up <strong>Mac</strong> <strong>OS</strong> X, make sure you protect your system hardware.Protecting HardwareThe first level <strong>of</strong> security is protection from unwanted physical access. If someone canphysically access a computer, it becomes much easier to compromise the computer’ssecurity. When someone has physical access to the computer, they can install maliciouss<strong>of</strong>tware or event-tracking and data-capturing services.Use as many layers <strong>of</strong> physical protection as possible. Restrict access to rooms thatcontain computers that store or access sensitive information. Provide room access onlyto those who must use those computers. If possible, lock the computer in a locked orsecure container when it is not in use, and bolt or fasten it to a wall or piece <strong>of</strong>furniture.The hard disk is the most critical hardware component in your computer. Take specialcare to prevent access to the hard disk. If someone removes your hard disk and installsit in another computer, they can bypass safeguards you set up. Lock or secure thecomputer’s internal hardware.If you can’t guarantee the physical security <strong>of</strong> the hard disk, consider using FileVault foreach home folder FileVault encrypts home folder content and prevents the contentfrom being compromised. For more information, see “Encrypting Home Folders” onpage 130.If you have a portable computer, keep it secure. Lock it up or hide it when it is not inuse. When transporting the computer, never leave it in an insecure location. Considerbuying a computer bag with a locking mechanism and lock the computer in the bagwhen you aren’t using it.41
Preventing RF EavesdroppingMost network environments have wired and wireless access to the network. Wirelessaccess helps businesses or organizations <strong>of</strong>fer mobility to users throughout theirnetwork.Although wireless technology gives your network more flexibility with your users, it cancause possible security vulnerabilities you may be unaware <strong>of</strong>. When configuring awireless access point make sure you properly configure the security settings to preventunauthorized users from attempting to access your network.Your wireless access point should require encryption <strong>of</strong> the connection, userauthentication (through the use <strong>of</strong> certificates or smart cards), and time-outs forconnections.By requiring an encrypted wireless connection you can maintain the integrity <strong>of</strong> databeing transmitted to your wireless access point. The use <strong>of</strong> certificates or smart cardshelps to ensure the users identity, that your users are who they say they are.Also, setting a time-out that disconnects wireless user connections lasting longer than8 to 10 hours prevents your network from being attacked by a computer that isconnected through your wireless access point and left unattended.If you need to use WiFi, see “Network Access Control (802.1x)” on page 162 to leverage802.1x for securing WiFi traffic.Understanding RF <strong>Security</strong> ChallengesMany <strong>Mac</strong> laptop computers have a built-in wireless network card. Users can configuretheir computer to be a wireless access point to share their Internet connection withother users. However, a user creating this wireless access point doesn’t usually securelyconfigure it, creating a point <strong>of</strong> access for an attacker.Anyone within the wireless range can gain access to your network by using anauthorized user’s insecurely configured wireless LAN. These possible points <strong>of</strong> accesscan be very large, depending on the number <strong>of</strong> users with wireless technology on theircomputers.The challenge arises when trying to prevent users from creating this access point toyour network or trying identify where the access points are and who is attempting touse these insecure wireless access points.Many organizations restrict the use <strong>of</strong> wireless technology in their networkenvironment. However, many <strong>Mac</strong> laptop computers have wireless capability built-inand turning it <strong>of</strong>f will probably not meet your organization’s wireless technologyrestrictions. You might need to remove components from <strong>Mac</strong> <strong>OS</strong> X to disable themfrom being mistakenly turned on in System Preferences.42 Chapter 3 Protecting System Hardware
<strong>OS</strong> Components<strong>Mac</strong> <strong>OS</strong> X provides kernel extensions (also called <strong>OS</strong> components), which is atechnology that dynamically loads pieces <strong>of</strong> code in the kernel space withoutrecompiling the kernel. These <strong>OS</strong> components can be removed from <strong>Mac</strong> <strong>OS</strong> X toprevent the use <strong>of</strong> a piece <strong>of</strong> hardware.Important: <strong>Mac</strong> <strong>OS</strong> X sometimes has updates to specific <strong>OS</strong> components. When yourcomputer installs these updates the component is overwritten or reinstalled if it hasbeen removed. This then reenables the hardware you wanted disabled. When youinstall updates make sure that the installation does not reenable an Operating System(<strong>OS</strong>) component you wanted disabled.Removing Wi-Fi Support S<strong>of</strong>twareUse the following instructions for removing Airport support. This task requires you tohave administrator privileges.You can also have an Apple Authorized Technician remove Airport hardware from yourApple computer.Important: Repeat these instructions every time a system update is installed.To remove kernel extensions for AirPort hardware:1 Open the /System/Library/Extensions folder.2 Drag the following files to the Trash:AppleAirPort.kextAppleAirPort2.kextAppleAirPortFW.kext3 Open Terminal and enter the following command:$ sudo touch /System/Library/ExtensionsThe touch command changes the modified date <strong>of</strong> the /System/Library/Extensionsfolder. When the folder has a new modified date, the Extension cache files(located in /System/Library/) are deleted and rebuilt automatically by <strong>Mac</strong> <strong>OS</strong> X.4 Choose Finder > Secure Empty Trash to delete the file.5 Restart the system.Chapter 3 Protecting System Hardware 43
From the Command Line:# -------------------------------------------------------------------# Protecting System Hardware# -------------------------------------------------------------------# Securing Wi-Fi Hardware# -------------------------# Remove AppleAirport kernel extensions.srm -rf /System/Library/Extensions/AppleAirPort.kextsrm -rf /System/Library/Extensions/AppleAirPort2.kextsrm -rf /System/Library/Extensions/AppleAirPortFW.kext# Remove Extensions cache files.touch /System/Library/ExtensionsRemoving Bluetooth Support S<strong>of</strong>twareUse the following instructions to remove Bluetooth® support for peripherals such askeyboards, mice, or phones. This task requires you to have administrator privileges.You can also have an Apple Authorized Technician remove the built-in Bluetoothhardware from your Apple computer.Important: Repeat these instructions every time a system update is installed.To remove kernel extensions for Bluetooth hardware:1 Open the /System/Library/Extensions folder.2 Drag the following files to the Trash:IOBluetoothFamily.kextIOBluetoothHIDDriver.kext3 Open Terminal and enter the following command:$ sudo touch /System/Library/ExtensionsThe touch command changes the modified date <strong>of</strong> the /System/Library/Extensionsfolder. When the folder has a new modified date, the Extension cache files(located in /System/Library/) are deleted and rebuilt by <strong>Mac</strong> <strong>OS</strong> X.4 Choose Finder > Secure Empty Trash to delete the file.5 Restart the system.44 Chapter 3 Protecting System Hardware
From the Command Line:# Removing BlueTooth Hardware# -----------------------------# Remove Bluetooth kernel extensions.srm -rf /System/Library/Extensions/IOBluetoothFamily.kextsrm -rf /System/Library/Extensions/IOBluetoothHIDDriver.kext# Remove Extensions cache files.touch /System/Library/ExtensionsPreventing Unauthorized RecordingYou computer might be in an environment where recording devices such as cameras ormicrophones are not permitted. You can protect your organization’s privacy bydisabling these devices. This task requires you to have administrator privileges.Note: Some organizations insert a dummy plug into the audio input and output portsto ensure that audio hardware is disabled.Removing Audio Recording Support S<strong>of</strong>twareUse the following instructions to remove support for the microphone.You can also have an Apple Authorized Technician remove the built-in microphonehardware from your Apple computer.Important: Repeat these instructions every time a system update is installed.To remove kernel extensions for audio hardware:1 Open the /System/Library/Extensions folder.2 To remove support for audio components such as the microphone, drag the followingfiles to the Trash:AppleOnboardAudio.kextAppleUSBAudio.kextAudioDeviceTreeUpdater.kextIOAudioFamily.kextVirtualAudioDriver.kext3 Open Terminal and enter the following command:$ sudo touch /System/Library/ExtensionsThe touch command changes the modified date <strong>of</strong> the /System/Library/Extensionsfolder. When the folder has a new modified date, the Extension cache files(located in /System/Library/) are deleted and rebuilt by <strong>Mac</strong> <strong>OS</strong> X.4 Choose Finder > Secure Empty Trash to delete the file.Chapter 3 Protecting System Hardware 45
5 Restart the system.From the Command Line:# Securing Audio Recording Hardware# -----------------------------# Remove Audio Recording kernel extensions.srm -rf /System/Library/Extensions/AppleOnboardAudio.kextsrm -rf /System/Library/Extensions/AppleUSBAudio.kextsrm -rf /System/Library/Extensions/AppleDeviceTreeUpdater.kextsrm -rf /System/Library/Extensions/IOAudioFamily.kextsrm -rf /System/Library/Extensions/VirtualAudioDriver.kext# Remove Extensions cache files.touch /System/Library/ExtensionsRemoving Video Recording Support S<strong>of</strong>twareUse the following instructions to remove support for an external or built-in iSightcamera.You can also have an Apple Authorized Technician remove the built-in video camerahardware from your Apple computer.Important: Repeat these instructions every time a system update is installed.To remove kernel extensions for video hardware:1 Open the /System/Library/Extensions folder.2 To remove support for the external iSight camera, drag the following file to the Trash:Apple_iSight.kext3 To remove support for the built-in iSight camera, control click the IOUSBFamily.kext andselect Show Package Contents.4 Open the /Contents/PlugIns/ folder.5 Drag the following file to the Trash:AppleUSBVideoSupport.kext6 Open Terminal and enter the following command:$ sudo touch /System/Library/ExtensionsThe touch command changes the modified date <strong>of</strong> the /System/Library/Extensionsfolder. When the folder has a new modified date, the Extension cache files(located in /System/Library/) are deleted and rebuilt by <strong>Mac</strong> <strong>OS</strong> X.7 Choose Finder > Secure Empty Trash to delete the file.8 Restart the system.46 Chapter 3 Protecting System Hardware
From the Command Line:# Securing Video Recording Hardware# -----------------------------# Remove Video Recording kernel extensions.# Remove external iSight camera.srm -rf /System/Library/Extensions/Apple_iSight.kext# Remove internal iSight camera.srm -rf /System/Library/Extensions/IOUSBFamily.kext/Contents/PlugIns/\AppleUSBVideoSupport.kext# Remove Extensions cache files.touch /System/Library/ExtensionsPreventing Data Port AccessComputer data ports can be easily compromised if your machine is left alone for a longperiod <strong>of</strong> time or is stolen. To prevent your machine from being compromised, keep itin a locked environment or hidden when you are not using it.You can protect your system by preventing an unauthorized user from using your dataports. This prevents users from booting to a different volume using a USB Flash drive,USB, or FireWire external hard drive. This task requires you to have administratorprivileges.Also by setting a firmware password using the Firmware Password Utility, you canprevent a physical Direct Memory Access (DMA) attack over Firewire. When thefirmware password is set, any external device is denied direct access to computermemory content. For more information about the Firmware Password Utility, see “Usingthe Firmware Password Utility” on page 52.Removing USB Support S<strong>of</strong>twareUse the following instructions to remove USB mass storage device input/outputsupport such as USB Flash drives and external USB hard drives.The removal <strong>of</strong> this kernel extension only affects USB mass storage devices. It does notaffect other USB devices such as a USB printer, mouse, or keyboard. This task requiresyou to have administrator privileges.Important: Repeat these instructions every time a system update is installed.To remove kernel extensions for specific hardware:1 Open the /System/Library/Extensions folder.2 To remove support for USB mass storage devices, drag the following file to the Trash:IOUSBMassStorageClass.kextChapter 3 Protecting System Hardware 47
3 Open Terminal and enter the following command:$ sudo touch /System/Library/ExtensionsThe touch command changes the modified date <strong>of</strong> the /System/Library/Extensionsfolder. When the folder has a new modified date, the Extension cache files(located in /System/Library/) are deleted and rebuilt by <strong>Mac</strong> <strong>OS</strong> X.4 Choose Finder > Secure Empty Trash to delete the file.5 Restart the system.From the Command Line:# Securing USB Hardware# -----------------------------# Remove USB kernel extensions.srm -rf /System/Library/Extensions/IOUSBMassStorageClass.kext# Remove Extensions cache files.touch /System/Library/ExtensionsRemoving FireWire Support S<strong>of</strong>twareUse the following instructions to remove Firewire input/output support such asexternal Firewire hard disks. This task requires you to have administrator privileges.Important: Repeat these instructions every time a system update is installed.To remove kernel extensions for specific hardware:1 Open the /System/Library/Extensions folder.2 To remove support for FireWire mass storage devices, drag the following file to theTrash:IOFireWireSerialBusProtocolTransport.kext3 Open Terminal and enter the following command:$ sudo touch /System/Library/ExtensionsThe touch command changes the modified date <strong>of</strong> the /System/Library/Extensionsfolder. When the folder has a new modified date, the Extension cache files(located in /System/Library/) are deleted and rebuilt by <strong>Mac</strong> <strong>OS</strong> X.4 Choose Finder > Secure Empty Trash to delete the file.5 Restart the system.48 Chapter 3 Protecting System Hardware
From the Command Line:# Securing FireWire Hardware# -----------------------------# Remove FireWire kernel extensions.srm -rf /System/Library/Extensions/\IOFireWireSerialBusProtocolTransport.kext# Remove Extensions cache files.touch /System/Library/ExtensionsSystem Hardware ModificationsRemoving kernel extensions does not permanently disable components; however,administrative access is needed to restore and reload them.Although disabling hardware in this manner is not as secure as physically disablinghardware, it is more secure than disabling hardware through System Preferences. Thismethod <strong>of</strong> disabling hardware components might not be sufficient to meet anorganization’s security policy. Consult operational policy to determine if this method isadequate.Authorized AppleCare Certified TechniciansIf your environment does not permit the use <strong>of</strong> the following hardware components,you must physically disable them: Airport Bluetooth Microphone CameraOnly an Apple Certified technician should physically disable these components, whichis not practical in some circumstances.A limited number <strong>of</strong> Apple Certified technicians can remove preapproved components.An Apple Certified technician can remove the component without voiding thewarranty on your computer.After an Apple Certified technician removes the component the technician logs aspecial note with Apple Care, indicating that the computer has had a componentproperly removed. Most components removed by Apple technicians can be reinstalled,if needed.To locate a Certified Apple technician go to:www.apple.com/buy.Also, see your local Apple representative for more information.Chapter 3 Protecting System Hardware 49
Note: If you are in a government organization and need a letter <strong>of</strong> volatility for Appleproducts, send your request to AppleFederal@apple.com.50 Chapter 3 Protecting System Hardware
4 SecuringGlobal System Settings4Use this chapter to learn how to secure global systemsettings, secure firmware and <strong>Mac</strong> <strong>OS</strong> X startup, and to useaccess warnings.After installing and setting up <strong>Mac</strong> <strong>OS</strong> X, make sure you protect your hardware andsecure global system settings.Securing System StartupWhen a computer starts up, it first starts Open Firmware or Extensible FirmwareInterface (EFI). EFI is similar to Open Firmware, but it runs on Intel-based <strong>Mac</strong>intoshcomputers. Open Firmware and EFI determine which partition or disk to load <strong>Mac</strong> <strong>OS</strong> Xfrom. They also determine whether the user can enter single-user mode.Single-user mode logs in the user as root. This is dangerous because root user access isthe most powerful level <strong>of</strong> access, and actions performed as root are anonymous.If you create an Open Firmware or EFI password, you disable single-user mode. Thepassword also stops users from loading unapproved partitions or disks and fromenabling target disk mode at startup.After creating an Open Firmware or EFI password, you must enter this password whenyou start the computer from an alternate disk (for situations such as hard disk failure orfile system repair).To secure startup, perform one <strong>of</strong> the following tasks: Use the Firmware Password Utility to set the Open Firmware password. Set the Open Firmware password within Open Firmware. Verify and set the security mode from the command line.WARNING: Open Firmware settings are critical. Take great care when modifying thesesettings and when creating a secure Open Firmware password.51
An Open Firmware password provides some protection, but it can be reset if a user hasphysical access to the machine and changes the physical memory configuration <strong>of</strong> themachine.Open Firmware password protection can be bypassed if the user changes the physicalmemory configuration <strong>of</strong> the machine and then resets the PRAM three times (byholding down Command, Option, P, and R keys during system startup).You can require a password to start single-user mode, which further secures yourcomputer.For more information about Open Firmware password protection, see:Â AppleCare Knowledge Base article #106482,“Setting up Open Firmware Passwordprotection in <strong>Mac</strong> <strong>OS</strong> X 10.1 or later” (www.apple.com/support/)Â AppleCare Knowledge Base article #107666,“Open Firmware: Password NotRecognized when it Contains the Letter ‘U’” (www.apple.com/support/)PowerPC-Based SystemsPowerPC-based computers use Open Firmware to control hardware. This is similar tothe BI<strong>OS</strong> on an x86 PC. Open Firmware is the hardware base layer for <strong>Mac</strong> <strong>OS</strong> X and is apossible point <strong>of</strong> intrusion. By protecting it from unauthorized access, you can preventattackers from gaining access to your computer.Using the Firmware Password UtilityThe <strong>Mac</strong> <strong>OS</strong> X installation disc includes the Firmware Password Utility, which you canuse to enable an Open Firmware or EFI password.To use the Firmware Password Utility:1 Log in with an administrator account and open the Firmware Password Utility (locatedon the <strong>Mac</strong> <strong>OS</strong> X installation disc in /Applications/Utilities/).2 Click Change.3 Select “Require password to change Open Firmware settings.”To disable the Open Firmware or EFI password, deselect “Require password to changeOpen Firmware settings.” You won’t need to enter a password and verify it. Disablingthe Open Firmware password is only recommended for installing <strong>Mac</strong> <strong>OS</strong> X.4 In the Password and Verify fields, enter a new Open Firmware or EFI password, and clickOK.This password can be up to eight characters.Do not use the capital letter “U” in an Open Firmware password. If you do, yourpassword will not be recognized during the startup process.5 Close the Firmware Password Utility.52 Chapter 4 Securing Global System Settings
You can test your settings by attempting to start up in single-user mode. Restart thecomputer while holding down the Command and S keys. If the login window loads,changes made by the Firmware Password Utility were completed successfully.Configuring Open Firmware SettingsYou can securely configure Open Firmware settings in Open Firmware.Note: If you are using an Intel-based <strong>Mac</strong>intosh computer, you cannot use thefollowing method to change the Open Firmware password. Use the Firmware PasswordUtility instead.WARNING: Modifying critical system files can cause unexpected issues. Your modifiedfiles can also be overwritten during s<strong>of</strong>tware updates. Make these modifications on atest computer first, and thoroughly test your changes every time you change yoursystem configuration.To configure Open Firmware settings in Open Firmware:1 Restart the computer while holding down the Command, Option, O, and F keys.This loads Open Firmware.2 At the following prompt, change the password:> password3 Enter a new password and verify it when prompted.This password can be up to eight characters.Do not use the capital letter “U” in an Open Firmware password.4 Enable command mode:> setenv security-mode commandIn command mode the computer starts up from the partition selected in the StartupDisk pane <strong>of</strong> System Preferences.You can also enable full mode. Full mode is more restrictive than command mode.After enabling full mode, Open Firmware commands require you to enter your OpenFirmware password. This includes the boot command, so <strong>Mac</strong> <strong>OS</strong> X will not start upunless you enter boot and authenticate with the Open Firmware password.To enable full mode, enter:> setenv security-mode full5 Restart the computer and enable Open Firmware settings with the followingcommand:> reset-allThe login window should appear after restarting.Chapter 4 Securing Global System Settings 53
To test your settings, attempt to start up in single-user mode. Restart the computerwhile holding down the Command and S keys. If the login window appears, your OpenFirmware settings are set correctly.Using Command-Line Tools for Secure StartupYou can also configure Open Firmware or EFI from the command line by using thenvram tool. However, only the security-mode environment variable can be securely set.You can set the security mode to one <strong>of</strong> the following values: None: This is the default value <strong>of</strong> security-mode and provides no security to yourcomputer’s Open Firmware. Command: This value requires a password if changes are made to Open Firmware ora user attempts to start up from an alternate volume or device. Full: This value requires a password to start up or restart your computer. It alsorequires a password to make changes to Open Firmware.For example, to set the security-mode to full you would use the following command:$ sudo nvram setsecurity-mode=FullDo not set the security-password variable with nvram because the password is visiblewhen viewing the environment variable list. The nvram tool requires systemadministrator or root access to set environment variables.To securely set the password for EFI, use the Firmware Password Utility.From the Command Line:# Securing Global System Settings# -------------------------------------------------------------------------# Configuring Open Firmware Settings# ----------------------------------# Secure startup by setting security-mode. Replace $mode-value with# “command” or “full”.nvram security-mode=”$mode-value”# Verify security-mode setting.nvram -pIntel-Based SystemsIntel-based computers use EFI to control low-level hardware. EFI is similar to BI<strong>OS</strong> on anx86 PC and is the hardware base layer for <strong>Mac</strong> <strong>OS</strong> X computers with Intel-basedprocessors. By protecting it from unauthorized access you can prevent attackers fromgaining access to your computer.54 Chapter 4 Securing Global System Settings
Intel-based and PowerPC-based computers can use the Firmware Password Utility topassword protect the hardware layer. For information on using the Firmware PasswordUtility, see “Using the Firmware Password Utility” on page 52.Configuring Access WarningsYou can use a login window or Terminal access warning to provide notice <strong>of</strong> acomputer’s ownership, to warn against unauthorized access, or to remind authorizedusers <strong>of</strong> their consent to monitoring.Enabling Access Warnings for the Login WindowBefore enabling an access warning, review your organization’s policy for what to use asan access warning.When a user tries to access the computer’s login window (locally or through AppleRemote Desktop), the user sees the access warning you create, such as the following:To create a login window access warning:1 Open Terminal and verify that your logged-in account can use sudo to perform adefaults write.2 Change your login window access warning:$ sudo defaults write /Library/Preferences/com.apple.loginwindowLoginwindowText “Warning Text”Replace Warning Text with your access warning text.3 Log out to test your changes.Your access warning text appears below the <strong>Mac</strong> <strong>OS</strong> X subtitle.Chapter 4 Securing Global System Settings 55
From the Command Line:# Enabling Access Warning for the Login Window# ----------------------------------# Create a login window access warning.defaults write /Library/Preferences/com.apple.loginwindow LoginwindowText“Warning Text”# You can also used the BannerSample project to create an access warning.Understanding the AuthPlugin ArchitectureAuthPlugins are used to control access to a service or application. PreinstalledAuthPlugins for <strong>Mac</strong> <strong>OS</strong> X are located in the /System/Library/CoreServices/SecurtiyAgentPlugins/ folder. These plug-ins (along with their associated rules andauthorization rights for users) are defined in the /etc/authorization database, and arequeried by the <strong>Security</strong> Server.For more information about /etc/authorization, see “Managing Authorization ThroughRights” on page 191.The following graphic shows the workflow <strong>of</strong> the <strong>Security</strong> Server.Applications<strong>Security</strong>AgentAuthorization1 5 Credentail4 3BiometricJuan ChavezRequestauthorizationfor right<strong>Security</strong>Server2Request userinteractionif necessaryPassword :PasswordSmart CardRights Database/etc/authorization56 Chapter 4 Securing Global System Settings
When an application requests authorization rights from the security server the securityserver interrogates the rights database (/etc/authorization) to determine themechanisms to be used for authentication. If necessary, the security server requestsuser interaction through the security agent. The security agent then prompts the userto authenticate through the use <strong>of</strong> a password, biometric, or Smart Card device. Thenthe security agent sends the authentication information back to the security server,which passes it back to the application.Understanding the BannerSample ProjectIf your computer has developer tools installed, the sample code for the banner sampleproject is located in /Developer/examples/security/bannersample. You can modify andcustomize this sample banner code for your organization. After you compile the codeyou can place it in the /Library/<strong>Security</strong>/<strong>Security</strong>AgentPlugins/ folder. Then modify thekey system.login.console in the /etc/authorization file using Terminal.For more information about the banner sample, see the bannersample README file.To modify the /etc/authorization file:1 Open Terminal.2 Enter the following command:$ sudo vi /etc/authorization3 Locate the system.login.console key.4 Add bannersample:test above builtin:smartcardsiffer,privileged,as shown in bold below:system.login.consoleclassevaluate-mechanismscommentLogin mechanism based rule. Not for general use, yet.mechanismsbannersample:testbuiltin:smartcard-sniffer,privilegedEnabling Access Warnings for the Command LineBefore enabling an access warning, review your organization’s policy for what to use asan access warning.Chapter 4 Securing Global System Settings 57
When a user opens Terminal locally or connects to the computer remotely, the usersees the access warning you create. The following task must be performed by anadministrator user. You can use any text editor.To create a command-line access warning:1 Open Terminal.2 Enter the following command to create the /etc/motd file:$ sudo touch /etc/motd3 Enter the following command to edit the /etc/motd file:$ sudo pico /etc/motd4 Enter in your access warning message.5 Save changes and exit the text editor.6 Open a new Terminal window to test changes.Your access warning text appears above the prompt in the new Terminal window.58 Chapter 4 Securing Global System Settings
5 SecuringAccounts5Use this chapter to learn how to secure accounts by assigninguser account types, configuring directory access, using strongauthentication procedures, and by safely storing credentials.Securing user accounts requires determining how accounts are used and setting thelevel <strong>of</strong> access for users.When you define a user’s account you specify the information to prove the user’sidentity, such as user name, authentication method (password, digital token, smartcard, or biometric reader), and user identification number (user ID). Other informationin a user’s account is needed by various services—to determine what the user isauthorized to do and to personalize the user’s environment.Types <strong>of</strong> User AccountsWhen you log in to <strong>Mac</strong> <strong>OS</strong> X, you use a nonadministrator or administrator account.The main difference is that <strong>Mac</strong> <strong>OS</strong> X provides safety mechanisms to preventnonadministrator users from editing key preferences, or from performing actionscritical to computer security. Administrator users are not as limited as nonadministratorusers.You can further define nonadministrator and administrator accounts by specifyingadditional user privileges or restrictions.The following table shows the access provided to user accounts.User AccountGuest nonadministratorStandard nonadministratorManaged nonadministratorAdministratorSystem administrator (root)User AccessRestricted user access (disabled by default)Nonprivileged user accessRestricted user accessFull computer configuration administrationUnrestricted access to the computer59
Unless administrator access is required, always log in as a nonadministrator user. Logout <strong>of</strong> the administrator account when you are not using the computer as anadministrator.If you are logged in as an administrator, you are granted privileges and abilities thatyou might not need. For example, you can modify system preferences without beingrequired to authenticate. This authentication bypasses a security safeguard thatprevents malicious or accidental modification <strong>of</strong> system preferences.Guidelines for Creating AccountsWhen you create user accounts, follow these guidelines: Never create accounts that are shared by several users. Each user should have his orher own standard or managed account.Individual accounts are necessary to maintain accountability. System logs can trackactivities for each user account, but if several users share the same account it isdifficult to track which user performed an activity. Similarly, if several administratorsshare a single administrator account, it becomes harder to track which administratorperformed an action.If someone compromises a shared account, it is less likely to be noticed. Users mightmistake malicious actions performed by an intruder for legitimate actions by a usersharing the account. Each user needing administrator access should have an administrator account inaddition to a standard or managed account.Administrator users should only use their administrator accounts for administratorpurposes. By requiring an administrator to have a personal account for typical useand an administrator account for administrator purposes, you reduce the risk <strong>of</strong> anadministrator performing actions like accidentally reconfiguring secure systempreferences.Defining User IDsA user ID is a number that uniquely identifies a user. <strong>Mac</strong> <strong>OS</strong> X computers use the userID to track a user’s folder and file ownership. When a user creates a folder or file, theuser ID is stored as the creator ID. A user with that user ID has read and writepermissions to the folder or file by default.The user ID is a unique string <strong>of</strong> digits between 500 and 2,147,483,648. New userscreated using the Accounts pane <strong>of</strong> System Preferences are assigned user IDs startingat 501.60 Chapter 5 Securing Accounts
It is risky to assign the same user ID to different users, because two users with the sameuser ID have identical directory and P<strong>OS</strong>IX file permissions. However, each user has aunique GUID that is generated when the user account is created. Your GUID isassociated with ACL permissions that are set on files or folders. By setting ACLpermissions you can prevent users with identical user IDs from accessing files andfolders.The user ID 0 is reserved for the root user. User IDs below 100 are reserved for systemuse; user accounts with these user IDs should not be deleted and should not bemodified except to change the password <strong>of</strong> the root user.If you don’t want the user name to appear in the login window <strong>of</strong> a computer, assign auser ID <strong>of</strong> less than 500 and enter the following command in a Terminal window:sudo defaults write /Library/Preferences/com.apple.loginwindow Hide500Users-bool YESIn general, after a user ID is assigned and the user starts creating files and folders, youshouldn’t change the user ID.One possible scenario in which you might need to change a user ID is when mergingusers from different servers onto a new server or cluster <strong>of</strong> servers. The same user IDmight have been associated with a different user on the previous server.Securing the Guest AccountThe guest account is used to give a user temporary access to your computer. The guestaccount is disabled by default because it does not require a password to log in on thecomputer. If this account is enabled and is not securely configured, malicious users cangain access to your computer without the use <strong>of</strong> a password.If you enable the guest account, enable parental controls to limit what the user can doand disable guest account access to shared files and folders by deselecting the “Allowguest to connect to shared folders” checkbox. If you permit the guest account to accessshared folders, an attacker can easily attempt to access shared folders without apassword.When you finish with this account, disable it by deselecting the “Allow guests to loginto this computer.” This prevents the guest user account from logging into thecomputer.For more information about parental controls, see “Controlling Local Accounts withParental Controls” on page 62.Chapter 5 Securing Accounts 61
Securing Nonadministrator AccountsThere are two types <strong>of</strong> nonadministrator user accounts: Standard user accounts, which don’t have administrator privileges and don’t haveparental controls limiting their actions. Managed user accounts, which don’t have administrator privileges, but have activeparental controls. Parental controls help deter unsophisticated users from performingmalicious activities. They can also help prevent users from misusing their computer.Note: If your computer is connected to a network, a managed user can also be a userwhose preferences and account information are managed through the network.When creating nonadministrator accounts, restrict the accounts so they can only usewhat is required. For example, if you plan to store data on your local computer, disablethe ability to burn DVDs.Controlling Local Accounts with Parental ControlsYou can set limits for users by using Parental Control preferences. For example, youmight not want to prevent users from being able to install or uninstall s<strong>of</strong>tware, or youmight want to restrict access to specific administrator tools or utilities. The preferencescan be set according to your environment.The following screen shows Parental Controls that you can set to restrict accounts.62 Chapter 5 Securing Accounts
To securely configure an account with parental controls:1 Open System Preferences, then click Accounts.2 If the lock icon is locked, click the lock icon and enter an administrator name andpassword.3 Select the user account you want to manage with parental controls and select theEnable Parental Controls checkbox.4 Click Open Parental Controls.5 Click System.You can enable Simple Finder, which restricts an account to using applications listed onthe Dock. With Simple Finder enabled, users can’t create or delete files. Simple Finderalso prevents users from changing their passwords.Enabling Simple Finder is not recommended, unless your computer is used in a kiosklikeenvironment.In the System pane you can specify the applications the user has access to by selectingthe “Only allow selected applications” checkbox. Then you can select or deselectapplications in the applications list.When you install third-party applications, you can add them to this list. Disable thirdpartyapplications unless the user needs to use such an application and can do so in asecure manner. Third-party applications might give a standard user some administratorabilities, which can be a security issue.You can also prevent the user from administering printers, changing his or herpassword, burning CDs and DVDs, and modifying the Dock by deselecting associatedcheckboxes.6 Click Content.In the Content pane you can restrict the websites that users can view by selecting “Tryto limit access to adult websites automatically” and you can customize the list <strong>of</strong> adultsites by clicking customize and adding the URL <strong>of</strong> sites to the “Always allow these sites”list or the “Never allow these sites” list.You can also select Allow access to only these websites, which prevents a user fromaccessing any site not in the list. The list can be expanded by clicking the Add (+)button below the list <strong>of</strong> sites.7 Click Mail & iChat.In the Mail & iChat pane you can limit Mail and iChat to specific mail and iChataddresses in the “Only allow emailing and instant messaging with” list. To add users tothe list, click the Add (+) button below the list.Chapter 5 Securing Accounts 63
You can also require that mail addressed to a recipient not listed must have permissionto be sent by selecting the “Send permission request to” checkbox and entering anadministrator’s mail address. When a user attempts to send mail, the mail is sent to theadministrator’s mail address for permission to be sent.8 Click Time Limits.In the Time Limits pane you can restrict the number <strong>of</strong> hours the computer is usedduring Monday through Friday or weekends by selecting the “Limit computer use to”checkbox and setting the number <strong>of</strong> hours.You can also set the times the computer can be accessed by selecting “weekdaySunday through Thursday” or “weekends Friday and Saturday,” and setting a timerange.9 Click Logs.In the Logs pane you can view a user’s activity on the web or a specific application,from the current day to an entire year. If you see an activity you want to prevent a userfrom using, select the activity and then click Restrict.Securing External AccountsAn external account is a mobile account that has its local home folder stored on avolume in an external drive. When an external account logs in, <strong>Mac</strong> <strong>OS</strong> X only showsthe external account that the user logged in with. The external user account cannotview other accounts on the computer.External accounts require <strong>Mac</strong> <strong>OS</strong> X v10.5 or later and an external or ejectable volumethat is formatted as <strong>Mac</strong> <strong>OS</strong> X Extended format (HFS Plus). If you use an externalaccount use FileVault to protect the content <strong>of</strong> your home folder in case your externalvolume is stolen or lost.For information about external accounts, see User Management.Protecting Data on External VolumesWhen selecting an external volume to use for your external account, the volume mustbe able to process an external authentication, such as requiring a PIN or smart cardbefore the volume is mounted or viewable. Using FileVault for your external account,adds a layer <strong>of</strong> security to the contents <strong>of</strong> your home folder.Securing Directory-Based AccountsDirectory-based account is an account is located on a directory server. A directoryserver contains user account records and important data for authenticating users. Ifyour computer is connected to a directory server, you can add directory users to yourcomputer and grant them access. You can restrict a directory user account by usingParental Controls.Access to directory servers is usually tightly restricted to protect the data on them.64 Chapter 5 Securing Accounts
Securing Administrator AccountsEach administrator should have two accounts: a standard account for daily use and anadministrator account for administrator access. To secure administrator accounts,restrict the distribution <strong>of</strong> administrator accounts and limit the use <strong>of</strong> such accounts.A user account with administrator privileges can perform standard user andadministrator tasks such as: Creating user accounts Adding users to the Admin group Changing the FileVault master password Enabling or disabling sharing Enabling, disabling, or changing firewall settings Changing other protected areas in System Preferences Installing system s<strong>of</strong>twareThe following screen shows an account enabled to be an administrator account.Securing the System Administrator AccountThe most powerful user account in <strong>Mac</strong> <strong>OS</strong> X is the system administrator or rootaccount. By default, the root account on <strong>Mac</strong> <strong>OS</strong> X is disabled and it is recommendedyou do not enable it. The root account is primarily used for performing UNIXcommands. Generally, actions that involve critical system files require you to performthose actions as root.Chapter 5 Securing Accounts 65
If you are logged in as a <strong>Mac</strong> <strong>OS</strong> X administrator, you perform commands as root or byusing the sudo command. <strong>Mac</strong> <strong>OS</strong> X logs actions performed using the sudo command.This helps you track misuse <strong>of</strong> the sudo command on a computer.You can use the su command to log in to the command line as another user.By entering su root, you can log in as the root user (if the root account is enabled).You can use sudo to perform commands that require root privileges.You should restrict access to the root account.If multiple users can log in as root, you cannot track which user performed root actions.Do not allow direct root login because the logs cannot identify which administratorlogged in. Instead, log in using accounts with administrator privileges, and then use thesudo command to perform actions as root.For instructions about how to restrict root user access in Directory Utility, open<strong>Mac</strong> Help and search for “Directory Utility.”You can also disable the root account by using an administrative account and thedsenableroot command. For example, the following command disables the rootaccount.$ dsenableroot -dBy default, sudo is enabled for administrator users. From the command line, you candisable root login or restrict the use <strong>of</strong> sudo. Limit the administrators allowed to usesudo to those who require the ability to run commands as root.The computer uses a file named /etc/sudoers to determine which users can use sudo.You can modify root user access by changing the /etc/sudoers file to restrict sudoaccess to specific accounts, and allow those accounts to perform specifically allowedcommands. This gives you control over what users can do as root.To restrict sudo usage, change the /etc/sudoers file:1 As the root user, use the following command to edit the /etc/sudoers file, which allowsfor safe editing <strong>of</strong> the file.$ sudo visudo2 When prompted, enter the administrator password.There is a timeout value associated with sudo. This value indicates the number <strong>of</strong>minutes until sudo prompts for a password again. The default value is 5, which meansthat after issuing the sudo command and entering the correct password, additionalsudo commands can be entered for 5 minutes without reentering the password.This value is set in the /etc/sudoers file. For more information, see the sudo and sudoersman pages.66 Chapter 5 Securing Accounts
3 In the Defaults specification section <strong>of</strong> the file, add the following line to limit the use <strong>of</strong>the sudo command to a single command per authentication:Defaults timestamp_timeout=04 Restrict which administrators can run sudo by removing the line that begins with%admin, and add the following entry for each user, substituting the user’s short namefor the word user:user ALL=(ALL) ALLDoing this means that when an administrator is added to the computer, theadministrator must be added to the /etc/sudoers file as described, if the administratorneeds to use sudo.5 Save and quit visudo.For more information, enter man vi or man visudo in a Terminal window. For informationabout how to modify the /etc/sudoers file, see the sudoers man page.Understanding Directory DomainsUser accounts are stored in a directory domain. Your preferences and accountattributes are set according to the information stored in the directory domain.Local accounts are hosted in a local directory domain. When you log in to a localaccount, you authenticate with that local directory domain. Users with local accountstypically have local home folders. When a user saves files in a local home folder, thefiles are stored locally. To save a file over the network, the user must connect to thenetwork and upload the file.Network-based accounts are hosted in a network-based directory domain, such as aLightweight Directory Access Protocol (LDAP) or Network <strong>Information</strong> Service (NIS)directory. When you log in to a network-based account, you authenticate with thenetwork-based directory domain. Users with network accounts typically have networkhome folders. When they save files in their network home folders, the files are storedon the server.Mobile accounts cache authentication information and managed preferences. A user’sauthentication information is maintained on the directory server but is cached on thelocal computer. With cached authentication information, a user can log in using thesame user name and password (or a digital token, smart card, or biometric reader),even if the user is not connected to the network.Chapter 5 Securing Accounts 67
Users with mobile accounts have local and network home folders which combine t<strong>of</strong>orm portable home directories. When users save files, the files are stored in a localhome folder. The portable home directory is a synchronized subset <strong>of</strong> a user’s local andnetwork home folders. For information about protecting your home folder, seeChapter 7, “Securing Data and Using Encryption,” on page 123.Understanding Network Services, Authentication, and ContactsYou can use Directory Utility to configure your computer to use a network-baseddirectory domain. Disable directory search services that are not used by deselectingthem in the Services pane <strong>of</strong> Directory Utility (shown here).You can enable or disable each kind <strong>of</strong> directory service protocol in Directory Utility.<strong>Mac</strong> <strong>OS</strong> X doesn’t access disabled directory services, except for the local directorydomain, which is always accessed.In addition to enabling and disabling services, you can use Directory Utility to choosethe directory domains you want to authenticate with. Directory Utility defines theauthentication search policy that <strong>Mac</strong> <strong>OS</strong> X uses to locate and retrieve userauthentication information and other administrative data from directory domains.The login window Finder and other parts <strong>of</strong> <strong>Mac</strong> <strong>OS</strong> X use this authenticationinformation and administrative data. File service, Mail service, and other servicesprovided by <strong>Mac</strong> <strong>OS</strong> X Server also use this information.Directory Utility also defines the contacts search policy that <strong>Mac</strong> <strong>OS</strong> X uses to locateand retrieve name, address, and other contact information from directory domains.Address Book can use this contact information, and other applications can beprogrammed to use it as well.68 Chapter 5 Securing Accounts
The authentication and contacts search policy consists <strong>of</strong> a list <strong>of</strong> directory domains(also known as directory nodes). The order <strong>of</strong> directory domains in the list defines thesearch policy.Starting at the top <strong>of</strong> the list, <strong>Mac</strong> <strong>OS</strong> X searches each listed directory domain in turnuntil it finds the information it needs or reaches the end <strong>of</strong> the list without finding theinformation.For more information about using Directory Utility, see Open Directory Administration.Configuring LDAPv3 Access<strong>Mac</strong> <strong>OS</strong> X v10.5 primarily uses Open Directory as its network-based directory domain.Open Directory uses LDAPv3 as its connection protocol. LDAPv3 includes severalsecurity features that you should enable if your server supports them. Enabling everyLDAPv3 security feature maximizes LDAPv3 security.To make sure your settings match your network’s required settings, contact yournetwork administrator.When configuring LDAPv3, do not add DHCP-supplied LDAP servers to automaticsearch policies if you cannot secure the network the computer is running on. If you do,someone can create a rogue DHCP server and a rogue LDAP directory and then controlyour computer as the root user.For information about changing the security policy for an LDAP connection or forinformation about protecting computers from malicious DHCP servers, see OpenDirectory Administration.Configuring Active Directory Access<strong>Mac</strong> <strong>OS</strong> X v10.5 supports mutual authentication with Active Directory servers. Kerberosis a ticket-based system that enables mutual authentication. The server must identifyitself by providing a ticket to your computer. This prevents your computer fromconnecting to rogue servers.<strong>Mac</strong> <strong>OS</strong> X v10.5 also supports digital signing and encrypted packet security settingsused by Active Directory. These setting are enabled by default.Mutual authentication occurs when you bind to Active Directory servers.If you’re connecting to an Active Directory server with Highly Secure (HISEC) templatesenabled, you can use third-party tools to further secure your Active Directoryconnection.When you configure Active Directory access, the settings you choose are generallydictated by the Active Directory server’s settings. To make sure your settings matchyour network’s required settings, contact your network administrator.Chapter 5 Securing Accounts 69
The “Allow administration by” setting can cause security issues because any member <strong>of</strong>the group specified will have administrator privileges on your computer. Additionally,you should only connect to trusted networks.For more information about using Directory Utility to connect to Active Directoryservers, see Open Directory Administration.Using Strong AuthenticationAuthentication is the process <strong>of</strong> verifying the identity <strong>of</strong> a user. <strong>Mac</strong> <strong>OS</strong> X supports localand network-based authentication to ensure that only users with valid authenticationcredentials can access the computer’s data, applications, and network services.You can require passwords to log in, to wake the computer from sleep or from a screensaver, to install applications, or to change system settings. <strong>Mac</strong> <strong>OS</strong> X also supportsauthentication methods such as smart cards, digital tokens, and biometric readers.Strong authentication is created by using combinations <strong>of</strong> the following authenticationdimensions: What the user knows, such as a password or PIN number What the user has, such as one-time-password (OTP) token or smart card What the user is, such as a fingerprint, retina scan, or DNA sampleUsing a combination <strong>of</strong> these dimensions makes authentication more reliable and useridentification more certain.Using Passwords<strong>Mac</strong> <strong>OS</strong> X includes Password Assistant, an application that analyzes the complexity <strong>of</strong> apassword or generates a complex password for you. You can specify the length andtype <strong>of</strong> password you’d like to generate.You can choose from the following types <strong>of</strong> passwords: Manual: You enter a password and then Password Assistant gives you the qualitylevel <strong>of</strong> your password. If the quality level is low, Password Assistant gives tips forincreasing the quality level. Memorable: According to your password length requirements, Password Assistantgenerates a list <strong>of</strong> memorable passwords in the Suggestion menu. Letters & Numbers: According to your password length requirements, PasswordAssistant generates a list <strong>of</strong> passwords with a combination <strong>of</strong> letters and numbers. Numbers Only: According to your password length requirements, PasswordAssistant generates a list <strong>of</strong> passwords containing only numbers. Random: According to your password length requirements, Password Assistantgenerates a list <strong>of</strong> passwords containing random characters.70 Chapter 5 Securing Accounts
 FIPS-181 compliant: According to your password length requirements, PasswordAssistant generates a password that is FIPS-181 compliant (which includes mixedupper and lowercase, punctuation, and numbers).For example, you can create a randomly generated password or a FIPS-181 compliantpassword that is 12 characters long.The following screen shows Password Assistant.You can open Password Assistant from some applications. For example, when youcreate an account or change passwords in Accounts preferences, you can use PasswordAssistant to help you create a secure password.Using KerberosKerberos is an authentication protocol used for systemwide single sign-on, allowingusers to authenticate to multiple services without reentering passwords or sendingthem over the network. Every system generates its own principals, allowing it to <strong>of</strong>fersecure services that are fully compatible with other Kerberos-based implementations.Note: <strong>Mac</strong> <strong>OS</strong> X v10.5 support Kerberos v5 but does not support Kerberos v4.Chapter 5 Securing Accounts 71
<strong>Mac</strong> <strong>OS</strong> X v10.5 uses Kerberos to make it easier to share services with other computers.A key distribution center (KDC) server is not required to use Kerberos authenticationbetween two <strong>Mac</strong> <strong>OS</strong> X v10.5 computers.When you connect to a computer that supports Kerberos, you are granted a ticket thatpermits you to continue to use services on that computer, without reauthentication,until your ticket expires.For example, consider two <strong>Mac</strong> <strong>OS</strong> X 10.5 computers named "<strong>Mac</strong>01" and "<strong>Mac</strong>02."<strong>Mac</strong>02 has screen sharing and file sharing turned on. If <strong>Mac</strong>01 connects to a sharedfolder on <strong>Mac</strong>02, <strong>Mac</strong>01 can subsequently connect to screen sharing on <strong>Mac</strong>02 withoutneeding to supply login credentials again.This Kerberos exchange is only attempted if you connect using Bonjour, if you navigateto the computer in Finder, or if you use the Go menu in Finder to connect to a serverusing the local hostname <strong>of</strong> the computer name (for example, computer_name.local).Kerberos is also used to secure the Back to My <strong>Mac</strong> (BTMM) service. For moreinformation about using Kerberos with BTMM, see “Securing BTMM Access” onpage 171.Normally, after your computer gains a Kerberos ticket in this manner, keep the Kerberosticket until it expires. However, if you want to manually remove your Kerberos ticket,you can do so using the Kerberos utility in <strong>Mac</strong> <strong>OS</strong> X.To manually remove a Kerberos ticket:1 Open Keychain Access (in /Applications/Utilities).2 From the Keychain Access menu, choose Kerberos Ticket Viewer.3 In the Kerberos application’s Ticket Cache window, find the key that looks like this:"yourusername@LKDC:SHA1..."It is followed by a long string <strong>of</strong> alphanumeric characters.4 Click "Destroy" to delete that key.You can also use the kinit, kdestroy, and kpasswd commands to manage Kerberostickets. For more information, see kinit, kdestroy, and kpasswd man pages.Using Smart CardsA smart card is a plastic card (similar in size to a credit card) or USB dongle thathas memory and a microprocessor embedded in it. The smart card can store andprocess information such as passwords, certificates, and keys.The microprocessor inside the smart card can do authentication evaluation <strong>of</strong>flinebefore releasing information.72 Chapter 5 Securing Accounts
Before the smart card processes information, you must authenticate with the smartcard by a PIN or biometric measurement (such as a fingerprint), which provides anadditional layer <strong>of</strong> security.Smart card support is integrated into <strong>Mac</strong> <strong>OS</strong> X v10.5 and can be configured to workwith the following services: Cryptographic login (local or network based accounts) Unlock <strong>of</strong> FileVault enabled accounts Unlock keychains Signed and encrypted email (S/MIME) Securing web access (HTTPS) VPN (L2TP, PPTP, SSL) 802.1X Screen saver unlock System administration Keychain AccessFor more information, see the Smart Card Setup Guide at www.apple.com/server/macosx/resources/.Using TokensUse a digital token to identify a user for commerce, communication, or access control.This token can be generated by s<strong>of</strong>tware or hardware.Some common tokens are the RSA SecurID and the CRYPTOCard KT-1 devices. Thesehardware devices generate tokens to identify the user. The generated tokens arespecific to that user, so two users with different RSA SecurIDs or different CRYPTOCardKT-1s have different tokens.You can use tokens for two-factor authentication. Two-factor refers to authenticatingthrough something you have (a one-time-password token) and something you know (afixed password). The use <strong>of</strong> tokens increases the strength <strong>of</strong> the authentication. Tokensare frequently used for VPN authentication.Using Biometrics<strong>Mac</strong> <strong>OS</strong> X supports biometrics authentication technologies such as thumbprint readers.Password-protected websites and applications can be accessed without requiring theuser to remember a long list <strong>of</strong> passwords.Some biometric devices allow you to authenticate by placing your finger on a pad.Unlike a password, your fingerprint can never be forgotten or stolen. Fingerprintidentification provides personal authentication and network access.Chapter 5 Securing Accounts 73
The use <strong>of</strong> biometrics adds an additional factor to authentication by using somethingthat is a part <strong>of</strong> you (your fingerprint).Setting Global Password PoliciesTo configure a password policy that can apply globally or to individual users, use thepwpolicy command-line tool.Global password policies are not implemented in <strong>Mac</strong> <strong>OS</strong> X; instead, password policiesare set for each user account.You can set specific rules governing the size and complexity <strong>of</strong> acceptable passwords.For example, you can specify requirements for the following: Minimum and maximum character length Alphabetic and numeric character inclusion Maximum number <strong>of</strong> failed logins before account lockoutTo require that an authenticator’s password be a minimum <strong>of</strong> 12 characters and haveno more than 3 failed login attempts, enter the following in a Terminal window:$ pwpolicy -n /Local/Default -setglobalpolicy "minChars=12maxFailedLoginAttempts=3”For advanced password policies, use Password Server in <strong>Mac</strong> <strong>OS</strong> X Server. You can use itto set global password policies that specify requirements for the following: Password expiration duration Special character inclusion Mixed-case character inclusion Password reuse limitsYou can use pwpolicy to set a password policy that meets your organization’s passwordstandards. For more information about how to use pwpolicy, enter man pwpolicy in aTerminal window.Storing Credentials<strong>Mac</strong> <strong>OS</strong> X includes Keychain Access, an application that manages collections <strong>of</strong>passwords and certificates in a single credential store called a keychain. Each keychaincan hold a collection <strong>of</strong> credentials and protect them with a single password.Keychains store encrypted passwords, certificates, and other private values (calledsecure notes). These values are accessible only by unlocking the keychain using thekeychain password and only by applications that are approved and added to the accesscontrol application list.74 Chapter 5 Securing Accounts
You can create multiple keychains, each <strong>of</strong> which appears in a keychain list in KeychainAccess. Each keychain can store multiple values. Each value is called a key item. You cancreate a key item in any user-created keychain.When an application must store an item in a keychain, it stores it in the keychaindesignated as your default. The default is named “login,” but you can change that toany user-created keychain. The default keychain name is displayed in bold.Each item in a keychain has an Access Control List (ACL) that can be populated withapplications that have authority to use that keychain item. A further restriction can beadded that forces an application with access to confirm the keychain password.The main issue with remembering passwords is that you’re likely to make all passwordsidentical or keep a written list <strong>of</strong> passwords. By using keychains, you can greatly reducethe number <strong>of</strong> passwords you need to remember. Because you no longer need toremember passwords for multiple accounts, the passwords you choose can be verycomplex and can even be randomly generated.Keychains provide additional protection for passwords, passphrases, certificates, andother credentials stored on the computer. In some cases, such as using a certificate tosign a mail message, the certificate must be stored in a keychain.If a credential must be stored on the computer, store and manage it using KeychainAccess. Check your organization’s policy on keychain use.Due to the sensitive nature <strong>of</strong> keychain information, keychains use cryptography toencrypt and decrypt secrets, and they safely store secrets and related data in files.<strong>Mac</strong> <strong>OS</strong> X Keychain services enable you to create keychains and provide secure storage<strong>of</strong> keychain items. After a keychain is created, you can add, delete, and edit keychainitems, such as passwords, keys, certificates, and notes. A user can unlock a keychainwith a single password and applications can then use that keychain to store andretrieve data, such as passwords.Using the Default User KeychainWhen a user’s account is created, a default keychain named “login” is created for thatuser. The password for the login keychain is initially set to the user’s login passwordand is unlocked when the user logs in. It remains unlocked unless the user locks it, oruntil the user logs out.You should change the settings for the login keychain so the user must unlock it whenhe or she logs in, or after waking the computer from sleep.To secure the login keychain:1 Open Keychain Access.2 If you do not see a list <strong>of</strong> keychains, click Show Keychains.Chapter 5 Securing Accounts 75
3 Select the login keychain.4 Choose Edit > Change Password for Keychain “login.”5 Enter the current password, and create and verify a password for the login keychain.After you create a login keychain password that is different from the normal loginpassword, your keychain is not unlocked at login.To help you create a more secure password, use Password Assistant. For information,see “Using Passwords” on page 70.6 Choose Edit > Change Settings for Keychain “login.”7 Select “Lock when sleeping.”8 Deselect “Synchronize this keychain using .<strong>Mac</strong>.”9 Secure each login keychain item.For information, see “Securing Keychains and Their Items” on page 77.Creating Additional KeychainsWhen a user account is created it contains only the initial default keychain named“login.” A user can create additional keychains, each <strong>of</strong> which can have differentsettings and purposes.For example, a user might want to group credentials for mail accounts into onekeychain. Because mail programs query the server frequently to check for mail, it is notpractical for the user to reauthenticate when such a check is performed.The user could create a keychain and configure its settings, so that he or she is requiredto enter the keychain password at login and whenever the computer is awakened fromsleep.He or she could then move all items containing credentials for mail applications intothat keychain and set each item so that only the mail application associated with thatcredential can automatically access it. This forces other applications to authenticate toaccess that credential.Configuring a keychain’s settings for use by mail applications might be unacceptablefor other applications. If a user has an infrequently used web-based account, it is moreappropriate to store keychain settings in a keychain configured to requirereauthentication for every access by any application.You can also create multiple keychains to accommodate varying degrees <strong>of</strong> sensitivity.By separating keychains based on sensitivity, you prevent the exposure <strong>of</strong> sensitivecredentials to less sensitive applications with credentials on the same keychain.To create a keychain and customize its authentication settings:1 In Keychain Access, choose File > New Keychain.76 Chapter 5 Securing Accounts
2 Enter a name, select a location for the keychain, and click Create.3 Enter a password, verify it, and click OK.4 If you do not see a list <strong>of</strong> keychains, click Show Keychains.5 Select the new keychain.6 Choose Edit > Change Settings for keychain “keychain_name,” and authenticate, ifrequested.7 Change the “Lock after # minutes <strong>of</strong> inactivity” setting based on the access frequency<strong>of</strong> the security credentials included in the keychain.If the security credentials are accessed frequently, do not select “Lock after # minutes <strong>of</strong>inactivity.”If the security credentials are accessed frequently, select “Lock after # minutes <strong>of</strong>inactivity” and select a value, such as 15. If you use a password-protected screensaver,consider setting this value to the idle time required for your screensaver to start.If the security credentials are accessed infrequently, select “Lock after # minutes <strong>of</strong>inactivity” and specify a value, such as 1.8 Select “Lock when sleeping.”9 Drag the security credentials from other keychains to the new keychain andauthenticate, if requested.You should have keychains that only contain related certificates. For example, youcould have a mail keychain that only contains mail items.10 If you are asked to confirm access to the keychain, enter the keychain password andclick Allow Once.After confirming access, Keychain Access moves the security credential to the newkeychain.11 Secure each item in the security credentials for your keychain.You can also use the security and systemkeychain commands to create and manageyour keychains. For more information, see the security and systemkeychain manpages. For information, see “Securing Keychains and Their Items” on page 77.Securing Keychains and Their ItemsKeychains can store multiple encrypted items. You can configure items so only specificapplications have access. (However, you cannot set Access Control for certificates.)To secure a keychain item:1 In Keychain Access, select a keychain and then select an item.2 Click the <strong>Information</strong> (i) button.3 Click Access Control and then authenticate if requested.Chapter 5 Securing Accounts 77
4 Select “Confirm before allowing access.”After you enable this option, <strong>Mac</strong> <strong>OS</strong> X prompts you before giving a security credentialto an application.If you selected “Allow all applications to access this item” you allow any application toaccess the security credential when the keychain is unlocked. When accessing thesecurity credential, there is no user prompt, so enabling this is a security risk.5 Select “Ask for Keychain password.”After enabling this, you must provide the keychain password before applications canaccess security credentials.Enabling this is important for critical items, such as your personal identity (your publickey certificates and the corresponding private key), which are needed when signing ordecrypting information. These items can also be placed in their own keychains.6 Remove nontrusted applications listed in “Always allow access by these applications” byselecting each application and clicking the Remove (–) button.Applications listed here require the user to enter the keychain password to accesssecurity credentials.Using Smart Cards as Keychains<strong>Mac</strong> <strong>OS</strong> X v10.5 integrates support for hardware-based smart cards as dynamickeychains where any application using keychains can access that smart card.Smart cards are dynamic keychains and are added to the top <strong>of</strong> the Keychain Accesslist. They are the first searched in the list. They can be treated as other keychains on theuser’s computer, with the limitation <strong>of</strong> adding other secure objects.You cannot store passwords or other types <strong>of</strong> information on your smart card. A smartcard can be thought <strong>of</strong> as a portable protected keychain.When you attach a supported smart card to your computer, it appears in KeychainAccess. If multiple smart cards are attached to your computer, they will appear at thetop <strong>of</strong> the keychain list alphabetically as separate keychains.You can manually unlock and change the PIN using Keychain Access. When changingthe PIN on your smart card it is the same as changing the password on a regularkeychain.In Keychain Access, select your smart card and unlock it by double-clicking it. If it is notunlocked, you are prompted to enter the password for the smart card, which is thesame as the PIN. Enter the PIN and Keychain Access will bring up the PIN-protecteddata on that smart card.For more information, see the Smart Card Setup Guide at www.apple.com/server/macosx/resources/.78 Chapter 5 Securing Accounts
Using Portable and Network-Based KeychainsIf you’re using a portable computer, consider storing your keychains on a portabledrive, such as a USB flash memory drive. You can remove the portable drive from theportable computer and store it separately when the keychains are not in use.Anyone attempting to access data on the portable computer needs the portablecomputer, portable drive, and password for the keychain stored on the portable drive.This provides an extra layer <strong>of</strong> protection if the laptop is stolen or misplaced.To use a portable drive to store keychains, move your keychain files to the portabledrive and configure Keychain Access to use the keychains on the portable drive.The default location for your keychain is ~/Library/Keychains/. However, you can storekeychains in other locations.You can further protect portable keychains by storing them on biometric USB flashmemory drives, or by storing portable drive contents in an encrypted file.For information, see “Encrypting Portable Files” on page 134.Check with your organization to see if they allow portable drives to store keychains.To set up a keychain for use from a portable drive:1 Open Keychain Access.2 If you do not see a list <strong>of</strong> keychains, click Show Keychains.3 Choose Edit > Keychain List.4 Note the location <strong>of</strong> the keychain you want to set up.The default location is ~/Library/Keychains/.5 Click Cancel.6 Select the keychain you want set up.7 Choose File > Delete Keychain “keychain_name.”8 Click Delete References.9 Copy the keychain files from the previously noted location to the portable drive.10 Move the keychain to the Trash and use Secure Empty Trash to securely erase thekeychain file stored on the computer.For information, see “Using Secure Empty Trash” on page 139.11 Open Finder and double-click the keychain file on your portable drive to add it to yourkeychain search list.Chapter 5 Securing Accounts 79
80 Chapter 5 Securing Accounts
6 SecuringSystem Preferences6Use this chapter to set <strong>Mac</strong> <strong>OS</strong> X system preferences toenhance system security and further protect against attacks.System Preferences has many configurable preferences that you can use to enhancesystem security.System Preferences Overview<strong>Mac</strong> <strong>OS</strong> X includes system preferences that you can customize to improve security.When modifying settings for one account, make sure your settings are mirrored on allother accounts, unless there is an explicit need for different settings.You can view system preferences by choosing Apple > System Preferences. In theSystem Preferences window, click a preference to view it.The following is the System Preferences screen:81
Some critical preferences require that you authenticate before you modify theirsettings. To authenticate, you click the lock (see the images below) and enter anadministrator’s name and password (or use a digital token, smart card, or biometricreader).If you log in as a user with administrator privileges, these preferences are unlockedunless you select “Require password to unlock each System Preferences pane” in<strong>Security</strong> preferences. For more information, see “Securing <strong>Security</strong> Preferences” onpage 107.If you log in as a standard user these preferences remain locked. After unlockingpreferences, you can lock them again by clicking the lock.Preferences that require authentication include the following: Accounts Date & Time Energy Saver Network Parental Controls Print & Fax <strong>Security</strong> Sharing Startup Disk Time <strong>Mac</strong>hineThis chapter lists each set <strong>of</strong> preferences included with <strong>Mac</strong> <strong>OS</strong> X and describesmodifications recommended to improve security.82 Chapter 6 Securing System Preferences
Securing .<strong>Mac</strong> Preferences.<strong>Mac</strong> is a suite <strong>of</strong> Internet tools that help you synchronize data and other importantinformation when you’re away from the computer.Do not use .<strong>Mac</strong> if you must store critical data only on your local computer. You shouldonly transfer data over a secure network connection to a secure internal server.If you use .<strong>Mac</strong>, enable it only for user accounts that don’t have access to critical data.Don’t enable .<strong>Mac</strong> for administrator or root user accounts.Don’t enable options in the Sync pane <strong>of</strong> .<strong>Mac</strong> preferences (shown below).Chapter 6 Securing System Preferences 83
Don’t register computers for synchronization in the Advanced settings <strong>of</strong> the Sync pane(shown below).Don’t enable iDisk Syncing (shown below). If you must use a Public folder, enablepassword protection.To securely configure .<strong>Mac</strong> preferences:1 Open .<strong>Mac</strong> preferences.2 Deselect “Synchronize with .<strong>Mac</strong>.”84 Chapter 6 Securing System Preferences
3 Don’t register your computer for synchronization in the Advanced settings <strong>of</strong> the Syncpane.4 Don’t enable iDisk Syncing in the iDisk pane.From the Command Line:# -------------------------------------------------------------------# Securing System Preferences# -------------------------------------------------------------------# Securing .<strong>Mac</strong> Preferences# -------------------------# Disable Sync options.defaults -currentHost write com.apple.Dot<strong>Mac</strong>Sync ShouldSyncWithServer 1# Disable iDisk Syncing.defaults -currentHost write com.apple.idisk $USER_MirrorEnabled -bool noSecuring Accounts PreferencesUse Accounts preferences to change or reset account passwords (shown below), toenable Parental Controls, or to modify login options for each account.You should immediately change the password <strong>of</strong> the first account that was created onyour computer. If you are an administrator, you can change other user accountpasswords by selecting the account and clicking Change Password.Chapter 6 Securing System Preferences 85
Note: If you are an administrator, password policies are not enforced when you changeyour password or when you change an other user’s password. Therefore, when you arechanging passwords as an administrator, make sure you follow the password policythat you set. For more information about password policies, see “Setting GlobalPassword Policies” on page 74.The password change dialog (shown below) and the reset dialog provide access toPassword Assistant, an application that can analyze the strength <strong>of</strong> your password andassist you in creating a more secure password. For information, see “Using Passwords”on page 70.Consider the following login guidelines: Modify login options to provide as little information as possible to the user. Require that the user know which account they want to log in with and thepassword for that account. Don’t automatically log the user in. Require that the user enter a name and a password, and that the user authenticatewithout the use <strong>of</strong> a password hint. Don’t enable fast user switching—it is a security risk because it allows multiple usersto be simultaneously logged in to a computer.You should also modify login options to disable the Restart, Sleep, and Shut Downbuttons. By disabling these buttons, the user cannot restart the computer withoutpressing the power key or logging in.86 Chapter 6 Securing System Preferences
To securely configure Accounts preferences:1 Open Accounts preferences.2 Select an account and click the Password tab; then, change the password by clickingthe Change Password button.A menu appears asking you to input the old password, new password, verification <strong>of</strong>the new password, and a password hint.3 Do not enter a password hint, then click the Change Password button.4 Click Login Options.A screen similar to the following appears:5 Under “Display login window as,” select “Name and password” and deselect all otheroptions.Chapter 6 Securing System Preferences 87
From the Command Line:# Securing Accounts Preferences# -----------------------------# Change an account’s password.# Don’t use the following command on a computer that could possibly have# other users logged in simultaneously.sudo dscl . passwd /Users/$User_name $Oldpass $Newpass# Make sure there is no password hint set.defaults write /Library/Preferences/com.apple.loginwindow RetriesUntilHint-int 0# Set the login options to display name and password in the login window.defaults write /Library/Preferences/com.apple.loginwindow SHOWFULLNAME -bool yes# Disable Show the Restart, Sleep, and ShutDown Buttons.defaults write /Library/Preferences/com.apple.loginwindow PowerOffDisable -bool yes# Disable fast user switching.defaults write /Library/Preferences/.GlobalPreferencesMultipleSessionEnabled -bool N<strong>OS</strong>ecuring Appearance PreferencesOne method to secure appearance preferences is to change the number <strong>of</strong> recentitems displayed in the Apple menu to None.Recent items are applications, documents, and servers you’ve recently used. You accessrecent items by choosing Apple > Recent Items.If intruders gain access to your computer, they can use recent items to quickly viewyour most recently accessed files. Additionally, intruders can use recent items to accessauthentication mechanisms for servers if the corresponding keychains are unlocked.Removing recent items provides a minimal increase in security, but it can deterunsophisticated intruders.88 Chapter 6 Securing System Preferences
To securely configure Appearance preferences:1 Open Appearance preferences.A screen similar to the following appears:2 Set all “Number <strong>of</strong> Recent Items” preferences to None.From the Command Line:# Securing Appearance Preferences# -----------------------------# Disable display <strong>of</strong> recent applications.defaults write com.apple.recentitems Applications -dict MaxAmount 0Securing Bluetooth PreferencesBluetooth allows wireless devices, such as keyboards, mice, and mobile phones, tocommunicate with the computer. If the computer has Bluetooth capability, Bluetoothpreferences become available. If you don’t see Bluetooth preferences, you cannot useBluetooth.Note: Some high security areas do not allow radio frequency (RF) communication suchas Bluetooth. Consult your organizational requirements for possible furtherdisablement <strong>of</strong> the component.When you disable Bluetooth in System Preferences, you must disable Bluetooth forevery user account on the computer.Chapter 6 Securing System Preferences 89
This does not prevent users from reenabling Bluetooth. You can restrict a user account’sprivileges so the user cannot reenable Bluetooth, but to do this, you remove severalimportant user abilities, like the user’s ability to change his or her password. For moreinformation, see “Types <strong>of</strong> User Accounts” on page 59.To securely configure Bluetooth preferences:1 Open Bluetooth preferences.A screen similar to the following appears:2 Deselect “Bluetooth Power.”From the Command Line:# Securing Bluetooth Preferences# -----------------------------# Turn Bluetooth <strong>of</strong>f.defaults write /Library/Preferences/com.apple.Bluetooth \ControllerPowerState -int 0Securing CDs & DVDs PreferencesTo secure CDs and DVDs, do not allow the computer to perform automatic actionswhen the user inserts a disc.When you disable automatic actions in System Preferences, you must disable theseactions for every user account on the computer.90 Chapter 6 Securing System Preferences
This does not prevent users from reenabling automatic actions. To prevent the userfrom reenabling automatic actions, you must restrict the user’s account so the usercannot open System Preferences. For more information on restricting accounts, see“Securing Nonadministrator Accounts” on page 62.To securely configure CDs & DVDs preferences:1 Open CDs & DVDs preferences.A screen similar to the following appears:2 Disable automatic actions when inserting media by choosing Ignore for each pop-upmenu.From the Command Line:# Securing CDs & DVDs Preferences# -----------------------------# Disable blank CD automatic action.defaults write /Library/Preferences/com.apple.digihubcom.apple.digihub.blank.cd.appeared -dict action 1# Disable music CD automatic action.defaults write /Library/Preferences/com.apple.digihubcom.apple.digihub.cd.music.appeared -dict action 1# Disable picture CD automatic action.defaults write /Library/Preferences/com.apple.digihubcom.apple.digihub.cd.picture.appeared -dict action 1# Disable blank DVD automatic action.defaults write /Library/Preferences/com.apple.digihubcom.apple.digihub.blank.dvd.appeared -dict action 1# Disable video DVD automatic action.defaults write /Library/Preferences/com.apple.digihubcom.apple.digihub.dvd.video.appeared -dict action 1Securing Date & Time PreferencesCorrect date and time settings are required for authentication protocols, like Kerberos.Incorrect date and time settings can cause security issues.Chapter 6 Securing System Preferences 91
You can use Date & Time preferences (shown below) to set the date and time based ona Network Time Protocol (NTP) server.If you require automatic date and time, use a trusted, internal NTP server.To securely configure Date & Time preferences:1 Open Date & Time preferences.2 In the Date & Time pane, enter a secure and trusted NTP server in the “Set date & timeautomatically” field.3 Click the Time Zone button.A screen similar to the following appears:92 Chapter 6 Securing System Preferences
4 Choose a time zone.From the Command Line:# Securing Date & Time Preferences# -----------------------------# Set the NTP server.cat >> /etc/ntp.conf
You can configure Desktop & Screen Saver preferences to allow you to quickly enableor disable screen savers if you move your mouse cursor to a corner <strong>of</strong> the screen, asshown below. (You can also do this by configuring Exposé & Spaces preferences.)When you configure Desktop & Screen Saver preferences, you configure thepreferences for every user account on the computer.This doesn’t prevent users from reconfiguring their preferences. You can restrict a user’saccount privileges so the user cannot reconfigure preferences. Doing this removesseveral important user abilities, like the user’s ability to change his or her password. Formore information, see “Types <strong>of</strong> User Accounts” on page 59.To securely configure Desktop & Screen Saver preferences:1 Open Desktop & Screen Saver preferences.2 Click the Screen Saver pane.3 Set “Start screen saver” to a short inactivity time.4 Click Hot Corners.5 Set a corner to Start Screen Saver for quick enabling <strong>of</strong> the screen saver.Don’t set a screen corner to disable Screen Saver.94 Chapter 6 Securing System Preferences
From the Command Line:# Securing Desktop & Screen Saver Preferences# -----------------------------# Set idle time for screen saver. XX is the idle time in seconds.defaults -currentHost write com.apple.screensaver idleTime -int XX# Set host corner to activate screen saver.#wvous-bl-corner (bottom-left)#wvous-br-corner(bottom-right)#wvous-tl-corner (top-left)#wvous-tr-corner (top-right)defaults write /Library/Preferences/com.apple.dock.wvous-corner_code-corner-int 5# Set modifier key to 0 wvous-corner_code-modifierdefaults write /Library/Preferences/com.apple.dock.wvous-corner_codemodifier-int 0Securing Display PreferencesIf multiple displays are attached to your computer, enabling display mirroring mightexpose private data to others. Having this additional display provides extra opportunityfor others to see private data.Securing Dock PreferencesYou can configure the Dock to be hidden when not in use, which can prevent othersfrom seeing the applications you have on your computer.To securely configure Dock preferences:1 Open Dock preferences.The following screen appears:2 Select “Automatically hide and show the Dock.”Chapter 6 Securing System Preferences 95
From the Command Line:# Securing Dock Preferences# -----------------------------# Automatically hide and show Dock.defaults write /Library/Preferences/com.apple.dock autohide -bool YESSecuring Energy Saver PreferencesYou can use the Energy Saver Sleep pane (shown in the procedure below) to configurea period <strong>of</strong> inactivity before a computer, display, or hard disk enters sleep mode.If the computer receives directory services from a network that manages its clientcomputers and you computer is in sleep mode, it is unmanaged and cannot bedetected as being connected to the network. To allow management and networkvisibility, configure the display and the hard disk to sleep, but not the computer.You can require authentication by use <strong>of</strong> a password, digital token, smart card, orbiometric reader to reactivate the computer (see “Securing <strong>Security</strong> Preferences” onpage 107). This is similar to using a password-protected screen saver.You can also use the Options pane to make settings depending on your power supply(power adapter, UPS, or battery). Configure the computer so it only wakes when youphysically access the computer. Also, don’t set the computer to restart after a powerfailure.To securely configure Energy Saver preferences:1 Open Energy Saver preferences.A screen similar to the following appears:96 Chapter 6 Securing System Preferences
2 From the Sleep pane, set “Put the computer to sleep when it is inactive for” to Never.3 Select “Put the hard disk(s) to sleep when possible” and then click the “Options” pane.A screen similar to the following appears:4 Deselect “Wake for Ethernet network administrator access” and “Restart automaticallyafter a power failure.”From the Command Line:# Securing Energy Saver Preferences# -----------------------------# Disable computer sleep.pmset -a sleep 0# Enable hard disk sleep.pmset -a disksleep 1# Disable Wake for Ethernet network administrator access.pmset -a womp 0# Disable Restart automatically after power failure.pmset -a autorestart 0Chapter 6 Securing System Preferences 97
Securing Exposé & Spaces PreferencesYour computer should require authentication when waking from sleep or screen saver.You can configure Exposé & Spaces preferences (shown below) to allow you to quicklystart the screen saver if you move your mouse cursor to a corner <strong>of</strong> the screen. Don’tconfigure a corner to disable the screen saver.For information about requiring authentication for the screen saver, see “Securing<strong>Security</strong> Preferences” on page 107.Dashboard widgets included with <strong>Mac</strong> <strong>OS</strong> X can be trusted. However, be careful whenyou install third-party Dashboard widgets. You can install Dashboard widgets withoutauthenticating. To prevent Dashboard from running, set the keyboard and mouseshortcuts to “–.”When you configure Exposé & Spaces preferences, you must configure thesepreferences for every user account on the computer.This doesn’t prevent users from reconfiguring their preferences. You can restrict a useraccount’s privileges so the user cannot reconfigure preferences. To do this, you removeseveral important user abilities, like the user’s ability to change his or her password. Formore information, see “Types <strong>of</strong> User Accounts” on page 59.If your organization does not want to use Dashboard because <strong>of</strong> its potential securityrisk, you can disable it.98 Chapter 6 Securing System Preferences
From the Command Line:# Securing Exposé & Spaces Preferences# -----------------------------# Disable dashboard.defaults write com.apple.dashboard mcx-disabled -boolean YESSecuring International PreferencesNo security-related configuration is necessary. However, if your computer uses morethan one language, review the security risk <strong>of</strong> the language character set. Considerdeselecting unused packages during <strong>Mac</strong> <strong>OS</strong> X installation.Securing Keyboard & Mouse PreferencesIf Bluetooth is not required, turn it <strong>of</strong>f. If Bluetooth is necessary, disable allowingBluetooth devices to awake the computer.To securely configure Keyboard & Mouse preferences:1 Open Keyboard & Mouse preferences.2 Click Bluetooth.A screen similar to the following appears.3 Deselect “Allow Bluetooth devices to wake this computer.”Chapter 6 Securing System Preferences 99
From the Command Line:# Securing Keyboard & Mouse Preferences# -----------------------------# Disable Bluetooth Devices to wake computer.defaults write /Library/Preferences/com.apple.Bluetooth \BluetoothSystemWakeEnable -bool 0Securing Network PreferencesDisable unused hardware devices listed in Network preferences (shown below).Enabled, unused devices (such as AirPort and Bluetooth) are a security risk. Hardware islisted in Network preferences only if the hardware is installed in the computer.Some organizations use IPv6, a new version <strong>of</strong> the Internet protocol (IP). The primaryadvantage <strong>of</strong> IPv6 is that it increases the address size from 32 bits (the current IPv4standard) to 128 bits.An address size <strong>of</strong> 128 bits is large enough to support a huge number <strong>of</strong> addresses,even with the inefficiency <strong>of</strong> address assignment. This allows more addresses or nodesthan are otherwise available. IPv6 also provides more ways to set up the address andsimplifies autoconfiguration.By default IPv6 is configured automatically, and the default settings are sufficient formost computers that use IPv6. You can also configure IPv6 manually. If yourorganization’s network cannot use or does not require IPv6, turn it <strong>of</strong>f.100 Chapter 6 Securing System Preferences
To securely configure Network preferences:1 Open Network preferences.2 From the list <strong>of</strong> hardware devices, select the hardware device you use to connect toyour network (For example, Airport or Ethernet).If you frequently switch between the two, you can disable IPv6 for AirPort and Ethernetor any hardware device that you use to connect to your network.3 Click Advanced.A screen similar to the following appears:4 In the Configure IPv6 pop-up menu, choose Off.5 Click OK.From the Command Line:# Securing Network Preferences# -----------------------------# Disable IPv6.# The interface value can be AirPort, Bluetooth, Ethernet, or FireWire.networksetup -setv6<strong>of</strong>f $interfaceSecuring Parental Control PreferencesParental Controls enable you to customize access controls for each account. You mustset Parental Controls for each account. You cannot enable Parental Controls for theadministrator account logged in to the computer at that time.Chapter 6 Securing System Preferences 101
Use the following System pane options to limit access to applications and otherfunctions: Only allow selected applications. You can restrict the user’s access to specificapplications by deselecting the checkbox next to the application in the “Check theapplications to allow” list. Can administer printers. You can restrict the user’s ability to select alternative printersand to change printer settings. Can burn CDs and DVDs. You can limit the user’s ability to burn CDs and DVDs on thecomputer. Can change password. You can remove the user’s ability to change their accountpassword. Can modify the Dock. You can limit the user’s ability to add or remove applicationsfrom the Dock.In the Content pane, use the “Allow access to only these websites” option to restrictand define a list <strong>of</strong> approved websites that the user can visit.To secure Parental Controls preferences:1 Open Parental Controls preferences.A screen similar to the following appears:2 Select the account you want to activate parental controls for.102 Chapter 6 Securing System Preferences
If the account you want to manage is not listed, open Account preferences and clickthe lock to authenticate, if it is locked. From the accounts list, select the account youwant to manage. Then select the “Enable Parental Control” checkbox and click OpenParental Controls.3 In the System pane, enable “Only allow selected applications” to restrict applicationaccess to specific applications.4 From “Check the applications to allow” select the applications that the user can access.5 Disable the following other features that the user should not perform: Can administer printers Can burn CDs and DVDs Can change password Can modify the dock6 Select the Content pane.A screen similar to the following appears:7 In the Content pane, limit website access to specific sites by selecting “Allow access toonly these websites.”8 Select “Add bookmark” from the pop-up menu and enter the website name andaddress.Chapter 6 Securing System Preferences 103
Securing Print & Fax PreferencesThe Print & Fax preferences screen looks like this:Only use printers in a secure location. If you print confidential material in an insecurelocation, the material might be viewed by unauthorized users.Be careful when printing to a shared printer. Doing so allows other computers tocapture the print job directly. Another computer could be maliciously monitoring andcapturing confidential data being sent to the real printer. In addition, unauthorizedusers can add items to your print queue without authenticating.You can access your printer using the CUPS web interface (http://localhost:631). TheCUPS web interface by default cannot be accessed remotely. It can only be accessed bythe local host.You can create policies in CUPS that restrict users from such actions as canceling jobsor deleting printers using the CUPS web interface. For more information about creatingCUPS policies, see http://localhost:631/help/policies.html.To avoid an additional avenue <strong>of</strong> attack, don’t receive faxes on your computer.104 Chapter 6 Securing System Preferences
To securely configure Print & Fax preferences:1 Open Print & Fax preferences and select a fax from the equipment list.2 Click Receive Options.A screen similar to the following appears:3 Deselect “Receive faxes on this computer.”4 Click OK.5 Select a printer from the equipment list.A screen similar to the following appears:Chapter 6 Securing System Preferences 105
6 Deselect “Share this printer.”From the Command Line:# Securing Printer & Fax Preferences# -----------------------------# Disable the receiving <strong>of</strong> faxes.launchctl unload -w /System/Library/LaunchDaemons/com.apple.efax.plist# Disable printer sharing.cp /etc/cups/cupsd.conf $TEMP_FILEif /usr/bin/grep "Port 631" /etc/cups/cupsd.confthenusr/bin/sed "/^Port 631.*/s//Listen localhost:631/g" $TEMP_FILE> /etc/cups/cupsd.confelseecho "Printer Sharing not on"fiSecuring QuickTime PreferencesOnly download QuickTime movies from trusted, secure sources. By default, QuickTimestores downloaded movies in a cache. If someone gains access to your account theycan see your previously viewed movies, even if you did not save them as files.You can change QuickTime preferences to disable the storing <strong>of</strong> movies in a cache (in/Users/user name/Library/Caches/QuickTime/downloads/), as shown here.106 Chapter 6 Securing System Preferences
You can find and install third-party QuickTime s<strong>of</strong>tware using the Update pane. Installthird-party QuickTime s<strong>of</strong>tware only if your organization requires that s<strong>of</strong>tware.To securely configure QuickTime preferences:1 Open QuickTime preferences.2 In the Browser pane, deselect “Save movies in disk cache.”Securing <strong>Security</strong> PreferencesThe settings in <strong>Security</strong> preferences (shown here) cover a range <strong>of</strong> <strong>Mac</strong> <strong>OS</strong> X securityissues, including login options, FileVault, and firewall protection.The settings under “For all accounts on this computer” require you to unlock <strong>Security</strong>preferences. Disable automatic login, require a password to unlock <strong>Security</strong>preferences, disable automatic logout because <strong>of</strong> inactivity, use secure virtual memory,and disable remote control infrared receivers.Chapter 6 Securing System Preferences 107
General <strong>Security</strong>Consider the following general security guidelines: Wake computer: Require a password to wake this computer from sleep or screensaver. This helps prevent unauthorized access on unattended computers. Althoughthere is a lock button for <strong>Security</strong> preferences, users don’t need to be authorized asan administrator to make changes. Enable this password requirement for every useraccount on the computer. Automatic login: Disabling automatic login is necessary for any level <strong>of</strong> security. Ifyou enable automatic login, an intruder can log in without authenticating. Even ifyou automatically log in with a restricted user account, it is still easier to performmalicious actions on the computer. Password protect System Preferences: Some system preferences are unlockedwhen you log in with an administrator account. By requiring a password, digitaltoken, smart card, or biometric reader to unlock secure system preferences, yourequire extra authentication. This helps prevent accidental modification <strong>of</strong> systempreferences. Automatic logout: Although you might want to enable automatic logout based oninactivity, there are reasons why you should disable this feature. First, it can disruptyour workflow. Second, it can close applications or processes without your approval(but a password-protected screen saver will not close applications). Third, becauseautomatic logout can be interrupted, it provides a false sense <strong>of</strong> security.Applications can prevent successful automatic logout. For example, if you edit a filein a text editor, the editor might ask if you want to save the file before you log out. Virtual memory: Use secure virtual memory. Virtual memory decreases the need formore physical memory. A swap file stores inactive physical memory contents, freeingyour physical memory. By default the swap file is unencrypted. This file can containconfidential data, such as documents and passwords. By using secure virtual memoryyou secure the swap file at a cost <strong>of</strong> slower speed (because <strong>Mac</strong> <strong>OS</strong> X must encryptand decrypt the secure swap file). Infrared receiver: If you are not using a remote control, disable the infrared receiver.This prevents unauthorized users from controlling your computer through theinfrared receiver. If you use an Apple IR Remote Control, pair it to your computer byclicking Pair. When you pair it, no other IR remote can control your computer.108 Chapter 6 Securing System Preferences
FileVault <strong>Security</strong><strong>Mac</strong> <strong>OS</strong> X includes FileVault (see below), which encrypts information in your homefolder.FileVault uses the government-approved 128-bit (AES-128) encryption standard keys,and supports the Advanced Encryption Standard with 256-bit (AES-256) keys. For moreinformation about data encryption, see Chapter 7, “Securing Data and UsingEncryption.”For more information about FileVault, see “Encrypting Home Folders” on page 130.Chapter 6 Securing System Preferences 109
Firewall <strong>Security</strong>To enable a firewall that can block TCP and UDP ports for services, use the Firewallpane (shown here). This firewall is powerful and includes logging and stealth modefeatures.Allow only essential services. Advanced options include Enable Firewall Logging toprovide information about firewall activity and Enable Stealth Mode to prevent thecomputer from sending responses to uninvited traffic.To securely configure <strong>Security</strong> preferences:1 Open <strong>Security</strong> preferences.2 Select the following: “Require password to wake this computer from sleep or screen saver” “Disable automatic login” “Require password to unlock each System Preferences pane”3 Deselect “Log out after # minutes <strong>of</strong> inactivity.”4 Select the following: “Use secure virtual memory” “Disable remote control infrared receiver”5 In the FileVault pane, select “Turn on FileVault.”6 Authenticate with your account password.7 Select “Use secure erase” and click “Turn on FileVault.”8 In the Firewall pane, select one <strong>of</strong> the following: “Allow only essential services”110 Chapter 6 Securing System Preferences
 “Set access for specific services and applications”9 If needed, click “Advanced” and select “Enable Firewall Logging” or “Enable StealthMode.”10 Add specific services and applications to the list.11 Restart the computer.From the Command Line:# Securing <strong>Security</strong> Preferences# -----------------------------# Enable Require password to wake this computer from sleep or screen saver.defaults -currentHost write com.apple.screensaver askForPassword -int 1# Disable Automatic login.defaults write /Library/Preferences/.GlobalPreferencescom.apple.userspref.DisableAutoLogin -bool yes# Requiring password to unlock each System Preference pane.# Edit the /etc/authorization file using a text editor.# Find system.preferences.# Then find shared.# Then replace with .# Disable automatic login.defaults write /Library/Preferences/.GlobalPreferences \com.apple.autologout.AutoLogOutDelay -int 0# Enable secure virtual memory.defaults write /Library/Preferences/com.apple.virtualMemory \UseEncryptedSwap -bool yes# Disable IR remote control.defaults write /Library/Preferences/com.apple.driver.AppleIRController \DeviceEnabled -bool no# Enable FileVault.# To enable FileVault for new users, use this command./System/Library/CoreServices/ManagedClient.app/Contents/Resources/ \createmobileaccount# Enable Firewall.# where value is# 0 = <strong>of</strong>f# 1 = on for specific services# 2 = on for essential servicesdefaults write /Library/Preferences/com.apple.alf globalstate -int value# Enable Stealth mode.defaults write /Library/Preferences/com.apple.alf stealthenabled 1# Enable Firewall Logging.defaults write /Library/Preferences/com.apple.alf loggingenabled 1Chapter 6 Securing System Preferences 111
Securing Sharing PreferencesBy default, every service listed in Sharing preferences is disabled. Do not enable theseservices unless you use them. The following services are described in detail in “SecuringNetwork Sharing Services” on page 172.ServiceDVD or CD SharingScreen SharingFile SharingPrinter SharingWeb SharingRemote LoginRemote ManagementRemote Apple EventsXgrid SharingInternet SharingBluetooth SharingDescriptionAllows users <strong>of</strong> other computers to remotely use the DVD or CD drive onyour computer.Allows users <strong>of</strong> other computers to remotely view and control thecomputer.Gives users <strong>of</strong> other computers access to each user’s Public folder.Allows other computers to access a printer connected to this computer.Allows a network user to view websites located in /Sites. If you enablethis service, securely configure the Apache web server.Allows users to access the computer remotely by using SSH. If you requirethe ability to perform remote login, SSH is more secure than telnet, whichis disabled by default.Allows the computer to be accessed using Apple Remote Desktop.Allows the computer to receive Apple events from other computers.Allows computers on a network to work together in a grid to process ajob.Allows other users to connect with computers on your local network,through your internet connection.Allows other Bluetooth-enabled computers and devices to share fileswith your computer.112 Chapter 6 Securing System Preferences
You can change your computer’s name in Sharing preferences, shown here.By default your computer’s host name is typically firstname-lastname-computer, wherefirstname and lastname are the system administrator’s first name and last name,respectively, and computer is the type <strong>of</strong> computer or “Computer.”When users use Bonjour to discover available services, your computer appears ashostname.local. To increase privacy, change your computer’s host name so you are notidentified as the owner <strong>of</strong> your computer.For more information about these services and the firewall and sharing capabilities <strong>of</strong><strong>Mac</strong> <strong>OS</strong> X, see Chapter 12, “<strong>Information</strong> Assurance with Services.”To securely configure Sharing preferences:1 Open Sharing preferences.2 Change the default computer name to a name that does not identify you as the owner.From the Command Line:# Securing Sharing Preferences# -----------------------------# Change computer name where $host_name is the name <strong>of</strong> the computer.systemsetup -setcomputername $host_name# Change computer Bonjour host name.# The host name cannot contain spaces or other non-DNS characters.scutil --set LocalHostName $host_nameChapter 6 Securing System Preferences 113
Securing S<strong>of</strong>tware Update PreferencesYour S<strong>of</strong>tware Update preferences configuration depends on your organization’s policy.For example, if your computer is connected to a managed network, the managementsettings determine what s<strong>of</strong>tware update server to use.Instead <strong>of</strong> using S<strong>of</strong>tware Update (shown here), you can also update your computer byusing installer packages.You could install and verify updates on a test computer before installing them on youroperational computer. For more information about how to manually update yourcomputer, see “Updating Manually from Installer Packages” on page 36.After transferring installer packages to your computer, verify the authenticity <strong>of</strong> theinstaller packages. For more information, see “Repairing Disk Permissions” on page 37.When you install a s<strong>of</strong>tware update using S<strong>of</strong>tware Update or an installer package, youmust authenticate with an administrator’s name and password. This reduces the chance<strong>of</strong> accidental or malicious installation <strong>of</strong> s<strong>of</strong>tware updates.S<strong>of</strong>tware Update will not install a s<strong>of</strong>tware package that has not been digitally signedby Apple.114 Chapter 6 Securing System Preferences
To securely configure S<strong>of</strong>tware Updates preferences:1 Open S<strong>of</strong>tware Update preferences.2 Click the Scheduled Check pane.3 Deselect “Download important updates automatically” and “Check for updates.”From the Command Line:# Securing S<strong>of</strong>tware Updates Preferences# -----------------------------# Disable check for updates and Download important updates automatically.s<strong>of</strong>twareupdate --schedule <strong>of</strong>fSecuring Sound PreferencesMany Apple computers include an internal microphone, which can cause securityissues. You can use Sound preferences (shown below) to disable the internalmicrophone and the line-in port.To securely configure Sound preferences:1 Open Sound preferences.A screen similar to the following appears:2 Select Internal microphone (if present), and set “Input volume” to zero.3 Select Line-In (if present), and set “Input volume” to zero.This ensures that “Line-In” is the device selected rather than the internal microphonewhen Sound preferences is closed. This provides protection from inadvertent use <strong>of</strong> theinternal microphone.Chapter 6 Securing System Preferences 115
From the Command Line:# Securing Sound Preferences# -----------------------------# Disable internal microphone or line-in.# This command does not change the input volume for all input devices. It# only sets the default input device volume to zero.osascript -e “set volume input volume 0”Securing Speech Preferences<strong>Mac</strong> <strong>OS</strong> X includes speech recognition and text-to-speech features, which are disabledby default.Only enable these features if you work in a secure environment where no one can hearyou speak to the computer or hear the computer speak to you. Also make sure noaudio recording devices can record your communication with the computer.The following shows the Speech Recognition preferences pane:116 Chapter 6 Securing System Preferences
The following shows the Text to Speech pane:If you enable text-to-speech, use headphones to keep others from overhearing yourcomputer.To securely configure Speech preferences:1 Open Speech preferences.2 Click the Speech Recognition pane and set Speakable Items On or Off.Change the setting according to your environment.3 Click the Text to Speech pane and change the settings according to your environment.From the Command Line:# Securing Speech Preferences# -----------------------------# Disable Speech Recognition.defaults write "com.apple.speech.recognition.AppleSpeechRecognition.prefs"StartSpeakableItems -bool false# Disable Text to Speech settings.defaults write "com.apple.speech.synthesis.general.prefs"TalkingAlertsSpeakTextFlag -bool falsedefaults write "com.apple.speech.synthesis.general.prefs"SpokenNotificationAppActivationFlag -bool falsedefaults write "com.apple.speech.synthesis.general.prefs"SpokenUIUseSpeakingHotKeyFlag -bool falsedefaults delete "com.apple.speech.synthesis.general.prefs"TimeAnnouncementPrefsChapter 6 Securing System Preferences 117
Securing Spotlight PreferencesYou can use Spotlight to search your computer for files. Spotlight searches the name,the meta-information associated with each file, and the contents <strong>of</strong> each file.Spotlight nullifies the use <strong>of</strong> file placement as an additional layer <strong>of</strong> security. You muststill properly set access permissions on folders containing confidential files. For moreinformation about access permissions, see “Repairing Disk Permissions” on page 37.The following is Spotlight Preferences Search Results pane.118 Chapter 6 Securing System Preferences
By placing specific folders or disks in the Privacy pane (shown below), you can preventSpotlight from searching them.Disable the searching <strong>of</strong> folders that contain confidential information. Considerdisabling top-level folders. For example, if you store confidential documents insubfolders <strong>of</strong> ~/Documents/, instead <strong>of</strong> disabling each folder, disable ~/Documents/.By default, the entire system is available for searching using Spotlight.To securely configure Spotlight preferences:1 Open Spotlight preferences.2 In the Search Results pane, deselect categories you don’t want searchable by Spotlight.3 Click the Privacy pane.4 Click the Add button, or drag a folder or disk into the Privacy pane.Folders and disks in the Privacy pane are not searchable by Spotlight.From the Command Line:# Securing Spotlight Preferences# -----------------------------# Disable Spotlight for a volume and erase its current meta data, where# $volumename is the name <strong>of</strong> the volume.$ mdutil -E -i <strong>of</strong>f $volumenameChapter 6 Securing System Preferences 119
For more information, enter man mdutil in a Terminal window.Securing Startup Disk PreferencesYou can use Startup Disk preferences (shown below) to make your computer start upfrom a CD, a network volume, a different disk or disk partition, or another operatingsystem.Be careful when selecting a startup volume: Choosing a network install image reinstalls your operating system and might erasethe contents <strong>of</strong> your hard disk. If you choose a FireWire volume, your computer starts up from the FireWire diskplugged into the current FireWire port for that volume. If you connect a differentFireWire disk to that FireWire port, your computer starts from the first valid <strong>Mac</strong> <strong>OS</strong> Xvolume available to the computer (if you have not enabled the firmware password). When you enable a firmware password, the FireWire volume you select is the onlyvolume that can start the computer. The computer firmware locks the FireWireBridge Chip GUID as a startup volume instead <strong>of</strong> the hard disk’s GUID (as is done withinternal hard disks). If the disk inside the FireWire drive enclosure is replaced by anew disk, the computer can start from the new disk without using the firmwarepassword. To avoid this intrusion make sure your hardware is physically secured. Yourcomputer firmware can also have a list <strong>of</strong> FireWire volumes that are approved forsystem startup. For information about physically protecting your computer, see“Protecting Hardware” on page 41.In addition to choosing a new startup volume from Startup Disk preferences, you canrestart in Target Disk Mode. When your computer is in Target Disk Mode, anothercomputer can connect to your computer and access your computer’s hard disk. Theother computer has full access to all files on your computer. All file permissions for yourcomputer are disabled in Target Disk Mode.120 Chapter 6 Securing System Preferences
To enter Target Disk Mode, hold down the T key during startup. You can prevent thestartup shortcut for Target Disk Mode by enabling an Open Firmware or EFI password. Ifyou enable an Open Firmware or EFI password, you can still restart in Target Disk Modeusing Startup Disk preferences.For more information about enabling an Open Firmware or EFI password, see “Usingthe Firmware Password Utility” on page 52.To select a startup disk:1 Open Startup Disk preferences.2 Select a volume to use to start up your computer.3 Click the “Restart” button to restart from the selected volume.From the Command Line:# Securing Startup Disk Preferences# -----------------------------# Set startup disk.systemsetup -setstartupdisk $pathSecuring Time <strong>Mac</strong>hine PreferencesTime <strong>Mac</strong>hine (shown below) makes an up-to-date copy <strong>of</strong> everything on your <strong>Mac</strong>—digital photos, music, movies, downloaded TV shows, and documents—and lets youeasily go "back in time" to recover files. Time <strong>Mac</strong>hine is <strong>of</strong>f by default.<strong>Information</strong> stored on your backup disk is not encrypted and can be read by othercomputers that are connected to your backup disk. Keep your backup disk in aphysically secure location to prevent unauthorized access to your data.Chapter 6 Securing System Preferences 121
To secure Time <strong>Mac</strong>hine preferences:1 Open Time <strong>Mac</strong>hine preferences.2 Slide the switch to ON.A screen similar to the following appears:3 Select the disk where backups will be stored, and click Use for backup.From the Command Line:# Securing Time <strong>Mac</strong>hine Preferences# -----------------------------# Enable Time <strong>Mac</strong>hine.defaults write /Library/Preferences/com.apple.Time<strong>Mac</strong>hine AutoBackup 1Securing Universal Access PreferencesUniversal Access preferences are disabled by default. If you don’t use an assistive devicethere are no security-related issues. However, if you use an assistive device follow theseguidelines: To prevent possible security risks, see the device manual. Enabling VoiceOver configures the computer to read the contents under the cursorout loud, which might disclose confidential data. These devices allow access to the computer that could reveal information in acompromising manner.122 Chapter 6 Securing System Preferences
7 SecuringData and UsingEncryption7Use this chapter to learn how to set P<strong>OS</strong>IX, ACL, and globalfile permissions, to encrypt home folders and portable files,and to securely erase data.Your data is the most valuable part <strong>of</strong> your computer. By using encryption you canprotect data in case <strong>of</strong> an attack or theft <strong>of</strong> your mobile computer.By setting global permissions, encrypting home folders, and encrypting portable datayou can be sure your data is secure. In addition, by using the secure erase feature <strong>of</strong><strong>Mac</strong> <strong>OS</strong> X, deleted data is completely erased from the computer.Understanding PermissionsYou protect files and folders by setting permissions that restrict or allow users to accessthem. <strong>Mac</strong> <strong>OS</strong> X supports two methods <strong>of</strong> setting file and folder permissions: Portable Operating System Interface (P<strong>OS</strong>IX) permissions—standard for UNIXoperating systems. Access Control Lists (ACLs) permissions—used by <strong>Mac</strong> <strong>OS</strong> X, and compatible withMicros<strong>of</strong>t Windows Server 2003 and Micros<strong>of</strong>t Windows XP.ACL uses P<strong>OS</strong>IX when verifying file and folder permissions. The process ACL uses todetermine if an action is allowed or denied includes verification rules called accesscontrol entries (ACEs). If no ACEs apply, standard P<strong>OS</strong>IX permissions determine access.Note: In this guide, the term “privileges” refers to the combination <strong>of</strong> ownership andpermissions, while the term “permissions” refers only to the permission settings thateach user category can have (Read & Write, Read Only, Write Only, and None).123
Setting P<strong>OS</strong>IX Permissions<strong>Mac</strong> <strong>OS</strong> X bases file permissions on P<strong>OS</strong>IX standard permissions such as file ownershipand access. Each share point, file, and folder has read, write, and execute permissiondefined for three categories <strong>of</strong> users: owner, group, and everyone. You can assign fourtypes <strong>of</strong> standard P<strong>OS</strong>IX access permissions to a share point, folder, or file: Read &Write, Read Only, Write Only, and None.Viewing P<strong>OS</strong>IX PermissionsYou can assign standard P<strong>OS</strong>IX access permissions to these categories <strong>of</strong> users: Owner—A user who creates an item (file or folder) on the computer is its owner andhas Read & Write permissions for that folder. By default the owner <strong>of</strong> an item and theadministrator can change the item’s access privileges (allow a group or everyone touse the item). The administrator can also transfer ownership <strong>of</strong> the shared item toanother user. Group—You can put users who need the same access to files and folders into groupaccounts. Only one group can be assigned access permissions to a shared item. Formore information about creating groups, see the User Management guide. Everyone—This is any user who can log in to the file server (registered users andguests).Before setting or changing P<strong>OS</strong>IX permissions, view the current permission settings.To view folder or file permissions:1 Open Terminal.2 Run the ls command:$ ls -lOutput similar to the following appears:computer:~/Documents ajohnson$ ls -ltotal 500drwxr-xr-x 2 ajohnson ajohnson 68 Apr 28 2006 NewFolder-rw-r--r-- 1 ajohnson ajohnson 43008 Apr 14 2006 file.txtNote: The “~” refers to your home folder, which in this case is /Users/ajohnson.~/Documents/ is the current working folder.You can also use the Finder to view P<strong>OS</strong>IX permissions. In the Finder, Control-click a fileand choose Get Info. Open the Ownership & Permissions disclosure triangle to viewP<strong>OS</strong>IX permissions.124 Chapter 7 Securing Data and Using Encryption
Interpreting P<strong>OS</strong>IX PermissionsTo interpret P<strong>OS</strong>IX permissions, read the first 10 bits <strong>of</strong> the long format output listed fora file or folder.drwxr-xr-x 2 ajohnson ajohnson 68 Apr 28 2006 NewFolder-rw-r--r-- 1 ajohnson ajohnson 43008 Apr 14 2006 file.txtIn this example, NewFolder has the P<strong>OS</strong>IX permissions drwxr-xr-x and has an ownerand group <strong>of</strong> ajohnson. Permissions are as follows: The d <strong>of</strong> the P<strong>OS</strong>IX permissions signifies that newfolder is a folder. The first three letters after the d (rwx) signify that the owner has read, write, andexecute permissions for that folder. The next three characters, r-x, signify that the group has read and executepermissions. The last three characters, r-x, signify that all others have read and executepermissions.In this example, users who can access ajohnson’s ~/Documents/ folder can open theNewFolder folder but can’t modify or open the file.txt file. Read P<strong>OS</strong>IX permissions arepropagated through the folder hierarchy.Although NewFolder has drwxr-xr-x privileges, only ajohnson can access the folder.This is because ajohnson‘s ~/Documents/ folder has drwx------ P<strong>OS</strong>IX permissions.By default, most user folders have drwx------ P<strong>OS</strong>IX permissions. Only the~/Sites/ and ~/Public/ folders have drwxr-xr-x permissions. These permissions allowother people to view folder contents without authenticating. If you don’t want otherpeople to view the contents, change the permissions to drwx------ .In the ~/Public/ folder, the Drop Box folder has drwx-wx-wx P<strong>OS</strong>IX permissions. Thisallows other users to add files into ajohnson‘s drop box but they can’t view the files.You might see a t for others’ privileges on a folder used for collaboration. This t issometimes known as the sticky bit. Enabling the sticky bit on a folder prevents peoplefrom overwriting, renaming, or otherwise modifying other people’s files. This can becommon if several people are granted rwx access.The sticky bit can appear as t or T, depending on whether the execute bit is set forothers: If the execute bit appears as t, the sticky bit is set and has searchable and executablepermissions. If the execute bit appears as T, the sticky bit is set but does not have searchable orexecutable permissions.For more information, see the sticky man page.Chapter 7 Securing Data and Using Encryption 125
Modifying P<strong>OS</strong>IX PermissionsAfter your determine current P<strong>OS</strong>IX permission settings, you can modify them usingthe chmod command.To modify P<strong>OS</strong>IX permission:1 In Terminal, enter the following to add write permission for the group to file.txt:$ chmod g+w file.txt2 View the permissions using the ls command.$ ls -l3 Validate that the permissions are correct.computer:~/Documents ajohnson$ ls -ltotal 12346drwxr-xr-x 2 ajohnson ajohnson 68 Apr 28 2006 NewFolder-rw-rw-r-- 1 ajohnson ajohnson 43008 Apr 14 2006 file.txtFor more information, see the chmod man page.Setting File and Folder FlagsYou can also protect files and folders by using flags. These flags, or permissionextensions, override standard P<strong>OS</strong>IX permissions. They can only be set or unset by thefile’s owner or an administrator using sudo. Use flags to prevent the systemadministrator (root) from modifying or deleting files or folders.To enable and disable flags, use the chflags command.Viewing FlagsBefore setting or changing file or folder flags, view the current flag settings.To display flags set on a folder:$ ls -lo secret-rw-r--r-- 1 ajohnson ajohnson uchg 0 Mar 1 07:54 secretThis example displays the flag settings for a folder named secret.Modifying FlagsAfter your determine current file or folder flag settings, modify them using the chflagscommand.To lock or unlock a folder using flags:$ sudo chflags uchg secret126 Chapter 7 Securing Data and Using Encryption
In this example, the folder named secret is locked.To unlock the folder, change uchg to nouchg:$ sudo chflags nouchg secretWARNING: There is an schg option for the chflags command. It sets the systemimmutable flag. This setting can only be undone when the computer is in single-usermode. If this is done on a RAID, XSan, or other storage device that cannot bemounted in single user mode, the only way to undo the setting is to reformat theRAID or XSan device.For more information, see the chflags man page.Setting ACL PermissionsFor greater flexibility in configuring and managing file permissions, <strong>Mac</strong> <strong>OS</strong> Ximplements ACLs. An ACL is an ordered list <strong>of</strong> rules called ACEs that control filepermissions. Each ACE contains the following components: User—owner, group, and other Action—read, write, or execute Permission—allow or deny the actionThe rules specify the permissions to be granted or denied to a group or user andcontrols how the permissions are propagated through a folder hierarchy.ACLs in <strong>Mac</strong> <strong>OS</strong> X let you set file and folder access permissions for multiple users andgroups, in addition to standard P<strong>OS</strong>IX permissions. This makes it easy to set upcollaborative environments with smooth file sharing and uninterrupted workflowswithout compromising security.<strong>Mac</strong> <strong>OS</strong> X has implemented file system ACLs that are fully compatible with Micros<strong>of</strong>tWindows Server 2003, Windows Server 2008, Windows XP, and Windows Vista.To determine if an action is allowed or denied, ACEs are considered in order. The firstACE that applies to a user and action determines the permission and no further ACEsare evaluated. If no ACEs apply, standard P<strong>OS</strong>IX permissions determine access.Modifying ACL PermissionsYou can set ACL permission for files. The chmod command enables an administrator togrant read, write, and execute privileges to specific users regarding a single file.To set ACL permissions for a file:1 Allow specific users to access specific files.For example, to allow Anne Johnson permission to read the file secret.txt, enter thefollowing in Terminal:Chapter 7 Securing Data and Using Encryption 127
$ chmod +a “ajohnson allow read” secret.txt2 Allow specific groups <strong>of</strong> users to access specific files.For example, to allow the engineers group permission to delete the file secret.txt, enterthe following in Terminal:$ chmod +a “engineers allow delete” secret.txt3 Deny access privileges to specific files.For example, to prevent Tom Clark from modifying the file secret.txt, enter thefollowing in Terminal:$ chmod +a “tclark deny write” secret.txt4 View and validate the ACL modifications with the ls command:$ ls -le secret.txt-rw------- 1 ajohnson admin 43008 Apr 14 2006 secret.txt0: ajohnson allow read1: tclark deny write2: engineers allow deleteFor more information, enter man chmod in a Terminal window.Setting Global File PermissionsEvery file or folder has P<strong>OS</strong>IX permissions associated with it. When you create a file orfolder, the umask setting determines these P<strong>OS</strong>IX permissions.The umask value is subtracted from the maximum permissions value (777) todetermine the default permission value <strong>of</strong> a newly created file or folder. For example, aumask <strong>of</strong> 022 results in a default permission <strong>of</strong> 755.The default umask setting 022 (in octal) removes group and other write permissions.Group members and other users can read and run these files or folders. Changing theumask setting to 027 enables group members to read files and folders and preventsothers from accessing the files and folders. If you want to be the only user to accessyour files and folders, set the umask setting to 077.To change the globally defined umask setting, change the NSUmask setting.You must be logged in as a user who can use sudo to perform these operations andyou must use the decimal equivalent, not an octal number.128 Chapter 7 Securing Data and Using Encryption
Not all applications recognize the NSUmask setting so files and folders created by otherapplications might not have proper umask settings. The NSUmask setting also doesn’taffect some command-line tools.WARNING: Many installations depend on the default umask setting. There can beunintended and possibly severe consequences to changing it. Instead, use inheritedpermissions, which are applied by setting permissions on a folder. All files containedthat folder will inherit the permissions <strong>of</strong> that folder.To change the global umask file permission:1 Sign in as a user who can use sudo.2 Open Terminal.3 Change the NSUmask setting to be the decimal equivalent <strong>of</strong> the umask setting:$ sudo defaults write /Library/Preferences/.GlobalPreferences NSUmask 23Use the decimal equivalent, not a hexadecimal number.This example sets the global umask setting to 027, which has the decimal equivalent <strong>of</strong>23. Replace 23 with the decimal equivalent <strong>of</strong> your umask setting.Important: Make sure the path you enter is .GlobalPreferences—not.GlobalPreferences.plist, which might be accidentally added by Terminal’sautocompletion feature.4 Log out.Changes to umask settings take effect at the next login.Users can use the Finder’s Get Info window or the chmod command-line tool to changepermissions for files and folders.Securing User Home FoldersTo secure user home folders, change the permissions <strong>of</strong> each user’s home folder so thefolder is not world-readable or world-searchable.When FileVault is not enabled, the permissions on the home folder <strong>of</strong> a new useraccount allow other users to browse the folder’s contents. The ~/Public and ~/Public/Drop Box folders in each home folder require these permissions. However, users mightinadvertently save sensitive files to their home folder, instead <strong>of</strong> into the moreprotected~/Documents, ~/Library, or ~/Desktop folders.Although ~/Public and ~/Public/Drop Box folders no longer work when you changethe permissions on each user’s home folder, doing so prevents other users frombrowsing the folder’s contents.Chapter 7 Securing Data and Using Encryption 129
To change home folder permissions:Enter the following command:$ sudo chmod 750 /Users/usernameReplace username with the name <strong>of</strong> the account.Run this command immediately after someone creates an account.The 750 permission setting still allows members <strong>of</strong> the group owning the folder tobrowse it, but in <strong>Mac</strong> <strong>OS</strong> X v10.3 or later that group consists only <strong>of</strong> the user.If more advanced group management is performed and members <strong>of</strong> the group owningthe folder should not be granted permission to browse it, issue the command withpermission 700 instead <strong>of</strong> 750.As the owner <strong>of</strong> his or her home folder, the user can alter the folder’s permissionsettings at any time, and can change these settings back.Encrypting Home Folders<strong>Mac</strong> <strong>OS</strong> X includes FileVault, which can encrypt your home folder and its files. UseFileVault on portable computers and other computers whose physical security youcan’t guarantee. Enable FileVault encryption for your computer and its user accounts.FileVault moves all content <strong>of</strong> your home folder into a bundle disk image that supportsAES-256 encryption. <strong>Mac</strong> <strong>OS</strong> X v10.5 supports the <strong>Mac</strong> <strong>OS</strong> X v10.4 sparse disk imageformat created using AES-128 encryption. The sparse format allows the image tomaintain a size proportional to its contents, which can save disk space.If you remove files from a FileVault-protected home folder it takes time to recover freespace from the home folder. After the home folder is optimized, you can access files inFileVault-protected home folders without noticeable delays.If you’re working with confidential files that you plan to erase later, store those files inseparate encrypted images that are not located in your home folder. You can thenerase those images without needing to recover free space. For more information, see“Encrypting Portable Files” on page 134.If you’ve insecurely deleted files before using FileVault, these files are recoverable afteractivating it. When you initially enable FileVault, securely erase free space.For information, see “Using Disk Utility to Securely Erase Free Space” on page 139.Because FileVault is an encryption <strong>of</strong> a user’s local home folder, FileVault does notencrypt or protect files transferred over the network or saved to removable media, soyou’ll need to encrypt specific files or folders. FileVault can only be enabled for local ormobile accounts and cannot be enabled for network home folders.130 Chapter 7 Securing Data and Using Encryption
If you want to protect file or folders on portable media or a network volume, you mustcreate an encrypted disk image on the portable media or network volume. You canthen mount these encrypted disk images, which protect data transmitted over thenetwork using AES-256 encryption. When using this method, you must only mount theencrypted disk image from one computer at a time to prevent irreparable corruption tothe image content.For information about encrypting specific files or folders for transfer from your networkhome folder, see “Encrypting Portable Files” on page 134.When you set up FileVault, you create a master password. If you forget your loginpassword, you can use your master password to recover encrypted data. If you forgetyour login password and your master password, you cannot recover your data. Because<strong>of</strong> this, consider sealing your master password in an envelope and storing it in a securelocation.You can use Password Assistant to help create a complex master password that cannotbe easily compromised. For information, see “Using Passwords” on page 70.Enabling FileVault copies data from your home folder into an encrypted home folder.After copying, FileVault erases the unencrypted data.By default FileVault insecurely erases the unencrypted data, but if you enable secureerase, your unencrypted data is securely erased.Overview <strong>of</strong> FileVault<strong>Mac</strong> <strong>OS</strong> X v10.5 extends the unlocking <strong>of</strong> FileVault to Smart Cards, which provides themost secure practice for protecting FileVault accounts.Accounts protected by FileVault support authentication using a passphrase or a SmartCard. With Smart Card authentication, the AES-256 symmetric Data key (DK) used toencrypt the user’s data is unwrapped using a private (encryption) key on the SmartCard. The data written to or read from disk is encrypted and decrypted on the flyduring access.FileVault encrypts the Data Key (DK) using the User Key (UK1), which can be generatedfrom your passphrase or from the public key on your Smart Card. FileVault separatelyencrypts the Data Key using the FileVault Master Key (MK).The architectural design <strong>of</strong> FileVault makes it possible for the MK and UK1 to encryptand decrypt files. Providing strong encryption protects user data at rest while ensuringaccess management by IT staff.The easiest method for centralized management <strong>of</strong> FileVault on a client computer is touse <strong>Mac</strong> <strong>OS</strong> X Server v10.5 and WorkGroup Manager to enforce the use <strong>of</strong> FileVault andthe proper identity.Chapter 7 Securing Data and Using Encryption 131
Managing FileVaultYou can set a FileVault master keychain to decrypt an account that uses FileVault toencrypt data. Then if users forget their FileVault account password (which they use todecrypt encrypted data), you can use the FileVault master keychain to decrypt the data.To create the FileVault master keychain:1 Open System Preferences.2 Click <strong>Security</strong>, then click FileVault.3 Click Master Password and set a master password.Select a strong password and consider splitting the password into at least twocomponents (first half and second half). You can use Password Assistant to ensure thatthe quality <strong>of</strong> the password is strong.To avoid having one person know the full password, have separate securityadministrators keep each password component. This prevents a single person fromunlocking (decrypting) a FileVault account. For more information about PasswordAssistant, see “Using Passwords” on page 70.This creates a keychain called FileVaultMaster.keychain in /Library/Keychains/.The FileVault master keychain contains a FileVault recovery key (self-signed rootcertificate) and a FileVault master password key (private key).4 Delete the certificate named FileVaultMaster.cer in the same location as theFileVaultMaster.keychain.FileVaultMaster.cer is only used for importing the certificate into the keychain. This isonly a certificate and does not contain the private key, so there is no security concernabout someone gaining access to this certificate.5 Make a copy <strong>of</strong> FileVaultMaster.keychain and put it in a secure place.6 Delete the private key from FileVaultMaster.keychain created on the computer tomodify the keychain.This ensures that even if someone unlocks the FileVault master keychain they cannotdecrypt the contents <strong>of</strong> a FileVault account because there is no FileVault masterpassword private key available for decryption.Managing the FileVault Master KeychainThe modified FileVault master keychain can now be distributed to network computers.This can be done by transferring FileVaultMaster.keychain to the computers by usingApple Remote Desktop, by using a distributed installer executed on each computer, byusing various scripting techniques, or by including it in the original disk image if yourorganization restores systems with a default image.132 Chapter 7 Securing Data and Using Encryption
This provides network management <strong>of</strong> any FileVault account created on any computerwith the modified FileVaultMaster.keychain located in the /Library/Keychains/ folder.These computers indicate that the master password is set in <strong>Security</strong> preferences.When an account is created and the modified FileVault master keychain is present, thepublic key from the FileVault recovery key is used to encrypt the dynamically generatedAES 256-bit symmetric key used for encryption and decryption <strong>of</strong> the encrypted diskimage (FileVault container).To decrypt access to the encrypted disk image, the FileVault master password privatekey is required to decrypt the original dynamically generated AES 128-bit or 256-bitsymmetric key. The user’s original password continues to work as normal, but theassumption here is that the master password service is being used because the userhas forgotten the password or the organization must perform data recovery from auser’s computer.To recover a network-managed FileVault system account:1 Retrieve the copy <strong>of</strong> FileVaultMaster.keychain that was stored before the private keywas deleting during modification.2 If the master password was split into password components, bring together all securityadministrators involved in generating the master password.Note: The administrator must have root access to restore FileVaultMaster.keychain.3 Restore the original keychain to the /Library/Keychains/ folder <strong>of</strong> the target computerreplacing the installed one.4 Verify that the restored FileVaultMaster.keychain file has the correct ownership andpermissions set, similar to the following example.-rw-r--r-- 1 root admin 24880 Mar 2 18:18 FileVaultMaster.keychain5 Log in to the FileVault account you are attempting to recover and incorrectly enter theaccount password three times.If “Password Hints” is enabled, you are granted an additional try after the hint appears.6 When prompted for the master password, have the security administrators combinetheir password components to unlock access to the account.7 When the account is unlocked, provide a new password for the account.The password is used to encrypt the original symmetric key used to encrypt anddecrypt the disk image.Note: This process does not reencrypt the FileVault container. It reencrypts the originalsymmetric key with a key derived from the new master password you entered.You are now logged in to the account and given access to the user’s home folder.Chapter 7 Securing Data and Using Encryption 133
This process does not change the password used to protect the user’s original loginkeychain because that password is not known or stored anywhere. Instead, this processcreates a login keychain with the password entered as the user’s new accountpassword.Encrypting Portable FilesTo protect files you want to transfer over a network or save to removable media,encrypt a disk image or encrypt the files and folders. FileVault doesn’t protect filestransmitted over the network or saved to removable media.Using a server-based encrypted disk image provides the added benefit <strong>of</strong> encryptingnetwork traffic between the computer and the server hosting the mounted encrypteddisk image.Creating an Encrypted Disk ImageTo encrypt and securely store data, you can create a read/write image or a sparseimage: A read/write image consumes the space that was defined when the image wascreated. For example, if the maximum size <strong>of</strong> a read/write image is set to 10 GB, theimage consumes 10 GB <strong>of</strong> space even if it contains only 2 GB <strong>of</strong> data. A sparse image consumes only the amount <strong>of</strong> space the data needs. For example, ifthe maximum size <strong>of</strong> a sparse image is 10 GB and the data is only 2 GB, the imageconsumes only 2 GB <strong>of</strong> space.If an unauthorized administrator might access your computer, creating an encryptedblank disk image is preferred to creating an encrypted disk image from existing data.Creating an encrypted image from existing data copies the data from an unprotectedarea to the encrypted image. If the data is sensitive, create the image before creatingthe documents. This creates the working copies, backups, or caches <strong>of</strong> files inencrypted storage from the start.Note: To prevent errors when a file system inside a sparse image has more free spacethan the volume holding the sparse image, HFS volumes inside sparse images reportan amount <strong>of</strong> free space slightly less than the amount <strong>of</strong> free space on the volume theimage resides on.To create an encrypted disk image:1 Open Disk Utility.2 Choose File > New > Blank Disk Image.3 Enter a name for the image, and choose where to store it.4 Choose the size <strong>of</strong> the image, by clicking the Size pop-up menu.134 Chapter 7 Securing Data and Using Encryption
Make sure the size <strong>of</strong> the image is large enough for your needs. You cannot increasethe size <strong>of</strong> an image after creating it.5 Choose an encryption method by clicking the Encryption pop-up menu.AES-128 or AES-256 is a strong encryption format.6 Choose a format by clicking the Format pop-up menu.Although there is some overhead, the sparse format allows the image to maintain asize proportional to its contents (up to its maximum size), which can save disk space.7 Click Create.8 Enter a password and verify it.You can access Password Assistant from this window. For more information,see “Using Passwords” on page 70.9 Deselect “Remember password (add to Keychain)” and click OK.Creating an Encrypted Disk Image from Existing DataIf you must maintain data confidentiality when transferring files from your computerbut you don’t need to encrypt files on your computer, create a disk image from existingdata.Such situations include unavoidable plain text file transfers across a network,such as mail attachments or FTP, or copying to removable media, such as a CD orfloppy disk.If you plan to add files to this image instead <strong>of</strong> creating an image from existing data,create an encrypted disk image and add your existing data to it. For information, see“Creating an Encrypted Disk Image” on page 134.To create an encrypted disk image from existing data:1 Open Disk Utility.2 Choose File > New > Disk Image from Folder.3 Select a folder, and click Image.4 Choose File > New > Blank Disk Image.5 Enter a name for the image and choose where to store it.6 Choose a format by clicking the Format pop-up menu.The compressed disk image format can help you save hard disk space by reducing yourdisk image size.7 Choose an encryption method by clicking the Encryption pop-up menu.AES-128 or AES-256 provide strong encryption.8 Click Save.Chapter 7 Securing Data and Using Encryption 135
9 Enter a password and verify it.You can easily access Password Assistant from this window. For more information, see“Using Passwords” on page 70.10 Deselect “Remember password (add to Keychain)” and click OK.Creating Encrypted PDFsYou can quickly create password protected, read-only PDF documents <strong>of</strong> confidentialor personal data. To open these files you must know the password for them.Some applications do not support printing to PDF. In this case, create an encrypted discimage. For information, see “Creating an Encrypted Disk Image from Existing Data” onpage 135.To create an encrypted PDF, read-only document:1 Open the document.2 Choose File > Print.Some applications don’t allow you to print from the File menu. These applicationsmight allow you to print from other menus.3 Click PDF and choose Save as PDF.4 Click <strong>Security</strong> Options and select one or more <strong>of</strong> the following options: Require password to open document Require password to copy text images and other content Require password to print documentWhen you require a password for the PDF, it becomes a encrypted.5 Enter a password, verify it, and click OK.6 Enter a name for the document, choose a location, and click Save.7 Test your document by opening it.You must enter the password before you can view the contents <strong>of</strong> your document.Securely Erasing DataWhen you erase a file, you’re removing information that the file system uses to find thefile. The file’s location on the disk is marked as free space. If other files have not writtenover the free space, it is possible to retrieve the file and its contents.<strong>Mac</strong> <strong>OS</strong> X provides the following ways to securely erase files. Zero-out erase 7-pass erase 35-pass erase136 Chapter 7 Securing Data and Using Encryption
A zero-out erase sets all data bits on the disk to 0, while a 7-pass erase and a 35-passerase use algorithms to overwrite the disk. A 7-pass erase follows the Department <strong>of</strong>Defense standard for the sanitization <strong>of</strong> magnetic media. A 35-pass erase uses theextremely advanced Gutmann algorithm to help eliminate the possibility <strong>of</strong> datarecovery.The zero-out erase is the quickest. The 35-pass erase is the most secure, but it is also 35times slower than the zero-out erase.Each time you use a 7-pass or 35-pass secure erase, the following seven-step algorithmis used to prevent the data from ever being recovered: Overwrite file with a single character Overwrite file with zeroes Overwrite file with a single character Overwrite file with random characters Overwrite file with zeroes Overwrite file with a single character Overwrite file with random charactersConfiguring Finder to Always Securely EraseIn <strong>Mac</strong> <strong>OS</strong> X v10.5 you can configure Finder to always securely erase items placed in theTrash. This prevents data you place in the Trash from being restored. Using secure erasetake longer than emptying the Trash.To configure Finder to always perform a secure erase:1 In Finder, choose Finder > Preferences.2 Click Advanced.3 Select the “Empty Trash securely” checkbox.Using Disk Utility to Securely Erase a Disk or PartitionYou can use Disk Utility to securely erase a partition, using a zero-out erase, a 7-passerase, or a 35-pass erase.Note: If you have a partition with <strong>Mac</strong> <strong>OS</strong> X installed and you want to securely erase anunmounted partition, you don’t need to use your installation discs. In the Finder, openDisk Utility (located in /Applications/Utilities/).WARNING: Securely erasing a partition is irreversible. Before erasing the partition,back up critical files you want to keep.To securely erase a partition using Disk Utility:1 Insert the first <strong>of</strong> the <strong>Mac</strong> <strong>OS</strong> X installation discs in the optical drive.Chapter 7 Securing Data and Using Encryption 137
2 Restart the computer while holding down the C key.The computer starts up from the disc in the optical drive.3 Proceed past the language selection step.4 Choose Utilities > Disk Utility.5 Select the partition you want to securely erase.Select a partition, not a drive. Partitions are contained in drives and are indented onelevel in the list on the left.6 Click Erase, choose “<strong>Mac</strong> <strong>OS</strong> Extended Journaled,” and then click <strong>Security</strong> Options.<strong>Mac</strong> <strong>OS</strong> Extended disk formatting provides enhanced multiplatform interoperability.7 Choose an erase option and click OK.8 Click Erase.Securely erasing a partition can take time, depending on the size <strong>of</strong> the partition andthe method you choose.Using Command-Line Tools to Securely Erase FilesYou can use the srm command in Terminal to securely erase files or folders. By usingsrm, you can remove each file or folder by overwriting, renaming, and truncating thefile or folder before erasing it. This prevents other people from undeleting or recoveringinformation about the file or folder.For example, srm supports simple methods, like overwriting data with a single pass <strong>of</strong>zeros, to more complex ones, like using a 7-pass or 35-pass erase.The srm command cannot remove a write-protected file owned by another user,regardless <strong>of</strong> the permissions <strong>of</strong> the directory containing the file.WARNING: Erasing files with srm is irreversible. Before securely erasing files, back upcritical files you want to keep.To securely erase a folder named secret:$ srm -r -s secretThe -r option removes the content <strong>of</strong> the directory and the -s option (simple)overwrites with a single random pass.For a more secure erase, use the -m (medium) option to perform a 7-pass erase <strong>of</strong>the file. The -s option overrides the -m option if both are present. If neither is specified,the 35-pass is used.For more information, see the srm man page.138 Chapter 7 Securing Data and Using Encryption
Using Secure Empty TrashSecure Empty Trash uses a 7-pass erase to securely erase files stored in the Trash.Depending on the size <strong>of</strong> the files being erased, securely emptying the Trash can taketime to complete.WARNING: Using Secure Empty Trash is irreversible. Before securely erasing files, backup critical files you want to keep.To use Secure Empty Trash:1 Open the Finder.2 Choose Finder > Secure Empty Trash.3 Click OK.Using Disk Utility to Securely Erase Free SpaceYou can use Disk Utility to securely erase free space on partitions, using a zero-outerase, a 7-pass erase, or a 35-pass erase.To securely erase free space using Disk Utility:1 Open Disk Utility (located in /Applications/Utilities/).2 Select the partition to securely erase free space from.Select a partition, not a drive. Partitions are contained in drives and are indented onelevel in the list on the left.3 Click Erase and then click Erase Free Space.4 Choose an erase option and click Erase Free Space.Securely erasing free space can take time, depending on the amount <strong>of</strong> free spacebeing erased and the method you choose.5 Choose Disk Utility > Quit Disk Utility.Using Command-Line Tools to Securely Erase Free SpaceYou can securely erase free space from the command line by using the diskutilcommand. However, ownership <strong>of</strong> the affected disk is required. This tool allows you tosecurely erase using one <strong>of</strong> the three levels <strong>of</strong> secure erase: 1—Zero-out secure erase (also known as single-pass) 2—7-pass secure erase 3—35-pass secure eraseTo erase free space using a 7-pass secure erase (indicated by the number 2):$ diskutil secureErase freespace 2 /dev/disk0s3For more information, see the diskutil man page.Chapter 7 Securing Data and Using Encryption 139
140 Chapter 7 Securing Data and Using Encryption
8 SecuringSystem Swap andHibernation Storage8Use this chapter to protect data in swap files from beingreadable.The data that an application writes to random-access memory (RAM) might containsensitive information, such as user names and passwords. <strong>Mac</strong> <strong>OS</strong> X writes the contents<strong>of</strong> RAM to your local hard disk to free memory for other applications.While the data is on the hard disk, it can be easily viewed or accessed. You can protectthis data by securing your virtual memory in case <strong>of</strong> an attack or theft <strong>of</strong> yourcomputer.System Swap File OverviewWhen your computer is turned <strong>of</strong>f, the RAM on your computer contains no data.Computers use virtual memory to reduce problems caused by limited memory.Virtual memory swaps data between your hard disk and RAM. It’s possible thatsensitive information in your computer’s RAM will be written to your hard disk in virtualmemory while you are working and remain there until overwritten. This data can becompromised if your computer is accessed by an unauthorized user because the data isstored on the hard disk unencrypted.When your computer goes into hibernation, it writes the content <strong>of</strong> RAM to the /var/vm/sleepimage file. The sleepimage file contains the contents <strong>of</strong> RAM unencrypted,similar to virtual memory.You can prevent your sensitive RAM information from being left unencrypted on yourhard disk by enabling secure virtual memory to encrypt the virtual memory and the /var/vm/sleepimage file (where your hibernation files are stored).Note: If you use FileVault, your virtual memory is encrypted because the data beingwritten to virtual memory is encrypted by FileVault.141
Encrypting System SwapYou can prevent your sensitive information from remaining on your hard disk andeliminate the security risk by using secure virtual memory. Secure virtual memoryencrypts the data being written to disk.To turn on secure virtual memory:1 Open System Preferences.2 Click <strong>Security</strong>, then click General.3 Select “Use secure virtual memory.”4 Reboot.From the Command Line:# Securing System Swap and Hibernation Storage# -----------------------------# Enable secure virtual memory.defaults write /Library/Preferences/com.apple.virtualMemory \UseEncryptedSwap -bool YES142 Chapter 8 Securing System Swap and Hibernation Storage
9 AvoidingMultiple SimultaneousAccount Access9Use this chapter to protect your data from the securityvulernabilities <strong>of</strong> multiple users using single accounts.Monitoring user accounts and activities is important to securing your computer. Thisenables you to determine if an account is compromised or if a user is performingmalicious tasks.Avoiding Fast User SwitchingAlthough the use <strong>of</strong> Fast User Switching is convenient when you have multiple userson a single computer, avoid enabling it.Fast User Switching allows multiple users to log in simultaneously. This makes it difficultto track user actions and allows users to run malicious applications in the backgroundwhile another user is using the computer.Also, external volumes attached to the computer are mounted when another user logsin, granting all users access to the volume and ignoring access permissions.Avoid creating accounts that are shared by several users. Individual accounts maintainaccountability. Each user should have his or her own standard or managed account.System logs can track activities to each user account, but if several users share thesame account, it becomes difficult to track which user performed an activity. Similarly, ifseveral administrators share a single administrator account, it becomes harder to trackwhich administrator performed a specific action.If someone compromises a shared account it is less likely to be noticed. Users mightmistake malicious actions performed by an intruder for legitimate actions by a usersharing the account.143
144 Chapter 9 Avoiding Multiple Simultaneous Account Access
10 EnsuringData Integrity withBackups10Use this chapter to learn about secure ways <strong>of</strong> backing updata and preventing unauthorized access to backups.Most organizations perform backups to protect data from being lost. However, manyorganizations don’t consider that their backups can be compromised if not securelystored on media.Understanding the Time <strong>Mac</strong>hine ArchitectureTime <strong>Mac</strong>hine is based on the <strong>Mac</strong> <strong>OS</strong> X HFS+ file system. It tracks file changes anddetects file system permissions and user access privileges.When Time <strong>Mac</strong>hine performs the initial backup, it copies the contents <strong>of</strong> yourcomputer to your backup drive to protect the data from unauthorized uses. Everysubsequent backup is an incremental backup, which copies only the files that havechanged since the previous backup.Deleting Permanently from Time <strong>Mac</strong>hine backupsYou can permanently delete files or folders from your computer and Time <strong>Mac</strong>hinebackups using Time <strong>Mac</strong>hine. This prevents any old sensitive data that you no longerneed from being recovered.To permanently delete files or folders from Time <strong>Mac</strong>hine backups:1 Delete the file or folder from your computer.2 Open Time <strong>Mac</strong>hine.3 Select the file for folder you want to permanently delete from Time <strong>Mac</strong>hine.4 Click the Action pop-up menu and select “Delete All Backups <strong>of</strong> “File or Folder name.”5 When the warning message appears, click OK to permanently delete the file or folder.All backup copies <strong>of</strong> your file or folder are permanently deleted from your computer.145
Storing Backups Inside Secure StorageYou can also perform backups <strong>of</strong> specific files or folders that contain sensitive data byplacing your data in an encrypted disk image. This image can then be placed on anyserver that is backed up regularly and still maintain the integrity <strong>of</strong> your data because itis protected by encryption.For example, <strong>Mac</strong> users that are in a Windows Server environment can use this method<strong>of</strong> backing up to ensure that sensitive data is secure and regularly backed up.To securely encrypt and back up data:1 Create a disk image.For more information about creating a disk image, see “Encrypting Portable Files” onpage 134.2 Mount the disk image.3 Copy the files you want to back up onto the disk image.4 Unmount the image and copy it to your backup media.If you’re in a Windows Server environment, copy your image to a folder that is backedup by the Windows server. Your data will be encrypted and backed up.Restoring Backups from Secure StorageIf you accidentally delete or lose a file, you can restore it from your encrypted backupmedia.To restore from your encrypted backup:1 Access the media that contains your disk image backup.2 Mount the disk image and, if prompted, enter your password for the image file.If the image is on a network, you don’t need to copy it locally. It will securely mountacross the network because the data is encrypted.3 Copy the backup <strong>of</strong> the file you lost locally to your computer.4 Unmount the disk image.146 Chapter 10 Ensuring Data Integrity with Backups
11 <strong>Information</strong>Assurance withApplications11Use this chapter to learn about settings and configurationsfor network services to improve the security <strong>of</strong> networkcommunication.Securely configuring network services is an important step in securing your computerfrom network attacks.Organizations depend on network services to communicate with other computers onprivate networks and wide area networks. Improperly configured network servicesprovide an avenue for attacks.Protecting Data While Using Apple ApplicationsAlthough Apple applications are secure by default, you can further enhance security byusing the following information.Mail <strong>Security</strong>You can change Mail preferences to enhance security. Depending on your mail serversettings, consider changing Mail preferences so you use SSL and a Kerberos-basedauthentication method. These settings must match those provided by your mail server.Only send mail that is digitally signed and encrypted. Digitally signed messages letyour recipients verify your identity as the sender and provide assurance that themessage was not tampered with in transit. Encrypted messages keep the contents <strong>of</strong>the message private and readable only by the intended recipient.You can only send encrypted messages to recipients if you have received a digitallysigned message from them or if you have access to their public key. Recipients receiveyour public key when they receive your signed messages.147
This certificate-based system is referred to as public key infrastructure (PKI) messaging.It verifies that the message is from you and that it has not been altered in transit. Whenyou use PKI and encrypt a message, only the intended recipient can read and view itscontents.Mail recognizes sender and recipient certificates. It notifies you <strong>of</strong> the inclusion <strong>of</strong>certificates by displaying a Signed (checkmark) icon and an Encrypt (closed lock) icon.When sending signed or encrypted mail, the sender’s certificate must contain the casesensitivemail address listed in Mail preferences.To further enhance security, disable the display <strong>of</strong> remote images in HTML messages inMail’s Viewing preferences. Bulk mailers use image-tracking mechanisms to findindividuals who open junk mail. If you don’t load remote images, you help reducespam.If you use a third-party mail application, consider applying similar security guidelines.For more information, open Mail Help and search for “security.”Enabling Account <strong>Security</strong>You can configure Mail to send and receive secure mail by using SSL to provide asecure connection to the mail server. <strong>Mac</strong> <strong>OS</strong> X v10.5 supports SSLv2, SSLv3, and TLSv1.SSL prevents other users from intercepting your communication to gain unauthorizedaccess to data.If you are using SSL to connect to your mail server, your password and data are securelytransmitted. However, you can further secure your password by using a strongauthentication method that encrypts your password. You can protect your password byusing one <strong>of</strong> the following methods <strong>of</strong> authentication: MD5 Challenge-Response NTLM Kerberos Version 5 (GSSAPI)To use a secure connection to the mail server:1 Choose Mail > Preferences and then click Accounts.2 Select an account and then click Advanced.3 Select Use SSL.The port number changes to port 993. Verify that this port is the same port used by SSLon your mail server.4 From the Authentication pop-up menu, select one <strong>of</strong> the following methods <strong>of</strong>authentication: MD5 Challenge-Response148 Chapter 11 <strong>Information</strong> Assurance with Applications
 NTLM Kerberos Version 5 (GSSAPI)5 Click Account <strong>Information</strong>.6 From the Outgoing Mail Server (SMTP) pop-up menu, select Edit Server List.7 From the server list, select your outgoing mail server and then click Advanced.8 Select Secure Socket Layer (SSL).9 Close the preferences window and then click Save in the message that appears.Signing and Encrypting Mail MessagesA signed message (including attachments) enables recipients to verify your identity asthe sender and provides assurance that your message wasn’t tampered with in transit.To send a signed message, you must have a digital identity in your keychain. Yourdigital identity is the combination <strong>of</strong> a personal certificate and a corresponding privatekey. You can view digital identities in your keychain by opening Keychain Access andclicking My Certificates in the Category list.If you only have the certificate portion <strong>of</strong> your digital identity, you can’t send signedmessages. You must have the corresponding private key. Also, if people use yourcertificate to send you an encrypted message, you must have your private key installedon the computer that you are trying to view the message on. Otherwise, you cannotview the encrypted message.An encrypted message (including attachments) <strong>of</strong>fers a higher level <strong>of</strong> security than asigned message. To send an encrypted message, you must have a digital identity andthe certificate <strong>of</strong> each recipient must be installed in Keychain Access.To sign and encrypt a message:1 Choose File > New Message and choose the account in the Account pop-up menu forwhich you have a personal certificate installed in your keychain.A Signed icon (a checkmark) on the upper right side above the message text indicatesthe message will be signed when you send it.2 Address the message to recipients.If you’re sending the message to a mailing list, send it unsigned. Many mailing listsreject signed messages (because the signature is an attachment). To send the messageunsigned, click the Signed icon. An “x” replaces the checkmark.An Encrypt (closed lock) icon appears next to the Signed icon if you have a personalcertificate for a recipient in your keychain. The icon indicates the message will beencrypted when you send it.Chapter 11 <strong>Information</strong> Assurance with Applications 149
If you don’t have a certificate for all recipients, you’re asked to cancel the message orsend the message unencrypted. To send the message unencrypted, click the Encrypticon. An open lock icon replaces the closed lock icon.If your recipients use Mail, security headers marked Signed and Encrypted are visible inthe messages they receive. If they’re using a mail application that doesn’t use signedand encrypted messages, the certificate might be in the form <strong>of</strong> an attachment. Ifrecipients save the attachment as a file, they can add your certificate to their keychains.Web Browsing <strong>Security</strong> with SafariYou can change Safari preferences to enhance security. By customizing your Safaripreferences you can prevent information on your computer or about your computerfrom being compromised or exposed to an attacker.In particular, consider changing Safari preferences to disable AutoFill options, to opensafe files after downloading, to disable cookies (from sites you navigate to), to disablejavascript, and to ask before sending nonsecure forms.After disabling cookies, remove existing cookies using the Show Cookies dialog inSafari <strong>Security</strong> preferences. For websites that require cookies, enable cookies and thendisable them after visiting the site.Enabling and disabling cookies can be time-consuming if you visit many sites that usecookies. Consider using multiple accounts with different cookie settings. For example,your personal account might allow all cookies, while your more secure account hasrestrictive cookie settings.Javascript has built-in security restrictions that limit javascript applications and preventthem from compromising your computer. However, by disabling it, you can furthersecure your computer from unauthorized javascript applications attempting to run onyour computer.When using Safari, use private browsing. Private browsing prevents Safari from loggingactions, adding webpages to history, keeping items in the Downloads window, savinginformation for AutoFill, and saving Google searches. You can still use the Back andForward buttons to navigate through visited sites. After you close the window, the Backand Forward history is removed.After using Safari, empty the cache. Caching improves performance and reducesnetwork load by storing viewed webpages and webpage content on your local harddisk, but it is a security risk because these files are not removed.150 Chapter 11 <strong>Information</strong> Assurance with Applications
Safari supports server-side and client-side authentication using X.509 certificates.Server-side authentication occurs when you access webpages that use an https URL.When Safari uses client-side authentication, it provides the server with a credential thatcan be a certificate in your keychain, or it can be from a smart card (which is treatedlike a keychain).If you use a third-party web browser, apply similar security guidelines.For information about how to perform these tasks and for other Safari security tips,open Safari Help and search for “security.”Verifying Server IdentityWhen you receive a certificate from a server, your computer verifies the authenticity <strong>of</strong>the certificate by checking the signature inside the certificate to determine if it’s from atrusted Certificate Authority (CA).There are two common methods for verifying the validity <strong>of</strong> a certificate: OnlineCertificate Status Protocol (OCSP) and Certificate Revocation List (CRL).For a CRL, information about the status <strong>of</strong> certificates is stored on a revocation server.The <strong>Mac</strong> <strong>OS</strong> X security system can check with the revocation server to validate thecertificate. The trusted commercial CA certificates are installed on your computer andare used to verify certificates you receive. You can set this in Keychain Accesspreferences.You can also visually inspect certificates using Safari or Keychain Access.To check the validity <strong>of</strong> a certificate while using Safari, click the lock in the upper rightcorner <strong>of</strong> the page. A certificate drop-down page appears and a green check iconindicates that the certificate can be trusted. You can continue to move up the chain <strong>of</strong>certificates checking their validity and verifying the green check icon is there.If a certificate is invalid, the lock icon turns red. The invalid certificate has a red-x iconindicating it is invalid.You can use Certificate Assistant in Keychain Access to evaluate a certificate anddetermine if it is genuine. S<strong>of</strong>tware that uses certificates, such as a mail application orweb browser, usually evaluates certificates before using them. However, the CertificateAssistant lets you evaluate certificates given to you with a greater amount <strong>of</strong> controland detail.To visually validate a certificate using Certificate Assistant:1 Open Keychain Access (located in Applications/Utilities).2 Choose Keychain Access > Certificate Assistant > Open.3 Read the introduction and click Continue.Chapter 11 <strong>Information</strong> Assurance with Applications 151
4 Select “View and evaluate certificates” then click Continue.5 Select a trust policy.For an explanation about the trust policy, click Learn More. To evaluate a email certificate, select “S/MIME (Secure Multipurpose Internet MailExchange)” and enter the mail address <strong>of</strong> the sender. To evaluate a web server, select “SSL (Secure Socket Layer)” and enter the hostserver’s URL. If you want to ask the host for the certificates, select “Ask Host ForCertificates.” For any other type <strong>of</strong> certificate, select “Generic Apple X509.”6 Click Continue.7 Click the Add (+) button and select the certificate you want to evaluate.You can add and evaluate multiple certificates.To include other certificates from your keychain when evaluating the certificate chain,select “Include certificates from my keychain.” For example, if the root and intermediatecertificates for your selected certificate are in your keychain, selecting this buttonincludes them in the evaluation.The default certificate evaluated is always the user certificate, or leaf. If the certificateyou want to evaluate is an intermediate or root certificate click Make Leaf.Client-Side AuthenticationSome applications or services require that you use a digital certificate to authenticate.Digital certificates can be stored in a Smart Card and can also include a photograph <strong>of</strong>the authorized user to further protect a certificate from being used by an unauthorizeduser.By using a certificate as an authentication and identification method, the service orapplication can ensure that the person who provided the certificate is not only thesame person who provided the data, but is also who they say they are. The certificate isalso signed—in this case by the certificate authority (CA) who issued the certificate.Managing Data Communication and ExecutionDownloaded files are tagged with the com.apple.quarantine extended attribute untilyou permit the file to be opened or executed.Opening Safe FilesWhen you enable “Open ‘safe’ files after downloading” in Safari preferences, files thatare considered safe are opened after downloading. These include pictures, movies,sounds, text files, PDFs, disk images, and ZIP archives.152 Chapter 11 <strong>Information</strong> Assurance with Applications
Before they are opened, the following content factors are examined to verify that thefile is safe: The file extension The MIME type What’s inside the fileSometimes malware tries to disguise itself as safe, but <strong>Mac</strong> <strong>OS</strong> X v10.5 checks for signsthat indicate this. If Safari considers that a downloaded file is safe: Safari opens the file after it downloads. If the downloaded file is an archive (.zip file), Safari decompresses it. If the downloaded file is a disk image (.img file), Safari mounts the image volume.Other types <strong>of</strong> files might not be safe. Applications, scripts, web archives, and archivesthat contain applications or scripts can harm your computer. Not all such files areunsafe, but you should exercise caution when opening a downloaded file.Note: Although Safari, iChat, and Mail <strong>of</strong>fer Download Validation for increased security,no s<strong>of</strong>tware can detect all potentially dangerous file types.If Download Validation cannot determine that a downloaded file is safe, it is stored inyour default download directory in the same way it is if the "Open ‘safe’ files afterdownloading" preference was disabled.If Download Validation determines that a downloaded file is unsafe, you are promptedto download or cancel the download. If you download the file, it is placed in yourdownload location as configured in Safari preferences. If you cancel, the file is saved asa web download in your download location as configured by Safari preferences.The file is named the same as the original file with “.download” at the end <strong>of</strong> it. This canbe moved to the Trash or inspected manually.Nonsecure FormsIn some cases, forms you complete in Safari might be submitted in a nonsecure way toa secure website. Safari is set to display a message when this is about to happen, soyou can prevent the form from being submitted if you are concerned about thesecurity <strong>of</strong> your information.If you don’t want to see this message, choose Preferences from the Safari menu andclick <strong>Security</strong>. Deselect the checkbox labeled “Ask before sending a nonsecure form to asecure website.”Chapter 11 <strong>Information</strong> Assurance with Applications 153
Syncing BookmarksIf you’re using <strong>Mac</strong> <strong>OS</strong> X v10.5 or later and Safari 1.0 or later, you can synchronize yourSafari bookmarks with the bookmarks in your .<strong>Mac</strong> Bookmarks library on the web. Youcan also synchronize your Safari bookmarks across multiple <strong>Mac</strong> <strong>OS</strong> computers.With bookmarks synchronization turned on, the bookmarks in your .<strong>Mac</strong> Bookmarksapplication on the web synchronize with Safari on your computer’s hard disk each timeyou sync. (After you sync, it might take a few minutes before you see the changes.)You can turn <strong>of</strong>f synchronization in Safari Preferences by deselecting “Turn on .<strong>Mac</strong>Bookmarks Synchronization.” While synchronization is <strong>of</strong>f, changes you make tobookmarks in .<strong>Mac</strong> Bookmarks or Safari are saved until the next time you turn onsynchronization and click the Sync Now button on the .<strong>Mac</strong> pane <strong>of</strong> SystemPreferences (v10.4 or later) or in iSync.For example, if you delete a bookmark from .<strong>Mac</strong> Bookmarks with synchronizationturned <strong>of</strong>f, the bookmark is deleted from Safari on your computer’s hard disk the nexttime you use iSync with synchronization turned on.AutoFillSafari can use information from various sources to complete forms that are on manywebpages: Personal information, such as mailing addresses, mail addresses, and phone numbers,are retrieved from your Address Book card. User names and passwords that you enter on websites are saved in your keychainand retrieved when you try to log in later. (Some websites do not allow you to saveyour user name and password.) Any other information that you enter at a website is saved in Safari’s cache to bereused later.You can select the information that Safari uses to complete web forms. ChoosePreferences from the Safari menu and click AutoFill. Then select the items you wantSafari to use.To complete a web form, open the webpage and click the AutoFill button in theaddress bar. If you don’t see the AutoFill button in the address bar, choose AutoFill fromthe View menu. Items that are completed using AutoFill appear in yellow in thewebpage.To complete individual fields in a form, select a text box and start typing. If Safarimatches saved information for the field, it finishes entering the text for you. If severalitems match what you typed, a menu appears. Press the arrow keys to select thecorrect item and press Return.154 Chapter 11 <strong>Information</strong> Assurance with Applications
Website forms can include items that Safari doesn’t recognize. You must fill out theseitems yourself.If you enter a user name and password, Safari asks if you to want to save theinformation. Click Yes to save the name and password. Click Not Now if you want tosave the information in the future. Click Never for this Website if you don’t want to beasked to save the name and password for the website again.To change or delete saved user names and passwords or other information, click theEdit button next to the related checkbox in the AutoFill preferences pane.Controlling Web ContentA plug-in is s<strong>of</strong>tware installed on your computer that provides additional capabilities toapplications. Safari uses plug-ins to handle multimedia content on webpages, such aspictures, music, and video. For example, the QuickTime Internet plug-in allows Safari todisplay media content. To see the plug-ins available to Safari, choose Installed Plug-insfrom the Help menu.Some webpages display pop-up windows. For example, a webpage might use a popupwindow to request your user name or to display ads. To block these pop-upwindows, choose Safari > Block Pop-Up Windows so that a checkmark appears next toit.Blocking pop-up windows stops windows that appear when you open or close a page.It does not block pop-up windows that open when you click a link.If you block pop-up windows, you might miss important information for a webpage.Cookie Storage or Tracking <strong>Information</strong>A cookie is a small file created by a website to store information. The cookie is storedon your computer. Cookies are normally helpful and harmless. It’s rare to encounter abad cookie.When you visit a website that uses cookies, the site asks Safari to put cookies on yourcomputer. When you return to the site later, Safari sends back the cookies that belongto the site. The cookies tell the site who you are, so the site can show you informationthat’s appropriate for you.Cookies store information that identifies you, such as your user ID for a website andyour website preferences. A website has access only to the information you provide. Awebsite can’t determine your mail address unless you provide it. A website can’t gainaccess to other information on your computer.When you use the default cookie preferences in Safari, you won’t know when Safari isaccepting or sending cookies. You can change your cookies preferences so that Safaridoesn’t accept cookies or so it accepts them only from limited sources.Chapter 11 <strong>Information</strong> Assurance with Applications 155
ProxiesUse the Advanced preference pane to customize Safari for Universal Access, tocustomize the appearance <strong>of</strong> webpages with your own style sheet, and to set proxysettings. You can select from the following: The “Never use font sizes smaller than” option prevents text from getting so smallthat you can longer read it. The “Press Tab to highlight each item on a webpage” option helps you find all linksand options on a page by highlighting each one in turn when you press the Tab key. The Style Sheet pop-up menu lets you customize the appearance <strong>of</strong> webpages byselecting a style sheet you’ve created. The Proxies option opens the Network panel in System Preferences so you can editproxy settings for your current network location.Securing File DownloadsIf you navigate to a downloadable file with Safari (for example, by clicking a downloadlink), <strong>Mac</strong> <strong>OS</strong> X provides download validation to warn you about unsafe file types.Cancel the download if you have doubts about the integrity <strong>of</strong> the file.If you download a file by Command-clicking or selecting Download Linked File from acontextual menu, the download is not inspected by the <strong>Mac</strong> <strong>OS</strong> X download validation,and it is not opened. Inspect the downloaded file using the Finder. If you wereexpecting a document and Finder indicates that it is an application, do not open thefile. Instead, delete it immediately.When distinguishing between legitimate and malicious applications, where you get thefile from is the most important indicator. Only download and install applications fromtrusted sources, such as well-known application publishers, authorized resellers, orother well-known distributors. Use antivirus s<strong>of</strong>tware to scan files before installingthem. A selection <strong>of</strong> third-party products is available at the <strong>Mac</strong>intosh Products Guide.Instant Message <strong>Security</strong> with iChat AVYou can use iChat to send secure text, audio, and video messages. You can also useiChat to securely send files.To set up secure iChat messaging, you and your iChat buddy must have a .<strong>Mac</strong>membership and have <strong>Mac</strong> <strong>OS</strong> X v10.4.3 or later installed. With a .<strong>Mac</strong> membership youcan sign up for a Secure iChat certificate that allows you to enable secure messaging.When you enable iChat encryption, iChat performs a Certificate Signing Request (CSR)to .<strong>Mac</strong>. iChat then receives a certificate, which includes your original public key and aprivate key. The public and private key pair is created by the CSR process.156 Chapter 11 <strong>Information</strong> Assurance with Applications
iChat AV Encryption leverages a PKI approach. The public and private asymmetric keysare derived from the user’s .<strong>Mac</strong> identity, which consist <strong>of</strong> the user’s certificate andprivate key. The private key and certificate represent your .<strong>Mac</strong> identity. These keys areused to encrypt content between you and your buddy.When you securely send a message, iChat requests your buddy’s Secure iChat publickey. It then encrypts the message based on your buddy’s public key. It sends thatencrypted message to your buddy, who decrypts the message based on his or herprivate key.Although iChat is secure, messaging services allow for the possibility <strong>of</strong> an attack.Unless your organization requires messaging services, disable messaging.If your organization runs an internal iChat server, the server can use SSL to certify theidentity <strong>of</strong> the server and establish secure, encrypted data exchange between an iChatuser and the server. Consider only accepting messages from specific people or frompeople on your buddy list. This helps prevent information phishing through iChat.Note: If a you create a certificate using Certificate Assistant, you can use that certificateto encrypt the iChat AV communication without using a .<strong>Mac</strong> account.For more information, open iChat Help and search for “security.” For information aboutiChat and SSL, see Web Technologies Administration.iChat AV <strong>Security</strong>When you share your screen with an iChat buddy, the buddy has the same access toyour computer that you have. Share your screen only with trusted parties, and beparticularly careful if you receive a request to share your screen from someone whoisn’t on your buddy list.If the request comes from someone in your Bonjour list, remember that the person’sname is not necessarily accurate, so his or her identity is uncertain.Although every screen sharing connection uses encryption, the highest level <strong>of</strong>security requires both participants to have .<strong>Mac</strong> accounts with encryption enabled. Ifthis is the case, you will see a lock icon in the screen-sharing window. To quickly end ascreen sharing session, press Control-Escape.iChat AV in <strong>Mac</strong> <strong>OS</strong> X v10.4.3 and later encrypts all communications between .<strong>Mac</strong>members. Text messages, audio chats, video conferences, and file transfers are securedusing robust 128-bit encryption so that others can’t listen in on your communications.If you have an active, paid .<strong>Mac</strong> account, you can set up iChat to encryptcommunications when you chat, conference, or send files to other .<strong>Mac</strong> members whohave set up iChat encryption.Chapter 11 <strong>Information</strong> Assurance with Applications 157
Enabling PrivacyTo prevent messages temporarily, set your status to Offline or Invisible, or log out bychoosing iChat > Log Out.You can also specify that messages from specific people be blocked or allowed. Blockedpeople can’t send you messages or see when you are online.To block people:1 Choose iChat > Preferences and then click Accounts.2 Select the account you want to set privacy options for.Bonjour and Jabber accounts don’t have privacy options.3 Click <strong>Security</strong>.4 From the Privacy Level list, select an option.If you select “Allow specific people,” click the Edit List button, click the Add (+) button,and then enter the names or IDs for those you want to allow. Anyone not added to thelist is blocked.If you select “Block specific people,” click the Edit List button, click the Add (+) button,and then enter the names or IDs for those you want to block. Anyone not on the list isallowed.To quickly add a person to the list <strong>of</strong> blocked people, click the Block button thatappears in the message window when you get a message from that person.You can’t see or send messages to people you have blocked.Enabling Encryption Using .<strong>Mac</strong> IdentityYou can secure your iChat communications so no one can access your conferences. Touse this safeguard, you and your iChat buddy must both have .<strong>Mac</strong> accounts andrequest .<strong>Mac</strong> identity certificates.To set up secure messaging:1 Choose iChat > Preferences and then click Accounts.2 Select the .<strong>Mac</strong> account you want to secure.Free trial .<strong>Mac</strong> memberships are not eligible for secure messaging.3 Click <strong>Security</strong> and then click Enable.As part <strong>of</strong> the setup process, you must enter an encryption password. This is thepassword you enter if you are using secure messaging on a second computer. Thispassword can be different from your <strong>Mac</strong> <strong>OS</strong> X password.158 Chapter 11 <strong>Information</strong> Assurance with Applications
When you and your buddy have the .<strong>Mac</strong> certificate installed and you start a chat, alock icon appears in the upper-right corner <strong>of</strong> the iChat window. Text, audio, and videoare encrypted on your computer and are not decrypted until they reach your buddy’scomputer.To view your Secure iChat certificate, open Keychain Access and click My Certificates inthe Categories window. Double-click the certificate that is the same as your .<strong>Mac</strong> shortname.Multimedia <strong>Security</strong> with iTunesYour iTunes account is protected by your user name and password, which should neverbe shared with other users, to prevent it from being compromised by an unauthorizeduser. If an unauthorized user gains access to your user name and password, they canuse your account to purchase music, videos, and podcasts from the iTunes store.You can protect your iTunes account from being compromised by using a strongpassword. When creating your iTune password use Password Assistant to help yougenerate a strong password.Also, you can use the sharing preference <strong>of</strong> iTunes to share your music with othernetwork users. When configuring iTunes sharing preference, require that users set astrong password to access your shared music. You can generate a strong passwordusing Password Assistant. When you finish sharing your music, turn the iTunes sharingpreference <strong>of</strong>f to keep unauthorized users from attempting to access your sharediTunes music.For more information about creating strong passwords, see “Using Passwords” onpage 70.Guest Operating Systems with Boot CampWith Boot Camp you can install and run other operating systems such as Windows XPor Windows Vista on your Intel-based <strong>Mac</strong> computer.Boot Camp Assistant (located in /Applications/Utilities) helps you set up a Windowspartition on your computer’s hard disk and then start the installation <strong>of</strong> your Windowss<strong>of</strong>tware.When you install a guest operating system on your Intel-based <strong>Mac</strong> computer, accesscontrol lists (ACLs) set on your <strong>Mac</strong> partition might not be enforced by the guestoperating system. This creates a possible point <strong>of</strong> intrusion or corruption to yoursensitive data. When the guest operating system is booted, your computer becomessusceptible to network vulnerabilities <strong>of</strong> the guest operating system.Chapter 11 <strong>Information</strong> Assurance with Applications 159
If you decide to use a guest operating system on your <strong>Mac</strong> computer, use encrypteddisk images to store your data when you are using <strong>Mac</strong> <strong>OS</strong> X. This prevents yoursensitive data from being accessed by the guest operating system. For moreinformation, see “Creating an Encrypted Disk Image” on page 134.Also, keep backup copies <strong>of</strong> your data in the event that your <strong>Mac</strong> <strong>OS</strong> X partitionbecomes corrupt.When setting a password for your guest operating system, start in <strong>Mac</strong> <strong>OS</strong> X v10.5 anduse Password Assistant to create a strong password. For more information, see “UsingPasswords” on page 70.You can also prevent attacks by keeping your guest operating system installed with themost current updates.Protecting Data While Using Apple ServicesYou can protect your data when sending it across unsecure networks, such as theInternet, by using a secure network connection. This prevents unauthorized access toyour data.Securing Remote Access CommunicationYou can secure remote access to other networks by using a Virtual Private Network(VPN). A VPN consists <strong>of</strong> computers or networks (nodes) connected by a private linkthat transmits encrypted data. This link simulates a local connection, as if the remotecomputer were attached to the local area network (LAN).VPN is the tunnel mode <strong>of</strong> the IPSec protocol, which is a collection <strong>of</strong> protocols used tosecure Internet Protocol (IP). IPSec encrypts the data transmitted over IP.VPN <strong>Security</strong> (L2TP and PPTP)There are two encrypted transport protocols: Layer Two Tunneling Protocol, SecureInternet Protocol (L2TP/IPSec) and Point–to–Point Tunneling Protocol (PPTP). You canenable either or both <strong>of</strong> these protocols. Each has its own strengths and requirements.The L2TP over IPSec protocol provides the highest level <strong>of</strong> security because it runs overIPSec. PPTP does not use the IPsec protocol, which makes it a less secure VPN protocol.L2TP over IPSecL2TP is an extension <strong>of</strong> PPTP used by Internet service providers to enable a VPN overthe Internet. IPSec is a set <strong>of</strong> security protocols. When you combine IPSEC with LT2P,IPSec encrypts the data to ensure data integrity and L2TP creates the tunnel for thedata to be transferred.L2TP/IPSec uses strong IPSec encryption to tunnel data to and from network nodes. Itis based on Cisco’s L2F protocol.160 Chapter 11 <strong>Information</strong> Assurance with Applications
IPSec requires security certificates (self-signed or signed by a CA such as Verisign) or apredefined shared secret between connecting nodes. The shared secret must beentered on the server and the client.The shared secret is not a password for authentication, nor does it generate encryptionkeys to establish secure tunnels between nodes. It is a token that the key managementsystems use to trust each other.L2TP is <strong>Mac</strong> <strong>OS</strong> X Server’s preferred VPN protocol because it has superior transportencryption and can be authenticated using Kerberos.IPSec <strong>Configuration</strong><strong>Mac</strong> <strong>OS</strong> X v10.5 computers are configured to use DHCP to obtain IP addresses andretrieve information about an LDAP directory from the DHCP server. After youconfigure DHCP service with information about an LDAP directory, that information isdelivered to <strong>Mac</strong> <strong>OS</strong> X clients when they receive IP addresses from the DHCP server. Ifnecessary, configure <strong>Mac</strong> <strong>OS</strong> X clients to retrieve information from the DHCP server.The following settings are configured: Network preferences are set to use DHCP. To access the setting, select SystemPreferences, open Network preferences, select the internal Ethernet interface, andselect “Using DHCP with manual address” or “Using DHCP” from the Configure IPv4pop-up menu. The computer’s search policy is set to be defined automatically. To access this setting,open Directory Utility (in /Applications/Utilities/) and click Search Policy, then clickAuthentication. If the lock icon is locked, click it and authenticate as an administrator.Choose Automatic from the Search pop-up menu, then click Apply. The use <strong>of</strong> DHCP-supplied LDAP information is enabled. To access this setting, openDirectory Utility and click Services. If the lock icon is locked, click it and authenticateas an administrator. Select LDAPv3 in the list <strong>of</strong> services, then click Configure. Click“Use DHCP-supplied LDAP Server,” then click OK.To configure <strong>Mac</strong> <strong>OS</strong> X clients so they can use the VPN server:1 Open System Preferences, then click Network.2 Click the Add (+) button at the bottom <strong>of</strong> the network connection services list and thenchoose VPN from the Interface pop-up menu.3 From the VPN Type pop-up menu, choose “L2TP over IPsec” or “PPTP” according to yournetwork .4 Enter a VPN service name in the Service Name field, then click Create.5 Enter the DNS name or IP address in the Server Address field.Server Address: gateway.example.com6 Enter the user account name in the Account Name field.Chapter 11 <strong>Information</strong> Assurance with Applications 161
Account Name: 7 Click Authentication Settings and enter the User Authentication and <strong>Mac</strong>hineAuthentication configuration information.8 Click OK.Understanding PPTPPPTP is a commonly used Windows standard VPN protocol. PPTP <strong>of</strong>fers goodencryption (if strong passwords are used) and supports a number <strong>of</strong> authenticationschemes. It uses a user-provided password to produce an encryption key.By default, PPTP supports 128-bit (strong) encryption. PPTP also supports the 40-bit(weak) security encryption.Network Access Control (802.1x)AirPort or Ethernet networks can be protected by the Institute <strong>of</strong> Electrical andElectronics Engineers (IEEE) 802.1x standard. The 802.1x standard enhances the security<strong>of</strong> a LAN.802.1x is used to protect your network from unauthorized users that attempt to attachto your wireless or wired network LAN. <strong>Mac</strong> <strong>OS</strong> X v10.5 also provides multidomain802.1x support for Login Window domains, User domains, and System domains. Youcan only enable and use one <strong>of</strong> these. For example, you cannot combine User andSystem domain. To configure the settings for 802.1x, use Network preferences.Securing Internet Communication with Host-Based FirewallsUsing a firewall to filter network traffic from a host or a network <strong>of</strong> hosts that areattempting to access your computer, prevents attackers from gaining access to yourcomputer.Firewall ProtectionA Firewall is s<strong>of</strong>tware that protects your <strong>Mac</strong> <strong>OS</strong> X computer from unauthorized users.When you turn firewall protection on, it is similar to erecting a wall to limit access toyour computer. The firewall scans incoming network traffic and rejects or accepts thesepackets based on rules. You can restrict access to any network service running on yourcomputer.You can monitor activity involving your firewall by enabling firewall logging. Firewalllogging creates a log file that tracks activity such as the sources and connectionattempts blocked by the firewall. You can view this log in the Console utility.162 Chapter 11 <strong>Information</strong> Assurance with Applications
<strong>Mac</strong> <strong>OS</strong> X includes a firewall. If you turn on a sharing service, such as file sharing,<strong>Mac</strong> <strong>OS</strong> X opens a specific port in the firewall for the service to communicate through.When you open the Firewall pane <strong>of</strong> <strong>Security</strong> preferences, any sharing services turnedon in Sharing preferences, such as File Sharing or Remote Apple Events, appear in thelist.In addition to the sharing services you turn on in Sharing preferences, the list caninclude other services, applications, and programs that are allowed to open ports in thefirewall. An application or program might have requested and been given accessthrough the firewall, or it might be signed by a trusted certificate and thereforeallowed access.Important: Some programs have access through the firewall although they don’tappear in the list. These might include system applications, services, and processes.They can also include digitally signed programs that are opened by other programs.You might be able to block these programs’ access through the firewall by addingthem to the list.To add an application to the list, select “Set access for specific services and applications”in the Firewall pane <strong>of</strong> <strong>Security</strong> preferences, click Add (+) at the bottom <strong>of</strong> the list, andthen select what you want to add. After the program is added, click the up and downarrows to allow or block connections through the firewall.Note: Blocking a program’s access through the firewall might harm the program orother programs that depend on it, or it might affect the performance <strong>of</strong> otherapplications and services you use.When the system detects a connection attempt to a program that is not enabled in<strong>Security</strong> preferences or is not signed, you are prompted to allow or deny access to theprogram. If you don’t respond, the program is added to the list in the Firewall pane <strong>of</strong><strong>Security</strong> preferences and the access is set to “Allow only essential services.”The Application Firewall<strong>Mac</strong> <strong>OS</strong> X v10.5.1 or later includes a new technology called the Application firewall. Thistype <strong>of</strong> firewall permits you to control connections on a per-application basis, ratherthan a per-port basis.This makes it easier for users to gain the benefits <strong>of</strong> firewall protection and helpsprevent undesirable applications from taking control <strong>of</strong> network ports that have beenopened for legitimate applications.The firewall applies to Internet protocols most commonly used by applications, TCP andUDP. It does not affect AppleTalk. The firewall can be set to block incoming ICMP pingsby enabling Stealth Mode in Advanced settings.Chapter 11 <strong>Information</strong> Assurance with Applications 163
Earlier IPFW technology is still accessible from the command line (in Terminal), and theApplication firewall doesn’t override rules set with IPFW. If IPFW blocks an incomingpacket, the Application firewall does not process it.Application Firewall ArchitectureThe Application firewall has the following modes <strong>of</strong> operation: Allowing all incoming connections: This is the most open mode. <strong>Mac</strong> <strong>OS</strong> X does notblock incoming connections to your computer. This is the default mode for <strong>Mac</strong> <strong>OS</strong> Xv10.5. If you upgraded from <strong>Mac</strong> <strong>OS</strong> X v10.4.x, your Application firewall defaults tothis mode. Allow only essential services: This is the most conservative mode. <strong>Mac</strong> <strong>OS</strong> X blocks allconnections except a limited list <strong>of</strong> services essential to operating your computer.The system services that are still allowed to receive incoming connections are: configd: Implements DHCP and other network configuration services. mDNSResponder: Implements Bonjour. racoon: Implements Internet Key Exchange (IKE). Set access for specific services and applications: This mode <strong>of</strong>fers you the mostflexibility. You can choose whether to allow or deny incoming connections for anyapplication on your system. After you add an application to the list, you can choosewhether to allow or deny incoming connections for that application. You can evenadd command-line applications to this list.When you add an application to this list, <strong>Mac</strong> <strong>OS</strong> X digitally signs the application (if ithas not been signed). If the application is later modified, you are prompted to allow ordeny incoming network connections to it. Most applications do not modify themselves.This is a safety feature that notifies you <strong>of</strong> the change.Enabling Advanced FeaturesThe Application firewall has the following advanced features that can be used to logfirewall activity and hide the identity <strong>of</strong> your computer.Firewall LoggingYou can monitor firewall activity by enabling firewall logging. Firewall logging creates alog file that tracks activity such as the sources and connection attempts blocked by thefirewall. You can view this log in the Console utility.To enable firewall logging:1 Open System Preferences.2 Click <strong>Security</strong> and then click Firewall.3 Open the Firewall pane <strong>of</strong> <strong>Security</strong> preferencesIf some settings are dimmed, click the lock icon and enter an administrator name andpassword.164 Chapter 11 <strong>Information</strong> Assurance with Applications
4 Click Advanced.5 Select the Enable Firewall Logging checkbox.6 To view firewall activity, click Open Log.Stealth ModeComputer hackers scan networks so they can attempt to identify computers to attack.You can prevent your computer from responding to these scans by using Stealth Mode.Stealth Mode prevents outgoing traffic like ARP, Bonjour, and connections to theInternet from giving away the presence <strong>of</strong> your computer on the network.When Stealth Mode is enabled, your computer will not respond to ICMP requests suchas ping requests and will not answer to connection attempts from a closed TCP or UDP.This makes it difficult for attackers to find your computer.To enable stealth mode:1 Open System Preferences.2 Click <strong>Security</strong> and then click Firewall.3 Open the Firewall pane <strong>of</strong> <strong>Security</strong> preferences.If some settings are dimmed, click the lock icon and enter an administrator name andpassword.4 Click Advanced.5 Select the Enable Stealth Mode checkbox.The IPFW2 Firewall<strong>Mac</strong> <strong>OS</strong> X v10.5.1 and later use the reliable open source IPFW2 s<strong>of</strong>tware for its firewall.You use the ipfw command-line tool to filter packets by using rules to decide whichpackets to allow and which to deny.The firewall scans incoming IP packets and rejects or accepts them based on the set <strong>of</strong>filters or rules you create. You can restrict access to any IP service running on yourcomputer, and you can customize filters for all incoming addresses or for a range <strong>of</strong> IPaddresses.IPFW handles packets at a lower level <strong>of</strong> the networking stack than the Applicationfirewall. Therefore, its rules take precedence over the Application firewall.IPFW2 Firewall ArchitectureThe new IPFW2 firewall is an extension <strong>of</strong> the older IPFW firewall. IPFW2 is an inclusivefirewall that only allows traffic that is specified by a rule. This is different from anexclusive firewall, which allows all traffic except those blocked by rules.Chapter 11 <strong>Information</strong> Assurance with Applications 165
Managing Firewall RulesPlan carefully before you configure your firewall rules. Knowing the applications thatshould access the Internet or your network is important. Without proper planning youcan accidently create a duplication <strong>of</strong> rules or rules that override one another, causing afirewall to become an easy access point for an attacker.Protection from Unauthorized ApplicationsApplications not in the list that have been digitally signed by a CA trusted by thesystem (for the purpose <strong>of</strong> code signing) can to receive incoming connections. EveryApple application in <strong>Mac</strong> <strong>OS</strong> X v10.5 has been signed by Apple and can receiveincoming connections. To deny a digitally signed application, add it to the list and thenexplicitly deny it.If you run an unsigned application not in the Application firewall list, you must allow ordeny connections for the application using the dialog. If you choose Allow, <strong>Mac</strong> <strong>OS</strong> Xv10.5 signs the application and adds it to the Application firewall list. If you chooseDeny, <strong>Mac</strong> <strong>OS</strong> X v10.5 signs the application, adds it to the Application Firewall list, anddenies the connection.Some applications check their own integrity when they are run without using codesigning.If the Application firewall recognizes the application, it does not sign theapplication instead, it displays the dialog every time the application runs. To preventthis dialog from appearing, upgrade to a version <strong>of</strong> the application that is signed by itsdeveloper.Some harmful applications can cause problems for your computer. Frequently, aharmful application tries to appear as an innocent document, such as a movie orgraphic file. These applications, called trojans, are most <strong>of</strong>ten spread by Internetdownloads and mail enclosures.Important: If you receive an application warning and you don’t expect the file to be anapplication, don’t open the file. Delete it from your computer.To protect your computer from harmful applications: Accept only applications from known and trusted sources. Run an antivirus program if you find suspicious files or applications, or if you noticeunusual behavior on your computer. To reduce the amount <strong>of</strong> exposure to harmful applications or files, limit the number<strong>of</strong> administrator accounts you create. Consider creating a user account for your dailywork and then use an administrator account only when you need to install s<strong>of</strong>twareor administer accounts. If you enabled the root user and you don’t need it, disable it.166 Chapter 11 <strong>Information</strong> Assurance with Applications
12 <strong>Information</strong>Assurance withServices12Use this chapter to secure network and shared services.Securely configuring network services is an important step in securing your computerfrom network attacks.Organizations depend on network services to communicate with other computers onprivate networks and wide area networks. Improperly configured network servicesprovide an avenue for attacks.Securing Local ServicesYour <strong>Mac</strong> <strong>OS</strong> X v10.5 computer <strong>of</strong>fers many services that can be quickly set up andconfigured. Although these services are helpful and easy to configure, they must besecurely configured to prevent unauthorized users from accessing your computer. Mostservices can be securely configured by using strong passwords or by turning theservices <strong>of</strong>f when they are not in use.Managing Who Can Obtain Administrative Privileges (sudo)You can use the sudo command to execute commands as the superuser (root) oranother user with more privileges, as specified in the sudoers file. The computer uses afile named /etc/sudoers to determine which users have the authority to use sudo.You can modify root user access by changing the /etc/sudoers file to restrict sudoaccess to specific accounts, and by allowing those accounts to perform specificcommands. This granularity gives you fine control over what users can do as root. Forinformation about modifying the /etc/sudoers file, see the sudoers man page.Limit the list <strong>of</strong> administrators allowed to use sudo to only those administrators whomust to run commands as root.To restrict sudo usage:1 Edit the /etc/sudoers file using the visudo tool, which allows for safe editing <strong>of</strong> the file.The command must be run as root:$sudo visudo167
2 When prompted, enter the administrator password.There is a time-out value associated with sudo. This value indicates the number <strong>of</strong>minutes until sudo prompts for a password again. The default value is 5, which meansthat after issuing the sudo command and entering the correct password, you can enteradditional sudo commands for five minutes without reentering the password. Thisvalue is set in the /etc/sudoers file. For more information, see the sudo and sudoersman pages.3 In the Defaults specification section <strong>of</strong> the file, add the following line:Defaults timestamp_timeout=04 Restrict which administrators are allowed to run sudo by removing the line that beginswith %admin, and adding the following entry for each user, substituting the user’s shortname for the word user:user ALL=(ALL) ALLEach time you add a new administrator to a system, you must add that administrator tothe /etc/sudoers file if the administrator requires the ability to use sudo.5 Save and quit visudo.For more information, see the sudoers man pages.Securing Discovery ServicesWhen computers on your network can discover services that are available, they canattempt to connect to your computer. Attackers use these available services to identifytheir entry for attack. By keeping your applications current and knowing yourenvironment, you can protect your computer from malicious users. When theseservices are not being used, turn them <strong>of</strong>f.Securing Bonjour (mDNS)Bonjour is a protocol for discovering file, print, chat, music sharing, and other serviceson IP networks. Bonjour listens for service inquiries from other computers and providesinformation about available services.Users and applications on your local network can use Bonjour to quickly determinewhich services are available on your computer. Although this might seem like a securityrisk, malicious intruders can use their own tools, such as port scanners, to locate theseservices. Disable unused services that you don’t want others to discover throughBonjour.To secure Bonjour, you must secure your local network. You should only connect tosecure, trusted local networks. You should also verify that Network preferences onlyenables required networking connections. This reduces the chance <strong>of</strong> connecting to aninsecure network.168 Chapter 12 <strong>Information</strong> Assurance with Services
Before using Bonjour to connect to a service, verify that the service is legitimate andnot spo<strong>of</strong>ed. If you connect to a spo<strong>of</strong>ed service, you might download malicious files.To disable Bonjour, enter the following command:$ sudo launchctl unload -w /System/Library/LaunchDaemons/ \com.apple.mDNSResponder.plistYou can’t use network printing using Bonjour, so you must manually configure networkprinters. Disabling Bonjour can also disable functionality in other applications that relyon Bonjour or possibly make them unusable. For example, there might be issues withcalendar and address book sharing, and finding iChat buddies.If disabling Bonjour interferes with other applications, enter the following command toreenable Bonjour:$ sudo launchctl load -w /System/Library/LaunchDaemons/ \com.apple.mDNSResponder.plistIf you decide to reenable Bonjour, block UDP port 5353 on your firewall to blockexternal Bonjour traffic.Securing Application Use <strong>of</strong> BonjourSome applications can be used to share data such as contact information, photos, andmusic. When these application share your data, they use Bonjour to let other networkusers know what you are sharing. When you are sharing information, use PasswordAssistant to help you create a strong password.Address BookYou can use your .<strong>Mac</strong> account to share your address book with others over theInternet. In Address book preferences under sharing, you can add contacts that have a.<strong>Mac</strong> account to the sharing list and assign them editing or viewing privileges for yourcontacts.When delegating privileges, limit the number <strong>of</strong> people who have editing privileges.This prevents users from accidently removing contact information. When your addressbook is not being used, turn Address book sharing <strong>of</strong>f.iChat AVYou can use iChat to communicate with other iChat users that are members <strong>of</strong> thesame iChat server. iChat uses Bonjour to find other iChat instances on your localnetwork. To secure iChat, turn <strong>of</strong>f all Bonjour preferences and use a secure iChat server.If a request comes from someone in your Bonjour list, remember that the person’sname is not necessarily accurate, so his or her identity is uncertain. To preventunauthorized users from instant messaging you, you can reject their request to sendyou messages.Chapter 12 <strong>Information</strong> Assurance with Services 169
iPhotoYou can share your photos using the sharing pane <strong>of</strong> iPhoto. Before you begin sharingphotos, make sure you are in a trusted or secure environment. To securely sharephotos, never use your name or user name as the shared name for your photos, andrequire that viewers use a password to view your photos. When creating the passwordfor viewers, use Password Assistant to help you create a strong password.iTunesYou can share your music using the sharing pane <strong>of</strong> iTunes. Before you begin sharingmusic, make sure you are in a trusted or secure environment. To securely share music,make sure shared name is not your name or user name, and require that users use apassword to access your music. When creating the password for users, use PasswordAssistant to help you create a strong password.Securing iDisk Service AccessiDisk is personal storage space for .<strong>Mac</strong> members on Apple’s Internet servers. You canus it to publish photos, websites, and movies, and to store personal data that you needaccess to at any time and from any computer with an Internet connection.iDisk Service AccessYour iDisk data is stored on Internet servers and is protected by your .<strong>Mac</strong> account.However, if your .<strong>Mac</strong> account is accessed by an unauthorized user, your data can becompromised. Don’t store sensitive data on iDisk. Keep sensitive data local andencrypted on your computer.Securing Public Folder AccessWhen using iDisk, make sure you have a backup copy <strong>of</strong> your data. Also, when creatinga .<strong>Mac</strong> account, use a strong password. (You can use Password Assistant to help youcreate a strong password.)You can protect iDisk data by creating an encrypted disk image that encrypts the datastored in it. Then you can upload this encrypted disk image to iDisk and know that yourdata is protected.When sharing data on your public folder on iDisk, require users to use a password toaccess the data. When creating the password for your public iDisk folder, use PasswordAssistant to help you create a strong password.170 Chapter 12 <strong>Information</strong> Assurance with Services
Securing the Back to My <strong>Mac</strong> (BTMM) ServiceThe new Back to My <strong>Mac</strong> (BTMM) feature in <strong>Mac</strong> <strong>OS</strong> X v10.5 gives you access to othercomputers over the Internet. BTMM requires you to have a .<strong>Mac</strong> account. BTMM usesyour .<strong>Mac</strong> account to create a secure connection to the computer your are accessingover the Internet. Both computers must be must be signed into your .<strong>Mac</strong> account andhave BTMM enabled.A new installation <strong>of</strong> <strong>Mac</strong> <strong>OS</strong> X v10.5 has BTMM enabled by default. However, thecomputer cannot be reached until sharing services are enabled in Sharing preferences.Note: You can only connect to computers using BTMM that are running <strong>Mac</strong> <strong>OS</strong> X v10.5or later.BTMM Service ArchitectureTo ensure that network connections between computers are secure over the Internet,BTMM uses a technology called IPSec to encrypt data. To provide secure and trustedauthentication, BTMM uses Kerberos with digital certificates. Kerberos provides anadditional convenience: it eliminates the need for you to enter your username andpassword each time you want to reach another computer in your BTMM network.Securing BTMM AccessComputers in your BTMM network can discover and authenticate to configured sharingservices. Consider the following to secure each computer in your BTMM network: Choose a strong password for your .<strong>Mac</strong> account. Anyone who knows your .<strong>Mac</strong>password can access all computers in your BTMM network. Therefore, it is importantto choose a strong password and keep it safe. When creating your password, usePassword Assistant to help you create a strong password. Consider who has physical access to your computers. Anyone who knows the loginname and password <strong>of</strong> your computer can potentially access shared services on allother computers. Set a strong password for your <strong>Mac</strong> <strong>OS</strong> X user account in theAccounts pane <strong>of</strong> System Preferences. Before you disconnect from sharing a screen with a remote computer, lock thescreen on the remote computer.To secure computers that are not part <strong>of</strong> your BTMM network:1 Open the <strong>Security</strong> preferences.2 Click the “Require password to wake this computer from sleep or screen saver”checkbox.3 Close <strong>Security</strong> preferences, then close System Preferences.4 Open Keychain Access (in Application/Utilities/).5 From the Keychain Access menu, choose Preferences.6 In the General pane, click the "Show Status in Menu Bar" checkbox.Chapter 12 <strong>Information</strong> Assurance with Services 171
A small padlock icon appears in the menu bar. When you are away from the computer,click the padlock menu and choose Lock Screen to protect your computer.7 Disable automatic login for user accounts with a .<strong>Mac</strong> account that is signed in.Performed these steps on each computer on your BTMM network.Securing Network Sharing ServicesYou can configure your computer to share files, folders, and other services with othercomputers on your network. You can even share your website hosted by yourcomputer.When sharing these services, make sure your computer has the most current Appleupdates and turn <strong>of</strong>f services you are not using. Also, make sure you set permissions foreach service to restrict access to unauthorized users.DVD or CD SharingYou can enable DVD or CD Sharing on a <strong>Mac</strong> or Windows computer to use the RemoteDisc feature <strong>of</strong> <strong>Mac</strong>Book Air or to share read only data stored on your DVD or CD. Whileyour optical disc drive is shared, a user <strong>of</strong> another computer can view and access datastored on the DVD or CD in your optical disc drive.DVD or CD SharingData transmitted between computers is not encrypted or secure, so you should onlyuse this service in a secure environment. To prevent unauthorized users from accessingyour shared optical disc drive, select the “Ask me before allowing others to use my DVDdrive“ checkbox to require users to request permission before they can access a DVD orCD in your <strong>Mac</strong> or Windows-based optical disc drive.DVD or CD Sharing is turned <strong>of</strong>f by default and should be <strong>of</strong>f when it is not being used.This prevents unauthorized users from accessing your computer.From the Command Line:# -------------------------------------------------------------------# <strong>Information</strong> Assurance with Services# -------------------------------------------------------------------# DVD or CD Sharing# -------------------------# Disable DVD or CD Sharing.service com.apple.ODSAgent stop172 Chapter 12 <strong>Information</strong> Assurance with Services
Screen Sharing (VNC)Screen Sharing is based on virtual network communication (VNC). You can set up yourcomputer using VNC so that others can share your screen. While your screen is shared,a user <strong>of</strong> another computer sees what’s on your screen and can open, move, and closefiles and windows, open applications, and even restart your computer.Screen SharingVNC allows anyone with permission to control your computer. Data transmittedbetween computers is not encrypted or secure so you should only used this service ina secure environment.Screen Sharing is turned <strong>of</strong>f by default and should be <strong>of</strong>f when it is not being used. Thisprevents unauthorized users from accessing your computer.Restricting Access to Specific UsersWhen securely configuring Screen Sharing options, grant access to only specific usersto prevent unauthorized users from gaining access your computer.The default setting for Screen Sharing should be changed from “All users” to “Onlythese users”. The default setting “All users” includes all users on your local computer andall users in the directory server you are connected to. If you create a sharing useraccount, create a strong password using the Password Assistant.You can also enable “VNC viewers may control screen with password” to permit VNCusers to control your screen using a third-party VNC viewer with a password. The VNCpassword is different from the user name and password that is also required whenattempting to access the computer. When creating the password, use PasswordAssistant to create a strong password.From the Command Line:# Screen Sharing (VNC)# -------------------------# Disable Screen Sharing.srm /Library/Preferences/com.apple.ScreenSharing.launchdFile Sharing (AFP, FTP, and SMB)You can set up your computer to share files and folders with other users on yournetwork using the protocols Apple Filing Protocol (AFP), File Transfer Protocol (FTP), orServer Message Block (SMB). You can give users permission to read, write, and modifyfiles and folders in the shared folder on your computer.Chapter 12 <strong>Information</strong> Assurance with Services 173
File SharingWhen you share files and folder on your computer, you are permitting users to accessthe files on your computer. Permitting access requires that you maintain who hasaccess to your files, the permissions they have, and the protocol used to access theseshared files.To securely set up File Sharing, you must configure permissions for your users. If youdon’t, you can create an access point for a malicious user to access your files andfolders.Depending on your environment, you can share your files using AFP, FTP, or SMB. Whenyou share your files using AFP, user names and passwords are encrypted when the userauthenticates to your computer to access files. When using SMB to share files,passwords are also encrypted when attempting to authenticate. However, SMBpasswords are not securely stored on your computer.FTP does not encrypt user names and passwords. This creates a possible way forunauthorized users to obtain the user name and password and easily access your files.Avoid using this protocol to share sensitive data. If you must use this protocol, encryptyour data using a secure encrypted image.File Sharing is great for sharing files with others if you are in an environment where filesharing is frequent. Consider setting up a file server to prevent others from accessingyour computer.File sharing is turned <strong>of</strong>f by default and should remain <strong>of</strong>f when it is not being used.This prevents unauthorized users from attempting to access your computer.Restricting Access to Specific UsersWhen you configure File Sharing on your computer, you set restrictions that provideaccess for specific users. The users you select can be further restricted by giving themaccess to specific folders.The default setting for File Sharing should be changed from “All users” to “Only theseusers”. The default setting “All users” includes all users on your local computer and allusers in the directory server you are connected to.You can securely configure File Sharing by restricting access to specific users. You canalso restrict each user’s file permissions for each file you are sharing by using thetriangles next to the user name (No Access, Read & Write, Read Only, or Write Only(Drop Box)). If you create a sharing user account, create a strong password usingPassword Assistant.If you are sharing files with Windows users, you must use SMB. When you create thepassword for users that will use SMB, use Password Assistant to help create a strongpassword. The password you enter is not securely stored on the computer.174 Chapter 12 <strong>Information</strong> Assurance with Services
From the Command Line:# Disable File Sharing services.# -------------------------# Disable FTP.launctl unload -w /System/Library/LaunchDaemons/ftp.plist# Disable SMB.defaults delete /Library/Preferences/System<strong>Configuration</strong>/ \com.apple.smb.server EnabledServiceslaunctl unload -w /System/Library/LaunchDaemons/nmbd.plistlaunctl unload -w /System/Library/LaunchDaemons/smbd.plist# Disable AFP.launctl unload -w /System/Library/LaunchDaemons/ \com.apple.AppleFileServer.plistPrinter Sharing (CUPS)Printer Sharing allows users on other computers to access printers connected to yourcomputer. Consider using dedicated print servers instead <strong>of</strong> sharing a printer from yourcomputer. By using a dedicated print server, you won’t have printer traffic routedthrough your computer.Web Sharing (HTTP)You can use the Apache web server s<strong>of</strong>tware included with <strong>Mac</strong> <strong>OS</strong> X to host a websiteon your computer. Web sharing does not allow you to share files or folders on yourwebsite but users on your network can view your website, which has read access. Thisis helpful when you are developing a website for testing purposes and need to shareinformation with others.Web SharingThere are two separate websites available for users to view. Users can only view thefollowing website located in /shortname/Sites folder if you are logged in on thecomputer:http://your.computer.address/~yourusername/.By using Web Sharing you expose your login user name (short name). This can givehackers the ability to gain information about your computer.The following website is located in Library/WebServer/Documents folder and isavailable while the Web Sharing service is running:http://your.computer.address.Chapter 12 <strong>Information</strong> Assurance with Services 175
Web sharing is turned <strong>of</strong>f by default and should remain <strong>of</strong>f when it is not being used.This prevents unauthorized users from accessing your computer.From the Command Line:# Web Sharing# -----------------------------# Disable Web Sharing service.launctl unload -w /System/Library/LaunchDaemons/org.apache.httpd.plistRemote Login (SSH)Remote Login allows users to connect to your computer through secure shell (SSH). Byenabling Remote Login, you activate more secure versions <strong>of</strong> commonly used insecuretools.The following table lists tools enabled with Remote Login, and their insecurecounterparts.Secure Remote Login ToolsshsloginscpsftpInsecure TooltelnetloginrcpftpFor more information about securing SSH, see “Enabling an SSH Connection” onpage 177.Remote Login is turned <strong>of</strong>f by default and should remain <strong>of</strong>f when it is not being used.This prevents unauthorized users from accessing your computer.Restricting Access to Specific UsersYou can securely configure Remote Login by restricting access to specific users. Thedefault setting for Remote Login should be changed from “All users” to “Only theseusers.” The default setting “All users” includes all users on your local computer and allusers in the directory server you are connected to.From the Command Line:# Remote Login (SSH)# -----------------------------# Disable Remote Login.service ssh stop176 Chapter 12 <strong>Information</strong> Assurance with Services
Enabling an SSH ConnectionTo enable an SSH connection, you must first enable Remote Login in Sharingpreferences on the server. For more information, see “Securing Sharing Preferences” onpage 112.To establish a secure SSH connection, verify that the client is receiving a validfingerprint from the server. Fingerprints help determine the authenticity <strong>of</strong> theconnection because they prove that the intended server, and not a rogue server, isreceiving SSH requests from the client.To enable an SSH connection:1 On the server and the client, open Terminal.2 On the server, configure Energy Saver preferences so the computer never goes to sleep.The hard disk can go to sleep.For more information, see “Securing Energy Saver Preferences” on page 96.3 On the client, enter the following command, but do not continue connecting ifprompted:$ ssh username@ipaddress_or_hostnameReplace username with the name <strong>of</strong> a user on the server.Replace ipaddress_or_hostname with the IP address or host name <strong>of</strong> the server.When you connect to a host using the IP address, entries are created in thessh_known_hosts file. If you connect to the same host using its host name, a separateentry is created in the ssh_known_host file because each connection is treated as aunique connection.On the server, if you select Remote Login in Sharing preferences, you are presentedwith a sample command showing how to connect to the server. This commandincludes the short name <strong>of</strong> the user you are logged in as and the IP address <strong>of</strong> theserver.4 On the server, enter the following command:$ ssh-keygen -l -f /private/etc/ssh_host_rsa_key.pubThis command prints the fingerprint <strong>of</strong> the server’s RSA key.5 Compare the fingerprint displayed on the client with the one displayed on the server.6 If they match, enter yes on the client.If they do not match, your connection is not authentic.You should never need to validate the server’s fingerprint again. If you are asked tovalidate the server’s fingerprint again, your connection has been compromised or<strong>Mac</strong> <strong>OS</strong> X has been reinstalled on the server. Verify with the server administrator tomake sure that your connection is authentic.Chapter 12 <strong>Information</strong> Assurance with Services 177
7 On the client, authenticate with the server using the password for the user name youentered.8 Test the connection with the server.The name <strong>of</strong> your server should appear in the prompt.To display your user name, enter whoami.9 On the server and client, enter the following command:$ exitConfiguring a Key-Based SSH ConnectionSSH supports the use <strong>of</strong> password, key, and Kerberos authentication. You can modifythe ssh command so it only supports key-based authentication.With key-based authentication, the client and server have public and private keys. Thetwo computers exchange public keys. When the computers communicate with eachother, they send data that is encrypted based on the other computer’s public key.When a computer receives encrypted data, it can decrypt the data based on its privatekey.Key-based authentication is more secure than password authentication because itrequires that you have the private key file and know the password that lets you accessthe key file. Password authentication can be compromised without needing a privatekey file.To perform this task, enable an SSH connection. For information, see “Enabling an SSHConnection” on page 177.If the server uses FileVault to encrypt the home folder <strong>of</strong> the user you want to use SSHto connect as, you must be logged in on the server to use SSH. Alternatively, you canstore the keys for the user in a location that is not protected by FileVault. However, thisis not secure.To allow only key-based SSH connections:1 On the server and the client, open Terminal.2 On the server, enter the following command:$ mkdir ~/.ssh3 On the client, enter the following command:$ ssh-keygen -b 1024 -t dsaThis command generates a public/private key pair for the client.4 On the client, press Enter without entering a location when prompted for a location tostore the keys.The keys are stored in /Users/username/.ssh/. The public key is named id_dsa.pub, andthe private key is named id_dsa.178 Chapter 12 <strong>Information</strong> Assurance with Services
5 On the client, enter a complex password when prompted for a passphrase.A complex password is at least 12 letters long and is composed <strong>of</strong> mixed-casecharacters, numbers, and special characters. For more information, see “UsingPasswords” on page 70.6 On the client, enter the following command:$ scp ~/.ssh/id_dsa.pub username@ipaddress:~/.ssh/authorized_keysReplace username with the name <strong>of</strong> a user on the server.Replace ipaddress_or_hostname with the IP address or host name <strong>of</strong> the server.This command copies the client’s public key into the server’s .ssh/ folder and renamesthe key to authorized_keys.7 On the client, authenticate with the password <strong>of</strong> the user whose name you entered.8 On the server, enter the following command and authenticate, if requested:$ sudo pico /private/etc/sshd_configThis command loads the sshd_config file in the pico text editor. For information abouthow to use pico, enter man pico in a Terminal window.9 On the server, edit the following lines, removing the # when replacing original values:Default Replace with Notes#PermitRootLogin yes PermitRootLogin no Prevents logging in as rootthrough SSH.#PasswordAuthentication yes PasswordAuthentication no Disables passwordauthentication.#PermitEmptyPasswords no PermitEmptyPasswords no Denies access to accountswithout passwords.#PubKeyAuthentication yes PubKeyAuthentication yes Enables key-basedauthentication.#RSAAuthentication yes RSAAuthentication no Disables RSAauthentication. (Notneeded for key-basedauthentication.)#RhostsRSAAuthentication no RhostsRSAAuthentication no Disables Rhostauthentication. (Notneeded for key-basedauthentication.)#ChallengeResponseAuthenticationyesChallengeResponseAuthenticationnoNot needed for key-basedauthentication.#UsePAM yes UsePAM no Not needed for key-basedauthentication.#StrictModes yes StrictModes yes Ensures that files andfolders are adequatelyprotected by the server’spermissions’ scheme.Chapter 12 <strong>Information</strong> Assurance with Services 179
Default Replace with Notes#LoginGraceTime 2m LoginGraceTime 30 Reduces the time allowedto authenticate to 30seconds.#KeyRegenerationInterval 1h KeyRegenerationInterval 3600 Ensures that the server keyis changed frequently.#ServerKeyBits 768 ServerKeyBits 1024 Requires that the serverkey is 1024 bits.#Protocol 2,1 Protocol 2 Restricts OpenSSH so itonly uses SSH2.10 On the client, enter the following command:$ sudo pico /private/etc/sshd_config11 Authenticate, if requested.12 On the client, edit the following lines:AllowUsers usernameYou must add this line.Replace username with thename <strong>of</strong> the account youwant to log in as.Default Replace with Notes#PasswordAuthentication yes PasswordAuthentication no Disables password authentication.#RSAAuthentication yes RSAAuthentication no Disables RSA authentication. (Notneeded for key-basedauthentication.)13 On the client, test the SSH connection by entering the following command:$ ssh username@ipaddress_or_hostnameReplace username with the name <strong>of</strong> a user on the server.Replace ipaddress_or_hostname with the IP address or host name <strong>of</strong> the server.When you connect to a host using the IP address, entries are created in thessh_known_hosts file. If you connect to the same host using its host name, a separateentry is created in the ssh_known_host file because each connection is treated as aunique connection.If successful, you are prompted to enter your passphrase for the key.Preventing Connection to Unauthorized Host ServersYou can prevent your computer from connecting to rogue SSH servers by modifyingyour /etc/ssh_known_hosts file. This file lists the servers you are allowed to connect to,including their domain names and their public keys.To prevent your computer from connecting to unauthorized servers:1 If ~/.ssh/ doesn’t exist, enter the following command:180 Chapter 12 <strong>Information</strong> Assurance with Services
$ mkdir ~/.ssh/2 If ~/.ssh/known_hosts exists, enter the following command to remove it:$ srm ~/.ssh/known_hosts3 Use SSH to connect to every server you want to allow access to by entering thefollowing command for each server:$ ssh username@ipaddress_or_hostnameReplace username with the name <strong>of</strong> a user on the server.Replace ipaddress_or_hostname with the IP address or host name <strong>of</strong> the server.When you connect to a host using the IP address, entries are created in thessh_known_hosts file. If you connect to the same host using its host name, a separateentry is created in the ssh_known_hosts file because each connection is treated as aunique connection.4 When you are asked to verify the server’s public key fingerprint, enter yes if it matchesthe server’s public key fingerprint.You can display the server’s public key fingerprint by entering the following on theserver:$ ssh-keygen -l -f /private/etc/ssh_host_rsa_key.pub5 Enter the following command:$ sudo cp ~/.ssh/known_hosts /etc/ssh_known_hosts6 Authenticate, if requested.Because ssh_known_hosts is located in /etc/, users can’t modify this file unless theyhave administrator access.7 Enter the following command:$ srm ~/.ssh/known_hostsAfter you remove ~/.ssh/known_hosts, your computer will only connect to serverslisted in /etc/ssh_known_hosts.Using SSH as a Secure TunnelYou can use SSH to create a secure tunnel connecting to a server or client computer.Many organizations only allow connection though a single port on the firewall toenhance network security. By using SSH tunneling, you can connect through a singleport on a firewall and access a computer on the network.This is important for computers on the network that are not configured for secureencrypted communication. SSH tunneling encrypts the data between the computerand the firewall, securing the data transmitted over an insecure network (such as theInternet).Chapter 12 <strong>Information</strong> Assurance with Services 181
In the following example, Anne Johnson can create an SSH tunnel that connects to anAFP server through a firewall. For additional security, this firewall should restrict allother ports. After the SSH tunnel is established, Anne Johnson can securely connect tothe AFP server.AFP connectionjd oijon o o ioifw xgh ew ewfew wef tprp s pAnne Johnson’scomputerEncrypted SSH TunnelInternetport 22 openAFP serverport 548 openTom Clark’scomputerUnencryptedAFP connectionsecretcodes.txt,quarterlyreports.xlsFirewall allowsSSH (port 22) andAFP (port 548) connectionsTo create an ssh tunnel:1 Open Terminal.2 Use the ssh command to create the SSH tunnel.$ ssh -v -L 2501:localhost:5900 RemoteHostName -l RemoteAFPAccountReplace RemoteHostName with the name <strong>of</strong> the host you what to connect to.Replace RemoteAFPAccount with the AFP account name, and when prompted enter thepassword for RemoteAFPAccount.3 Create a server in AFP.Enter the address localhost:2501 and the RemoteAFPAccount username and password.Modifying the SSH <strong>Configuration</strong> FileMaking changes to the SSH configuration file enables you to set options for each sshconnection. You can make these changes for the system or specific users. To make the change for the system, change the options in the /etc/ssh_config file,which affects all ssh users on the computer. To make the change for a user, make them in the username/.ssh/config file.The ssh configuration file has connection options and other specifications for a specificssh host. A host is specified by the Host declaration. By default, the Host declaration isan asterisk (“*”) indicating any host you are connecting to will use the options listedbelow the Host declaration.182 Chapter 12 <strong>Information</strong> Assurance with Services
You can add a specific host and options for that host by adding a new Host declaration.The new Host declaration will specify a name or address in place <strong>of</strong> the asterisk (“*”).You can then set the connection option for your new host below the Host declaration.This helps secure your ssh sessions in environments with different security levels.For example, if you are connecting to a server using ssh through the Internet, theserver might require a more secure or stricter connection options. However, if you arein a more secure environment, such as your own personal network, you might notneed such strict connection options.For more information about ssh configuration file options, see the ssh man pages.Generating Key Pairs for Key-Based SSH ConnectionsBy default, SSH supports the use <strong>of</strong> password, key, and Kerberos authentication. Thestandard method <strong>of</strong> SSH authentication is to supply login credentials in the form <strong>of</strong> auser name and password. Key pair authentication enables you to log in to the serverwithout supplying a password.This process works as follows:1 A private and a public key are generated, each associated with a user name to establishthat user’s authenticity.2 When you attempt to log in as that user, the user name is sent to the remote computer.3 The remote computer looks in the user’s .ssh/ folder for the user’s public key.This folder is created after using SSH the first time.4 A challenge is then sent to the user based on his or her public key.5 The user verifies his or her identity by using the private portion <strong>of</strong> the key pair todecode the challenge.6 After the challenge is decoded, the user is logged in without needing a password.This is especially useful when automating remote scripts.Key-based authentication is more secure than password authentication because itrequires that you have the private key file and know the password that lets you accessthat key file. Password authentication can be compromised without needing a privatekey file.If the server uses FileVault to encrypt the home folder <strong>of</strong> the user you want to use SSHto connect as, you must be logged in on the server to use SSH. Alternatively, you canstore the keys for the user in a location that is not protected by FileVault. However, thisis not secure.To generate the identity key pair:1 Enter the following command on the local computer.$ ssh-keygen -t dsaChapter 12 <strong>Information</strong> Assurance with Services 183
2 When prompted, enter a filename to save the keys in the user’s folder.3 Enter a password followed by password verification (empty for no password).For example:Generating public/private dsa key pair.Enter file in which to save the key (/Users/anne/.ssh/id_dsa): frogEnter passphrase (empty for no passphrase):Enter same passphrase again:Your identification has been saved in frog.Your public key has been saved in frog.pub.The key fingerprint is:4a:5c:6e:9f:3e:35:8b:e5:c9:5a:ac:00:e6:b8:d7:96 annejohnson1@mac.comThis creates two files. Your identification or private key is saved in one file (frog in ourexample) and your public key is saved in the other (frog.pub in our example). The keyfingerprint, which is derived cryptographically from the public key value, is alsodisplayed. This secures the public key, making it computationally infeasible forduplication.The location <strong>of</strong> the server SSH key is /etc/ssh_host_key.pub. Back up your key in caseyou need to reinstall your server s<strong>of</strong>tware. If your server s<strong>of</strong>tware is reinstalled, you canretain the server identity by putting the key back in its folder.4 Copy the resulting public file, which contains the local computer’s public key, to the.ssh/ folder in the user’s home folder on the remote computer.The next time you log in to the remote computer from the local computer, you won’tneed to enter a password.If you are using an Open Directory user account and you have logged in using theaccount, you do not need to supply a password for SSH login. On <strong>Mac</strong> <strong>OS</strong> X Servercomputers, SSH uses Kerberos for single sign-on authentication with any user accountthat has an Open Directory password (but Kerberos must be running on the OpenDirectory server). For more information, see the Open Directory Administration guide.Updating SSH Key FingerprintsThe first time you connect to a remote computer using SSH, the local computerprompts for permission to add the remote computer’s fingerprint (or encrypted publickey) to a list <strong>of</strong> known remote computers.You might see a message like this:The authenticity <strong>of</strong> host "server1.example.com" can’t be established.RSA key fingerprint is a8:0d:27:63:74:f1:ad:bd:6a:e4:0d:a3:47:a8:f7.Are you sure you want to continue connecting (yes/no)?184 Chapter 12 <strong>Information</strong> Assurance with Services
The first time you connect, you have no way <strong>of</strong> knowing whether this is the correcthost key. When you respond “yes,” the host key is then inserted into the ~/.ssh/known_hosts file so it can be compared against in later sessions.Be sure this is the correct key before accepting it. If at all possible, provide your userswith the encryption key through FTP, mail, or a download from the web, so they canverify the identity <strong>of</strong> the server.If you later see a warning message about a man-in-the-middle attack when you try toconnect, the key on the remote computer might no longer match the key on the localcomputer. This can happen if you: Change your SSH configuration on the local or remote computer. Perform a clean installation <strong>of</strong> the server s<strong>of</strong>tware on the computer you are loggingin to using SSH. Start up from a <strong>Mac</strong> <strong>OS</strong> X Server CD on the computer you are logging in to usingSSH. Attempt to use SSH to log in to a computer that has the same IP address as acomputer that you previously used SSH with on another network.To connect again, delete the entries corresponding to the remote computer you areaccessing (which can be stored by both name and IP address) in ~/.ssh/known_hosts.Important: Removing an entry from the known_hosts file bypasses a securitymechanism that would help you avoid imposters and man-in-the-middle attacks. Besure you understand why the key on the remote computer has changed before youdelete its entry from the known_hosts file.Remote Management (ARD)You can use Apple Remote Desktop (ARD) to perform remote management tasks suchas screen sharing. When sharing your screen you should provide access to specific usersto prevent unauthorized access to your computer screen. You also need to determinethe privileges users will have when viewing your screen.An ARD manager with full privileges can run these tasks as the root user. By limitingthe privileges that an ARD manager has, you can increase security. When settingprivileges, disable or limit an administrator’s access to an ARD client.You can set a VNC password that requires authorized users to use a password to accessyour computer. The most secure way is to require authorized users to requestpermission to access your computer screen.ARD is turned <strong>of</strong>f by default and should remain <strong>of</strong>f when it is not being used. Thisprevents unauthorized users from attempting to access your computer.Chapter 12 <strong>Information</strong> Assurance with Services 185
Restricting Access to Specific UsersIf you need to share your screen using ARD, you must securely turn on remotemanagement in Sharing preferences.The default setting for remote management should be changed from “All users” to“Only these users.” The default setting “All users” includes all users on your localcomputer and all users in the directory server you are connected to.Any account using ARD should have limited privileges to prevent remote users fromhaving full control <strong>of</strong> your computer.You can securely configure ARD by restricting access to specific users. You can alsorestrict each user’s privileges by setting ARD options. The user’s privileges should belimited to the user’s permission on the computer. For example, you might not want togive a standard user the ability to change your settings or delete items.For more information, see Apple Remote Desktop Administration Guide.You can also securely configure computer settings for remote management. If usersconnect to your computer using VNC, require that they use a password by enabling“VNC viewer may control screen with password.” Use Password Assistant to create astrong password for VNC users.From the Command Line:# Remote Management (ARD)# -----------------------------# Disable Remote Management./System/Library/CoreServices/RemoteManagement/ARDAgent.app/Contents/\Resources/kickstart -deactivate -stopRemote Apple Events (RAE)If you enable Remote Apple Events (RAE), you allow your computer to respond toevents sent by other computers on your network. These events include AppleScriptprograms. A malicious AppleScript program can do things like delete your~/Documents/ folder.RAE is turned <strong>of</strong>f by default and should remain <strong>of</strong>f when it is not being used. Thisprevents unauthorized users from accessing your computer.186 Chapter 12 <strong>Information</strong> Assurance with Services
From the Command Line:# Remote Apple Events (RAE)# -----------------------------# Disable Remote Apple Events.launchctl unload -w /System/Library/LaunchDaemons/eppc.plistRestricting Access to Specific UsersAvoid enabling RAE. If you enable RAE, do so on a trusted private network and disableit immediately after disconnecting from the network. The default setting for RAE shouldbe changed from “All users” to “Only these users.” The default setting “All users” includesall users on your local computer and all users in the directory server you are connectedto.When securely configuring RAE, restrict remote events to only be accepted fromspecific users. This prevents unauthorized users form sending malicious events to yourcomputer. If you create a sharing user account, create a strong password usingPassword Assistant. Avoid accepting events from <strong>Mac</strong> <strong>OS</strong> 9 computers. If you need toaccept <strong>Mac</strong> <strong>OS</strong> 9 events, use Password Assistant to create a strong password.Xgrid SharingComputers on a network can use Xgrid to work together in a grid to process a job. Yourcomputer can join the grid as an Xgrid client or as an Xgrid agent. A client submits jobsto the grid and an agent processes jobs received from an Xgrid controller. A controlleris a server that receives jobs from clients and distributes jobs to agents.For more information about Xgrid, see Xgrid Administration.Xgrid Sharing is turned <strong>of</strong>f by default and should remain <strong>of</strong>f when it is not being used.This prevents unauthorized users from accessing your computer.When you volunteer your computer as an agent, or when you run a grid-enabledapplication as a client, specify the controller by name or address. This can be donewithin the configuration settings <strong>of</strong> Xgrid Sharing. Also, always use a password orsingle sign-on for authentication.Although your computer can use Bonjour to discover controllers on the local network,when you specify a controller, you help ensure that your computer connects to theintended Xgrid controller and not a malicious controller.It is still possible for a malicious controller to spo<strong>of</strong> a legitimate controller’s DNS and IPaddress, but choosing a specific controller prevents trivial attacks.Chapter 12 <strong>Information</strong> Assurance with Services 187
Restricting Access to Specific UsersYour computer can specify the type <strong>of</strong> authentication it requires, including password,Kerberos, or no authentication. If your computer connects to the Internet, require someform <strong>of</strong> authentication to avoid unknowingly connecting to a malicious controller.Malicious controllers can make agents run malicious s<strong>of</strong>tware, create networkconnections, and possibly crash your computer. Similarly, clients or controllers that lackauthentication might find their jobs (and sensitive data they contain) hijacked bymalicious agents.Only connect to controllers that require authentication. Password authentication is asimple authentication solution that maintains the confidentiality <strong>of</strong> your passwordwhen validating the password supplied by the controller.After password authentication, communication with the controller is transmitted inclear text. If your connection uses Kerberos authentication, only the authenticationwith the controller is encrypted.From the Command Line:# Xgrid Sharing# -----------------------------# Disable Xgrid Sharing.xgridctl controller stopxgridctl agent stopInternet SharingAlthough Internet Sharing is a convenient way to share Internet access, enabling it is asecurity risk. Internet Sharing also violates many organizational security policies.Internet Sharing in Sharing preferences is preconfigured. Enabling Internet Sharingactivates DHCP, NAT, and Firewall services, which are unconfigurable. A compromise toa single user node exposes the organization’s network to attack.Internet Sharing is turned <strong>of</strong>f by default and should remain <strong>of</strong>f when it is not beingused. This prevents unauthorized users from accessing your computer.188 Chapter 12 <strong>Information</strong> Assurance with Services
From the Command Line:# Internet Sharing# -----------------------------# Disable Internet Sharing.defaults write /Library/Preferences/System<strong>Configuration</strong>/com.apple.nat NAT -dict Enabled -int 0launctl unload -w /System/Library/LaunchDaemons/\com.apple.InternetSharing.plistRestricting Access to Specific UsersIf you are in an environment where you need to share your Internet connection usingAirPort, use the AirPort options to secure AirPort and prevent access to your computerfrom unauthorized users.When configuring AirPort options to secure Internet Sharing, choose a channel fromthe channel pop-up menu and enable encryption using WEP.Use a strong password for the connection, use Password Assistant to help you create astrong password, and set the WEP key length to 128 bit.When you finish sharing your Internet connection, turn the service <strong>of</strong>f.Bluetooth SharingIf you have a Bluetooth module installed in your computer or if you are using anexternal USB Bluetooth module, you can set up your computer to use Bluetooth tosend and receive files with other Bluetooth-enabled computers or devices.You can control how your computer handles files that are exchanged betweenBluetooth devices. You can choose to accept or refuse files sent to your computer andchoose which folder other devices can browse.Bluetooth Sharing is turned <strong>of</strong>f by default and should remain <strong>of</strong>f when it is not beingused. This prevents unauthorized users from accessing your computer.Restricting Access to Specified UsersIf you are in an environment where you would like to share files with another computeror device, use the Bluetooth Sharing options and Bluetooth preferences to securelyenable Bluetooth and avoid unauthorized access to your computer.Your Bluetooth options should always require pairing and be set to “Ask What to Do”when receiving or sharing items.Chapter 12 <strong>Information</strong> Assurance with Services 189
When configuring Bluetooth preferences to secure Bluetooth sharing, use theDiscoverable option only while you are setting up the Bluetooth computer or device.After the device is configured, disable the Discoverable option to prevent unauthorizedusers from discovering your Bluetooth connection.In the advanced section <strong>of</strong> Bluetooth preferences make sure that “Allow Bluetoothdevices to wake this computer” and “Share my internet connection with otherBluetooth devices” are not selected.From the Command Line:# Bluetooth Sharing# -----------------------------# Disable Bluetooth Sharing.defaults -currentHost write com.apple.bluetooth PrefKeyServicesEnabled 0190 Chapter 12 <strong>Information</strong> Assurance with Services
13 Advanced<strong>Security</strong> Management13Use this chapter to monitor your system and prevent attacks.Knowing the points <strong>of</strong> your computer that are susceptible to attack can help youmonitor activity and prevent attacks from occurring.Managing Authorization Through RightsAuthorization on <strong>Mac</strong> <strong>OS</strong> X is controlled by a policy database. This database is stored in/etc/authorization. The database format is described in comments at the top <strong>of</strong> that file.All requests for authentication are processed by a <strong>Security</strong>Agent plug-in withrequirements gathered from the policy database (/etc/authorization).Acquiring <strong>of</strong> rights by the user is what is necessary to successfully perform that action.Understanding the Policy DatabaseThe policy database is a property list that consists <strong>of</strong> two dictionaries: The rights dictionary The rules dictionaryThe Rights DictionaryThe rights dictionary contains a set <strong>of</strong> key/value pairs, called right specifications. Thekey is the right name and the value is information about the right, including adescription <strong>of</strong> what the user must do to acquire the right.The following is an extract from the policy database installed on your system....rights191
classrulecommentMatches otherwise unmatched rights (i.e., is a default).ruledefaultsystem.device.dvd.setregion.initialclassusercommentUsed by the DVD player to set the region code the firsttime. Note that changing the region code after it has been set requiresa different right (system.device.dvd.setregion.change).groupadminshared...config.add.classallowcommentWildcard right for adding rights. Anyone is allowed to addany (non-wildcard) rights....In this extract from the policy database, there are three rights: The right specification with an empty key string is known as the default rightspecification. To obtain this right a user must satisfy the default rule which, by defaulton current versions <strong>of</strong> <strong>Mac</strong> <strong>OS</strong> X, is to prove that they are an administrator. system.device.dvd.setregion.initial controls whether the user is allowed to setthe initial region code for the DVD drive. By default, a user must prove that they arean administrator (in group admin) to set the DVD region. config.add. is a wildcard right specification (it ends with a dot) that matches anyright whose name starts with the config.add. characters. This right controls whethera user can add a right specification to the policy database. By default any user canadd a right specification.192 Chapter 13 Advanced <strong>Security</strong> Management
When a program asks for a right, Authorization Services executes the followingalgorithm:1 It searches the policy database for a right specification whose key exactly matches theright name.2 If that fails, it searches the policy database for a wildcard right specification whose keymatches the right name. If multiple right specifications are present, it uses the one withthe longest key.3 If that fails, it uses the default right specification.After it has found the relevant right specification, Authorization Services evaluates thespecification to decide whether to grant the right. In some cases this is easy. Forexample, in the extract from the policy database above, config.add. is always granted.In other cases it can be more complex. For example, setting the DVD region requiresthat you enter an administrator password.The Rules DictionaryA rule consists <strong>of</strong> a set <strong>of</strong> attributes. Rules are preconfigured when <strong>Mac</strong> <strong>OS</strong> X Server isinstalled, but applications can change them at any time. Rules are contained in theRules dictionary.The following table describes the attributes defined for rules.Rule attribute Generic rule value DescriptionkeyThe key is the name <strong>of</strong> a rule. A key uses the samenaming conventions as a right. The <strong>Security</strong> Server uses arule’s key to match the rule with a right. Wildcard keysend with a period (“.”). The generic rule has an empty keyvalue. Rights that do not match a specific rule use thegeneric rule.group admin The user must authenticate as a member <strong>of</strong> this group.This attribute can be set to any one group.shared true If this is set to true, the <strong>Security</strong> Server marks thecredentials used to gain this right as shared. The <strong>Security</strong>Server can use any shared credentials to authorize thisright.For maximum security, set sharing to false so credentialsstored by the <strong>Security</strong> Server for one application cannotbe used by another application.timeout 300 The credential used by this rule expires in the specifiednumber <strong>of</strong> seconds.For maximum security where the user must authenticateevery time, set the timeout to 0.For minimum security, remove the timeout attribute sothe user authenticates only once per session.Chapter 13 Advanced <strong>Security</strong> Management 193
There are specific rules in the policy database for <strong>Mac</strong> <strong>OS</strong> X applications. There is also ageneric rule in the policy database that the <strong>Security</strong> Server uses for any right thatdoesn’t have a specific rule.Managing Authorization RightsManaging authorization rights involves creating and modifying right and rule values.Creating an Authorization RightTo authorize a user for specific rights, you must create an authorization right to therights dictionary. Each right consists <strong>of</strong> the following: The name <strong>of</strong> the right A value that contains optional data pertaining to the right The byte length <strong>of</strong> the value field Optional flagsThe right always matches the generic rule unless a new rule is added to the policydatabase.Modifying an Authorization RightTo modify a right, change the value in /etc/authorization and save the file.To lock out all privileged operations not explicitly allowed, change the generic rule bysetting the timeout attribute to 0.To allow all privileged operations after the user is authorized, remove the timeoutattribute from the generic rule.To prevent applications from sharing rights, set the shared attribute to false.To require users to authenticate as a member <strong>of</strong> the staff group instead <strong>of</strong> the admingroup, set the group attribute to staff.Example Authorization RestrictionsAs an example <strong>of</strong> how the <strong>Security</strong> Server matches a right with a rule in the policydatabase, consider a grades-and-transcripts application.The application requests the right com.myOrganization.myProduct.transcripts.create.The <strong>Security</strong> Server looks up the right in the policy database. Not finding an exactmatch, the <strong>Security</strong> Server looks for a rule with a wildcard key set tocom.myOrganization.myProduct.transcripts., com.myOrganization.myProduct.,com.myOrganization., or com.—in that order—checking for the longest match.If no wildcard key matches, the <strong>Security</strong> Server uses the generic rule.194 Chapter 13 Advanced <strong>Security</strong> Management
The <strong>Security</strong> Server requests authentication from the user. The user provides a username and password to authenticate as a member <strong>of</strong> the group admin. The <strong>Security</strong>Server creates a credential based on the user authentication and the right requested.The credential specifies that other applications can use it, and the <strong>Security</strong> Server setsthe expiration to five minutes.Three minutes later, a child process <strong>of</strong> the application starts. The child process requeststhe right com.myOrganization.myProduct.transcripts.create.The <strong>Security</strong> Server finds the credential, sees that it allows sharing, and uses the right.Two and a half minutes later, the same child process requests the rightcom.myOrganization.myProduct.transcripts.create again, but the right has expired.The <strong>Security</strong> Server begins the process <strong>of</strong> creating a new credential by consulting thepolicy database and requesting user authentication.Example <strong>of</strong> Authorizing for Screen SaverAfter you have configured a password-protected screen saver to prevent unauthorizedusers from accessing your unattended computer, modify the default rule settings <strong>of</strong> thesystem.login.screensaver (shown below) to prevent users in the admin group frombeing able to unlock your screen saver.system.login.screensaverclassrulecommentthe owner as well as any admin can unlock thescreensaver;modify the group key to change this.ruleauthenticate-session-owner-or-adminsystem.login.ttyThe authenticate-session-owner-or-admin rule (shown below) permits users in theadmin group or the session owner to authenticate and unlock the screen saver.authenticate-session-owner-or-adminallow-rootclassusercommentthe owner as well as any admin canauthorizegroupadminsession-ownerChapter 13 Advanced <strong>Security</strong> Management 195
sharedThe default setting creates a possible point <strong>of</strong> attack, because the more users you havein the admin group the more you depend on those users to protect their user namesand passwords.The authenticate-session-owner rule (shown below) permits only the session owner toauthenticate and unlock the screen saver.authenticate-session-ownerclassusercommentauthenticate session ownersession-ownerBy changing the rule in system.login.screensaver (shown below) to authenticatesession-owner,users <strong>of</strong> the admin group cannot unlock the screen saver.system.login.screensaverclassrulecommentthe owner as well as any admin can unlock thescreensaver;modify the group key to change this.ruleauthenticate-session-ownersystem.login.ttyMaintaining System IntegrityBy monitoring events and logs you can help protect the integrity <strong>of</strong> your computer andnetwork. Auditing and logging tools monitor your computer and help you maintain thesecurity <strong>of</strong> your computer.By reviewing audits and logs, you can stop login attempts from unauthorized users orcomputers and further protect your configuration settings.196 Chapter 13 Advanced <strong>Security</strong> Management
Validating File IntegrityWhen downloading files over an insecure network, the files are vulnerable to attack.Your files can be intercepted and modified by an attacker who is monitoring theinsecure website activity.For example, if you are downloading a file or program from a website that is not usingSSL, your files can be intercepted and modified to become a security threat to yourcomputer.You can prevent this by comparing the checksum (SHA-1 or SHA-256/512 hash) value <strong>of</strong>the file you download with the original checksum value <strong>of</strong> the file, which is usuallyposted on the website you are downloading from.The checksum value is a 128-bit value generated from the file you are downloading,which is like a fingerprint <strong>of</strong> the file. This value is unique to the file, and as long as thefile is not modified, it always generates the same checksum value. The checksum valueis generally posted on the website to use as a comparison. Only trust checksum valuesthat are on a website that is accessed over SSL.After you download the file, run the following command on the file to generate thechecksum value (file_name is the name <strong>of</strong> the file):$ md5 file_nameThen compare the two checksum values. If the values are the same, the file has notbeen modified and is safe to use. If the values differ, the file has been modified andshould not be trusted. Delete the file and try downloading it again.<strong>Mac</strong> <strong>OS</strong> X provides the checksum tool for checking file validity; however, it is not theonly tool you can use to check the validity <strong>of</strong> a file. Other third-party tools are availablefor verifying file integrity.About File Integrity Checking ToolsFile integrity tools help protect your computer by detecting and logging changes to filesystem objects such as files and folders. Some file integrity tools can also detectchanges to your local directory domain and to kernel modules.Depending on the file integrity tool you choose, you can use advanced features such asthe ability to reverse file system changes or to receive detailed logs in various formats.File integrity tools are generally hosted on a server that you securely connect to. Theserver retrieves logs from clients and stores baseline configuration databases andconfiguration data.For more information about tools such as checksum and file hashing, see “Verifying theIntegrity <strong>of</strong> S<strong>of</strong>tware” on page 37.Chapter 13 Advanced <strong>Security</strong> Management 197
Using Digital Signatures to Validate Applications andProcessesA digital signature uses public key cryptography to ensure the integrity <strong>of</strong> data. As withtraditional signatures written with ink on paper, they can be used to identify andauthenticate the signer <strong>of</strong> the data.However, digital signatures go beyond traditional signatures because they can alsoensure that the data itself has not been altered. This is like designing a check in such away that if someone alters the amount <strong>of</strong> the sum written on the check, an “Invalid”watermark becomes visible on the face <strong>of</strong> the check.To create a digital signature, the signer generates a message digest <strong>of</strong> the data andthen uses a private key to sign the digest. The signer must have a valid digitalcertificate containing the public key that corresponds to the private key. Thecombination <strong>of</strong> a certificate and related private key is called an identity.The signature includes the signed digest and information about the signer’s digitalcertificate. The certificate includes the public key and the algorithm needed to verifythe signature.To verify that the signed document has not been altered, the recipient uses thealgorithm to create their own message digest and applies the public key to the signeddigest. If the two digests prove identical, the message was not altered and was sent bythe owner <strong>of</strong> the public key.To ensure that the person who provided the signature is not only the same person whoprovided the data but is also who they say they are, the certificate is also signed—inthis case by the certification authority (CA) who issued the certificate.Signed code uses several digital signatures: If the code is universal, the object code for each architecture is signed separately. Various components <strong>of</strong> the application bundle (such as the Info.plist file, if there isone) are also signed.Validating Application Bundle IntegrityTo validate the signature on a signed application bundle, use the codesign commandwith the -v option.$ codesign -v code-pathThis command verifies that the code binaries at code-path are signed, that thesignature is valid, that all sealed components are unaltered, and that the whole bundlepasses basic consistency checks. It does not by default verify that the code satisfies anyrequirements except its own designated requirement.198 Chapter 13 Advanced <strong>Security</strong> Management
To inspect a specific requirement, use the -R option. For example, to verify that theApple Mail application is identified as Mail, signed by Apple, and secured with Apple’sroot signing certificate, use the following command:$ codesign -v -R="identifier com.apple.Mail and anchor apple"/Applications/Mail.appUnlike the -r option, the -R option takes only a single requirement rather than arequirements collection (no => tags). Add additional -v options to get details on thevalidation process.For more information about signing and verifying application bundle signatures, seethe Code Signing Guide at developer.apple.com/documentation/<strong>Security</strong>/Conceptual/CodeSigningGuide. For more information about the codesign command, see its manpage.Validating Running ProcessesYou can also use codesign to validate the signatures <strong>of</strong> running processes.If you pass a number rather than a path to the verify option, codesign takes thenumber to be the process ID (pid) <strong>of</strong> a running process, and performs dynamicvalidation instead.Activity Analysis Tools<strong>Mac</strong> <strong>OS</strong> X includes several command-line tools that you can use to analyze computeractivity.Depending on tool configurations and your computer’s activity, running these toolscan use a large amounts <strong>of</strong> disk space. Additionally, these tools are only effective whenother users don’t have administrator access. Users with administrator access can editlogs generated by the tool and circumvent the tool.If your computer contains sensitive data, consider using auditing and logging tools. Byusing both types <strong>of</strong> tools, you can properly research and analyze intrusion attemptsand changes in your computer’s behavior.You configure these tools to meet your organization’s needs, and then change theirlogging settings to create relevant information for review or archiving.Validating System LoggingLogging is the recording <strong>of</strong> events, including changes to service status, processes, andoperating system components. Some events are security related, while others areinformation messages about your computer’s activity.Chapter 13 Advanced <strong>Security</strong> Management 199
If an unexpected error occurs, you can analyze logs to help determine the cause <strong>of</strong> theerror. For example, logs might explain why a s<strong>of</strong>tware update can’t be installed, or whyyou can’t authenticate.Logging tools can be useful if you have multiple users who can access the sudocommand. You can view logs to see what users did using the sudo command.Because some sudo commands perform additional actions that are not logged, limitthe sudo commands that users can use. For more information, see “Securing the SystemAdministrator Account” on page 65.Use Console to view and maintain log files. Console is located in the /Applications/Utilities/ folder. Upon starting, the Console window shows the console.log file. ClickLogs to display a pane that shows other log files on the system in a tree view. The treeincludes folders for services such as web and mail server s<strong>of</strong>tware.<strong>Mac</strong> <strong>OS</strong> X log files are handled by the BSD subsystem or by a specific application. TheBSD subsystem handles most important system logging, while some applicationshandle their own logging.Like other BSD systems, <strong>Mac</strong> <strong>OS</strong> X uses a background process called syslogd to handlelogging. A fundamental decision to make when configuring syslogd is whether to uselocal or remote logging. In local logging, log messages are stored on the hard disk. Inremote logging, log messages are stored on a dedicated log server.Using remote logging is strongly recommended. If computer logs are stored on aremote computer they can be analyzed: however, you must ensure the logs aretransferred securely to the remote computer and that they are secure. Otherwise, thelog files could be modified through a man-in-the-middle attack.Configuring syslogdThe configuration file for the system logging process syslogd is /etc/syslog.conf. Forinformation about configuring this file, issue the command man syslog.conf in aTerminal window.Each line <strong>of</strong> /etc/syslog.conf consists <strong>of</strong> text containing the following types <strong>of</strong> data. Facilities are categories <strong>of</strong> log messages. Standard facilities include mail, news, user,and kern (kernel). Priorities deal with the urgency <strong>of</strong> the message. In order from least to most critical,they are as follows: debug, info, notice, warning, err, crit, alert, and emerg. Thepriority <strong>of</strong> the log message is set by the application sending it, not syslogd. An action specifies what to do with the log message <strong>of</strong> a facility and priority.Messages can be sent to files, named pipes, devices, or remote hosts.200 Chapter 13 Advanced <strong>Security</strong> Management
The following sample line specifies that for any log messages in the category “mail”with a priority <strong>of</strong> “emerg” or higher, the message is written to the /var/log/mail.log file:mail.emerg /var/log/mail.logThe facility and priority are separated by a period, and these are separated from theaction by tabs. You can use wildcards (“*”) in the configuration file. The followingsample line logs messages <strong>of</strong> any facility or priority to the file /var/log/all.log:*.* /var/log/all.logLocal System LoggingThe default configuration in /etc/newsyslog.conf is configured for local logging in the/var/log folder. The computer is set to rotate log files using the periodic launchd jobaccording to time intervals specified in the /etc/newsyslog.conf file.Rotation entails compressing the current log file, incrementing the integer in thefilename <strong>of</strong> compressed log files, and creating a log file for new messages.The following table describes the rotation process after two rotations.Files before rotation Files after first rotation File after second rotationsystem.log system.log system.logmail.log mail.log mail.logmail.log.1.gzmail.log.1.gzsystem.log.1.gzsystem.log.1.gzmail.log.2.gzsystem.log.2.gzLog files are rotated by a launchd job, and the rotation occurs if the computer is onwhen the job is scheduled. By default, log rotation tasks are scheduled betweenmidnight and 1 in the morning, to be as unobtrusive as possible to users. If the systemwill not be powered on at this time, adjust the settings in /etc/newsyslog.conf.For information about editing the /etc/newsyslog.conf file, issue the man 5newsyslog.conf command in a Terminal window.Remote System LoggingIn addition to local logging, consider using remote logging. Local logs can be altered ifthe computer is compromised.When deciding whether to use remote logging, consider the following issues. If theseissues outweigh the benefits <strong>of</strong> remote logging, don’t use remote logging. The syslog process sends log messages in the clear, which could expose sensitiveinformation.Chapter 13 Advanced <strong>Security</strong> Management 201
 Too many log messages will fill storage space on the logging system, renderingfurther logging impossible. Log files can indicate suspicious activity only if a baseline <strong>of</strong> normal activity isestablished and if the logs are monitored for such activity.The following instructions assume a remote log server exists on the network.To enable remote logging:1 Open /etc/syslog.conf as root.2 Add the following line to the top <strong>of</strong> the file, replacing your.log.server with the nameor IP address <strong>of</strong> the log server, and keeping all other lines intact:*.* @your.log.server3 Exit, saving changes.4 Send a hangup signal to syslogd to make it reload the configuration file:$ sudo killall –HUP syslogdAuditing System ActivityAuditing is the capture and maintenance <strong>of</strong> information about security-related events.Auditing helps determine the causes and the methods used for successful and failedaccess attempts.<strong>Mac</strong> <strong>OS</strong> X includes a suite <strong>of</strong> auditing tools to manage, refine, and view auditing logs.You install these tools from the installation disc. For information about these auditingtools, see the Common Criteria <strong>Configuration</strong> and Administration guide, available atwww.apple.com/support/security/commoncriteria/.<strong>Security</strong> AuditingAuditing is the capture and maintenance <strong>of</strong> information about security-related events.Auditing helps determine the causes and methods used for successful and failed accessattempts.The audit subsystem allows authorized administrators to create, read, and delete auditinformation. The audit subsystem creates a log <strong>of</strong> auditable events and allows theadministrator to read audit information from the records in a manner suitable forinterpretation. The default location for these files is the /var/audit/ folder.The audit subsystem is controlled by the audit utility located in the /usr/sbin/ folder.This utility transitions the system in and out <strong>of</strong> audit operation.The default configuration <strong>of</strong> the audit mechanism is controlled by a set <strong>of</strong>configuration files in the /etc/security/ folder.202 Chapter 13 Advanced <strong>Security</strong> Management
If auditing is enabled, the /etc/rc startup script starts the audit daemon at systemstartup. All features <strong>of</strong> the daemon are controlled by the audit utility and theaudit_control file.Installing Auditing ToolsThe Common Criteria Tools disk image (.dmg) file contains the installer for auditingtools. This disk image file is available from the Common Criteria webpage located atwww.apple.com/support/security/commoncriteria/.After downloading the Common Criteria Tools disk image file, copy it to a removabledisk, such as a CD-R disc, FireWire disk, or USB disk.To install the Common Criteria Tools s<strong>of</strong>tware:1 Insert the disk that contains the Common Criteria Tools disk image file and open thefile to mount the volume containing the tools Installer.2 Double-click the CommonCriteriaTools.pkg installer file.3 Click Continue, then proceed through the installation by following the onscreeninstructions.4 When prompted to authenticate, enter the user name and password <strong>of</strong> theadministrator account.Enabling <strong>Security</strong> AuditingModify the hostconfig file to enable auditing.To turn auditing on:1 Open Terminal.2 Enter the following command to edit the /etc/hostconfig file.$ sudo vi /etc/hostconfig3 Add the following entry to the file.AUDIT=-YES-4 Save the file.Auditing is enabled when the computer starts up.Analyzing <strong>Security</strong> Audit LogsIf auditing is enabled, the auditing subsystem adds records <strong>of</strong> auditable events to anaudit log file. The name <strong>of</strong> an audit log file consists <strong>of</strong> the date and time it was created,followed by a period, and the date and time it was terminated. For example:20040322183133.20040322184443.This log was created on March 22nd 2004 at 18:31:33 and was terminated on March22nd 2004 at 18:44:43.Chapter 13 Advanced <strong>Security</strong> Management 203
The audit subsystem appends records to only one audit log file at a given time. Thecurrently active file has a suffix “.not_terminated” instead <strong>of</strong> a date and time. Audit logfiles are stored in the folders specified in the audit_control file. The audit subsystemcreates an audit log file in the first folder specified.When less than the minfree amount <strong>of</strong> disk space is available on the volume containingthe audit log file, the audit subsystem:1 Issues an audit_warn s<strong>of</strong>t warning2 Terminates the current audit log file3 Creates a new audit log file in the next specified folderAfter all folders specified have exceeded this minfree limit, auditing resumes in the firstfolder again. However, if that folder is full, an auditing subsystem failure can occur.You can terminate the current audit log file and create a new one manually using theaudit utility. This action is commonly referred to as “rotating the audit logs.”Use audit -n to rotate the current log file. Use audit -s to force the audit subsystem toreload its settings from the audit_control file (which also rotates the current log file).Antivirus ToolsInstalling antivirus tools helps prevent infection <strong>of</strong> your computer by viruses, and helpsprevent your computer from becoming a host used to spread viruses to othercomputers. These tools quickly identify suspicious content and compare them toknown malicious content.In addition to using antivirus tools, follow computer usage habits that avoid virusinfection. For example, don’t download or open content you didn’t request, and neveropen a file sent to you by someone you don’t know. For more information aboutsecurely using mail, see “Mail <strong>Security</strong>” on page 147.When you use antivirus tools, make sure you have the latest virus definition files. Theprotection provided by your antivirus tool depends on the quality <strong>of</strong> your virusdefinition files. If your antivirus program supports it, enable automatic downloading <strong>of</strong>virus definitions.For a list <strong>of</strong> antivirus tools, see the <strong>Mac</strong>intosh Products Guide at guide.apple.com.204 Chapter 13 Advanced <strong>Security</strong> Management
Intrusion Detection SystemsAn intrusion detection system (IDS) monitors user activity and examines data receivedthrough the network. You are notified <strong>of</strong> suspicious activity, and in many cases thesuspicious activity is automatically prevented.There are two types <strong>of</strong> intrusion detection systems: Host-based intrusion detection systems (HIDS). A HIDS monitors operating systemactivity on specific computers, but not network traffic. If an intruder repeats attemptsto guess a login password, this can cause a HIDS alert. Network-based intrusion detection systems (NIDS). A NIDS examines networkpackets and compares them to a database <strong>of</strong> known attack patterns.For more information, see “Intrusion Protection Using Open Source Tools”(www.apple.com/itpro/articles/intrusionprotection/index2.html).Chapter 13 Advanced <strong>Security</strong> Management 205
206 Chapter 13 Advanced <strong>Security</strong> Management
A<strong>Security</strong> ChecklistAAppendixUse the checklist in this appendix to follow the steps requiredto secure <strong>Mac</strong> <strong>OS</strong> X.This appendix contains checklists <strong>of</strong> action items found throughout this guide, orderedby chapter.You can customize these checklists to suit your needs. For example, you can mark thecompletion status <strong>of</strong> action items in the “Completed?” column. If you deviate from thesuggested action item, use the “Notes” column to justify or clarify your deviation.Installation Action ItemsFor details, see Chapter 2, “Installing <strong>Mac</strong> <strong>OS</strong> X,” on page 29.Action Item Completed? NotesSecurely erase the <strong>Mac</strong> <strong>OS</strong> Xpartition before installationInstall <strong>Mac</strong> <strong>OS</strong> X using <strong>Mac</strong> <strong>OS</strong>Extended disk formattingDo not install unnecessarypackagesDo not transfer confidentialinformation in Setup AssistantDo not connect to the InternetCreate administrator accountswith difficult-to-guess namesCreate complex passwords foradministrator accountsDo not enter a password-relatedhint; instead, enter help deskcontact informationEnter correct time settings207
Action Item Completed? NotesUse an internal S<strong>of</strong>tware UpdateserverUpdate system s<strong>of</strong>tware usingverified packagesRepair disk permissions afterinstalling s<strong>of</strong>tware or s<strong>of</strong>twareupdatesHardware Action ItemsFor details, see Chapter 3, “Protecting System Hardware,” on page 41.Action Item Completed? NotesRestrict access to rooms thathave computersStore computers in locked orsecure containers when not inuseDisable Wi-Fi Support S<strong>of</strong>twareDisable Bluetooth SupportS<strong>of</strong>twareDisable Audio RecordingSupport S<strong>of</strong>twareDisable Video RecordingSupport S<strong>of</strong>twareDisable USB Support S<strong>of</strong>twareDisable FireWire SupportS<strong>of</strong>twareGlobal System Action ItemsFor details, see Chapter 4, “Securing Global System Settings,” on page 49.Action Items Completed? NotesRequire an Open Firmware orEFI passwordCreate an access warning for thelogin windowCreate an access warning for thecommand line208 Appendix A <strong>Security</strong> Checklist
Account <strong>Configuration</strong> Action ItemsFor details, see Chapter 5, “Securing Accounts,” on page 59.Action Item Completed? NotesCreate an administrator accountand a standard account for eachadministratorCreate a standard or managedaccount for eachnonadministratorSet parental controls formanaged accountsRestrict sudo users to accessrequired commandsSecurely configure LDAPv3accessSecurely configure ActiveDirectory accessUse Password Assistant togenerate complex passwordsAuthenticate using a smart card,token, or biometric deviceSet a strong password policySecure the login keychainSecure keychain itemsCreate keychains for specializedpurposesUse a portable drive to storekeychainsAppendix A <strong>Security</strong> Checklist 209
System Preferences Action ItemsFor details, see Chapter 6, “Securing System Preferences,” on page 79.Action Items Completed? NotesLog in with administratorprivilegesEnable .<strong>Mac</strong> only for useraccounts without access tocritical dataSecurely configure .<strong>Mac</strong>preferencesSecurely configure AccountspreferencesSecurely configure AppearancepreferencesChange the number <strong>of</strong> recentitems displayedSecurely configure BluetoothpreferencesSecurely configure CD & DVDpreferencesSecurely configure Date & TimepreferencesSecurely configure Desktop &Screen Saver preferencesSecurely configure DisplaypreferencesSecurely configure DockpreferencesSecurely configure Energy SaverpreferencesConfigure Exposé & SpacesPreferencesSecurely configure Key & MousepreferencesSecurely configure NetworkpreferencesSecurely configure ParentalControl preferencesSecurely configure Print & FaxpreferencesSecurely configure QuickTimepreferences210 Appendix A <strong>Security</strong> Checklist
Action Items Completed? NotesSecurely configure <strong>Security</strong>preferencesSecurely configure SharingpreferencesSecurely configure S<strong>of</strong>twareUpdate preferencesSecurely configure SoundpreferencesSecurely configure SpeechpreferencesSecurely configure SpotlightpreferencesSecurely configure Startup DiskpreferencesSecurely configure Time<strong>Mac</strong>hine preferencesEncryption (DAR) Action ItemsFor details, see Chapter 7, “Securing Data and Using Encryption,” on page 125.Action Items Completed? NotesAssign P<strong>OS</strong>IX access permissionsbased on user categoriesReview and modify folder flagsBackup Action ItemsFor details, see Chapter 10, “Ensuring Data Integrity with Backups,” on page 147.Action Items Completed? NotesSecurely encrypt and backupyour dataApplication Action ItemsFor details, see Chapter 11, “<strong>Information</strong> Assurance with Applications,” on page 149.Action Items Completed? NotesConfigure Mail using SSLVerify certificate validityRequest .<strong>Mac</strong> identity certificateAppendix A <strong>Security</strong> Checklist 211
Action Items Completed? NotesSecure iChat communicationsCreate a strong password foriTunesSecure remote access using VPNTurn firewall protection onServices Action ItemsFor details, see Chapter 12, “<strong>Information</strong> Assurance with Services,” on page 169.Action Items Completed? NotesLimit the list <strong>of</strong> administratorsallowed to use sudoSecure BTMM access through<strong>Security</strong> PreferencesSet up screen sharing throughVNC with password protectionEstablish key-based SSHconnectionsCreate an SSH secure tunnelConfigure ARD to manageremote tasksAdvanced Management Action ItemsFor details, see Chapter 13, “Advanced <strong>Security</strong> Management,” on page 191.Action Item Completed? NotesCreate an authorization right tothe dictionary to authorize usersCreate a digital signatureEnable security auditingConfigure security auditingGenerate auditing reportsEnable local loggingEnable remote loggingInstall a file integrity checkingtoolCreate a baseline configurationfor file integrity checking212 Appendix A <strong>Security</strong> Checklist
Action Item Completed? NotesInstall an antivirus toolConfigure the antivirus tool toautomatically download virusdefinition filesAppendix A <strong>Security</strong> Checklist 213
214 Appendix A <strong>Security</strong> Checklist
B<strong>Security</strong> ScriptsBAppendix# Updating from an Internal S<strong>of</strong>tware Update Server# ------------------------------------------------# Specify the s<strong>of</strong>tware update server to use.# Replace swupdate.apple.com with the fully qualified domain name (FQDN)# or IP address <strong>of</strong> your s<strong>of</strong>tware update server.defaults write com.apple.S<strong>of</strong>twareUpdate CatalogURL http://swupdate.apple.com:8088/index.sucatalog# Switch your computer back to the default Apple update server.defaults delete com.apple.S<strong>of</strong>twareUpdate CatalogURL# Updating from Internet S<strong>of</strong>tware Update Server# -----------------------------------# Download and install s<strong>of</strong>tware updates.s<strong>of</strong>twareupdate --download --all --install# Updating Manually from Installer Packages# -----------------------------------# Download s<strong>of</strong>tware updates.s<strong>of</strong>twareupdate --download --all# Install s<strong>of</strong>tware updates.installer -pkg $Package_Path -target /Volumes/$Target_Volume# Verifying the Integrity <strong>of</strong> S<strong>of</strong>tware# -----------------------------------# Use the sha1 command to display a files a file’s SHA-1 digest.# Replace $full_path_filename with the full path filename <strong>of</strong> the update# package or image that SHA-1 digest is being checked for./usr/bin/openssl sha1 $full_path_filename# Using Disk Utility to Repair Disk Permissions# -----------------------------------# Repair disk permissions.diskutil repairPermissions /Volumes/$Target_Boot_Drive# -------------------------------------------------------------------# Protecting System Hardware# -------------------------------------------------------------------# Securing Wi-Fi Hardware215
# -------------------------# Remove AppleAirport kernel extensions.srm -rf /System/Library/Extensions/AppleAirPort.kextsrm -rf /System/Library/Extensions/AppleAirPort2.kextsrm -rf /System/Library/Extensions/AppleAirPortFW.kext# Remove Extensions cache files.touch /System/Library/Extensions# Removing BlueTooth Hardware# -----------------------------# Remove Bluetooth kernel extensions.srm -rf /System/Library/Extensions/IOBluetoothFamily.kextsrm -rf /System/Library/Extensions/IOBluetoothHIDDriver.kext# Remove Extensions cache files.touch /System/Library/Extensions# Securing Audio Recording Hardware# -----------------------------# Remove Audio Recording kernel extensions.srm -rf /System/Library/Extensions/AppleOnboardAudio.kextsrm -rf /System/Library/Extensions/AppleUSBAudio.kextsrm -rf /System/Library/Extensions/AppleDeviceTreeUpdater.kextsrm -rf /System/Library/Extensions/IOAudioFamily.kextsrm -rf /System/Library/Extensions/VirtualAudioDriver.kext# Remove Extensions cache files.touch /System/Library/Extensions# Securing Video Recording Hardware# -----------------------------# Remove Video Recording kernel extensions.# Remove external iSight camera.srm -rf /System/Library/Extensions/Apple_iSight.kext# Remove internal iSight camera.srm -rf /System/Library/Exensions/IOUSBFamily.kext/Contents/PlugIns/\AppleUSBVideoSupport.kext# Remove Extensions cache files.touch /System/Library/Extensions# Securing USB Hardware# -----------------------------# Remove USB kernel extensions.srm -rf /System/Library/Extensions/IOUSBMassStorageClass.kext# Remove Extensions cache files.touch /System/Library/Extensions# Securing FireWire Hardware# -----------------------------# Remove FireWire kernel extensions.srm -rf /System/Library/Extensions/IOFireWireSerialBusProtocolTransport.kext# Remove Extensions cache files.touch /System/Library/Extensions216 Appendix B <strong>Security</strong> Scripts
# Securing Global System Settings# -------------------------------------------------------------------------# Configuring Open Firmware Settings# ----------------------------------# Secure startup by setting security-mode. Replace $mode-value with# “command” or “full”.nvram security-mode=”$mode-value”# Verify security-mode setting.nvram -p# Enabling Access Warning for the Login Window# ----------------------------------# Create a login window access warning.defaults write /Library/Preferences/com.apple.loginwindow LoginwindowText“Warning Text”# You can also used the BannerSample project to create an access warning.# -------------------------------------------------------------------# Securing System Preferences# -------------------------------------------------------------------# Securing .<strong>Mac</strong> Preferences# -------------------------# Disable Sync options.defaults -currentHost write com.apple.Dot<strong>Mac</strong>Sync ShouldSyncWithServer 1# Disable iDisk Syncing.defaults -currentHost write com.apple.idisk $USER_MirrorEnabled -bool no# Securing Accounts Preferences# -----------------------------# Change an account’s password.# Don’t use the following command on a computer that could possibly have# other users logged in simultaneously.sudo dscl . passwd /Users/$User_name $Oldpass $Newpass# Make sure there is no password hint set.defaults write /Library/Preferences/com.apple.loginwindow RetriesUntilHint -int 0# Set the login options to display name and password in the login window.defaults write /Library/Preferences/com.apple.loginwindow SHOWFULLNAME -boolyes# Disable Show the Restart, Sleep, and ShutDown Buttons.defaults write /Library/Preferences/com.apple.loginwindow PowerOffDisable -bool yes# Disable fast user switching.defaults write /Library/Preferences/.GlobalPreferencesMultipleSessionEnabled -bool NO# Securing Appearance Preferences# -----------------------------# Disable display <strong>of</strong> recent applications.defaults write com.apple.recentitems Applications -dict MaxAmount 0Appendix B <strong>Security</strong> Scripts 217
# Securing Bluetooth Preferences# -----------------------------# Turn Bluetooth <strong>of</strong>f.defaults write /Library/Preferences/com.apple.Bluetooth \ControllerPowerState -int 0# Securing CDs & DVDs Preferences# -----------------------------# Disable blank CD automatic action.defaults write /Library/Preferences/com.apple.digihubcom.apple.digihub.blank.cd.appeared -dict action 1# Disable music CD automatic action.defaults write /Library/Preferences/com.apple.digihubcom.apple.digihub.cd.music.appeared -dict action 1# Disable picture CD automatic action.defaults write /Library/Preferences/com.apple.digihubcom.apple.digihub.cd.picture.appeared -dict action 1# Disable blank DVD automatic action.defaults write /Library/Preferences/com.apple.digihubcom.apple.digihub.blank.dvd.appeared -dict action 1# Disable video DVD automatic action.defaults write /Library/Preferences/com.apple.digihubcom.apple.digihub.dvd.video.appeared -dict action 1# Securing Date & Time Preferences# -----------------------------# Set the NTP server.cat >> /etc/ntp.conf
# Securing Energy Saver Preferences# -----------------------------# Disable computer sleep.pmset -a sleep 0# Enable hard disk sleep.pmset -a disksleep 1# Disable Wake for Ethernet network administrator access.pmset -a womp 0# Disable Restart automatically after power failure.pmset -a autorestart 0# Securing Exposé & Spaces Preferences# -----------------------------# Disable dashboard.defaults write com.apple.dashboard mcx-disabled -boolean YES# Securing Keyboard & Mouse Preferences# -----------------------------# Disable Bluetooth Devices to wake computer.defaults write /Library/Preferences/com.apple.Bluetooth \BluetoothSystemWakeEnable -bool 0# Securing Network Preferences# -----------------------------# Disable IPv6.# The interface value can be AirPort, Bluetooth, Ethernet, or FireWire.networksetup -setv6<strong>of</strong>f $interface# Securing Printer & Fax Preferences# -----------------------------# Disable the receiving <strong>of</strong> faxes.launchctl unload -w /System/Library/LaunchDaemons/com.apple.efax.plist# Disable printer sharing.cp /etc/cups/cupsd.conf $TEMP_FILEif /usr/bin/grep "Port 631" /etc/cups/cupsd.confthenusr/bin/sed "/^Port 631.*/s//Listen localhost:631/g" $TEMP_FILE> /etc/cups/cupsd.confelseecho "Printer Sharing not on"fi# Securing <strong>Security</strong> Preferences# -----------------------------# Enable Require password to wake this computer from sleep or screen saver.defaults -currentHost write com.apple.screensaver askForPassword -int 1# Disable Automatic login.defaults write /Library/Preferences/.GlobalPreferencescom.apple.userspref.DisableAutoLogin -bool yes# Requiring password to unlock each System Preference pane.# Edit the /etc/authorization file using a text editor.Appendix B <strong>Security</strong> Scripts 219
# Find system.preferences.# Then find shared.# Then replace with .# Disable automatic login.defaults write /Library/Preferences/.GlobalPreferences \com.apple.autologout.AutoLogOutDelay -int 0# Enable secure virtual memory.defaults write /Library/Preferences/com.apple.virtualMemory \UseEncryptedSwap -bool yes# Disable IR remote control.defaults write /Library/Preferences/com.apple.driver.AppleIRController \DeviceEnabled -bool no# Enable FileVault.# To enable FileVault for new users, use this command./System/Library/CoreServices/ManagedClient.app/Contents/Resources/ \createmobileaccount# Enable Firewall.# where value is# 0 = <strong>of</strong>f# 1 = on for specific services# 2 = on for essential servicesdefaults write /Library/Preferences/com.apple.alf globalstate -int value# Enable Stealth mode.defaults write /Library/Preferences/com.apple.alf stealthenabled 1# Enable Firewall Logging.defaults write /Library/Preferences/com.apple.alf loggingenabled 1# Securing Sharing Preferences# -----------------------------# Change computer name where $host_name is the name <strong>of</strong> the computer.systemsetup -setcomputername $host_name# Change computer Bonjour host name.# The host name can not contain spaces or other non-DNS characters.scutil --set LocalHostName $host_name# Securing S<strong>of</strong>tware Updates Preferences# -----------------------------# Disable check for updates and Download important updates automatically.s<strong>of</strong>twareupdate --schedule <strong>of</strong>f# Securing Sound Preferences# -----------------------------# Disable internal microphone or line-in.# This command does not change the input volume for all input devices, it# only sets the default input device volume to zero.osascript -e “set volume input volume 0”# Securing Speech Preferences# -----------------------------# Disable Speech Recognition.220 Appendix B <strong>Security</strong> Scripts
defaults write "com.apple.speech.recognition.AppleSpeechRecognition.prefs"StartSpeakableItems -bool false# Disable Text to Speech settings.defaults write "com.apple.speech.synthesis.general.prefs"TalkingAlertsSpeakTextFlag -bool falsedefaults write "com.apple.speech.synthesis.general.prefs"SpokenNotificationAppActivationFlag -bool falsedefaults write "com.apple.speech.synthesis.general.prefs"SpokenUIUseSpeakingHotKeyFlag -bool falsedefaults delete "com.apple.speech.synthesis.general.prefs"TimeAnnouncementPrefs# Securing Spotlight Preferences# -----------------------------# Disable Spotlight for a volume and erase its current meta data, where# $volumename is the name <strong>of</strong> the volume.$ mdutil -E -i <strong>of</strong>f $volumename# Securing Startup Disk Preferences# -----------------------------# Set startup disk.systemsetup -setstartupdisk $path# Securing Time <strong>Mac</strong>hine Preferences# -----------------------------# Enable Time <strong>Mac</strong>hine.defaults write /Library/Preferences/com.apple.Time<strong>Mac</strong>hine AutoBackup 1# Securing System Swap and Hibernation Storage# -----------------------------# Enable secure virtual memory.defaults write /Library/Preferences/com.apple.virtualMemory \UseEncryptedSwap -bool YES# -------------------------------------------------------------------# <strong>Information</strong> Assurance with Services# -------------------------------------------------------------------# DVD or CD Sharing# -------------------------# Disable DVD or CD Sharing.service com.apple.ODSAgent stop# Screen Sharing (VNC)# -------------------------# Disable Screen Sharing.srm /Library/Preferences/com.apple.ScreenSharing.launchd# Disable File Sharing services.# -------------------------# Disable FTP.launctl unload -w /System/Library/LaunchDaemons/ftp.plistAppendix B <strong>Security</strong> Scripts 221
# Disable SMB.defaults delete /Library/Preferences/System<strong>Configuration</strong>/ \com.apple.smb.server EnabledServiceslaunctl unload -w /System/Library/LaunchDaemons/nmbd.plistlaunctl unload -w /System/Library/LaunchDaemons/smbd.plist# Disable AFP.launctl unload -w /System/Library/LaunchDaemons/ \com.apple.AppleFileServer.plist# Web Sharing# -----------------------------# Disable Web Sharing service.launctl unload -w /System/Library/LaunchDaemons/org.apache.httpd.plist# Remote Login (SSH)# -----------------------------# Disable Remote Login.service ssh stop# Remote Management (ARD)# -----------------------------# Disable Remote Management./System/Library/CoreServices/RemoteManagement/ARDAgent.app/Contents/\Resources/kickstart -deactivate -stop# Remote Apple Events (RAE)# -----------------------------# Disable Remote Apple Events.launchctl unload -w /System/Library/LaunchDaemons/eppc.plist# Xgrid Sharing# -----------------------------# Disable Xgrid Sharing.xgridctl controller stopxgridctl agent stop# Internet Sharing# -----------------------------# Disable Internet Sharing.defaults write /Library/Preferences/System<strong>Configuration</strong>/com.apple.nat NAT -dict Enabled -int 0launctl unload -w /System/Library/LaunchDaemons/\com.apple.InternetSharing.plist# Bluetooth Sharing# -----------------------------# Disable Bluetooth Sharing.defaults -currentHost write com.apple.bluetooth PrefKeyServicesEnabled 0222 Appendix B <strong>Security</strong> Scripts
GlossaryGlossaryThis glossary defines terms and spells out abbreviations you may encounter whileworking with online help or the various reference manuals for <strong>Mac</strong> <strong>OS</strong> X Server.References to terms defined elsewhere in the glossary appear in italics.access control A method <strong>of</strong> controlling which computers can access a network ornetwork services.ACE Access Control Entry. An entry within the ACL that controls access rights. See ACL.ACL Access Control List. A list, maintained by a system, that defines the rights <strong>of</strong> usersand groups to access resources on the system.administrator A user with server or directory domain administration privileges.Administrators are always members <strong>of</strong> the predefined “admin” group.administrator computer A <strong>Mac</strong> <strong>OS</strong> X computer onto which you’ve installed the serveradministration applications from the <strong>Mac</strong> <strong>OS</strong> X Server Admin CD.AFP Apple Filing Protocol. A client/server protocol used by Apple file service to sharefiles and network services. AFP uses TCP/IP and other protocols to supportcommunication between computers on a network.authentication The process <strong>of</strong> proving a user’s identity, typically by validating a username and password. Usually authentication occurs before an authorization processdetermines the user’s level <strong>of</strong> access to a resource. For example, file service authorizesfull access to folders and files that an authenticated user owns.authentication authority attribute A value that identifies the password validationscheme specified for a user and provides additional information as required.authorization The process by which a service determines whether it should grant auser access to a resource and how much access the service should allow the user tohave. Usually authorization occurs after an authentication process proves the user’sidentity. For example, file service authorizes full access to folders and files that anauthenticated user owns.223
BIND Berkeley Internet Name Domain. The program included with <strong>Mac</strong> <strong>OS</strong> X Serverthat implements DNS. The program is also called the name daemon, or named, whenthe program is running.binding A connection between a computer and a directory domain for the purpose <strong>of</strong>getting identification, authorization, and other administrative data. (verb) Also, theprocess <strong>of</strong> making such a connection. See also trusted binding.biometrics A technology that authenticates a person’s identity based on uniquephysiological or behavioral characteristics. Provides an additional factor toauthentication. See two-factor authentication.blog A webpage that presents chronologically ordered entries. Often used as anelectronic journal or newsletter.Bonjour A protocol developed by Apple for automatic discovery <strong>of</strong> computers,devices, and services on IP networks. Formerly called Rendezvous, this proposedInternet standard protocol is sometimes referred to as ZeroConf or multicast DNS.BSD Berkeley S<strong>of</strong>tware Distribution. A version <strong>of</strong> UNIX on which <strong>Mac</strong> <strong>OS</strong> X s<strong>of</strong>tware isbased.buffer caching Holding data in memory so that it can be accessed more quickly than ifit were repeatedly read from disk.cache A portion <strong>of</strong> memory or an area on a hard disk that stores frequently accesseddata in order to speed up processing times. Read cache holds data in case it’srequested by a client; write cache holds data written by a client until it can be storedon disk. See also buffer caching, controller cache, disk cache.certificate Sometimes called an “identity certificate” or “public key certificate.” A file ina specific format (<strong>Mac</strong> <strong>OS</strong> X Server uses the X.509 format) that contains the public keyhalf <strong>of</strong> a public-private keypair, the user’s identity information such as name andcontact information, and the digital signature <strong>of</strong> either a Certificate Authority (CA) orthe key user.Certificate Authority An authority that issues and manages digital certificates in orderto ensure secure transmission <strong>of</strong> data on a public network. See also certificate, publickey infrastructure.cluster A collection <strong>of</strong> computers interconnected in order to improve reliability,availability, and performance. Clustered computers <strong>of</strong>ten run special s<strong>of</strong>tware tocoordinate the computers’ activities. See also computational cluster.224 Glossary
computational cluster A group <strong>of</strong> computers or servers that are grouped together toshare the processing <strong>of</strong> a task at a high level <strong>of</strong> performance. A computational clustercan perform larger tasks than a single computer would be able to complete, and such agrouping <strong>of</strong> computers (or “nodes”) can achieve high performance comparable to asupercomputer.controller In an Xsan storage area network, short for metadata controller. In RAIDsystems, controller refers to hardware that manages the reading and writing <strong>of</strong> data.By segmenting and writing or reading data on multiple drives simultaneously, the RAIDcontroller achieves fast and highly efficient storage and access. See also metadatacontroller.controller cache A cache that resides within a controller and whose primary purpose isto improve disk performance.cracker A malicious user who tries to gain unauthorized access to a computer systemin order to disrupt computers and networks or steal information. Compare to hacker.crypt password A type <strong>of</strong> password that’s stored as a hash (using the standard UNIXencryption algorithm) directly in a user record.daemon A program that runs in the background and provides important systemservices, such as processing incoming email or handling requests from the network.decryption The process <strong>of</strong> retrieving encrypted data using some sort <strong>of</strong> specialknowledge. See also encryption.deploy To place configured computer systems into a specific environment or makethem available for use in that environment.DHCP Dynamic Host <strong>Configuration</strong> Protocol. A protocol used to dynamically distributeIP addresses to client computers. Each time a client computer starts up, the protocollooks for a DHCP server and then requests an IP address from the DHCP server it finds.The DHCP server checks for an available IP address and sends it to the client computeralong with a lease period—the length <strong>of</strong> time the client computer may use theaddress.directory See folder.disk cache A cache that resides within a disk. See also cache, controller cache.disk image A file that, when opened, creates an icon on a <strong>Mac</strong> <strong>OS</strong> X desktop that looksand acts like an actual disk or volume. Using NetBoot, client computers can start upover the network from a server-based disk image that contains system s<strong>of</strong>tware. Diskimage files have a filename extension <strong>of</strong> either .img or .dmg. The two image formatsare similar and are represented with the same icon in the Finder. The .dmg formatcannot be used on computers running <strong>Mac</strong> <strong>OS</strong> 9.Glossary 225
DNS Domain Name System. A distributed database that maps IP addresses to domainnames. A DNS server, also known as a name server, keeps a list <strong>of</strong> names and the IPaddresses associated with each name.domain Part <strong>of</strong> the domain name <strong>of</strong> a computer on the Internet. It does not includethe top-level domain designator (for example, .com, .net, .us, .uk). Domain name“www.example.com” consists <strong>of</strong> the subdomain or host name “www,” the domain“example,” and the top-level domain “com.”DoS attack Denial <strong>of</strong> service attack. An Internet attack that uses thousands <strong>of</strong> networkpings to prevent the legitimate use <strong>of</strong> a server.drop box A shared folder with privileges that allow other users to write to, but notread, the folder’s contents. Only the owner has full access. Drop boxes should becreated only using AFP. When a folder is shared using AFP, the ownership <strong>of</strong> an itemwritten to the folder is automatically transferred to the owner <strong>of</strong> the folder, thus givingthe owner <strong>of</strong> a drop box full access to and control over items put into it.Dynamic Host <strong>Configuration</strong> Protocol See DHCP.encryption The process <strong>of</strong> obscuring data, making it unreadable without specialknowledge. Usually done for secrecy and confidential communications. See alsodecryption.EFI Extensible Firmware Interface. S<strong>of</strong>tware that runs automatically when an Intelbased<strong>Mac</strong>intosh first starts up. It determines the computers hardware configurationand starts the system s<strong>of</strong>tware.Ethernet A common local area networking technology in which data is transmitted inunits called packets using protocols such as TCP/IP.file server A computer that serves files to clients. A file server may be a generalpurposecomputer that’s capable <strong>of</strong> hosting additional applications or a computercapable only <strong>of</strong> serving files.firewall S<strong>of</strong>tware that protects the network applications running on your server.IP firewall service, which is part <strong>of</strong> <strong>Mac</strong> <strong>OS</strong> X Server s<strong>of</strong>tware, scans incoming IP packetsand rejects or accepts these packets based on a set <strong>of</strong> filters you create.firmware S<strong>of</strong>tware that’s stored in read-only memory (ROM) on a device and helps instarting up and operating the device. Firmware allows for certain changes to be madeto a device without changing the actual hardware <strong>of</strong> the device.folder Also known as a directory. A hierarchically organized list <strong>of</strong> files and/or otherfolders.226 Glossary
FTP File Transfer Protocol. A protocol that allows computers to transfer files over anetwork. FTP clients using any operating system that supports FTP can connect to a fileserver and download files, depending on their access privileges. Most Internet browsersand a number <strong>of</strong> freeware applications can be used to access an FTP server.hacker An individual who enjoys programming, and explores ways to program newfeatures and expand the capabilities <strong>of</strong> a computer system. See also cracker.hash (noun) A scrambled, or encrypted, form <strong>of</strong> a password or other text.host Another name for a server.host name A unique name for a computer, historically referred to as the UNIXhostname.HTTP Hypertext Transfer Protocol. The client/server protocol for the World Wide Web.HTTP provides a way for a web browser to access a web server and request hypermediadocuments created using HTML.ICMP Internet Control Message Protocol. A message control and error-reportingprotocol used between host servers and gateways. For example, some Internets<strong>of</strong>tware applications use ICMP to send a packet on a round trip between two hosts todetermine round-trip times and discover problems on the network.image See disk image.IMAP Internet Message Access Protocol. A client-server mail protocol that allows usersto store their mail on the mail server rather than downloading it to the local computer.Mail remains on the server until the user deletes it.installer package A file package with the filename extension .pkg. An installer packagecontains resources for installing an application, including the file archive, Read Me andlicensing documents, and installer scripts.IP Internet Protocol. Also known as IPv4. A method used with Transmission ControlProtocol (TCP) to send data between computers over a local network or the Internet. IPdelivers data packets and TCP keeps track <strong>of</strong> data packets.IP subnet A portion <strong>of</strong> an IP network, which may be a physically independent networksegment, that shares a network address with other portions <strong>of</strong> the network and isidentified by a subnet number.IPv4 See IP.IPv6 Internet Protocol version 6. The next-generation communication protocol toreplace IP (also known as IPv4). IPv6 allows a greater number <strong>of</strong> network addresses andcan reduce routing loads across the Internet.Glossary 227
JBoss A full-featured Java application server that provides support for Java 2Platform, Enterprise Edition (J2EE) applications.KDC Kerberos Key Distribution Center. A trusted server that issues Kerberos tickets.Kerberos A secure network authentication system. Kerberos uses tickets, which areissued for a specific user, service, and period <strong>of</strong> time. After a user is authenticated, it’spossible to access additional services without retyping a password (called single signon)for services that have been configured to take Kerberos tickets. <strong>Mac</strong> <strong>OS</strong> X Serveruses Kerberos v5.kernel The part <strong>of</strong> an operating system that handles memory management, resourceallocation, and other low-level services essential to the system.key frame A sample in a sequence <strong>of</strong> temporally compressed samples that doesn’t relyon other samples in the sequence for any <strong>of</strong> its information. Key frames are placed intotemporally compressed sequences at a frequency that’s determined by the key framerate.L2TP Layer Two Tunnelling Protocol. A network transport protocol used for VPNconnections. It’s essentially a combination <strong>of</strong> Cisco’s L2F and PPTP. L2TP itself isn’t anencryption protocol, so it uses IPSec for packet encryption.LAN Local area network. A network maintained within a facility, as opposed to a WAN(wide area network) that links geographically separated facilities.LDAP Lightweight Directory Access Protocol. A standard client-server protocol foraccessing a directory domain.managed network The items managed clients are allowed to see when they click theNetwork icon in a Finder window. Administrators control this setting using WorkgroupManager. Also called a network view.metadata controller The computer that manages metadata in an Xsan storage areanetwork.mutual authentication Also known as two-way authentication. A type <strong>of</strong>authentication in which two parties authenticate with each other. For example, a clientor user verifies their identity to a server, and that server confirms its identity to theclient or user. Each side has the other’s authenticated identity.NAT Network address translation. A method <strong>of</strong> connecting multiple computers to theInternet (or any other IP network) using one IP address. NAT converts the IP addressesyou assign to computers on your private, internal network into one legitimate IPaddress for Internet communications.228 Glossary
NetBoot server A <strong>Mac</strong> <strong>OS</strong> X server you’ve installed NetBoot s<strong>of</strong>tware on and haveconfigured to allow clients to start up from disk images on the server.Network File System See NFS.network view See managed network.NFS Network File System. A client/server protocol that uses Internet Protocol (IP) toallow remote users to access files as though they were local. NFS can export sharedvolumes to computers based on IP address, and also supports single sign-on (SSO)authentication through Kerberos.node A processing location. A node can be a computer or some other device, such asa printer. Each node has a unique network address. In Xsan, a node is any computerconnected to a storage area network.NTP Network Time Protocol. A network protocol used to synchronize the clocks <strong>of</strong>computers across a network to some time reference clock. NTP is used to ensure thatall the computers on a network are reporting the same time.object class A set <strong>of</strong> rules that define similar objects in a directory domain byspecifying attributes that each object must have and other attributes that each objectmay have.<strong>of</strong>fline Refers to data that isn’t immediately available, or to a device that is physicallyconnected but not available for use.Open Directory The Apple directory services architecture, which can accessauthoritative information about users and network resources from directory domainsthat use LDAP, Active Directory protocols, or BSD configuration files, and networkservices.Open Directory master A server that provides LDAP directory service, Kerberosauthentication service, and Open Directory Password Server.Open Directory Password Server An authentication service that validates passwordsusing a variety <strong>of</strong> conventional authentication methods required by the differentservices <strong>of</strong> <strong>Mac</strong> <strong>OS</strong> X Server. The authentication methods include APOP, CRAM-MD5,DHX, LAN Manager, NTLMv1, NTLMv2, and WebDAV-Digest.open source A term for the cooperative development <strong>of</strong> s<strong>of</strong>tware by the Internetcommunity. The basic principle is to involve as many people as possible in writing anddebugging code by publishing the source code and encouraging the formation <strong>of</strong> alarge community <strong>of</strong> developers who will submit modifications and enhancements.partition A subdivision <strong>of</strong> the capacity <strong>of</strong> a physical or logical disk. Partitions are madeup <strong>of</strong> contiguous blocks on the disk.Glossary 229
PDC Primary domain controller. In Windows networking, a domain controller that hasbeen designated as the primary authentication server for its domain.permissions Settings that define the kind <strong>of</strong> access users have to shared items in a filesystem. You can assign four types <strong>of</strong> permissions to a share point, folder, or file: Read &Write, Read Only, Write Only, and No Access. See also privileges.phishing An attempt to masquerade as a trusted organization or individual to trickothers into divulging confidential information.PKI Public Key Infrastructure. A mechanism that allows two parties to a datatransaction to authenticate each other and use encryption keys and other informationin identity certificates to encrypt and decrypt messages they exchange.POP Post <strong>Office</strong> Protocol. A protocol for retrieving incoming mail. After a user retrievesPOP mail, it’s stored on the user’s computer and is usually deleted automatically fromthe mail server.portable home directory A portable home directory provides a user with both a localand network home folder. The contents <strong>of</strong> these two home folders, as well as the user’sdirectory and authentication information, can be automatically kept in sync.P<strong>OS</strong>IX Portable Operating System Interface for UNIX. A family <strong>of</strong> open systemstandards based on UNIX, which allows applications to be written to a single targetenvironment in which they can run unchanged on a variety <strong>of</strong> systems.print queue An orderly waiting area where print jobs wait until a printer is available.The print service in <strong>Mac</strong> <strong>OS</strong> X Server uses print queues on the server to facilitatemanagement.private key One <strong>of</strong> two asymmetric keys used in a PKI security system. The private keyis not distributed and is usually encrypted with a passphrase by the owner. It candigitally sign a message or certificate, claiming authenticity. It can decrypt messagesencrypted with the corresponding public key and it can encrypt messages that canonly be decrypted by the private key.privileges The right to access restricted areas <strong>of</strong> a system or perform certain tasks(such as management tasks) in the system.protocol A set <strong>of</strong> rules that determines how data is sent back and forth between twoapplications.proxy server A server that sits between a client application, such as a web browser,and a real server. The proxy server intercepts all requests to the real server to see if itcan fulfill the requests itself. If not, it forwards the request to the real server.230 Glossary
public key One <strong>of</strong> two asymmetric keys used in a PKI security system. The public key isdistributed to other communicating parties. It can encrypt messages that can bedecrypted only by the holder <strong>of</strong> the corresponding private key, and it can verify thesignature on a message originating from a corresponding private key.public key certificate See certificate.public key infrastructure A secure method <strong>of</strong> exchanging data over an unsecurepublic network, such as the Internet, by using public key cryptography.QTSS QuickTime Streaming Server. A technology that lets you deliver media over theInternet in real time.record type A specific category <strong>of</strong> records, such as users, computers, and mounts.For each record type, a directory domain may contain any number <strong>of</strong> records.recursion The process <strong>of</strong> fully resolving domain names into IP addresses.A nonrecursive DNS query allows referrals to other DNS servers to resolve the address.In general, user applications depend on the DNS server to perform this function, butother DNS servers do not have to perform a recursive query.rogue computer A computer that is set up by an attacker for the purpose <strong>of</strong>infiltrating network traffic in an effort to gain unauthorized access to your networkenvironment.root An account on a system that has no protections or restrictions. Systemadministrators use this account to make changes to the system’s configuration.router A computer networking device that forwards data packets toward theirdestinations. A router is a special form <strong>of</strong> gateway which links related networksegments. In the small <strong>of</strong>fice or home, the term router <strong>of</strong>ten means an Internetgateway, <strong>of</strong>ten with Network Address Translation (NAT) functions. Although generallycorrect, the term router more properly refers to a network device with dedicatedrouting hardware.RSA Rivest Shamir Adleman algorithm. A public key encryption method that can beused both for encrypting messages and making digital signatures.SACL Service Access Control List. Lets you specify which users and groups have accessto specific services. See ACL.schema The collection <strong>of</strong> attributes and record types or classes that provide ablueprint for the information in a directory domain.server A computer that provides services (such as file service, mail service, or webservice) to other computers or network devices.Glossary 231
shadow password A password that’s stored in a secure file on the server and can beauthenticated using a variety <strong>of</strong> conventional authentication methods required by thedifferent services <strong>of</strong> <strong>Mac</strong> <strong>OS</strong> X Server. The authentication methods include APOP, CRAM-MD5, DHX, LAN Manager, NTLMv1, NTLMv2, and WebDAV-Digest.share point A folder, hard disk (or hard disk partition), or optical disc that’s accessibleover the network. A share point is the point <strong>of</strong> access at the top level <strong>of</strong> a group <strong>of</strong>shared items. Share points can be shared using AFP, SMB, NFS (an export), or FTP.shared secret A value defined at each node <strong>of</strong> an L2TP VPN connection that serves asthe encryption key seed to negotiate authentication and data transport connections.single sign-on An authentication strategy that relieves users from entering a nameand password separately for every network service. <strong>Mac</strong> <strong>OS</strong> X Server uses Kerberos toenable single sign-on.smart card A portable security device that contains a microprocessor. The smart card’smicroprocessor and its reader use a mutual identification protocol to identify eachother before releasing information. The smart card is capable <strong>of</strong> securely storingpasswords, certificates, and keys.SMB Server Message Block. A protocol that allows client computers to access files andnetwork services. It can be used over TCP/IP, the Internet, and other network protocols.SMB services use SMB to provide access to servers, printers, and other networkresources.SMTP Simple Mail Transfer Protocol. A protocol used to send and transfer mail. Itsability to queue incoming messages is limited, so SMTP is usually used only to sendmail, and POP or IMAP is used to receive mail.SNMP Simple Network Management Protocol. A set <strong>of</strong> standard protocols used tomanage and monitor multiplatform computer network devices.Spotlight A comprehensive search engine that searches across your documents,images, movies, PDF, email, calendar events, and system preferences. It can findsomething by its text content, filename, or information associated with it.SSL Secure Sockets Layer. An Internet protocol that allows you to send encrypted,authenticated information across the Internet. More recent versions <strong>of</strong> SSL are knownas TLS (Transport Level <strong>Security</strong>).standalone server A server that provides services on a network but doesn’t getdirectory services from another server or provide directory services to other computers.static IP address An IP address that’s assigned to a computer or device once and isnever changed.232 Glossary
streaming Delivery <strong>of</strong> video or audio data over a network in real time, as a stream <strong>of</strong>packets instead <strong>of</strong> a single file download.subnet A grouping on the same network <strong>of</strong> client computers that are organized bylocation (for example, different floors <strong>of</strong> a building) or by usage (for example, all eighthgradestudents). The use <strong>of</strong> subnets simplifies administration. See also IP subnet.TCP Transmission Control Protocol. A method used with the Internet Protocol (IP) tosend data in the form <strong>of</strong> message units between computers over the Internet. IPhandles the actual delivery <strong>of</strong> the data, and TCP keeps track <strong>of</strong> the units <strong>of</strong> data (calledpackets) into which a message is divided for efficient routing through the Internet.ticket, Kerberos A temporary credential that proves a Kerberos client’s identity to aservice.trusted binding A mutually authenticated connection between a computer and adirectory domain. The computer provides credentials to prove its identity, and thedirectory domain provides credentials to prove its authenticity.tunneling A technology that allows one network protocol to send its data using theformat <strong>of</strong> another protocol.two-factor authentication A process that authenticates through a combination <strong>of</strong> twoindependent factors: something you know (such as a password), something you have(such as a smart card), or something you are (such as a biometric factor). This is moresecure than authentication that uses only one factor, typically a password.UDP User Datagram Protocol. A communications method that uses the InternetProtocol (IP) to send a data unit (called a datagram) from one computer to another ona network. Network applications that have very small data units to exchange may useUDP rather than TCP.VPN Virtual Private Network. A network that uses encryption and other technologiesto provide secure communications over a public network, typically the Internet. VPNsare generally cheaper than real private networks using private lines, but they rely onhaving the same encryption system at both ends. The encryption may be performed byfirewall s<strong>of</strong>tware or by routers.WAN Wide area network. A network maintained across geographically separatedfacilities, as opposed to a LAN (local area network) within a facility. Your WAN interfaceis usually the one connected to the Internet.WebDAV Web-based Distributed Authoring and Versioning. A live authoringenvironment that allows client users to check out webpages, make changes, and thencheck the pages back in to the site while the site is running.weblog See blog.Glossary 233
workgroup A set <strong>of</strong> users for whom you define preferences and privileges as a group.Any preferences you define for a group are stored in the group account.zone transfer The method by which zone data is replicated among authoritative DNSservers. Slave DNS servers request zone transfers from their master servers to acquiretheir data.234 Glossary
IndexIndex.<strong>Mac</strong> preferences 83–85, 156–159Aaccess control entries. See ACEsaccess rights. See permissionsaccess warnings 55–58See also permissionsaccountsadministrator 32–33, 59–60, 65–67, 167–168authentication setup 70–81checklists 209creating secure 62–67credential storage 74–79directory domains 67–70initial setup 32–33mobile 67nonadministrator user 59–60preferences 85–87security 143types 59ACEs (access control entries) 38, 127ACLs (access control lists) 38, 75, 123, 127–128, 159–160Active Directory 69–70activity analysis tools 199–202Address Book 68, 169administrator account 32–33, 59–60, 65–67Advanced Encryption Standard (AES-128) 108AFP (Apple Filing Protocol) 173–174antivirus tools. See virus screeningappearance preferences 88–89Apple Filing Protocol. See AFPApple Remote Desktop. See ARDApple S<strong>of</strong>tware Restore. See ASRApplication firewall 163–165applicationsaccess control 24, 26, 166securing 147–151, 198–199ARD (Apple Remote Desktop) 185–186ASR (Apple S<strong>of</strong>tware Restore) 31assistive devices 122attributes, rules 193auditing tools 202–204authenticationaccurate time settings 33Active Directory 69Directory Access 68–69key-based SSH 183–185See also keychain services; passwordsserver- vs. client-side 151strengthening methods 70–74system preferences 82userauthorization 191See also authenticationauthorization rights 194–196AutoFill options 150, 154automatic actions, disabling 90BBack to My <strong>Mac</strong>. See BTMMbackups 145–146BannerSample file, modifying 57Berkeley S<strong>of</strong>tware Distribution. See BSDBill <strong>of</strong> Materials file 38biometrics-based authentication 73Bluetooth preferences 89–90, 189–190Bonjour browsing service 168–170bookmarks, synchronizing 154Boot Camp 159–160boot command 53browserspreferences 153security 150–151BSD (Berkeley S<strong>of</strong>tware Distribution) 20, 200BTMM (Back to My <strong>Mac</strong>) 171–172CCA. See Certificate Authoritycache, browser 150CDs, preferences 90, 172CDSA (Common Data <strong>Security</strong> Architecture) 20CERT (Computer Emergency Response Team) 19Certificate Assistant 151–152Certificate Authority 151–152Certificate Revocation List. See CRL235
certificates 22, 28, 132, 147–150, 156–159chat service. See iChat servicechecksum tool 197CIFS (Common Internet File System). See SMBclient-side authentication 151codesign command 198–199command-line interfaceaccess warnings 57erasing files 138ssh access 176–185startup security setup 54command-line tools, Firewall service 165command mode startup 53Common Criteria Tools 203Common Data <strong>Security</strong> Architecture. See CDSACommon <strong>Security</strong> Service Manager. See CSSMComputer Emergency Response Team. See CERTcomputers, host name 113configuration files 182Console tool 200contacts search policy 68–69cookies 150, 155credential storage 74–79CRL (Certificate Revocation List) 151CSSM (Common <strong>Security</strong> Service Manager) 23DDashboard preferences 98–99data security 123–139, 141–142, 143, 145–146Date & Time preferences 91–93Desktop preferences 93–94DHCP (Dynamic Host <strong>Configuration</strong> Protocol)service 161dictionariesrights 191–193rules 193digital signature 147–150, 198–199directories. See directory services; domains, directory;foldersDirectory Access 68–69directory servicesActive Directory 69–70directory domains 67–70Open Directory 69discovery, service 68disk imagesencrypting 27, 134–136, 170read/write 134restoring from 31diskspermissions for 37–39startup 120–121Disk Utility 27, 38, 137, 139display mirroring 95Displays preferences 95Dock preferences 95documentation 14–16domains, directory 67–70Download Inspector 25DVDs, preferences 90, 172EEFI (Extensible Firmware Interface) 51, 121email. See Mail serviceencryptiondisk images 134–136FileVault 26–27, 130–134Mail service 147–150secure virtual memory 141–142Time <strong>Mac</strong>hine 145–146Energy Saver preferences 96–97erasing data permanently 136–139Everyone permission level 124Exposé & Spaces preferences 98–99Extensible Firmware Interface. See EFIFfax preferences 104–106filesbackup <strong>of</strong> 145–146Bill <strong>of</strong> Materials 38downloading safely 152–153encryption 130–136erasing 136–139integrity checking tools 197managing log 200package 38permissions 123–126, 128–129security 141–142, 156file servicesSee also FTP; share pointsfile sharing 173–174file systems, erasing data 136File Transfer Protocol. See FTPFileVault 26–27, 41, 108, 130–134, 178FileVault master keychain 132fingerprints, server 177, 184–185Firewall service 25, 113, 162–166FireWire 120FireWire Bridge Chip GUID 120firmware, open password 29–30, 52–54, 120–121flags for files and folders 126–127foldersflags for 126–127home 67, 129–134permissions for 129–130shared 170free disk space, erasing 139FTP (File Transfer Protocol) 173–174full mode startup 53236 Index
Gglobal file permissions 128–129grids, server 187–188groups, permissions 124guest accounts, permissions 124guest operating systems 159–160Hhard drive 41hardware, protection <strong>of</strong> 41, 208, 212HIDS (host-based intrusion detection systems) 205HISEC (Highly Secure) templates 69home folders 68, 129–134hostconfig file 203host name 113hosts. See serversHTML (Hypertext Markup Language) email 148IiChat service 156–159, 169iDisk 170images. See disk imagesinstallation 29–39, 114, 207–208installer packages 114instant messaging. See iChat serviceIntel-based <strong>Mac</strong>intosh 30, 51, 159–160International preferences 99Internet-based S<strong>of</strong>tware Update 34Internet security.<strong>Mac</strong> preferences 83–85browsers 150–151, 155email 147–150instant messaging 156–159sharing 112–113, 159, 171–172, 187–190intrusion detection system (IDS) monitors 205IP addresses 100IPFW2 s<strong>of</strong>tware 165iPhoto 170IPv6 addressing 100iTunes 159, 170KKerberos 69, 71–72, 147key-based SSH connection 178–180, 183–185Keyboard & Mouse preferences 99Keychain Access 74, 149–150, 151–152keychain services 22, 26, 74–79, 132LL2TP/IPSec (Layer Two Tunneling Protocol, SecureInternet Protocol) 160–162Launch Services 25layered security architecture 21LDAP (Lightweight Directory Access Protocol)service 69, 161LDAPv3 accessLightweight Directory Access Protocol. See LDAPlocal system logging 201locking folders 126logging tools 199–202loginaccess warnings 55–58automatic 107keychain 75–76remote 176–185, 187security measures 85–87, 205logsaudit 203–204Firewall service 164security 200–202M<strong>Mac</strong>h 20Mail service 147–150managed preferences.<strong>Mac</strong> 83–85Dashboard 98–99Date & Time 91–93Desktop 93–94Displays 95Dock 95Energy Saver 96–97Exposé & Spaces 98–99International 99Keyboard & Mouse 99Network 100–101, 162Parental Controls 101–103Print & Fax 104–106<strong>Security</strong> 107–110, 163Sharing 112–113, 163, 177, 186–190S<strong>of</strong>tware Update 34–36, 114Sound 115Spotlight 118–120Startup Disk 120–121Time <strong>Mac</strong>hine 121–122, 145–146Universal Access 122managed user accounts 59, 143mandatory access controls 22, 23–25Micros<strong>of</strong>t Windows compatibilities 127mobile accounts 67NNetBoot service 31network-based directory domains 67–70network-based intrusion detection systems. See NIDSnetwork-based keychains 79network install image 120Network preferences 162network servicesaccess control 162Index 237
FileVault limitations 130, 134installation 31keychains 79logs 199–202managed users 62preferences 100–101security methods 28, 147–166, 167–190sharing 112–113, 172, 187–190sleep mode security 96S<strong>of</strong>tware Update cautions 34wireless preferences 89–90newsyslog command 201NIDS (network-based intrusion detectionsystems) 205nonadministrator user accounts 59–60NTP (network time protocol) 33nvram tool 54OOpen Directory 69Open Firmware interface 52Open Firmware password 29–30, 52–54, 120–121open source s<strong>of</strong>tware 20–21owner permission 124Ppackages, file 38Parental Controls 25, 62–64, 101–103Password Assistant 70–71, 86passwordsauthentication setup 70–71, 148–149changing 85–87command-line tools 54firmware 29–30, 52–54, 120–121keychain 75master FileVault 131–134Startup Disk preferences 120–121tokens 73vs. key-based authentication 178PDFs, encrypted 136permissionsaccess 20disk 37–39folders 129–130manipulating 126overview 123–129user 174viewing 124physical access, securing 41physical computershardware security 41PKI (public key infrastructure) 22, 147, 157, 178See also certificatesplug-ins 155policy database 191–194portable computersFileVault 130keychains 79mobile accounts 68portable files, encrypting 134–136portable keychains 79P<strong>OS</strong>IX (Portable Operating System Interface) 38,124–129PPTP (Point-to-Point Tunneling Protocol) 162preferencesaccounts 85–87appearance 88–89Bluetooth wireless 89–90, 189–190CDs 90, 172cookies 155DVDs 90, 172fax 104–106overview 81–82QuickTime 106–107screen saver 93–94See also managed preferencesspeech recognition 116time 91–93Print & Fax preferences 104–106Printer Sharing 175privacy option, iChat service 158private browsing 150private key 178privileges, administrator 167–168privileges vs. permissions 37protocols. See specific protocolsproxy settings 156public key cryptography 198–199public key infrastructure. See PKIpwpolicy command 73QQuarantine 25QuickTime cache 106QuickTime preferences 106–107Rread/write disk images 134recent items list 88–89Remote Apple Events 186remote images in email 148Remote Login 176–185remote server login 187remote system logging 201–202removable mediaFileVault limitations 130, 134rights dictionary 191–193right specifications 191–193root permissions 51, 65–66rules dictionary 193238 Index
SSafari preferences 150, 152–156sandboxing 24screen saver preferences 93–94, 108Screen Sharing 173searching preferences 118–120Secure Empty Trash command 139Secure iChat certificate 157secure notes 74Secure Sockets Layer. See SSLSecure Transport 22security 141–142, 143, 159security architecture overview 20–23security-mode environment variable 54security-password environment variable 54<strong>Security</strong> preferences 107–110, 163Server Message Block/Common Internet File System.See SMBserversauthentication 151–152fingerprints 177, 184–185securing connections 180server-side authentication 151Setup Assistant 32SHA-1 digest 37shared resourcesprinters 104, 106user accounts 60share points 173–174Sharing preferences 112–113, 163, 177, 186–190Simple Finder 63single sign-on (SSO) authentication 71–72See also Kerberossingle-user mode 51sleep mode, securing 96–97, 108smart cards 26–27, 72SMB (Server Message block) 173–174s<strong>of</strong>tware, networking 147–166S<strong>of</strong>tware Update service 33, 34–36, 114Sound preferences 115sparse images 134speech recognition preferences 116Spotlight preferences 118–120srm command 138SSH (secure shell host) 176–185ssh command 176–185SSL (Secure Sockets Layer) 22, 147, 157standard user accounts 59startup, securing 51–52Startup Disk preferences 120–121stealth mode 165sudo tool 65–68, 167–168su tool 66swap file 108synchronization 83–85, 154syslogd configuration file 200system administrator (root) account 65–68system preferences. See preferencessystem setup 31–33Ttarget disk mode 121third-party applications 98, 107ticket-based authentication 69Time <strong>Mac</strong>hine 121–122, 145–146time settings 33, 91–93TLS (Transport Layer <strong>Security</strong>) protocoltokens, digital 73Transport Layer <strong>Security</strong> protocol. See TLStransport services 22tunneling protocolsSSH 181VPN 160–162two-factor authentication 26–27UUIDs (user IDs) 60–61Universal Access preferences 122UNIX and security 20updating s<strong>of</strong>tware 33–36, 114user accounts 59–67, 143user ID. See UIDusersaccess control 25, 62–64, 143, 174, 194–196automatic actions control 90home folders 68, 129–134keychain management 77–78mobile 68permissions 38, 124preferences control 94, 98root 51See also user accountsVvalidation, system integrity 197, 212virtual memory 108, 141–142Virtual Network Communication. See VNCvirus screening 204VNC (Virtual Network Communication) 173volumes, erasing data 136VPN (Virtual Private Network)clients 28security 160–162Wweb browsers. See browsersweb forms, completing 154Web Sharing 175websites, sharing 175wireless preferences 89–90XXgrid 187–188Index 239
240 Index