Graham's Karaoke And DJ System – Manual - Graham's Karaoke ...
Graham's Karaoke And DJ System – Manual - Graham's Karaoke ...
Graham's Karaoke And DJ System – Manual - Graham's Karaoke ...

You also want an ePaper? Increase the reach of your titles
YUMPU automatically turns print PDFs into web optimized ePapers that Google loves.
Graham’s <strong>Karaoke</strong> and <strong>DJ</strong> <strong>System</strong><br />
<strong>Manual</strong>
Setting Up Computer for <strong>Karaoke</strong> Shows<br />
Certain settings on your computer should be changed before you begin hosting your shows. For<br />
instance the system sound settings should be changed to No Sounds as you don’t want your computer<br />
beeping every time you press the enter key. To change the system sound settings click on your start<br />
menu (Figure 1 <strong>–</strong> XP shown Vista and 7 similar)<br />
Click on Control Panel (Figure 2)<br />
Figure 1<br />
Figure 2
Click on Sounds (Figure 3)<br />
Figure 3<br />
Then click on Sounds and Audio or click on change sound scheme. The audio properties window is<br />
displayed. Please click on the sounds tab and then the drop down arrow and select No Sounds (Figure 4)<br />
Figure 4
Click OK and then answer No to the save sound scheme dialog box that pops up (Figure 5).<br />
Figure 5<br />
You also need to setup your second display for the singers. Before doing the following steps ensure that<br />
you have a TV or external monitor connected to your computer.<br />
Right click on a blank area of desktop, then click on properties or (personalize for Vista or 7 - Figure 6).<br />
Figure 6<br />
Now click on the settings tab in the display properties box (XP shown - Figure 7). On Vista and Windows<br />
7 click on Display Settings.<br />
Figure 7
You will be presented with a screen similar to figure 8. Click on the picture of a monitor labeled 2 and<br />
make sure that extend my desktop is checked. Also to ensure that the Grahams <strong>Karaoke</strong> <strong>System</strong> can<br />
detect your second monitor drag the second monitor (click and hold with the left mouse button and<br />
drag around) either to the left or right of the first monitor with the tops of the monitor at the same<br />
position.<br />
Figure 8<br />
Press OK. You should now have your desktop background on your second monitor and the main screen<br />
of your desktop/laptop should have the background and the program icons.<br />
To ensure that everything is setup properly before you start hosting your shows there are some<br />
concerns to address when working within windows. Some of these apply to XP, Vista and Windows 7<br />
and some only apply to certain version of windows. You should know what version of Windows that you<br />
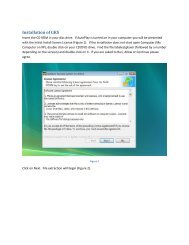
are running as well as whether it is a 32 or 64 bit version of Windows. You should also have a little<br />
knowledge about the UAC (User Account Control) in Vista and Windows 7. If you do not connect your<br />
computer to the internet and do not use CD/DVD’s or Flash Drives in your computer (without scanning<br />
their contents first with an anti-virus on another computer) then you are reasonably safe to turn<br />
off/uninstall any preinstalled anti-virus solutions that have been preinstalled on your computer. This<br />
will ensure that an anti-virus will not start scanning in the middle of your show, causing music to stutter<br />
or the whole computer to slow down. If you wish to put an anti-virus on your machine I recommend MS<br />
Security Essentials. On Vista you can turn off the UAC if you wish (Control Panel, User Accounts and<br />
Family Safety, User Accounts, Turn off UAC) and then reboot your computer. On Windows 7 follow the<br />
same procedure as Vista until you see the UAC slider. Slide all the way to turn off UAC and then reboot.
If you decide not to turn off UAC you must change the security permissions on two folders<br />
(c:\karaokemp\mover and c:\karaokemp\tempzip) to allow write permissions. This is caused by security<br />
settings in Vista/7. Open My Computer, c: Local Hard Disk, karaokemp. Right click on folder mover,<br />
select properties, and then the Security Tab. Click on the edit button beside “To change permissions,<br />
click Edit.”. Click on the account that you are logged in as (usually the bottom one in the top list) and<br />
then click on allow full control. Press OK and then OK again. Now right click on folder tempzip and do the<br />
same thing.<br />
After changing the permissions open both the mover and tempzip folders and delete everything inside<br />
of them. Reboot the computer and it should not happen again.<br />
You are now ready to start GKS. The opening screen will appear (figure 9).<br />
Figure 9<br />
After several seconds the main screen will appear (figure 10).<br />
Figure 9
To add songs to the program click on the Add Kar (add karaoke) button (figure 11).<br />
Figure 10<br />
Click on Yes and then browse to the location on your computer where the songs are stored (figure 12).<br />
Figure 11<br />
You will be shown a progress bar of the import progress (figure 12). Please be patient, with a large<br />
number of files this can take a fair amount of time.<br />
Figure 12<br />
When finished you will be presented with the main program screen showing the karaoke files that you<br />
have imported into the program. If all song filenames are in the correct format of “DISKID-TRACKNO <strong>–</strong><br />
ARTIST <strong>–</strong> TITLE” the artist, title and disked will be formatted correctly (separate the disked/trackno, the<br />
artist and the title by space dash space) (figure 13).
Figure 13<br />
To add songs to the playlist (bottom table) double click on the song. You can enter search information<br />
in the box in the middle of the screen. The search data can be bits of the title/artist/disc. In other<br />
words you could enter “pat sc midnight” to find occurrences of Sound Choice, Patsy Cline, Walking After<br />
Midnight. (Figure 14)<br />
Figure 14
Double clicking on the song name will bring up the karaoke singer’s name prompt (if the singer prompt<br />
button on the right hand side is depressed) where you can enter the singers name and enter key change<br />
or speed change. (Figure 15)<br />
Figure 15<br />
Pressing enter will then place this song in your playlist. To play the song you would then double click on<br />
the song in the playlist. Please note that the song is highlighted. This is to show that this singer has not<br />
sung yet tonight and is not in the rotation list. (Figure 16) The total playlist time is shown in the box to<br />
the right of the search box.<br />
Figure 16
Note that once you have played the song and the singers name is in the rotation list the highlight will<br />
turn off. This shows that the singer has sung at least once at this show. (Figure 17)<br />
Figure 17<br />
When the song is halfway through playing as indicated by the time left display (under the single play<br />
button) and the progress bar at the bottom of the screen the song will be deleted from the playlist.<br />
When entering song names the singers name is added to the singer history as well. From this the next<br />
time that the person comes in you will be able to suggest songs for the singer to sing. The history can<br />
also be exported to a spreadsheet file if you would like to provide your singers with a listing of what<br />
songs they have sung in the past. At the top of the main screen on the right is a box that alternates the<br />
current time with the number of songs in your song library. Directly below that is the mode switch for<br />
the program. Pressing this repeatedly will cycle you between Single Play, Kar with <strong>DJ</strong>, Cont Kar, and<br />
Cont <strong>DJ</strong>. <strong>Karaoke</strong> with <strong>DJ</strong> mode will play a <strong>DJ</strong> Song after the karaoke song is finished (picked from your<br />
<strong>DJ</strong> playlist or randomly selected from the <strong>DJ</strong> song list <strong>–</strong> see <strong>DJ</strong> Section). Double clicking on the next<br />
karaoke song will fade out the <strong>DJ</strong> song and start the next karaoke song. Continuous karaoke will play<br />
the next song on your playlist automatically until the playlist is empty. Continuous <strong>DJ</strong> will play your<br />
entire <strong>DJ</strong> playlist and then will randomly select songs from the <strong>DJ</strong> song list <strong>–</strong> see <strong>DJ</strong> Section for limiting<br />
the random search feature to a particular genre). Below the mode button is the time remaining digital<br />
display (mimicked by the progress bar at the bottom for a visual confirmation). The next button is the<br />
Singer Prompt button. When turned off this also turns off the singer history feature of the program.<br />
The channel selection button cycles between Both Channels, Left Channel and Right Channel. This
feature is good for karaoke songs which have the vocal track on the left (or right) channel, however it<br />
should be used only if you are running your sound system in mono mode as setting it to left channel will<br />
only output sound to the left channel of your sound system. The next button “Set Reminder” allows you<br />
to set a visual cue to remind you of something you should do at a particular time such as last call.<br />
Setting this alarm will put a banner across the screen at the selected time which you can close by clicking<br />
on the Close Reminder button. (Figure 18)<br />
Figure 18<br />
Load File button allows you to load a file that is not in your song list (possibly a customer bought a disc<br />
in that they want to sing off of <strong>–</strong> you rip it with Audiograbber to a separate directory and then using the<br />
load file button browse to the location where you ripped the song). Always on Top is self explanatory.<br />
The hot keys button shows you all the keyboard shortcuts that you can use during your show to allow<br />
you to use the program without/or with limited use of the mouse. Add Kar button adds karaoke songs<br />
as shown previously. The TV Background button will take you to the fourth tab (Configuration) where at<br />
the bottom you can set the singer monitor background (either one picture or six pictures used as a slide<br />
show). The slider allows you to set the key graphically (or you can use the function keys F11 and F12).<br />
Reset pitch will reset the pitch and tempo to normal. The stop button will stop either <strong>DJ</strong> or karaoke<br />
music from playing but will not stop the sound effects. To stop the sound effects press Stop S Eff. The<br />
fade 2 <strong>DJ</strong> button will immediately start a <strong>DJ</strong> song playing. If you have mp3 or midi files that you would<br />
like to use as karaoke songs the Backing Tracks button allows you to add these songs here. With the<br />
backing tracks if the music file is accompanied by a PDF file with the exact same filename and you have a<br />
pdf reader installed, the pdf will be displayed in the singer screen. If you have Adobe Reader installed a
pop out window will open which will allow you to navigate through the pdf (Next Page / Previous Page <strong>–</strong><br />
figure 19). This window can also be opened with the Toggle Pop Out Media Player button.<br />
Figure 19<br />
The Save TV Width and Height allow you to save the width and height of the singer screen if you are not<br />
using the full screen function. Just to the left of this button is the Keep Songs in Playlist button. Press<br />
this button if you don’t want the program to delete the songs in your playlist on exit. The button will<br />
change to Remove Songs from Playlist. The large blank window is where your singer rotation is<br />
displayed. The top name in the list is the next singer; the singer at the bottom is the current singer. The<br />
song list, playlist and the singer rotation list all support right click operations. The song list right click<br />
allows you to mark a track as bad (deletes from song list but keeps file, can get a text file of bad songs in<br />
the configuration screen). Toggle best track allows you to highlight a file according to the legend at the<br />
top of the screen. Add to singer history allows you to add a song to the singer history listing without<br />
placing it in the playlist. The next four options work together to rename the song’s in your list as well as<br />
rename the files. Switch last name first name and switch title with artist are also available from your hot<br />
keys. Delete file from disc deletes the file to the recycle bin. Open in Explorer will open Windows<br />
Explorer at the file location so that you can examine the actual file. (Figure 20)<br />
Figure 20
Figure 21 - Playlist Right Click Menu<br />
Figure 22 - Singer Rotation Right Click Menu<br />
The second tab (Singer History/Settings) gives you access to the singer history as well as mixing<br />
parameters, relative volumes of karaoke/dj, and pitch tempo control. (Figure 23) Please note that you<br />
can search for singer’s names in the singers name box.<br />
Figure 23
Figure 24 - Singer History Right Click Menu<br />
The third tab (<strong>DJ</strong>) allows you to add songs to your <strong>DJ</strong> song list, create a <strong>DJ</strong> Playlist as well as save and<br />
load playlists. The display playlist will show you all the songs, in order that you have played in the<br />
program since the last time that you cleared the listing. This includes all karaoke and dj files. Note that<br />
total playlist time is shown to the right of the add <strong>DJ</strong> button.<br />
Figure 25<br />
To add files to the <strong>DJ</strong> song list click on Add <strong>DJ</strong>, then browse to where you music files are stored and then<br />
press OK. This will start the file import process. This can take some time as the program first uses the<br />
filename to parse the title and artist of the song. It then takes a second pass of the music to examine<br />
the idv3 tags. If the information is contained in the tag the song information will be updated. (Figure 26)
Figure 26<br />
To play a song, you can search for title / artist / genre. Double Clicking on a file will place it on the<br />
playlist (right hand side). If in continuous mode and the playlist is empty the program will randomly pick<br />
a song from your playlist. By entering for example the word country in the search box the random songs<br />
will only be played from the songs in your song list that contain the word country in the title, the artist<br />
name or the genre. (Figure 27) Double click on file in playlist to play it.<br />
Figure 27
Clicking on Display Playlist will show the date and time played as well as the filename of the file. (Figure<br />
28)<br />
Figure 28<br />
Figure 29 - Configurations Screen
To add sound effects to the program you would go to the configuration screen, pick the key combination<br />
that you would like to trigger a sound effect (ALT + 0 through 9) and click on the ellipses and browse to<br />
the sound effect. Click OK. (Figure 30)<br />
Figure 30<br />
Here is where you set the alarm time for the silent reminder alarm. Change the time to what you need<br />
(24 hour military time), change the reminder message and then click set reminder. Click set reminder<br />
again to shut off alarm (figure 31).<br />
Figure 31<br />
The program allows you to display ads at the bottom of the singer screen. It will also display the current<br />
singer name, as well as the next and the third singer. This area (figure 32) is where you set these<br />
features. Enter three lines in the Display Ads boxes and make sure that remove ad from display is<br />
unchecked. If you wish to display singer names make sure the appropriate box is unchecked. If you are<br />
using Adobe Reader please check the appropriate box.<br />
Figure 32
The Singer Screen Full Screen check box will display the singer screen full screen in the monitor where it<br />
is displayed. When the program starts it attempts to detect the screen setup and place the singer<br />
monitor screen in the second display. If it detects it incorrectly you can drag it to the proper monitor<br />
and then double click on the title bar. If the singer screen opens in the main window full screen you<br />
cannot see the program window. Simply click on the singer screen and it will shrink to the saved size. If<br />
you are using the program without a monitor attached you may want to turn off the singer screen. On<br />
slower computers you may want to turn off interactive search (this is the feature which searches as you<br />
type, but as it goes through your song list for every keystroke it may slow and older computer down). If<br />
you turn this off you must press enter to have the program search the song list. With the Save Daily<br />
Playlist check box turned on the program will save the playlist of your files every time you exit the<br />
program. The file will be stored in your My Documents folder in the numeric format yearmonthdate.txt.<br />
This file will open in notepad. The slider below will adjust the time between ad changes on the singer<br />
screen. The way that ads and singers are displayed is ad line one, current singer, ad line two, next<br />
singer, ad line three and finally third singer.<br />
Figure 33<br />
Upper Case button will force all characters to be in upper case and not honor casing in the file names.<br />
Toggle Title/Artist in Playlist simply toggles the order in which these two fields are displayed in the<br />
karaoke song list. Create spreadsheet file will create a csv file of your karaoke song list. It also will<br />
create a bad song list created by right clicking on songs in the karaoke listing. Check for updates will<br />
check for an update and install it (requires internet connection). (Figure 34)<br />
Figure 34
Delete <strong>Karaoke</strong> Duplicates and Delete <strong>DJ</strong> Duplicate Files work the same way. Please read the warnings<br />
that are shown when clicking on these buttons. These look for file names that are identical, in other<br />
words if you have two copies of a karaoke song SC1234-01 <strong>–</strong> Some Artist <strong>–</strong> Some Title.zip and in another<br />
directory the exact same file it will delete one copy to the recycle bin. If one copy is named SC1234-01 <strong>–</strong><br />
Artist, Some <strong>–</strong> Some Title.zip it will not be found as a duplicate. Before using this feature make sure that<br />
you empty the recycle bin. This way you can restore the recycle bin if you do not like the results.<br />
(Figure 35).<br />
Figure 35<br />
The last option controls the background pictures displayed in the singer screen. If you wish a static<br />
background just select the first box. To change the background just click on the button and browse to<br />
any picture file (including gif file) and press OK. If you want a slide show select six pictures. The slider to<br />
the right can be used to change the interval between slides. (Figure 36)<br />
Figure 36<br />
To print your songbooks select Print songbooks from your start menu. (Figure 37)<br />
Figure 37
Enter the Title you would like at the top of your songbooks in the bottom text entry box.<br />
Then enter whether you want to print lines on<br />
the report. Now decide whether you want to<br />
print only new songs or whether you want to<br />
print the whole song list. To use this feature<br />
you should understand how the program flags<br />
a song as a new song. When you add songs to<br />
Graham’s <strong>Karaoke</strong> <strong>System</strong> all songs are<br />
flagged as new. When you have added all<br />
your songs to the library and are happy with<br />
the way they look in the song list you would<br />
start the song book printing program. Choose<br />
the report style that you would like, enter a<br />
title for the song book and then press the<br />
desired style button. A preview window will<br />
open where you can preview the list and if<br />
you are happy select print. A suggestion if<br />
you are going to print multiple books and are<br />
using an inkjet printer search for a PDF printer<br />
driver such as Cute PDF, install it and then<br />
print to the PDF printer driver. The file can<br />
then be taken to a print shop to be printed. If<br />
you can find a shop that will print for around<br />
3 or 4 cents a copy it will probably be cheaper<br />
then printing hundreds of pages with ink jet<br />
cartridges. When you are sure that you have<br />
the books printed the way you like click on<br />
the clear new songs button. This will remove<br />
the new song flag from your database of<br />
songs. The next time you add songs to the<br />
database (Add Kar) the new songs will be<br />
flagged as new. Then you are able to print an update sheet for your book. If you do not check the Print<br />
New Songs Only check box all the songs in your song list will be printed in your song book.<br />
The print songbook program will not print songs without titles or without artists. It will also remove all<br />
duplicates from your song book. This way if you have ten different versions of Grandpa by the Judds, it<br />
will only be printed once in your book. Remember for the program to remove duplicates the song name<br />
and song artist have to be the same. So if you have one song titled “Grand’pa <strong>–</strong> Judds, The” and one<br />
song titled “Grandpa <strong>–</strong> Judds, The” the song will be printed twice.<br />
Email suggestions for improvements to grahamskaraoke@gmail.com or<br />
graham@grahamskaraokesystem.com