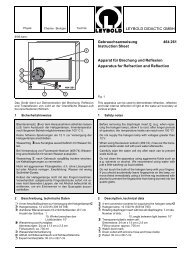
LEYBOLD DIDACTIC GMBH Gebrauchsanweisung 666 221 ...
LEYBOLD DIDACTIC GMBH Gebrauchsanweisung 666 221 ...
LEYBOLD DIDACTIC GMBH Gebrauchsanweisung 666 221 ...

You also want an ePaper? Increase the reach of your titles
YUMPU automatically turns print PDFs into web optimized ePapers that Google loves.
8/96-Ne-<br />
Physik Chemie ⋅ Biologie Technik <strong>LEYBOLD</strong> <strong>DIDACTIC</strong> <strong>GMBH</strong><br />
Das Hand-pH-Meter (<strong>666</strong> <strong>221</strong>) dient zusammen mit einer pH-<br />
Elektrode (z.B. 667 417) und einer Temperatursonde (z. B.<br />
<strong>666</strong> 241) zur quantitativen Bestimmung der H3O + -Ionen-Konzentration<br />
in wäßrigen Lösungen und zur Temperaturmessung<br />
und mit einer Redox-Einstabmeßkette (667 415) können Redoxpotentiale<br />
gemesen werden. Die Temperaturkompensation<br />
erfolgt automatisch mit angeschlossenem Temperaturfühler<br />
oder manuell mit eingegebener Temperatur.<br />
Literatur: Ökologische Untersuchungen mit dem Umweltmeßkoffer<br />
(668 331)<br />
1 Sicherheitshinweise<br />
Gerät und Sensoranschlüsse vor Feuchtigkeit schützen<br />
Hinweis als Auflage des EMV-Gesetzes:<br />
Die empfindliche Elektronik des Gerätes kann in Versuchsanordnungen<br />
durch ESD (Entladung elektrostatischer Elektrizität)<br />
beeinträchtigt werden. Deshalb sind elektrostatische<br />
Aufladungen (insbesondere durch die Benutzung in geeigneten<br />
Räumen) zu vermeiden bzw. durch Entladung (an metallischen<br />
Gegenständen) zu beseitigen.<br />
2 Beschreibung, technische Daten<br />
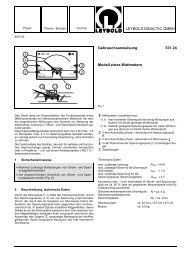
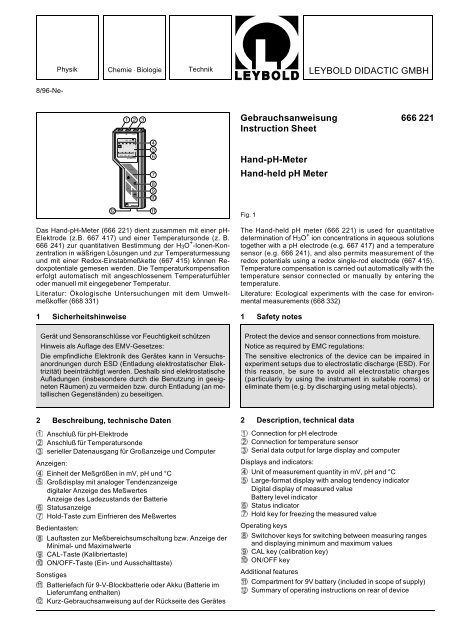
� Anschluß für pH-Elektrode<br />
� Anschluß für Temperatursonde<br />
� serieller Datenausgang für Großanzeige und Computer<br />
Anzeigen:<br />
� Einheit der Meßgrößen in mV, pH und °C<br />
� Großdisplay mit analoger Tendenzanzeige<br />
digitaler Anzeige des Meßwertes<br />
Anzeige des Ladezustands der Batterie<br />
� Statusanzeige<br />
� Hold-Taste zum Einfrieren des Meßwertes<br />
Bedientasten:<br />
� Lauftasten zur Meßbereichsumschaltung bzw. Anzeige der<br />
Minimal- und Maximalwerte<br />
� CAL-Taste (Kalibriertaste)<br />
� ON/OFF-Taste (Ein- und Ausschalttaste)<br />
Sonstiges<br />
� Batteriefach für 9-V-Blockbatterie oder Akku (Batterie im<br />
Lieferumfang enthalten)<br />
� Kurz-<strong>Gebrauchsanweisung</strong> auf der Rückseite des Gerätes<br />
<strong>Gebrauchsanweisung</strong> <strong>666</strong> <strong>221</strong><br />
Instruction Sheet<br />
Hand-pH-Meter<br />
Hand-held pH Meter<br />
Fig. 1<br />
The Hand-held pH meter (<strong>666</strong> <strong>221</strong>) is used for quantitative<br />
determination of H3O + ion concentrations in aqueous solutions<br />
together with a pH electrode (e.g. 667 417) and a temperature<br />
sensor (e.g. <strong>666</strong> 241), and also permits measurement of the<br />
redox potentials using a redox single-rod electrode (667 415).<br />
Temperature compensation is carried out automatically with the<br />
temperature sensor connected or manually by entering the<br />
temperature.<br />
Literature: Ecological experiments with the case for environmental<br />
measurements (668 332)<br />
1 Safety notes<br />
Protect the device and sensor connections from moisture.<br />
Notice as required by EMC regulations:<br />
The sensitive electronics of the device can be impaired in<br />
experiment setups due to electrostatic discharge (ESD). For<br />
this reason, be sure to avoid all electrostatic charges<br />
(particularly by using the instrument in suitable rooms) or<br />
eliminate them (e.g. by discharging using metal objects).<br />
2 Description, technical data<br />
� Connection for pH electrode<br />
� Connection for temperature sensor<br />
� Serial data output for large display and computer<br />
Displays and indicators:<br />
� Unit of measurement quantity in mV, pH and °C<br />
� Large-format display with analog tendency indicator<br />
Digital display of measured value<br />
Battery level indicator<br />
� Status indicator<br />
� Hold key for freezing the measured value<br />
Operating keys<br />
� Switchover keys for switching between measuring ranges<br />
and displaying minimum and maximum values<br />
� CAL key (calibration key)<br />
� ON/OFF key<br />
Additional features<br />
� Compartment for 9V battery (included in scope of supply)<br />
� Summary of operating instructions on rear of device
Technische Daten<br />
Meßbereich: 0 ... 14,00 pH Meßgenauigkeit ± 0,5 pH<br />
-1999 ... 1999 mV ± 0,5 %<br />
-10 ... 110C (NTC) ± 0,2 °C<br />
-199,9 ... 199,9 °C<br />
(PT 1000)<br />
± 0,5 °C<br />
Eingangswiderstand: 10 12 Ω<br />
Eingang: pH-DIN-Buchse DIN 19 262<br />
Diodenbuchse, 8-polig, (für Temperaturfühler),<br />
Ausgang: serielle Schnittstelle (galvanisch getrennt)<br />
und externe Spannungsversorgung.<br />
Die Pin-Belegung und das Datenformat<br />
für die serielle Schnittstelle entnehmen<br />
Sie bitte der Gebrauchsanleitung<br />
für das Computeranschlußkabel<br />
(<strong>666</strong> 251).<br />
Spannungsversorgung: 9 V Blockbatterie oder Akku<br />
(automatische Abschaltung nach<br />
30 min)<br />
Abmessung: 21 x 8,5 x 3,7 cm<br />
Gewicht: 233 g<br />
3 Bedienung<br />
Zur Messung zusätzlich erforderlich:<br />
pH-Einstabmeßkette:<br />
pH-Einstabmeßkette, Glaselektrode: 667 424<br />
oder<br />
pH-Einstabmeßkette, Kunststoffschaft: 667 417<br />
pH-Einstabmeßkette, mit Kegelmembran: 667 418<br />
oder<br />
pH-Einstabmeßkette, mit Flachmembran: 667 419<br />
oder<br />
Redox-Einstabmeßkette: 667 415<br />
Temperaturfühler:<br />
Widerstandstemperaturfühler, (NTC) <strong>666</strong> 212<br />
Meßbereich: -20 ... +1100 °C<br />
Toleranz: -20 ... + 70 °C: 0,2 K<br />
+70 ... +120 °C: 0,4 K<br />
oder<br />
Widerstandstemperaturfühler, (PT 1000) <strong>666</strong> 241<br />
Meßbereich: -50 ... +400 °C<br />
Toleranz: Klasse B (DIN ICE 751)<br />
(0,30+0,005*ltl)<br />
Die pH-Elektrode an Eingangsbuchse � den Temperaturfühler<br />
an Eingangsbuchse � anschließen.<br />
Kalibrierung<br />
Vor der erstmaligen Benutzung des Gerätes und/oder der pH-<br />
Elektrode muß eine Kalibrierung erfolgen.<br />
Die Kalibrierung kann automatisch mit Standardpufferlösungen<br />
(z. B. in <strong>666</strong> 260 Reagenzienkoffer mit Reagenzien-Basissatz<br />
oder <strong>666</strong> 261 Reagenzien-Basissatz zum Reagenzienkoffer für<br />
das Handphotometer <strong>666</strong> 225 enthalten) erfolgen oder manuell<br />
mit jedem beliebigen Puffer.<br />
2<br />
Technical data<br />
Measuring<br />
range:<br />
0 ... 14.00 pH Measuring<br />
accuracy:<br />
± 0.5 pH<br />
-1999 ... 1999 mV ± 0.5 %<br />
-10 ... 110C (NTC) ± 0.2 °C<br />
-199.9 ... 199.9 °C<br />
(PT 1000)<br />
± 0.5 °C<br />
Input resistance: 10 12 Ω<br />
Input: pH-DIN socket DIN 19 262<br />
DIN socket, 8-pin (for temperature<br />
sensor)<br />
Output: Serial interface (electrically isolated)<br />
and external voltage supply.<br />
See the Instruction Sheet for the<br />
computer connection cable (<strong>666</strong> 251)<br />
for pin assignment and data format.<br />
Voltage supply: 9 V battery<br />
(automatic battery cut-out after<br />
30 min)<br />
Dimensions: 21 x 8.5 x 3.7 cm<br />
Weight: 233 g<br />
3 Operation:<br />
The following is additionally required for measuring:<br />
pH single-rod electrode:<br />
pH single-rod measurement cell<br />
(glass electrode): 667 424<br />
or<br />
pH single-rod electrode with plastic shaft: 667 417<br />
pH single-rod electrode with conical<br />
diaphragm: 667 418<br />
or<br />
pH single-rod electrode with flat diaphragm: 667 419<br />
or<br />
Redox single-rod electrode: 667 415<br />
Temperature sensors:<br />
Temperature sensor (NTC) <strong>666</strong> 212<br />
Measuring range: -20 ... +1100 °C<br />
Tolerance: -20 ... + 70 °C: 0.2 K<br />
+70 ... +120 °C: 0.4 K<br />
or<br />
Temperature sensor (PT 1000) <strong>666</strong> 241<br />
Measuring range: -50 ... +400 °C<br />
Tolerance: class B (DIN ICE 751)<br />
(0.30+0.005*ltl)<br />
Connect the pH electrode at input socket � and the temperature<br />
sensor at input socket �.<br />
Calibration<br />
Before using the instrument and/or the pH electrode for the first<br />
time, you must calibrate the apparatus.<br />
Calibration can be carried out automatically using the standard<br />
buffer solutions (e.g. in <strong>666</strong> 260 reagent case with basic reagent<br />
kit or <strong>666</strong> 261 basic reagent kit for reagent case for hand-held<br />
photometer <strong>666</strong> 225) or manually using any buffer solution.
Automatische Kalibrierung:<br />
Dazu die ON/OFF-Taste und CAL-Taste beim Einschalten<br />
gleichzeitig drücken, die CAL-Taste etwas länger festhalten,<br />
das Gerät geht in den Kalibriermodus und schlägt den pH-Wert<br />
7,00 vor.<br />
(Bei Kalibrierung ohne Temperaturfühler wird zuerst die Temperatur<br />
abgefragt. Temperatur mit den Lauftasten einstellen<br />
(erfolgt in Schritten von 0,5 K) und mit CAL-Taste bestätigen).<br />
Gummikappe von Elektrode abziehen und Elektrode mit dest.<br />
Wasser abspülen. Elektrode in Pufferlösung pH = 7,00 eintauchen.<br />
Warten bis sich stabiler pH-Wert eingestellt hat. Wert mit<br />
CAL-Taste bestätigen. Das Gerät schlägt pH-Wert 4,00 vor.<br />
Elektrode mit dest. Wasser abspülen und in Pufferlösung<br />
pH = 4,00 tauchen. Wert mit CAL-Taste bestätigen. Das Gerät<br />
springt in den Meßmodus.<br />
Hinweis:<br />
Erscheint E1 oder E2 auf dem Display, siehe Fehlersuche<br />
Punkt 5<br />
Manuelle Kalibrierung:<br />
Dazu die ON/OFF-Taste und CAL-Taste beim Einschalten<br />
gleichzeitig drücken, die CAL-Taste etwas länger festhalten,<br />
das Gerät geht in den Kalibriermodus und schlägt den pH-Wert<br />
7,00 vor.<br />
(Bei Kalibrierung ohne Temperaturfühler wird zuerst die Temperatur<br />
abgefragt. Temperatur mit den Lauftasten einstellen<br />
(erfolgt in Schritten von 0,5 K) und mit CAL-Taste bestätigen).<br />
Mit den Lauftasten "� " und "� " können die pH-Werte in folgenden<br />
Schritten 2,00, 4,00, 7,00, 9,00 oder 11,00 geändert<br />
werden. Durch gleichzeitiges Drücken der HOLD-Taste und einer<br />
Lauftaste ("� " oder "� ") kann der pH-Wert in Schritten von<br />
0,01 verändert werden. Entsprechenden pH-Wert des gewählten<br />
Puffers einstellen. Gummikappe von Elektrode abziehen<br />
und Elektrode mit dest. Wasser abspülen. Elektrode in Pufferlösung<br />
eintauchen, warten bis sich stabiler pH-Wert eingestellt<br />
hat. Wert mit CAL-Taste bestätigen. Das Gerät schlägt dann<br />
pH-Wert 4,00 vor. Wert wieder gegebenenfalls ändern, Elektrode<br />
mit dest. Wasser abspülen und in Pufferlösung tauchen.<br />
Wert mit CAL-Taste bestätigen. Das Gerät springt in den Meßmodus.<br />
(Anmerkung: Die vorgeschlagenen pH-Werte 7,00 bzw. 4,00<br />
erscheinen nur bei der ersten Kalibrierung, danach werden die<br />
zuletzt eingestellten pH-Werte vorgeschlagen.)<br />
Die Kalibrierung kann jederzeit durch Drücken der ON/OFF-<br />
Taste abgebrochen werden.<br />
• Messen<br />
Durch Drücken der ON/OFF-Taste das Gerät einschalten. Als<br />
Funktionstest erscheinen auf dem Display kurzzeitig (1 Sekunde)<br />
alle Anzeigeelemente. Danach schaltet das Gerät selbständig<br />
in den zuletzt verwendeten Meßmodus. PH-Elektrode und<br />
Temperaturfühler in die Probelösung eintauchen und mit<br />
gleichmäßiger Bewegung kreisend rühren.<br />
Ist kein Temperaturfühler angeschlossen, kann die Temperatur<br />
nach Drücken der CAl-Taste manuell in Schritten von 0,5 K eingestellt<br />
werden.<br />
Meßwert erscheint auf dem Display. Mittels der Lauftasten �<br />
kann von pH-Wert-Anzeige auf Temperatur- bzw. Spannungsanzeige<br />
umgeschaltet werden.<br />
Durch Drücken der Hold-Taste � wird der Meßwert festgehalten,<br />
ein entsprechender Hinweis erscheint auf dem Display.<br />
Über die Lauftaste " � " erscheint auf dem Display die Anzeige<br />
"Max-Wert" und der entsprechende Meßwert wird angezeigt.<br />
Über die Lauftaste"� " erscheint die Anzeige "Min-Wert" und<br />
der entsprechende Meßwert wird angezeigt. Nach erneutem<br />
Drücken der Hold-Taste � wird die Messung fortgesetzt. Durch<br />
Ein/Ausschalten werden die Min/Max-Werte zurückgesetzt.<br />
Alle Einstellungen und Kalibrierwerte bleiben erhalten.<br />
Das Gerät schaltet sich automatisch 30 Minuten nach der letzten<br />
Benutzung aus, außer wenn das Gerät an den PC, Großanzeige<br />
oder Data-Logger angeschlossen ist.<br />
3<br />
Automatic calibration:<br />
When switching on the device, press the ON/OFF key and CAL<br />
key simultaneously; hold down the CAL key a bit longer, until<br />
the instrument enters calibration mode and prompts for the pH<br />
value 7.00.<br />
(When calibrating without a temperature sensor, the instrument<br />
first prompts you to enter the temperature. Set the temperature<br />
with the switchover keys (in steps of 0.5 K) and confirm with the<br />
CAL key).<br />
Remove the rubber cap from the electrode and rinse the<br />
electrode with distilled water. Immerse the electrode in buffer<br />
solution pH = 7.00. Wait until the pH value on the meter stabilizes,<br />
then confirm the value with the CAL key. The device then<br />
prompts for the pH value 4.00. Rinse the electrode with distilled<br />
water and immerse it in buffer solution pH = 4.00. Confirm the<br />
value with the CAL key. The device then switches to measuring<br />
mode.<br />
Note<br />
If E1 or E2 appears in the display, see Fault-finding, point 5<br />
Manual calibration:<br />
When switching on the device, press the ON/OFF key and CAL<br />
key simultaneously; hold down the CAL key a bit longer, until<br />
the device enters calibration mode and suggests the pH value<br />
7.00.<br />
(When calibrating without a temperature sensor, the instrument<br />
first prompts you to enter the temperature. Set the temperature<br />
with the switchover keys (in steps of 0.5 K) and confirm with the<br />
CAL key).<br />
Using the switchover keys "� " and "� ", you can change the<br />
pH values in the steps 2.00, 4.00, 7.00, 9.00 or 11.00. By<br />
simultaneously pressing the HOLD key and a switchover key<br />
("� " or "� "), you can change the pH values in steps of 0.01.<br />
Set the corresponding pH value of the chosen buffer solution.<br />
Remove the rubber cap from the electrode and rinse the<br />
electrode with distilled water. Immerse the electrode in buffer<br />
solution. Wait until the pH value on the meter stabilizes, then<br />
confirm the value with the CAL key. The device then suggests<br />
the pH value 4.00. Change this value if necessary, then rinse<br />
the electrode with distilled water and immerse it in the buffer<br />
solution. Confirm the value with the CAL key. The device then<br />
switches to measuring mode.<br />
(Note: The suggested pH values 7.00 and 4.00 only appear for<br />
the first calibration; at all other times, the device suggests the<br />
pH calibration values last used.)<br />
You can terminate calibration at any time by pressing the<br />
ON/OFF key.<br />
• Measuring<br />
Switch on the instrument by pressing the ON/OFF key. The<br />
device executes a brief function test (1 second) in which all display<br />
elements light up, before automatically switching to the last<br />
measuring mode used. Immerse the pH electrode and the<br />
temperature sensor in the sample solution and agitate them<br />
with an even circular stirring motion.<br />
If no temperature sensor is connected, you can manually change<br />
the temperature in steps of 0.5 K by pressing the CAL key.<br />
The measured value appears in the display. Using the switchover<br />
keys �, you can switch from pH value display to display of<br />
temperature or voltage.<br />
Pressing the Hold key � "freezes" the measured value; a<br />
corresponding indicator appears in the display. Pressing the<br />
switchover key "� " causes the instrument to display the<br />
message "MAX" along with the corresponding maximum<br />
measured value. Pressing the switchover key "� " causes the<br />
instrument to display the message "MIN" along with the<br />
corresponding minimum measured value. Pressing the Hold<br />
key � again continues the measurement. Switching the device<br />
on and off resets the minimum and maximum values. All<br />
settings and calibration values are retained.<br />
The devices switches itself off automatically 30 minutes after<br />
the last use, unless it is connected to a PC, large digital display<br />
or data logger.
• Anschluß an Großanzeige<br />
Der Anschluß des Hand-pH-Meters an die Großanzeige<br />
(<strong>666</strong> 250) ist über die eingebaute serielle Schnittstelle und ein<br />
Anschlußkabel, das sich im Lieferumfang der Großanzeige befindet,<br />
möglich. Dadurch kann das Handmeßgerät als Demonstrations-Meßgerät<br />
mit einer 26 mm hohen roten LED-Anzeige<br />
benutzt werden, in diesem Fall erfolgt die Stromversorgung des<br />
Handmeßgerätes über die Großanzeige. Auf der Rückseite der<br />
Großanzeige befindet sich eine Stativklemme zur Befestigung<br />
an allen üblichen Stativaufbauten. Gleichzeitig bietet die<br />
Großanzeige einen Schreiber- (Analog-) und Druckerausgang<br />
(Centronics) wodurch bei Langzeitversuchen problemlos die<br />
Meßwerte zu registrieren sind.<br />
• Meßwerterfassung mit dem Computer<br />
Das Computeranschlußkabel (<strong>666</strong> 251) ermöglicht den direkten<br />
Anschluß des Handmeßgerätes an die serielle Schnittstelle<br />
(9-polig) des Computers. Die zum Lieferumfang des Computeranschlußkabels<br />
gehörende komfortable Windows-Software<br />
macht aus den Handmeßgeräten ein modernes Meßwerterfassungssystem.<br />
Nähere Hinweise dazu finden Sie in der READ-<br />
ME-Datei der Software.<br />
4 Batteriewechsel<br />
Bei verbrauchter Batterie erscheint im Display das Batteriesymbol.<br />
Gerät ausschalten. Abdeckung des Batteriefachs � durch<br />
Schieben nach rechts oder links entfernen und die Batterie entnehmen.<br />
Neue Batterie oder einen Akku mit der Batterieanschlußklemme<br />
verbinden. Angeschlossene Batterie ins Batteriefach<br />
schieben und mit der Abdeckung verschließen. Gegebenenfalls<br />
das Gerät ausschalten. Alle Kalibrierdaten bleiben<br />
bei Batteriewechsel erhalten.<br />
Verbrauchte Batterie ordnungsgemäß entsorgen.<br />
5 Fehlersuche<br />
Fehlermeldung E1 (Error 1) im Display:<br />
Die Pufferlösungen unterscheiden sich nicht genügend. Durch<br />
Drücken der ON/OFF Taste fehlerhafte Kalibrierung beenden.<br />
Erneute Kalibrierung mit zwei unterschiedlichen Pufferlösungen.<br />
Fehlermeldung E2 (Error 2) im Display:<br />
pH-Elektrode defekt (z. B. überaltert bzw. die Steilheit der Elek-<br />
55 m V<br />
trode ist nicht mehr ausreichend <<br />
pH ).<br />
Neue Elektrode verwenden oder falls trotzdem weitergearbeitet<br />
werden soll, mit CAL-Taste bestätigen, Gerät springt in den<br />
Meßmodus.<br />
• Connecting the large digital display<br />
The hand-held pH meter can be connected to the large digital<br />
display (<strong>666</strong> 250) via the built-in serial interface and the<br />
connection cable included in the scope of supply of the display.<br />
The large digital display allows you to use the hand-held meter<br />
as a demonstration measuring instrument with a 26 mm high<br />
red LED display. In this case, the voltage supply for the handheld<br />
meter is supplied via the large digital display. The rear of<br />
the large digital display is fitted with a stand clamp for mounting<br />
in all common stand configurations. At the same time, the large<br />
digital display is provided with outputs for connection to a chart<br />
recorder (analog) or printer (Centronics), for easy and problemfree<br />
registration in long-term experiments.<br />
• Recording measured values via the computer<br />
Using the computer connection cable (<strong>666</strong> 251), you can connect<br />
your hand-held meter directly to the serial interface (9-pin) of<br />
your computer. The user-friendly Windows software included in<br />
the scope of supply of the computer connection cable turns the<br />
hand-held measuring instruments into a modern measurement<br />
data acquisition system. For more information, see the READ-<br />
ME file of the software.<br />
4 Changing the battery<br />
When the battery is low, the battery symbol appears in the<br />
display. Switch off the instrument, and remove the cover of the<br />
battery compartment � by pushing it to the right or the left; then<br />
remove the battery. Attach a new battery to the battery<br />
connection terminals. Slide the connected battery into the battery<br />
compartment and close it with the cover. Switch off the instrument<br />
if necessary. All calibration data are retained when changing<br />
the battery.<br />
Dispose of the dead battery in an environmentally responsible<br />
manner.<br />
5 Fault-finding<br />
Error message E1 (Error 1) in display:<br />
The difference between the buffer solutions is not great<br />
enough. Terminate the invalid calibration by pressing the<br />
ON/OFF key. Repeat the calibration using two more different<br />
buffer solutions.<br />
Error message E2 (Error 2) in display:<br />
pH electrode defective (e.g. too old or the slope of the electrode is<br />
55 m V<br />
no longer sufficient <<br />
pH ).<br />
Use a new electrode. If you still wish to continue with the<br />
present electrode, confirm this by pressing the CAL key. The<br />
instrument switches to measuring mode.<br />
<strong>LEYBOLD</strong> <strong>DIDACTIC</strong> <strong>GMBH</strong> ⋅ Leyboldstrasse 1 ⋅ D-50354 Hürth ⋅ Phone (02233) 604-0 ⋅ Telefax (02233) 604-222 ⋅ Telex 17 223 332 LHPCGN D<br />
© by Leybold Didactic GmbH, Printed in the Federal Republic of Germany<br />
Technical alterations reserved
![[667 359] Labor-Refraktometer - LD DIDACTIC](https://img.yumpu.com/24788329/1/184x260/667-359-labor-refraktometer-ld-didactic.jpg?quality=85)