Trapano a Percussione I - Worx Power Tools
Trapano a Percussione I - Worx Power Tools
Trapano a Percussione I - Worx Power Tools

Create successful ePaper yourself
Turn your PDF publications into a flip-book with our unique Google optimized e-Paper software.
OPERATING INSTRUCTIONS<br />
1. ON/OFF SWITCH<br />
Depress to start and release to stop your tool.<br />
2. SWITCH LOCK-ON BUTTON<br />
Depress on/off switch (1) then lock on button<br />
(2) (See A), release on/off switch first and lockon<br />
button second. Your switch is now locked<br />
on for continuous use. To switch off your tool<br />
just depress and release the on/off switch.<br />
3.FORWARD AND REVERSE ROTATION<br />
CONTROL<br />
For drilling and screwdriving use forward<br />
rotation marked “ ”(lever is moved to the<br />
left). Only use reverse rotationmarked“<br />
”(lever is moved to the right) to remove<br />
screws or release a jammed drill bit.<br />
Never change the direction of rotation<br />
when the tool is rotating, wait until it has<br />
stopped.<br />
4.AUXILIARY HANDLE<br />
Slide the handle onto the drill and rotate<br />
to the desired working position. To clamp<br />
the auxiliary handle rotates the handgrip<br />
clockwise. To loosen the auxiliary handle rotate<br />
the hand grip anti-clockwise. Always use the<br />
auxiliary handle (See C).<br />
5. DEPTH STOP<br />
Fit the drill bit or driver bit into the chuck.<br />
Loosen the depth stop by rotating the handle<br />
grip anti-clockwise. Slide the depth stop until<br />
the distance between the depth stop end and<br />
the drill/driver bit end is equal to the depth of<br />
hole/screw you wish to make. Then clamp the<br />
depth stop by rotating the handle clockwise.<br />
6.HAMMER OR DRILLING CONTROL<br />
When drilling masonry and concrete choose<br />
the Hammer position When drilling wood,<br />
metal, plastic and screwdriving choose the<br />
Drill position . (See B)<br />
7. SPEED CHANGE KNOB<br />
Choose position 1 for high torque/low speed<br />
range for large diameter drill bits and screw<br />
driving. Choose position 2 for low torque/<br />
High-speed range for small diameter drill bits.<br />
If the gears do not engage easily then rotate<br />
the chuck by hand to align the gears. Never<br />
change the gears when the tool is rotating,<br />
wait until it has stopped.<br />
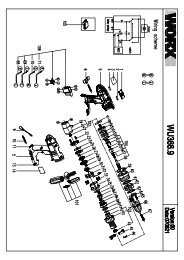
8. MOUNTING OF BIT IN CHUCK<br />
When mounting the drill bit, insert bit between<br />
the chuck jaws as far as it will go. Ensure drill<br />
bit is in the center of the chuck jaws. Using<br />
the chuck key provided, there are three holes<br />
in which the chuck key should be inserted.<br />
Tighten them equally in turn at each of the<br />
three holes, not just at one hole. Your drill<br />
bit is now locked in the chuck. The bit can be<br />
removed by reversing the above procedure<br />
(See D).<br />
WORKING HINTS FOR YOUR<br />
DRILL<br />
If your power tool becomes too hot. set the<br />
speed to maximum and run no load for 2-3<br />
minutes to cool the motor. Tungsten carbide<br />
drill bits should always be used for concrete<br />
and masonry. When drilling in metal, only<br />
use HSS drill bits in good condition. Always<br />
use a magnetic bit holder when using short<br />
screwdriver bits.<br />
Where possible use a pilot hole before drilling<br />
a large diameter hole.<br />
MAINTENANCE<br />
Your power tool requires no additional<br />
lubrication or maintenance. There is no user<br />
serviceable parts in your power tool. Never<br />
use water or chemical cleaners to clean your<br />
power tool. Wipe clean with a dry cloth.<br />
Always store your power tool in a dry place.<br />
Keep the motor ventilation slots clean. Keep<br />
all working controls free of dust. If you see<br />
some sparks flashing in the ventilation slots,<br />
this is normal and will not damage your drill.<br />
ENVIRONMENTAL<br />
PROTECTION<br />
Waste electrical products should not<br />
be disposed of with household waste.<br />
Please recycle where facilities exist.<br />
Check with your local authorities or retailer for<br />
recycling advice.<br />
09<br />
Hammer Drill<br />
ENG<br />
13L-WU303-M-060919-·¨ÓïCE´¦ÐÞ¸Ä.indd 9 2007-3-5 16:04:02