Laserliner AquaPro 200 - UMAREX GmbH & Co.KG
Laserliner AquaPro 200 - UMAREX GmbH & Co.KG
Laserliner AquaPro 200 - UMAREX GmbH & Co.KG

Erfolgreiche ePaper selbst erstellen
Machen Sie aus Ihren PDF Publikationen ein blätterbares Flipbook mit unserer einzigartigen Google optimierten e-Paper Software.
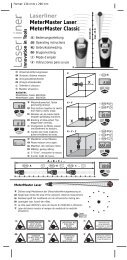
Vertical use<br />
VERY IMPORTANT: Before using the instrument in the vertical mode, please put the <strong>AquaPro</strong> in the<br />
horizontal position (look to “horizontal use”), but DO NOT switch it on yet. Then the compensator<br />
clamp (4) have to set to LOCK before preparing instrument for vertical use.<br />
Insert vertical adapter (6) for use without tripod.<br />
Fit both vertical adapter (6) and tripod adapter for use on tripod.<br />
Set bubble (8) by setting screw of vertical adapter (6). Please take care to set bubble very<br />
precisely as compensator will not work in vertical mode.<br />
Switch the <strong>AquaPro</strong> on, remaining functions are the same as described for horizontal use.<br />
Infra-red remote control<br />
The keys of the remote control are identical with the keys of the instrument with the exception of the<br />
„POWER“-key. With the „POWER“-key of the remonte control the <strong>AquaPro</strong> can only be switched-off<br />
but not started again.<br />
Checking accuracy<br />
Set up the <strong>AquaPro</strong> in rotating mode and take reading on wall at distance of 10 meters.<br />
Mark laser line on wall. Turn instrument 180° around its vertical axis and take 2 nd reading.<br />
Mark centre point between two readings. Deviation of both readings fom centre point should not<br />
exceed 2 mm per 10 meters.<br />
Take two more readings after turning instrument 90° around its vertical axis and proceed as<br />
mentioned above.<br />
If the unit is disadjusted please contact Umarex-<strong>Laserliner</strong> or an authorized workshop.<br />
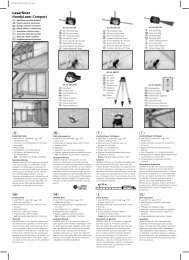
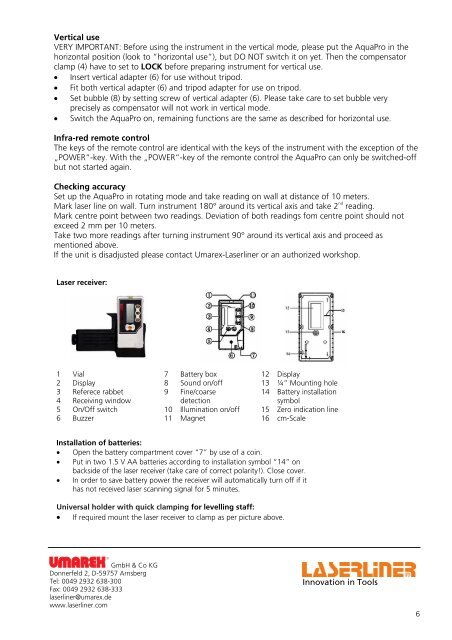
Laser receiver:<br />
1 Vial 7 Battery box 12 Display<br />
2 Display 8 Sound on/off 13 ¼” Mounting hole<br />
3 Referece rabbet 9 Fine/coarse 14 Battery installation<br />
4 Receiving window detection symbol<br />
5 On/Off switch 10 Illumination on/off 15 Zero indication line<br />
6 Buzzer 11 Magnet 16 cm-Scale<br />
Installation of batteries:<br />
Open the battery compartment cover “7” by use of a coin.<br />
Put in two 1.5 V AA batteries according to installation symbol “14” on<br />
backside of the laser receiver (take care of correct polarity!). Close cover.<br />
In order to save battery power the receiver will automatically turn off if it<br />
has not received laser scanning signal for 5 minutes.<br />
Universal holder with quick clamping for levelling staff:<br />
If required mount the laser receiver to clamp as per picture above.<br />
<strong>GmbH</strong> & <strong>Co</strong> <strong>KG</strong><br />
Donnerfeld 2, D-59757 Arnsberg<br />
Tel: 0049 2932 638-300<br />
Fax: 0049 2932 638-333<br />
laserliner@umarex.de<br />
www.laserliner.com<br />
Innovation in Tools<br />
6