

LED-BAR - Arcadia Aquatic
LED-BAR - Arcadia Aquatic
LED-BAR - Arcadia Aquatic

Erfolgreiche ePaper selbst erstellen
Machen Sie aus Ihren PDF Publikationen ein blätterbares Flipbook mit unserer einzigartigen Google optimierten e-Paper Software.
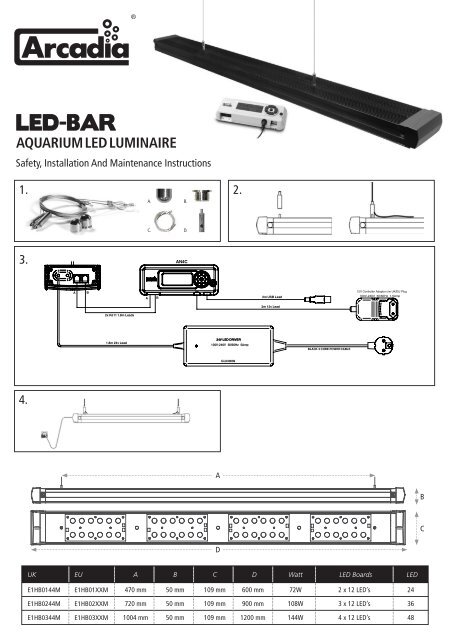
<strong>LED</strong>-<strong>BAR</strong><br />
AQUARIUM <strong>LED</strong> LUMINAIRE<br />
Safety, Installation And Maintenance Instructions<br />
1. 2.<br />
3.<br />
4.<br />
A<br />
B<br />
2x RJ11 1.8m Leads<br />
1.8m 24v Lead<br />
A<br />
A.<br />
C.<br />
B<br />
B.<br />
D.<br />
AN4C<br />
24V <strong>LED</strong> DRIVER<br />
100V-240V 50/60Hz 5Amp<br />
A<br />
D<br />
UK EU A B C D Watt <strong>LED</strong> Boards <strong>LED</strong><br />
E1HB0144M E1HB01XXM 470 mm 50 mm 109 mm 600 mm 72W 2 x 12 <strong>LED</strong>’s 24<br />
E1HB0244M E1HB02XXM 720 mm 50 mm 109 mm 900 mm 108W 3 x 12 <strong>LED</strong>’s 36<br />
E1HB0344M E1HB03XXM 1004 mm 50 mm 109 mm 1200 mm 144W 4 x 12 <strong>LED</strong>’s 48<br />
GL630009<br />
2m USB Lead<br />
2m 12v Lead<br />
BLACK 3 CORE POWER CABLE<br />
12V Controller Adaptor c/w UK/EU Plug<br />
100V-240V 50/60Hz 1.5Amp<br />
B<br />
C
READ AND FOLLOW ALL INSTALLATION INSTRUCTIONS<br />
DANGER- To avoid possible electric shock, special care should be taken since water is employed<br />
in the use of aquarium equipment. For each of the following situations, do not attempt repairs<br />
yourself; return the appliance to an authorised service facility or discard the appliance.<br />
This product is designed for indoor use and the illumination of aquariums only and will provide a<br />
good and safe service life, provided that these instructions are followed. Failure to do so may result<br />
in serious personal injury or property damage.<br />
If you are in any doubt about the installation or operation of this product, please consult a<br />
qualified and experienced electrician.<br />
Check that the voltage and frequency rating on the product label is the same as your electrical<br />
supply before proceeding further.<br />
WARNING- To guard against injury, basic safety precautions should be observed, including the<br />
following:<br />
1. Caution! Disconnect all appliances in the aquarium from the mains supply socket before<br />
putting your hands in the water or maintaining the Luminaire.<br />
2. Always support the Luminaire when fitting to the tank frame, or adjusting the suspension<br />
height to physically prevent it from falling into the water.<br />
3. Do not operate the Luminaire less than 5cm above the aquarium water level.<br />
4. Regularly check the security of all your Luminaire legs or suspension mechanism parts.<br />
5. The Luminaire can get HOT. Never touch the Luminaire while it is operating, allow adequate<br />
time for it to cool before attempting any maintenance.<br />
Physical installation<br />
Select a suitable site close to your electricity supply; take into consideration the electrical voltage<br />
of your mains supply socket. Do not connect Luminaire to the mains supply socket during<br />
installation. This Luminaire is for indoor use only and must only be placed a minimum of 5cm<br />
above the aquarium water level. This Luminaire has an IP67 rated lens for protection against the<br />
ingress of water, however it should be kept in a ventilated area and away from other heat sources.<br />
Make sure that the light from the Luminaire is aimed solely at the water within the aquarium.<br />
Luminaire Suspension<br />
If you are suspending the Luminaire take into consideration the strength of the wall and ceiling<br />
structure before suspending. Make sure the Luminaire has a clear and unobstructed space over<br />
the aquarium. When installing over an existing aquarium take precautions to protect it from drill<br />
dust, tools or any other falling debris.<br />
Ensure that the fastenings, and the wall or ceiling position you are fixing them to are suitable.<br />
Where a ceiling is not suitable due to height or construction, the <strong>Arcadia</strong> “Wall Mount” bracket<br />
can be used to suspend the Luminaire.<br />
Wire Suspension Kit - (APWIRESET) See illustration 1.<br />
Comprises of the following parts:<br />
A. Ceiling Attachment. (x2)<br />
B. Screw Cap. (x2)<br />
C. Suspension Wire with Bead. (x2)<br />
D. Quick adjust holder. (x2)<br />
Securely assemble the wire holders (D) onto the luminaire using the studs on top of the unit.<br />
See illustration 2.<br />
Securely fix the attachments (A) to your ceiling using the most suitable method of fastening,<br />
either screws or nuts and bolts. Pass the suspension wire (C) through the screw cap (B), so that<br />
the bead sits inside. Tightly screw the screw cap into the ceiling attachment. It is advisable to<br />
tighten it with a spanner to ensure that it will not come undone accidentally. Take necessary<br />
precautions to avoid scratching it.<br />
When both suspension wires are in place, feed the wires down through the buttons on top of the<br />
Quick-adjust Holders (D), which will automatically hold the wires in position. To lower the height<br />
of the Luminaire, support the Luminaire one end at a time, and release the wire by depressing the<br />
button at the top of the Quick-adjust Holders. To raise the Luminaire, support it and pull the wire<br />
through the hole in the side of the Quick-adjust Holders.<br />
When adjusting the Luminaire always ensure there is sufficient wire to achieve your target height.<br />
Always leave a minimum 10mm of wire showing. Excess wire can often be concealed in the<br />
channel on the top. If cutting the wire, wrap the wire with masking tape and cut with sharp,<br />
heavy duty side cutters.<br />
At all times when adjusting the luminaire ensure the aquarium is securely covered in case it is<br />
accidentally dropped.<br />
Electrical installation<br />
Must be earthed and the circuit must be protected by a suitable fuse!<br />
Before installing, ensure that the rated voltage and frequency of the Luminaire match that of your<br />
power supply, and that the mains lead plug is fully compatible with your mains supply socket. If<br />
in doubt, please return the unit to the point of purchase for verification.<br />
WARNING – This luminaire uses <strong>LED</strong> panels rated for 24 volts at 5 amps. Use of any other power<br />
supply above or below this could seriously damage or degrade the performance of the unit.<br />
Earth (Grounding) Instructions<br />
This appliance should be earthed to minimise the possibility of electric shock. This appliance<br />
is equipped with an electric cord having an equipment earth wire conductor and a grounding<br />
type plug. The plug must be plugged into a mains supply socket that is installed and earthed in<br />
accordance with all appropriate codes and ordinances.<br />
Power Supply Connections<br />
Connect the mains lead and the 24V supply as shown in illustration 3.<br />
Protective Shields<br />
To protect against water ingress, this Luminaire has an IP67 water-proof protective lens.<br />
Never operate the Luminaire without the protective lens. Any Luminaire with lens or seal<br />
damage needs to be returned to <strong>Arcadia</strong> for repair.<br />
<strong>Arcadia</strong> Products Plc 8 io Centre, Salbrook Road, Redhill, Surrey, RH1 5GJ, United Kingdom<br />
email: arcadia@arcadia-uk.com www.arcadia-uk.com<br />
<strong>LED</strong> Panels<br />
WARNING – This luminaire uses <strong>LED</strong> panels rated for 24 volts at 5 amps. Use of any other power<br />
supply above or below this could seriously damage or degrade the performance of the unit.<br />
Do not attempt to repair or replace any of the panels. Should a panel be damaged or broken<br />
please contact <strong>Arcadia</strong> Products Plc.<br />
Dimming with the <strong>Arcadia</strong> Dimming Controller<br />
The cables from the Dimming Controller plug into the sockets shown in Illustration 3. They can<br />
be routed through the slot in the dimming cover.<br />
Follow the instructions provided with the Dimming Controller for programming.<br />
600mm <strong>LED</strong> <strong>BAR</strong><br />
Cable A Cable B<br />
Channel 1 Blue <strong>LED</strong> (Cable End) Channel 3 Blue <strong>LED</strong> (Other End)<br />
Channel 2 White <strong>LED</strong> (Cable End) Channel 4 White <strong>LED</strong> (Other End)<br />
900/1200mm <strong>LED</strong> <strong>BAR</strong><br />
Cable A Cable B<br />
Channel 1 Blue <strong>LED</strong> (Outer Boards) Channel 3 Blue <strong>LED</strong> (Inner Boards)<br />
Channel 2 White <strong>LED</strong> (Outer Boards) Channel 4 White <strong>LED</strong> (Inner Boards)<br />
SAFETY AND MAINTENANCE INSTRUCTIONS FOR THE LUMINAIRE<br />
WARNING- To guard against injury, basic safety precautions should be observed, including the<br />
following:<br />
DANGER- To avoid possible electric shock, special care should be taken since water is employed<br />
in the use of aquarium equipment. For each of the following situations, do not attempt repairs<br />
yourself; return the appliance to an authorised service facility or discard the appliance.<br />
1. If the appliance falls into the water, DO NOT reach for it! First unplug it and then retrieve it. If<br />
electrical components of the appliance get wet, unplug the appliance immediately.<br />
2. If the appliance shows any sign of abnormal water leakage, immediately unplug it from the mains<br />
supply socket.<br />
3. Carefully examine the appliance after installation. It should not be plugged in if there is water<br />
on parts not intended to get wet.<br />
4. Do not operate any appliance if it has a damaged cord or plug, or if it is malfunctioning or has<br />
been dropped or damaged in any manner. If the cord or plug of this Luminaire is damaged, it<br />
shall be exclusively replaced by the manufacturer or their service agent or a similar qualified<br />
person in order to avoid a hazard.<br />
5. To avoid the possibility of the appliance plug or the mains supply socket getting wet, position<br />
the aquarium stand and tank to one side of the mains supply socket, to prevent water from<br />
dripping onto the receptacle or plug. The “drip loop” should be arranged by the user for each<br />
cord connecting an aquarium appliance to a mains supply socket. The “drip loop” is the part of<br />
the cord below the level of the mains supply socket, or the connector if an extension cord is used,<br />
to prevent water travelling along the cord and coming in contact with the mains supply socket.<br />
See illustration 4.<br />
Close supervision is necessary when any appliance is used by or near children.<br />
To avoid injury, do not connect moving parts or hot parts such as heaters, reflectors and lamp bulbs.<br />
Always unplug an appliance from the mains supply socket when not in use, before putting on or<br />
taking off parts, and before cleaning. Never pull on the cord to remove the plug from the mains<br />
supply socket. Instead, grasp the plug and pull to disconnect.<br />
Do not use this Luminaire other than for the intended use. The use of non- <strong>Arcadia</strong> attachments<br />
or accessories is not recommended, and may cause an unsafe condition.<br />
Do not install or store the appliance where it will be exposed to the weather or temperatures<br />
below freezing.<br />
Make sure the Luminaire is mounted securely over the tank before operating it.<br />
Read and observe all the important notices on the appliance.<br />
If an extension cord is necessary, one with a proper rating should be used. A cord rated for less<br />
amperes or watts than the appliance rating may cause overheating. Care should be taken to arrange<br />
the cord so that it will not be tripped over or pulled.<br />
This product is designed for indoor use only.<br />
Maintenance Section:<br />
Caution! Disconnect all appliances in the aquarium from the mains supply before putting your<br />
hands in the water or maintaining the Luminaire.<br />
Always support the Luminaire when adjusting its height and physically prevent it from falling<br />
into the water.<br />
Regularly check the security of all parts of your hanging mechanism.<br />
Cleaning: Disconnect from the power supply and wait till the Luminaire is cool before cleaning,<br />
this not only avoids smears but also reduces the likelihood of any damage from moisture entering<br />
the Luminaire.<br />
Both the appearance and performance of your Luminaire can benefit from regular cleaning. A damp<br />
cloth is normally adequate to clean the body. Excessive deposits of salt on the underside can reduce<br />
light output and are a sign that the Luminaire is too close to the aquarium. These can be removed<br />
with the careful use of a damp cloth ensuring that water does not enter the Luminaire body.<br />
Spare items:<br />
For a list of spare items available, please refer to the <strong>Arcadia</strong> Products website for the most up<br />
to date information.<br />
JB009
ALLE SICHERHEITSANLEITUNGEN DURCHLESEN UND BEFOLGEN<br />
WARNUNG - Zur Vermeidung von Stromschlägen besondere Sorgfalt walten lassen, da beim Einsatz von<br />
Aquariumsgeräten Wasser benutzt wird. In folgenden Situationen keine eigenen Reparaturen vornehmen,<br />
sondern das Gerät immer an eine autorisierte Wartungsstelle schicken oder entsorgen:<br />
Dieses Produkt ist nur für die Verwendung in Innenräumen und die Beleuchtung von Aquarien und<br />
Terrarien vorgesehen. Es bietet einen guten, sicheren Betrieb und eine lange Lebensdauer, sofern diese<br />
Anleitungen befolgt werden. Eine Missachtung der Anleitungen kann schwere Verletzungen oder<br />
Sachschäden zur Folge haben.<br />
Im Falle von Fragen zur Installation oder Verwendung dieses Produkts sollten Sie einen qualifizierten<br />
und erfahrenen Elektriker zu Rate ziehen.<br />
Bevor Sie fortfahren, sollten Sie sicherstellen, dass die Nennwerte für Spannung und Frequenz auf<br />
dem Produktschild mit Ihrer Stromversorgung übereinstimmen.<br />
WARNUNG - Zum Schutz vor Verletzungen sind prinzipielle Sicherheitsvorkehrungen zu beachten, und<br />
zwar u.a:<br />
1. Vorsicht ! Alle Geräte im Aquarium vom Netzstrom trennen, bevor Sie Ihre Hände ins Wasser<br />
tauchen oder die Aquarium-Aufsetzleuchte warten.<br />
2. Die Aufsetzleuchte bei Befestigung am Aquarienrahmen oder bei Höhenverstellung immer festhalten, um<br />
zu verhindern, dass sie auf das Aquarium oder ins Wasser fällt.<br />
3. Die Leuchte nicht im Abstand von weniger als 5cm über dem Wasserspiegel des Aquariums<br />
betreiben.<br />
4. Regelmäßig alle Teile der Füße oder Aufhängevorrichtung für die Aufsetzleuchte auf ihre Sicherheit<br />
überprüfen.<br />
5. Die Leuchte kann HEISS werden. Die Aufsetzleuchte während des Betriebs niemals berühren und vor<br />
Wartungsarbeiten genügend Zeit verstreichen lassen, bis die Leuchte sich abgekühlt hat.<br />
Physische Installation<br />
Einen geeigneten Standort in der Nähe Ihrer Stromversorgung wählen. Stromleistung der Steckdose<br />
und die Stärke der Zimmerdecke berücksichtigen. Die Leuchte während der Installation nicht an eine<br />
Stromquelle anschließen. Die Leuchte ist nur für die Verwendung in Innenräumen vorgesehen und muss<br />
mit mindestens 5 cm Abstand zum höchstmöglichen Wasserstand über dem Aquarium angebracht werden.<br />
Die Leuchte besitzt zwar eine spezielle Linse mit IP67-Wasserschutz, sollte jedoch in einem gut belüfteten<br />
Bereich und entfernt von anderen Hitzequellen gehalten werden.<br />
Sicherstellen, dass das Licht der Leuchte nur auf das Wasser im Aquarium fällt.<br />
Aufhängen der Leuchte<br />
Wenn Sie die Leuchte aufhängen möchten, bitte zuvor die Stärke der Wand- und Deckenstruktur<br />
überprüfen. Sicherstellen, dass der Bereich unter der Leuchte völlig frei liegt. Wenn Sie die Leuchte<br />
über einem vorhandenen Aquarium installieren, ist dieses vor Bohrstaub, Werkzeug oder anderen<br />
fallenden Gegenständen zu schützen.<br />
Sicherstellen, dass die Befestigungsteile sowie der Befestigungspunkt an Wand oder Decke dafür<br />
geeignet sind.<br />
Wenn eine Decke aufgrund ihrer Höhe oder Konstruktion nicht geeignet ist, kann die Leuchte auch an<br />
einer Wandhalterung von <strong>Arcadia</strong> aufgehängt werden.<br />
Aufhänge-Set - (APWIRESET) Siehe Abbildung 1.<br />
Das Set enthält folgende Teile:<br />
A. Deckenbefestigung (x2)<br />
B. Schraubkappe (x2)<br />
C. Aufhängedraht mit Endwulst (x2)<br />
E. Schnellspannhalter mit Seil (x2)<br />
Befestigen Sie die Schnellspannhalter (D) mit Hilfe der Stifte oben an der Einheit sicher an der Lampe.<br />
Siehe Abbildung 2.<br />
Die Deckenbefestigungen (A) mit der geeigneten Methode (Schrauben oder Bolzen und Muttern)<br />
sicher an der Decke anbringen. Den Hängedraht (C) durch die Schraubkappe führen (B), so dass der<br />
Endwulst innen sitzt. Die Schraubkappe fest in die Deckenbefestigung einschrauben. Es empfiehlt sich,<br />
dafür einen Schraubenschlüssel zu verwenden, damit sich die Kappe nicht versehentlich lösen kann.<br />
Die Deckenbefestigung dabei mit einer Zange festhalten (ein weiches Tuch dazwischen legen, um<br />
Kratzer zu vermeiden).<br />
Nach Installation der beiden Aufhängedrähte diese durch die Knöpfe oben in den verstellbaren<br />
Halterungen führen (D), so dass sie automatisch in Position gehalten werden. Zum Herabsenken der<br />
Hängeleuchte diese jeweils an einem Ende festhalten, den Knopf am anderen Ende drücken und<br />
dadurch den Draht freigeben. Zum Höherstellen der Hängeleuchte diese festhalten und den Draht durch<br />
das Loch seitlich in den verstellbaren Halterungen ziehen.<br />
Beim Verstellen der Hängeleuchte stets sicherstellen, dass genügend Draht für die beabsichtigte Höhe<br />
vorhanden ist. Immer mindestens 10 mm Draht überstehen lassen. Überschüssige Drahtlängen lassen sich<br />
oft im Kanal auf der Oberseite verstecken. Beim Kürzen des Drahts diesen mit Abdeckband umwickeln und<br />
mit einem scharfen, starken Seitenschneider durchtrennen.<br />
Stellen Sie bei jeder Justierung des Seils sicher, dass das Aquarium abgedeckt ist, um Schäden bei<br />
einem versehentlichen Fall der Lampe zu vermeiden.<br />
Elektrischer Anschluss<br />
Dieses Gerät muss geerdet und durch eine geeignete Sicherung geschützt sein.<br />
Vor der Installation sicherstellen, dass die Nennwerte für Spannung und Frequenz der Leuchte mit<br />
denen Ihrer Stromversorgung übereinstimmen und dass der Netzstecker mit Ihrer Netzsteckdose<br />
kompatibel ist. Im Zweifelsfall entsprechende Informationen von Ihrem Händler einholen.<br />
WARNUNG – Diese Leuchte enthält <strong>LED</strong>-Panels mit einer Nennspannung von 24 Volt bei 5 Ampere.<br />
Eine Stromquelle mit höherer oder niedrigerer Nennspannung könnte die Leuchte ernsthaft<br />
beschädigen oder ihre Leistung beeinträchtigen.<br />
Erdungsanleitungen<br />
Dieses Gerät sollte geerdet werden, um das Risiko von Stromschlägen zu minimieren. Das Stromkabel<br />
des Geräts ist mit einem Erdleiter und einem Erdungsstecker versehen. Der Stecker ist an eine<br />
Steckdose anzuschließen, die vorschriftsmäßig installiert und geerdet wurde.<br />
Stromkabel Verbindung<br />
Verbinden Sie das Stromkabel mit dem 24V Netzteil wie in Abbildung 3 dargestellt<br />
Schutzabdeckungen<br />
Um dieser Aufsetzleuchte wasserdicht zu machen, hat es eine IP67 wasserdicht Schutzlinse.<br />
Die Aquarium-Aufsetzleuchte niemals ohne Schutzabdeckung verwenden. Aufsetzleuchten mit<br />
beschädigter Linse oder Dichtung müssen zur Reparatur an <strong>Arcadia</strong> zurückgeschickt werden.<br />
<strong>LED</strong> Panels<br />
WARNUNG – Diese Leuchte enthält <strong>LED</strong>-Panels mit einer Nennspannung von 24 Volt bei 5 Ampere.<br />
Eine Stromquelle mit höherer oder niedrigerer Nennspannung könnte die Leuchte ernsthaft<br />
beschädigen oder ihre Leistung beeinträchtigen.<br />
Nicht versuchen, die Panels zu reparieren oder zu ersetzen. Bei beschädigtem Panel bitte <strong>Arcadia</strong><br />
Products Plc kontaktieren.<br />
Dimmen über die <strong>Arcadia</strong> Dimmer-Betriebseinheit<br />
Die Kabel der Dimmer-Einheit werden an der OT2 <strong>LED</strong> wie in Abbildung 3 gezeigt befestigt. Die<br />
Kabel können wie in gezeigt durch die Dimmer-Abdeckung geführt werden.<br />
Zur Programmierung der Dimmer-Einheit befolgen Sie die der Dimmer-Einheit beiliegenden<br />
Bedienungsanleitung.<br />
600 mm <strong>LED</strong> <strong>BAR</strong><br />
Kabel A Kabel B<br />
Kanal 1 Blaue <strong>LED</strong>s kabelseitiges <strong>LED</strong> Panel Kanal 3 Blaue <strong>LED</strong>s rückwärtiges <strong>LED</strong> Panel<br />
Kanal 2 Weiße <strong>LED</strong>s kabelseitig <strong>LED</strong> Panel Kanal 4 Weiße <strong>LED</strong>s rückseitiges <strong>LED</strong> Panel<br />
900/1200 mm <strong>LED</strong> <strong>BAR</strong><br />
Kabel A Kabel B<br />
Kanal 1 Blaue <strong>LED</strong>s auf den äußeren <strong>LED</strong> Panels Kanal 3 Blaue <strong>LED</strong>s auf dem/n inneren <strong>LED</strong> Panels<br />
Kanal 2 Weiße <strong>LED</strong>s auf den äußeren <strong>LED</strong> Panels Kanal 4 Weiße <strong>LED</strong>s auf dem/n inneren <strong>LED</strong> Panels<br />
ALLE SICHERHEITSANLEITUNGEN DURCHLESEN UND BEFOLGEN<br />
WARNUNG - Zum Schutz vor Verletzungen sind prinzipielle Sicherheitsvorkehrungen zu beachten, und<br />
zwar u.a:<br />
GEFAHR - Zur Vermeidung von Stromschlägen besondere Sorgfalt walten lassen, da beim Einsatz von<br />
Aquariumsgeräten Wasser benutzt wird. In folgenden Situationen keine eigenen Reparaturen vornehmen,<br />
sondern das Gerät immer an eine autorisierte Wartungsstelle schicken oder entsorgen:<br />
1. Sollte das Gerät ins Wasser fallen, NICHT danach greifen! Erst den Stecker ziehen, dann das<br />
Gerät herausnehmen. Wenn elektrische Teile des Gerätes nass werden, sofort den Stecker aus der<br />
Steckdose ziehen.<br />
2. Sollte das Gerät Anzeichen ungewöhnlicher Wasserundichte aufweisen, sofort den Stecker aus der<br />
Steckdose ziehen.<br />
3. Das Gerät nach dem Einbau sorgfältig untersuchen und nicht an die Stromversorgung anschließen,<br />
wenn sich Wasser auf Teilen zeigt, die nicht nass werden dürfen.<br />
4. Gerät unter folgenden Umständen nicht einschalten: bei beschädigtem Netzkabel oder Stecker,<br />
im Falle von Funktionsstörungen oder wenn es fallengelassen oder anderweitig beschädigt<br />
wurde. Ist das Netzkabel oder der Stecker dieser Leuchte beschädigt, sollte das defekte Teil aus<br />
Sicherheitsgründen nur von dem Hersteller, seinem Kundendienstvertreter oder einem ähnlich<br />
qualifizierten Fachmann ersetzt werden.<br />
5. Um Gerätestecker und Steckdose vor Nässe zu schützen, das Aquarium so neben einer<br />
Wandsteckdose aufstellen, dass kein Wasser auf Steckdose oder Stecker tropfen kann. Für jedes<br />
Verbindungskabel zwischen Aquariumsgerät und Steckdose sollte eine „Tropfenschleife“ (siehe<br />
Abbildung unten) gebildet werden. Die „Tropfenschleife“ ist der Teil des Kabels unterhalb der Höhe<br />
der Steckdose oder der Anschlussdose eines Verlängerungskabels, der verhindert, dass Wasser das<br />
Kabel entlang kriechen und in Kontakt mit der Steckdose kommen kann. Siehe Abbildung 4.<br />
Sorgfältige Aufsicht ist notwendig, wenn ein Gerät von Kindern oder in deren Nähe benutzt wird.<br />
Um Verletzungen zu vermeiden, sollten bewegliche oder heiße Teile wie Heizer, Reflektoren,<br />
Glühbirnen u.ä. nicht berührt werden.<br />
Bei Nichtbenutzung des Geräts, vor An- oder Abbau von Teilen und vor der Reinigung grundsätzlich<br />
den Stecker aus der Steckdose ziehen. Dabei niemals am Kabel ziehen, sondern den Stecker anfassen<br />
und herausziehen.<br />
Diese Leuchte nur für ihren vorgesehenen Zweck benutzen. Die Verwendung von Zubehör oder<br />
Anbaugeräten, die nicht von <strong>Arcadia</strong> verkauft werden, ist nicht empfehlenswert und kann zu einem<br />
unsicheren Betriebszustand führen.<br />
Das Gerät nicht an Orten installieren oder lagern, wo es Witterungs-einflüssen oder Temperaturen<br />
unter dem Gefrierpunkt ausgesetzt wird.<br />
Vor Betrieb der Leuchte überprüfen, dass sie sicher über dem Aquarium befestigt ist.<br />
Bitte alle wichtigen Hinweise auf dem Gerät lesen und beachten.<br />
Bei Verwendung eines Verlängerungs-kabels stets ein Kabel der richtigen Leistungsstufe wählen. Ein<br />
Kabel mit geringerer Ampere- oder Wattzahl als das Gerät kann sich überhitzen. Außerdem das Kabel<br />
so verlegen, dass es keine Zug- oder Stolpergefahr darstellt.<br />
Dieses Produkt ist nur für die Verwendung in Innenräumen vorgesehen.<br />
Wartung<br />
Vorsicht! Alle Geräte im Aquarium vom Netzstrom trennen, bevor Sie Ihre Hände ins Wasser tauchen<br />
oder die Hängeleuchte warten.<br />
Die Aquarium-Aufsetzleuchte bei der Höhenverstellung immer festhalten, um zu verhindern, dass sie<br />
auf das Aquarium oder ins Wasser fällt.<br />
Alle Teile der Aufhängevorrichtung regelmäßig auf ihre Sicherheit überprüfen.<br />
Reinigung: Die Aquarium-Aufsetzleuchte nur reinigen, wenn sie vom Netzstrom getrennt und ganz<br />
abgekühlt ist. Das verhindert nicht nur Schlieren, sondern reduziert auch das Risiko von Schäden durch<br />
eindringende Feuchtigkeit.<br />
Aussehen und Leistung Ihrer Aufsetzleuchte werden durch regelmäßige Reinigung längerfristig<br />
aufrecht erhalten. Für die Reinigung des Gehäuses genügt gewöhnlich ein feuchtes Tuch. Starke<br />
Salzablagerungen an der Unterseite können die Lichtleistung reduzieren und deuten darauf hin, dass<br />
die Aufsetzleuchte zu dicht über dem Aquarium hängt. Ablagerungen lassen sich vorsichtig mit einem<br />
feuchten Tuch entfernen (sicherstellen, dass kein Wasser in das Gehäuse eindringt).<br />
Ersatzteile<br />
Eine Liste von Ersatzteilen und aktuelle Informationen finden Sie auf der <strong>Arcadia</strong>-Website.
