Aufbauanleitung für natura Kleintierstall mit Freilaufgehege ... - Trixie
Aufbauanleitung für natura Kleintierstall mit Freilaufgehege ... - Trixie
Aufbauanleitung für natura Kleintierstall mit Freilaufgehege ... - Trixie

Erfolgreiche ePaper selbst erstellen
Machen Sie aus Ihren PDF Publikationen ein blätterbares Flipbook mit unserer einzigartigen Google optimierten e-Paper Software.
Art Nr. /<br />
Item No.<br />
62324<br />
Pos. Nr. /<br />
Pos. No.<br />
Pos. 1<br />
Pos. 2<br />
Pos. 3<br />
Pos. 4<br />
Pos. 5<br />
Pos. 6<br />
Pos. 7<br />
Pos. 8<br />
Pos. 9<br />
Pos. 10<br />
Pos. 11<br />
Pos. 12<br />
Pos. 13<br />
Pos. 14<br />
Pos. 15<br />
Pos. 16<br />
190411<br />
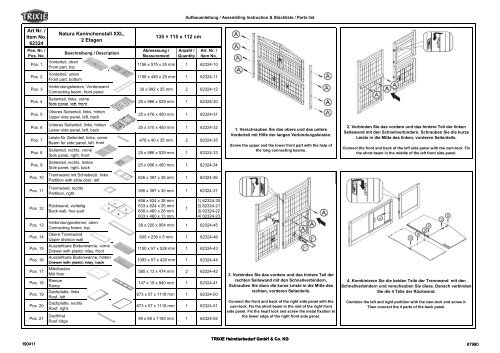
Natura Kaninchenstall XXL,<br />
2 Etagen<br />
Vorderteil, oben<br />
Front part, top<br />
Beschreibung / Description<br />
Vorderteil, unten<br />
Front part, bottom<br />
Verbindungsleisten, Vorderwand<br />
Connecting beam, front panel<br />
Seitenteil, links, vorne<br />
Side panel, left, front<br />
Oberes Seitenteil, links, hinten<br />
Upper side panel, left, back<br />
Unteres Seitenteil, links, hinten<br />
Lower side panel, left, back<br />
Leiste <strong>für</strong> Seitenteil, links, vorne<br />
Beam for side panel, left, front<br />
Seitenteil, rechts, vorne<br />
Side panel, right, front<br />
Seitenteil, rechts, hinten<br />
Side panel, right, back<br />
Trennwand <strong>mit</strong> Schiebetür, links<br />
Partition with slide door, left<br />
Trennwand, rechts<br />
Partition, right<br />
Rückwand, vielteilig<br />
Back wall, four-part<br />
Verbindungsrahmen, oben<br />
Connecting frame, top<br />
Obere Trennwand<br />
Upper division wall<br />
Ausziehbare Bodenwanne, vorne<br />
Drawer with plastic inlay, front<br />
Ausziehbare Bodenwanne, hinten<br />
Drawer with plastic inlay, back<br />
Pos. 17 Mittelboden<br />
Mid floor<br />
Pos. 18 Rampe<br />
Ramp<br />
Pos. 19<br />
Dachplatte, links<br />
Roof, left<br />
Pos. 20<br />
Dachplatte, rechts<br />
Roof, right<br />
Pos. 21 Dachfirst<br />
Roof ridge<br />
135 × 115 x 112 cm<br />
Abmessung /<br />
Measurement<br />
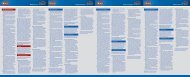
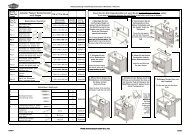
<strong>Aufbauanleitung</strong> / Assembling Instruction & Stückliste / Parts list<br />
Anzahl /<br />
Quantity<br />
Art. Nr. /<br />
Item No.<br />
1156 x 575 x 25 mm 1 62324-10<br />
1156 x 446 x 25 mm 1 62324-11<br />
30 x 992 x 25 mm 2 62324-12<br />
25 x 986 x 529 mm 1 62324-30<br />
25 x 476 x 450 mm 1 62324-31<br />
25 x 510 x 450 mm 1 62324-32<br />
478 x 40 x 35 mm 2 62324-35<br />
25 x 986 x 529 mm 1 62324-33<br />
25 x 986 x 450 mm 1 62324-34<br />
826 x 387 x 38 mm 1 62324-36<br />
390 x 387 x 30 mm 1 62324-37<br />
658 x 624 x 38 mm<br />
633 x 624 x 25 mm<br />
658 x 460 x 28 mm<br />
633 x 460 x 13 mm<br />
1<br />
1) 62324-20<br />
2) 62324-21<br />
3) 62324-22<br />
4) 62324-23<br />
38 x 220 x 954 mm 1 62324-45<br />
605 x 236 x 5 mm 1 62324-46<br />
1150 x 57 x 528 mm 1 62324-43<br />
1083 x 57 x 426 mm 1 62324-44<br />
585 x 13 x 474 mm 2 62324-42<br />
147 x 19 x 940 mm 1 62324-41<br />
673 x 57 x 1118 mm 1 62324-50<br />
673 x 57 x 1118 mm 1 62324-51<br />
90 x 60 x 1150 mm 1 62324-52<br />
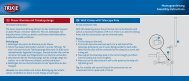
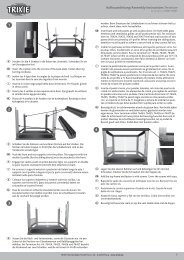
1. Verschrauben Sie das obere und das untere<br />
Vorderteil <strong>mit</strong> Hilfe der langen Verbindungsleisten.<br />
Screw the upper and the lower front part with the help of<br />
the long connecting beams.<br />
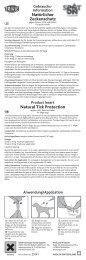
3. Verbinden Sie das vordere und das hintere Teil der<br />
rechten Seitewand <strong>mit</strong> den Schnellverbindern.<br />
Schrauben Sie dann die kurze Leiste in die Mitte des<br />
rechten, vorderen Seitenteils.<br />
Connect the front and back of the right side panel with the<br />
cam-lock. Fix the short beam in the mid of the right front<br />
side panel. Fix the heart lock and screw the metal fixation to<br />
the lower edge of the right front side panel.<br />
TRIXIE Heimtierbedarf GmbH & Co. KG<br />
2. Verbinden Sie das vordere und das hintere Teil der linken<br />
Seitewand <strong>mit</strong> den Schnellverbindern. Schrauben Sie die kurze<br />
Leiste in die Mitte des linken, vorderen Seitenteils.<br />
Connect the front and back of the left side panel with the cam-lock. Fix<br />
the short beam in the middle of the left front side panel.<br />
4. Kombinieren Sie die beiden Teile der Trennwand <strong>mit</strong> den<br />
Schnellverbindern und verschauben Sie diese. Danach verbinden<br />
Sie die 4 Teile der Rückwand.<br />
Combine the left and right partition with the cam-lock and screw it.<br />
Then connect the 4 parts of the back panel.<br />
87980
A 22<br />
B 9<br />
Senkkopfschraube<br />
C 9<br />
Countersunk screw<br />
D 9<br />
E 3<br />
F<br />
G<br />
190411<br />
Linsenkopfschraube <strong>mit</strong> Mutter<br />
Rounded head screw with nut<br />
Senkkopfschraube<br />
Countersunk screw<br />
Fixierung <strong>für</strong> Rampe<br />
Fixation for ramp<br />
Verriegelungsherz<br />
Lock heart<br />
Fangband, links/rechts<br />
Check strap, left/right<br />
Kleinteileset / Small parts<br />
weitere bereits vormontierte Teile (als Ersatzteile separat erhältlich) /<br />
other parts already assembled (spare parts separately available)<br />
Scharnier, <strong>für</strong> Tür<br />
Hinge, for door<br />
Scharnier, <strong>für</strong> Dach<br />
Hinge, for roof<br />
Scharnier, schmal, <strong>für</strong> kleine Tür<br />
Hinge, for door<br />
3-Wege Verschlussriegel<br />
3-way locking bolt<br />
<strong>Aufbauanleitung</strong> / Assembling Instruction & Stückliste / Parts list<br />
3<br />
4<br />
1<br />
62324-60<br />
1 6235-51<br />
1/1<br />
6235-61<br />
6235-60<br />
5 cm 6 6235-72<br />
7,6 cm 4 6235-74<br />
3,8 cm 2 6235-70<br />
5,5 cm 1 6235-52<br />
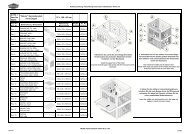
7. Schieben Sie die vordere<br />
und die hintere Bodenwanne<br />
ein. Setzen Sie die Rampe ein<br />
und schrauben Sie sie fest.<br />
Danach legen Sie bitte den<br />
Mittelboden ein und<br />
verschrauben die obere<br />
Trennwand.<br />
Insert the front and back drawer.<br />
Put in the ramp and tighten it.<br />
Insert the mid-floor and screw<br />
the upper division wall.<br />
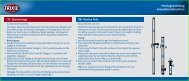
5. Schrauben Sie nun auch die beiden Seitenteile an<br />
die langen Verbindungsleisten. Verbinden Sie dann<br />
die Trennwand und die Seitenteile <strong>mit</strong> Hilfe der<br />
Schnellverbinder.<br />
Screw the side panels with the long beams. Connect the<br />
partition with the side panel by cam-lock.<br />
8. Befestigen Sie die beiden Dachplatten und danach<br />
die beide Fangbänder. Schrauben Sie zum Abschluss<br />
den Dachfirst an eine Seite der Dachplatten.<br />
Fix the two parts of the roof. Screw the check straps and<br />
then fix the roof ridge to one side of the roof.<br />
TRIXIE Heimtierbedarf GmbH & Co. KG<br />
6. Verschrauben Sie die Rückwand <strong>mit</strong> den Seitenteilen und<br />
fixieren Sie den Verbindungsrahmen an Vorder- und Rückseite<br />
<strong>mit</strong> den Schnellverbindern.<br />
Screw the back panel with the side panels. Connect the connecting<br />
frame with front and back panel by cam-lock.<br />
87980