Aufbauanleitung für natura Kleintierstall mit 2 Etagen Art ... - Trixie
Aufbauanleitung für natura Kleintierstall mit 2 Etagen Art ... - Trixie
Aufbauanleitung für natura Kleintierstall mit 2 Etagen Art ... - Trixie

Erfolgreiche ePaper selbst erstellen
Machen Sie aus Ihren PDF Publikationen ein blätterbares Flipbook mit unserer einzigartigen Google optimierten e-Paper Software.
<strong>Art</strong> Nr. /<br />
Item No.<br />
62402<br />
120827<br />
Pos. Nr. /<br />
Pos. No.<br />
Pos. 1<br />
Pos. 2<br />
Pos. 3<br />
Pos. 4<br />
Pos. 5<br />
Pos. 6<br />
Pos. 7<br />
Pos. 8<br />
Pos. 9<br />
Pos. 10<br />
Pos. 11<br />
Pos. 12<br />
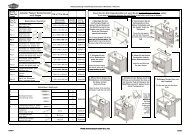
"Natura" Kaninchenstall<br />
<strong>mit</strong> 2 <strong>Etagen</strong><br />
Beschreibung / Description<br />
Vorderteil incl. Tür, oben/unten<br />
Front parts with door, top/bottom<br />
Seitenteil, links<br />
Side panel, left<br />
Seitenteil, rechts<br />
Side panel, right<br />
Rückwand, oben<br />
Back wall, top<br />
Rückwand, unten<br />
Back wall, bottom<br />
Dach, incl. Scharniere<br />
Roof , including hinges<br />
Hintere Bodenplatte, oben<br />
Mid-floor, top<br />
Rampe<br />
Ramp<br />
Trennwand, oben<br />
Upper partition<br />
Trennwand, unten<br />
Lower partition<br />
Ausziehbare Bodenwanne, oben<br />
Drawer with plastic inlay, top<br />
Ausziehbare Bodenwanne, unten<br />
Drawer with plastic inlay, bottom<br />
116 × 111 × 65 cm<br />
Abmessung /<br />
Measurement<br />
<strong>Aufbauanleitung</strong> / Assembling Instruction & Stückliste / Part List<br />
Anzahl /<br />
Quantity<br />
<strong>Art</strong>. Nr. /<br />
Item No.<br />
1015 x 445 x 25 mm 2 62402-10<br />
35 x 1075 x 565 mm 1 62402-30<br />
35 x 1075 x 565 mm 1 62402-31<br />
1085 x 505 x 30 mm 1 62402-20<br />
1085 x 425 x 25 mm 1 62402-21<br />
1160 x 40 x 650 mm 1 62402-50<br />
1010 x 33 x 180 mm 1 6235-31<br />
890 x 150 x 20 mm 1 62402-41<br />
8 x 430 x 535 mm 1 62402-32<br />
8 x 430 x 535 mm 1 62402-33<br />
1010 x 50 x 383 mm 1 62402-40<br />
1010 x 35 x 565 mm 1 62402-43<br />
A Senkkopfschraube<br />
9<br />
B Countersunk screw<br />
14<br />
C<br />
D<br />
Linsenkopfschraube m. Mutter<br />
Rounded head screw with nut<br />
Senkkopfschraube<br />
Countersunk screw<br />
Fangband<br />
Check strap for roof<br />
Verriegelungsherz<br />
Lock heart<br />
Fixierung <strong>für</strong> Rampe<br />
Fixation for ramp<br />
Kleinteileset / Small parts<br />
28 cm 1 6235-60<br />
Ø 5,5 cm 1 6235-51<br />
16,5 cm 1 6240-60<br />
3<br />
3<br />
6240-60<br />
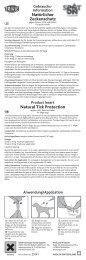
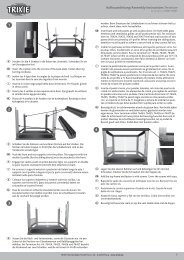
Bauen Sie den Stall folgendermaßen auf, wenn Sie die beiden <strong>Etagen</strong> verbinden wollen:<br />
If you want a connection between the both floors of the hutch, build it up as follows:<br />
1. Verschrauben Sie<br />
die Seitenteile <strong>mit</strong> den<br />
beiden Vorderteilen.<br />
Screw the side panels<br />
with the both front parts.<br />
3. Verschrauben Sie nun die beiden<br />
Teile der Rückwand <strong>mit</strong> den<br />
Seitenteilen und befestigen Sie das<br />
Dach.<br />
Screw both back walls with the side<br />
panels and fix the roof.<br />
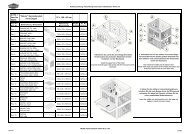
5. Abschließend<br />
schieben Sie die obere<br />
und die untere<br />
ausziehbare<br />
Bodenwanne ein.<br />
Insert the upper and<br />
lower drawer with plastic<br />
inlay.<br />
2. Befestigen Sie den<br />
herzförmigen Riegel am oberen<br />
Teil der Rückwand. Die<br />
Metallfixierung <strong>für</strong> die Rampe<br />
muss an die untere Kante der<br />
Rückwand geschraubt werden.<br />
Fix the heart-shaped lock to the upper<br />
part of the back panel. The metal<br />
fixation has to be fixed to the lower<br />
edge of the back panel.<br />
4. Öffnen Sie das Dach und<br />
befestigen Sie das Fangband.<br />
Setzen Sie die hintere Bodenplatte<br />
ein, schieben Sie die Rampe<br />
durch die Öffnung und schrauben<br />
Sie diese fest, so dass der Fuß<br />
der Rampe in der Metallfixierung<br />
steht. Setzen Sie die obere<br />
Trennwand ein.<br />
Open the roof and fix the large hinge.<br />
Insert mid-floor, put in the ramp and<br />
tighten it. The foot of the ramp has to<br />
stand in the metal fixation. Insert the<br />
upper partition.<br />
TRIXIE Heimtierbedarf GmbH & Co. KG 81860
Pos. Nr. /<br />
Pos. No.<br />
120827<br />
weitere bereits vormontierte Teile (als Ersatzteile separat erhältlich) /<br />
other parts already assembled (spare parts separately available)<br />
Beschreibung / Description<br />
Scharnier, schmal, <strong>für</strong> kleine Tür<br />
Hinge, narrow, for small door<br />
Scharnier, <strong>für</strong> Tür oder Dach<br />
Hinge, for door or roof<br />
Scharnier, <strong>für</strong> Dach<br />
Hinge, for roof<br />
3-Wege Verschlussriegel<br />
3-way locking bolt<br />
Abmessungen /<br />
Measurements<br />
<strong>Aufbauanleitung</strong> / Assembling Instruction & Stückliste / Part List<br />
Anzahl /<br />
Quantity<br />
<strong>Art</strong>-Nr. /<br />
Item No.<br />
3,8 cm 2 6235-70<br />
5 cm 8 6235-72<br />
7,6 cm 2 6235-74<br />
5,5 cm 2 6235-52<br />
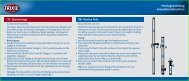
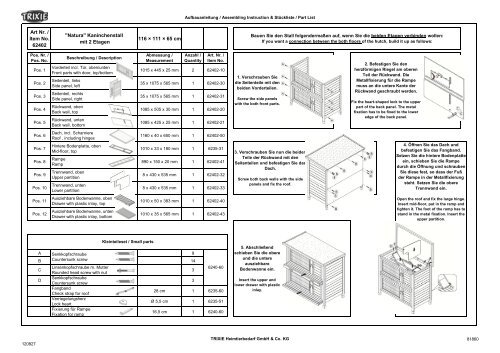
Sie können den Stall folgendermaßen umbauen, um zwei getrennte <strong>Etagen</strong> <strong>mit</strong> je einer<br />
Rückzugsmöglichkeit zu erhalten:<br />
You can change the hutch as follows, to get two separate floors with one room for retreat on each floor:<br />
1. Entfernen Sie die obere Trennwand, die obere<br />
Bodenwanne, den Mittelboden, sowie die<br />
Rampe.<br />
Remove upper partition, upper drawer, mid-floor and<br />
ramp.<br />
3. Setzen Sie den<br />
Mittelboden ein und<br />
schließen Sie die<br />
Luke. Schieben Sie die<br />
obere Bodenwanne<br />
ein und setzten Sie die<br />
obere Trennwand<br />
wieder ein.<br />
Insert mid-floor and<br />
close the flap. Insert<br />
upper plastic tub and<br />
upper partition.<br />
2. Setzen Sie die untere Trennwand ein.<br />
Insert the lower partition.<br />
TRIXIE Heimtierbedarf GmbH & Co. KG 81860