AZBox Ultra HD Wiederbelebung

Sie wollen auch ein ePaper? Erhöhen Sie die Reichweite Ihrer Titel.
YUMPU macht aus Druck-PDFs automatisch weboptimierte ePaper, die Google liebt.
13 14<br />
15 16<br />
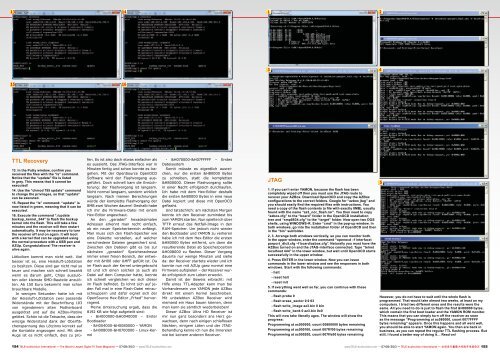
TTL Recovery<br />
13. In the Putty window, confirm you<br />
received the files with the “ls” command.<br />
Notice that the “update” file is listed<br />
in grey. This means that it cannot be<br />
executed!<br />
14. Use the “chmod 755 update” command<br />
to change the privileges, so that “update”<br />
can be executed.<br />
15. Repeat the “ls” command: “update” is<br />
now listed in green, meaning that it can be<br />
executed.<br />
16. Execute the command “./update<br />
backup_kernel_344” to flash the backup<br />
kernel into the flash. This will take a few<br />
minutes and the receiver will then restart<br />
automatically. It may be necessary to turn<br />
the receiver off and on again. It will boot<br />
with a kernel that can be upgraded using<br />
the normal procedure with a USB pen and<br />
AZUp. Congratulations! The receiver is<br />
alive again.<br />
Lötkolben kommt man nicht weit. Viel<br />
besser ist es, eine Heissluft-Lötstation<br />
zu besitzen. Diese sind gar nicht mal so<br />
teuer und machen sich schnell bezahlt<br />
wenn es darum geht, Chips auszulöten<br />
oder kleinste SMD-Bauteile anzulöten.<br />
Ab 150 Euro bekommt man schon<br />
brauchbare Modelle.<br />
In wenigen Sekunden hatte ich mit<br />
der Heissluft-Lötstation zwei passende<br />
Widerstände mit der Beschriftung 103<br />
von irgendeinem alten Motherboard<br />
ausgelötet und auf die <strong>AZBox</strong>-Platine<br />
gelötet. Schön ist die Tatsache, dass der<br />
winzige Widerstand dank der Oberflächenspannung<br />
des Lötzinns korrekt auf<br />
die Kontakte angezogen wird. Mit dem<br />
Auge ist es nicht einfach, dies zu prü-<br />
fen. Es ist also doch etwas einfacher als<br />
es aussieht. Das JTAG-Interface war in<br />
Minuten fertig und schon konnte es losgehen.<br />
Mit der OpenSource OpenOCD<br />
Software wird der Flashvorgang ausgeführt.<br />
Doch schnell kam die Ernüchterung:<br />
der Flashvorgang ist langsam.<br />
Nicht normal langsam, sondern wirklich<br />
langsam. Nach meinen Berechnungen<br />
würde der komplette Flashvorgang der<br />
8MB zwei Wochen dauern! Deshalb habe<br />
ich mir die Firmware-Datei mit einem<br />
Hex-Editor angeschaut.<br />
An den „geraden“ hexadezimalen<br />
Adressen erkennt man recht einfach,<br />
ob ein neuer Speicherbereich anfängt.<br />
Man muss sich den Flash-Speicher wie<br />
eine Diskette vorstellen, auf welcher<br />
verschiedene Dateien gespeichert sind.<br />
Zwischen den Dateien gibt es bis zur<br />
nächsten „geraden“ Speicheradresse<br />
immer einen freien Bereich, der entweder<br />
mit &H00 oder &HFF gefüllt ist. Da<br />
im Flash auch der Kernel untergebracht<br />
ist und ich einen solchen ja auch als<br />
Datei auf dem Computer hatte, konnte<br />
ich schnell vergleichen wo sich dieser<br />
im Flash befindet. Es lohnt sich auf jeden<br />
Fall mal in eine Flash-Datei reinzuschnuppern<br />
und dafür eignet sich der<br />
OpenSource Hex-Editor „Frhed“ hervorragend.<br />
Meine Untersuchung ergab, dass die<br />
8192 KB wie folgt aufgeteilt sind:<br />
- &H000000-&H0040000 – Erster<br />
Bootloader<br />
- &H004000-&H0080000 – YAMON<br />
- &H008000-&H0700000 – Linux-Kernel<br />
- &H070000-&H07FFFFF – Erstes<br />
Dateisystem<br />
Somit müsste es eigentlich ausreichen,<br />
nur die ersten &H80000 Bytes<br />
zu schreiben, statt die kompletten<br />
&H800000. Dieser Flashvorgang sollte<br />
in einer Nacht erfolgreich durchlaufen.<br />
Ich habe mit dem Hex-Editor deshalb<br />
die ersten &H80000 Bytes in eine neue<br />
Datei kopiert und diese mit OpenOCD<br />
geflasht.<br />
Und tatsächlich: am nächsten Morgen<br />
konnte ich den Receiver zumindest bis<br />
zum YAMON starten. Nun spielte ich über<br />
TFTP erneut das Notfall-Image in den<br />
RAM-Speicher. Um jedoch nicht wieder<br />
den Bootloader und YAMON zu verlieren<br />
habe ich mit dem Hex-Editor die ersten<br />
&H80000 Bytes entfernt, um dann die<br />
resultierende Datei ab Speicherposition<br />
&H008000 zu flashen. Dieser Vorgang<br />
dauerte nur wenige Minuten und siehe<br />
da: der Receiver startete wieder und ich<br />
konnte nun mit AZUp ganz normal eine<br />
Firmware aufspielen – der Receiver wurde<br />
erfolgreich zum Leben erweckt.<br />
Damit ist der Beweis erbracht: mit<br />
Hilfe eines TTL-Adapter kann man bei<br />
Vorhandensein von YAMON jede <strong>AZBox</strong><br />
direkt mit einem Kernel beschreiben.<br />
Mit unbelebten <strong>AZBox</strong> Receiver wird<br />
niemand ein Haus bauen können, denn<br />
man kann sie sämtlich wiederbeleben!<br />
Dieser <strong>AZBox</strong> <strong>Ultra</strong> <strong>HD</strong> Receiver ist<br />
mir nun ganz besonders ans Herz gewachsen,<br />
denn nach einigen schlaflosen<br />
Nächten, einigem Löten und der JTAG-<br />
Behandlung kenne ich nun die Innereien<br />
wie bei keinem anderen Receiver.<br />
1 2<br />
3 4<br />
154 TELE-audiovision International — The World‘s Largest Digital TV Trade Magazine — 07-08/2013 — www.TELE-audiovision.com www.TELE-audiovision.com — 07-08/2013 — TELE-audiovision International — 全球发行量最大的数字电视杂志 155<br />
JTAG<br />
1. If you can’t enter YAMON, because the flash has been<br />
completely wiped off then you must use the JTAG route to<br />
recover your <strong>AZBox</strong>. Download OpenOCD and copy the <strong>AZBox</strong><br />
configurations to the correct folders. Google for “azbox jtag” and<br />
you should easily find the required files with instructions. You<br />
need a copy of the flash contents (a file with exactly 8MB), usually<br />
found with the name “az3_nor_flash.rar”. You then need to copy<br />
“azbox.cfg” to the “board” folder in the OpenOCD installation<br />
tree and “smp8634.cfg” to the “target” folder. Now open two DOS<br />
shells, using WINDOWS-R. Enter “cmd” in the pop-up window. In<br />
both windows, go into the installation folder of OpenOCD and then<br />
in the “bin” subfolder.<br />
2, 3. Arrange both windows vertically, so you can monitor both.<br />
In the upper window, enter the command “openocd –f interface\<br />
parport_dlc5.cfg –f board\azbox.cfg”. Naturally you must have the<br />
<strong>AZBox</strong> turned on and the JTAG-interface connected. Type “telnet<br />
localhost 444” in the lower window, but wait until OpenOCD starts<br />
successfully in the upper window.<br />
4. Press ENTER in the lower window. Now you can issue<br />
commands in the lower window and see the responses in both<br />
windows. Start with the following commands:<br />
- halt<br />
- reset halt<br />
- reset init<br />
5. If everything went well so far, you can continue with these<br />
commands:<br />
- flash probe 0<br />
- flash erase_sector 0 0 63<br />
- flash write_image az3.bin 0 bin<br />
- flash write_bank 0 az3.bin 0x0<br />
This will now take literally ages. The window will show the<br />
progress:<br />
Programming at ac000000, count 00800000 bytes remaining<br />
Programming at ac000100, count 007fff00 bytes remaining<br />
Programming at ac000200, count 007ffe00 bytes remaining<br />
5<br />
However, you do not have to wait until the whole flash is<br />
programmed. That would take almost two weeks, at least on my<br />
computers. I tried two different ones and the results were the<br />
same. All you need to do is just to flash the first &H80000 bytes,<br />
which contain the first boot loader and the YAMON ROM monitor.<br />
This means that you can simply turn off the receiver as soon<br />
as the message “Programming at ac080000, count 0077FFFF<br />
bytes remaining” appears. Once this happens and all went well,<br />
you should be able to start YAMON again. You then are back in<br />
business, as you can repeat the regular TTL flashing process. But<br />
still, I found a better way of doing it… Read on!