filo NV - Occhio
filo NV - Occhio
filo NV - Occhio

Erfolgreiche ePaper selbst erstellen
Machen Sie aus Ihren PDF Publikationen ein blätterbares Flipbook mit unserer einzigartigen Google optimierten e-Paper Software.
12 V<br />
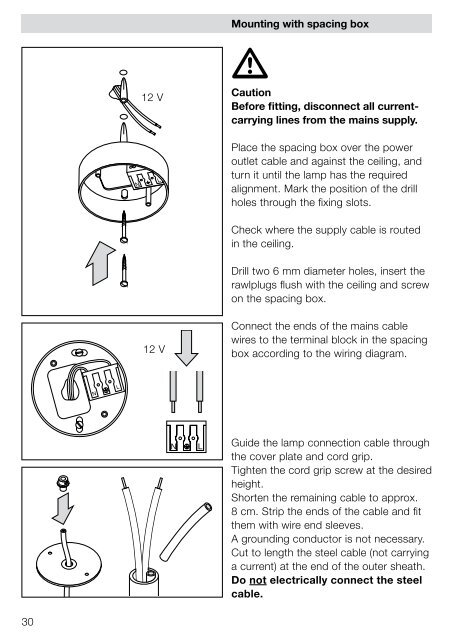
Mounting with spacing box<br />
$<br />
Caution<br />
Before fitting, disconnect all currentcarrying<br />
lines from the mains supply.<br />
Place the spacing box over the power<br />
outlet cable and against the ceiling, and<br />
turn it until the lamp has the required<br />
alignment. Mark the position of the drill<br />
holes through the fixing slots.<br />
Check where the supply cable is routed<br />
in the ceiling.<br />
Drill two 6 mm diameter holes, insert the<br />
rawlplugs flush with the ceiling and screw<br />
on the spacing box.<br />
12 V<br />
Connect the ends of the mains cable<br />
wires to the terminal block in the spacing<br />
box according to the wiring diagram.<br />
Guide the lamp connection cable through<br />
the cover plate and cord grip.<br />
Tighten the cord grip screw at the desired<br />
height.<br />
Shorten the remaining cable to approx.<br />
8 cm. Strip the ends of the cable and fit<br />
them with wire end sleeves.<br />
A grounding conductor is not necessary.<br />
Cut to length the steel cable (not carrying<br />
a current) at the end of the outer sheath.<br />
Do not electrically connect the steel<br />
cable.<br />
30