1 2 3 4 5 6 OpenStage Wall Mount Kit V2 for OpenStage 10/15/20/30 ...
1 2 3 4 5 6 OpenStage Wall Mount Kit V2 for OpenStage 10/15/20/30 ...
1 2 3 4 5 6 OpenStage Wall Mount Kit V2 for OpenStage 10/15/20/30 ...
Erfolgreiche ePaper selbst erstellen
Machen Sie aus Ihren PDF Publikationen ein blätterbares Flipbook mit unserer einzigartigen Google optimierten e-Paper Software.
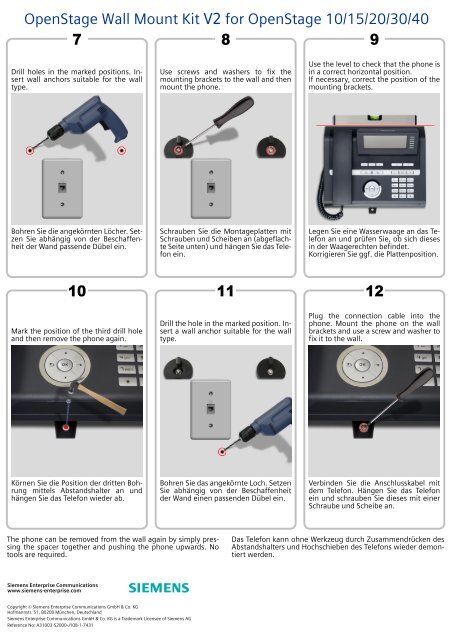
<strong>OpenStage</strong> <strong>Wall</strong> <strong>Mount</strong> <strong>Kit</strong> <strong>V2</strong> <strong>for</strong> <strong>OpenStage</strong> <strong>10</strong>/<strong>15</strong>/<strong>20</strong>/<strong>30</strong>/40<br />
7<br />
8<br />
9<br />
Drill holes in the marked positions. Insert<br />
wall anchors suitable <strong>for</strong> the wall<br />
type.<br />
Use screws and washers to fix the<br />
mounting brackets to the wall and then<br />
mount the phone.<br />
Use the level to check that the phone is<br />
in a correct horizontal position.<br />
If necessary, correct the position of the<br />
mounting brackets.<br />
Bohren Sie die angekörnten Löcher. Setzen<br />
Sie abhängig von der Beschaffenheit<br />
der Wand passende Dübel ein.<br />
Schrauben Sie die Montageplatten mit<br />
Schrauben und Scheiben an (abgeflachte<br />
Seite unten) und hängen Sie das Telefon<br />
ein.<br />
Legen Sie eine Wasserwaage an das Telefon<br />
an und prüfen Sie, ob sich dieses<br />
in der Waagerechten befindet.<br />
Korrigieren Sie ggf. die Plattenposition.<br />
<strong>10</strong><br />
Mark the position of the third drill hole<br />
and then remove the phone again.<br />
11<br />
Drill the hole in the marked position. Insert<br />
a wall anchor suitable <strong>for</strong> the wall<br />
type.<br />
12<br />
Plug the connection cable into the<br />
phone. <strong>Mount</strong> the phone on the wall<br />
brackets and use a screw and washer to<br />
fix it to the wall.<br />
Körnen Sie die Position der dritten Bohrung<br />
mittels Abstandshalter an und<br />
hängen Sie das Telefon wieder ab.<br />
Bohren Sie das angekörnte Loch. Setzen<br />
Sie abhängig von der Beschaffenheit<br />
der Wand einen passenden Dübel ein.<br />
Verbinden Sie die Anschlusskabel mit<br />
dem Telefon. Hängen Sie das Telefon<br />
ein und schrauben Sie dieses mit einer<br />
Schraube und Scheibe an.<br />
The phone can be removed from the wall again by simply pressing<br />
the spacer together and pushing the phone upwards. No<br />
tools are required.<br />
Das Telefon kann ohne Werkzeug durch Zusammendrücken des<br />
Abstandshalters und Hochschieben des Telefons wieder demontiert<br />
werden.<br />
Siemens Enterprise Communications<br />
www.siemens-enterprise.com<br />
Copyright © Siemens Enterprise Communications GmbH & Co. KG<br />
Hofmannstr. 51, 80<strong>20</strong>0 München, Deutschland<br />
Siemens Enterprise Communications GmbH & Co. KG is a Trademark Licensee of Siemens AG<br />
Reference No: A3<strong>10</strong>03-S<strong>20</strong>00-J<strong>10</strong>8-1-7431


