Bedienungsanleitung Eldat Easywave RCL07 ... - Hidrex-reha.de
Bedienungsanleitung Eldat Easywave RCL07 ... - Hidrex-reha.de
Bedienungsanleitung Eldat Easywave RCL07 ... - Hidrex-reha.de

Erfolgreiche ePaper selbst erstellen
Machen Sie aus Ihren PDF Publikationen ein blätterbares Flipbook mit unserer einzigartigen Google optimierten e-Paper Software.
GB<br />
Mo<strong>de</strong>l<br />
<strong>RCL07</strong>-5001E-02<br />
Technical Details<br />
Call receiver <strong>RCL07</strong><br />
Cable entry with<br />
cord grip<br />
Programming<br />
button with LED<br />
Frequency:<br />
868.3 MHz<br />
Modulation:<br />
FSK<br />
Coding:<br />
<strong>Easywave</strong><br />
Power supply: 12-24 V DC<br />
Power consumption: 0.3 W stand by<br />
0.8 W on-load<br />
Max. contact rating: 30 V / 1 A / 30 W<br />
Output:<br />
1 potential-free<br />
relay contact (CO)<br />
Operating Temperature: -20 °C to +60 °C<br />
Degree of Protection: IP44<br />
Dimensions:<br />
35/80/20 mm<br />
Weight:<br />
24.0 g<br />
Connecting cable: Ø 5 mm<br />
Scope of Delivery<br />
Call receiver <strong>RCL07</strong>, operating instructions<br />
Inten<strong>de</strong>d Use<br />
The unit may only be operated with safety extra<br />
low voltage (SELV) and may only be used as a radio<br />
control for switching <strong>de</strong>vices with safety extra<br />
low voltage (SELV).<br />
The manufacturer shall not be liable for any damage<br />
caused by improper or non-inten<strong>de</strong>d use.<br />
Safety Advice<br />
Before using the <strong>de</strong>vice, carefully read<br />
through the operating instructions!<br />
Caution! Observe the permissible supply voltage<br />
and the max. contact rating!<br />
Have faulty radio controls checked by the<br />
manufacturer!<br />
Do not make any unauthorized alterations or<br />
modifications to the receiver!<br />
Function<br />
The <strong>RCL07</strong> <strong>Easywave</strong> Mini-Receiver can be operated<br />
in a voltage range of 12-24 V DC.<br />
A total of 32 different <strong>Easywave</strong> radio transmission<br />
co<strong>de</strong>s can be memorized.<br />
Four operating mo<strong>de</strong>s are available:<br />
DEAD MAN´S MODE<br />
The relay is triggered as long as the corresponding<br />
transmitter button is pressed (max. 36 secs).<br />
ON/OFF<br />
Transmitter button<br />
A or C<br />
B or D<br />
Function<br />
1st pressing: ON<br />
2nd pressing: OFF<br />
IMPULSE<br />
If a transmitter button is pressed, the corresponding<br />
relay is triggered for 1 second.<br />
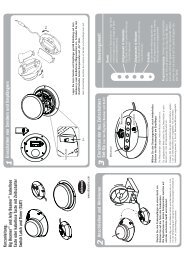
Start-Up<br />
1. Remove the housing cover.<br />
2. Select the <strong>de</strong>sired operating mo<strong>de</strong> with<br />
jumper J1. The factory setting is the DEAD<br />
MAN`S MODE.<br />
DEAD MAN´S MODE<br />
(Pos. 1+2)<br />
ON/OFF<br />
(Pos. 2+3)<br />
IMPULSE<br />
(Pos. 4+5)<br />
3. Connect the supply voltage and the safety<br />
extra low voltage <strong>de</strong>vices to be switched as<br />
follows:<br />
NC<br />
COM<br />
J1<br />
NO<br />
IN1<br />
IN2<br />
1<br />
J1<br />
J1<br />
J1<br />
Power supply:<br />
12-24V DC:<br />
IN1, IN2<br />
(Polarity is<br />
arbitrary)<br />
Device:<br />
Channel 1<br />
NC, COM, NO<br />
(change over)<br />
4. Re-install the housing cover.<br />
5. Transfer the co<strong>de</strong>s of the transmitters to<br />
the receiver (see section “Programming the<br />
transmission co<strong>de</strong>s“).<br />
Caution: Make sure there is no inter-ference with<br />
the wireless connection. Do not mount the <strong>de</strong>vice<br />
in a distribution box, in metal casings, in direct<br />
proximity to large metal objects, on the floor or<br />
close to it.<br />
Programming the transmission co<strong>de</strong>s<br />
In the “Programming the transmission co<strong>de</strong>s”<br />
mo<strong>de</strong> you can transfer the co<strong>de</strong>s of your transmitter<br />
buttons to the receiver.<br />
The selected operating mo<strong>de</strong> is adopted as a result<br />
of the memorizing process and applies to the<br />
transmission co<strong>de</strong> currently memorized.<br />
1. Briefly (< 1.6 sec.) press the programming<br />
button. The LED flashes.<br />
2. Press and hold a transmitter button. If the<br />
co<strong>de</strong> has been memorized, the LED lights up<br />
and then flashes again. Release the transmitter<br />
button.<br />
3. Repeat step 2 with the other transmitters.<br />
4. Briefly (< 1.6 sec.) press the programming<br />
button in or<strong>de</strong>r to return to the operating<br />
mo<strong>de</strong>.<br />
1<br />
1<br />
1<br />
Deleting specific transmission co<strong>de</strong>s<br />
In the Delete mo<strong>de</strong> you can <strong>de</strong>lete specific transmission<br />
Co<strong>de</strong>s memorized by the receiver.<br />
1. Keep the programming button pressed for<br />
more than 1.6 sec. The LED flashes rapidly.<br />
2. Press the selected transmitter button. If the<br />
co<strong>de</strong> has been <strong>de</strong>leted, the LED lights up and<br />
then flashes again rapidly.<br />
3. Repeat step 2 with another transmitter or<br />
briefly (< 1.6 sec.) press the programming<br />
button in or<strong>de</strong>r to return to the operating<br />
mo<strong>de</strong>.<br />
Deleting all transmission co<strong>de</strong>s (Reset)<br />
In the Reset mo<strong>de</strong> you can <strong>de</strong>lete all co<strong>de</strong>s memorized<br />
by the receiver.<br />
1. Keep the programming button pressed for<br />
more than 1.6 sec. The LED flashes rapidly.<br />
2. Press the programming button again and<br />
keep it pressed for more than 1.6 sec. If the<br />
memory has been <strong>de</strong>leted completely, the<br />
LED lights up and then flashes again rapidly.<br />
3. Briefly (< 1.6 sec.) press the programming<br />
button in or<strong>de</strong>r to return to the operating<br />
mo<strong>de</strong>.<br />
Disposal<br />
Waste electrical products not be disposed of<br />
with household waste!<br />
Dispose of the waste product via a collection<br />
point for electronic scrap or via<br />
your specialist <strong>de</strong>aler.<br />
Put the packaging material into the<br />
recycling bins for cardboard, paper and<br />
plastics.<br />
Warranty<br />
Within the statutory warranty period we un<strong>de</strong>rtake<br />
to rectify free of charge by repair or replacement<br />
any product <strong>de</strong>fects arising from material or<br />
production faults.<br />
Any unauthorized tampering with, or modifications<br />
to, the product shall ren<strong>de</strong>r this warranty<br />
null and void.<br />
Conformity<br />
This product conforms to the basic<br />
requirements of the R&TTE Directive<br />
1999/5/EC.<br />
For use in: EU/CH/FL/IS/N<br />
The Declaration of Conformity can be found on<br />
the Internet at: www.eldat.<strong>de</strong>.<br />
Service<br />
If, <strong>de</strong>spite correct handling, faults or malfunctions<br />
occur or if the product was damaged, please<br />
contact the company at the address below:<br />
ELDAT GmbH<br />
Im Gewerbepark 14<br />
15711 Zeesen<br />
Germany<br />
Phone: + 49 (0) 33 75 / 90 37-0<br />
Telefax: + 49 (0) 33 75 / 90 37-90<br />
Internet: www.eldat.<strong>de</strong><br />
E-mail: info@eldat.<strong>de</strong><br />
101805 16.07.2012 D/GB