Bord Control 811 - Calira
Bord Control 811 - Calira
Bord Control 811 - Calira

Sie wollen auch ein ePaper? Erhöhen Sie die Reichweite Ihrer Titel.
YUMPU macht aus Druck-PDFs automatisch weboptimierte ePaper, die Google liebt.
Pumpe +1,5mm²<br />
0<br />
Pumpe<br />
ws 1<br />
br ¾<br />
gn ½<br />
ge ¼<br />
gr 0<br />
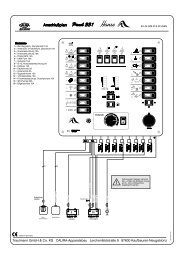
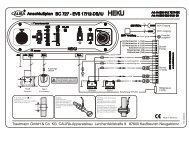
Anschlußplan <strong>Bord</strong> <strong>Control</strong> <strong>811</strong> Art.-Nr. H08 012 0<strong>811</strong> 01<br />
0<br />
10<br />
12<br />
Tank<br />
14<br />
0<br />
1/4<br />
1/2<br />
3/4<br />
1/1<br />
5pol. 3pol. 5pol.<br />
5 5<br />
ws 1<br />
br ¾<br />
gn ½<br />
ge ¼<br />
gr 0<br />
Tank II Tank I<br />
(Abwasser) (Frischwasser)<br />
16<br />
max.<br />
16A<br />
***<br />
max.<br />
10A<br />
+<br />
2A<br />
<strong>Bord</strong> <strong>Control</strong> <strong>811</strong><br />
I II III<br />
16A 10A 7A 7A<br />
0,25mm² rt<br />
max.<br />
7A<br />
0,25mm² bl<br />
20A<br />
max.<br />
7A<br />
+ +<br />
2A<br />
0,25mm² rs<br />
20A<br />
Batterie 12V Batterie 12V<br />
(starten) (versorgen)<br />
mind. 2,5mm²<br />
Hauptschalter<br />
Made in Germany<br />
9,5-10mm<br />
Empfehlung für Leitungsquerschnitte<br />
Elektrische Leitungen sollten, um Spannungsverluste und<br />
Überlast- ungen zu vermeiden, nie zu schwach dimensioniert<br />
verlegt werden. Länge der Leitung und Strombelastung spielen<br />
eine wichtige Rolle beim Festlegen des Querschnittes. Die Werte<br />
der nachfolgenden Empfehlung sollten nicht unterschritten<br />
Länge<br />
bis 1,5m<br />
bis 3,0m<br />
bis 6,0m<br />
über 6,0m<br />
Strom<br />
bis 15/30Amp.<br />
bis 15/30Amp<br />
bis 15/30Amp<br />
bis 15/30Amp<br />
Querschnitt<br />
1,5/4,0mm²<br />
2,5/4,0mm²<br />
4,0/6,0mm²<br />
6,0/10,0mm²<br />
Trautmann GmbH & Co. KG CALIRA-Apparatebau Lerchenfeldstraße 9 87600 Kaufbeuren-Neugablonz<br />
12V<br />
Made in Germany<br />
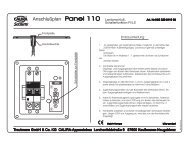
In die Tanks Löcher mit 9,5-<br />
10,0mm bohren.<br />
Bohrungen von außen, und möglichst<br />
auch von innen, entgraten<br />
Meßfühler<br />
zusammensetzen,<br />
Schrauben dabei mit Dichtmasse<br />
oder elastischem<br />
Kleber einsetzen, Schrauben<br />
zunächst nur lose von Hand<br />
anziehen<br />
-Meßfühler in die Tankbohrung<br />
einsetzen<br />
-Kabelfarben beachten- und mit<br />
Schraubendreher fest anziehen.<br />
Der Rand der Gummidichtung<br />
wird dabei gegen die Außenwand<br />
des Tanks gepreßt. Innen bildet<br />
sich eine Gummiwulst, welche die<br />
Bohrung zuverlässig abdichtet<br />
B51 080565 01
Pump +1,5mm²<br />
0<br />
Water pump<br />
WH 1<br />
BN ¾<br />
GN ½<br />
YE ¼<br />
GY 0<br />
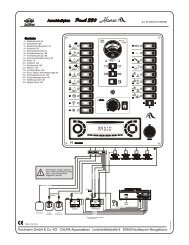
Connection diagram <strong>Bord</strong> <strong>Control</strong> <strong>811</strong> Art.-Nr. H08 012 0<strong>811</strong> 01<br />
0<br />
10<br />
12<br />
Tank<br />
14<br />
0<br />
1/4<br />
1/2<br />
3/4<br />
1/1<br />
5pole 3pole 5pole<br />
5 5<br />
WH 1<br />
BN ¾<br />
GN ½<br />
YE ¼<br />
GY 0<br />
16<br />
max.<br />
16A<br />
***<br />
max.<br />
10A<br />
Tank II Tank I Battery 12V Battery 12V<br />
(Waste water)<br />
(Freshwater)<br />
(start) (supply)<br />
+<br />
2A<br />
<strong>Bord</strong> <strong>Control</strong> <strong>811</strong><br />
I II III<br />
16A 10A 7A 7A<br />
0,25mm² RD<br />
max.<br />
7A<br />
0,25mm² BU<br />
20A<br />
max.<br />
7A<br />
+ +<br />
2A<br />
0,25mm² PK<br />
20A<br />
at least 2,5mm²<br />
Hauptschalter<br />
Made in Germany<br />
9,5-10mm<br />
Wire cross section recommendations<br />
Electric lines must be correct dimensioned to avoid voltage drops<br />
and overload. The length of the line and the current are<br />
important factors to determine the right wire cross section.<br />
Use at least the values of the following recommendations.<br />
Length<br />
til 1,5m<br />
til 3,0m<br />
til 6,0m<br />
over 6,0m<br />
Current<br />
til 15/30Amp.<br />
til 15/30Amp<br />
til 15/30Amp<br />
til 15/30Amp<br />
Wire cross section<br />
1,5/4,0mm²<br />
2,5/4,0mm²<br />
4,0/6,0mm²<br />
6,0/10,0mm²<br />
Trautmann GmbH & Co. KG CALIRA-Apparatebau Lerchenfeldstraße 9 87600 Kaufbeuren-Neugablonz<br />
12V<br />
Fuses must be assembled near to the<br />
+poles of the batteries<br />
Made in Germany<br />
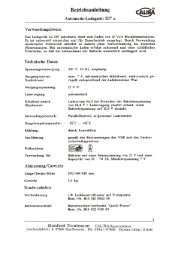
Drill holes into the tanks with<br />
9,5-10,0mm diameter.<br />
Burr the holes from both sides.<br />
Compose the sensor, insert the<br />
screw with sealing compound<br />
and fasten srews first only by<br />
hand.<br />
Insert the sensor into the hole<br />
in the tank and fasten it with a<br />
screw driver. Note the wire<br />
colours. The edge of the rubber<br />
gasket is pressed against the<br />
outer surface of the tank.<br />
Inside the tank it forms a<br />
rubber fold , which seals up the<br />
B51 080565 01