PrioAir EC und E2_2013-10-22.indb - Systemair
PrioAir EC und E2_2013-10-22.indb - Systemair
PrioAir EC und E2_2013-10-22.indb - Systemair

Sie wollen auch ein ePaper? Erhöhen Sie die Reichweite Ihrer Titel.
YUMPU macht aus Druck-PDFs automatisch weboptimierte ePaper, die Google liebt.
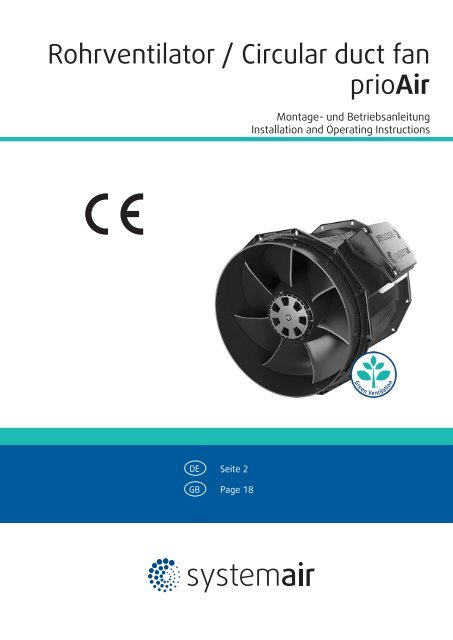
Rohrventilator / Circular duct fan<br />
prioAir<br />
Montage- <strong>und</strong> Betriebsanleitung<br />
Installation and Operating Instructions<br />
DE<br />
GB<br />
Seite 2<br />
Page 18
Die angegebenen Daten in dieser Bedienungsanleitung dienen allein der Produktbeschreibung. Eine Aussage über eine bestimmte<br />
Beschaffenheit oder eine Eignung für einen bestimmten Einsatzzweck kann aus unseren Angaben nicht abgeleitet werden. Die Angaben<br />
entbinden den Verwender nicht von eigenen Beurteilungen <strong>und</strong> Prüfungen.<br />
Es ist zu beachten, dass unsere Produkte einem natürlichen Verschleiß- <strong>und</strong> Alterungsprozess unterliegen.<br />
Alle Rechte liegen bei der <strong>Systemair</strong> GmbH auch für den Fall von Schutzrechtsanmeldungen.<br />
Jede Verfügungsbefugnis, wie Kopie- <strong>und</strong> Weitergaberecht, liegt bei uns.<br />
Auf der Titelseite ist eine Beispielkonfiguration abgebildet. Das ausgelieferte Produkt kann daher von der Abbildung abweichen. Die<br />
Originalbetriebsanleitung wurde in deutscher Sprache erstellt.
Inhaltsverzeichnis<br />
1 Allgemeine Hinweise ..............................................4<br />
1.1 Darstellung der Hinweise ............................................4<br />
1.2 Hinweise zur Dokumentation .....................................4<br />
2 Wichtige Sicherheitsinformationen .......................5<br />
2.1 Sicherheitshinweise .....................................................5<br />
2.2 Personal ..........................................................................5<br />
2.3 Bestimmungsgemäße Verwendung .........................5<br />
2.4 Bestimmungswidrige Verwendung ...........................6<br />
3 Gewährleistung .......................................................6<br />
4 Lieferung, Transport, Lagerung .............................6<br />
4.1 Lieferung ........................................................................6<br />
4.2 Transport ........................................................................7<br />
4.3 Lagerung ........................................................................7<br />
5 Beschreibung ...........................................................7<br />
5.1 Rohrventilator prioAir <strong>EC</strong> <strong>und</strong> prioAir <strong>E2</strong> ..................7<br />
5.2 Typenschlüssel ..............................................................9<br />
5.3 Technische Daten ....................................................... <strong>10</strong><br />
5.4 Sicherheitseinrichtungen ......................................... <strong>10</strong><br />
5.5 Hinweise zum Motor <strong>und</strong> zur Regelung ................ <strong>10</strong><br />
6 Montage .................................................................<strong>10</strong><br />
6.1 Sicherheitshinweise .................................................. <strong>10</strong><br />
6.2 Montagevoraussetzungen ....................................... <strong>10</strong><br />
6.3 Montage des Ventilators ...........................................11<br />
7 Elektrischer Anschluss ..........................................11<br />
7.1 Anschlussbild prioAir <strong>E2</strong> ........................................... 12<br />
7.2 Anschlussbild prioAir <strong>EC</strong> ........................................... 12<br />
8 Inbetriebnahme .....................................................13<br />
8.1 Voraussetzungen ....................................................... 13<br />
8.2 Inbetriebnahme ......................................................... 13<br />
9 Betrieb....................................................................13<br />
9.1 Sicherheitshinweise .................................................. 13<br />
9.2 Betriebsbedingungen ............................................... 13<br />
9.3 Betrieb/Bedienung .................................................... 14<br />
<strong>10</strong> Wartung / Störungsbeseitigung ..........................14<br />
<strong>10</strong>.1 Störungen <strong>und</strong> Fehlerbehebung ............................. 14<br />
<strong>10</strong>.2 Reinigung .................................................................... 15<br />
<strong>10</strong>.3 Instandhaltung, Wartung ......................................... 15<br />
<strong>10</strong>.4 Ersatzteile ................................................................... 15<br />
11 Deinstallation / Demontage .................................16<br />
12 Entsorgung .............................................................16<br />
12.1 Rohrventilator entsorgen ......................................... 16<br />
12.2 Verpackung entsorgen ............................................. 16<br />
13 EG-Konformitätserklärung ...................................17<br />
Genius - V 1.0<br />
3
Allgemeine Hinweise<br />
1 Allgemeine Hinweise<br />
1.1 Darstellung der Hinweise<br />
GEFAHR<br />
Unmittelbare Gefahr<br />
Die Nichtbeachtung des Warnhinweises führt unmittelbar zum Tod oder zu schwerer Körperverletzung.<br />
WARNUNG<br />
Mögliche Gefahr<br />
Die Nichtbeachtung des Warnhinweises führt möglicherweise zum Tod oder zu schwerer Körperverletzung.<br />
VORSICHT<br />
Gefährdung mit geringem Risiko<br />
Die Nichtbeachtung des Warnhinweises führt zu leichten bis mittleren Körperverletzungen.<br />
VORSICHT<br />
Gefährdung mit Risiko von Sachschäden<br />
Die Nichtbeachtung des Warnhinweises führt zu Sachschäden.<br />
HINWEIS<br />
Nützliche Informationen <strong>und</strong> Hinweise<br />
1.1.1 Verwendete Symbole<br />
Allgemeines Gefahrensymbol<br />
Feuer- oder Explosionsgefahr!<br />
Elektrische Spannung!<br />
Verbrennungsgefahr<br />
1.1.2 Darstellung von Handlungsanweisungen<br />
Handlungsanweisung<br />
Handlungsanweisung mit festgelegter Reihenfolge<br />
Führen Sie diese Handlung aus. 1. Führen Sie diese Handlung aus.<br />
(ggf. weitere Handlungen) 2. Führen Sie diese Handlung aus.<br />
3. (ggf. weitere Handlungen)<br />
1.2 Hinweise zur Dokumentation<br />
WARNUNG<br />
Gefahr durch unsachgemäßen Umgang mit dem Rohrventilator<br />
Diese Bedienungsanleitung beschreibt den sicheren Gebrauch des Rohrventilators.<br />
» Bedienungsanleitung genau lesen!<br />
» Bedienungsanleitung bei dem Rohrventilator prioAir aufbewahren. Sie muss ständig am Einsatzort zur Verfügung<br />
stehen.<br />
Mitgeltende Unterlagen:<br />
- Technischen Unterlagen des Motorenherstellers<br />
- Technischen Unterlagen des Herstellers der Regelung<br />
4
Wichtige Sicherheitsinformationen<br />
2 Wichtige Sicherheitsinformationen<br />
2.1 Sicherheitshinweise<br />
Planer, Anlagenbauer <strong>und</strong> Betreiber sind für die ordnungsgemäße Montage <strong>und</strong> den bestimmungsgemäßen Betrieb verantwortlich.<br />
• Verwenden Sie den Rohrventilator prioAir nur in einwandfreiem Zustand.<br />
• Sehen Sie allgemein vorgeschriebene elektrische <strong>und</strong> mechanische Schutzeinrichtungen bauseits vor.<br />
• Sichern Sie während der Montage, Inbetriebnahme, Instandhaltung <strong>und</strong> Kontrolle die Montagestelle <strong>und</strong> die Räumlichkeiten für<br />
eventuelle Vorbereitungen vor Zutritt von Unbefugten.<br />
• Beachten Sie die Vorschriften der Arbeitssicherheit.<br />
• Sicherheitskomponenten dürfen weder umgangen, noch außer Funktion gesetzt werden.<br />
• Halten Sie alle Warnhinweise am Rohrventilator vollzählig in lesbarem Zustand.<br />
• Unterweisen Sie regelmäßig das Personal über sicherheitsbewusstes Verhalten.<br />
HINWEIS<br />
Für den Rohrventilator prioAir haben wir eine Risikobewertung durchgeführt. Diese kann jedoch nur für den<br />
Rohrventilator prioAir selbst gelten. Nach Einbau <strong>und</strong> Installation des Rohrventilators prioAir empfehlen wir eine<br />
Risikobewertung der Gesamtanlage durchzuführen. Damit haben Sie die Gewähr, dass durch die Anlage kein<br />
Gefährdungspotential entsteht.<br />
2.2 Personal<br />
2.2.1 Montagepersonal<br />
• Die Montage darf nur von ausgebildetem Fachpersonal durchgeführt werden.<br />
2.2.2 Arbeiten an der elektrischen Ausrüstung<br />
• Arbeiten an der elektrischen Ausrüstung des Ventilators dürfen nur von einer Elektrofachkraft oder einer elektrotechnisch<br />
unterwiesenen Person ausgeführt werden. Diese Person muss die einschlägigen Sicherheitsvorschriften kennen, um mögliche<br />
Gefahren zu erkennen <strong>und</strong> zu vermeiden.<br />
2.2.3 Personal für Betrieb, Bedienung, Wartung <strong>und</strong> Reinigung<br />
• Betrieb, Bedienung, Wartung <strong>und</strong> Reinigung darf nur von ausgebildetem <strong>und</strong> dazu berechtigtem Personal durchgeführt werden.<br />
Das Bedienpersonal muss über entsprechende Kenntnisse verfügen, den Rohrventilator prioAir zu bedienen. Im Falle einer Störung<br />
oder eines Notfalls muss es richtig <strong>und</strong> angemessen reagieren können.<br />
2.3 Bestimmungsgemäße Verwendung<br />
Die Rohrventilatoren prioAir sind zum Einbau in lüftungstechnische Anlagen vorgesehen. Sie können sowohl in ein Kanalsystem<br />
als auch frei ansaugend über Einströmdüse <strong>und</strong> ein saugseitiges Berührungsschutzgitter eingebaut werden. Freie Ausblas- <strong>und</strong>/<br />
oder Ansaugrichtung über ein Berührungsschutzgitter ist nach Berücksichtigung bei der Auslegung möglich.<br />
• Die Rohrventilatoren prioAir eignen sich zur Förderung von sauberer Luft, Luft mit geringem Staub- <strong>und</strong> Fettgehalt, Medien bis<br />
zu einer max. Luftdichte von 1,3 kg/m³ <strong>und</strong> einer zulässigen Feuchte von max. 95 %.<br />
• Die maximal zulässigen Betriebsdaten auf dem Typenschild gelten für eine Luftdichte ρ = 1,2 kg/m³ (Meereshöhe) <strong>und</strong> eine<br />
maximale Luftfeuchtigkeit von 80 %.<br />
• Die Rohrventilatoren prioAir sind geeignet für folgende Fördermitteltemperaturbereiche:<br />
– prioAir <strong>EC</strong> von -25 °C bis +55 °C<br />
– prioAir <strong>E2</strong> von -25 °C bis +55 °C<br />
5
Gewährleistung<br />
2.4 Bestimmungswidrige Verwendung<br />
Als bestimmungswidrige Verwendung gilt vor allem, wenn Sie die Rohrventilatoren prioAir anders verwenden, als es beschrieben<br />
ist. Folgende Punkte sind bestimmungswidrig <strong>und</strong> gefährlich:<br />
• Betrieb in medizinischen Geräten mit lebenserhaltender oder lebenssichernder Funktion,<br />
• Fördern von explosiven <strong>und</strong> brennbaren Medien,<br />
• Fördern von aggressiven bzw. staub- oder fetthaltigen Medien,<br />
• Außenaufstellung ohne Witterungsschutz,<br />
• Betrieb in explosionsfähiger Atmosphäre,<br />
• Betrieb ohne Kanalsystem, bzw. Schutzgitter,<br />
• Betrieb mit verschlossenen Luftanschlüssen.<br />
3 Gewährleistung<br />
Die Gewährleistung für unsere Produkte bestimmt sich nach den vertraglichen Festlegungen, unseren Angeboten sowie in Ergänzung<br />
dazu unseren Allgemeinen Geschäftbedingungen. Gewährleistungsansprüche setzen voraus, dass die Produkte korrekt<br />
angeschlossen werden, entsprechend den Datenblättern betrieben <strong>und</strong> eingesetzt werden, bei Bedarf auch gewartet werden.<br />
4 Lieferung, Transport, Lagerung<br />
4.1 Lieferung<br />
Jedes Gerät verlässt unser Werk in elektrisch <strong>und</strong> mechanisch einwandfreiem Zustand. Die Rohrventilatoren prioAir werden auf<br />
Paletten geliefert. Es wird empfohlen, sie bis zur Montagestelle original verpackt zu transportieren.<br />
VORSICHT<br />
Gefährdung durch Schneiden!<br />
» Beim Auspacken Schutzhandschuhe tragen.<br />
Lieferung prüfen<br />
Prüfen Sie den Rohrventilator prioAir auf offensichtliche Mängel, die den sicheren Betrieb beeinträchtigen könnten.<br />
Achten Sie vor allem auf Schäden am Klemmkasten <strong>und</strong> Laufrad, auf Risse im Gehäuse, fehlende Nieten, Schrauben oder<br />
Abdeckkappen.<br />
Die Lagerposition laut Kartonaufdruck ist zu beachten!<br />
6
Lieferung, Transport, Lagerung<br />
4.2 Transport<br />
WARNUNG<br />
Stoßgefahr durch herabfallenden Rohrventilator!<br />
» Gerät vorsichtig transportieren!<br />
WARNUNG<br />
Elektrische Gefährdung durch beschädigte Anschlüsse<br />
» Nicht am Klemmkasten oder Laufrad transportieren.<br />
<br />
<br />
Transportieren Sie den Rohrventilator prioAir original verpackt.<br />
Vermeiden Sie Schläge <strong>und</strong> Stöße.<br />
4.3 Lagerung<br />
VORSICHT<br />
Gefährdung durch Funktionsverlust der Motorlagerung<br />
» Zu lange Lagerzeiträume vermeiden (Empfehlung: max. 1 Jahr),<br />
» vor dem Einbau die ordungsgemäße Funktion der Motorlagerung prüfen.<br />
<br />
<br />
<br />
Lagern Sie den Rohrventilator prioAir staubdicht, trocken <strong>und</strong> wettergeschützt in der Originalverpackung.<br />
Vermeiden Sie extreme Hitze- oder Kälteeinwirkung.<br />
Lagerposition Kartonaufdruck beachten!<br />
5 Beschreibung<br />
5.1 Rohrventilator prioAir <strong>EC</strong> <strong>und</strong> prioAir <strong>E2</strong><br />
• Niedrige SFP-Werte (Specific Fan Power nach EN 13779) <strong>und</strong> sehr hoher Wirkungsgrad.<br />
Ihr Vorteil: maximale Leistung <strong>und</strong> geringerer Energieverbrauch.<br />
• Leistungsstarker <strong>EC</strong>-Motor mit integrierter Motorelektronik.<br />
Ihr Vorteil: reduzierter Energieverbrauch senkt Betriebskosten.<br />
• Kompaktes Design.<br />
Ihr Vorteil: wenig Platzbedarf, keine großen Außenaufbauten vorhanden.<br />
• Material: Spezieller Verb<strong>und</strong>werkstoff.<br />
Ihr Vorteil: reduziertes Gewicht, leicht <strong>und</strong> schnell zu montieren.<br />
• Geräuscharm<br />
• Lange Lebensdauer<br />
Die Rohrventilatoren sind mit speziell entwickelten strömungsoptimierten Laufrädern inklusive einem speziellen Nachleitwerk aus<br />
Polypropylen <strong>und</strong> spannungssteuerbaren Außenläufermotoren ausgestattet.<br />
7
Beschreibung<br />
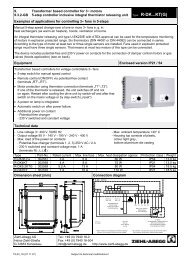
5.1.1 Typenschilder<br />
1 2<br />
3<br />
4<br />
5<br />
Bild 1:<br />
Beispiel Typenschild prio 200 <strong>EC</strong><br />
Legende<br />
1 Spannung / Frequenz 4 Leistung<br />
2 Typbezeichnung 5 Drehzahl (max/min)<br />
3 Strom<br />
1<br />
2<br />
3 4<br />
5<br />
6 7<br />
Bild 2:<br />
Beispiel Typenschild prio 200 <strong>E2</strong><br />
Legende<br />
1 Spannung / Frequenz 5 Drehzahl (max/min)<br />
2 Typbezeichnung 6 Kapazität<br />
3 Strom 7 Isolationsklasse Motor<br />
4 Leistung<br />
8
Beschreibung<br />
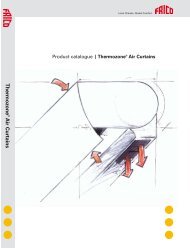
5.1.2 Maße<br />
A<br />
ØD<br />
E<br />
E<br />
ØB<br />
ØB<br />
C<br />
Bild 3:<br />
Maße des prioAir <strong>EC</strong> <strong>und</strong> prioAir <strong>E2</strong><br />
Ambessungen<br />
Typ A ⌀B C ⌀D E<br />
prio 160 <strong>E2</strong> mm 220 159 211 182 25<br />
prio 160 <strong>EC</strong> mm 220 159 211 182 25<br />
prio 200 <strong>E2</strong> mm 245 199 249,1 227 25<br />
prio 200 <strong>EC</strong> mm 245 199 249,1 227 25<br />
5.2 Typenschlüssel<br />
prio 200 <strong>EC</strong> Polzahl (entfällt bei <strong>EC</strong>)<br />
Motorart: E: Einphasen-Wechselstrom<br />
<strong>EC</strong>: elektronisch kommutiert<br />
Baugröße<br />
Typenbezeichnung<br />
9
Montage<br />
5.3 Technische Daten<br />
prio 160 <strong>EC</strong> prio 200 <strong>EC</strong> prio 160 <strong>E2</strong> prio 200 <strong>E2</strong><br />
Temperaturbereich Fördermittel [°C] -25 ... +55 -25 ... +55<br />
Temperaturbereich Lagerung [°C] -40 ... +60 -40 ... +60<br />
Spannung / Stromstärke<br />
siehe Typenschild<br />
Schutzart<br />
siehe Typenschild<br />
Schalldruckpegel bei 1 m [dB(A)]
Elektrischer Anschluss<br />
6.3 Montage des Ventilators<br />
<br />
<br />
<br />
<br />
<br />
Befestigen Sie das Rohrsystem auf festem Untergr<strong>und</strong>.<br />
Schieben Sie den Rohrventilator ohne Befestigungswinkel direkt in<br />
das Rohrsystem ein.<br />
Beachten Sie die Durchströmrichtung (Pfeile).<br />
Befestigen Sie den Rohrventilator am Rohrsystem.<br />
Verspannen Sie das Gehäuse des Rohrventilators beim Einbau nicht.<br />
Befestigungswinkel<br />
Alternative:<br />
Befestigen Sie den Rohrventilator mit dem Befestigungswinkel<br />
(Anzugsmoment 1Nm) an Wand oder Decke (fester Untergr<strong>und</strong>).<br />
Schieben Sie das Rohrsystem auf die Luftanschlüsse.<br />
Beachten Sie die Durchströmrichtung (Pfeile).<br />
Befestigen Sie das Rohrsystem am Rohrventilator.<br />
Verspannen Sie das Gehäuse des Rohrventilators beim Einbau nicht.<br />
EMPFEHLUNG<br />
Verwenden Sie zur Montage gepolsterte Verbindungsmanschetten, die die Geräuschübertragung auf das Kanalsystem<br />
stark vermindern.<br />
7 Elektrischer Anschluss<br />
WARNUNG<br />
Gefährdung durch elektrische Spannung!<br />
» Elektrischer Anschluss nur durch Elektrofachkraft bzw. ausgebildetes <strong>und</strong> unterwiesenes Fachpersonal!<br />
» Elektrischer Anschluss in Übereinstimmung mit den gültigen Vorschriften.<br />
» Eindringen von Wasser in den Klemmkasten vermeiden.<br />
» Die 5 Regeln der Elektrotechnik beachten!<br />
– Freischalten (allpolige Trennung der elektrischen Anlage von spannungsführenden Teilen),<br />
– gegen Wiedereinschalten sichern,<br />
– Spannungsfreiheit feststellen,<br />
– erden <strong>und</strong> kurzschließen,<br />
– benachbarte, unter Spannung stehende Teile abdecken oder abschranken.<br />
<br />
Schließen Sie den elektrischen Anschluss gemäß Schaltbild an<br />
- prioAir <strong>E2</strong> siehe Bild 4<br />
- prioAir <strong>EC</strong> siehe Bild 6.<br />
<br />
<br />
<br />
<br />
Verlegen Sie die Anschlussleitungen im Klemmkasten so, dass der Klemmkastendeckel ohne Widerstand schließt.<br />
Verwenden Sie alle Verschlussschrauben.<br />
Setzen Sie die Schrauben von Hand an, um Beschädigungen am Gewinde zu vermeiden.<br />
Die Schrauben des Klemmkastendeckels sind mit einem vordefinierten Anzugsmoment von 1Nm anzuziehen.<br />
11
Elektrischer Anschluss<br />
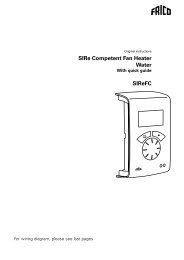
7.1 Anschlussbild prioAir <strong>E2</strong><br />
Farbe Funktion/Belegung<br />
blau L Spannungsversorgung 230 V AC, 50 ... 60 Hz<br />
schwarz N Neutralleiter<br />
grün/gelb PE Schutzleiter<br />
Bild 4:<br />
Anschlussplan prio 160 <strong>E2</strong> + prio 200 <strong>E2</strong><br />
7.2 Anschlussbild prioAir <strong>EC</strong><br />
K<strong>und</strong>enseite<br />
max. Drehzahl<br />
einstellbare Drehzahl<br />
<strong>10</strong> V n = max<br />
1 V n = min<br />
Inbetriebnahme<br />
8 Inbetriebnahme<br />
8.1 Voraussetzungen<br />
• Einbau <strong>und</strong> elektrische Installation sind fachgerecht abgeschlossen.<br />
• Montagerückstände <strong>und</strong> Fremdkörper sind aus dem Ventilatorraum entfernt.<br />
• Ansaug- <strong>und</strong> Ausblasöffnung sind frei.<br />
• Die Sicherheitseinrichtungen sind montiert (Berührungsschutz).<br />
• Der Schutzleiter ist angeschlossen.<br />
• Die Kabeleinführung ist dicht.<br />
• Anschlussdaten stimmen mit den Daten auf dem Typenschild überein.<br />
• Die Nennstromaufnahme (Typenschild) wird nicht überschritten.<br />
8.2 Inbetriebnahme<br />
WARNUNG<br />
Gefährdung durch elektrische Spannung!<br />
» Inbetriebnahme nur durch ausgebildetes <strong>und</strong> unterwiesenes Fachpersonal!<br />
<br />
Schalten Sie den Rohrventilator wie bauseits vorgesehen ein.<br />
WARNUNG<br />
Gefährdung durch berstende Teile<br />
» Bei der Kontrolle der Drehrichtung des Laufrades Schutzbrille tragen.<br />
<br />
<br />
Kontrollieren Sie:<br />
– die Drehrichtung / Förderrichtung. Es gilt immer die Drehrichtung mit Blick auf das Laufrad,<br />
– die Laufruhe.<br />
Prüfen Sie den sicheren Sitz der Sicherheitsbauteile bzw. Schutzgitter.<br />
9 Betrieb<br />
9.1 Sicherheitshinweise<br />
WARNUNG<br />
Gefährdung durch elektrische Spannung!<br />
» Die Bedienung des Gerätes darf nur von Personen durchgeführt werden,<br />
– die in die Funktion <strong>und</strong> Gefahren eingewiesen wurden,<br />
– sie verstanden haben <strong>und</strong> in der Lage sind entsprechend zu agieren.<br />
» Stellen Sie sicher, dass Kinder das Gerät nicht unbeaufsichtigt bedienen oder damit spielen.<br />
» Stellen Sie sicher, dass nur Personen Zugang haben, die in der Lage sind, das Gerät sicher zu bedienen.<br />
9.2 Betriebsbedingungen<br />
• Betreiben Sie den Rohrventilator nicht in explosionsfähiger Atmosphäre.<br />
• Während des Betriebes darf das Berühren des Laufrades nicht möglich sein.<br />
• Sicherheitskomponenten dürfen weder umgangen, noch außer Funktion gesetzt werden<br />
• Betreiben Sie den Rohrventilator nur innerhalb der auf dem Typenschild angegebenen Grenzwerte.<br />
• Verhindern Sie das Einsaugen von Fremdpartikeln, dies kann den Ventilator zerstören.<br />
• Geräuschentwicklung kann durch Verwenden eines Geräuschfilters verringert werden.<br />
13
Betrieb<br />
9.3 Betrieb/Bedienung<br />
<br />
<br />
<br />
Betreiben Sie den Rohrventilator nur unter Beachtung dieser Bedienungsanleitung <strong>und</strong> den mitgeltenden Unterlagen.<br />
Überwachen Sie den Rohrventilator während des Betriebs auf die korrekte Funktion.<br />
Schalten Sie den Rohrventilator wie bauseits vorgesehen an <strong>und</strong> aus.<br />
WARNUNG<br />
Gefährdung durch elektrische Spannung bzw. berstende Teile!<br />
Auftretende Fehler können zu Personen <strong>und</strong>/oder Sachschäden führen<br />
Schalten Sie den Rohrventilator wie bauseits vorgesehen aus:<br />
» bei untypischen Laufgeräuschen, Schwingungen, Druckschwankungen,<br />
» bei Überschreiten der Werte für Strom, Spannung <strong>und</strong> Temperatur (Typenschild).<br />
<strong>10</strong> Wartung / Störungsbeseitigung<br />
WARNUNG<br />
Gefährdung durch elektrische Spannung!<br />
» Störungsbeseitigung <strong>und</strong> Wartung nur durch Elektrofachkraft bzw. ausgebildetes <strong>und</strong> unterwiesenes Fachpersonal!<br />
» Bei der Fehlersuche Arbeitsschutzvorschriften beachten!<br />
» Die 5 Regeln der Elektrotechnik beachten!<br />
– Freischalten (allpolige Trennung der elektrischen Anlage von spannungsführenden Teilen),<br />
– gegen Wiedereinschalten sichern,<br />
– Spannungsfreiheit feststellen,<br />
– erden <strong>und</strong> kurzschließen,<br />
– benachbarte, unter Spannung stehende Teile abdecken oder abschranken.<br />
<strong>10</strong>.1 Störungen <strong>und</strong> Fehlerbehebung<br />
Störung Mögliche Ursachen Abhilfe<br />
Rohrventilator läuft unruhig Laufrad hat Unwucht nachwuchten durch Fachfirma<br />
Anbackungen am Laufrad<br />
Sorgfältig reinigen, evt. nachwuchten<br />
Materialzersetzung am Laufrad aufgr<strong>und</strong> Rücksprache mit <strong>Systemair</strong><br />
aggressiver Fördermedien<br />
Deformierung des Laufrades durch zu hohe<br />
Temperatur<br />
Rücksprache mit <strong>Systemair</strong>,<br />
Neues Laufrad einbauen,<br />
Lagerung kontrollieren,<br />
Leistung des Rohrventilators zu Falsche Drehrichtung des Laufrades<br />
Drehrichtung ändern<br />
gering<br />
Druckverluste in den Leitungen sind zu groß Andere Leitungsführung<br />
Drosselorgane sind nicht oder nur zum Teil Öffnungsstellung vor Ort kontrollieren<br />
geöffnet<br />
Saug- oder Druckwege sind verstopft Behinderungen entfernen<br />
Schleifgeräusche im Betrieb oder<br />
beim Anlaufen des Rohrventilators<br />
Saugleitung verspannt eingebaut<br />
Saugleitung lösen <strong>und</strong> neu ausrichten<br />
Interner Motorschutz hat ausgelöst<br />
Rohrventilator erreicht ihre<br />
Nenndrehzahl nicht<br />
Tabelle 2:<br />
Fehlerbehebung<br />
Motor blockiert<br />
Elektische Schalteinrichtungen sind falsch<br />
eingestellt<br />
Motorwicklung defekt<br />
Rücksprache mit <strong>Systemair</strong><br />
Einstellung der Schalteinrichtung überprüfen<br />
<strong>und</strong> evt. neu einstellen<br />
Rücksprache mit <strong>Systemair</strong><br />
14
Betrieb<br />
<strong>10</strong>.2 Reinigung<br />
Regelmäßige Reinigung des Rohrventilators beugt Unwucht vor.<br />
WARNUNG<br />
Gefährdung durch elektrische Spannung!<br />
» Innenreinigung des Rohrventilators nur durch Elektrofachkraft bzw. ausgebildetes <strong>und</strong> unterwiesenes Fachpersonal!<br />
» Die 5 Regeln der Elektrotechnik beachten!<br />
– Freischalten (allpolige Trennung der elektrischen Anlage von spannungsführenden Teilen),<br />
– gegen Wiedereinschalten sichern,<br />
– Spannungsfreiheit feststellen,<br />
– erden <strong>und</strong> kurzschließen,<br />
– benachbarte, unter Spannung stehende Teile abdecken oder abschranken.<br />
VORSICHT<br />
Gefährdung durch heiße Oberfläche!<br />
» Bei Wartungs- <strong>und</strong> Reinigungsarbeiten Schutzhandschuhe tragen!<br />
<br />
<br />
<br />
<br />
<br />
Halten Sie die Luftwege des Rohrventilators frei <strong>und</strong> reinigen Sie diese ggf. mit einer Reinigungsbürste,<br />
Verwenden Sie keine Stahlbürste.<br />
Verwenden Sie keinesfalls einen Hochdruckreiniger („Dampfstrahler“).<br />
Verbiegen Sie die Ventilatorschaufeln bei der Reinigung nicht.<br />
Verwenden Sie keine Reinigungsmittel zur Innenreinigung.<br />
<strong>10</strong>.3 Instandhaltung, Wartung<br />
Der Rohrventilator ist durch Verwendung von Kugellagern mit „Lebensdauerschmierung“ weitestgehend wartungsfrei.<br />
WARNUNG<br />
Gefährdung durch elektrische Spannung!<br />
Beachten Sie bei allen Installations- <strong>und</strong> Wartungsarbeiten:<br />
» Ventilatorlaufrad muss stillstehen.<br />
» Stromkreis muss unterbrochen <strong>und</strong> gegen Wiedereinschalten gesichert sein.<br />
» Arbeitsschutzvorschriften müssen beachtet werden.<br />
<br />
<br />
<br />
Achten Sie auf untypische Laufgeräusche.<br />
Verwenden Sie bei Wechsel von Lagern nur Originalkugellager (Sonderbefettung) der Firma <strong>Systemair</strong>.<br />
Wenden Sie sich bei allen anderen Schäden (z. B. Wicklungsschäden) an unsere Serviceabteilung. Defekte Rohrventilatoren<br />
müssen komplett ausgetauscht werden. Reparaturen dürfen nur in der Firma des Herstellers <strong>und</strong> durch den Hersteller durchgeführt<br />
werden. Die Adresse finden Sie auf der Rückseite dieser Bedienungsanleitung.<br />
<strong>10</strong>.4 Ersatzteile<br />
Geben Sie bei einer Ersatzteilbestellung die Typenbezeichnung Ihres Rohrventilators an. Sie finden diese auf dem Typenschild.<br />
15
Deinstallation / Demontage<br />
11 Deinstallation / Demontage<br />
WARNUNG<br />
Gefährdung durch elektrische Spannung!<br />
» Abschalten <strong>und</strong> Deinstallieren nur durch Elektrofachkraft bzw. ausgebildetes <strong>und</strong> unterwiesenes Fachpersonal!<br />
» Die 5 Regeln der Elektrotechnik beachten!<br />
– Freischalten (allpolige Trennung der elektrischen Anlage von spannungsführenden Teilen),<br />
– gegen Wiedereinschalten sichern,<br />
– Spannungsfreiheit feststellen,<br />
– erden <strong>und</strong> kurzschließen,<br />
– benachbarte, unter Spannung stehende Teile abdecken oder abschranken.<br />
<br />
<br />
Klemmen Sie alle elektrischen Leitungen sorgfältig ab.<br />
Trennen Sie den Rohrventilator von den Versorgungsanschlüssen.<br />
VORSICHT<br />
Gefährdung durch Stoß <strong>und</strong> Schneiden!<br />
» Beim Demontieren Schutzhandschuhe tragen!<br />
» Vorsichtig demontieren.<br />
<br />
<br />
Entfernen Sie vorsichtig das Befestigungsmaterial.<br />
Legen Sie den Rohrventilator auf dem Boden ab.<br />
12 Entsorgung<br />
Sowohl das Gerät als auch die zugehörige Transportverpackung bestehen zum überwiegenden Teil aus recyclingfähigen Rohstoffen.<br />
12.1 Rohrventilator entsorgen<br />
Soll der Rohrventilator endgültig demontiert <strong>und</strong> entsorgt werden, verfahren Sie wie folgt:<br />
Schalten Sie den Rohrventilator spannungsfrei.<br />
Trennen Sie den Rohrventilator von den Versorgungsanschlüssen.<br />
Zerlegen Sie den Rohrventilator in seine Bestandteile.<br />
Trennen Sie die entstehenden Teile nach<br />
– wiederverwendbaren Bauteilen<br />
– zu entsorgenden Materialgruppen (Metall, Kunststoff, Elektroteil, usw.)<br />
Sorgen Sie für die Rückführung der Teile in den Wertstoffkreislauf. Beachten Sie die nationalen Vorschriften.<br />
12.2 Verpackung entsorgen<br />
<br />
Sorgen Sie für die Rückführung der Teile in den Wertstoffkreislauf. Beachten Sie die nationalen Vorschriften.<br />
16
EG-Konformitätserklärung<br />
13 EG-Konformitätserklärung<br />
EG-Konformitätserklärung<br />
<strong>EC</strong> Declaration of Conformity<br />
Der Hersteller:<br />
<strong>Systemair</strong> GmbH<br />
The Manufacturer Seehöfer Str. 45<br />
D-97944 Windischbuch<br />
Tel.: +49-79 30 / 92 72-0<br />
erklärt hiermit, dass folgende Produkte:<br />
certified herewith that the following products:<br />
Produktbezeichnung:<br />
Rohrventilatoren<br />
product designation<br />
Circular duct fans<br />
Typenbezeichnung:<br />
prioAir<br />
type designation<br />
Ab Baujahr: <strong>2013</strong><br />
Since year of manufacture<br />
allen einschlägigen Bestimmungen der Maschinen Richtlinie RL 2006/42/EG entspricht.<br />
ensure all relavant regulations of machinery directive RL 2006/42/EG.<br />
Die Maschine entspricht weiterhin allen Bestimmungen der Richtlinien Elektrische Betriebsmittel (2006/95/EG),<br />
Elektromagnetische Verträglichkeit (EMV) (2004/<strong>10</strong>8/EG) <strong>und</strong> RoHS-Richtlinie 2011/65/EU.<br />
The products ensure furthermore all regulations of directives electrical equipment (2006/95/EG), electromagnetic compatibility (EMC)<br />
(2004/<strong>10</strong>8/EG) and RoHS-directive 2011/65/EU.<br />
Folgende harmonisierte Normen sind angewandt:<br />
The following standards are used:<br />
EN ISO 12<strong>10</strong>0-1:2003 Sicherheit von Maschinen - Gr<strong>und</strong>begriffe, allgemeine Gestaltungsleitsätze, Teil 1:<br />
Gr<strong>und</strong>sätzliche Terminologie, Methodik<br />
Safety of machinery - Basic concepts, general principles for design - Part 1: Basic<br />
terminology, methodology<br />
EN ISO 12<strong>10</strong>0-2:2003 Sicherheit von Maschinen - Gr<strong>und</strong>begriffe, allgemeine Gestaltungsleitsätze, Teil 2:<br />
Technische Leitsätze <strong>und</strong> Spezifikationen<br />
Safety of machinery - Basic concepts, general principles for design - Part 2:<br />
Technical principles<br />
EN 60204-1:2011 Sicherheit von Maschinen - Elektrische Ausrüstungen von Maschinen, Teil 1:<br />
Allgemeine Anforderungen<br />
Safety of machinery - Electrical equipment of machines - Part 1: General requirements<br />
DIN EN 6<strong>10</strong>00-6-1:2007 Elektromagnetische Verträglichkeit (EMV) - Teil 6-1: Fachgr<strong>und</strong>normen -<br />
Störfestigkeit für Wohnbereich, Geschäfts- <strong>und</strong> Gewerbebereiche sowie Kleinbetriebe<br />
Electromagnetic compatibility (EMC) - Part 6-1: Generic standards - Immunity for<br />
residential, commercial and light-industrial environments<br />
DIN EN 6<strong>10</strong>00-6-2:2005 Elektromagnetische Verträglichkeit (EMV) - Teil 6-2: Fachgr<strong>und</strong>normen -<br />
Störfestigkeit für Industriebereiche<br />
Electromagnetic compatibility (EMC) - Part 6-2: Generic standards - Immunity for<br />
industrial environments<br />
Boxberg,<br />
01.06.<strong>2013</strong><br />
Datum/date<br />
ppa. Harald Rudelgass, Technischer Leiter<br />
ppa. Harald Rudelgass, Technical director<br />
Genius - V 1.0<br />
17
The data stated in these operating instructions are merely for the purpose of describing the product. Information about a certain<br />
property or suitability for a certain purpose of use cannot be derived from our information. The information does not release the user<br />
from his own assessments and examinations.<br />
Please consider the fact that our products are subject to a natural wear and ageing process.<br />
All rights are with <strong>Systemair</strong> GmbH, also for the event of applications for protective rights.<br />
Any powers of use, such as copying and forwarding rights, are with us.<br />
The original operating instructions have been written in the German language.
Contents<br />
1 General information ..............................................20<br />
1.1 List of information ..................................................... 20<br />
1.2 Notes on the documentation................................... 20<br />
2 Important safety information ..............................21<br />
2.1 Safety notes ............................................................... 21<br />
2.2 Personnel .................................................................... 21<br />
2.3 Intended use ............................................................... 21<br />
2.4 Incorrect use ............................................................... 22<br />
3 Warranty ............................................................... 22<br />
4 Delivery, transport, storage ................................ 22<br />
4.1 Delivery ....................................................................... 22<br />
4.2 Transport ..................................................................... 22<br />
4.3 Storage ........................................................................ 23<br />
5 Description .............................................................23<br />
5.1 Circular duct fan prioAir <strong>EC</strong> and prioAir <strong>E2</strong> ............ 23<br />
5.2 Type key ...................................................................... 25<br />
5.3 Technical data ............................................................ 26<br />
5.4 Safety devices ............................................................ 26<br />
5.5 Instructions regarding motor and controller......... 26<br />
6 Installation .............................................................26<br />
6.1 Safety information .................................................... 26<br />
6.2 Preconditions for installation .................................. 26<br />
6.3 Assembly of the fan .................................................. 27<br />
7 Electrical connection .............................................27<br />
7.1 Wiring diagram prioAir <strong>E2</strong> ........................................ 28<br />
7.2 Wiring diagram prioAir <strong>EC</strong> ........................................ 28<br />
8 Commissioning ......................................................29<br />
8.1 Preconditions .............................................................. 29<br />
8.2 Commissioning ........................................................... 29<br />
9 Operation ...............................................................29<br />
9.1 Safety notes ............................................................... 29<br />
9.2 Operating conditions ................................................. 29<br />
9.3 Operation/use ............................................................ 30<br />
<strong>10</strong> Maintenance/troubleshooting .............................30<br />
<strong>10</strong>.1 Faults and troubleshooting ...................................... 30<br />
<strong>10</strong>.2 Cleaning ....................................................................... 31<br />
<strong>10</strong>.3 Maintenance, service ................................................ 31<br />
<strong>10</strong>.4 Spare parts .................................................................. 31<br />
11 Uninstalling/dismounting .....................................32<br />
12 Disposal ..................................................................32<br />
12.1 Disposal of the circular duct fan ............................. 32<br />
12.2 Disposal of packaging ............................................... 32<br />
13 <strong>EC</strong>-Declaration of Conformity ...............................33<br />
prioAir - V 1.0<br />
19
General information<br />
1 General information<br />
1.1 List of information<br />
DANGER<br />
Direct danger<br />
Failure to comply with this warning leads directly to death or to serious bodily harm.<br />
WARNING<br />
Possible danger<br />
Failure to comply with this warning potentially leads to death or to serious bodily harm.<br />
CAUTION<br />
Hazard with a low risk<br />
Failure to comply with this warning potentially leads to moderate injuries.<br />
ATTENTION<br />
Hazard with risk of property damage<br />
Failure to comply with this warning leads to property damage.<br />
NOTE<br />
Useful information and notes<br />
1.1.1 Safety symbols<br />
General hazard symbol<br />
Hazard of fire or explosion!<br />
Electrical voltage!<br />
Risk of burning<br />
1.1.2 List of instructions for action<br />
Instruction for action<br />
Instructions for action with fixed order!<br />
Carry out this action. 1. Carry out this action.<br />
(if applicable, further action) 2. Carry out this action.<br />
3. (if applicable, further action)<br />
1.2 Notes on the documentation<br />
WARNING<br />
Hazard as a result of improper dealing with the circular duct fan<br />
These operating instructions describe safe use of the circular duct fan.<br />
» Read the operating instructions carefully!<br />
» Keep the operating instructions with the circular duct fan prioAir. They must permanently be available at the<br />
place of use.<br />
Applicable documents:<br />
- Technical documents provided by the motor manufacturer<br />
- Technical documents provided by the controller manufacturer<br />
20
Important safety information<br />
2 Important safety information<br />
2.1 Safety notes<br />
Designers, installers and operators are responsible for the proper mounting and intended use.<br />
• Only use the circular duct fan prioAir in a proper condition.<br />
• Provide generally prescribed electrical and mechanical protective devices.<br />
• During mounting, commissioning, maintenance and control, secure the place of mounting and the premises for possible preparations<br />
against unauthorised access.<br />
• Observe rules for safe work.<br />
• Safety components must not be bypassed or put out of function.<br />
• Keep all the warning signs on the fan complete and readable.<br />
• Regularly instruct the personnel about safety-conscious behaviour.<br />
NOTE<br />
We have carried out a risk assessment for the circular duct fan prioAir. However, it can only apply to the circular<br />
duct fan prioAir itself. After installation of the circular duct fan prioAir, we recommend to carry out a risk<br />
assessment for the whole system. In this way, you have the guarantee that there is no risk potential from the<br />
system.<br />
2.2 Personnel<br />
2.2.1 Mounting personnel<br />
• Mounting may only be carried out by trained, qualified personnel.<br />
2.2.2 Work on the electrical equipment<br />
• Work on the electrical equipment of the fan may only be done by a qualified electrician or electrotechnically edu-cated person.<br />
This person must know the relevant safety rules to recognise and avoid potentially risks.<br />
2.2.3 Personnel for operation, use, maintenance and cleaning<br />
• Operation, use, maintenance and cleaning may only be carried out by trained and authorized personnel. The oper-ating personnel<br />
must have appropriate knowledge about handling with the circular duct fan prioAir. In the case of a malfunction or an emergency<br />
they must react correctly and adequately.<br />
2.3 Intended use<br />
The circular duct fans prioAir are intended for installation in ventilation systems. They can be installed either in duct systems or as<br />
a free sucking fan over a nozzle and a sucking side protection grid. A free blow-out and/or suction device via a contact-protection<br />
grid is possible following consideration in the design.<br />
• The circular duct fans prioAir are suitable for extraction of clean air, air with a low dust and grease content, media up to max.<br />
density of 1,3 kg/m³ and a maximum permissible humidity of 95 %.<br />
• The maximum permissible operating data on the name plate apply for an air density ρ = 1,2 kg/m³ (sea level) and a maximum<br />
air moisture of 80 %.<br />
• The circular duct fans prioAir are suitable for the following conveyed medium temperature range:<br />
– prioAir <strong>EC</strong> from -25 °C to +55 °C<br />
– prioAir <strong>E2</strong> from -25 °C to +55 °C<br />
21
Warranty<br />
2.4 Incorrect use<br />
Above all, the incorrect use means using the circular duct fans prioAir in a way other than that described. The following points are<br />
incorrect and hazardous:<br />
• Operation in medical devices with life-sustaining or life-supporting function<br />
• Extraction of explosive and combustible media,<br />
• Extraction of aggressive, dust or grease containing media,<br />
• Outdoor installation without weather protection,<br />
• Operation in an explosion hazardous atmosphere,<br />
• Operation without duct system or protective guard,<br />
• Operation with the air connections closed<br />
3 Warranty<br />
Warranty for our products shall be based on the contractual stipulations, our quotations and also as a supplement our General<br />
Terms and Conditions of Business. Warranty claims shall presuppose that the products are connected prop-erly, operated and used<br />
in accordance with the data sheets and are also maintained as required.<br />
4 Delivery, transport, storage<br />
4.1 Delivery<br />
Each device leaves our plant in an electrically and mechanically proper condition. The circular duct fans prioAir are on pallets. We<br />
recommend to transport them to the installation site in original packaging.<br />
CAUTION<br />
Danger from cutting edges!<br />
» Wear protective gloves when unpacking.<br />
Check delivery<br />
Check the circular duct fan prioAir for obvious defects, which can impair safe operation.<br />
First of all, pay attention for defects on the connection cable, terminal box and rotor, cracks in the housing, missing rivets,<br />
screws or covering caps.<br />
The correct storage according cardboard label has to be observed.<br />
4.2 Transport<br />
WARNING<br />
Hazard of impact if the circular duct fan falls down!<br />
» Transport the fan carefully!<br />
WARNING<br />
Electrical hazard from damaged connections<br />
» Do not use the terminal box or rotor for transport.<br />
<br />
<br />
Transport the prioAir circular duct fan in its original packing material.<br />
Avoid shocks or impact.<br />
22
Delivery, transport, storage<br />
4.3 Storage<br />
CAUTION<br />
Hazard due to loss of function of the motor bearings!<br />
» Avoid storing for too long time (recommendation: max. 1 year).<br />
» Before installation, check proper function of the motor bearings<br />
<br />
<br />
<br />
Store the circular duct fan prioAir in the original packaging dustproof, dry and protected against weather.<br />
Avoid effects of extreme heat or cold.<br />
Please observe the storage position to the carton labels!<br />
5 Description<br />
5.1 Circular duct fan prioAir <strong>EC</strong> and prioAir <strong>E2</strong><br />
• Low SFP-values (Specific Fan Power pursuant to EN 13779) and very high<br />
efficiency. Your benefit: maximum power and low energy consumption.<br />
• Powerful <strong>EC</strong>-motor with integrated electronics.<br />
• Your benefit: reduced energy consumption lowers operating costs.<br />
• Compact design.<br />
• Your benefit: lower space requirement, no large external parts.<br />
• Material: special composite material.<br />
• Your benefit: reduced weight, easy and fast installation.<br />
• Low noise<br />
• Long life<br />
The circular duct fans are fitted with specially designed flow-optimized impeller including special guide vanes made of polypropylene<br />
and voltage-controllable external rotor motors.<br />
23
Description<br />
5.1.1 Name plates<br />
1 2<br />
3<br />
4<br />
5<br />
Fig. 2: Name plate prio 200 <strong>EC</strong><br />
Legend<br />
1 Voltage / frequency 4 Output<br />
2 Type designation 5 Speed (max./min.)<br />
3 Current<br />
1<br />
2<br />
3 4<br />
5<br />
6 7<br />
Fig. 3: Name plate prio 200 <strong>E2</strong><br />
Legend<br />
1 Voltage / frequency 5 Speed (max./min.)<br />
2 Type designation 6 Capacity<br />
3 Current 7 IInsulation class motor<br />
4 Output<br />
24
Description<br />
5.1.2 Dimensions<br />
A<br />
ØD<br />
E<br />
E<br />
ØB<br />
ØB<br />
C<br />
Fig. 4: Dimensions of the prioAir <strong>EC</strong> and prioAir <strong>E2</strong><br />
Dimensions<br />
Typ A ⌀B C ⌀D E<br />
prio 160 <strong>E2</strong> mm 220 159 211 182 25<br />
prio 160 <strong>EC</strong> mm 220 159 211 182 25<br />
prio 200 <strong>E2</strong> mm 245 199 249,1 227 25<br />
prio 200 <strong>EC</strong> mm 245 199 249,1 227 25<br />
5.2 Type key<br />
prio 200 <strong>EC</strong> Number of poles (N/A in <strong>EC</strong>)<br />
Motor type:<br />
E: single-phase AC<br />
<strong>EC</strong>: electronically commutated<br />
Size<br />
Type designation<br />
25
Installation<br />
5.3 Technical data<br />
prio 160 <strong>EC</strong> prio 200 <strong>EC</strong> prio 160 <strong>E2</strong> prio 200 <strong>E2</strong><br />
Temperature range conveying material [°C] -25 ... +55 -25 ... +55<br />
Temperature range storage [°C] -40 ... +60 -40 ... +60<br />
Voltage / current strength<br />
see name plate<br />
Protection class<br />
see name plate<br />
So<strong>und</strong> level at 1 m [dB(A)]
Electrical connection<br />
6.3 Assembly of the fan<br />
<br />
<br />
<br />
<br />
<br />
Install the duct system on a firm base.<br />
Insert the duct fan directly into the duct without using a mounting<br />
bracket.<br />
Pay attention to the direction of flow (arrows).<br />
Mount the duct fan to the duct.<br />
Do not create tension on the duct fan housing during installation.<br />
Mounting bracket<br />
Alternative:<br />
Mount the duct fan to a wall or ceiling (firm base) using the mounting<br />
bracket (tightening torque 1Nm).<br />
Push the duct system onto the air connections.<br />
Pay attention to the direction of flow (arrows).<br />
Attach the duct system to the duct fan.<br />
Do not create tension on the duct fan housing during installation.<br />
NOTE<br />
Use padded connector sleeves for installation, to significantly reduce noise transmission to the duct sys-tem.<br />
7 Electrical connection<br />
WARNING<br />
Hazard from electrical voltage!<br />
» Electrical connection only by a trained electrician or trained and instructed qualified personnel!<br />
» Electrical connection in accordance with the valid regulations.<br />
» Prevent the ingress of water into the connection box/service switch.<br />
» Observe 5 safety rules for the electrical expert!<br />
– disconnect from the power supply (all-pole),<br />
– prevent switching on again,<br />
– test absence of voltage,<br />
– earthing and short-circuiting,<br />
– protect adjacent live parts by covers and barriers and fit a suitable warning notice.<br />
<br />
Make the electrical connections according to the wiring diagram<br />
- prioAir <strong>E2</strong> see figure<br />
- prioAir <strong>EC</strong> see figure 6.<br />
<br />
<br />
<br />
<br />
Arrange the connecting wires in the switch box in such way that the cover can be closed without resistance.<br />
Use all cover screws.<br />
Apply screws by hand to avoid damage to the thread.<br />
The screws of the terminal box cover should be tightened to a predefined torque of 1 Nm.<br />
27
Electrical connection<br />
7.1 Wiring diagram prioAir <strong>E2</strong><br />
Color<br />
Function/pin assignment<br />
blue L Power supply 230 V AC, 50 ... 60 Hz<br />
black N Neutral conductor<br />
green/<br />
yellow<br />
PE<br />
Protective conductor<br />
7.2 Wiring diagram prioAir <strong>EC</strong><br />
Client side<br />
max. speed<br />
adjustable speed<br />
<strong>10</strong> V n = max<br />
1 V n = min<br />
Commissioning<br />
8 Commissioning<br />
8.1 Preconditions<br />
• Mounting and electrical connection have been correctly performed.<br />
• Installation residuals and foreign objects have been removed from the fan.<br />
• Inlet and outlet are free.<br />
• The safety devices have been fitted (protection against contact).<br />
• Gro<strong>und</strong>ing connected.<br />
• The cable glands are tight.<br />
• Provided mains connection complies with the data on the name plate.<br />
• Nominal current (from the name plate) does not exceed the mains data.<br />
8.2 Commissioning<br />
WARNING<br />
Hazard from electrical voltage!<br />
» Commissioning by trained and instructed qualified personnel only!<br />
<br />
Switch the circular duct fan on as planned.<br />
WARNING<br />
Hazard from bursting parts!<br />
» » When checking the direction of rotation, wear safety goggles.<br />
<br />
<br />
Check:<br />
– the direction of rotation / conveying. The direction of rotation always applies looking at the rotor.<br />
– smoothly running<br />
Check, if safety elements e.g. protective guards are fastened.<br />
9 Operation<br />
9.1 Safety notes<br />
WARNING<br />
Hazard from electrical voltage!<br />
» The device may only be operated by persons<br />
– instructed in function and risks,<br />
– who have <strong>und</strong>erstood handling and can accordingly react.<br />
» Ensure that children cannot operate or play with the device without supervision.<br />
» Ensure access only to persons, who can safe handle the device.<br />
9.2 Operating conditions<br />
• Do not operate the circular duct fan in an explosion-hazardous atmosphere.<br />
• During operation, touching the rotor must not be possible.<br />
• Safety components must not be bypassed or put out of function.<br />
• The circular duct fan may operate inside limits declared on the nameplate.<br />
• Prevent suction of foreign particles, this can destroy the fan.<br />
• So<strong>und</strong> development can be reduced by using a so<strong>und</strong> filter.<br />
29
Operation<br />
9.3 Operation/use<br />
Operate the circular duct fan only in accordance with the instructions in this manual and the applicable documents.<br />
Control the circular duct fan during operation for correct function.<br />
Switch the circular duct fan off as planned.<br />
WARNING<br />
Hazard from electrical voltage and flying parts!<br />
Errors occurring can lead to personal and/or property damage!<br />
Switch the circular duct fan off as planned:<br />
» in cases of a non-typical noise from bearings, vibrations, pressure pulsation.<br />
» in case of overcurrent, overvoltage or temperature (nameplate).<br />
<strong>10</strong> Maintenance/troubleshooting<br />
WARNING<br />
Hazard from electrical voltage!<br />
» Trouble setting and service only by a trained electrician or trained and instructed qualified personnel!<br />
» Observe rules for safe work while troubleshooting!<br />
» Observe 5 safety rules for the electrical expert!<br />
– disconnect from the power supply (all-pole),<br />
– prevent switching on again,<br />
– test absence of voltage,<br />
– earthing and short-circuiting,<br />
– protect adjacent live parts by covers and barriers.<br />
<strong>10</strong>.1 Faults and troubleshooting<br />
Fault Possible causes Remedy<br />
The circular duct fan does not run<br />
smoothly<br />
Air output of circular duct fan too<br />
low<br />
Grinding so<strong>und</strong>s in operation or<br />
start of the circular duct fan<br />
Internal motor protection was<br />
initiated<br />
The circular duct fan does not<br />
reach nominal speed<br />
Table 2: Troubleshooting<br />
Rotor imbalance<br />
Adhesions to the rotor<br />
Material decomposition on the rotor due to<br />
aggressive material conveyed<br />
Deformation of rotor due to excessive temperature<br />
Wrong direction of rotation of rotor<br />
Losses of pressure in lines too high<br />
Throttle organs not or only partly open<br />
Intake or pressure paths blocked<br />
Intake line installed twisted<br />
Motor blocked<br />
Electrical switching devices set wrongly<br />
Motor coil defective<br />
Re-balancing by specialist company<br />
Clean carefully, rebalance if necessary<br />
Contact <strong>Systemair</strong><br />
Contact <strong>Systemair</strong>,<br />
Install new rotor,<br />
Check bearings<br />
Change direction of rotation<br />
Different line guidance<br />
Check opening position on site<br />
Remove obstacles<br />
Loosen intake line and realign<br />
Contact <strong>Systemair</strong><br />
Check and possibly reset setting of switching<br />
device<br />
Contact <strong>Systemair</strong><br />
30
Maintenance/troubleshooting<br />
<strong>10</strong>.2 Cleaning<br />
Regular cleaning of the circular duct fan prevents unbalance.<br />
WARNING<br />
Hazard from electrical voltage!<br />
» Interior cleaning of the circular duct fan only by a trained electrician or trained and instructed qualified personnel!<br />
» Observe rules for safe work while troubleshooting!<br />
» Observe 5 safety rules for the electrical expert!<br />
– disconnect from the power supply (all-pole),<br />
– prevent switching on again,<br />
– test absence of voltage,<br />
– earthing and short-circuiting,<br />
– protect adjacent live parts by covers and barriers.<br />
CAUTION<br />
Danger from hot surfaces!<br />
» During maintenance and cleaning wear protective gloves!<br />
<br />
<br />
<br />
<br />
<br />
Keep the airways of the circular duct fan clean and clean them if necessary with a brush.<br />
Do not use a steel brush.<br />
Do not use a high-pressure cleaner (“steam jet cleaner”) <strong>und</strong>er any circumstances.<br />
Do not bend the fan blades when cleaning.<br />
Do not use any detergents for interior cleaning.<br />
<strong>10</strong>.3 Maintenance, service<br />
The fan is by built-in for-life lubricated ball bearings as far as possible low-maintenance product.<br />
WARNING<br />
Hazard from electrical voltage!<br />
Observe at maintenance and service:<br />
» Rotor must stand still..<br />
» Electrical circuit must be interrupted and secured against restarting.<br />
» Observe the rules for safe work.<br />
<br />
<br />
<br />
Pay attention to a non-typical noise from bearings.<br />
For replacement use only original ball bearings (special grease) of <strong>Systemair</strong>.<br />
For all other damages (e.g. damage to winding) please contact our Service Department. Defective circular duct fans must be<br />
replaced completely. Repairs may be accomplished only in the company of manufacturer and by the manufacturer. You find<br />
the address on the back of these operating instructions.<br />
<strong>10</strong>.4 Spare parts<br />
In case of order of spare parts please specify the type description of the circular duct fan. You can find it on the name plate.<br />
31
Uninstalling/dismounting<br />
11 Uninstalling/dismounting<br />
WARNING<br />
Hazard from electrical voltage!<br />
» Switching off and de-installation only by a trained electrician or trained and instructed qualified personnel!<br />
» Observe 5 safety rules for the electrical expert!<br />
– disconnect from the power supply (all-pole),<br />
– prevent switching on again,<br />
– test absence of voltage,<br />
– earthing and short-circuiting,<br />
– protect adjacent live parts by covers and barriers.<br />
<br />
<br />
Carefully disconnect all the electrical lines.<br />
Separate the circular duct fan from the supply connections.<br />
CAUTION<br />
Gefährdung durch Stoß <strong>und</strong> Schneiden!<br />
» Wear protective gloves when dismounting!<br />
» Dismount carefully..<br />
<br />
<br />
Carefully remove the fastening material.<br />
Place the circular duct fan on the floor.<br />
12 Disposal<br />
Both the appliance and also the matching transport packaging predominantly comprise recycling-capable raw materials.<br />
12.1 Disposal of the circular duct fan<br />
Should the circular duct fan be disposed, proceed as follows:<br />
<br />
<br />
<br />
<br />
<br />
Switch the circular duct fan free of voltage.<br />
Disconnect the circular duct fan from the supply connections.<br />
Disassemble the circular duct fan into its components.<br />
Separate the parts according to<br />
– reusable material<br />
– material groups to be disposed (metal, plastics, electrical parts, etc.)<br />
Provide for the recycling of material. Consider the national regulation.<br />
12.2 Disposal of packaging<br />
<br />
Provide for the recycling of material. Consider the national regulation.<br />
32
<strong>EC</strong>-Declaration of Conformity<br />
13 <strong>EC</strong>-Declaration of Conformity<br />
EG-Konformitätserklärung<br />
<strong>EC</strong> Declaration of Conformity<br />
Der Hersteller:<br />
<strong>Systemair</strong> GmbH<br />
The Manufacturer Seehöfer Str. 45<br />
D-97944 Windischbuch<br />
Tel.: +49-79 30 / 92 72-0<br />
erklärt hiermit, dass folgende Produkte:<br />
certified herewith that the following products:<br />
Produktbezeichnung:<br />
Rohrventilatoren<br />
product designation<br />
Circular duct fans<br />
Typenbezeichnung:<br />
prioAir<br />
type designation<br />
Ab Baujahr: <strong>2013</strong><br />
Since year of manufacture<br />
allen einschlägigen Bestimmungen der Maschinen Richtlinie RL 2006/42/EG entspricht.<br />
ensure all relavant regulations of machinery directive RL 2006/42/EG.<br />
Die Maschine entspricht weiterhin allen Bestimmungen der Richtlinien Elektrische Betriebsmittel (2006/95/EG),<br />
Elektromagnetische Verträglichkeit (EMV) (2004/<strong>10</strong>8/EG) <strong>und</strong> RoHS-Richtlinie 2011/65/EU.<br />
The products ensure furthermore all regulations of directives electrical equipment (2006/95/EG), electromagnetic compatibility (EMC)<br />
(2004/<strong>10</strong>8/EG) and RoHS-directive 2011/65/EU.<br />
Folgende harmonisierte Normen sind angewandt:<br />
The following standards are used:<br />
EN ISO 12<strong>10</strong>0-1:2003 Sicherheit von Maschinen - Gr<strong>und</strong>begriffe, allgemeine Gestaltungsleitsätze, Teil 1:<br />
Gr<strong>und</strong>sätzliche Terminologie, Methodik<br />
Safety of machinery - Basic concepts, general principles for design - Part 1: Basic<br />
terminology, methodology<br />
EN ISO 12<strong>10</strong>0-2:2003 Sicherheit von Maschinen - Gr<strong>und</strong>begriffe, allgemeine Gestaltungsleitsätze, Teil 2:<br />
Technische Leitsätze <strong>und</strong> Spezifikationen<br />
Safety of machinery - Basic concepts, general principles for design - Part 2:<br />
Technical principles<br />
EN 60204-1:2011 Sicherheit von Maschinen - Elektrische Ausrüstungen von Maschinen, Teil 1:<br />
Allgemeine Anforderungen<br />
Safety of machinery - Electrical equipment of machines - Part 1: General requirements<br />
DIN EN 6<strong>10</strong>00-6-1:2007 Elektromagnetische Verträglichkeit (EMV) - Teil 6-1: Fachgr<strong>und</strong>normen -<br />
Störfestigkeit für Wohnbereich, Geschäfts- <strong>und</strong> Gewerbebereiche sowie Kleinbetriebe<br />
Electromagnetic compatibility (EMC) - Part 6-1: Generic standards - Immunity for<br />
residential, commercial and light-industrial environments<br />
DIN EN 6<strong>10</strong>00-6-2:2005 Elektromagnetische Verträglichkeit (EMV) - Teil 6-2: Fachgr<strong>und</strong>normen -<br />
Störfestigkeit für Industriebereiche<br />
Electromagnetic compatibility (EMC) - Part 6-2: Generic standards - Immunity for<br />
industrial environments<br />
Boxberg,<br />
01.06.<strong>2013</strong><br />
Datum/date<br />
ppa. Harald Rudelgass, Technischer Leiter<br />
ppa. Harald Rudelgass, Technical director<br />
33
Notes<br />
Notes<br />
34
Notes<br />
Notes<br />
35
<strong>Systemair</strong> GmbH • Seehöfer Str. 45 • D-97944 Windischbuch<br />
Tel.: +49 (0)7930/9272-0 • Fax: +49 (0)7930/9273-92<br />
info@systemair.de • www.systemair.de<br />
313047 / 12-<strong>2013</strong>