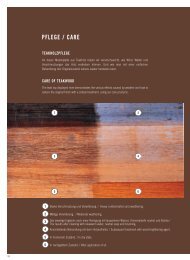
Klassiker Flaschenzugmontage
Klassiker Flaschenzugmontage
Klassiker Flaschenzugmontage

Erfolgreiche ePaper selbst erstellen
Machen Sie aus Ihren PDF Publikationen ein blätterbares Flipbook mit unserer einzigartigen Google optimierten e-Paper Software.
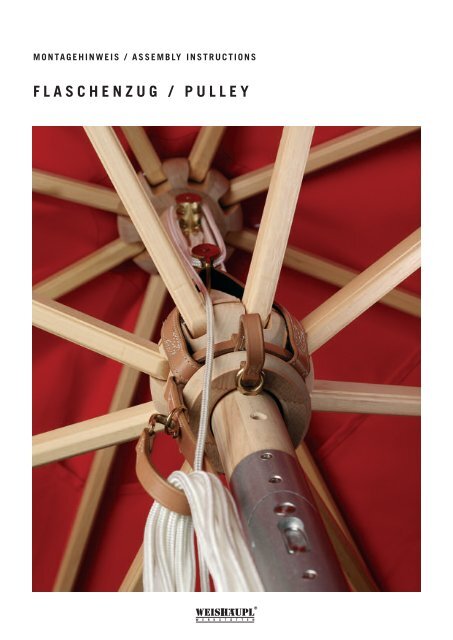
M O N TA G E H I N W E I S / A S S E M B LY I N S T R U C T I O N S<br />
F L A S C H E N Z U G / P U L L E Y
M O N TA G E H I N W E I S<br />
F L A S C H E N Z U G<br />
1<br />
2<br />
3<br />
4<br />
5<br />
6<br />
Lieferumfang: 1 x FZ-Block-unten (a), 1 x FZ-Gurt (b), 1 x FZ-Block-oben mit Seil (c),<br />
2 x Holzschrauben 4,5 x 30 mm (d), 1 x Hakengurt, zur Aufbewahrung des Seils (e)<br />
Schirm aufspannen und mit dem vorhandenen Stift arretieren. Unter der oberen<br />
Schirmnabe, im Abstand von ca. 5 cm die beiden Löcher für den FZ-Block-oben<br />
markieren und mit einem Bohrer (3,5 mm ø) vorbohren.<br />
ACHTUNG: Die beiden Bohrungen müssen genau mittig, zwischen den Schirmstreben liegen.<br />
Ansonsten besteht beim Schließen des Schirmes Bruchgefahr der Streben!<br />
Nun den oberen FZ-Block mittels beiliegenden Holzschrauben befestigen.<br />
Öffnen Sie mit Hilfe einer Zange den Ledergurt mit Schließe und ziehen ihn aus<br />
dem Stiftgurt, da Sie die verschiedenen Gurte neu zusammenfügen müssen.<br />
Auf den Ledergurt mit Schließe werden nacheinander die verschiedenen Gurte<br />
aufgereiht: Hakengurt (e), 1. Schlaufe vom FZ-Gurt (b) mit integriertem FZ-Block<br />
unten (a), Schlaufe Stiftgurt, 2. Schlaufe vom FZ-Gurt (b). Achten Sie bitte darauf,<br />
daß sich der FZ-Block-unten in der Flucht zum oberen FZ-Block befindet.<br />
Haben Sie alle Gurte dementsprechend ausgerichtet, ziehen Sie den Ledergurt mit<br />
Schließe wieder fest. Achtung: Seil nicht im Gurt einschließen.<br />
7<br />
Einfädeln des Seils in die Flaschenzug-Blöcke:<br />
Drehen Sie den Schirm, so daß er mit der Skizze<br />
überein stimmt und beginnen Sie mit dem unteren<br />
FZ-Block, in der Reihenfolge 1, 2, 3, 4.<br />
Bei den unteren Rollen (1) und (3) wird das Seil<br />
von vorne, bei den oberen Rollen (2) und (4) von<br />
hinten durchgeführt.<br />
4<br />
2<br />
3<br />
1
A S S E M B LY I N S T R U C T I O N S<br />
P U L L E Y<br />
1 Included in delivery: 1 x bottom pulley block (a), 1 x pulley strap (b), 1 x top pulley<br />
block with rope (c), 2 x wood screws 4.5 x 30 mm (d), 1 x strap with clip to retain<br />
the rope (e).<br />
2<br />
3<br />
4<br />
5<br />
6<br />
Put umbrella up and lock in place with the pin provided. Mark position for two holes<br />
for the top pulley block, below the upper hub of the umbrella and approx. 5 cm apart,<br />
and drill the holes (3.5 mm Ø).<br />
CAUTION: The two holes must be positioned in dead center between the struts of the<br />
umbrella. Otherwise, there is a danger of the struts breaking when the umbrella is closed!<br />
Now attach the top pulley block using the two enclosed wood screws.<br />
Using pliers, open the leather strap with buckle and pull it out of the pin strap, as<br />
the straps have to be reattached in a different configuration.<br />
The various straps are now threaded onto the leather strap with buckle in the<br />
following order: Strap with clip (e), 1st loop of the pulley strap (b) with the integrated<br />
bottom pulley block (a), loop of the pin strap, 2nd loop of the pulley strap (b).<br />
Please ensure that the bottom pulley block is aligned flush with the top pulley block.<br />
Once you have aligned all the straps, refasten the leather strap with the buckle.<br />
Take care not to snare the rope in the strap.<br />
7<br />
Threading the rope through the pulley blocks:<br />
Turn the umbrella so that it is positioned as shown<br />
in the sketch and begin with the bottom pulley block<br />
in the order 1, 2, 3, 4.<br />
At the lower rollers (1) and (3), the rope is inserted<br />
from the front, at the upper rollers (2) and (4)<br />
from the rear.<br />
4<br />
2<br />
3<br />
1
M O N TA G E S C H R I T T E / A S S E M B LY I N S T R U C T I O N S<br />
1<br />
a<br />
b<br />
d<br />
c<br />
e<br />
2 3 4<br />
5<br />
6<br />
7