Bedienungsanleitung / Instruction manual - Bohle AG
Bedienungsanleitung / Instruction manual - Bohle AG
Bedienungsanleitung / Instruction manual - Bohle AG

Sie wollen auch ein ePaper? Erhöhen Sie die Reichweite Ihrer Titel.
YUMPU macht aus Druck-PDFs automatisch weboptimierte ePaper, die Google liebt.
BO 52 062 62/63 & BO 55 002 82/84<br />
<strong>Bedienungsanleitung</strong> / <strong>Instruction</strong> <strong>manual</strong>
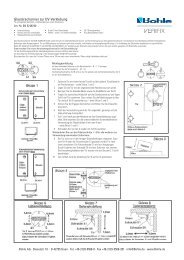
Montageanleitung Swing-Scharnier<br />
BO 52 062 62/63<br />
BO 55 002 82/84<br />
Das "Swing"-Scharnier ist eine Präzisions-Komponente aus Edelstahl. Es erlaubt eine einfache Handhabung und sinkt<br />
nicht ab - vorausgesetzt, dass es ordnungsgemäß nach den folgenden Anweisungen montiert wird.<br />
1. Die "Swing"-Scharniere BO 52 062 62/63 und<br />
BO 55 002 82/84 sind für einen Holzmöbelkorpus mit einliegenden<br />
Einzel- und Doppeltüren mit Glasstärken bis zu 12 mm<br />
sowie für Spiegeltüren geeignet. Es ist keine Lochbohrung im<br />
Glas nötig. Das Gewicht jeder Tür sollte 10 kg (BO 52 062 62/<br />
BO 55 022 82) bzw. 20 kg (BO 52 062 63/BO 55 022 84) nicht<br />
überschreiten. Für eine einfache Abschätzung kann das<br />
Gewicht des Glases mit 2,5 kg/m 2 /mm berechnet werden.<br />
2. Das Verhältnis Türhöhe zu Türbreite sollte 3:2 nicht<br />
überschreiten. Das Glas für die Tür sollte präzise gem. Abb. 1<br />
gefertigt werden.<br />
3. Das Scharnier wird an der äußeren Seite der Tür verklebt<br />
und an dem Holzkorpus (minimum 16 mm Stärke) mit "Euro"-<br />
Schrauben befestigt.<br />
4. Vor dem Zusammenbau des Korpus sollte eine Aussparung<br />
für den Zapfen und die Schrauben (beigelegt) in dem oberen<br />
und unteren Paneel vorgesehen werden. (s. Abb. 2). Stellen Sie<br />
sicher, dass das obere und untere Scharnier denselben Abstand<br />
zu den Korpuskanten haben und die Kante mit dem Korpus<br />
bündig ist. (s. Abb. 3)<br />
5. Wenn der Korpus zusammengebaut ist und die Tür/Türen<br />
fertig sind, muss die Zapfenplatte mit den "Euro"-Schrauben an<br />
den unteren und oberen Paneelen befestig werden.<br />
6. Die Tür/Türen sind einfacher zu bearbeiten, wenn der Korpus<br />
mit der Rückseite auf einer ebenen Unterlage liegt. Fixieren Sie<br />
die Edelstahlspiegel (beigelegt) auf der Unterseite des Glases,<br />
dort wo das Gegenstück verklebt wird. Falls Sie Spiegeltüren<br />
verkleben, wird dieser Schritt ausgelassen.<br />
7. Mit Hilfe von Stützen können die Türen stabilisiert,<br />
ausgeglichen und dann verklebt werden (s. Abb. 5). Wenn der<br />
Korpus eine glatte Lackoberfläche hat, können die Exzenteranschläge<br />
637.1 und das Verifix Klemmstück (636.1) von <strong>Bohle</strong><br />
verwendet werden. Es ist sehr wichtig, dass während der<br />
Vorhärtungsphase keine Verschiebungen stattfinden.<br />
(s. Abb. 4 & 5)<br />
8. Bitte beachten Sie die <strong>Bohle</strong>-Verarbeitungshinweise für die<br />
UV-Verklebung. Bringen Sie B 682-T oder MV 760 auf das Glas<br />
auf. Anschließend legen Sie das Scharnier auf und schieben es<br />
über den Zapfen. Üben Sie leichten Druck aus, um den Klebstoff<br />
gleichmäßig zu verteilen. (s. Abb. 6)<br />
9. Bitte stellen Sie sicher, dass das Scharnier parallel und<br />
bündig zur Glaskante ausgerichtet ist.<br />
10. Üben Sie leichten Druck auf Glas und Zapfen aus und<br />
verwenden Sie den UVA-Handstrahler BO 52 094 04.<br />
Belichten Sie die Verklebung im 45° Winkel von allen Seiten<br />
für die Voraushärtung. (s. Abb. 7)<br />
11. Nach der Funktionsüberprüfung entfernen Sie den Edelstahlspiegel<br />
und den herausgetretenen Klebstoff. Jetzt erfolgt<br />
die Endaushärtung mit der UV-Lampe.<br />
Falls Spiegeltüren verklebt werden, erfolgt die Endaushärtung<br />
durch die Reflektion des Lichts im Spiegel. (nur mit UVA-Handstrahler<br />
BO 52 094 04 möglich)<br />
12. Bewegen Sie die Tür/Türen nach der Verklebung nur, wenn<br />
der Korpus in vertikaler Position steht.<br />
Diese Anleitung gilt sowohl für die eckigen als auch für die runden Varianten dieses Scharniers, die Verarbeitung der eckigen Scharniere<br />
erfolgt analog der dargestellten runden Version.<br />
BO 52 062 62 BO 52 062 63 BO 55 002 82<br />
BO 55 002 84<br />
<strong>Bohle</strong> <strong>AG</strong> · Dieselstraße 10 · D-42781 Haan · T +49 2129 5568-0 · F +49 2129 5568-201 · info@bohle.de · www.bohle-group.com
<strong>Instruction</strong>s Swing hinge<br />
BO 52 062 62/63<br />
BO 55 002 82/84<br />
The swing hinge is precision engineered from stainless steel, it requires no adjustment, will not sag and delivers smooth<br />
operation provided it is assembled in accordance with the following instructions.<br />
1. Swing hinge BO 52 062 62/63 and BO 55 002 82/84 are<br />
suitable for mounting single and double glass doors of up inset<br />
to 12 mm thickness on wooden carcasses, and are especially<br />
recommended for mirror doors. No drilling is required in the<br />
glass and each door should not exceed 10 kg in weight<br />
(BO 52 062 62/ BO 55 022 82) and 20 kg in weight (BO 52 062 63/<br />
BO 55 022 84). For easy reference glass weight is calculated<br />
2.5 kg/m 2 /mm.<br />
2. The ideal height/width ratio of each door should not<br />
exceed 3:2. Glass door sizes are to be accurately machined<br />
as per (Fig 1).<br />
3. The hinge is UV bonded to the outer face of the door and is<br />
fixed to the wooden carcass (minimum 16 mm thick) by means<br />
of the "Euro" screws provided.<br />
4. A cut out for the male part of the hinge and pilot holes for<br />
the screws must be machined into the upper and lower panels<br />
of the carcass prior to assembly. (see Fig 2) Make sure taken<br />
that the upper and lower hinges are machined exactly the same<br />
distance from the edge of the carcass (see Fig 3).<br />
5. When the carcasses have been assembled and the doors are<br />
ready for fitting, affix the base plates of the hinges to the<br />
carcass. It is usually the lower hinges that will have the<br />
detachable screw spindle to facilitate removal of the doors<br />
after installation.<br />
6. The door/doors are best fitted with the carcass on it back.<br />
Tape the stainless steel mirrors provided under the position<br />
where the female part will be bonded. (Should you be fitting<br />
mirror doors, then this step can be omitted).<br />
7. With the aid of suitable supports, set up your door/doors to<br />
commence bonding (see Fig 5). If the carcass has smooth lacquered<br />
surfaces, you may avail yourself of the <strong>Bohle</strong> eccentric<br />
suction stopper (637.1) and clamping devive (636.1). It is vitally<br />
important to set up the door/doors in such a way that proper<br />
bonds are obtained and absolutely no movement occurs<br />
whatsoever in the initial pre-cure bonding period (see Fig 4 & 5).<br />
8. All bonding is to be carried out in strict accordance with the<br />
<strong>Bohle</strong> <strong>manual</strong> on UV bonding. Apply the required amount of<br />
B682-T or MV760 to the glass and introduce the female part of<br />
the hinge over the male spindle. Afterwards position the hinge<br />
on the glass and apply light pressure in order to spread the<br />
adhesive evenly (see Fig 6).<br />
9. Ensure that the bonding surface of the hinge and the<br />
surface of the glass are shimmed flush with each other.<br />
10. Apply light pressure on glass and spindle and use the UVA<br />
hand lamp BO 52 094 04 for pre-curing. Position the lamp in a<br />
45° angle to the bonding surface and make sure the bond is<br />
pre-cured from both sides (see Fig 7).<br />
11. Check the correct functioning, remove the stainless steel<br />
mirror and clean the bonding joint of excess adhesive. Now the<br />
final curing can be done using the UV lamp. For bonding mirror<br />
doors, final curing is done through the reflection of the light in<br />
the mirror (only possible with UVA hand lamp BO 52 094 04.)<br />
12. The carcass may now be placed upright and the door/doors<br />
operated.<br />
The present instructions are valid both for the square and the round hinge models. The square hinges are to be mounted in the same<br />
way as shown for the round models.<br />
BO 52 062 62 BO 52 062 63 BO 55 002 82<br />
BO 55 002 84<br />
<strong>Bohle</strong> <strong>AG</strong> · Dieselstraße 10 · D-42781 Haan · T +49 2129 5568-0 · F +49 2129 5568-201 · info@bohle.de · www.bohle-group.com
1<br />
3 mm Spalt zwischen Tür und Korpusdecke<br />
2<br />
3 mm grap between door and carcass top<br />
Korpusboden / Carcass Bottom<br />
Korpusdecke / Carcass Top<br />
Korpusseite / Carcass Side<br />
Korpusseite / Carcass Side<br />
2 mm Spalt<br />
zwischen Tür<br />
und Korpusseite<br />
2 mm grap between<br />
door/doors and<br />
carcass sides<br />
BO 52 062 62/63<br />
BO 55 002 82/84<br />
BO 52 062 62/63<br />
BO 55 002 82/84<br />
Seitenpanel / Side Panel<br />
3 mm Spalt zwischen Tür und Korpusboden<br />
3 mm grap between door and carcass bottom<br />
3<br />
Seitenpaneel/Side Panel<br />
Unterer/Oberer Paneel<br />
Base/Top Panel<br />
BO 52 062 62/63<br />
BO 55 002 82/84<br />
Seitenpanel / Side Panel<br />
Unterer/Oberer Paneel<br />
Base/Top Panel<br />
5<br />
2 mm Holzklotz<br />
2 mm wooden spacers/<br />
wedges<br />
BO 52 062 62/63<br />
BO 55 002 82/84<br />
Glastür<br />
Glass Door<br />
4<br />
Seitenpaneel/Side Panel<br />
3 mm Holzklotz<br />
3 mm wooden spacers/<br />
wedges<br />
Korpusseite/Carcass Side<br />
Glastür/Glass Door<br />
Korpusdecke / Carcass Top<br />
Aussparung<br />
Shims/Wedges<br />
Bohrlehre<br />
Wooden Jig<br />
Korpus/Carcass Back<br />
Korpusboden / Carcass Bottom<br />
7<br />
Korpusdecke/-boden<br />
Top/Bottom of Carcass<br />
Lampe/Lamp<br />
6<br />
Gegenstück/Female Hinge Part<br />
Zapfenplatte/Base Plate<br />
Zapfenplatte/Base Plate<br />
Korpus/Carcass Back<br />
Glastür/Glass Door<br />
Spiegel/Mirror<br />
B682-T / MV 760<br />
Korpusdecke /-boden<br />
Carcass Top /-Bottom<br />
Glastür/Glass Door<br />
Spiegel/Mirror<br />
<strong>Bohle</strong> <strong>AG</strong> · Dieselstraße 10 · D-42781 Haan · T +49 2129 5568-0 · F +49 2129 5568-201 · info@bohle.de · www.bohle-group.com