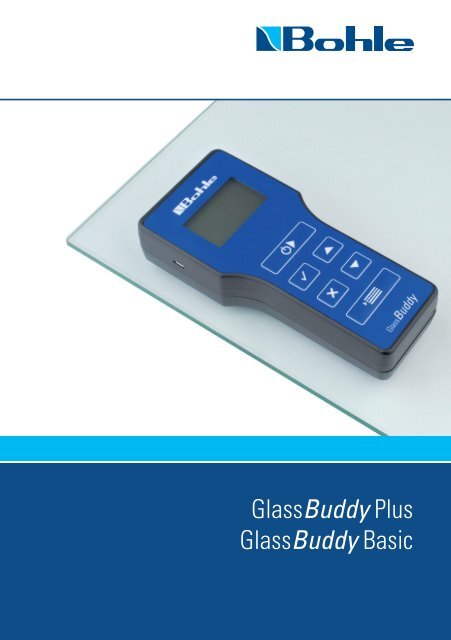
GlassBuddy Plus GlassBuddy Basic - Bohle AG
GlassBuddy Plus GlassBuddy Basic - Bohle AG
GlassBuddy Plus GlassBuddy Basic - Bohle AG

Sie wollen auch ein ePaper? Erhöhen Sie die Reichweite Ihrer Titel.
YUMPU macht aus Druck-PDFs automatisch weboptimierte ePaper, die Google liebt.
<strong>GlassBuddy</strong> <strong>Plus</strong><br />
<strong>GlassBuddy</strong> <strong>Basic</strong>
Bedienungsanleitung<br />
Seiten 4 - 18<br />
DE<br />
Operating Instructions<br />
Pages 20 - 34<br />
EN
Inhalt<br />
01 Lieferumfang<br />
10 Fehler- und Warnmeldungen<br />
02 Merkmale des <strong>GlassBuddy</strong><br />
11 Laden des Akkus<br />
03 Die Tastenbelegung<br />
12 Pflege und Instandhaltung<br />
04 Das Display - Erklärung der verwendeten<br />
Zeichen<br />
13 Glassorten<br />
14 Software-Update<br />
05 Erste Inbetriebnahme - Einstellung von<br />
Sprache und Maßeinheit<br />
15 Software-Upgrade<br />
06 Installation und Bedienung<br />
der PC-Software<br />
16 Technische Daten<br />
17 Sicherheitshinweise<br />
07 Erste Schritte<br />
Grundlagen zum Arbeiten mit dem <strong>GlassBuddy</strong><br />
Erklärung der Menüpunkte<br />
18 Technischer Support<br />
08 Glasanalyse mit dem <strong>GlassBuddy</strong><br />
09 Ablesen der Messergebnisse<br />
4
Herzlichen Glückwunsch<br />
Sie haben mit dem <strong>GlassBuddy</strong> ein hochwertiges Messgerät für die Analyse von Flachglas erworben. Egal<br />
ob Einfach-, Verbund- oder Isolierglas, ob in ein- oder ausgebautem Zustand. Und das alles für monolithisches<br />
Glas, 2-fach- oder 3-fach-Isolierglas. In Sekundenschnelle liefert die Lasertechnik des Gerätes Informationen<br />
zu Glasdicke, Scheibenaufbau, Beschichtungen, Zwischenlagen und deren Position. In nur einem<br />
Messvorgang und einer Genauigkeit von 0,1 Millimetern. Bitte lesen Sie die Bedienungsanleitung genau<br />
durch, um sich mit der einfachen Bedienung vertraut zu machen. So können Sie alle Vorzüge Ihres neuen<br />
<strong>GlassBuddy</strong> optimal nutzen.<br />
DE<br />
01 Lieferumfang<br />
n 1 x <strong>GlassBuddy</strong><br />
n 1 x Sicherheitskoffer<br />
n 1 x Kurzanleitung<br />
n 1 x USB-Stick mit Bedienungsanleitung<br />
und PC-Software<br />
n 1 x USB 2.0 Anschlusskabel,<br />
A / Micro B<br />
02 Merkmale des <strong>GlassBuddy</strong><br />
<strong>Basic</strong> / <strong>GlassBuddy</strong> <strong>Plus</strong><br />
n Zerstörungsfreie Analyse von Gläsern,<br />
auch in eingebautem Zustand<br />
n Auswahlmöglichkeit für die Analyse unterschiedlicher<br />
Glastypen wie<br />
- „kein ISO“ (für Einfachglas, monolithisches<br />
VG oder VSG),<br />
- „ISO“ (2-fach-Isolierglas außer<br />
Brandschutzgläser)<br />
- „ISO3“ (für 3-fach-Isolierglas außer Mehrfachverbundgläser<br />
und Brandschutzgläser)<br />
- „kein ISO MVG“* (für monolithische Brandschutzgläser)<br />
- „ISO MVG“* (für Brandschutzgläser im<br />
2-fach-Isolierglasaufbau).<br />
n Messen von Einfachglas von 2,6 mm bis 19 mm<br />
Dicke<br />
n Analysieren von Verbundglas, Verbund-Sicherheitsglas,<br />
Mehrfachverbundgläsern, 2-fach- und<br />
3-fach-Isolierglasscheiben bis zu einem Gesamtaufbau<br />
von 50 mm (GlasBuddy <strong>Plus</strong> bis<br />
100mm**, Gesamtdicke auch mit Brandschutzgläsern)<br />
n Anzeigegenauigkeit: 0,1 mm, Toleranz: 1% auf<br />
den Messbereich<br />
n Erkennung von bis zu 3 Beschichtungen<br />
und Bestimmung von deren Lage<br />
n Erkennung von PVB-Folien (bis max 8 Folien pro<br />
Verbund), Bestimmung deren Anzahl und Dicke<br />
sowie der Position<br />
n Speicherung von bis zu 99 Messergebnissen<br />
n USB-Schnittstelle<br />
n Einfache und selbsterklärende Menüführung<br />
n hochwertiger Li-Ion-Akku<br />
03 Die Tastenbelegung<br />
Der <strong>GlassBuddy</strong> kommt trotz seiner umfangreichen<br />
Funktionen mit wenigen Tasten aus. Die Benutzerführung<br />
ist intuitiv und daher schnell und einfach zu<br />
erlernen. In diesem Kapitel erklären wir Ihnen die<br />
Funktionen der einzelnen Tasten.<br />
Drücken Sie die Taste<br />
n zum Einschalten des <strong>GlassBuddy</strong><br />
n zum Starten einer Messung<br />
n um nach der Messung die Daten zu speichern<br />
n um Eingaben zu bestätigen<br />
n zum Löschen des aktuellen Messergebnisses<br />
n zum Verlassen des Menüs<br />
n um die Löschung der gespeicherten Daten zu<br />
unterbrechen<br />
n zum Löschen von Fehlermeldungen<br />
* nur <strong>GlassBuddy</strong> <strong>Plus</strong>. ** siehe Kapitel 13 Glassorten/Messbereich<br />
5
05 Erste Inbetriebnahme<br />
Einstellung von Sprache und Maßeinheit<br />
n um in das Menü zu gelangen<br />
n zum Blättern im Messergebnis<br />
n zum Einstellen von Datum und Uhrzeit<br />
n zum Blättern im Menü<br />
n zum Einschalten der Beleuchtung<br />
04 Das Display<br />
Erklärung der verwendeten Zeichen<br />
4 oder 4.2 Glasdicke, Foliendicke bzw.<br />
Scheibenzwischenraum<br />
in mm oder inch oder als Inch-<br />
Bruch<br />
« Position einer Beschichtung,<br />
die Pfeilrichtung gibt die Lage an<br />
» Position einer Beschichtung,<br />
die Pfeilrichtung gibt die Lage an<br />
! Hinweiszeichen, dass nicht alle<br />
Eigenschaften restlos erkannt<br />
wurden<br />
G1, G2, ... Glasscheibe mit Position<br />
G 1.1, G 1.2 Glasscheibe mit Position im<br />
Verbund<br />
SZR1, SZR2 Scheibenzwischenraum mit<br />
Position<br />
Folie 0,38 Dicke der im Aufbau verwendeten<br />
Folie<br />
Gel 1,4 Dicke des im Aufbau verwendeten<br />
Brandschutzgels*<br />
Layer 1,6 Dicke der im Aufbau verwendeten<br />
Zwischenschicht<br />
* nur <strong>GlassBuddy</strong> <strong>Plus</strong><br />
Der <strong>GlassBuddy</strong> wird mit einer Menüführung in<br />
deutscher Sprache ausgeliefert. Möchten Sie die<br />
Sprache dauerhaft umprogrammieren, gehen Sie<br />
bitte wie folgt vor:<br />
Verbinden Sie den <strong>GlassBuddy</strong> über das mitgelieferte<br />
USB-Kabel mit Ihrem PC oder Laptop. Bitte<br />
verwenden Sie nur das mitgelieferte USB-Kabel.<br />
Jetzt wird der Akku geladen und Sie können den<br />
<strong>GlassBuddy</strong> gleichzeitig auf die von Ihnen gewünschte<br />
Sprache und Maßeinheit umprogrammieren<br />
(Hinweis: Bei Änderungen ohne PC-Verbindung<br />
fällt der <strong>GlassBuddy</strong> nach dem Ausschalten wieder<br />
in die Grundeinstellung zurück).<br />
1. Drücken Sie für ungefähr<br />
2 Sekunden. Der <strong>GlassBuddy</strong> wird<br />
eingeschaltet und im Display steht<br />
PC-Verbindung .... Akku lädt<br />
2. Drücken Sie<br />
3. In der Anzeige steht jetzt > Sprache <<br />
4. Drücken Sie<br />
5. Bewegen Sie die Pfeile > < mit den Tasten<br />
auf die von Ihnen gewünschte Sprache<br />
und bestätigen Sie mit<br />
6. Nach etwa 2-3 Sekunden ist die Sprache umprogrammiert<br />
7. Für die Änderung der Maßeinheit gehen Sie mit<br />
den Pfeilen > < auf Einheiten, drücken und<br />
wählen die gewünschte Maßeinheit aus.<br />
Bestätigen Sie die Auswahl mit<br />
8. Die Änderungen sind nun im <strong>GlassBuddy</strong><br />
gespeichert. Verlassen Sie das Menü mit<br />
und trennen Sie danach die Verbindung zum<br />
Computer.<br />
6
06 Installation und Bedienung<br />
der <strong>GlassBuddy</strong> Software<br />
Die Installation der <strong>GlassBuddy</strong> Software muss mit<br />
vollen Administratorrechten vorgenommen werden.<br />
Mit der Software, die für PC und Laptop mit einem<br />
Betriebssystemen ab Windows 2000 geeignet ist,<br />
können Sie Ihre Messdaten bequem verwalten.<br />
DE<br />
Installation<br />
Zur Installation des Programms stecken Sie den<br />
mitgelieferten USB-Stick in eine freie USB-Buchse<br />
Ihres Computers und starten im Explorer das Programm<br />
setup.exe.<br />
Das Programm installiert sich dann auf Ihrem Computer.<br />
Nach der Installation wird ein Neustart des<br />
Computers notwendig.<br />
Programmstart<br />
Zum Starten des Programms <strong>GlassBuddy</strong> klicken<br />
Sie doppelt auf das Programmsymbol <strong>GlassBuddy</strong>.<br />
Programm<br />
Mit dem Programm können Sie Daten aus dem<br />
Speicher des <strong>GlassBuddy</strong> auf Ihren Computer übertragen.<br />
Dazu muss das Gerät mit dem USB-Kabel<br />
an Ihren PC angeschlossen sein. Darüber hinaus<br />
können Sie mit dem Programm bereits eingelesene<br />
und abgespreicherte Daten wieder aufrufen. Eine<br />
Verbindung mit dem <strong>GlassBuddy</strong> ist hierzu nicht<br />
erforderlich.<br />
Programmmaske<br />
Nach dem Programmstart sehen Sie die leere<br />
Programmmaske mit folgenden Bereichen:<br />
Scheibenliste:<br />
Hier werden die aus dem <strong>GlassBuddy</strong> übertragenen<br />
Messungen nach laufender Nummer angezeigt.<br />
Zusätzlich werden noch das Datum der Messung,<br />
die Uhrzeit sowie die Gesamtdicke des Glasaufbaus<br />
sowie der Modus, in dem die Messung durchgeführt<br />
wurde, angezeigt.<br />
Die Grafik zeigt Ihnen den Scheibenaufbau der<br />
gewählten Zeile der Scheibenliste an. Farbig hervorgehoben<br />
sind dabei Glas (grün), Folie (blau), Brandschutzgel<br />
(gelb) und Layer (lila).<br />
In dem Feld unterhalb der Grafik werden folgende<br />
Geräteinformationen dargestellt: Name (falls vergeben),<br />
Seriennummer und Versionsnummer der<br />
Gerätesoftware.<br />
Verbunden:<br />
Dieses Feld ist dunkelgrün, wenn der <strong>GlassBuddy</strong><br />
nicht mit dem Programm verbunden ist und hellgrün,<br />
wenn der <strong>GlassBuddy</strong> mit dem Programm verbunden<br />
ist.<br />
Bauteilnummer:<br />
Hier kann für den in der Scheibenliste gewählten<br />
Eintrag eine Bauteilnummer vergeben werden.<br />
Scheibengröße:<br />
Hier kann getrennt nach Breite und Höhe das Scheibenmaß<br />
zu dem in der Scheibenliste gewählten<br />
Eintrag eingetragen werden.<br />
Kommentar:<br />
Wenn Sie aus der Scheibenliste eine Messung<br />
ausgewählt haben, können Sie diese mit einem<br />
individuellen Kommentar versehen.<br />
Details:<br />
Wenn Sie aus der Scheibenliste eine Messung<br />
ausgewählt haben, werden Ihnen hier alle Messergebnisse<br />
detailliert angezeigt.<br />
7
Datenübertragung aus dem <strong>GlassBuddy</strong><br />
Um Daten aus dem <strong>GlassBuddy</strong> auf Ihren Computer<br />
zu übertragen, schließen Sie diesen bitte mit dem<br />
mitgelieferten USB-Kabel an Ihren Computer an.<br />
Benutzen Sie dafür den Micro-USB-Anschluss an<br />
dem <strong>GlassBuddy</strong> und einen freien USB-Anschluss<br />
an Ihrem PC. Schalten Sie nun den <strong>GlassBuddy</strong> ein.<br />
In der Anzeige des <strong>GlassBuddy</strong> sehen Sie<br />
PC-Verbindung. Der <strong>GlassBuddy</strong> ist nun mit<br />
Ihrem PC verbunden.<br />
Starten Sie nun die PC-Anwendung <strong>GlassBuddy</strong>.<br />
In der Programmmaske sehen Sie den Bereich Verbunden,<br />
der dunkelgrün erscheint. Das Programm<br />
hat noch keine Verbindung mit dem <strong>GlassBuddy</strong>.<br />
Zum Verbinden klicken Sie bitte auf den Menüpunkt<br />
Geräte und im sich öffnenden Fenster auf den Eintrag<br />
Aktualisieren.<br />
Die übertragenen Messungen können Sie auf Ihrem<br />
PC speichern. Klicken Sie dazu auf den Menüpunkt<br />
Datei und im sich öffnenden Fenster Daten<br />
Speichern. Sie können dann die Messungen unter<br />
einem selbstgewählten Dateinamen abspeichern.<br />
Zum abschließenden Speichern bestätigen Sie bitte<br />
mit OK.<br />
Die Verbindung des Programms mit dem <strong>GlassBuddy</strong><br />
wird nun hergestellt. Wenn die Verbindung erfolgreich<br />
war, leuchtet in der Programmmaske der<br />
Bereich unter Verbunden hellgrün. Sollte dieser<br />
Bereich nicht hellgrün leuchten, klicken Sie den<br />
Punkt Geräte - Aktualisieren erneut an.<br />
Gespeicherte Daten aufrufen<br />
Auf dem PC gespeicherte Daten können Sie wieder<br />
aufrufen. Klicken Sie dazu auf den Menüpunkt Datei<br />
und dann auf Daten Laden. Wählen Sie eine gespeicherte<br />
Messreihe aus und bestätigen Sie mit OK.<br />
Zum Übertragen der im <strong>GlassBuddy</strong> gespeicherten<br />
Daten klicken Sie auf den Menüpunkt Datei und<br />
im sich öffnenden Fenster den Punkt Daten Transferieren.<br />
Nach erfolgreicher Übertragung erscheinen<br />
die Messergebnisse in der Scheibenliste.<br />
8
Geräte<br />
Unter dem Menüpunkt Geräte finden Sie den<br />
Unterpunkt „Aktualisieren“. Hierüber können<br />
Nutzer mit mehreren <strong>GlassBuddy</strong>s zwischen den<br />
verschiedenen Geräten wechseln. Es kann immer<br />
nur ein <strong>GlassBuddy</strong> mit dem Programm gleichzeitig<br />
kommunizieren.<br />
DE<br />
Alle Details:<br />
Mit diesem Punkt können Sie alle Messungen,<br />
die in der Scheibenliste aufgeführt sind, mit den<br />
dazugehörigen Details ausdrucken. Pro Messung<br />
wird dann ein Blatt mit Details und Kommentaren<br />
gedruckt.<br />
Drucken<br />
Sie haben verschiedene Möglichkeiten, die Messergebnisse<br />
auszudrucken.<br />
Drucken Scheibenliste:<br />
Hier werden alle aufgeführten Messungen aus der<br />
Scheibenliste als Liste ausgedruckt.<br />
Sprache<br />
Im Menü Sprache können Sie die Sprache des<br />
Programms auswählen.<br />
Markiertes Detail:<br />
Wenn Sie eine Messung aus der Scheibenliste angewählt<br />
haben, können Sie hier die Details zu der<br />
Messung mit Kommentar ausdrucken.<br />
9
Hilfsmittel<br />
Unter dem Menüpunkt Hilfsmittel finden Sie die<br />
folgenden Einträge:<br />
Firmware senden<br />
Hierüber kann eine Software-Aktualisierung des<br />
angeschlossenen <strong>GlassBuddy</strong>s vorgenommen werden<br />
(siehe Punkt 14).<br />
Debug Transferieren<br />
Dieser Punkt ist noch nicht aktiviert, hier können<br />
keine Änderungen vorgenommen werden.<br />
Lizenz senden<br />
Dieser Punkt ist noch nicht aktiviert, hier können<br />
keine Änderungen vorgenommen werden.<br />
07 Erste Schritte<br />
Grundlagen zum Arbeiten mit dem <strong>GlassBuddy</strong><br />
Geräteinformation<br />
Hier kann der <strong>GlassBuddy</strong> durch den Nutzer personalisiert<br />
werden.<br />
Zum Einschalten des <strong>GlassBuddy</strong> halten Sie<br />
etwa 2 Sekunden gedrückt.<br />
Auf dem vierzeiligen, beleuchteten Display müssen<br />
Sie nun den Glastyp auswählen, den Sie analysieren<br />
möchten (siehe auch Unterpunkt „GLASTYP“).<br />
Nach der Auswahl informiert Sie der <strong>GlassBuddy</strong><br />
nun über das aktuelle Datum, die Uhrzeit und den<br />
ausgewählten Glastyp.<br />
10
Aus Energiespargründen schaltet sich die Beleuchtung<br />
des Displays nach ca. 60 Sekunden aus, kann<br />
aber durch Betätigen der Taste oder wieder<br />
eingeschaltet werden. Nach ca. 10 Minuten<br />
ohne Tastenbetätigung schaltet sich der <strong>GlassBuddy</strong><br />
automatisch aus.<br />
Erklärung der Menüpunkte<br />
Über gelangen Sie in das Menü und können<br />
über die Tasten zwischen den einzelnen<br />
Menüpunkten wählen :<br />
AUSSCHALTEN<br />
Wenn die Pfeile > < vor dem Menüpunkt Ausschalten<br />
stehen, können Sie den <strong>GlassBuddy</strong> mit<br />
ausschalten.<br />
GLASTYP<br />
Wenn die Pfeile > < vor dem Menüpunkt Glastyp<br />
stehen, gelangen Sie nach der Auswahl mit in<br />
das Untermenü. Dort können Sie mit den<br />
Tasten den Glastyp auswählen, den Sie analysieren<br />
möchten. Bestätigen Sie Ihre Auswahl mit<br />
.<br />
n kein ISO-Glas (Menüanzeige: kein ISO)<br />
- für die Analyse von Einfachglas von 2,6 mm bis<br />
19 mm Dicke<br />
- für die Analyse von monolithischem Verbundund<br />
Verbundsicherheitsglas (VG und VSG)<br />
- für die Analyse von monolithischem Mehrfachverbundglas<br />
(MVG), mit Ausnahme von Brandschutzgläsern<br />
Hinweis: Wenn Sie andere Gläser in dieser<br />
Einstellung messen, kann das zu einer verfälschten<br />
Analyse führen.<br />
n ISO-Glas (Menüanzeige: ISO)<br />
- für die Analyse von 2-fach-Isolierglas aus 2 x<br />
Einfachglas<br />
- für die Analyse von 2-fach-Isolierglas mit VG<br />
- für die Analyse von 2-fach-Isolierglas mit VSG<br />
- für die Analyse von 2-fach-Isolierglas mit MVG,<br />
mit Ausnahme von Brandschutzglas<br />
Hinweis: Wenn Sie andere Gläser in dieser<br />
Einstellung messen, kann das zu einer verfälschten<br />
Analyse führen.<br />
* nur <strong>GlassBuddy</strong> <strong>Plus</strong><br />
n ISO3-Glas (Menüanzeige ISO3)<br />
- für die Analyse von 3-fach-Isolierglas aus 3 x<br />
Einfachglas<br />
- für die Analyse von 3-fach-Isolierglas mit VG<br />
- für die Analyse von 3-fach-Isolierglas mit VSG<br />
Hinweis: Wenn Sie andere Gläser in dieser<br />
Einstellung messen, kann das zu einer verfälschten<br />
Analyse führen.<br />
n kein ISO-Brandschutzglas*<br />
(Menüanzeige: kein ISO MVG)<br />
- für die Analyse von monolithischem Mehrfachverbundglas<br />
(MVG) als Brandschutzglas<br />
Hinweis: Wenn Sie andere Gläser in dieser<br />
Einstellung messen, kann das zu einer verfälschten<br />
Analyse führen.<br />
n ISO mit Brandschutzglas*<br />
(Menüanzeige : ISO MVG)<br />
- für die Analyse von 2-fach-Isolierglas mit MVG<br />
als Brandschutzglas<br />
Hinweis: Wenn Sie andere Gläser in dieser<br />
Einstellung messen, kann das zu einer verfälschten<br />
Analyse führen.<br />
Der eingestellte Glastyp wird im Menü angezeigt.<br />
Hinweis: Nach dem Ausschalten wechselt der<br />
<strong>GlassBuddy</strong> automatisch in die Grundeinstellung<br />
zurück und Sie können beim nächsten Einschalten<br />
den Glastyp neu bestimmen.<br />
DURCHSCHNITT<br />
Dazu müssen Sie zunächst den richtigen Modus<br />
wählen. In dem gewählten Modus können Sie dann<br />
unter dem Menüpunkt „Durchschnitt“ die Durchschnittsmessung<br />
aktivieren. Das Zeichen Ø zeigt<br />
an, dass die Durchschnittsmessung aktiviert ist. Für<br />
eine Durchschnittsmessung können bis zu 19 Einzelmessungen<br />
herangezogen werden. Diese Einzelmessungen<br />
werden hintereinander durch wiederholtes<br />
drücken der Taste ausgeführt und alphabetisch<br />
bezeichnet. Nachdem die 2 bis 19 Einzelmessungen<br />
durchgeführt wurden, wird durch Drücken<br />
der Taste das arithmetische Mittel errechnet.<br />
Zur schnelleren Information werden Durchschnittsmessungen<br />
im Modus „Daten anzeigen“ mit einer<br />
DE<br />
11
Freistelle an Stelle des dritten Zeichens gekennzeichnet.<br />
Die Einzelmessungen werden fortlaufend,<br />
mit „a“ beginnend bezeichnet.<br />
Beispiel:<br />
03a310113_14:15<br />
03b310113_14:16<br />
03c310113_14:17<br />
03_310113_14:18<br />
Die ersten beiden Stellen bezeichnen die laufende<br />
Nummer der Messung. Die dritte Stelle bezeichnet<br />
die Reihenfolge der Einzelmessungen. Die folgenden<br />
Stellen sind Datum und Uhrzeit vorbehalten.<br />
Ist die dritte Stelle durch einen _ gekennzeichnet,<br />
ist dies das Zeichen für den errechneten Durchschnittswert.<br />
Da alle Einzelmessungen und die Durchschnittsmessungen<br />
auf Wunsch abgespeichert werden, können<br />
unplausible Einzelmessungen auch später noch<br />
nachvollzogen werden.<br />
EINSTELLUNGEN<br />
Wenn die Pfeile > < auf dem Menüpunkt Einstellungen<br />
stehen, gelangen Sie nach der Auswahl mit<br />
in das Untermenü. Dort können Sie folgende<br />
Einstellungen vornehmen:<br />
Sprache<br />
Wenn die Pfeile > < auf dem Menüpunkt Sprache<br />
stehen, gelangen Sie nach der Auswahl mit in<br />
das Untermenü. Dort können die Einstellungen über<br />
die Tasten geändert werden. Bestätigen Sie<br />
Ihre Änderungen mit .<br />
Hinweis: Nach dem Ausschalten wechselt der<br />
<strong>GlassBuddy</strong> in die Grundeinstellung zurück. Für die<br />
dauerhafte Änderung der Sprache verbinden Sie<br />
den <strong>GlassBuddy</strong> über das USB-Kabel mit Ihrem PC<br />
(siehe Punkt 5).<br />
Einheiten<br />
Wenn die Pfeile > < auf dem Menüpunkt Einheiten<br />
stehen, gelangen Sie nach der Auswahl mit in<br />
das Untermenü. Dort können die Einstellungen über<br />
die Tasten geändert werden. Bestätigen Sie<br />
Ihre Änderungen mit .<br />
Hinweis: Nach dem Ausschalten wechselt der<br />
<strong>GlassBuddy</strong> in die Grundeinstellung zurück. Für<br />
die dauerhafte Änderung der Einheiten verbinden<br />
Sie den <strong>GlassBuddy</strong> mit dem mitgelieferten USB-<br />
Kabel mit Ihrem PC (siehe Punkt 5).<br />
Version<br />
Anzeige der Seriennummer und der Version des<br />
Gerätes.<br />
Datum<br />
Wenn die Pfeile > < auf dem Menüpunkt Datum<br />
stehen, gelangen Sie nach der Auswahl mit in<br />
das Untermenü. Dort können die Einstellungen über<br />
die Tasten geändert werden. Bestätigen Sie<br />
Ihre Änderungen mit .<br />
Uhrzeit<br />
Wenn die Pfeile > < auf dem Menüpunkt Uhrzeit<br />
stehen, gelangen Sie nach der Auswahl mit in<br />
das Untermenü. Dort können die Einstellungen über<br />
die Tasten geändert werden. Bestätigen Sie<br />
Ihre Änderungen mit .<br />
Schriftgröße<br />
Wenn die Pfeile > < auf dem Menüpunkt Schriftgröße<br />
stehen, gelangen Sie nach der Auswahl mit<br />
in das Untermenü. Dort können die Einstellungen<br />
über die Tasten geändert werden. Bestätigen<br />
Sie Ihre Änderungen mit .<br />
Hinweis: Nach dem Ausschalten wechselt der<br />
<strong>GlassBuddy</strong> in die Grundeinstellung zurück. Für die<br />
dauerhafte Änderung der Sprache verbinden Sie<br />
den <strong>GlassBuddy</strong> mit dem mitgelieferten USB-Kabel<br />
mit Ihrem PC (siehe Punkt 5).<br />
Hinweis: bei Chinesisch, Japanisch, Koreanisch und<br />
Russisch ist eine Umstellung auf kleine Schrift nicht<br />
möglich.<br />
Geräteinfo<br />
Anzeige der Geräteinformation die als personalisierte<br />
Angaben wie Firmenname und Anschrift im Gerät<br />
gespeichert werden können. Dafür verbinden Sie<br />
den <strong>GlassBuddy</strong> mit dem mitgelieferten USB-Kabel<br />
mit Ihrem PC (siehe Punkt 5).<br />
DATEN LÖSCHEN<br />
Wenn die Pfeile > < auf dem Menüpunkt Daten<br />
löschen stehen, erscheint nach der Auswahl mit<br />
die Frage, ob Sie alle Messergebnisse löschen<br />
möchten. Es ist nicht möglich nur einzelne Messungen<br />
zu löschen.<br />
12
Die erneute Bestätigung mit löscht alle gespeicherten<br />
Messergebnisse. Mit gelangen Sie<br />
zurück in das Menü, ohne dass die Daten gelöscht<br />
werden.<br />
DATEN ANZEIGEN<br />
Wenn die Pfeile > < auf dem Menüpunkt Daten anzeigen<br />
stehen, gelangen Sie nach der Auswahl mit<br />
zu allen bisher gespeicherten Messungen. Mit<br />
dem Pfeil > können Sie nun das gewünschte Messergebnis<br />
auswählen und über anzeigen lassen.<br />
08 Glasanalyse mit dem<br />
<strong>GlassBuddy</strong><br />
Das Glas muss immer sauber und trocken sein, da<br />
schon ein Fingerabdruck eine nicht gewollte Lichtbrechung<br />
und somit ein abweichendes Messergebnis<br />
verursachen kann.<br />
Liegende Gläser sollten grundsätzlich auf einem<br />
dunklen und nicht reflektierenden Untergrund (z.B.<br />
schwarzem Filztuch) analysiert werden, da es auf<br />
reflektierenden Untergründen eventuell zu nicht<br />
korrekten Ergebnissen kommen kann.<br />
Eingebaute Isolierglasscheiben sollten bevorzugt im<br />
Randbereich analysiert werden.<br />
Positionieren Sie den eingeschalteten <strong>GlassBuddy</strong><br />
mit bereits ausgewähltem Glastyp (siehe Punkt 5)<br />
so auf dem Glas, dass er mit allen Kunststofffüßen<br />
auf der Scheibe aufliegt und nicht wackelt.<br />
Drücken Sie . Die Beleuchtung erlischt und<br />
auf dem Display des <strong>GlassBuddy</strong> steht<br />
Messen -- bitte warten ... .<br />
Hinweis: Der <strong>GlassBuddy</strong> darf während des Messvorganges<br />
nicht bewegt werden, da es sonst zu<br />
falschen Messergebnissen kommen kann.<br />
Nach 1-2 Sekunden geht die Beleuchtung wieder<br />
an und Sie können den <strong>GlassBuddy</strong> vom Glas entfernen.<br />
Das Ergebnis der Messung wird auf dem<br />
Display angezeigt.<br />
Durch das Messergebnis können Sie mit den Tasten<br />
blättern. Nach den gerundeten Einzelergebnissen<br />
werden die auf 0,1mm genau gemessenen<br />
Einzelwerte angezeigt, danach folgt eine grafische<br />
Darstellung des Scheibenaufbaus. Diese grafische<br />
Darstellung zeigt von links nach rechts den gemessenen<br />
Scheibenaufbau so, wie der <strong>GlassBuddy</strong><br />
ihn gemessen hat. Die Ergebnisdarstellung ist<br />
rollierend.<br />
Mit<br />
könnten Sie das Messergebnis verwerfen.<br />
Mit haben Sie folgende weiterführende<br />
Optionen:<br />
Speichern<br />
Wenn die Pfeile > < auf dem Menüpunkt Speichern<br />
stehen, können Sie das aktuelle Messergebnis über<br />
im Speicher des <strong>GlassBuddy</strong> ablegen. Abgelegt<br />
wird das Ergebnis unter der Nummer, die der Glass-<br />
Buddy mit dem Messergebnis im Display oben links<br />
anzeigt.<br />
Verwerfen<br />
Wenn die Pfeile > < auf dem Menüpunkt Verwerfen<br />
stehen, können Sie über das aktuelle Messergebnis<br />
löschen. Direkt löschen können Sie das<br />
Messergebnis immer mit .<br />
09 Ablesen der<br />
Messergebnisse<br />
Nach dem oben beschriebenen Messvorgang zeigt<br />
der <strong>GlassBuddy</strong> das Ergebnis auf dem beleuchteten<br />
Display an. Mit den Tasten können Sie nun<br />
zeilenweise in den Messergebnissen auf und ab<br />
blättern.<br />
Zeile 1<br />
In der ersten Zeile zeigt der <strong>GlassBuddy</strong> die<br />
Position an, unter der das Messergebnis abgelegt<br />
wird, wenn Sie es speichern (hier die Position 08,<br />
insgesamt stehen Ihnen bis zu 99 Speicherplätze zur<br />
Verfügung). Danach sehen Sie das Datum und die<br />
Uhrzeit der Messung.<br />
DE<br />
13
Zeile 2<br />
In der zweiten Zeile zeigt der <strong>GlassBuddy</strong> die tatsächlich<br />
gemessene Gesamtdicke des Messobjektes<br />
an.<br />
Ab der dritten Zeile folgen die Einzelergebnisse,<br />
gefolgt von der grafischen Darstellung des Scheibenaufbaus.<br />
Die Auflistung ist rollierend.<br />
10 Fehler- und<br />
Warnmeldungen<br />
Mit verschiedenen Meldungen macht der<br />
<strong>GlassBuddy</strong> Sie auf vorliegende Fehler aufmerksam<br />
oder warnt Sie vor zu niedrigem Akkustand. Alle<br />
Hinweise werden im Klartext angezeigt und können<br />
durch wieder gelöscht werden.<br />
n „Messung nicht möglich“<br />
- Diese Meldung erscheint, wenn der zu<br />
messende Gegenstand keine Reflektionen<br />
erzeugt, die der <strong>GlassBuddy</strong> in ein Ergebnis<br />
umrechnen kann.<br />
- Diese Meldung erscheint, wenn die Gesamtdicke<br />
einer Einzelglasscheibe unter 2,6 mm<br />
beträgt.<br />
- Diese Meldung erscheint, wenn der<br />
<strong>GlassBuddy</strong> eine ungerade Anzahl an<br />
Reflexen aus dem Messvorgang erhält.<br />
Grund: z.B. eine getönte Scheibe,<br />
bei der nur die Oberfläche eine<br />
Reflektion abgibt und der Laser<br />
nicht zur Unterseite der Scheibe<br />
Grund:<br />
durchdringen kann<br />
eine sehr helle Unterlage, auf dem<br />
das zu messende Glas liegt, kann<br />
einen zusätzlichen Reflex abgeben<br />
Lösung: Legen Sie die Glasscheibe zur<br />
Analyse auf eine dunkle, nicht<br />
reflektierende Unterlage.<br />
n Kein „kein ISO-Glas“<br />
- Diese Meldung kann erscheinen in der Einstellung<br />
“kein ISO“, wenn versucht<br />
wird einen anderen Aufbau als „kein ISO“<br />
Glas zu messen.<br />
Lösung: Bitte überprüfen Sie die Einstellung<br />
und ändern diese bei Bedarf.<br />
.<br />
n Kein „ISO-Glas“<br />
- Diese Meldung kann in der Einstellung<br />
“ISO“ erscheinen, wenn versucht<br />
wird, einen anderen Aufbau als „ISO“ -<br />
Glas zu messen.<br />
Lösung: Bitte überprüfen Sie die Einstellung<br />
und ändern diese bei Bedarf.<br />
n Kein „ISO3“<br />
- Diese Meldung kann erscheinen in der Einstellung<br />
für Glastyp ISO3, wenn versucht<br />
wird einen anderen Aufbau als 3-fach Isolierglas<br />
zu messen<br />
Lösung: Bitte überprüfen Sie die Einstellung<br />
und ändern diese bei Bedarf.<br />
n „Akku leer“<br />
- Diese Meldung erscheint, wenn der Akkuladezustand<br />
unter 5% liegt.<br />
Lösung: Bitte laden Sie den Akku auf. Um<br />
weiter messen zu können, genügt<br />
eine kurze Aufladung von 5 bis<br />
10 Minuten.<br />
n „Verspiegelung zu stark“<br />
- Diese Meldung kann bei Messungen von stark<br />
reflektierenden Gläsern angezeigt werden.<br />
Lösung: Nicht alle stark reflektierenden<br />
bzw. spiegelnden Gläser sind<br />
messbar.<br />
Eine Messung von der Rückseite<br />
kann erfolgreich sein.<br />
n „Speicher voll“<br />
- Diese Fehlermeldung erscheint, wenn alle<br />
99 Speicherplätze belegt sind.<br />
Lösung: Vor einer neuen Speicherung sollten<br />
Sie die gespeicherten Messergebnisse<br />
auf Ihren PC übertragen<br />
und anschließend den kompletten<br />
Speicherinhalt im <strong>GlassBuddy</strong><br />
löschen (siehe Punkt 7).<br />
n „Glas außerhalb Messbereich“<br />
- Diese Fehlermeldung erscheint, wenn der<br />
gesamte Scheibenaufbau über den Messbereich<br />
von 50 mm hinausgeht<br />
(kann nur bei <strong>GlassBuddy</strong> <strong>Basic</strong> erscheinen).<br />
Lösung: Software-Upgrade auf<br />
<strong>GlassBuddy</strong> <strong>Plus</strong><br />
14
n „Fehler“<br />
- Diese Fehlermeldung erscheint, wenn ein<br />
interner Fehler im <strong>GlassBuddy</strong> vorliegt.<br />
Lösung: Bei wiederholter Meldung Fehler<br />
sollte der <strong>GlassBuddy</strong> zur Überprüfung<br />
eingeschickt werden.<br />
n „Keine Daten“<br />
- Diese Meldung erscheint, wenn keine Daten<br />
im Speicher sind, die angezeigt werden können.<br />
n „Messung in <strong>Basic</strong> nicht möglich“<br />
- Diese Fehlermeldung erscheint, wenn<br />
versucht wird, Gläser zu messen, die nur mit<br />
dem <strong>GlassBuddy</strong> <strong>Plus</strong> messbar sind.<br />
Lösung: Software-Upgrade auf<br />
<strong>GlassBuddy</strong> <strong>Plus</strong><br />
11 Akku laden<br />
Mit vollständig aufgeladenem Akku ist ein<br />
Dauerbetrieb von mindestens 8 Stunden möglich.<br />
Eine Akkuladung reicht bei normaler Nutzung mindestens<br />
ein oder zwei Wochen aus. Bei ca. 10%<br />
Akkustatus erhalten Sie die Meldung Akku laden.<br />
Es sind jetzt noch Messungen möglich, der Glass-<br />
Buddy sollte aber bald aufgeladen werden, um einen<br />
störungsfreien Betrieb zu gewährleisten.<br />
Zum Laden des Akkus verbinden Sie den <strong>GlassBuddy</strong><br />
mit dem mitgelieferten USB-Kabel mit Ihrem PC<br />
oder Laptop. Zum Aufladen an der Steckdose oder<br />
im Auto bieten wir Ihnen als Zubehör ein USB-<br />
Power-Set an (BO 5164751), das auch wechselbare<br />
Eingangsstecker für verschiedene Länder enthält<br />
(EU/US/UK/AU). Mit dem Autoadapter können Sie<br />
den <strong>GlassBuddy</strong> auch während der Fahrt von einer<br />
Baustelle zur nächsten aufladen.<br />
Bei einem fast leeren Akku beträgt die Ladedauer<br />
bis zum einem Akkustatus von 100% ca. 120 Minuten<br />
(wenn der <strong>GlassBuddy</strong> während des Ladevorganges<br />
eingeschaltet bleibt, verlängert sich die<br />
Ladezeit). Der <strong>GlassBuddy</strong> zeigt an, wenn der Ladevorgang<br />
abgeschlossen ist. Im Display steht dann<br />
PC-Verbindung - Akku ist geladen. Hierzu muss<br />
der <strong>GlassBuddy</strong> jedoch eingeschaltet werden.<br />
Der <strong>GlassBuddy</strong> enthält einen hochwertigen Li-Ion-<br />
Akku mit einer sehr langen Lebensdauer, der fest<br />
verbaut ist. Sollte dieser nach vielen Jahren deutlich<br />
an Leistung verloren haben, kann der Akku bei<br />
<strong>Bohle</strong> ausgetauscht werden.<br />
12 Pflege und Instandhaltung<br />
Um Beschädigungen oder Fehlfunktionen bei Ihrem<br />
<strong>GlassBuddy</strong> zu vermeiden, sollten Sie folgende<br />
Punkte unbedingt beachten:<br />
n Der <strong>GlassBuddy</strong> muss immer in dem mitgelieferten<br />
Sicherheitskoffer aufbewahrt werden, da<br />
nur dieser den <strong>GlassBuddy</strong> optimal vor Beschädigungen<br />
schützt.<br />
n Um Beschädigungen zu vermeiden, darf der<br />
<strong>GlassBuddy</strong> nur in einem Temperaturbereich<br />
von 0° C bis +40° C betrieben und/oder gelagert<br />
werden.<br />
n Der <strong>GlassBuddy</strong> darf keinen starken Vibrationen<br />
oder Stößen ausgesetzt werden.<br />
n Reinigen Sie Anzeigefenster und Gehäuse nur<br />
mit einem trockenen, sauberen und weichen<br />
Tuch. Zur Reinigung dürfen auf keinen Fall Reinigungsflüssigkeiten<br />
oder Verdünnungsmittel<br />
verwendet werden.<br />
n Die Laseröffnung und der Sensorschlitz dürfen<br />
nur mit einem trockenen, sauberen und weichen<br />
Pinsel bzw. mit sauberer Druckluft gereinigt<br />
werden.<br />
n Reparaturen dürfen nur durch den Hersteller<br />
durchgeführt werden, bitte wenden Sie sich an<br />
Ihren Händler.<br />
DE<br />
15
13 Glassorten/Messbereich<br />
Spezifikation <strong>GlassBuddy</strong> <strong>Basic</strong> <strong>GlassBuddy</strong> <strong>Plus</strong><br />
Einfachglas ja ja<br />
Monolithisches Verbundglas (VG) ja ja<br />
Monolithisches Verbundsicherheitsglas (VSG) ja ja<br />
Monolithisches Mehrfachverbundglas (MVG) ja ja<br />
Monolithisches MVG als Brandschutzglas nein ja<br />
2-fach-Isolierglas aus 2 x Einfachglas ja ja<br />
2-fach-Isolierglas mit VG ja ja<br />
2-fach-Isolierglas mit VSG ja ja<br />
2-fach-Isolierglas mit MVG nein ja<br />
2-fach-Isolierglas mit MVG als Brandschutzglas nein ja<br />
3-fach-Isolierglas aus 3 x Einfachglas ja ja<br />
3-fach-Isolierglas mit VG ja ja<br />
3-fach-Isolierglas mit VSG ja ja<br />
Erkennung von Zwischenlagen ja ja<br />
Angaben zur Position und Dicke der Zwischenlagen ja ja<br />
Grafische Darstellung der Messung ja ja<br />
PC-Software mit grafischer Darstellung ja ja<br />
Software-Update online ja ja<br />
mehrere Sprachen ja ja<br />
Art.-Nr. BO 51 647 60 BO 51 647 55<br />
16<br />
Messbereich in Abhängigkeit vom<br />
Scheibenzwischenraum (SZR)<br />
Scheibenzwischenraum (SZR) mm<br />
Maximale Gesamtdicke in<br />
Abhängigkeit vom SZR in mm<br />
Nicht oder nur eingeschränkt sind die folgenden<br />
Glasarten bzw. –aufbauten messbar:<br />
- Stark streuende Gläser, wie z.B. satinierte oder<br />
gestrahlte Gläser, Gussgläser<br />
- Stark absorbierende Gläser, wie z.B. Verbundgläser<br />
mit matten oder stark eingefärbten Zwischenlagen,<br />
In der Masse eingefärbte Gläser<br />
- Interferenzbeschichtete Gläser<br />
- Stark reflektierende Gläser, wie z.B. Sonnenschutzgläser<br />
- Alle von DIN EN 572 Teil 2 abweichenden Basisglaserzeugnisse<br />
Hinweise:<br />
Um eine zuverlässige Aussage über den Aufbau des<br />
Messobjektes treffen zu können, empfehlen wir,<br />
immer mehrere Messvorgänge an verschiedenen<br />
Stellen und von beiden Seiten durchzuführen.<br />
Bei sehr großen Einheiten, oder bei Unsicherheiten
über die erhaltenen Ergebnisse empfehlen wir die<br />
Durchführung von Durchschnittsmessungen an mindestens<br />
4 Messpunkten, die über die Scheibenfläche<br />
verteilt sein sollten.<br />
Die Analyse auf nachträglich mit Splitter- oder Sonnenschutzfolie<br />
beklebten Gläsern kann zu falschen<br />
Messergebnissen führen.<br />
Bei Isoliergläsern sollte immer ca. 5 cm vom Rand<br />
gemessen werden, da die Scheiben je nach Fläche<br />
und Luftdruck zum „Durchbiegen“ neigen und<br />
dadurch in der Mitte der Scheiben ein ungenaues<br />
Messergebnis erzielt werden kann.<br />
Bei einem Gießharzverbund, bei dem das Harz den<br />
gleichen Lichtbrechungsindex hat wie das Glas,<br />
errechnet der <strong>GlassBuddy</strong> die Gesamtdicke.<br />
Wenn die detaillierte Analyse einer VSG-Scheibe<br />
in wenigen Fällen nicht möglich ist, zeigt der Glass-<br />
Buddy dies durch den Zusatz eines Ausrufezeichens<br />
vor dem Einzelergebnis an. In der grafischen Auswertung<br />
im <strong>GlassBuddy</strong> und in der PC-Software werden<br />
diese Ergebnisse durch zwei waagerechte Striche<br />
im unteren Bereich der entsprechenden Scheibe<br />
dargestellt. Für ein besseres Messergebnis wird eine<br />
neue Analyse von der gegenüberliegenden Seite<br />
empfohlen.<br />
14 Software-Update<br />
Es ist möglich, für den <strong>GlassBuddy</strong> <strong>Basic</strong> und den<br />
<strong>GlassBuddy</strong> <strong>Plus</strong> Software-Updates zu erhalten.<br />
Die auf der Website www.bohle-group.com unter<br />
den Artikelnummern BO 51 647 60 für den Glass<br />
Buddy <strong>Basic</strong> und BO 51 647 55 für den Glass Buddy<br />
<strong>Plus</strong> in unregelmäßigem Turnus erscheinenden<br />
Updates zur Fehlerbehebung können vom Nutzer<br />
selbst durchgeführt werden. Dafür muss die unter<br />
Downloads zu findende Version auf Ihrem PC<br />
gespeichert werden.<br />
Bitte verbinden Sie Ihren <strong>GlassBuddy</strong> <strong>Basic</strong> oder<br />
<strong>GlassBuddy</strong> <strong>Plus</strong> mit ihrem PC oder Laptop und stellen<br />
Sie eine Verbindung zwischen dem Gerät und der<br />
PC-Software her (siehe Punkt 6).<br />
Um nun das Update zu installieren, klicken Sie bitte<br />
auf „Hilfsmittel“ und wählen den Unterpunkt „Firmware<br />
senden“.<br />
Nun müssen Sie die zuvor abgespeicherte Software-<br />
Version auswählen.<br />
Den abgeschlossenen Download zum <strong>GlassBuddy</strong><br />
mit „OK“ bestätigen.<br />
Um die Update-Version in Ihrem <strong>GlassBuddy</strong> zu aktivieren,<br />
müssen Sie zunächst das Gerät ausschalten.<br />
Bitte drücken Sie dann gleichzeitig 4 Sekunden lang<br />
die Tasten und . So gelangen Sie in<br />
das Bootloader-Menü.<br />
Nun können Sie sich zwischen zwei Software-<br />
Versionen entscheiden, die neuere erkennen Sie an<br />
dem Datum. Mit der Taste wird die ausgewählte<br />
Version im Gerät geladen.<br />
15 Software-Upgrade<br />
Für den <strong>GlassBuddy</strong> <strong>Basic</strong> kann ein Upgrade auf die<br />
<strong>GlassBuddy</strong> <strong>Plus</strong>-Variante durchgeführt werden.<br />
Dies kann nicht durch den Nutzer selbst geschehen.<br />
Bitte senden Sie Ihren <strong>GlassBuddy</strong> <strong>Basic</strong> an die<br />
BOHLE <strong>AG</strong> ein. Diese Upgrades sind kostenpflichtig.<br />
DE<br />
17
16 Technische Daten<br />
Typ V4.0<br />
Spannungsversorgung Lithium - Ionen - Akku<br />
Laser<br />
< 1 mW; Klasse 2M<br />
Laser-Wellenlänge 650 nm<br />
Messbereich <strong>GlassBuddy</strong> <strong>Plus</strong> bis 100 mm<br />
<strong>GlassBuddy</strong> <strong>Basic</strong> bis 50 mm<br />
Anzeigegenauigkeit 0,1 mm<br />
Maßtoleranz<br />
1% auf den Messbereich<br />
Anzeige Display<br />
Abmessungen<br />
Gewicht<br />
Arbeitstemperatur<br />
64x128 Pixel<br />
180 x 83 x 42mm<br />
350 g<br />
0° C bis +40° C<br />
17 Sicherheitshinweise<br />
Der <strong>GlassBuddy</strong> ist ein Produkt der Laser-Klasse 2M.<br />
Es müssen somit keine zusätzlichen Laserschutzmaßnahmen<br />
zum Betreiben des Gerätes getroffen werden.<br />
Trotzdem sollte das Gerät nicht von unkundigen<br />
Personen betrieben werden oder in Kinderhände<br />
gelangen. Sie sollten nicht direkt in den Strahl<br />
blicken oder diesen mit optischen Instrumenten betrachten.<br />
19 Technischer Support<br />
Technische Fragen, Kommentare oder Hinweise richten<br />
sie bitte per e-mail an glassBuddy@bohle.de<br />
18
DE<br />
19
Operating Instructions Table of Contents<br />
01 Contents of the box<br />
09 Reading the Measurement Results<br />
02 Features of the <strong>GlassBuddy</strong> <strong>Basic</strong> /<br />
<strong>GlassBuddy</strong> <strong>Plus</strong><br />
10 Error and Warning Messages<br />
11 Charge Battery<br />
03 The Keypad<br />
12 Care and Maintenance<br />
04 The Display - Explanation of the<br />
symbols used<br />
13 Types of Glass<br />
05 First use of the <strong>GlassBuddy</strong> - Setting<br />
the language and measuring units<br />
14 Software Update<br />
15 Software Upgrade<br />
06 Installation and Operation<br />
of the <strong>GlassBuddy</strong> Software<br />
16 Technical Data<br />
07 First Steps<br />
<strong>Basic</strong> information about working with the<br />
<strong>GlassBuddy</strong><br />
17 Safety Information<br />
18 Technical Support<br />
08 Glass Analysis with the <strong>GlassBuddy</strong><br />
20
Thank you<br />
for purchasing the <strong>GlassBuddy</strong>, a top quality, measuring device for analysing flat glass. Regardless of<br />
whether you analyse simple single pane glass, laminated or insulated glass units, fitted or not, you deal<br />
with monolithic glass, or 1-gap or 2-gap insulating glass - with the press of a button the laser technology in<br />
the device will provide you with information about the thickness of the glass, the structure of the pane, the<br />
Low-E coating, PVB interlayers and their position all within a few seconds and with an accuracy of<br />
0.1 mm. Please read the operating instructions carefully to familiarise yourself with the operating procedures<br />
and allow you to get the most out of your new <strong>GlassBuddy</strong>.<br />
01 Contents of the box<br />
n 1 x <strong>GlassBuddy</strong><br />
n 1 x Safety case<br />
n 1 x Brief operating instructions<br />
n 1 x USB stick with operating<br />
instructions and PC software<br />
n 1 x USB cable 2.0 A / Micro B<br />
02 Features of the <strong>GlassBuddy</strong><br />
<strong>Basic</strong> / <strong>GlassBuddy</strong> <strong>Plus</strong><br />
n Destruction-free analysis of glass, even when<br />
installed<br />
n Selection of different glass types for analysis<br />
such as<br />
- "not ISO" (for monolithic glass, monolithic<br />
laminated glass or laminated safety glass),<br />
- "ISO" (1-gap insulating glass except for<br />
fire protection glass)<br />
- "ISO3" (for 2-gap insulating glass except for<br />
multi laminated glass and fire protection<br />
glass)<br />
- "not ISO mlg"* (for monolithic fire<br />
protection glass)<br />
- "ISO mlg"* (for fire protection glass in<br />
1-gap insulating glass compound).<br />
n Measurement of monolithic glass up to a<br />
thickness of 2.6 mm to 19 mm<br />
n Analysis of laminated glass, laminated safety<br />
glass, multi laminated glass, 1-gap and<br />
2-gap insulating glass panes up to a total<br />
thickness of 50 mm (GlasBuddy <strong>Plus</strong> up to<br />
100mm** total thickness also with fire<br />
protection glass)<br />
n Accuracy: 0.1 mm, tolerance: 1% on<br />
measuring range<br />
n Recognition of up to 3 coatings and<br />
determination of the coating position<br />
n Recognition of PVB interlayers (up to a max. of 8<br />
interlayers), determination of the number of<br />
layers, the thickness and the position<br />
n Memory to store 99 measurement results<br />
n USB interface<br />
n Simple and self-explanatory menu operation<br />
n Top quality Li-ion rechargeable battery<br />
03 The Keypad<br />
Despite the numerous functions of the <strong>GlassBuddy</strong><br />
only a few keys are needed. The user interface is<br />
intuitive and can be learned quickly and easily. This<br />
chapter explains the functions of the individual<br />
keys.<br />
Press<br />
n to switch the <strong>GlassBuddy</strong> on<br />
n to start measuring<br />
n to save the results after the measurement<br />
n to confirm input<br />
n to delete the current results<br />
n to quit the menus<br />
n to stop the deletion of saved data<br />
n to delete error messages<br />
EN<br />
* only <strong>GlassBuddy</strong> <strong>Plus</strong>, ** see graphic, chapter 13 Types of Glass / Measuring Range<br />
21
n Menu<br />
n to scroll through the results<br />
n to set the date and time<br />
n to scroll through the menu<br />
n to switch on the light<br />
04 The Display<br />
Explanations of the symbols used<br />
4 or 4.2 Glass thickness, film interlayer<br />
or air gap in mm or inches.<br />
« Coating position,<br />
the direction of the arrow<br />
indicates the position<br />
« Coating position,<br />
the direction of the arrow<br />
indicates the position<br />
! Signal indicating that not all<br />
properties could be detected<br />
G1, G2, ... Glass pane with position<br />
G 1.1, G 1.2 Glass pane with position in<br />
laminated compound<br />
SZR1, SZR2, ... Air gap and its position<br />
Film 0.38 Thickness of the film used within<br />
the compound<br />
Gel 1.4 Thickness of the fire protection<br />
gel* used within the compound<br />
Film 1.6 Thickness of the interlayer used<br />
within the compound<br />
* only <strong>GlassBuddy</strong> <strong>Plus</strong><br />
05 First use of the<br />
<strong>GlassBuddy</strong><br />
Setting the language and measuring unit<br />
The <strong>GlassBuddy</strong> is first supplied with a German<br />
menu. If you want to change the language, please<br />
proceed as follows:<br />
Connect the <strong>GlassBuddy</strong> to your PC or laptop using<br />
the supplied USB cable. Please only use the supplied<br />
USB cable.<br />
The battery is now charging and at the same time<br />
you can reprogram the <strong>GlassBuddy</strong> to the language<br />
and measuring unit of your choice (Note: If changes<br />
are made without a PC connection, the <strong>GlassBuddy</strong><br />
settings will return to the default settings once the<br />
device is switched off).<br />
1. Press for approximately<br />
2 seconds. The <strong>GlassBuddy</strong> will switch on<br />
and the display will show<br />
PC-Verbindung .... Akku lädt<br />
2. Press<br />
3. The display now shows > Sprache<br />
4. Press<br />
5. Move the arrows > using the keys<br />
to the language of your choice and select by<br />
pressing<br />
6. After around 2-3 seconds, the language will be<br />
reprogrammed<br />
7. For changing the measuring unit, move<br />
the arrows > < to Units, press and<br />
choose the desired measuring unit.<br />
Confirm your selection with<br />
8. The changes are now stored in the <strong>GlassBuddy</strong>.<br />
Quit the menu with and then disconnect<br />
the device from the computer.<br />
22
06 Installation and Operation<br />
of the <strong>GlassBuddy</strong><br />
Software<br />
Installation of the <strong>GlassBuddy</strong> software must be<br />
done with full administrative rights to the computer.<br />
The enclosed software, suitable for PC and laptop<br />
with an operating system starting from Windows<br />
2000 or later, allows you to comfortably store your<br />
measuring results.<br />
EN<br />
Installation<br />
To install the software, connect the supplied USB<br />
to your computer and start the program setup.exe in<br />
the Explorer.<br />
The program will then be installed onto your computer.<br />
After installation you will need to restart your<br />
computer.<br />
Program Start<br />
To start the <strong>GlassBuddy</strong> program, double-click the<br />
program icon <strong>GlassBuddy</strong> on your desktop.<br />
Program Description<br />
This program allows you to transfer data from the<br />
memory of the <strong>GlassBuddy</strong> to your computer. To do<br />
this, the device needs to be connected to your PC<br />
via the supplied USB cable. In addition, you can also<br />
call up any previously imported data using the program<br />
without a connection to the <strong>GlassBuddy</strong> .<br />
Program Screen<br />
Once the program has started, you will see the<br />
empty program screen with the following areas:<br />
Pane list:<br />
The measurements transferred from the Glass-<br />
Buddy are listed here according to the sequential<br />
number. The date of the measurement, the time, the<br />
total thickness of the glass structure as well as the<br />
measuring mode are also shown.<br />
The graphic shows you the pane compound of the<br />
selected glass in the corresponding list. The results<br />
for glass (green), film (blue), fire protection gel (yellow)<br />
and layer (purple) are highlighted in different<br />
colours.<br />
The field below the graphic shows the following<br />
information about the device: Name (if applicable),<br />
serial number and model number of the software.<br />
Connected:<br />
This field is dark green if the <strong>GlassBuddy</strong> is not<br />
connected to the program and light green if the<br />
<strong>GlassBuddy</strong> is connected to the program.<br />
Component number:<br />
Here you can assign a component number for the<br />
selected measurement.<br />
Pane size:<br />
Here you can indicate pane width and height for the<br />
selected measurement.<br />
Comments:<br />
If you have selected a measurement from the pane<br />
list, you can add an individual comment to this<br />
measurement.<br />
Details:<br />
If you have selected a measurement from the pane<br />
list, all the results will be shown in detail here.<br />
23
Data transfer for the <strong>GlassBuddy</strong><br />
To transfer the data stored on your <strong>GlassBuddy</strong> to<br />
your computer, first connect the device to your computer<br />
using the supplied USB cable. Use the micro<br />
USB slot on the <strong>GlassBuddy</strong> and a free USB slot on<br />
your PC. Now switch the <strong>GlassBuddy</strong> on.<br />
The display on the <strong>GlassBuddy</strong> will show PC<br />
connection. The <strong>GlassBuddy</strong> is now connected to<br />
your PC.<br />
Now start the <strong>GlassBuddy</strong> PC application.<br />
In the program screen you will see the field<br />
Connected, which is shown in dark green. The<br />
program is not yet connected to the <strong>GlassBuddy</strong>.<br />
To connect, click the menu item Devices and then<br />
select Update in the drop down menu.<br />
The transferred measurements can be stored on<br />
your PC. To do this, click on the menu item File and<br />
then on Save Data in the drop down menu. You can<br />
then save the measurements under a file name of<br />
your choice, then confirm with OK to save the data.<br />
The program is now connected to the <strong>GlassBuddy</strong>.<br />
Once the connection has been established, the field<br />
in the program screen below Connected will turn<br />
light green. If this field does not turn light green,<br />
click Devices - Update again.<br />
To transfer the data stored in the <strong>GlassBuddy</strong>, click<br />
on the menu item File and then on Transfer Data<br />
in the drop down menu. After the data has been<br />
successfully transferred, the measurement results<br />
will appear in the pane list.<br />
Calling up saved data<br />
You can call up the data saved on the PC. To do this,<br />
click on the menu item File and then on Open Data.<br />
Select a saved series of measurements and confirm<br />
with OK.<br />
24
Devices<br />
Under the menu item Devices you find the submenu<br />
"Update". If you are using several devices, this<br />
is a way of switching between the different Glass-<br />
Buddys. Only one <strong>GlassBuddy</strong> can communicate<br />
with the program at a time.<br />
EN<br />
All Details:<br />
This option allows you to print out all measurements<br />
stated in the pane list including the respective<br />
details. One page with details and comments is<br />
printed per measurement.<br />
Print<br />
You have a number of options for printing out the<br />
data.<br />
Print Pane List:<br />
Here, all listed measurements from the pane list<br />
will be printed as a list.<br />
Language<br />
You can select the program language in the menu<br />
Language.<br />
Marked Detail:<br />
If you have selected a measurement from the pane<br />
list, you can print out the details relating to the<br />
measurement with any comments you have added.<br />
25
Auxiliary options<br />
Under the menu item Auxiliary options, you can now<br />
find the following entries:<br />
Send firmware<br />
In this way, the software of the connected Glass-<br />
Buddy can be updated (see point 14).<br />
Transfer Debug<br />
The option has not yet been activated, no changes<br />
can be made here.<br />
Send licence<br />
The option has not yet been activated, no changes<br />
can be made here.<br />
07 First Steps<br />
<strong>Basic</strong> information about working with the<br />
<strong>GlassBuddy</strong><br />
Device information<br />
Here the user can customise the settings of the<br />
<strong>GlassBuddy</strong>.<br />
To switch on the <strong>GlassBuddy</strong> press for<br />
about 2 seconds.<br />
On the four-line illuminated display you can now<br />
select the glass type that you would like to<br />
analyse (See the following information under<br />
“GLASS TYPE“).<br />
After the selection, the <strong>GlassBuddy</strong> will now<br />
inform you about the current date, time and the<br />
selected glass type.<br />
26
For energy-saving reasons, the display lighting will<br />
switch off after approximately 60 seconds; however,<br />
it can be switched on again by pressing or .<br />
The <strong>GlassBuddy</strong> will switch off automatically after<br />
about 10 minutes if no keys have been pressed.<br />
Explanation of the Menu Items<br />
The menu can be accessed via ;<br />
allow you to select between the various<br />
menu items:<br />
SWITCH OFF<br />
If the arrow > is in front of the menu item Switch<br />
off, you can switch off the <strong>GlassBuddy</strong> by pressing<br />
.<br />
GLASS TYPE<br />
If the arrows > < are in front of the menu item Glass<br />
type, press after selecting in order to reach the<br />
submenu. Here you can select the type of glass you<br />
wish to analyse by pressing the keys .<br />
Confirm your selection with .<br />
n Not ISO glass (menu display: not ISO)<br />
- for the analysis of single-pane glass up to<br />
2.6 mm to 19 mm thick<br />
- for the analysis of monolithic laminated<br />
and laminated safety glass (lam and lamsafety)<br />
- for the analysis of monolithic laminated glass<br />
(multi-lam), with the exception of fire<br />
protection glass<br />
Note: If you measure other glass types with this<br />
setting, this can lead to erroneous<br />
measuring results.<br />
n ISO glass (menu display: ISO)<br />
- for the analysis of 1-gap insulating glass made<br />
of 2 x monolithic glass<br />
- for the analysis of 1-gap insulating glass with<br />
laminated glass<br />
- for the analysis of 1-gap insulating glass with<br />
* only <strong>GlassBuddy</strong> <strong>Plus</strong><br />
laminated safety glass<br />
- for the analysis of 1-gap insulating glass with<br />
multi laminated glass, with the exception of<br />
fire protection glass<br />
Note: If you measure other glass types with this<br />
setting, this can lead to erroneous<br />
measuring results.<br />
n ISO3 glass (menu display: ISO3)<br />
- for the analysis of 2-gap insulating glass made<br />
of 3 x monolithic glass<br />
- for the analysis of 2-gap insulating glass with<br />
laminated glass<br />
- for the analysis of 2-gap insulating glass with<br />
laminated safety glass<br />
Note: If you measure other glass types with this<br />
setting, this can lead to erroneous<br />
measuring results.<br />
n Not ISO fire protection glass*<br />
(Menu display: not ISO multi-lam)<br />
- for the analysis of monolithic multi<br />
laminated glass (multi-lam) as fire protection<br />
glass<br />
Note: If you measure other glass types with this<br />
setting, this can lead to erroneous<br />
measuring results.<br />
n ISO with fire protection glass*<br />
(Menu display: ISO multi-lam)<br />
- for the analysis of 1-gap insulating glass with<br />
multi laminated glass as fire protection glass<br />
Note: If you measure other glass types with this<br />
setting, this can lead to erroneous<br />
measuring results.<br />
The selected glass type setting is displayed in the<br />
menu.<br />
Note: The <strong>GlassBuddy</strong> will return to the default<br />
settings once the device is switched off. When<br />
switching it on again, you can analyse the glass<br />
type again.<br />
EN<br />
27
AVER<strong>AG</strong>E<br />
First of all, select the right mode. Once the mode<br />
is selected, you can activate the average measurement<br />
under the menu item "Average". The Ø sign in<br />
the display indicates that the right mode has been<br />
selected for carrying out an average measurement.<br />
Up to 19 individual measurements can be used in<br />
order to generate an average measuring result.<br />
The individual measurements are carried out one<br />
by one by repeatedly pressing and sorted<br />
alphabetically. After completing 2 to 19 individual<br />
measurements, the arithmetic mean is calculated by<br />
pressing . For distinguishing the average measuring<br />
results from the individual measuring results,<br />
the number displayed for the average measurement<br />
in the mode "Display data" has an underscore only<br />
(instead of a letter) after the first two numbers. The<br />
individual measurements are named consecutively<br />
beginning with "a".<br />
Example:<br />
03a310113_14:15<br />
03b310113_14:16<br />
03c310113_14:17<br />
03_310113_14:18<br />
The first two numbers stand for the number of<br />
the measurement. The third item is a letter which<br />
indicates the sequence of individual measurements.<br />
The following numbers indicate date and time. If<br />
instead of a letter an underscore "_" appears, this<br />
indicates that the measurement is an average measurement.<br />
As all individual and average measurements can be<br />
saved if desired, unrealistic measured values can<br />
still be detected ahead of time.<br />
SETTINGS<br />
If the arrows > < are moved to the menu item<br />
Settings, you can reach the submenu by pressing<br />
after making a selection. You can adjust the<br />
following settings here:<br />
Language<br />
If the arrows > < are moved to the menu item<br />
Language, you can reach the submenu by pressing<br />
after making a selection. Here you can change<br />
the settings using the keys . Confirm your<br />
changes with .<br />
Note: After it is switched off, the <strong>GlassBuddy</strong><br />
automatically switches back to the default settings.<br />
To permanently change the language, connect the<br />
<strong>GlassBuddy</strong> to your PC via the USB cable (see<br />
section 5).<br />
Units (Metric/Imperial)<br />
If the arrows > < are moved to the menu item<br />
Units, you can reach the submenu by pressing<br />
after making a selection. Here you can change<br />
the settings using the keys . Confirm your<br />
changes with .<br />
Note: After it is switched off, the <strong>GlassBuddy</strong> automatically<br />
switches back to the default settings. To<br />
permanently change the units, connect the Glass-<br />
Buddy to your PC via the USB cable (see section 5).<br />
Version<br />
Shows the version and serial number of the device.<br />
Date<br />
If the arrows > < are moved to the menu item Date,<br />
you can reach the submenu by pressing after<br />
making a selection. Here you can change the settings<br />
using the keys . Confirm your changes<br />
with .<br />
Time<br />
If the arrows > < are moved to the menu item Time,<br />
you can reach the submenu by pressing after<br />
making a selection. Here you can change the settings<br />
using the keys . Confirm your changes<br />
with .<br />
Font size<br />
If the arrows > < are moved to the menu item Font<br />
size, you can reach the submenu by pressing<br />
after making a selection. Here you can change the<br />
settings using the keys . Confirm<br />
your changes with .<br />
Note: After it is switched off, the <strong>GlassBuddy</strong><br />
automatically switches back to the default setting.<br />
To permanently change the language, connect the<br />
<strong>GlassBuddy</strong> to your PC via the USB cable (see<br />
section 5).<br />
Note: For Chinese, Japanese, Korean and Russian,<br />
making the font size smaller is not possible.<br />
Information about the device<br />
Display of information which can be saved in the<br />
28
device as customised entries such as company<br />
name and address. For this purpose connect the<br />
<strong>GlassBuddy</strong> to your PC with the USB cable (see<br />
point 5).<br />
DELETE DATA<br />
If the arrows > < are in front of the menu item<br />
Delete data, you can delete all the data entries by<br />
pressing . You will be asked if you really want to<br />
delete all measuring results.<br />
By pressing again, all the saved measuring<br />
results will be deleted. Press to return to the<br />
menu without deleting the data.<br />
SHOW DATA<br />
If the arrows > < are in front of the menu item<br />
Show data, you can display a list of your previously<br />
saved measurements by pressing . Use the arrow<br />
> to select the measurement result of your choice<br />
and display it by pressing .<br />
08 Glass Analysis with the<br />
<strong>GlassBuddy</strong><br />
The glass must always be clean and dry. Even a<br />
fingerprint can cause unwanted refraction and consequently<br />
incorrect measurement results.<br />
Glass that is laid flat should always be placed on a<br />
dark, non-reflecting base (e.g. a black felt cloth) for<br />
analysis, as incorrect results can occur on reflective<br />
bases.<br />
Already installed insulated glass panes should be<br />
preferably analysed in the marginal areas.<br />
Switch on the <strong>GlassBuddy</strong>, select the glass type<br />
(see point 5) and place it on top of the glass surface<br />
in a way that all plastic feet touch the glass and<br />
keep the device from slipping.<br />
Press . The light turns off and Measuring<br />
-- please wait ... is shown on the display of the<br />
<strong>GlassBuddy</strong>.<br />
Note: The <strong>GlassBuddy</strong> should not be moved during<br />
the measuring procedure as this could lead to inaccurate<br />
measuring results.<br />
After 1-2 seconds, the light will turn on again and<br />
you can remove the <strong>GlassBuddy</strong> from the glass.<br />
The measurement result is shown on the display.<br />
Use to scroll through the measuring results.<br />
After the rounded individual measurements, the<br />
single values (accurate to 0.1 mm) are displayed.<br />
Afterwards the structure of the glass pane is<br />
shown graphically. The graphical display shows<br />
the structure from left to right as analysed by the<br />
<strong>GlassBuddy</strong>. The measuring results are shown in a<br />
scrolling display.<br />
The measuring result can be rejected with .<br />
When pressing , you can choose between the<br />
following options:<br />
Save<br />
If the arrows > < are moved to the menu item Save,<br />
the current measuring result can be saved in the<br />
<strong>GlassBuddy</strong> by pressing . The result is saved<br />
under the number shown in the top left of the<br />
<strong>GlassBuddy</strong> display with the result.<br />
Reject<br />
If the arrows > < are moved to the menu item<br />
Reject, you can delete the current measuring result<br />
by pressing . You can always directly delete the<br />
result by pressing .<br />
09 Reading the Measurement<br />
Results<br />
After the measuring procedure described above, the<br />
<strong>GlassBuddy</strong> shows the result on the illuminated<br />
display. You can page up and down the measuring<br />
results row-by row with the keys.<br />
Row 1<br />
In the first row, the <strong>GlassBuddy</strong> shows the position<br />
under which the measuring result is saved (here<br />
position 08; there are a total of 99 memory slots<br />
available). After this you can see the date and the<br />
EN<br />
29
time of the measurement.<br />
Row 2<br />
In the second row, the <strong>GlassBuddy</strong> shows the<br />
actual measured total thickness of the measured<br />
object.<br />
From the third row downwards the individual results<br />
are displayed, followed by the graphical display<br />
of the glass structure. The measuring results are<br />
shown in a scrolling display.<br />
10 Error and Warning Messages<br />
The <strong>GlassBuddy</strong> uses a number of messages to<br />
notify you of errors or warn you about the battery<br />
status. All information is shown in plain text and<br />
can be deleted by pressing .<br />
n "Measurement not possible"<br />
- This message appears if the object you are<br />
measuring does not generate any reflections<br />
which the <strong>GlassBuddy</strong> can convert into a<br />
reading.<br />
- This message also appears if the total<br />
thickness of a glass pane is less than<br />
2.6 mm<br />
- This message appears if the <strong>GlassBuddy</strong><br />
receives an odd number of reflections from<br />
the measuring procedure.<br />
Reason: e.g. a tinted pane, where only the<br />
surface gives off a reflection and<br />
the laser cannot penetrate to the<br />
underneath of the pane<br />
Reason: a very light coloured base on<br />
which the glass is lying can give<br />
off an additional reflection<br />
Solution: Place the glass for analysis on a<br />
dark non-reflecting base.<br />
n Not "ISO glass"<br />
- This message can appear for the setting<br />
"not ISO" if you try to analyse a glass<br />
structure other than "not ISO".<br />
Solution:<br />
Please check the settings and<br />
change them if necessary.<br />
n Not "ISO glass"<br />
- This message can appear for the setting<br />
"ISO" if you try to analyse a glass structure<br />
other than "ISO".<br />
Solution: Please check the settings<br />
and change them if necessary.<br />
n Not "ISO3"<br />
- This message can appear for the setting<br />
for glass type ISO3 if you try to analyse a<br />
glass structure other than 2-gap insulating<br />
glass.<br />
Solution: Please check the settings<br />
and change them if necessary.<br />
n Battery empty<br />
- This message appears if the battery charging<br />
status is below 5%.<br />
Solution: Please charge the battery. To<br />
be able to continue measuring,<br />
charging for 5 to 10 minutes will<br />
suffice.<br />
n „Glass too highly reflective“<br />
- This message can appear when analysing<br />
highly reflective glass.<br />
Solution: Not all highly reflective<br />
or mirrored glasses can be<br />
measured.<br />
The measurement might be<br />
successful from the rear side<br />
of the glass.<br />
n Memory full<br />
- This error message appears when all<br />
99 memory slots are full.<br />
Solution: Before saving more data, you<br />
should transfer the saved<br />
measurement results onto your PC<br />
and then delete all data saved<br />
in the <strong>GlassBuddy</strong> (see section 7).<br />
n Glass outside measuring range<br />
- This error message appears if the<br />
complete structure of the pane exceeds the<br />
measuring range of 50 mm.<br />
(This message will only appear on the<br />
<strong>GlassBuddy</strong> <strong>Basic</strong> version.)<br />
Solution: Software Upgrade to<br />
<strong>GlassBuddy</strong> <strong>Plus</strong><br />
30
n Error<br />
- This error message appears if there is an<br />
internal error in the <strong>GlassBuddy</strong>.<br />
Solution: If the message Error is repeated,<br />
the <strong>GlassBuddy</strong> should be<br />
returned to the manufacturer for<br />
inspection.<br />
n No Data<br />
- This message appears if there is no data<br />
in the memory that can be shown.<br />
n "Measurement in <strong>Basic</strong> mode not possible"<br />
- This error message appears if types of glass<br />
are being analysed which can only be<br />
measured with <strong>GlassBuddy</strong> <strong>Plus</strong>.<br />
Solution: Software Upgrade to<br />
<strong>GlassBuddy</strong> <strong>Plus</strong><br />
11 Charge battery<br />
When the battery is fully charged, the device can<br />
work permanently for 8 hours. When charged, the<br />
battery usually lasts for one to two weeks under<br />
normal conditions of use. At a battery status of<br />
approximately 10% you will be shown the message<br />
Charge battery. Measurements can still be taken<br />
but the <strong>GlassBuddy</strong> should be charged as soon as<br />
possible to ensure problem-free operation.<br />
Connect the <strong>GlassBuddy</strong> to your PC or laptop using<br />
the supplied USB cable. To charge the battery at<br />
the mains supply or in the car, we also have a USB<br />
power set available as an accessory (BO 5164751);<br />
this contains interchangeable plugs for a number of<br />
countries (EU/US/UK/AU).<br />
Using the car adapter you can charge the Glass-<br />
Buddy whilst driving from one building site to the<br />
next.<br />
When the battery is almost empty, it takes approximately<br />
120 minutes to charge it to 100% again (if<br />
the <strong>GlassBuddy</strong> remains switched on during charging,<br />
the charging time is longer). The <strong>GlassBuddy</strong><br />
will indicate when the charging process is over. The<br />
display will then show PC connection - battery is<br />
charged. Nevertheless the <strong>GlassBuddy</strong> has to be<br />
switched on for displaying this message.<br />
The <strong>GlassBuddy</strong> contains a permanently installed<br />
top quality Li-ion rechargeable battery with a very<br />
long service life. If the performance of the battery<br />
diminishes over the years, <strong>Bohle</strong> can replace the<br />
battery.<br />
12 Care and Maintenance<br />
To avoid damage or malfunctions of your <strong>GlassBuddy</strong>,<br />
please strictly observe the following:<br />
n The <strong>GlassBuddy</strong> must always be stored in the<br />
supplied safety case as this is the only way to<br />
effectively prevent damage.<br />
n To avoid damage, the <strong>GlassBuddy</strong> must only<br />
be operated and/or stored at temperatures<br />
between 0° C and +40° C.<br />
n The <strong>GlassBuddy</strong> must not be exposed to<br />
vibrations or impacts.<br />
n Only clean the display window and casing<br />
with a dry, clean and soft cloth. Never use<br />
cleaning liquids or thinning agents.<br />
The laser opening and the sensor slit may only<br />
be cleaned with a dry, clean and soft brush and/or<br />
with clean compressed air.<br />
n Repairs may only be performed by the<br />
manufacturer; please contact your dealer.<br />
Measuring range depending on the gap between<br />
panes (gap).<br />
EN<br />
31
13 Types of Glass / Measuring Range<br />
Specification <strong>GlassBuddy</strong> <strong>Basic</strong> <strong>GlassBuddy</strong> <strong>Plus</strong><br />
Monolithic glass yes yes<br />
Monolithic laminated glass (lam) yes yes<br />
Monolithic laminated safety glass (lam-safety) yes yes<br />
Monolithic multi laminated glass (multi-lam) yes yes<br />
Monolithic multi laminated glass for fire protection no yes<br />
1-gap insulating glass with monolithic glass yes yes<br />
1-gap insulating glass with laminated glass yes yes<br />
1-gap insulating glass with laminated safety glass yes yes<br />
1-gap insulating glass with multi laminated glass no yes<br />
1-gap insulating glass with multi laminated glass as fire protection glass no yes<br />
2-gap insulating glass with monolithic glass yes yes<br />
2-gap insulating glass with laminated glass yes yes<br />
2-gap insulating glass with laminated safety glass yes yes<br />
Detection of interlayers yes yes<br />
Identification of position and thickness of the interlayer yes yes<br />
Graphic display of measured results yes yes<br />
PC software with display yes yes<br />
Software update online yes yes<br />
Multiple languages yes yes<br />
Art. no. BO 51 647 60 BO 51 647 55<br />
32<br />
Measuring range depending on gap<br />
between panes<br />
Gap between panes mm<br />
Maximum total thickness<br />
depending on gap in mm<br />
The following glass types or structures cannot<br />
be measured or only to a limited extent:<br />
- Strongly dispersing glass like e.g. satinfinished<br />
or sandblasted glass, cast glass<br />
- Strongly absorbing glass such as e.g. laminated<br />
glass with matt or coloured interlayers, entirely<br />
coloured glass<br />
- Glass with interference coating<br />
- Highly reflective glass like e.g. solar<br />
control glass<br />
- All basic glass products deviating from<br />
DIN EN 572 part 2<br />
Notes:<br />
For making reliable analysis of the structure of the<br />
measured object, we recommend taking several<br />
measurements at different points and from both<br />
sides.
In case of dealing with very large measuring units<br />
or if the results obtained are very unreliable, we<br />
recommend carrying out average measurements on<br />
at least 4 spots distributed over the whole surface of<br />
the glass pane.<br />
device to the PC software (see point 6).<br />
Click on "auxiliary options" for installing the update<br />
and choose the submenu "send firmware".<br />
The analysis of glass with additional coatings (Solar<br />
reflective films or splinter protection films) can lead<br />
to incorrect results.<br />
In the case of insulated glass units, measurements<br />
should always be taken 5 cm away from the edge, as<br />
the panes tend to “bend“ depending on the surface<br />
and air pressure, which means that measurements<br />
taken from the centre may be inaccurate.<br />
EN<br />
When analysing resin laminated glass, where the<br />
resin has the same refraction index as the glass, the<br />
<strong>GlassBuddy</strong> will measure the total thickness.<br />
In a very small number of cases, detailed analysis of<br />
laminated safety glass is not possible. In this event,<br />
the <strong>GlassBuddy</strong> displays an exclamation mark in<br />
front of the individual result. In the graphic display<br />
of the <strong>GlassBuddy</strong> and in the PC software, results<br />
of this kind are indicated by two horizontal lines in<br />
the bottom part of the respective pane. To achieve<br />
better measuring results, we recommend a new analysis<br />
on the opposite side.<br />
14 Software Update<br />
A software update is available both for <strong>GlassBuddy</strong><br />
<strong>Basic</strong> and <strong>GlassBuddy</strong> <strong>Plus</strong>.<br />
Troubleshooting updates can be carried out by the<br />
user. They can be found on our website www.bohlegroup.com<br />
with the article numbers BO 51 647 60 for<br />
<strong>GlassBuddy</strong> <strong>Basic</strong> and BO 51 647 55 for <strong>GlassBuddy</strong><br />
<strong>Plus</strong>. For this purpose, the updated version found<br />
under Downloads must be saved on your PC.<br />
Please connect your <strong>GlassBuddy</strong> <strong>Basic</strong> or Glass-<br />
Buddy <strong>Plus</strong> to your PC or laptop and connect the<br />
Now you have to choose the previously stored software<br />
version.<br />
Confirm the completed download of the <strong>GlassBuddy</strong><br />
update with "OK".<br />
To activate the updated version on your <strong>GlassBuddy</strong>,<br />
first switch off the device.<br />
Afterwards press keys and at the<br />
same time for approximately 4 seconds. In this way<br />
you reach the boot loader menu.<br />
You can choose between two software versions. The<br />
newer one can be recognised via the date. Press<br />
key to load the chosen version.<br />
15 Software Upgrade<br />
It is possible to upgrade <strong>GlassBuddy</strong> <strong>Basic</strong> to<br />
<strong>GlassBuddy</strong> <strong>Plus</strong>. This can not be done by the user.<br />
Please send your <strong>GlassBuddy</strong> <strong>Basic</strong> to BOHLE <strong>AG</strong>.<br />
These upgrades are not free of charge.<br />
33
16 Technical Data<br />
Type V4.0<br />
Power supply Lithium - ion - rechargeable<br />
battery<br />
Laser<br />
< 1 mW; class 2M<br />
Laser wavelength 650 nm<br />
Measuring range <strong>GlassBuddy</strong> <strong>Plus</strong> up to 100 mm<br />
<strong>GlassBuddy</strong> <strong>Basic</strong> up to 50 mm<br />
Accuracy<br />
0.1 mm,<br />
Measuring tolerance 1% on measuring range<br />
Display<br />
64x128 Pixel<br />
Dimensions 180 x 83 x 42mm<br />
Weight<br />
350 g<br />
Working temperature 0°C to +40°C<br />
17 Safety Information<br />
The <strong>GlassBuddy</strong> is a product of the 2M laser class.<br />
Therefore no additional laser protection measures need<br />
to be taken before the device is used. Despite this, the<br />
device should not be used by untrained persons or be<br />
allowed to fall into children‘s hands. You should not look<br />
directly into the beam or look at the beam using optical<br />
instruments.<br />
19 Technical Support<br />
Please address any technical questions, comments or<br />
suggestions by e-mail to glassBuddy@bohle.de.<br />
34
Germany<br />
<strong>Bohle</strong> <strong>AG</strong> - Head Office<br />
Dieselstraße 10<br />
D- 42781 Haan<br />
info@bohle.de<br />
Hungary<br />
<strong>Bohle</strong> GmbH - Forgalmazás HU<br />
Lemböckgasse 63/2/1<br />
A-1230 Wien<br />
info@bohle.at<br />
Sweden<br />
<strong>Bohle</strong> Scandinavia AB<br />
Pyramidbacken 3<br />
SE-14175 Kungens Kurva<br />
info@bohle.se<br />
Austria<br />
<strong>Bohle</strong> GmbH<br />
Lemböckgasse 63/2/1<br />
A-1230 Wien<br />
info@bohle.at<br />
Italy<br />
<strong>Bohle</strong> Italia s.r.l.<br />
Via Cavallotti 28<br />
I-20081 Abbiategrasso<br />
info@bohle.it<br />
United States<br />
<strong>Bohle</strong> America, Inc.<br />
10924, Granite Street<br />
Suite 200<br />
Charlotte, NC 28273<br />
info@bohle-america.com<br />
United Kingdom and Ireland<br />
<strong>Bohle</strong> Ltd.<br />
Fifth Avenue<br />
Tameside Park · Dukinfield<br />
Cheshire · SK16 4PP<br />
info@bohle.ltd.uk<br />
Netherlands<br />
<strong>Bohle</strong> Benelux B.V.<br />
Nieuweweg Noord 314 B - 20<br />
NL-3905 LX Veenendaal<br />
info@bohle.nl<br />
Russia<br />
<strong>Bohle</strong> - Moskau<br />
Leninsky Rayon<br />
Business Center Rumjanzevo<br />
Bldg. 1, Block A, Office 721 A,<br />
RU-142784 Moscow<br />
info@bohle.ru<br />
Estonia<br />
<strong>Bohle</strong> Baltic OÜ<br />
Punane 42 - 101<br />
EE-13619 Tallinn<br />
info@bohle.ee<br />
Spain<br />
<strong>Bohle</strong> Complementos del Vidrio S.A.U<br />
Mare de Deu de Bellvitge, 312<br />
E- 08907 L‘Hospitalet<br />
Barcelona<br />
info@bohle.es<br />
<strong>Bohle</strong> – St. Petersburg<br />
Ul. Bumazhnaya 9, korp. 1/A<br />
Office 433<br />
RU-198020 St. Petersburg<br />
info@bohle.spb.ru<br />
France<br />
<strong>Bohle</strong> <strong>AG</strong><br />
Département français<br />
Dieselstraße 10<br />
D- 42781 Haan<br />
france@bohle.de<br />
South Africa<br />
<strong>Bohle</strong> Glass Equipment (Pty) Ltd.<br />
Unit 3, Graphite Industrial Park<br />
Fabriek Street,<br />
Strijdom Park 2125, Gauteng<br />
info@bohle.co.za<br />
10-2794 · 05-10 · 0,15 Na · D, GB, F, IT, ES, NL, SE<br />
BX 64754