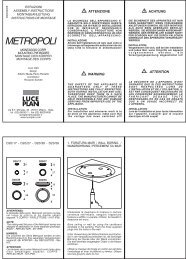
montageanleitung „schreibtischleuchte absolut” zur montage der ...
montageanleitung „schreibtischleuchte absolut” zur montage der ...
montageanleitung „schreibtischleuchte absolut” zur montage der ...

Sie wollen auch ein ePaper? Erhöhen Sie die Reichweite Ihrer Titel.
YUMPU macht aus Druck-PDFs automatisch weboptimierte ePaper, die Google liebt.
<strong><strong>montage</strong>anleitung</strong> <strong>„schreibtischleuchte</strong> <strong>absolut”</strong><br />
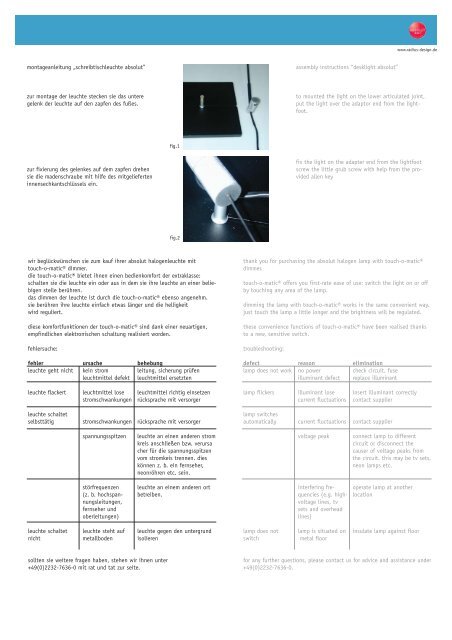
<strong>zur</strong> <strong>montage</strong> <strong>der</strong> leuchte stecken sie das untere<br />
gelenk <strong>der</strong> leuchte auf den zapfen des fußes.<br />
<strong>zur</strong> fixierung des gelenkes auf dem zapfen drehen<br />
sie die madenschraube mit hilfe des mitgelieferten<br />
innensechkantschlüssels ein.<br />
fig.1<br />
fig.2<br />
wir beglückwünschen sie zum kauf ihrer absolut halogenleuchte mit<br />
touch-o-matic® dimmer.<br />
die touch-o-matic® bietet ihnen einen bedienkomfort <strong>der</strong> extraklasse:<br />
schalten sie die leuchte ein o<strong>der</strong> aus in dem sie ihre leuchte an einer beliebigen<br />
stelle berühren.<br />
das dimmen <strong>der</strong> leuchte ist durch die touch-o-matic® ebenso angenehm.<br />
sie berühren ihre leuchte einfach etwas länger und die helligkeit<br />
wird reguliert.<br />
diese komfortfunktionen <strong>der</strong> touch-o-matic® sind dank einer neuartigen,<br />
empfindlichen elektronischen schaltung realisiert worden.<br />
fehlersuche:<br />
fehler ursache behebung<br />
leuchte geht nicht kein strom leitung, sicherung prüfen<br />
leuchtmittel defekt leuchtmittel ersetzten<br />
leuchte flackert leuchtmittel lose leuchtmittel richtig einsetzen<br />
stromschwankungen rücksprache mit versorger<br />
leuchte schaltet<br />
selbsttätig stromschwankungen rücksprache mit versorger<br />
spannungsspitzen leuchte an einen an<strong>der</strong>en strom<br />
kreis anschließen bzw. verursa<br />
cher für die spannungsspitzen<br />
vom stromkeis trennen. dies<br />
können z. b. ein fernseher,<br />
neonröhren etc. sein.<br />
störfrequenzen leuchte an einem an<strong>der</strong>en ort<br />
(z. b. hochspan- betreiben.<br />
nungsleitungen,<br />
fernseher und<br />
oberleitungen)<br />
leuchte schaltet leuchte steht auf leuchte gegen den untergrund<br />
nicht metallboden isolieren<br />
sollten sie weitere fragen haben, stehen wir ihnen unter<br />
+49(0)2232-7636-0 mit rat und tat <strong>zur</strong> seite.<br />
assembly instructions “desklight <strong>absolut”</strong><br />
www.radius-design.de<br />
to mounted the light on the lower articulated joint,<br />
put the light over the adaptor end from the lightfoot.<br />
fix the light on the adapter end from the lightfoot<br />
screw the little grub screw with help from the provided<br />
allen key<br />
thank you for purchasing the absolut halogen lamp with touch-o-matic®<br />
dimmer.<br />
touch-o-matic® offers you first-rate ease of use: switch the light on or off<br />
by touching any area of the lamp.<br />
dimming the lamp with touch-o-matic® works in the same convenient way.<br />
just touch the lamp a little longer and the brightness will be regulated.<br />
these convenience functions of touch-o-matic® have been realised thanks<br />
to a new, sensitive switch.<br />
troubleshooting:<br />
defect reason elimination<br />
lamp does not work no power check circuit, fuse<br />
illuminant defect replace illuminant<br />
lamp flickers illuminant lose insert illuminant correctly<br />
current fluctuations contact supplier<br />
lamp switches<br />
automatically current fluctuations contact supplier<br />
voltage peak connect lamp to different<br />
circuit or disconnect the<br />
causer of voltage peaks from<br />
the circuit. this may be tv sets,<br />
neon lamps etc.<br />
interfering fre- operate lamp at another<br />
quencies (e.g. high- location<br />
voltage lines, tv<br />
sets and overhead<br />
lines)<br />
lamp does not lamp is situated on insulate lamp against floor<br />
switch metal floor<br />
for any further questions, please contact us for advice and assistance un<strong>der</strong><br />
+49(0)2232-7636-0.
edienungshinweise „leuchte absolut 1 - 3 “ operating instructions “lamp absolut 1-3”<br />
die leuchte ist ausgelegt für eine netzspannung von<br />
230 v.<br />
wenn sie eine beschädigung an den zuleitungen<br />
o<strong>der</strong> am trafo bemerken, trennen sie die leuchte<br />
sofort vom stromnetz!<br />
durch den in die anschlussleitung integrierten dimmer<br />
kann die leuchtstärke <strong>der</strong> leuchte stufenlos<br />
eingestellt werden.<br />
die leuchte besitzt einen elektronischen dimmer,<br />
<strong>der</strong> auch zum ein- und ausschalten dient.<br />
zum einschalten <strong>der</strong> leuchte berühren sie kurz den<br />
carbonstab. noch-maliges kurzes berühren schaltet<br />
die leuchte aus. wenn sie den carbonstab länger<br />
berühren verstellt sich die helligkeit <strong>der</strong> leuchte<br />
stufenlos.<br />
pflegehinweise:<br />
reinigen sie ihre leuchte „absolut“ mit einem<br />
trockenen tuch. falls nötig kann für den fuss und<br />
das carbonrohr ein leicht feuchtes tuch verwendet<br />
werden. die edelstahlronde im leuchtenkopf sollte<br />
auf keinen fall mit bloßen fingern berührt werden<br />
da ansonsten sichtbare spuren <strong>zur</strong>ückbleiben können.<br />
ölen sie die kugel des gelenkes nicht ein.<br />
sonstige hinweise:<br />
sollten sie für ihre leuchte ersatzteile wie z.b.<br />
leuchtmittel benötigen, wenden sie sich bitte an<br />
ihren händler.<br />
wechseln des leuchtmittels: (fig. 12)<br />
trennen sie die leuchte vom stromnetz.<br />
leuchtmittel 12 v 35 w max. sockel g4 nie<strong>der</strong>druck<br />
matt. achten sie auf dieses zeichen:<br />
lassen sie die leuchte abkühlen! <strong>der</strong> leuchtenkopf<br />
kann sehr heiß werden. verbrennungsgefahr!<br />
ziehen sie das defekte leuchtmittel aus <strong>der</strong> fassung<br />
heraus und ersetzten sie es durch ein neues. vermeiden<br />
sie dabei das leuchtmittel mit bloßen fingern<br />
zu berühren.<br />
wechseln des gummiringes: fig (7-9)<br />
sollte <strong>der</strong> gummiring zwischen carbonstab und<br />
leuchtenkopf defekt sein, wechseln sie ihn wie<br />
folgt aus. lösen sie mit hilfe des beiliegenden<br />
innensechskantschlüssels die madenschraube im<br />
drehgriff des leuchtenkopfes. ziehen sie den drehgriff<br />
ab. vorsicht! <strong>der</strong> innenliegende stab ist spitz<br />
und könnte sie verletzen.<br />
legen sie den o-ring um den carbonstab und führen<br />
sie den stab des leuchtenkopfes ein. befestigen sie<br />
den drehgriff.<br />
fig.7<br />
fig.8<br />
fig.9<br />
fig.10<br />
fig.11<br />
fig.12<br />
the lamp is designed for a 230v line voltage.<br />
if you note damages at the wiring or the transformer,<br />
immediately separate the lamp from the power<br />
supply!<br />
thanks to the dimmer, which is integrated into the<br />
wiring of the lamp, the luminous intensity is infinitely<br />
variable.<br />
the lamp has an electronic dimmer which can also<br />
be used for turning on and off.<br />
for turning the lamp on, quickly touch the carbon<br />
bar. another quick touch will turn the lamp off.<br />
if you touch the carbon bar for a longer while, then<br />
the luminous intensity of the lamp will be infinitely<br />
variable.<br />
maintenance instructions:<br />
clean the lamp “<strong>absolut”</strong> with a dry cloth. if necessary,<br />
a slightly moist cloth can be used for cleaning<br />
the foot and the carbon pipe. you should never<br />
touch the round blank of stainless steel inside the<br />
lamp head with bare fingers as this could leave<br />
visible marks.<br />
do not grease the ball of the hinge.<br />
other instructions:<br />
if you need spare parts for your lamp like illuminants,<br />
please contact your dealer.<br />
changing the illuminant:(fig12)<br />
separate the lamp from the power supply.<br />
illuminant 12v 35w max. base g4 low pressure<br />
matt. pay attention to this symbol:<br />
www.radius-design.de<br />
allow the lamp to cool down! the lamp head can<br />
become very hot. danger of burning!<br />
remove the defect illuminant from the socket and<br />
replace it with a new one. avoid touching the illuminant<br />
with the bare fingers.<br />
changing the rubber ring: fig (7-9)<br />
if the rubber ring, which is situated between the<br />
carbon bar and the lamp head, is defect, change it<br />
as now described: release the grub screw inside the<br />
turning handle of the lamp head using the enclosed<br />
inner hexagonal wrench. slip off the turning handle<br />
carefully. caution! the bar inside is beaked and<br />
could hurt you.<br />
put the o-ring around the carbon bar and insert the<br />
bar into the lamp head. fix the turning handle.
informations d'utilisation lampe absolut<br />
pour le <strong>montage</strong> mettez le joint bas sur le maneton<br />
du pied.<br />
pour la fixation du joint sur le maneton vissez le<br />
boulon avec le clé allen<br />
fig.1<br />
fig.2<br />
nous vous félicitons dõavoir acheté votre lampe halogène absolut avec<br />
variateur touch-o-matic®.<br />
la technologie touch-o-matic®vous offre un confort d’utilisation de qualité<br />
supérieure : allumez ou éteignez la lampe en touchant votre lampe à n’importe<br />
quel endroit.<br />
grâce à touch-o-matic®, l'utilisation du variateur est également très confortable.<br />
il suffit de toucher votre lampe pendant un peu plus longtemps,<br />
et la luminosité sera réglée.<br />
ces fonctions confort de la technologie touch-o-matic® ont pu être réalisées<br />
grâce à une commutation électronique innovateur et sensible.<br />
recherche de défauts:<br />
défaut cause elimination<br />
la lampe ne pas d'alimentation vérifier le câble<br />
fonctionne pas en courant et fusible.<br />
ampoule défectueuse rechanger l’ampoule<br />
la lampe vacille ampoule desserrée fixer l’ampoule correctement<br />
fluctuations du contacter la compagnie<br />
courant d’électricité.<br />
la lampe commute fluctuations du contacter la compagnie<br />
automatiquement courant d’électricité.<br />
crêtes de tension connecter la lampe à un autre<br />
circuit, voire déconnecter les<br />
appareils causant les crêtes de<br />
tension du circuit. il peut s’agir<br />
p. ex. d’un téléviseur, de<br />
tubes à néon etc.<br />
fréquences parasites utiliser la lampe à un autre<br />
(p. ex. lignes à endroit.<br />
haute tension,<br />
téléviseurs et fils de<br />
contact)<br />
la lampe ne la lampe se trouve<br />
commute pas sur un sol métallique isoler la lampe contre le soussol<br />
au cas où vous auriez encore d’autres questions, nous sommes à votre disposition<br />
au numéro +49(0)2232-7636-0 pour vous conseiller.<br />
www.radius-design.de
informations d'utilisation " lampe absolut 1 - 3 "<br />
la lampe est construite pour une tension de 230 v.<br />
au cas où vous détectez que les lignes d'alimentation<br />
ou le transformateur sont défectueux, vous<br />
devez subitement débrancher la lampe du réseau<br />
électrique!<br />
grâce au variateur de lumière intégré dans la ligne<br />
d'alimentation, la luminosité peut être réglée sans<br />
à-coups.<br />
la lampe a un variateur de lumière électrique qui<br />
peut aussi être utilisé pour allumer et éteindre la<br />
lampe.<br />
pour allumer la lampe, touchez brièvement la tige<br />
argentée. Quand vous la touchez brièvement de<br />
nouveau, la lampe s'éteint. En touchant la tige<br />
argentée plus longtemps, vous pouvez régler la<br />
luminosité sans à-coups.<br />
informations d'entretien:<br />
nettoyez la lampe " absolut " avec un chiffon sec.<br />
si nécessaire, vous pouvez nettoyer le pied et la<br />
tige argentée avec un chiffon légèrement humide.<br />
ne touchez jamais le disque rond en acier affiné se<br />
trouvant dans la tête de la lampe à mains nues car<br />
cela peut laisser des traces visibles.<br />
n'huilez pas la boule de l'articulation.<br />
d'autres informations:<br />
au cas où vous avez besoin de pièces de rechange<br />
pour votre lampe comme par exemple des ampoules,<br />
veuillez contacter votre distributeur.<br />
changement d'ampoule: (fig. 12)<br />
débrancher la lampe du réseau électrique.<br />
ampoules 12 v 35 w max. base g4 basse pression<br />
mat. veuillez faire attention à ce symbole:<br />
laisser refroidir la lampe! la tête de lampe peut<br />
devenir très chaude. danger de brûlures!<br />
sortez l'ampoule défectueuse de la douille et remplacez-la<br />
par une nouvelle. évitez de toucher l'ampoule<br />
à mains nues.<br />
changement de l'anneau en caoutchouc: fig (7-9)<br />
au cas où l'anneau en caoutchouc se trouvant entre<br />
la tige argentée et la tête de la lampe est défectueux,<br />
remplacez-le comme suit. desserrez le goujon<br />
fileté dans la poignée tournante de la tête de la<br />
lampe à l'aide de la clé pour vis à six pans fournie<br />
avec cette lampe. enlevez la poignée tournante.<br />
attention! la tige intérieure est aiguë et peut causer<br />
des blessures.<br />
mettez le joint rond autour de la tige argentée et<br />
insérez la tige de la tête de la lampe. fixez la poignée<br />
tournante.<br />
fig.7<br />
fig.8<br />
fig.9<br />
fig.10<br />
fig.11<br />
fig.12<br />
www.radius-design.de