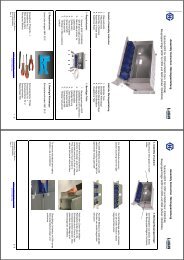
LiSA Baugruppenträger 900F/800F Montage Anleitung - Composites
LiSA Baugruppenträger 900F/800F Montage Anleitung - Composites
LiSA Baugruppenträger 900F/800F Montage Anleitung - Composites

Sie wollen auch ein ePaper? Erhöhen Sie die Reichweite Ihrer Titel.
YUMPU macht aus Druck-PDFs automatisch weboptimierte ePaper, die Google liebt.
Assembly Instruction / <strong>Montage</strong>anleitung<br />
Subrack <strong>900F</strong> and <strong>800F</strong> for ODR (Artikel: 23040051)<br />
Baugruppenträger <strong>900F</strong> und <strong>800F</strong> für ODR (Item: 23040051)<br />
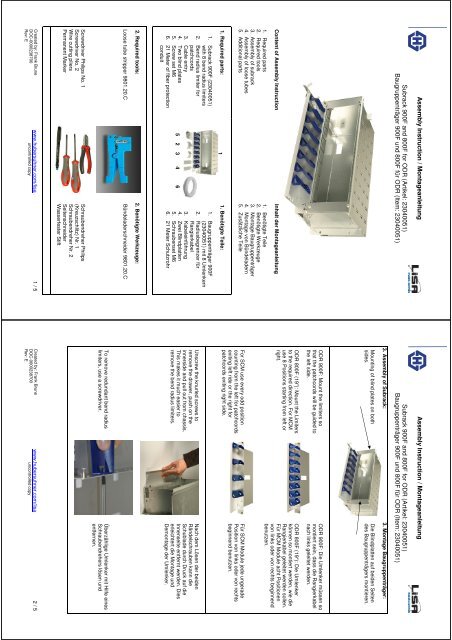
Content of Assembly Instruction<br />
Inhalt der <strong>Montage</strong>anleitung<br />
1. Required parts<br />
2. Required tools<br />
3. Assembly of subrack<br />
4. Assembly of loose tubes<br />
5. Additional parts<br />
1. Benötigte Teile<br />
2. Benötigte Werkzeuge<br />
3. <strong>Montage</strong> Baugruppenträger<br />
4. <strong>Montage</strong> von Bündeladern<br />
5. Zusätzliche Teile<br />
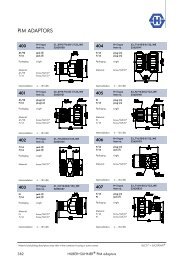
1. Required parts:<br />
1<br />
1. Benötigte Teile:<br />
1. Subrack <strong>900F</strong> (23040051)<br />
with 8 bend radius limiters<br />
2. Bend radius limiter for<br />
patchcords<br />
3. Cable entry<br />
4. Two blind plates<br />
5. Screw set M6<br />
6. 21 Meter of fiber protection<br />
conduit<br />
5 2 3 4 6<br />
1. Baugruppenträger <strong>900F</strong><br />
(23040051) mit 8 Umlenkern<br />
2. Radiusbegrenzer für<br />
Rangierkabel<br />
3. Kabeleinführung<br />
4. Zwei Blindplatten<br />
5. Schraubenset M6<br />
6. 21 Meter Schutzrohr<br />
2. Required tools:<br />
2. Benötigte Werkzeuge:<br />
Loose tube stripper 9801.20.C<br />
Bündeladerschneider 9801.20.C<br />
Screwdriver Philips No. 1<br />
Screwdriver No. 2<br />
Wire cutting pliers<br />
Permanent Marker<br />
Schraubendreher Philips<br />
(Kreuzschlitz) Nr. 1<br />
Schraubendreher Nr. 2<br />
Seitenschneider<br />
Wasserfester Stift<br />
Created by: Frank Brune<br />
DOC-0000238700<br />
Rev: E<br />
www.hubersuhner.com/lisa<br />
uncontrolled copy<br />
1 / 5<br />
Assembly Instruction / <strong>Montage</strong>anleitung<br />
Subrack <strong>900F</strong> and <strong>800F</strong> for ODR (Artikel: 23040051)<br />
Baugruppenträger <strong>900F</strong> und <strong>800F</strong> für ODR (Item: 23040051)<br />
3. Assembly of Subrack:<br />
3. <strong>Montage</strong> Baugruppenträger:<br />
Mounting of blind plates on both<br />
sides.<br />
Die Blindplatten auf beiden Seiten<br />
des Baugruppenträgers montieren.<br />
ODR <strong>900F</strong>: Mount the limiters so<br />
that the patchcords will be guided to<br />
the left side.<br />
ODR <strong>900F</strong>: Die Umlenker müssen so<br />
montiert sein, dass die Rangierkabel<br />
nach links geleitet werden.<br />
ODR <strong>800F</strong> (19”): Mount the Limiters<br />
to the required direction. For MCM<br />
use 8 Positions starting from left or<br />
right.<br />
ODR <strong>800F</strong> (19“): Die Umlenker<br />
können so montiert werden, wie die<br />
Rangierkabel geleitet werden sollen.<br />
Für MCM Module acht Positionen<br />
von links oder von rechts beginnend<br />
benutzen.<br />
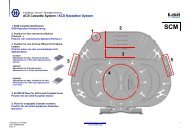
For SCM use every odd position<br />
counting from the left for patchcords<br />
exiting left ride or the right for<br />
patchcords exiting right side.<br />
Für SCM Module jede ungerade<br />
Position von links oder von rechts<br />
beginnend benutzen.<br />
Unscrew the knurled screws to<br />
remove the drawer, push on the<br />
innerside and pull out from chassis.<br />
This makes it much easier to<br />
remove the bend radius limiters.<br />
Nach dem Lösen der beiden<br />
Rändelschrauben kann die<br />
Schublade durch Druck auf die<br />
Innenseite entfernt werden. Dies<br />
erleichtert die <strong>Montage</strong> und<br />
Demontage der Umlenker.<br />
To remove redundant bend radius<br />
limiters, use a screwdriver.<br />
Überzählige Umlenker mit Hilfe eines<br />
Schraubendrehers lösen und<br />
entfernen.<br />
Created by: Frank Brune<br />
DOC-0000238700<br />
Rev: E<br />
www.hubersuhner.com/lisa<br />
uncontrolled copy<br />
2 / 5
Assembly Instruction / <strong>Montage</strong>anleitung<br />
Subrack <strong>900F</strong> and <strong>800F</strong> for ODR (Artikel: 23040051)<br />
Baugruppenträger <strong>900F</strong> und <strong>800F</strong> für ODR (Item: 23040051)<br />
For use in ODR <strong>900F</strong>:<br />
The cable entry can be mounted<br />
upwards or downwards. Mount it in<br />
the direction where the cables enter<br />
the rack.<br />
Fix the cable entry on the right front<br />
side with the supplied screws.<br />
Bei Gebrauch im ODR <strong>900F</strong>:<br />
Die Kabeleinführung an der rechten<br />
vorderen Seite mit der mitgelieferten<br />
Schraube montieren. Diese kann für<br />
Kabel von oben oder von unten<br />
kommend montiert werden.<br />
For use in ODR <strong>800F</strong> (19”):<br />
Fit the mounting angle to the front of<br />
the subrack and the cable entry at<br />
the required point in one of the rear<br />
positions.<br />
Bei Gebrauch im ODR <strong>800F</strong> (19“):<br />
Die Befestigungswinkel vorne an den<br />
Baugruppenträger montieren.<br />
For mounting of subrack in ODR<br />
screw two screws each side through<br />
the mounting angle into the rack.<br />
Zur <strong>Montage</strong> im ODR, je zwei<br />
Schrauben auf jeder Seite durch den<br />
<strong>Montage</strong>winkel in den Schrank<br />
schrauben.<br />
4. Assembly of loose tubes:<br />
4. <strong>Montage</strong> der Schutzrohre:<br />
Insert the conduits according to the<br />
sketch.<br />
Anordnung der Schutzrohre auf 1-8,<br />
wie im Bild dargestellt.<br />
If you are using two conduits per<br />
Module, the length of the protection<br />
conduit has to be reduced from<br />
1650 to 800mm.<br />
Bei der Nutzung von zwei<br />
Schutzschläuchen pro Modul, muss<br />
die Schutzrohrlänge von 1650 auf<br />
800mm reduziert werden.<br />
Cut the bend limitation conduit to<br />
eight lengths with the loose tube<br />
cutter according to the table.<br />
Nr. ODR <strong>800F</strong><br />
(19”)<br />
ODR<br />
<strong>900F</strong><br />
1. 2450 2050<br />
2. 2500 2100<br />
3. 2550 2150<br />
4. 2600 2200<br />
5. 2650 2250<br />
6. 2700 2300<br />
7. 2750 2350<br />
8. 2800 2400<br />
Die richtige Länge des Schutzrohres<br />
mit Hilfe der Tabelle ermitteln und<br />
abschneiden.<br />
Created by: Frank Brune<br />
DOC-0000238700<br />
Rev: E<br />
www.hubersuhner.com/lisa<br />
uncontrolled copy<br />
3 / 5<br />
Assembly Instruction / <strong>Montage</strong>anleitung<br />
Subrack <strong>900F</strong> and <strong>800F</strong> for ODR (Artikel: 23040051)<br />
Baugruppenträger <strong>900F</strong> und <strong>800F</strong> für ODR (Item: 23040051)<br />
Mark all conduits 1650mm from one<br />
end. Feed the loose tubes into the<br />
conduits from the other end.<br />
A=Protection Conduit<br />
B=Loose Tube<br />
C=Fibres<br />
A B C<br />
Alle Schutzrohre 1650mm von einem<br />
Ende markieren, anschliessend die<br />
Bündeladern vom anderen Ende aus<br />
in die Schutzrohre einschieben.<br />
A=Schutzschlauch<br />
B=Bündelader<br />
C=LWL Fasern<br />
For use in ODR <strong>800F</strong> (19”):<br />
Insert the conduits according to the<br />
sketch<br />
Bei Gebrauch im ODR <strong>800F</strong> (19“):<br />
Anordnung der Schutzrohre auf der<br />
Bündeladerzuführung für die<br />
Positionen 1-8, wie in beiden Bildern<br />
dargestellt.<br />
Align the conduit mark with the front<br />
of the loose tube and push down to<br />
retain.<br />
For MCM modules use all positions.<br />
For SCM modules use positions 2, 4,<br />
6 and 8.<br />
Die Schutzrohre mit der Markierung<br />
zur Vorderseite der<br />
Bündeladerzuführung <strong>900F</strong>/<strong>800F</strong><br />
positionieren und in die Aufnahme<br />
drücken.<br />
Für MCM Module können alle<br />
Positionen verwendet werden.<br />
Für SCM Module die Positionen 2, 4,<br />
6 und 8 benutzen.<br />
Fix the conduits at the next cable<br />
bracket and cable entry with cable<br />
ties.<br />
Die Schutzrohre an Kabeleinführung<br />
und Kabelhalter mit je einem<br />
Kabelbinder befestigen.<br />
Created by: Frank Brune<br />
DOC-0000238700<br />
Rev: E<br />
www.hubersuhner.com/lisa<br />
uncontrolled copy<br />
4 / 5
Assembly Instruction / <strong>Montage</strong>anleitung<br />
Subrack <strong>900F</strong> and <strong>800F</strong> for ODR (Artikel: 23040051)<br />
Baugruppenträger <strong>900F</strong> und <strong>800F</strong> für ODR (Item: 23040051)<br />
Mount the bend radius limiter for<br />
patchcords on the left side<br />
(ODR<strong>900F</strong>) or required side<br />
(ODR <strong>800F</strong>) of the subrack.<br />
Den Radienbegrenzer für<br />
Rangierkabel an der linken Seite<br />
(ODR <strong>900F</strong>) oder an die benötigte<br />
Seite (ODR <strong>800F</strong>) vom<br />
Baugruppenträger montieren.<br />
5. Additional parts:<br />
5. Zusätzliche Teile:<br />
Velcro Strap Item: 84005450<br />
Klettband Artikelnummer: 84005450<br />
To bind cables and patchcords<br />
together<br />
Um Kabel und Patchcords<br />
zusammen zu halten.<br />
Colour black<br />
Width 16mm<br />
Delivered on a reel (25m)<br />
Farbe schwarz<br />
Breite 16mm<br />
Lieferung auf einer Rolle (25m)<br />
HUBER+SUHNER is certified according to<br />
ISO 9001 and ISO 14001.<br />
HUBER+SUHNER ist nach ISO 9001 und ISO 14001<br />
zertifiziert.<br />
WAIVER<br />
It is exclusively in written agreements that we provide our customers with warrants and<br />
representations as to the technical specifications and/or the fitness for any particular<br />
purpose. The facts and figures contained herein are carefully compiled to the best of our<br />
knowledge, but they are intended for general informational purposes only.<br />
Hinweis<br />
Wir gewähren unseren Kunden Produktgarantien hinsichtlich technischer<br />
Funktionen und Eignungen zu besonderen Zwecken ausschliesslich in schriftlichen<br />
Vereinbarungen. Die Informationen in diesem Dokument sind nach bestem Wissen<br />
und Gewissen zusammengestellt, sie dienen aber vorab Informationszwecken.<br />
Created by: Frank Brune<br />
DOC-0000238700<br />
Rev: E<br />
www.hubersuhner.com/lisa<br />
uncontrolled copy<br />
5 / 5