vibroport 41 vibrotest 42 vibrobalancer 42 - Brüel & Kjaer Vibro
vibroport 41 vibrotest 42 vibrobalancer 42 - Brüel & Kjaer Vibro
vibroport 41 vibrotest 42 vibrobalancer 42 - Brüel & Kjaer Vibro

Erfolgreiche ePaper selbst erstellen
Machen Sie aus Ihren PDF Publikationen ein blätterbares Flipbook mit unserer einzigartigen Google optimierten e-Paper Software.
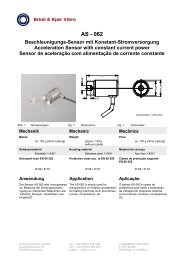
AS – 020<br />
• Die Montagefläche muss im<br />
Bereich des AS-020 plan und<br />
bearbeitbar sein.<br />
• Bei Ausführung mit Schutzdom ist<br />
die Montagefläche gemäß Datenblatt<br />
"Schutzdom" auszuführen.<br />
• Montagefläche mit Gewindebohrung<br />
M8 bzw. 1/4“, 12 mm tief<br />
versehen.<br />
• Dünne Schicht Silikonfett auf die<br />
Montagefläche auftragen, um<br />
Kontaktresonanz zu vermeiden.<br />
• Gewindestift M8 gemäß Abb. 3 in<br />
Montagefläche einschrauben und<br />
sichern (z.B. mit LOCTITE).<br />
• Max. Einschraubtiefe ≤ 5 mm für<br />
Beschleunigungs-Sensor<br />
einhalten.<br />
• AS-020 auf Gewindestift<br />
aufschrauben<br />
Max. Anzugsmoment<br />
entsprechend Gewindestift<br />
beachten.<br />
• The mounting surface in the area<br />
of AS-020 must be plane and<br />
machined.<br />
• For version with protective cover,<br />
the mounting surface must be<br />
designed in accordance with data<br />
sheet "protective cover".<br />
• Provide mounting surface with<br />
threaded hole M8 or 1/4“, 12 mm<br />
deep.<br />
• Apply a thin film of silicone grease<br />
on the mounting surface to prevent<br />
contact resonance.<br />
• Screw stud into the mounting<br />
surface in accordance with fig. 3<br />
and secure same (e.g. with<br />
LOCTITE).<br />
• Max. reach of screw ≤ 5 mm for<br />
acceleration sensors to be<br />
adhered to.<br />
• Screw AS-020 onto the stud.<br />
Observe max. tightening torque in<br />
accordance with stud.<br />
• La surface d'installation doit être<br />
plane et usinée aux alentours du<br />
AS-020.<br />
• Pour les modèles avec voûte de<br />
protection, la surface de montage<br />
est à exécuter suivant le fiche<br />
technique "Voûte de protection.<br />
• Prévoir un perçage fileté M8 ou<br />
1/4" de 12 mm de prof. sur la<br />
surface de montage.<br />
• Etaler une fine couche de graisse<br />
aux silicones sur la surface de<br />
montage pour éviter les résonances<br />
par contact.<br />
• Visser la goupille filetée suivant<br />
Fig.3 dans la surface de montage<br />
et sécuriser p.ex. avec du<br />
LOCTITE.<br />
• Profondeur maxi de vissage<br />
≤ 5 mm pour l'accéléromètre est<br />
impérative.<br />
• Visser le AS-020 sur la goupille<br />
filetée.<br />
Observer le couple de serrage<br />
maxi admissible respectif de la<br />
goupille filetée.<br />
Elektrischer Anschluss Electrical Connection Raccordement électrique<br />
Anschlusskabel verlegen Installation of connecting<br />
cable<br />
• Schutzdom, Stahlschutzschlauch<br />
und -rohre zum Schutz des Kabels<br />
gegen mechanische Beschädigungen<br />
sowie zur Erhöhung der<br />
EMV-Sicherheit verwenden.<br />
• Anschlusskabel nicht parallel zu<br />
Energieleitungen verlegen. Ist<br />
dieses nicht möglich, ist zwischen<br />
den Kabeln ein Mindestabstand<br />
von 1 m einhalten.<br />
• Use protective cover, metal<br />
conduit or protective tubes to<br />
protect the cable from mechanical<br />
damages as well as to safeguard<br />
the increase of EMC.<br />
• Connecting cable not to be<br />
installed in parallel to energy lines.<br />
If this is not possible, the minimum<br />
distance should be 1 m.<br />
Pose des câbles de<br />
raccordement<br />
• Utiliser voûte de protection,<br />
flexibles et tubes de protection en<br />
acier pour la protection du câble de<br />
toute détérioration mécanique,<br />
ainsi que pour assurer une<br />
meilleure compatibilité électromagnétiques.<br />
• Ne pas poser le câble de<br />
raccordement parallèlement aux<br />
lignes énergétiques. Si cela n'était<br />
pas possible, respecter une<br />
distance minimale de 1 m entre les<br />
câbles.<br />
Seite/Page 6 von/of/de 8 © AS020DEF 3.4.2006