NOXON iRadio M110+ - Index of - TERRATEC
NOXON iRadio M110+ - Index of - TERRATEC
NOXON iRadio M110+ - Index of - TERRATEC

Erfolgreiche ePaper selbst erstellen
Machen Sie aus Ihren PDF Publikationen ein blätterbares Flipbook mit unserer einzigartigen Google optimierten e-Paper Software.
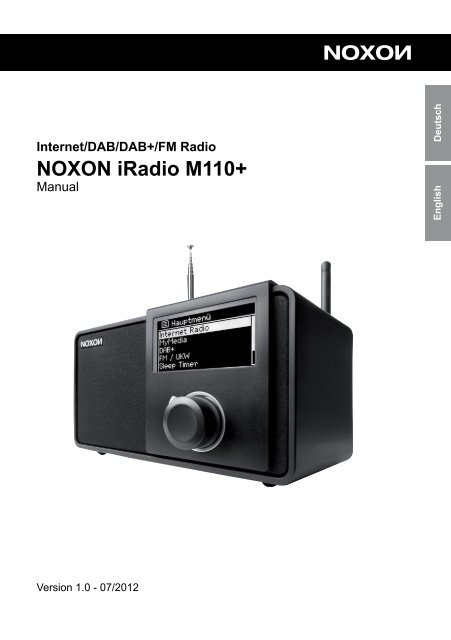
Internet/DAB/DAB+/FM Radio<br />
<strong>NOXON</strong> <strong>iRadio</strong> <strong>M110+</strong><br />
Manual<br />
Version 1.0 - 07/2012<br />
Deutsch<br />
English
<strong>NOXON</strong> <strong>iRadio</strong> <strong>M110+</strong><br />
Menüstruktur<br />
2<br />
Hauptmenü<br />
Internet Radio<br />
MyMedia<br />
Sleep Timer<br />
Wecker<br />
Systemeinstellungen<br />
Internet Radio<br />
Favoriten<br />
Sender<br />
Podcasts<br />
my<strong>NOXON</strong><br />
Verlauf<br />
My Media<br />
Serverliste<br />
USB abspielen<br />
Meine Wiedergabeliste<br />
Wiederholen: aus<br />
Shuffle: aus<br />
Meine Wiedergabeliste..<br />
Serverliste bereinigen<br />
Systemeinstellungen<br />
Equalizer<br />
Netzwerk<br />
Datum/Uhrzeit<br />
Sprache<br />
Werkseinstellungen<br />
S<strong>of</strong>tware Update<br />
Einrichtungsassistent<br />
Info<br />
Favoriten<br />
Sender 1<br />
Sender 2<br />
Sender 3<br />
Sender 4<br />
Sender 5<br />
Sender<br />
Lokaler Sender - Deut...<br />
Länder<br />
Genre<br />
Sendersuche<br />
Best <strong>of</strong> <strong>NOXON</strong><br />
Neue Sender<br />
Podcasts<br />
Afrika<br />
Asien<br />
Karibik<br />
Zentralamerika<br />
Europa<br />
Podcastsuche<br />
my<strong>NOXON</strong><br />
Dienst 1<br />
Dienst 2<br />
Dienst 3<br />
Dienst 4<br />
Dienst 5<br />
Verlauf<br />
Sender 1<br />
Sender 2<br />
Sender 3<br />
Sender 4<br />
Sender 5<br />
Serverliste<br />
Server 1<br />
Server 2<br />
Server 3<br />
Server 4<br />
Server 5<br />
Equalizer<br />
Aus<br />
...<br />
Netzwerk<br />
Netzwerkassistent<br />
WPS-Einrichtung<br />
Einstellungen anzeigen<br />
WLAN-Region<br />
Manuelle Einstellungen<br />
Netzwerkpr<strong>of</strong>il<br />
Datum/Uhrzeit<br />
Datum/Uhrzeit einstell...<br />
Auto-Update<br />
12/24h einstellen<br />
Wähle Zeitzone<br />
Sommerzeit<br />
Sprache<br />
English<br />
Deutsch<br />
Francaise<br />
Italiano<br />
Espanol<br />
Nederlandse<br />
S<strong>of</strong>tware Update<br />
Auto-Aktualisierung<br />
Jetzt aktualisieren
INHALT<br />
Menüstruktur . . . . . . . . . . . . . . . . . . . . . . . . . . . . . . . . . . . . . . . . . . . . . . . . . . . . . . . . . . . . . . . 2<br />
CE Konformitätserklärung . . . . . . . . . . . . . . . . . . . . . . . . . . . . . . . . . . . . . . . . . . . . . . . . . . . . . 4<br />
Wichtige Hinweise . . . . . . . . . . . . . . . . . . . . . . . . . . . . . . . . . . . . . . . . . . . . . . . . . . . . . . . . . . . . . 5<br />
Lieferumfang . . . . . . . . . . . . . . . . . . . . . . . . . . . . . . . . . . . . . . . . . . . . . . . . . . . . . . . . . . . . . . . . . . 6<br />
Überblick . . . . . . . . . . . . . . . . . . . . . . . . . . . . . . . . . . . . . . . . . . . . . . . . . . . . . . . . . . . . . . . . . . . . . 7<br />
Vorderseite. . . . . . . . . . . . . . . . . . . . . . . . . . . . . . . . . . . . . . . . . . . . . . . . . . . . . . . . . . . . . . . . . 7<br />
Oberseite . . . . . . . . . . . . . . . . . . . . . . . . . . . . . . . . . . . . . . . . . . . . . . . . . . . . . . . . . . . . . . . . . . 7<br />
Rückseite . . . . . . . . . . . . . . . . . . . . . . . . . . . . . . . . . . . . . . . . . . . . . . . . . . . . . . . . . . . . . . . . . . 8<br />
Fernbedienung. . . . . . . . . . . . . . . . . . . . . . . . . . . . . . . . . . . . . . . . . . . . . . . . . . . . . . . . . . . . . . 9<br />
Hauptfunktionen . . . . . . . . . . . . . . . . . . . . . . . . . . . . . . . . . . . . . . . . . . . . . . . . . . . . . . . . . . . . . . 10<br />
Internetradio. . . . . . . . . . . . . . . . . . . . . . . . . . . . . . . . . . . . . . . . . . . . . . . . . . . . . . . . . . . . . . . 11<br />
Podcast & Radio On Demand . . . . . . . . . . . . . . . . . . . . . . . . . . . . . . . . . . . . . . . . . . . . . . . . . 11<br />
Digital Media Player (UPnP) . . . . . . . . . . . . . . . . . . . . . . . . . . . . . . . . . . . . . . . . . . . . . . . . . . 12<br />
DAB, DAB+ und UKW . . . . . . . . . . . . . . . . . . . . . . . . . . . . . . . . . . . . . . . . . . . . . . . . . . . . . . . 13<br />
Wiedergabe von USB-Speichermedien . . . . . . . . . . . . . . . . . . . . . . . . . . . . . . . . . . . . . . . . . . 15<br />
Anzeige . . . . . . . . . . . . . . . . . . . . . . . . . . . . . . . . . . . . . . . . . . . . . . . . . . . . . . . . . . . . . . . . . . . . . 16<br />
Statuszeile . . . . . . . . . . . . . . . . . . . . . . . . . . . . . . . . . . . . . . . . . . . . . . . . . . . . . . . . . . . . . . . . 16<br />
Listenansicht . . . . . . . . . . . . . . . . . . . . . . . . . . . . . . . . . . . . . . . . . . . . . . . . . . . . . . . . . . . . . . 17<br />
Wiedergabeansicht . . . . . . . . . . . . . . . . . . . . . . . . . . . . . . . . . . . . . . . . . . . . . . . . . . . . . . . . . 17<br />
Hauptmenü & Co . . . . . . . . . . . . . . . . . . . . . . . . . . . . . . . . . . . . . . . . . . . . . . . . . . . . . . . . . . . . . . 18<br />
My Media . . . . . . . . . . . . . . . . . . . . . . . . . . . . . . . . . . . . . . . . . . . . . . . . . . . . . . . . . . . . . . . . . 20<br />
Sleep Timer . . . . . . . . . . . . . . . . . . . . . . . . . . . . . . . . . . . . . . . . . . . . . . . . . . . . . . . . . . . . . . . 20<br />
Wecker . . . . . . . . . . . . . . . . . . . . . . . . . . . . . . . . . . . . . . . . . . . . . . . . . . . . . . . . . . . . . . . . . . . 20<br />
Systemeinstellungen . . . . . . . . . . . . . . . . . . . . . . . . . . . . . . . . . . . . . . . . . . . . . . . . . . . . . . . . 21<br />
Internet Radio: Schnellstart . . . . . . . . . . . . . . . . . . . . . . . . . . . . . . . . . . . . . . . . . . . . . . . . . . . . . 25<br />
Vorab-Check . . . . . . . . . . . . . . . . . . . . . . . . . . . . . . . . . . . . . . . . . . . . . . . . . . . . . . . . . . . . . . 25<br />
Einrichten . . . . . . . . . . . . . . . . . . . . . . . . . . . . . . . . . . . . . . . . . . . . . . . . . . . . . . . . . . . . . . . . . 25<br />
Hören und Genießen . . . . . . . . . . . . . . . . . . . . . . . . . . . . . . . . . . . . . . . . . . . . . . . . . . . . . . . . 27<br />
Internet Radio: Einrichtung im Detail . . . . . . . . . . . . . . . . . . . . . . . . . . . . . . . . . . . . . . . . . . . . . 28<br />
Eine Frage vor dem Start: Kabel oder Funk?. . . . . . . . . . . . . . . . . . . . . . . . . . . . . . . . . . . . . . 28<br />
Von Routern, SSID, MAC & IPs . . . . . . . . . . . . . . . . . . . . . . . . . . . . . . . . . . . . . . . . . . . . . . . . 28<br />
Das erste Einschalten . . . . . . . . . . . . . . . . . . . . . . . . . . . . . . . . . . . . . . . . . . . . . . . . . . . . . . . 30<br />
Der Netzwerk-Einrichtungsassistent . . . . . . . . . . . . . . . . . . . . . . . . . . . . . . . . . . . . . . . . . . . . 30<br />
Szenario 1 – die Einbindung via Kabel . . . . . . . . . . . . . . . . . . . . . . . . . . . . . . . . . . . . . . . . . . 31<br />
Szenario 2 – die Einbindung via Funk . . . . . . . . . . . . . . . . . . . . . . . . . . . . . . . . . . . . . . . . . . . 32<br />
Manuelle Einstellungen . . . . . . . . . . . . . . . . . . . . . . . . . . . . . . . . . . . . . . . . . . . . . . . . . . . . . . 34<br />
WPS (WiFi Protected Setup) . . . . . . . . . . . . . . . . . . . . . . . . . . . . . . . . . . . . . . . . . . . . . . . . . . 34<br />
Anhang . . . . . . . . . . . . . . . . . . . . . . . . . . . . . . . . . . . . . . . . . . . . . . . . . . . . . . . . . . . . . . . . . . . . . 35<br />
3<br />
Deutsch<br />
English
<strong>NOXON</strong> <strong>iRadio</strong> <strong>M110+</strong><br />
CE Konformitätserklärung<br />
Wir: <strong>TERRATEC</strong> Electronic GmbH · Herrenpfad 38 · 41334 Nettetal · Deutschland<br />
erklären hiermit, dass das Produkt:<br />
<strong>NOXON</strong> <strong>iRadio</strong> <strong>M110+</strong><br />
auf die sich diese Erklärung bezieht, mit den folgenden Normen bzw. normativen Dokumenten<br />
übereinstimmen:<br />
• EN 55013:2001 + A1:2003 + A2:2006<br />
• EN 55020:2007<br />
• EN 61000-3-2:2006 + A1:2009 + A2:2009<br />
• EN 61000-3-3:2008<br />
• EN 60065:2002+A1:2006+A11:2008<br />
Die folgenden Bestimmungen werden erfüllt:<br />
• EN 301489-1 V1.8.1 (2008-04)<br />
• EN 301489-17 V2.1.1 (2009-05)<br />
• EN 300328 V1.7.1 (2006-10)<br />
• EN 50371:2002<br />
Dieses Produkt ist konform mit:<br />
• LVD directive 2006/95/EC<br />
Dieser Erklärung liegt zugrunde:<br />
• Prüfbericht(e) der ShenZhen Timeway Technology Consulting Co., Ltd.<br />
Damit sind die grundlegenden Schutzanforderungen der EMV Richtlinie 89/336/EEC<br />
erfüllt. Die CE-Konformität wurde nachgewiesen. Im Rahmen der R&TTE Directive<br />
(1999/5/EC) entspricht das Gerät einer Funkanlage der Klasse 1 (Commission Decision<br />
2000/299/EC).<br />
VORSICHT:<br />
Um dieses Gerät vollständig von der Stromversorgung abzutrennen, ziehen Sie bitte den<br />
Stecker aus der Wandsteckdose. Der Netzstecker wird verwendet, um die Stromversorgung<br />
zum Gerät völlig zu unterbrechen; er muss für den Benutzer gut und einfach zu<br />
erreichen sein.<br />
4
Wichtige Hinweise<br />
Sicherheit<br />
• Lesen Sie die Bedienungsanleitung sorgfältig durch und bewahren diese auf.<br />
• Beachten Sie alle Warnhinweise und folgen den Anweisungen, um Beschädigungen<br />
zu vermeiden.<br />
• Verwenden Sie dieses Gerät nur im Innenbereich.<br />
• Um Feuer, elektrische Schläge oder Schäden am Gerät zu verhindern, stellen Sie<br />
das Gerät bitte auf einen ebenen und trockenen Untergrund.<br />
• Benutzen Sie das Gerät nicht in der Nähe von Wasser oder anderen Flüssigkeiten.<br />
• Halten Sie das Gerät von direkter Sonneneinstrahlung, Heizkörpern, <strong>of</strong>fenen Flammen<br />
und anderen Wärmequellen fern.<br />
• Benutzen Sie nur das beigelegte Netzkabel. Wenn Sie das Gerät längere Zeit nicht<br />
benutzen, sollten Sie es von der Stromversorgung trennen. Bitte ziehen Sie nie direkt<br />
am Kabel, um Kurzschlüsse zu vermeiden. Außerdem sollte das Gerät bei aufkommendem<br />
Gewitter vorsorglich vom Netz getrennt werden.<br />
• Wird das Gerät starken Temperaturschwankungen ausgesetzt, so lassen Sie es für<br />
etwa eine Stunde stehen, ohne es anzuschließen. Es könnte sich im Gerät Kondensfeuchtigkeit<br />
gebildet haben, welche die Funktionalität beeinträchtigt.<br />
• Reinigen Sie den <strong>NOXON</strong> nur mit einem trockenen oder höchstens leicht angefeuchteten,<br />
fusselfreien Tuch. Reinigungsmittel können die Oberfläche des Gerätes in Mitleidenschaft<br />
ziehen und sollten nicht verwendet werden.<br />
• Kurz: gehen Sie bitte „vernünftig“ mit dem Gerät um. Eine vorsätzliche oder selbstverursachte<br />
Schädigung wird nicht von den Garantieleistungen abgedeckt.<br />
Umwelt<br />
• Das Produkt enthält Batterien, die der europäischen Richtlinie 2006/66/EG unterliegen<br />
und nicht mit dem normalen Hausmüll entsorgt werden dürfen.<br />
• Dieses Produkt erfüllt die EU Richtlinie 2002/96/EC und darf nicht über den normalen<br />
Hausmüll entsorgt werden.<br />
• Bitte informieren Sie sich bei den örtlichen Behörden über die korrekte Entsorgung –<br />
Sie helfen dadurch die Umwelt zu schützen!<br />
5<br />
Deutsch<br />
English
<strong>NOXON</strong> <strong>iRadio</strong> <strong>M110+</strong><br />
Lieferumfang<br />
• <strong>NOXON</strong> <strong>iRadio</strong> <strong>M110+</strong><br />
• Netzkabel<br />
• Fernbedienung mit eingelegter Batterie<br />
• WLAN-Antenne<br />
• UKW-Teleskopantenne<br />
• Antennen-Adapter (IEC weiblich)<br />
• Antennen-Adapter (IEC männlich)<br />
• Bedienungsanleitung (DE, EN)<br />
• Schnellstartanleitung (DE, EN, FR, IT, NL)<br />
6
Überblick<br />
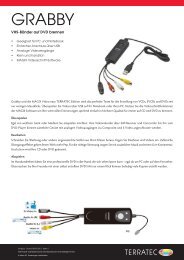
Vorderseite<br />
1. Navigationsrad mit Push-Funktion<br />
zur Auswahl: Durch Drehen in der<br />
Listenansicht scrollen Sie durch das<br />
Menü. Drehen während der Wiedergabe<br />
verändert die Lautstärke. Um<br />
einen Menüpunkt auszuwählen,<br />
drücken Sie einmal auf das Rad.<br />
2. Back-Button: Damit springen Sie einen<br />
Schritt zurück in der Auswahl.<br />
3. Display: Zeigt Ihnen alle zur Verfügung<br />
stehenden Informationen,<br />
Funktionen und Menüs an.<br />
Oberseite<br />
4. Stationstasten 1 bis 5: Hier können<br />
für den Schnellzugriff bis zu fünf<br />
Ihrer Lieblingssender gespeichert<br />
werden.<br />
5. Stopp: Stoppt die Wiedergabe.<br />
6. Skip Back: Springt zum vorherigen<br />
Titel.<br />
7. Play/Pause: Startet und pausiert die<br />
Wiedergabe.<br />
8. Skip Forward: Springt zum nächsten<br />
Titel.<br />
9. Standby On/Off: Hier wird das <strong>iRadio</strong><br />
zum Leben erweckt und auch<br />
wieder in den Schlaf geschickt.<br />
7<br />
Deutsch<br />
English
<strong>NOXON</strong> <strong>iRadio</strong> <strong>M110+</strong><br />
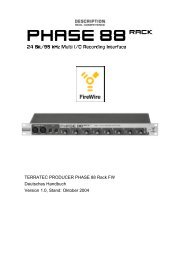
Rückseite<br />
1. WLAN-Antenne: Für den drahtlosen Empfang von Internet-Radiostationen muss hier<br />
die mitgelieferte WLAN-Antenne angeschlossen werden.<br />
2. UKW-Antenne: Hier können Sie die mitgelieferte UKW-Stabantenne einstecken. Alternativ<br />
dazu können Sie den mitgelieferten Antennen-Adapter verwenden, wenn Sie<br />
das Radiosignal z.B. von einer Hausantenne per Kabel einspeisen möchten.<br />
3. POWER-Schalter: Trennt das Gerät vollständig vom Netz.<br />
4. POWER: Verbinden Sie das mitgelieferte Netzkabel mit dieser Buchse.<br />
5. LAN: Zum kabelgebundenen Netzwerkbetrieb nutzen Sie bitte diese RJ45-Buchse.<br />
6. USB: An den USB-Anschluss können Sie Massenspeichermedien wie externe Festplatten<br />
und Speichersticks anschließen. Ihr <strong>NOXON</strong> unterstützt sowohl USB 1.x als<br />
auch USB 2.0 Speichergeräte.<br />
7. LINE-Ausgang: Diese 3,5 mm Stereo-Buchse können Sie mit einem Verstärker oder<br />
aktiven Lautsprechern verbinden. Wenn diese Buchse belegt ist, werden die internen<br />
Lautsprecher stumm geschaltet.<br />
8. Kopfhörer: Hier können Sie Ihren Kopfhörer anschließen, wenn Sie den Sound des<br />
<strong>iRadio</strong> einmal ganz für sich haben möchten. Bei angeschlossenem Kopfhörer, werden<br />
die internen stumm geschaltet.<br />
8
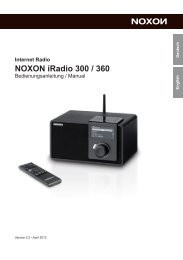
Fernbedienung<br />
Hier finden Sie fast die gleichen Bedienelemente und Funktionen wie am <strong>iRadio</strong>.<br />
Hinweis: Vor der ersten Inbetriebnahme müssen Sie die Sicherungslasche der Batterie<br />
entfernen.<br />
1. Standby An/Aus<br />
2. Stationstasten 1 bis 5<br />
3. Back Button (Navigation zurück)<br />
4. Navigation nach oben<br />
5. Auswahl<br />
6. Lautstärke niedriger<br />
7. Lautstärke höher<br />
8. Navigation nach unten<br />
9. Stopp<br />
10. Skip Back<br />
11. Skip Forward<br />
12. Wiedergabe/Pause<br />
9<br />
Deutsch<br />
English
<strong>NOXON</strong> <strong>iRadio</strong> <strong>M110+</strong><br />
Hauptfunktionen<br />
Zunächst möchten wir Ihre Fantasie ein wenig anregen, und Ihnen die Hauptleistungsmerkmale<br />
Ihrer Neuerwerbung vorstellen!<br />
Immer on the line, immer was zu hören! Als optimale Ergänzung zu einem DSL-Anschluss<br />
– am liebsten mit einer sogenannten ‚Flatrate’, um keine Beschränkungen in Zeit<br />
und Datenumfang zuhaben – können Sie mit dem <strong>NOXON</strong> über Ihren Internetzugang<br />
direkt auf das reichhaltige Angebot an Radiostationen aus dem Internet zurückgreifen.<br />
Ihr <strong>NOXON</strong> wird Ihnen eine ganz neue Art des Radiogenusses näher bringen - mit rund<br />
14.000 Sendern aus dem Internet! Vorbei die Zeiten, in denen man gezwungenermaßen<br />
eben hörte, was einem die Radiomacher der FM-Sender im eigenen Sendegebiet vorsetzten.<br />
Im Internet sehen die neuen Radiowelten ganz anders aus. Ihr neues „Sendegebiet“ ist<br />
die ganze Welt, von Albanien über die USA und China bis Zypern, und alles dazwischen!<br />
Ab jetzt gibt es für Sie zu jeder Tages- und Nachtzeit das Richtige: Die Musikrichtung, die<br />
Sie hören wollen, suchen Sie sich von nun an selbst aus. Die Möglichkeiten sind schier<br />
unbegrenzt, und die große und weiter wachsende Internetradiowelt steht Ihnen mit dem<br />
Erwerb des <strong>NOXON</strong> und dank des beinhalteten vTuner Premium-Service (zu dem wir<br />
Ihnen im Anschluss noch mehr verraten wollen) ab s<strong>of</strong>ort ohne weitere Zusatzkosten zur<br />
Verfügung – stets aktuell und auch in Zukunft von uns weiter ausgebaut. Nach Genres<br />
geordnet stehen Ihnen zu jeder der vielen vorsortierten Musik- oder Inhalts-Ausrichtungen<br />
(Rock, Pop, Hip Hop, Alternative, Jazz, Blues, Klassik, News u.v.a.m.) jeweils bis zu<br />
mehrere hundert (!) Stationen weltweit zur Verfügung.<br />
Aber die Möglichkeiten, den <strong>NOXON</strong> einzusetzen, gehen noch weiter: Üben Sie sich im<br />
Verstehen fremder Sprachen, oder machen Sie eine akustische Reise in ferne Regionen.<br />
Internationale News-Stationen haben auf dem <strong>NOXON</strong> ihre eigene Sparte, ebenso<br />
sind Spezialsender für Sport, Humor, Wetter u.v.a. vertreten. Fernab der Heimat können<br />
Sie sich mit dem <strong>NOXON</strong> nun ebenso zu Hause fühlen, wie anders herum. Erweitern Sie<br />
Ihren Horizont, und nehmen Sie teil am internationalen Geschehen – so macht Radio<br />
wieder richtig Spaß! Und damit Sie in der neuen, erschlagenden Fülle von Radiostationen<br />
den Überblick nicht verlieren, bietet der <strong>NOXON</strong> das komplette Angebot für Sie<br />
übersichtlich vorsortiert.<br />
Ran an die Mediathek! Das Gerät bindet sich problemlos in Ihr vorhandenes Netzwerk<br />
via Funk (Wireless LAN, WLAN oder auch WiFi genannt) oder Kabel (Ethernet, LAN)<br />
ein. Nur noch einen Medienserver (UPnP) im Netz installiert (wie das geht, erfahren Sie<br />
weiter hinten), und schon stehen Ihnen sämtliche Audio-Dateien (MP3, WMA, AAC+)<br />
Ihrer Sammlung überall in der Wohnung zur Verfügung.<br />
10
Internetradio<br />
Im vorherigen Abschnitt haben wir Ihnen bereits die beeindruckenden Möglichkeiten der<br />
Internetradi<strong>of</strong>unktion Ihres <strong>iRadio</strong>s dargestellt. Der große Vorteil zur herkömmlichen Art,<br />
Internetradio über den Webbrowser am Computer zu konsumieren, ist nun, dass Ihr<br />
<strong>iRadio</strong> auf die Internetvielfalt zugreift, ganz OHNE dass der Rechner läuft – einfach über<br />
Ihren Router, der die Verbindung zum Internet herstellt.<br />
Achtung – Transfervolumen! Bitte beachten Sie beim häufigen Konsum der<br />
Internetradiosender, dass dadurch über den Monat gebündelt einiges an Transfervolumen<br />
zusammenkommt. Falls Sie einen Vertrag mit Volumenobergrenze haben, kann<br />
es bei Überschreitung dieser zu Extrakosten kommen. Wir empfehlen daher Tarife ohne<br />
Beschränkung.<br />
Das Radiostations-Verzeichnis<br />
Sender<br />
Best <strong>of</strong> <strong>NOXON</strong><br />
Länder<br />
Lokale Sender<br />
Musikrichtungen<br />
Sendersuche<br />
Die Liste der Internetradiosender wird beständig<br />
aktuell gehalten und erweitert. So ist sichergestellt,<br />
dass bei all den Veränderungen, denen das<br />
Internet permanent unterliegt, stets ein top-aktuelles<br />
und vor allem zuverlässig funktionierendes Angebot<br />
an Internetradiostationen vorliegt. Das <strong>iRadio</strong><br />
ruft automatisch beim Zugriff auf das<br />
Internetradiomenü die aktuelle Version direkt im<br />
Internet auf und gewährleistet so stets den neuesten Stand. Zappen Sie sich mit der<br />
üblichen Navigation durch die Senderliste, die bereits sortiert vorliegt.<br />
Sollten Sie so auf einen Sender stoßen, den Sie noch einmal wiederfinden wollen, drücken<br />
Sie einfach während der Wiedergabe für ca. 2 Sekunden eine der Stationstasten,<br />
um den geschätzten Sender abzulegen, und ihn später bei Bedarf wieder über eben<br />
diese Nummerntaste aufzurufen. In der unteren Zeile des Displays erscheint daraufhin<br />
ein P (für Programm), gefolgt mit der jeweiligen Speichernummer – also zum Beispiel<br />
„P1“. Weitere Möglichkeiten der Favoritenverwaltung werden ebenfalls weiter hinten vorgestellt.<br />
Podcast & Radio On Demand<br />
Radio On Demand – Das heißt im wörtlichen Sinne „Radio auf Abruf“ und ist hauptsächlich<br />
im englischsprachigen Bereich ein treffendes Synonym für Podcasting. So werden<br />
z.B. beliebte Einzel-Produktionen des täglichen Radioangebotes – auch durch große<br />
und bekannte Radiosender – aufbereitet und als Podcast jederzeit online abrufbar zur<br />
Verfügung gestellt.<br />
Sie als Hörer sind nun nicht mehr an feste Sendezeiten im herkömmlichen Rundfunk gebunden,<br />
sondern können verfügbare Inhalte auf diese Weise zu jeder Zeit nutzen. Eben<br />
„Radio On Demand“. Die Vielfalt an Inhalten ist enorm und wächst täglich. Vielleicht<br />
auch eine interessante Alternative zum klassischen Radio: Nicht nur Rundfunkanstalten<br />
11<br />
Deutsch<br />
English
<strong>NOXON</strong> <strong>iRadio</strong> <strong>M110+</strong><br />
bieten auf diese Weise ihre Inhalte an, es finden sich mittlerweile auch Mitschnitte von<br />
Vorlesungen an Universitäten, Sprachkurse, Comedy-Produktionen oder schlicht und<br />
einfach akustische Tagebücher im Portfolio. Es ist für fast jeden Geschmack etwas dabei.<br />
Und das Beste: Mit Ihrem <strong>iRadio</strong> haben Sie einfachen und kostenfreien Zugriff auf<br />
die Podcast-Sammlung – umfangreich und gut nach Herkunft und Genre vorsortiert,<br />
stets aktuell und ganz ohne Rechner oder iPod.<br />
Digital Media Player (UPnP)<br />
Über eine Servers<strong>of</strong>tware, die auf einem Computer oder anderem Gerät läuft, können<br />
Sie Musikdateien zur Wiedergabe im Netzwerk freigeben. Beim <strong>iRadio</strong> muss es sich<br />
um einen UPnP-kompatiblen Server handeln (UPnP: Universal Plug and Play), der die<br />
Daten zur Verfügung stellt. Eine einfache Dateifreigabe, wie aus der Windows-Netzwelt<br />
bekannt, ist so nicht lesbar.<br />
Im Gegensatz zu einer unflexiblen statischen Dateifreigabe bietet das <strong>iRadio</strong> über einen<br />
virtuellen UPnP-Mediaserver eine flexible Sortierung, die die Handhabbarkeit Ihrer Bestände<br />
im Vergleich flexibler werden lassen: ein Titel kann sowohl über den Interpreten,<br />
das Genre, das Album und eben auch anhand der Ordnerstruktur aufgefunden werden!<br />
Und keine Angst, „… einen Server aufsetzen …“ bedeutet nicht mehr den Aufwand, der<br />
noch vor wenigen Jahren notwendig gewesen wäre. Um es kurz zu machen: UPnP Medienserver-S<strong>of</strong>tware<br />
starten, und fertig!<br />
Ein Vorteil: Es können mehrere UPnP-Server irgendwo im Netz laufen: da muss der Vater<br />
nicht hören, was nur die Tochter mag, und anders herum! Jeder laufende UPnP-Server<br />
erscheint separat im <strong>NOXON</strong>-Menü – für den schnellen und unkomplizierten Zugriff.<br />
Windows<br />
12<br />
Der Windows Media Player<br />
(Version 11 oder 12) ist die<br />
einfachste Art, solch einen<br />
Server aufzusetzen, da dieser<br />
diesen Dienst bereits ab<br />
Werk an Board hat. Wählen<br />
Sie bitte über den Menüpunkt<br />
„Streamen“ die Funktion<br />
„Medienstreaming aktivieren“<br />
aus.<br />
Im darauf folgenden Dialog<br />
müssen Sie nun diesen<br />
Dienst noch explizit aktivieren<br />
und dann die entsprechenden<br />
Geräte, sollten Sie<br />
mehrere Empfänger besit-
zen, ebenfalls freischalten. Nun kann das <strong>NOXON</strong> <strong>iRadio</strong> auf die Musikdaten Ihrer Bibliothek<br />
zugreifen.<br />
Apple<br />
Apple liefert leider keine UPnP-S<strong>of</strong>tware von Haus aus mit, daher muss man hier auf<br />
einen Drittanbieter zurückgreifen.<br />
Die Firma Elgato bietet mit ihrer S<strong>of</strong>tware EyeConnect aber eine Lösung an. Diese ist als<br />
Testversion kostenlos verfügbar und kann 30 Tage im vollen Funktionsumfang (inklusive<br />
Video-Streaming) genutzt werden. Nach dieser Periode steht aber weiterhin die Lite-Version<br />
zur Verfügung, welche uneingeschränkt Audiodateien im Netzwerk zur Verfügung<br />
stellt. Sie finden diese S<strong>of</strong>tware auf der Webseite von Elgato unter: www.elgato.com.<br />
<strong>NOXON</strong><br />
Im <strong>NOXON</strong> <strong>iRadio</strong> finden Sie die freigegebenen Dateien im Hauptmenü unter dem Punkt<br />
UPNP:<br />
UPNP<br />
Unter [Serverliste] werden alle gefunden UPnP-<br />
Server aufgelistet. Bitte beachten Sie, dass diese<br />
Serverliste<br />
Server in der Regel eine Datenbank auf Grundla-<br />
Wiederholen: Aus<br />
ge der ID3-Tags erstellen. Dementsprechend<br />
Shuffle: Aus<br />
hängt die Qualität der Liste entscheidend davon<br />
Serverliste erneuern<br />
ab, wie Ihre Daten gepflegt sind. Es kann zum<br />
Beispiel vorkommen, dass innerhalb eines Albums<br />
der Name des Künstlers in den ID3-Tags in<br />
unterschiedlicher Schreibweise vorkommt und der Server dann daraus auch mehrere<br />
Künstler erkennt.<br />
Generell kann man davon ausgehen, dass die Daten in der gleichen Sortierung im Netzwerk<br />
angeboten werden, wie sie auch im jeweiligen Programm erscheinen.<br />
DAB, DAB+ und UKW<br />
Mit Ihrem <strong>NOXON</strong> <strong>iRadio</strong> empfangen Sie nicht nur zahlreiche Radiostationen aus dem<br />
Internet, sondern auch die über DAB, DAB+ und UKW ausgestrahlten Rundfunksender!<br />
Bitte beachten Sie, dass Sie hierfür über eine geeignete Empfangsmöglichkeit (Antenne<br />
oder Kabelanschluss) verfügen müssen. DAB und DAB+ werden von den Rundfunkanstalten<br />
zum Teil nicht flächendeckend ausgestrahlt.<br />
Anschließen<br />
Der Anschluss gestaltet sich denkbar einfach: Verbinden Sie ein Standard-Antennenkabel<br />
mit Koax-Steckern (nicht im Lieferumfang) mit dem Tuner-Anschluss des <strong>iRadio</strong>s und<br />
Ihrem Antennen- bzw. Kabelanschluss.<br />
13<br />
Deutsch<br />
English
<strong>NOXON</strong> <strong>iRadio</strong> <strong>M110+</strong><br />
DAB/DAB+ Sender empfangen<br />
Suchlauf<br />
Mit dem Navigationsrad wählen Sie im Hauptmenü den Unterpunkt „DAB“ und bestätigen<br />
mit einem Druck auf das Navigationsrad. Dann wählen Sie „Vollständiger Suchlauf“,<br />
worauf das <strong>iRadio</strong> sämtliche in Ihrem Empfangsbereich zur Verfügung stehenden DAB<br />
und DAB+ Sender für Sie findet.<br />
Senderliste<br />
Im DAB-Menü finden Sie den Unterpunkt „Senderliste“. Mit einem Druck auf das Navigationsrad<br />
können Sie dort aus den vom Suchlauf gefundenen Sendern auswählen.<br />
Weiteres Drücken des Navigationsrads zeigt verschiedene Informationen zum gerade<br />
gespielten Sender an.<br />
Den jeweils nächsten oder vorherigen Sender können Sie mit den Skip Back/Skip Forward-Tasten<br />
entweder direkt am <strong>iRadio</strong> oder auf der Fernbedienung aufrufen, ohne dafür<br />
zuerst in die Senderliste zurückkehren zu müssen.<br />
Wenn Ihnen ein bestimmter Sender besonders gut gefällt, können Sie diesen durch längeres<br />
Drücken einer der Favoriten-Tasten direkt am Gerät oder auf der Fernbedienung<br />
abspeichern, sodass sie den Sender später durch kurzes Drücken derselben Taste s<strong>of</strong>ort<br />
und ohne den Umweg über die Menüs abrufen können.<br />
Senderliste bereinigen<br />
Wenn in der Senderliste ein Fragezeichen vor dem Sendernamen angezeigt wird, kann<br />
das <strong>iRadio</strong> diesen Sender nicht mehr empfangen. Das kann durch einen schlechteren<br />
Empfang, aber auch durch eine Umstellung seitens der Sendeanstalten begründet sein.<br />
Damit solche nicht mehr verfügbaren Sender die Senderliste nicht unübersichtlich erscheinen<br />
lassen, wählen Sie im DAB-Menü den Unterpunkt „Senderliste bereinigen“ und<br />
bestätigen die Sicherheitsabfrage mit „Ja“.<br />
Senderreihenfolge<br />
Der Unterpunkt „Senderreihenfolge“ im DAB-Menü überlässt Ihnen die Entscheidung,<br />
ob Sie die Rundfunkstationen in der Senderliste lieber in alphanumerischer Reihenfolge<br />
oder nach einzelnen Ensembles (das sind Gruppen von in einem ‚Paket‘ zusammen<br />
ausgestrahlten Sendern) sortiert bekommen möchten.<br />
UKW Sender empfangen<br />
Suchlauf<br />
Mit dem Navigationsrad wählen Sie im Hauptmenü den Unterpunkt „FM“ und bestätigen<br />
mit einem Druck auf das Navigationsrad. Ein weiterer Druck auf das Navigationsrad<br />
findet den jeweils nächsten verfügbaren Sender für Sie. Ihr <strong>iRadio</strong> verfügt über RDS und<br />
kann daher den Namen des Senders (falls ausgestrahlt) anzeigen.<br />
14
Suchlauf-Einstellung<br />
Wenn Sie bei laufendem UKW-Radio den Back-Button Ihres <strong>iRadio</strong>s (wahlweise der<br />
Fernbedienung) drücken, können Sie im Unterpunkt „Suchlauf-Einstellung“ festlegen,<br />
ob das Gerät nur kräftige Sender mit guter Übertragunsqualität für den Suchlauf berücksichtigen<br />
soll.<br />
Audio-Einstellung<br />
Bei generell schlechtem UKW-Empfang können Sie im Unterpunkt „Audio-Einstellung“<br />
festlegen, dass die Sender nur in Mono und nicht mehr in Stereo wiedergegeben werden.<br />
Dadurch kann der Rauschanteil im Signal deutlich vermindert werden.<br />
Manuelle Sendersuche<br />
Alternativ zum Suchlauf können Sie die Skip Back/Skip Forward-Tasten entweder direkt<br />
am <strong>iRadio</strong> oder auf der Fernbedienung nutzen, um bestimmte Frequenzen gezielt anzuspringen<br />
und somit die dort platzierten Sender zu finden.<br />
Zeitinformation über DAB, UKW oder Internet empfangen<br />
Die integrierte Uhr des <strong>iRadio</strong>s brauchen Sie nicht selber zu stellen, da viele Sender<br />
ein codiertes Zeitsignal zusammen mit Ihrem Programm ausstrahlen. Dies funktioniert<br />
allerdings nur dann, wenn Sie die entsprechenden Sender in ausreichender Qualität<br />
empfangen.<br />
Mit dem Navigationsrad wählen Sie im Hauptmenü den Unterpunkt „Systemeinstellungen“,<br />
dann „Datum/Uhrzeit“ und dann „Auto Update“. Jetzt können Sie wählen, ob Sie<br />
das Zeitsignal von Rundfunkstationen über DAB/DAB+, UKW oder aus dem Internet<br />
beziehen möchten.<br />
Wiedergabe von USB-Speichermedien<br />
An den USB-Anschluss können Sie Massenspeichermedien wie externe Festplatten und<br />
Speichersticks anschließen. Ihr <strong>NOXON</strong> unterstützt sowohl USB 1.x als auch USB 2.0<br />
Speichergeräte.<br />
Bitte achten Sie jedoch darauf, dass nicht jedes beliebige USB-Gerät dort Verwendung<br />
finden kann: Tastaturen und Mäuse werden ebenso wenig unterstützt, wie externe MP3-<br />
Speicher mit erweiterten Funktionen (USB-Hub, Verschlüsselung der Daten etc.). Auch<br />
einige MP3-Player, die bestimmte Verschlüsselungen mit den auf ihnen abgelegten Daten<br />
durchführen, können damit leider nicht gelesen werden.<br />
Wählen sie nun die Wiedergabe über USB aus, wird die Ordnerstruktur des Speichermediums<br />
1:1 abgebildet. Über die normale Navigation wählen Sie nun Ihre Titel aus und<br />
starten wie gewohnt die Wiedergabe. Als Dateisystem kommt FAT zum Einsatz.<br />
15<br />
Deutsch<br />
English
<strong>NOXON</strong> <strong>iRadio</strong> <strong>M110+</strong><br />
Anzeige<br />
In diesem Kapitel möchten wir Sie mit der Anzeige des <strong>NOXON</strong> vertraut machen, damit<br />
Sie immer den Überblick behalten.<br />
Statuszeile<br />
Im oberen Bereich des Bildschirms befindet sich die Statuszeile. Dort sehen Sie das<br />
aktuelle Verzeichnis, in dem Sie sich gerade befinden.<br />
16<br />
Hauptmenü<br />
Haben Sie einen Abspielmodus gewählt, wird dort neben dem Modus auch die aktuelle<br />
Uhrzeit eingeblendet.<br />
Internet Radio 09:23<br />
In der Fußzeile wird im Internetradiobetrieb – sollten Sie den Sender auf einer Stationstaste<br />
gespeichert haben – die jeweilige Nummer angezeigt (z.B. P3). Spielen Sie Musik<br />
aus dem Netzwerk ab, steht dort der Hinweis „UPNP“. Außerdem finden Sie in der rechten<br />
unteren Ecke die aktuell gewählte Verbindungsart.<br />
P3<br />
1<br />
z 23<br />
Verbindungsart: WLAN (mit Signalstärke)<br />
Verbindungsart: Ethernet<br />
Sender auf Stationstaste 3 gewählt<br />
Alarm 1 aktiv<br />
Sleeptimer aktiv (noch 23 Minuten)<br />
UPNP UPNP – Betrieb (Musik aus dem Netzwerk)<br />
Alle Titel wiederholen<br />
Zufallswiedergabe (Shuffle)
Listenansicht<br />
Hauptmenü<br />
Internet Radio<br />
MyMedia<br />
DAB+<br />
FM / UKW<br />
Sleep Timer<br />
In allen Auswahlmenüs finden Sie die Listenansicht.<br />
Weitere Navigationsebenen erkennen Sie<br />
an einem Pfeil-Symbol (>). In der Statusleiste finden<br />
Sie, zur besseren Orientierung, den Namen<br />
des Menüs, in dem Sie sich gerade befinden.<br />
Wiedergabeansicht<br />
Nach erfolgreicher Auswahl einer Quelle, startet die Wiedergabe und die Ansicht ändert<br />
sich:<br />
Internet Radio<br />
SWR 3<br />
09:23<br />
Deutsches Radio Netzwerk<br />
mit Rock und Popmusik<br />
im Programm<br />
Nun finden Sie Informationen wie den Sendernamen,<br />
Künstler und Titel. Die Lautstärke regeln Sie<br />
hier mit dem Navigationsrad. Drehen Sie dieses<br />
ganz auf Null, erscheint die Meldung „Muted“; das<br />
<strong>NOXON</strong> <strong>iRadio</strong> gibt also keinen Ton mehr von<br />
sich. Alternativ dazu können Sie natürlich auch die<br />
Fernbedienung benutzen.<br />
17<br />
Deutsch<br />
English
<strong>NOXON</strong> <strong>iRadio</strong> <strong>M110+</strong><br />
Hauptmenü & Co .<br />
Alle Wege führen nach Rom – und in unserem Fall zum Hauptmenü. Das ist der Ausgangspunkt<br />
für Sie, um all die anderen Menüs anzusteuern.<br />
Hauptmenü<br />
Internet Radio<br />
MyMedia<br />
DAB+<br />
FM / UKW<br />
Sleep Timer<br />
Internet Radio<br />
Internet Radio<br />
Favoriten<br />
Sender<br />
Podcasts<br />
my<strong>NOXON</strong><br />
Verlauf<br />
18<br />
Mit dem Navigationsrad scrollen Sie durch die Liste<br />
und bestätigen Ihren Wunsch mit dem Push-<br />
Button.<br />
Vom Hauptmenü aus kommen Sie ins Menü<br />
[Internet Radio]. Hier können Sie Sender und Podcasts<br />
auswählen und abonnieren.<br />
Favoriten<br />
Ihr <strong>NOXON</strong> <strong>iRadio</strong> verfügt über eine eigene Favoritenliste, welche Sie auf der Seite<br />
[Internet Radio] finden. Um Favoriten anzulegen, halten Sie das Navigationsrad oder die<br />
OK-Taste auf der Fernbedienung für einige Sekunden gedrückt. Ist ein Favorit gespeichert,<br />
quittiert das <strong>NOXON</strong> Ihnen es im Display mit der Nachricht „Favorit hinzugefügt“.<br />
Favorit entfernen<br />
Favorit entfernen?<br />
Ja Nein<br />
Um einen Favoriten wieder zu entfernen, wählen<br />
Sie diesen im Menü [Favoriten] aus (weiß hinterlegen)<br />
und halten das Navigationsrad oder die OK-<br />
Taste der Fernbedienung wieder für einige Sekunden<br />
gedrückt. Nun erscheint ein Menü „Favorit<br />
entfernen“.<br />
Bitte beachten Sie, dass Inhalte von UPnP-Servern nicht als Favorit gespeichert werden<br />
können, da diese nicht permanent zur Verfügung stehen.
Sender<br />
Hier gibt es für Sie diverse Möglichkeiten, aus der Fülle der Sender den oder die passenden<br />
zu finden.<br />
Sender<br />
Best <strong>of</strong> <strong>NOXON</strong><br />
Länder<br />
Lokale Sender<br />
Musikrichtungen<br />
Sendersuche<br />
Unter [Lokale Sender Deutschland] finden Sie –<br />
wer hätte das gedacht – ausschließlich nationale<br />
Sender. Und da das auch noch eine ganze Menge<br />
sind, haben wir die für Sie noch einmal nach Musikstil<br />
und Inhalt sortiert. So ist es kein Problem,<br />
mal eben schnell zu einem Nachrichtensender zu<br />
springen oder sich Smooth Jazz für den lauschigen<br />
Abend nach Hause zu holen.<br />
Wer über den nationalen Tellerrand schauen will, findet in den Kategorien [Länder] und<br />
[Genre] weitere Sortierungen.<br />
Sie haben mal von einem Sender gehört, finden ihn aber nicht auf der Liste? Mit [Sendersuche]<br />
können Sie seinen Namen per Hand über das Navigationsrad eingeben und<br />
ihn suchen.<br />
Fast täglich kommen neue Sender hinzu. Und da wir von Ihnen nicht erwarten, dass<br />
Sie die Stationsliste auswendig kennen und s<strong>of</strong>ort sehen, welche Stationen neu hinzu<br />
gekommen sind, gibt es für Sie den Punkt [Neue Sender]; hier sehen Sie auf einen Blick,<br />
was sich in letzter Zeit getan hat.<br />
Podcasts<br />
Mit Ihrem <strong>NOXON</strong> <strong>iRadio</strong> können Sie aber nicht nur Radiostationen und Sender, sondern<br />
auch Podcasts aus aller Welt abonnieren.<br />
Podcast<br />
Afrika<br />
Asien<br />
Karibik<br />
Zentral Amerika<br />
Europa<br />
Wie Sie sehen, sind die Podcasts nach Erdteilen<br />
sortiert. (Ok, die Karibik ist kein Erdteil, Sie haben<br />
Recht).<br />
Sie können aber auch – wie bei den Radiosendern<br />
– einen Ihnen bekannten Podcast durch die<br />
Eingabe seines Namens suchen.<br />
my<strong>NOXON</strong><br />
Hinter dem Begriff [my<strong>NOXON</strong>] finden Sie eine umfangreiche Dienste-Sammlung. Diese<br />
sind teilweise kostenfrei, teilweise mit einem kostenpflichtigen Abo verbunden.<br />
Genauere Informationen zu den verfügbaren Diensten und deren Einrichtung finden Sie<br />
auf: http://www.my-noxon.net/<br />
19<br />
Deutsch<br />
English
<strong>NOXON</strong> <strong>iRadio</strong> <strong>M110+</strong><br />
Verlauf<br />
20<br />
Verlauf<br />
Sender 1<br />
Sender 2<br />
Sender 3<br />
Sender 4<br />
Sender 5<br />
Unter dem Menüpunkt [Verlauf] werden die kürzlich<br />
abgespielten Stücke und empfangenen Radiosender<br />
aufgeführt.<br />
Somit können auch jene Sender problemlos wieder<br />
gefunden werden, die nach kurzzeitigem Gedächtnisverlust<br />
für immer verloren geglaubt waren.<br />
My Media<br />
UPnP erlaubt es dem Benutzer, Daten aus dem<br />
MyMedia<br />
Netzwerk zu empfangen. Haben Sie beispielswei-<br />
Serverliste<br />
se Ihre Musiksammlung auf Ihrem Computer über<br />
USB Abspielen<br />
ein UPnP-Programm freigegeben (z.B. Windows<br />
Meine Wiedergabeliste<br />
Media Player 11 oder Elgato EyeConnect am<br />
Wiederholen: Aus<br />
Mac), können Sie vom Wohnzimmer oder der Kü-<br />
Shuffle: Aus<br />
che aus mit dem <strong>NOXON</strong> <strong>iRadio</strong> darauf zugreifen<br />
und Titel abspielen. Ist die Musiksammlung zentral<br />
auf einer Netzwerkfestplatte (NAS) gespeichert, funktioniert das sogar ohne Rechner.<br />
Ihr <strong>NOXON</strong> <strong>iRadio</strong> greift dann als Netzwerkplayer direkt auf die Musikstücke auf der<br />
Platte zu.<br />
Sleep Timer<br />
Vor dem Aufwachen muss man erst einmal Einschlafen. Damit der Weg dahin so angenehm<br />
wie möglich ist, gibt es einen Sleep-Timer. Einmal aktiviert, sorgt er dafür, dass<br />
das <strong>iRadio</strong> sich nach der voreingestellten Zeit automatisch abschaltet, was vor allem<br />
dann vorteilhaft ist, wenn man selbst in der Zwischenzeit eingeschlafen ist… Gute Nacht!<br />
Und übrigens: Da die Alarmfunktion mit einer eigenen Lautstärke-Einstellung versehen<br />
werden kann, brauchen Sie sich keine Gedanken darüber zu machen, ob Sie das <strong>iRadio</strong><br />
gegebenenfalls überhören könnten, obwohl es zum Einschlafen nur mit niedriger Lautstärke<br />
betrieben wurde.<br />
Wecker<br />
Ihr <strong>iRadio</strong> verfügt auch über einen integrierten Wecker – genau genommen sogar zwei,<br />
da Sie zwei verschiedene Weckzeiten programmieren können. Da wird das morgendliche<br />
Aufstehen zum Vergnügen! Wir haben uns hier wirklich Mühe gegeben, und so können<br />
Sie nicht nur mit Ihren klassischen Radiosendern aufwachen, sondern sämtliche der<br />
rund 14.000 verfügbaren Internetradio-Sender als Tonquelle auswählen, die Sie dann<br />
des Morgens sanft aus dem Schlaf säuselt. Natürlich hat das <strong>iRadio</strong> auch einen eigenen<br />
Weckton.
Wecker 1<br />
Aktiviert: Aus<br />
Zeit: 09:25<br />
Modus: Internet Radio<br />
Voreingestellt: Verlauf<br />
Lautstärke: 24<br />
Systemeinstellungen<br />
Systemeinstellungen<br />
Equalizer<br />
Netzwerk<br />
Datum / Uhrzeit<br />
Sprache<br />
Werkseinstellungen<br />
Im Menü [Wecker] kann er aktiviert und die Zeit<br />
eingestellt werden. Als Quelle stehen ein Weckton,<br />
der zuletzt gehörte Sender oder Ihre Favoriten<br />
zur Verfügung. Zum Einstellen der Lautstärke<br />
wird die Quelle abgespielt und Sie können mit<br />
dem Navigationsrad den gewünschten Pegel einstellen.<br />
In diesem umfangreichen Menü finden Sie Informationen<br />
über Ihren <strong>NOXON</strong> und können Einstellungen<br />
am Gerät vornehmen und speichern.<br />
Equalizer<br />
Der Equalizer ermöglicht Ihnen, das Klangbild des <strong>NOXON</strong> Ihren Vorstellungen nach<br />
anzupassen. Die verschiedenen Programme gewichten die Bässe, Mitten und Höhen<br />
unterschiedlich nach, so dass für jedes Ohr etwas dabei ist. Für den Line-Out-Anschluss<br />
wird der Equalizer natürlich nicht berücksichtigt, der Ton wird hier in jedem Fall unverfälscht<br />
wiedergegeben.<br />
Folgende Equalizer stehen zur Auswahl: Aus, Loudness, Mehr Bass, Weniger Bass,<br />
Mehr Höhen, Weniger Höhen, Gesprochenes Wort und Rock):<br />
Bezeichnung Bass Höhen Loudness<br />
AUS 0 0<br />
Loudness 0 0<br />
Mehr Bässe +4 0<br />
Weniger Bässe -4 0<br />
Mehr Höhen 0 +4<br />
Weniger Höhen 0 -4<br />
Gesprochene Inhalte -4 0<br />
Rock +2 +2<br />
Wenn Ihnen keine der Voreinstellungen<br />
(neudeutsch: Presets) zusagt,<br />
können Sie unter [Meinen Equalizer<br />
einrichten] auch einen eigenen anlegen<br />
und ablegen, der ganz auf Ihre<br />
Ohren zugeschnitten ist. Dabei können<br />
Bässe und Höhen jeweils um bis<br />
zu 14 dB angehoben oder abgesenkt<br />
werden. Bei „Loudness“ handelt es<br />
sich um eine Voreinstellung, die auch<br />
bei sehr geringen Lautstärken ein voluminöses<br />
Klangbild ermöglicht.<br />
Anschließend können Sie Ihre gespeicherten Einstellungen über den Punkt<br />
[Mein Equalizer] aufrufen.<br />
21<br />
Deutsch<br />
English
<strong>NOXON</strong> <strong>iRadio</strong> <strong>M110+</strong><br />
Netzwerk<br />
Netzwerk<br />
Netzwerkassistent<br />
WPS-Einrichtung<br />
Einstellungen anzeigen<br />
WLAN Region<br />
Manuelle Einstellungen<br />
Datum und Uhrzeit<br />
Datum/Uhrzeit<br />
Datum/Uhrzeit einstellen<br />
Auto-Update<br />
12/24h einstellen<br />
Zeitzone einstellen<br />
Zeitumstellung<br />
22<br />
Hier können Sie die Netzwerkeinstellungen Ihres<br />
<strong>NOXON</strong> <strong>iRadio</strong>s vornehmen.<br />
Unter diesem Menüpunkt können das Datum und<br />
die Uhrzeit eingestellt werden.<br />
Das haben Sie ja bereits im Setup Wizard zu Beginn<br />
gemacht – aber vielleicht wollen Sie das NO-<br />
XON <strong>iRadio</strong> ja mit in den Urlaub nehmen, Sie ziehen<br />
um oder haben vergessen die Zeitumstellung<br />
einzuschalten. Unter [Datum/Uhrzeit einstellen]<br />
jedenfalls können Sie das alles wieder ändern. Das manuelle Einstellen erfolgt einfach<br />
per Navigationsrad und Push-Funktion. Nach erfolgreicher Eingabe sind die Uhr und das<br />
Datum gestellt.<br />
Wenn Sie es komfortabler mögen, können Sie Zeit und Datum über [Auto Update] auch<br />
aus dem Netz beziehen. Wer hat schon eine Uhr zu Hause, die wirklich genau geht? Das<br />
<strong>NOXON</strong> <strong>iRadio</strong> nutzt automatisch einen sogenannten NTP-Server zum Synchronisieren<br />
(NTP steht für Network Time Protocol).<br />
Falls Sie das Zeitformat ändern möchten, können Sie das unter [12/24h einstellen] erledigen.<br />
Wählen Sie hier bitte zwischen 24-Stunden oder ganz amerikanisch 12-Stunden.<br />
Bitte beachten Sie, dass bei der 12-Stunden Anzeige die Zusätze AM und PM nicht<br />
angezeigt werden. Wir h<strong>of</strong>fen aber, dass ein einfacher Blick aus dem Fenster jedem<br />
Missverständnis vorbeugt!<br />
Unter [Zeitzone auswählen] können Sie - wie der Name schon sagt - die Zeitzone auswählen,<br />
in der Sie sich gerade befinden. Ausgehend von der CET (Central European<br />
Time) geht es einmal um die Welt!<br />
Sie leben in einer Sommerzeit-Zone? Teilen Sie das Ihrem <strong>NOXON</strong> <strong>iRadio</strong> unter dem<br />
Menüpunkt [Sommerzeit] mit, damit Sie stets die richtige Zeit haben – auch wenn Sie<br />
das Umstellen im Frühjahr und im Herbst vergessen.<br />
Mit dem Back-Button geht’s wieder zurück in die Systemeinstellungen.
Sprache<br />
Hier wird die Sprache für das Menü im <strong>NOXON</strong> <strong>iRadio</strong> ausgewählt. Zur Drucklegung<br />
dieses Handbuchs stehen Ihnen Deutsch, Englisch, Spanisch, Französisch, Italienisch<br />
und Niederländisch zur Verfügung.<br />
Sprache<br />
English<br />
Deutsch<br />
Francaise<br />
Italiano<br />
Espanol<br />
Werkseinstellungen<br />
Werkseinstellungen<br />
Fortfahren?<br />
Ja Nein<br />
wählt haben, denn es erscheint dieses Fenster.<br />
Mit dem Navigationsrad scrollen Sie durch die Liste<br />
und bestätigen mit der Pushfunktion. Mit dem<br />
Back-Button geht es anschließend wieder zurück<br />
in die Systemeinstellungen.<br />
Es gibt Momente, wo man einfach alles mal wieder<br />
auf Null setzen und von vorne beginnen möchte.<br />
Vielleicht verspüren Sie diesen Wunsch ja<br />
auch irgendwann einmal bei Ihrem <strong>NOXON</strong> <strong>iRadio</strong>.<br />
Was hier dann aber wesentlich einfacher ist<br />
als im Leben: Und vor allem gibt es hier auch noch<br />
eine Sicherheitsfrage: Sie können immer noch<br />
wieder zurück, wenn Sie diesen Menüpunkt ge-<br />
S<strong>of</strong>tware über das Internet aktualisieren<br />
Nichts ist so gut, als dass man es nicht noch besser machen kann! Von daher kann man<br />
die Firmware im <strong>NOXON</strong> <strong>iRadio</strong> aktualisieren.<br />
S<strong>of</strong>tware Update<br />
Auto-Aktualisierung<br />
Jetzt aktualisieren<br />
Wenn Sie dieses Menü aufrufen, verbindet sich<br />
das <strong>iRadio</strong> mit dem Update-Server und prüft, ob<br />
Aktualisierungen vorliegen. Danach können Sie<br />
diese installieren oder noch zusätzliche Informationen<br />
ansehen. Nach erfolgreicher Installation<br />
startet das System neu.<br />
Wollen Sie das nicht immer von Hand machen, wählen Sie bitte [Auto Aktualisieren].<br />
Möchten Sie lieber selber von Zeit zu Zeit Hand anlegen, klicken Sie auf [Jetzt aktualisieren].<br />
ACHTUNG: Bei einem Firmware-Update gehen alle von Ihnen gemachte Einstellungen<br />
verloren (z .B . Netzwerkpr<strong>of</strong>ile, Sender-Favoriten, Equalizer-Einstellungen) .<br />
Diese müssen also nach dem Update erneut gemacht werden .<br />
23<br />
Deutsch<br />
English
<strong>NOXON</strong> <strong>iRadio</strong> <strong>M110+</strong><br />
Einrichtungsassistent<br />
Einrichtungsassistent<br />
24<br />
Jetzt starten?<br />
Ja Nein<br />
Sie möchten noch einmal von vorne beginnen und<br />
Datum und Netzwerksverbindungen neu einstellen?<br />
Dann starten Sie einfach erneut den Einrichtungsassistenten!<br />
Menü-Intervall<br />
Hier können Sie die Dauer einstellen, die gewartet wird, bevor das Gerät in aus der<br />
Listen- in die Wiedergabeansicht wechselt.<br />
Geräte Info<br />
In diesem Menü werden alle Geräte-relevanten Informationen angezeigt. Sie finden dort<br />
die installierte Firmware-Version und die Hardware-ID Ihres <strong>NOXON</strong> <strong>iRadio</strong>s. Die hier<br />
vorgefunden Informationen sind auch in einem Supportfall sehr hilfreich. Mit der Back-<br />
Taste geht es wieder zurück zu den Einstellungen.
Internet Radio: Schnellstart<br />
Diese Schnellstart-Anleitung zeigt Ihnen, wie Sie Ihr <strong>NOXON</strong>-Gerät in Betrieb nehmen.<br />
Ausführlichere Beschreibungen und Sonderkonfigurationen finden Sie weiter hinten in<br />
Ihrem Handbuch (je nach Lieferumfang gedruckt oder auf der beiliegenden CD und im<br />
Internet unter www.terratec.com verfügbar).<br />
Vorab-Check<br />
Ihr <strong>NOXON</strong> ist ein Netzwerk-Gerät, welches - wie alle derartigen Geräte - in Ihr Netzwerk<br />
eingebunden werden muss, bevor Sie loslegen können.<br />
Was brauchen Sie?<br />
• Einen schnellen Internetanschluss (z.B. DSL, idealerweise mit Flatrate)<br />
• Einen Router für den Internetzugang, für den kabellosen Betrieb einen so genannten<br />
WLAN-Router (Wireless LAN)<br />
• Ein Netzwerkkabel, falls Sie Ihr Gerät nicht kabellos ans Internet anbinden möchten<br />
• Bei WLAN-Einbindung: Ihren Netzwerkschlüssel (WEP, WPA oder WPA2)<br />
Dieser dient wie jeder Schlüssel zur Absicherung vor unbefugtem Zugriff, und wurde mit<br />
Ihrem Netzwerk eingerichtet. Für den Zugang zu einem so gesicherten Netzwerk muss<br />
der Schlüssel in einem späteren Schritt im <strong>NOXON</strong> eingegeben werden. Sollte Ihr Netzwerk<br />
über keinen Schlüssel verfügen, kann sich das Gerät ohne diese Eingabe mit dem<br />
Internet verbinden.<br />
Hinweis: Sollten Sie nicht sicher sein, ob Sie einen solchen Schlüssel in Ihrem Netzwerk<br />
benutzen, versuchen Sie es einfach erst einmal ohne Eingabe! Sollte das Gerät danach<br />
nicht funktionieren, wiederholen Sie den Einrichtungs-Vorgang. Dann sollten Sie allerdings<br />
den Schlüssel kennen. Bitten Sie gegebenenfalls die Person, die Ihr Netzwerk<br />
eingerichtet hat, um Hilfe.<br />
Einrichten<br />
Ist Ihr <strong>iRadio</strong> das erste Mal zum Leben erwacht, folgen nun die Schritte zur erstmaligen<br />
Einrichtung in Ihrem Netzwerk:<br />
Begrüßt werden Sie vom Einrichtungs-Assistenten, der Sie fragt, ob Sie ihn starten<br />
möchten.<br />
Einrichtungsassistent<br />
Jetzt starten?<br />
Ja Nein<br />
Wählen Sie mit dem Navigationsrad eine Sprache<br />
für das Menü aus und bestätigen Sie – wie<br />
auch in allen weiteren Menüs – die Auswahl<br />
durch Drücken des Navigationsrads.<br />
25<br />
Deutsch<br />
English
<strong>NOXON</strong> <strong>iRadio</strong> <strong>M110+</strong><br />
Anschließend geben Sie das Zeitformat (12/24 Stunden) ein.<br />
Datum und Uhrzeit stellen Sie aber besser gleich ein (Tag, Monat, Jahr, Uhrzeit), ebenso<br />
die WLAN-Region, in der Sie sich aufhalten.<br />
Ist das geschafft, fehlt nur noch die Verbindung zum Netzwerk. Keine Sorge, auch das<br />
ist nicht weiter schwer – der Netzwerk-Assistent wird Ihnen dabei unter die Arme greifen.<br />
Wie das genau funktioniert, erklären wir Ihnen in unserer ausführlichen Anleitung weiter<br />
hinten. Hier nur schon einmal ein kurzer Überblick:<br />
SSID<br />
Ihr WLAN-Netzwerk<br />
WLAN-Netzwerk des Nach...<br />
[Erneut suchen]<br />
[Kabel]<br />
[Manuelle Einstellungen]<br />
26<br />
Der Einrichtungsassistent gibt Ihnen die Möglichkeit,<br />
zwischen dem Anschluss per Kabel und<br />
dem drahtlosen WLAN-Anschluss zu wählen.<br />
Bevorzugen Sie die Kabelvariante, wählen Sie<br />
[Kabel] aus. Der Einrichtungsassistent verbindet<br />
sich daraufhin automatisch mit ihrem Router und<br />
die Sache ist gegessen – Sie sind drin!<br />
Wird das <strong>iRadio</strong> hingegen per WLAN eingebunden, wählen Sie bitte Ihr WLAN-Netz auf<br />
dem Display aus.<br />
Nach der Auswahl des gewünschten Netzes müssen Sie noch das Passwort eingeben,<br />
um sich mit dem WLAN zu verbinden.<br />
Schlüssel:<br />
0123456789. _ @,<br />
abcdefghijklmn<br />
opqrstuvwxyzABC<br />
DEFGHIJKLMNOPQR<br />
BKSP<br />
OK<br />
CANCEL<br />
Bewegen Sie sich wie gewohnt mittels Navigationsrad,<br />
Push-Funktion und Back-Button durch die<br />
Auswahl.<br />
Den fertig eingegebenen Schlüssel bestätigen<br />
Sie bitte mit OK. Das Feld erreichen Sie ebenfalls<br />
über das Navigationsrad.<br />
Fertig – das war es schon. Noch ein Druck auf das Navigationsrad und sie gelangen ins<br />
Hauptmenü – und können mit Ihrem <strong>NOXON</strong> <strong>iRadio</strong> in die wunderbare Welt des Internetradios<br />
eintauchen.<br />
Hinweis: Wir empfehlen, die Firmware des Geräts von Zeit zu Zeit auf den neuesten<br />
Stand hin zu überprüfen und gegebenenfalls zu aktualisieren – nur so haben Sie Zugriff<br />
die neusten Funktionen ihres Gerätes. Wie das geht, erfahren Sie weiter hinten in diesem<br />
Handbuch.
Hören und Genießen<br />
Nach erfolgreicher Einrichtung stehen Ihnen die (fast) unendlichen Weiten des Internetradios<br />
zur Verfügung.<br />
Hauptmenü<br />
Internet Radio<br />
UPnP<br />
Sleep Timer<br />
Wecker<br />
Systemeinstellungen<br />
Internet Radio<br />
Favoriten<br />
Senderliste<br />
Podcasts<br />
my<strong>NOXON</strong><br />
Verlauf<br />
Wählen Sie im Hauptmenü den Eintrag<br />
[Internet Radio] aus und bestätigen die Auswahl.<br />
Im darauf folgenden Untermenü navigieren Sie –<br />
je nach persönlichem Geschmack – zu dem Sender<br />
Ihrer Wahl.<br />
Bedingt durch die große Anzahl an verfügbaren Sendern weltweit, ist unsere Datenbank<br />
übersichtlich nach Ländern, Genres, populäre Stationen, usw. sortiert und wird immer<br />
auf dem Laufenden gehalten.<br />
Internet Radio<br />
SWR 3<br />
09:23<br />
Deutsches Radio Netzwerk<br />
mit Rock und Popmusik<br />
im Programm<br />
Volume<br />
P3<br />
15<br />
Nach der Auswahl startet nun die Wiedergabe.<br />
Im Wiedergabe-Bildschirm finden Sie Informationen<br />
über den gespielten Sender und – falls übertragen<br />
– Angaben zum Sender oder dem Künstler<br />
und Titel des gerade gespielten Songs.<br />
Zur Lautstärkeanpassung während der Wiedergabe,<br />
benutzen Sie bitte das Navigationsrad bzw.<br />
die Tasten und auf der Fernbedienung.<br />
27<br />
Deutsch<br />
English
<strong>NOXON</strong> <strong>iRadio</strong> <strong>M110+</strong><br />
Internet Radio: Einrichtung im Detail<br />
Eine Frage vor dem Start: Kabel oder Funk?<br />
Das <strong>NOXON</strong> bezieht seine Daten zur Wiedergabe vornehmlich aus dem Netzwerk,<br />
sei es aus dem Internet oder dem Heimnetz. Um die Einbindung zu vollziehen, gibt es<br />
grundsätzlich zwei unterschiedliche Arten:<br />
Via Kabel (LAN, Ethernet)<br />
Hier wird die Verbindung über ein Netzwerkkabel mit einem Router, mit einem Switch<br />
oder HUB hergestellt – oder direkt mit Ihrem PC über ein Crossover-Kabel (mit „gekreuzten“<br />
Datenleitungen).<br />
Via Funk (WLAN, WiFi)<br />
Über eine Funkstrecke wird die Verbindung mit einem Accesspoint (AP), einem Router<br />
oder Rechner aufgebaut.<br />
28<br />
NAS Storage / UPnP Server<br />
Internet<br />
Windows<br />
Mac<br />
Linux<br />
Router / Switch<br />
Hier beispielhaft die Einbindung via Kabel oder WLAN<br />
RJ45 Ethernet<br />
Von Routern, SSID, MAC & IPs<br />
Über einige der folgenden Themen werden Sie automatisch stolpern, sobald Sie sich<br />
mit der nun folgenden Einbindung Ihres <strong>NOXON</strong>s beschäftigen. Die hier in aller Kürze<br />
aufgeführten Erläuterungen sollen Ihnen – gemeinsam mit dem Glossar im Anhang – zu<br />
einem besseren Verständnis der notwendigen Entscheidungen und Einstellungen rund<br />
um Ihr Netzwerk verhelfen. Einige Punkte sind nur relevant in Verbindung mit einem<br />
Funknetzwerk, Sie können dieses Kapitel also nach Bedarf benutzen. Mit der konkreten<br />
Einrichtung fahren wir ab dem Kapitel „Szenario 1 – die Netz-Einbindung via Kabel“ fort!
Optionen am Router einstellen<br />
Hierzu ist es auf jeden Fall notwendig, dass Sie mit dem Router (oder dem Administrator<br />
des Routers) soweit vertraut sind, dass Sie Einstellungen vornehmen können und wissen,<br />
wie man mit dem Gerät umgeht. Oder jemanden kennen, der sich damit auskennt.<br />
Im Normalfall werden diese Geräte über ein Webinterface administriert, das heißt, Sie<br />
müssen nur eine bestimmte Adresse (z.B. 192.168.0.1) in den Web-Browser eingeben<br />
und Sie erhalten eine komfortable Oberfläche, über die Sie alle Optionen einstellen können.<br />
Achtung – hier bin ich: SSID Broadcast (WLAN)<br />
Wie auch im technischen Glossar zu lesen, steht die Abkürzung SSID für den Netzwerknamen,<br />
den alle Funknetzgeräte in Reichweite mitgeteilt bekommen: hier ist ein Netz mit<br />
dieser Kennung. Es gibt jedoch auch an einigen Routern die Möglichkeit, dieses Mitteilen<br />
des Namens zu unterdrücken. Diese Option nennt sich meist SSID Broadcast und kann<br />
ein- bzw. ausgeschaltet werden. Ist das Mitteilen abgeschaltet, müssen Sie diesen Namen<br />
in Erfahrung bringen, um ihn bei der Einrichtung am <strong>NOXON</strong> manuell einzugeben.<br />
Gerätekennung: die MAC-Adresse<br />
Die so genannte MAC-Adresse ist eine eindeutige Identifikationskennung eines jeden<br />
Netzwerkgeräts. Diese Adressen sind fest in die Geräte gebrannt und somit fast unabänderlich.<br />
Genau deshalb eignet sich diese Kennung dazu, einen Router so zu konfigurieren,<br />
dass er nur Geräte mit einer vermerkten Kennung auf das Netzwerk bzw. das<br />
Internet zugreifen lässt. In diesem Fall müsste dem Router eben diese MAC-Adresse<br />
des <strong>NOXON</strong>-Geräts mitgeteilt werden, sodass er seiner Bestimmung nachkommen kann<br />
und die Netzverbindung nutzen und auf Daten im Netz zugreifen kann. Die Kennung des<br />
jeweiligen <strong>NOXON</strong> <strong>iRadio</strong>s befindet sich auf einem Aufkleber an der Geräterückseite.<br />
Manchmal gewollt: eine feste IP<br />
Unter bestimmten Voraussetzungen macht es Sinn, ein Gerät unter immer derselben Adresse<br />
anzutreffen. Eigentlich sind die meisten Netze mittlerweile so eingerichtet, dass die<br />
Identifikationsadresse des TCP/IP-Protokolls, die so genannte IP-Adresse, dynamisch<br />
vergeben wird. Das bedeutet, dem jeweiligen Gerät wird beim ersten Verbindungsaufbau<br />
irgendeine gültige IP-Adresse über einen so genannten DHCP-Server zugewiesen, und<br />
solange diese nicht anderweitig verwendet wird, bleibt es auch bei dieser.<br />
Eigentlich bekommt der Nutzer also nichts davon mit, alles geschieht völlig automatisch.<br />
Basiert ein Netzwerk allerdings auf statischen IPs, also nicht auf dynamisch zugewiesenen<br />
IP-Adressen, gibt es hierzu meist genaue Regeln, welche Nummern da<br />
genau gewählt sein dürfen. Und das <strong>NOXON</strong> <strong>iRadio</strong> hat eine solche IP-Adresse. Will das<br />
Netz eine feste IP-Adresse, muss man die Regeln für die Vergabe kennen. Aber noch<br />
mal: eine feste IP ist wirklich die Ausnahme, in der Regel passiert alles automatisch.<br />
29<br />
Deutsch<br />
English
<strong>NOXON</strong> <strong>iRadio</strong> <strong>M110+</strong><br />
Das erste Einschalten<br />
Um den <strong>NOXON</strong> in Betrieb zu nehmen, drücken Sie den Ein-/Ausschalter der Fernbedienung<br />
bzw. am <strong>NOXON</strong> selbst.<br />
Einrichtungsassistent<br />
30<br />
Jetzt starten?<br />
Ja Nein<br />
Nach Einschalten des Gerätes gelangen Sie zum<br />
Setup Wizard, der Ihnen bei der Einrichtung Ihres<br />
<strong>NOXON</strong> <strong>iRadio</strong>s behilflich ist.<br />
Anschließend stellen Sie das Format für die Uhrzeit ein (12/24 Stunden).<br />
Es folgen Datum und Uhrzeit, die Sie bitte einzeln mit dem Navigationsrad einstellen<br />
und per Druck auf selbiges oder mit der Fernbedienung bestätigen. Das Datumsformat<br />
ist übrigens europäisch – also erst der Tag, dann der Monat. Danach können Sie sich<br />
für eine WLAN-Region entscheiden. Sollten Sie nicht gerade in Spanien oder Frankreich<br />
sitzen, ist [Größter Teil Europas] die richtige Wahl für einen Europäer.<br />
Das ist schon alles, was der Setup Wizard von Ihnen wissen will. Er übergibt den Staffelstab<br />
automatisch an den Netzwerk-Einrichtungsassistenten.<br />
Der Netzwerk-Einrichtungsassistent<br />
Da der <strong>NOXON</strong> als Netzwerkgerät noch keinerlei Informationen zu den möglichen Netzwerkumgebungen<br />
hat, aus denen er seine Inhalte bezieht, gelangen Sie nach dem ersten<br />
Einschalten und der Sprachauswahl automatisch zum Assistenten für die Netzwerkeinrichtung.<br />
Wie auch in allen anderen Menüs des <strong>NOXON</strong>, steuern Sie hier mit dem Navigationsrad<br />
durch die Auswahl. Bestätigen Sie diese durch Drücken des Navigationsrads.<br />
Wie der Zugriff eingerichtet wird, erfahren Sie in den folgenden Kapiteln zur kabelgebundenen<br />
und kabellosen Einbindung. Übrigens: Wenn nach der Einrichtung über<br />
den Assistenten die Dinge noch nicht so funktionieren, wie sie es sollten, können<br />
Sie den Assistenten jederzeit erneut aufrufen, indem Sie über das Hauptmenü den<br />
Punkt [Systemeinstellungen] auswählen und in dem darauf folgenden Untermenü den<br />
Punkt [Netzwerk] und anschließend den [Netzwerkassistenten] anwählen.
Szenario 1 – die Einbindung via Kabel<br />
Ist beim Einschalten des Gerätes ein Netzwerkkabel eingesteckt, und damit die Verbindung<br />
zu einem funktionierenden Netzwerk hergestellt, sollte die Einrichtung sehr unkompliziert<br />
und schnell wie folgt verlaufen:<br />
SSID<br />
Ihr WLAN-Netzwerk<br />
WLAN-Netzwerk des Nach...<br />
[Erneut suchen]<br />
[Kabel]<br />
[Manuelle Einstellungen]<br />
Falls in Ihrem Router ein DHCP-Server aktiv ist –<br />
wie eigentlich in fast jedem aktuellen Modell –<br />
wählen Sie bitte [Kabel].<br />
Der Assistent verbindet sich nun automatisch mit<br />
Ihrem Router und bezieht seine Netzwerkadresse<br />
vom DHCP-Server. Jedes Gerät, das am Netzwerk<br />
teilnehmen möchte, braucht eine solche<br />
„Hausnummer“, damit die Datenpakete richtig zugestellt werden können. Im Regelfall<br />
war es das auch schon und die Verbindung steht.<br />
Bei manchen Ausnahmenetzwerken werden jedoch für bestimmte Zugangsbestimmungen<br />
feste IP-Adressen verteilt – welche diese sein müsste, erfahren sie beim Administrator<br />
Ihres Vertrauens. Siehe „Manchmal gewollt: eine feste IP.“<br />
DHCP<br />
DHCP einrichten<br />
Statische IP einrichten<br />
IP-Einstellungen<br />
IP Adresse<br />
192 168 1 2<br />
Subnet Maske<br />
255 255 255 0<br />
Gateway Adresse<br />
Gateway Adresse<br />
192 168 1 1<br />
Um dem <strong>NOXON</strong> eine feste IP zuzuweisen, wählen<br />
Sie bitte [Manuelle Einstellungen]<br />
Im folgenden Menü bitte [Statische IP Einrichten]<br />
auswählen.<br />
Hier können Sie mit dem Navigationsrad die entsprechenden<br />
Werte eingeben. Um große Zahlen<br />
(wie z.B. 192) schneller zu erreichen, drehen Sie<br />
das Rad nach links. Um zum nächsten Eingabefeld<br />
zu gelangen, drücken Sie bitte einmal auf das Rad<br />
oder den OK-Button auf Ihrer Fernbedienung.<br />
Anschließend muss die Gateway-Adresse angegeben<br />
werden.<br />
31<br />
Deutsch<br />
English
<strong>NOXON</strong> <strong>iRadio</strong> <strong>M110+</strong><br />
DNS<br />
Primäre DNS<br />
192 168 1 1<br />
Sekundäre DNS<br />
0 0 0 0<br />
32<br />
Verbunden<br />
Nun nur noch die DNS-Adresse eintragen…fertig!<br />
Jetzt ist die Verbindung hergestellt und die Einstellungen<br />
sind im <strong>NOXON</strong> gespeichert.<br />
Szenario 2 – die Einbindung via Funk<br />
Alternativ zur Netzwerkeinbindung über Kabel – wie unter „Szenario 1 – die Einbindung<br />
via Kabel“ beschrieben – möchten wir Ihnen hier das notwendige Handwerkszeug mitgeben,<br />
um Ihren <strong>NOXON</strong> auch auf dem Funkwege über einen Router einzubinden.<br />
Nicht ganz unwichtig: Die Standortwahl<br />
Ein Funksignal wird immer auf direktem Wege, von Punkt zu Punkt bzw. von Antenne<br />
zu Antenne übertragen. Die Qualität einer Funkverbindung steht und fällt also mit den<br />
Hindernissen, welche per Luftlinie auf dem Weg vom <strong>NOXON</strong> zum Gegengerät durchquert<br />
werden müssen. Somit können Aufstellpositionen, welche eigentlich eine geringere<br />
Entfernung aufweisen im Resultat eine schlechtere Verbindung bedeuten. Sollte zum<br />
Beispiel mehr Mauerwerk oder andere Störquellen durchquert werden müssen, nimmt<br />
die Signalqualität trotz der geringeren Entfernung ab. Es gilt jedoch: je mehr Sendeleistung<br />
der Router hat, desto größer die Empfangsreichweite!
Anmerkung: Die Displayanzeige des <strong>NOXON</strong> hilft Ihnen beim Feststellen der Signalstärke<br />
an einem gewählten Standort.<br />
Die Funkeinbindung über einen Router<br />
Im Gegensatz zum kabelgebundenen Netzwerkgenuss bietet die Funkfreiheit über<br />
WLAN („Wireless Local Area Network“, englisch für „kabelloses lokales Netzwerk“) zwar<br />
ein deutliches Plus an Komfort, erfordert aber hier und da eine genauere Betrachtung,<br />
vor allem wenn man Sicherheitsaspekte nicht völlig außer Acht lassen will.<br />
Der kabellose Datentransport erfolgt über einen oder mehrere spezielle Zugriffspunkte<br />
oder Access Points (kurz: AP). Diese WLAN-Access Points sind heute meistens in den<br />
Breitbandroutern Ihres Internetanschlusses integriert. Man kann wahrscheinlich davon<br />
ausgehen, dass dies die zurzeit am weitesten verbreitete Art ist, einen breitbandigen<br />
Internet-Zugang zu nutzen und mit mehreren Nutzern lokal zu teilen. In diesem Zusammenhang<br />
macht der <strong>NOXON</strong> auch am meisten Spaß, denn so können Sie – ohne den<br />
eigenen Rechner eingeschaltet zu haben – Radio aus den Weiten des Internets, oder<br />
Stücke von anderen Rechnern im Netzwerk empfangen.<br />
Einrichtung der Funkverbindung am <strong>NOXON</strong><br />
Um nun das Gerät in Ihr Netz einzubinden, beginnt der <strong>NOXON</strong> in noch jungfräulichem<br />
Zustand mit dem Assistenten zur Anbindung an Ihr Netz.<br />
SSID<br />
Ihr WLAN-Netzwerk<br />
WLAN-Netzwerk des Nach...<br />
[Erneut suchen]<br />
[Kabel]<br />
[Manuelle Einstellungen]<br />
Er startet damit, Ihnen alle gefundenen Netze aufzulisten.<br />
Ihres sollten Sie darunter auch finden.<br />
Das sieht dann ungefähr so aus:<br />
Wählen Sie nun bitte „Ihr“ Netzwerk aus. Sollte das gesuchte Netzwerk nicht erscheinen,<br />
können Sie über den Menüpunkt [Erneut suchen] die Suche wiederholen. Vielleicht steht<br />
ihr <strong>NOXON</strong> <strong>iRadio</strong> ja einfach nur zu weit entfernt vom Router, oder es befinden sich zu<br />
viele Wände und andere Hindernisse zwischen den beiden Geräten? Platzieren Sie den<br />
<strong>NOXON</strong> ruhig mal in unmittelbarer Nachbarschaft zum Router, und sei es nur, um hier<br />
Fehlerquellen auszuschließen.<br />
Sollten Sie sich an dieser Stelle entschließen, Ihr Radio doch lieber per Kabel mit dem<br />
Router zu verbinden, wählen Sie bitte den Menüpunkt [Kabel].<br />
Nach erfolgter Auswahl des Netzwerkes müssen Sie nun das Netzwerkkennwort eingeben.<br />
Zumindest dann, wenn Sie Ihren WLAN-Router ordentlich verschlüsselt haben.<br />
Wozu wir Ihnen an dieser Stelle dringend raten möchten. Aber das nur nebenbei.<br />
33<br />
Deutsch<br />
English
<strong>NOXON</strong> <strong>iRadio</strong> <strong>M110+</strong><br />
Schlüssel:<br />
0123456789. _ @,<br />
abcdefghijklmn<br />
opqrstuvwxyzABC<br />
DEFGHIJKLMNOPQR<br />
34<br />
BKSP<br />
OK<br />
CANCEL<br />
Das Passwort für Ihren WLAN-Router geben Sie<br />
über das Navigationsrad ein: Durch Drehen wählen<br />
Sie die Buchstaben und Zahlen aus, durch einen<br />
Druck auf das Rad bestätigen Sie die Eingabe.<br />
Die Sonderzeichen finden Sie, wenn Sie mit<br />
dem Rad weiter durchscrollen.<br />
Haben Sie sich vertippt, nutzen Sie das Feld [BKSP] (für „Backspace“). Ist das Passwort<br />
komplett eingegeben, gehen Sie auf das Feld [OK]. Bitte nicht jeden Buchstaben über<br />
[OK] bestätigen, da das zum Abbruch der Eingabe führen würde. Nach dem Bestätigen<br />
über den OK-Button schickt das <strong>NOXON</strong> <strong>iRadio</strong> das Passwort an den Router (auf dem<br />
Bildschirm erscheint „Bitte warten“), der – nach erfolgreichem Abgleich – das <strong>iRadio</strong><br />
anmeldet (was auf dem Display mit „Verbunden“ angezeigt wird).<br />
Einrichtungsassistent<br />
Einstellungen<br />
abgeschlossen<br />
Zum Beenden SELECT drücken<br />
ter von alleine und wählt sich selbstständig ins Netz ein.<br />
Wenn alles geklappt hat, meldet sich der Netzwerks-Einrichtungsassistent<br />
mit der Erfolgsmeldung<br />
„Einstellungen abgeschlossen“. Mit einem<br />
Druck auf das Navigationsrad gelangen Sie ins<br />
Hauptmenü. Die von Ihnen vorgenommenen Eingaben<br />
sind damit im Gerät gespeichert und müssen<br />
kein zweites Mal vorgenommen werden. Beim<br />
nächsten Einschalten findet das <strong>iRadio</strong> Ihren Rou-<br />
Manuelle Einstellungen<br />
Diesen Eintrag müssen Sie wählen wenn Ihr Router den Netzwerknamen nicht verrät<br />
und Sie diesen manuell eingeben müssen oder der Router keinen DHCP-Server hat und<br />
die IP-Adresse fest vergeben werden soll. Hier gleicht die Einrichtung der unter „Szenario<br />
1 – die Einbindung via Kabel“ beschriebenen Art und Weise.<br />
WPS (WiFi Protected Setup)<br />
Hinter diesem kryptischen Namen verbirgt sich ein Standard für die einfache und sichere<br />
Einrichtung des <strong>NOXON</strong> <strong>iRadio</strong>s in einem Netzwerk. Bitte beachten Sie, dass Ihr Router<br />
dieses Protokoll ebenfalls unterstützen muss, damit es mit der Verbindung klappt.<br />
Push Button Konfiguration:<br />
WPS-Einrichtung<br />
Drücken Sie den<br />
WPS-Taste an Ihrem Router<br />
Drücken Sie anschließend<br />
auf das Navigationsrad<br />
P3<br />
Um diesen Verbindungsaufbau zu nutzen, drücken<br />
Sie bitte die WPS-Taste (PBC) an Ihrem<br />
Router und im Anschluss OK an Ihrem <strong>iRadio</strong>.<br />
Für die Konfiguration an Ihrem Router ziehen Sie<br />
bitte das entsprechende Handbuch zu Rate.
Anhang<br />
Technische Daten<br />
Standards:<br />
• WLAN (IEEE 802.11b/g)<br />
• Ethernet 10/100 (IEEE 802.3, IEEE-802.3u)<br />
• UPnP / DLNA konform<br />
• Micros<strong>of</strong>t Windows Media DRM 10<br />
Datenübertragungsraten:<br />
• 54 Mbit/s (WLAN)<br />
• 10/100 MBit/s (Ethernet)<br />
Netzwerksicherheit:<br />
• WPS-PBC<br />
• WEP Verschlüsselung (64/128 Bit Schlüssel)<br />
• WPA / WPA2 Verschlüsselung<br />
Datenformate:<br />
• Internet Radio (MP3 Streams)<br />
• MP3 ( Bitrate bis zu 320 kbps, Samplerate bis zu 48 kHz)<br />
• AAC / AAC+ (Bitrate bis zu 320 kbps, Samplerate bis zu 48 kHz)<br />
• WMA (Bitrate bis zu 320 kbps, Samplerate bis zu 48 kHz)<br />
Anschlüsse:<br />
• Line-Ausgang (3,5 mm Stereo-Klinke)<br />
• Kopfhöreranschluss (3,5 mm Klinke)<br />
• Netzwerk (RJ-45)<br />
• WLAN-Antenne<br />
• UKW-Antenne<br />
Glossar<br />
Access Point (AP/Knotenpunkt): Ein Access Point ist eine Netzwerkkomponente, auf die<br />
sich die WLAN-Clients (Endgeräte) verbinden, um Daten mit dem Internet oder anderen<br />
Clients auszutauschen. Er wird über die SSID identifiziert. Der <strong>NOXON</strong> kann sich mit<br />
einem AP verbinden, um von dort Daten von verschieden anderen Rechnern im lokalen<br />
Netz oder Audioströme aus dem Internet zu beziehen.<br />
DHCP: Eine englische Abkürzung, die für Dynamic Host Configuration Protocol steht und<br />
es ermöglicht, mit Hilfe eines entsprechenden Servers die dynamische Zuweisung von<br />
IP-Adressen und Konfigurationsparametern eines Computers zuzuweisen. Durch DHCP<br />
ist die Integration einer zusätzlichen Netzwerkkomponente ohne Konfiguration möglich.<br />
35<br />
Deutsch<br />
English
<strong>NOXON</strong> <strong>iRadio</strong> <strong>M110+</strong><br />
Der Konfigurationsassistent des <strong>NOXON</strong> ermöglicht DHCP, so dass keine weiteren Konfigurationsparameter<br />
eingegeben werden müssen.<br />
IEEE 802.11b/g: Bezeichnet einen Industriestandard für drahtlose Netzwerke. Herausgeber<br />
ist das Institute <strong>of</strong> Electrical and Electronics Engineers. Dabei bezeichnet b einen<br />
maximalen Datentransfer von 11 Mbit/s und g 54 Mbit/s Unser <strong>NOXON</strong> unterstützt diese<br />
beiden Standards.<br />
IP (IP-Adresse): (Internet Protocol) bezeichnet ein in Computernetzen verbreitetes Übertragungsprotokoll.<br />
Dabei bekommt jeder Client eine IP-Adresse (wie eine Hausnummer),<br />
die als Folge von vier Zahlenpaaren durch einen Punkt getrennt auftritt (z.B. 127.80.1.34)<br />
Diese Zuweisung erfolgt bei DHCP automatisch. Sollte der <strong>NOXON</strong> nicht über DHCP<br />
konfiguriert werden, kann die IP-Adresse manuell eingetragen werden.<br />
LAN: Unter einem LAN (englische Abkürzung für Local Area Network) versteht man ein<br />
Computernetzwerk in einem räumlich begrenzten Bereich (üblicherweise ein kabelbasiertes<br />
Netzwerk).<br />
MAC-Adresse: (Media Access Control Adresse) ist die Hardwareadresse einer jeden<br />
Netzwerkkomponente, die zur eindeutigen Identifikation dient. Sie ist fest und nicht veränderbar.<br />
Da <strong>NOXON</strong> eine Netzwerkkomponente ist, hat auch er eine feste MAC Adresse.<br />
Diese findet sich an der Rückseite des Geräts.<br />
Router: Ein Router ist ein Verbindungsrechner, der in einem Netzwerk dafür sorgt, dass<br />
verschickte Datenpakte an den richtigen Zielrechner (Client) weitergeleitet werden. Häufig<br />
verknüpft der Router verschiedene Netzwerke miteinander, so zum Beispiel WLAN<br />
und LAN. Auch <strong>NOXON</strong> ist ein solcher Client, der so seine Datenpakete bekommt.<br />
SSID (ESSID): Als Service Set Identifier (SSID) oder auch Network Name bezeichnet<br />
man eine Funk-Netzwerk-Kennung, das auf IEEE 802.11 basiert. Jedes Wireless LAN<br />
besitzt eine konfigurierbare, so genannte SSID oder ESSID (Extended Service Set Identifier),<br />
um das Funknetz eindeutig identifizieren zu können. Sie stellt also den Namen<br />
des Netzes dar. Der <strong>NOXON</strong> erkennt alle gefunden Netzwerke automatisch, hat jedoch<br />
zusätzlich die Option, eine SSID manuell einzugeben.<br />
UPnP: Diese Abkürzung steht für Universal Plug and Play und basiert auf einer Reihe<br />
von standardisierten Netzwerkprotokollen. Es dient der herstellerübergreifenden Ansteuerung<br />
von Geräten (Stereoanlage, Drucker, Router, Hausanlagen) über ein IP-basiertes<br />
Netzwerk. Der <strong>NOXON</strong> ist ein UPnP-Gerät, welches mit einer entsprechenden S<strong>of</strong>tware<br />
Daten empfangen kann.<br />
WEP-Verschlüsselung: beschreibt einen Verschlüsselungsstandard für WLANs. Natürlich<br />
kann auch <strong>NOXON</strong> WEP-verschlüsselte Daten empfangen und interpretieren.<br />
WPA-Verschlüsselung: Wie WEP ist auch WPA ein Standard für die Verschlüsselung<br />
36
und Authentifizierung. Entwickelt wurde WPA, um die grundlegenden Schwächen der<br />
WEP-Verschlüsselung zu beheben. WPA kann also als der sichere Nachfolger von WEP<br />
angesehen werden.<br />
WPS: WiFi Protected Setup ist ein Standard für eine einfache und sichere Art der Verbindung<br />
in einem drahtlosen Netzwerk.<br />
WiFi: Zertifikat für WLAN-Produkte, die nach den IEEE802.11 Standards arbeiten und<br />
kompatibel mit anderen Produkten sind. Auch der <strong>NOXON</strong> erfüllt die technischen Standards<br />
des WiFi-Konsortiums.<br />
WLAN: Auch Wireless LAN oder Wireless Local Area Network genannt; bezeichnet ein<br />
drahtloses, lokales Funknetzwerk zur Übertragung von Daten. Der <strong>NOXON</strong> wird via<br />
WLAN mit ihrem Netzwerk verbunden. Er empfängt die Daten über das lokale Funknetzwerk,<br />
verarbeitet diese und spielt letztlich die Musikdatei ab.<br />
Häufig gestellte Fragen<br />
Die aktuellste Version finden Sie im Internet unter:<br />
www.terratec.net/de/treiber-und-support.html<br />
Legales<br />
Die für Ihr Produkt gültigen ausführlichen Nutzungs- und Lizenzbedingungen sind dem<br />
Produkt gesondert beigefügt.<br />
Informationen in diesem Dokument können sich jederzeit ohne weitere Vorankündigung<br />
ändern und stellen in keiner Weise eine Verpflichtung von Seiten des Verkäufers dar.<br />
Keine Garantie oder Darstellung, direkt oder indirekt, wird gegeben in Bezug auf Qualität,<br />
Eignung oder Aussagekraft für einen bestimmten Einsatz dieses Dokuments. Der<br />
Hersteller behält sich das Recht vor, den Inhalt dieses Dokuments oder/und der zugehörigen<br />
Produkte jeder Zeit zu ändern, ohne zu einer Benachrichtigung einer Person<br />
oder Organisation verpflichtet zu sein. In keinen Fall haftet der Hersteller für Schäden<br />
jedweder Art, die aus dem Einsatz, oder der Unfähigkeit, dieses Produkts oder der Dokumentation<br />
einzusetzen zu können, erwachsen, selbst wenn die Möglichkeit solcher<br />
Schäden bekannt ist. Dieses Dokument enthält Informationen, die dem Urheberrecht<br />
unterliegen. Alle Rechte sind vorbehalten. Kein Teil oder Auszug dieses Handbuchs darf<br />
kopiert oder gesendet werden, in irgendeiner Form, auf keine Art und Weise oder für<br />
irgendeinen Zweck, ohne ausdrückliche schriftliche Genehmigung des Urheberrechtsinhabers.<br />
Produkt- und Markennamen die in diesem Dokument genannt werden, sind<br />
nur für Zwecke der Identifikation. Alle eingetragenen Warenzeichen, Produkt- oder Markennamen,<br />
die in diesem Dokument genannt werden, sind eingetragenes Eigentum der<br />
jeweiligen Besitzer.<br />
© <strong>TERRATEC</strong>® Electronic GmbH, 1994-2012. Alle Rechte vorbehalten (01.04.2012).<br />
Copyright-Hinweise:<br />
37<br />
Deutsch<br />
English
<strong>NOXON</strong> <strong>iRadio</strong> <strong>M110+</strong><br />
Thomson Licensing - MP3 audio decoder<br />
MPEG Layer-3 audio decoding technology licensed from Fraunh<strong>of</strong>er IIS and Thomson<br />
multimedia.<br />
Micros<strong>of</strong>t - Windows Media Audio decoder<br />
This product is protected by certain intellectual property rights <strong>of</strong> Micros<strong>of</strong>t. Use or distribution<br />
<strong>of</strong> such technology outside <strong>of</strong> this product is prohibited without a license from<br />
Micros<strong>of</strong>t.<br />
Micros<strong>of</strong>t - Windows Media Digital Rights Management (DRM 10)<br />
Content owners use Windows Media digital rights management technology (WMDRM)<br />
to protect their intellectual property, including copyrights. This device uses WMDRM s<strong>of</strong>tware<br />
to access WMDRM-protected content. If the WMDRM s<strong>of</strong>tware fails to protect the<br />
content, content owners may as Micros<strong>of</strong>t to revoke the s<strong>of</strong>tware’s ability to use WMDRM<br />
to play or copy protected content. Revocation does not affect unprotected content. When<br />
you download licenses for protected content, you agree that Micros<strong>of</strong>t may include a<br />
revocation list with the licenses. Content owners may require you to upgrade WMDRM<br />
to access their content. If you decline an upgrade, you will not be able to access content<br />
that requires the upgrade.<br />
38
39<br />
Deutsch<br />
English
<strong>NOXON</strong> <strong>iRadio</strong> <strong>M110+</strong><br />
Menu structure<br />
Main menu<br />
Internet Radio<br />
MyMedia<br />
Sleep Timer<br />
Alarm<br />
System settings<br />
40<br />
Internet Radio<br />
Favorits<br />
Stations<br />
Podcasts<br />
my<strong>NOXON</strong><br />
History<br />
MyMedia<br />
Serverlist<br />
USB playback<br />
My playlist<br />
Repeat: <strong>of</strong>f<br />
Shuffle: <strong>of</strong>f<br />
Clean my playlist<br />
Clean server list<br />
System settings<br />
Equalizer<br />
Network<br />
Time/Date<br />
Language<br />
Factory reset<br />
S<strong>of</strong>tware update<br />
Setup wizard<br />
Info<br />
Favorits<br />
Station 1<br />
Station 2<br />
Station 3<br />
Station 4<br />
Station 5<br />
Stations<br />
Local Germany<br />
By Region<br />
By Genre<br />
Search stations<br />
Best <strong>of</strong> <strong>NOXON</strong><br />
New Stations<br />
Podcasts<br />
Africa<br />
Asia<br />
Caribbean<br />
Central Amerika<br />
Europe<br />
Search podcasts<br />
my<strong>NOXON</strong><br />
Service 1<br />
Service 2<br />
Service 3<br />
Service 4<br />
Service 5<br />
History<br />
Station 1<br />
Station 2<br />
Station 3<br />
Station 4<br />
Station 5<br />
Serverlist<br />
Server 1<br />
Server 2<br />
Server 3<br />
Server 4<br />
Server 5<br />
Equalizer<br />
Off<br />
...<br />
Network<br />
Network wizard<br />
WPS wizard<br />
View settings<br />
WLAN region<br />
Manual settings<br />
Network pr<strong>of</strong>ile<br />
Time/Date<br />
Set Time/Date<br />
Auto update<br />
Set format<br />
Set timezone<br />
Daylight savings<br />
Language<br />
English<br />
Deutsch<br />
Francaise<br />
Italiano<br />
Espanol<br />
Nederlandse<br />
S<strong>of</strong>tware update<br />
Auto-check settings<br />
Check now
INDEX<br />
Menu structure . . . . . . . . . . . . . . . . . . . . . . . . . . . . . . . . . . . . . . . . . . . . . . . . . . . . . . . . . . . . . 40<br />
Declaration <strong>of</strong> CE conformity . . . . . . . . . . . . . . . . . . . . . . . . . . . . . . . . . . . . . . . . . . . . . . . . . . 42<br />
Important information . . . . . . . . . . . . . . . . . . . . . . . . . . . . . . . . . . . . . . . . . . . . . . . . . . . . . . . . . 43<br />
Scope <strong>of</strong> delivery . . . . . . . . . . . . . . . . . . . . . . . . . . . . . . . . . . . . . . . . . . . . . . . . . . . . . . . . . . . . . 44<br />
Overview . . . . . . . . . . . . . . . . . . . . . . . . . . . . . . . . . . . . . . . . . . . . . . . . . . . . . . . . . . . . . . . . . . . . 45<br />
Front. . . . . . . . . . . . . . . . . . . . . . . . . . . . . . . . . . . . . . . . . . . . . . . . . . . . . . . . . . . . . . . . . . . . . 45<br />
Top . . . . . . . . . . . . . . . . . . . . . . . . . . . . . . . . . . . . . . . . . . . . . . . . . . . . . . . . . . . . . . . . . . . . . . 45<br />
Back . . . . . . . . . . . . . . . . . . . . . . . . . . . . . . . . . . . . . . . . . . . . . . . . . . . . . . . . . . . . . . . . . . . . . 46<br />
Remote control. . . . . . . . . . . . . . . . . . . . . . . . . . . . . . . . . . . . . . . . . . . . . . . . . . . . . . . . . . . . . 47<br />
Main functions . . . . . . . . . . . . . . . . . . . . . . . . . . . . . . . . . . . . . . . . . . . . . . . . . . . . . . . . . . . . . . . 48<br />
Internet radio . . . . . . . . . . . . . . . . . . . . . . . . . . . . . . . . . . . . . . . . . . . . . . . . . . . . . . . . . . . . . . 49<br />
Podcast & Radio on demand . . . . . . . . . . . . . . . . . . . . . . . . . . . . . . . . . . . . . . . . . . . . . . . . . . 49<br />
Digital media player (UPnP). . . . . . . . . . . . . . . . . . . . . . . . . . . . . . . . . . . . . . . . . . . . . . . . . . . 50<br />
DAB, DAB+ and FM . . . . . . . . . . . . . . . . . . . . . . . . . . . . . . . . . . . . . . . . . . . . . . . . . . . . . . . . . 51<br />
Playback from USB storage devices . . . . . . . . . . . . . . . . . . . . . . . . . . . . . . . . . . . . . . . . . . . . 53<br />
Display . . . . . . . . . . . . . . . . . . . . . . . . . . . . . . . . . . . . . . . . . . . . . . . . . . . . . . . . . . . . . . . . . . . . . . 54<br />
Status line . . . . . . . . . . . . . . . . . . . . . . . . . . . . . . . . . . . . . . . . . . . . . . . . . . . . . . . . . . . . . . . . 54<br />
List view . . . . . . . . . . . . . . . . . . . . . . . . . . . . . . . . . . . . . . . . . . . . . . . . . . . . . . . . . . . . . . . . . . 55<br />
Playback view . . . . . . . . . . . . . . . . . . . . . . . . . . . . . . . . . . . . . . . . . . . . . . . . . . . . . . . . . . . . . 55<br />
Main menu & Co . . . . . . . . . . . . . . . . . . . . . . . . . . . . . . . . . . . . . . . . . . . . . . . . . . . . . . . . . . . . . . 56<br />
My Media . . . . . . . . . . . . . . . . . . . . . . . . . . . . . . . . . . . . . . . . . . . . . . . . . . . . . . . . . . . . . . . . . 58<br />
Sleep timer. . . . . . . . . . . . . . . . . . . . . . . . . . . . . . . . . . . . . . . . . . . . . . . . . . . . . . . . . . . . . . . . 58<br />
Alarm clock. . . . . . . . . . . . . . . . . . . . . . . . . . . . . . . . . . . . . . . . . . . . . . . . . . . . . . . . . . . . . . . . 58<br />
System settings . . . . . . . . . . . . . . . . . . . . . . . . . . . . . . . . . . . . . . . . . . . . . . . . . . . . . . . . . . . . 59<br />
Internet radio: Quick start . . . . . . . . . . . . . . . . . . . . . . . . . . . . . . . . . . . . . . . . . . . . . . . . . . . . . . 62<br />
Pretest . . . . . . . . . . . . . . . . . . . . . . . . . . . . . . . . . . . . . . . . . . . . . . . . . . . . . . . . . . . . . . . . . . . 62<br />
Setup . . . . . . . . . . . . . . . . . . . . . . . . . . . . . . . . . . . . . . . . . . . . . . . . . . . . . . . . . . . . . . . . . . . . 62<br />
Listen and enjoy. . . . . . . . . . . . . . . . . . . . . . . . . . . . . . . . . . . . . . . . . . . . . . . . . . . . . . . . . . . . 64<br />
Internet Radio: Setup in detail . . . . . . . . . . . . . . . . . . . . . . . . . . . . . . . . . . . . . . . . . . . . . . . . . . . 65<br />
One question before starting: Wired or wireless? . . . . . . . . . . . . . . . . . . . . . . . . . . . . . . . . . . 65<br />
On routers, SSID, MAC & IPs . . . . . . . . . . . . . . . . . . . . . . . . . . . . . . . . . . . . . . . . . . . . . . . . . 65<br />
Switching it on for the first time . . . . . . . . . . . . . . . . . . . . . . . . . . . . . . . . . . . . . . . . . . . . . . . . 66<br />
The network configuration wizard . . . . . . . . . . . . . . . . . . . . . . . . . . . . . . . . . . . . . . . . . . . . . . 67<br />
Scenario 1 – the wired connection. . . . . . . . . . . . . . . . . . . . . . . . . . . . . . . . . . . . . . . . . . . . . . 67<br />
Scenario 2 – the wireless connection. . . . . . . . . . . . . . . . . . . . . . . . . . . . . . . . . . . . . . . . . . . . 69<br />
Manual configuration . . . . . . . . . . . . . . . . . . . . . . . . . . . . . . . . . . . . . . . . . . . . . . . . . . . . . . . . 71<br />
WPS (WiFi Protected Setup) . . . . . . . . . . . . . . . . . . . . . . . . . . . . . . . . . . . . . . . . . . . . . . . . . . 71<br />
Annex . . . . . . . . . . . . . . . . . . . . . . . . . . . . . . . . . . . . . . . . . . . . . . . . . . . . . . . . . . . . . . . . . . . . . . . 72<br />
41<br />
Deutsch<br />
English
<strong>NOXON</strong> <strong>iRadio</strong> <strong>M110+</strong><br />
Declaration <strong>of</strong> CE conformity<br />
We: <strong>TERRATEC</strong> Electronic GmbH · Herrenpfad 38 · 41334 Nettetal · Germany<br />
hereby declare that the product:<br />
<strong>NOXON</strong> <strong>iRadio</strong> <strong>M110+</strong><br />
to which this declaration relates, conforms to the following standards or normative documents:<br />
• EN 55013:2001 + A1:2003 + A2:2006<br />
• EN 55020:2007<br />
• EN 61000-3-2:2006 + A1:2009 + A2:2009<br />
• EN 61000-3-3:2008<br />
• EN 60065:2002+A1:2006+A11:2008<br />
The following provisions are met:<br />
• EN 301489-1 V1.8.1 (2008-04)<br />
• EN 301489-17 V2.1.1 (2009-05)<br />
• EN 300328 V1.7.1 (2006-10)<br />
• EN 50371:2002<br />
‚This product is conform with:<br />
• LVD directive 2006/95/EC<br />
This statement is based on:<br />
• Report(s) <strong>of</strong> ShenZhen Timeway Technology Consulting Co.,Ltd.<br />
Thus, the essential requirements <strong>of</strong> the EMC Directive 89/336/EEC are met. The CE has<br />
been demonstrated. As part <strong>of</strong> the R & TTE Directive (1999/5/EC), the device <strong>of</strong> a radio<br />
system for Class 1 (Commission Decision 2000/299/EC).<br />
CAUTION:<br />
To completely disconnect this product from the mains, disconnect the plug from the wall<br />
socket outlet. The mains plug is used to completely interrupt the power supply to the unit<br />
and must be within easy access by the user.<br />
42
Important information<br />
Safety<br />
• Read through the operating manual carefully and keep it in a safe place.<br />
• Observe all warnings and follow the instructions to avoid damage.<br />
• Use this device indoors only.<br />
• Place the device on a level, dry surface to prevent fire and electrical shock hazards<br />
as well as possible damage to the player itself.<br />
• Do not use the device close to water or other liquids.<br />
• Keep the device away from direct sunlight, radiators, open flames and other sources<br />
<strong>of</strong> heat.<br />
• Only use the accompanying power supply cable. If you are not going to use the<br />
device for an extended period, disconnect it from the power supply. To avoid short<br />
circuits, never pull on the cable itself. In addition, be sure to unplug the device from<br />
the AC outlet in the event <strong>of</strong> a thunderstorm.<br />
• If the device has been exposed to extreme differences in temperature, allow it to<br />
adjust to the room temperature for one hour before plugging it in. Condensation may<br />
have formed inside the device, which impairs its functionality.<br />
• Use a dry or slightly moistened, lint-free cloth to clean the <strong>NOXON</strong>. Do not use cleaning<br />
products as they may damage the finish <strong>of</strong> the unit.<br />
• To put it simply, just use the device sensibly. The warranty does not cover deliberate<br />
damage to the device, <strong>of</strong> course. Thank you.<br />
Environment<br />
• The product contains batteries that are subject to European Directive 2006/66/EC<br />
and must not be disposed <strong>of</strong> in the normal household waste.<br />
• This product fulfils EC Directive 2002/96/EC and must not be disposed <strong>of</strong> in the normal<br />
household waste.<br />
• Please obtain information on correct disposal from your local authorities – this will<br />
help protect the environment!<br />
43<br />
Deutsch<br />
English
<strong>NOXON</strong> <strong>iRadio</strong> <strong>M110+</strong><br />
Scope <strong>of</strong> delivery<br />
• <strong>NOXON</strong> <strong>iRadio</strong> <strong>M110+</strong><br />
• Line cable<br />
• Remote control with battery inserted<br />
• WLAN antenna<br />
• FM telescopic antenna<br />
• Antenna adapter (IEC female)<br />
• Antenna adapter (IEC male)<br />
• Operating manual (DE, EN)<br />
• Quick Start Guide (DE, EN, FR, IT, NL)<br />
44
Overview<br />
Front<br />
1. Navigation dial with push function<br />
for selection: Scroll through the<br />
menu by turning the dial in the list<br />
view. Turning the dial during playback<br />
changes the volume. To select<br />
a menu item, press the dial once.<br />
2. Back button: This takes you one<br />
step back in the selection.<br />
3. Display: Shows information on media,<br />
functions and menus.<br />
Top<br />
4. Station keys 1 to 5: Here, you can<br />
save up to five <strong>of</strong> your favourite stations<br />
for quick access.<br />
5. Stop: Stops playback.<br />
6. Skip Back: Jumps to the previous<br />
track.<br />
7. Play/Pause: Starts and pauses<br />
playback.<br />
8. Skip Forward: Jumps to the next<br />
track.<br />
9. Standby On/Off: Here, you can<br />
wake up the <strong>iRadio</strong> or put it back to<br />
sleep.<br />
45<br />
Deutsch<br />
English
<strong>NOXON</strong> <strong>iRadio</strong> <strong>M110+</strong><br />
Back<br />
1. WLAN antenna: For wireless reception, please connect the WLAN antenna provided<br />
here.<br />
2. FM antenna: You can connect the provided telescopic antenna here. If you want to<br />
connect a cable here instead, please use the provided antenna adapter.<br />
3. POWER switch: Disconnects your <strong>iRadio</strong> from mains.<br />
4. POWER: Connect the provided line cable to this jack.<br />
5. LAN: For wired network operation, use this RJ45 jack.<br />
6. USB: Use the USB port to connect memory devices like external hard discs or memory<br />
sticks. Your <strong>NOXON</strong> supports both USB 1.x and 2.0 devices.<br />
7. LINE OUT: You can connect this 3.5 mm stereo jack to an amplifier or active speakers.<br />
When this jack is occupied, the internal speakers are muted.<br />
8. HEADPHONE: Here, you can connect your headphones if you want to have the<br />
sound <strong>of</strong> the <strong>iRadio</strong> all to yourself. If the headphones are connected, the internal<br />
speakers are muted.<br />
46
Remote control<br />
The operating elements and functions provided here are almost identical to those on the<br />
<strong>iRadio</strong>.<br />
Note: Before using the device for the first time, you have to remove the retaining tab <strong>of</strong><br />
the battery.<br />
1. Standby On/Off<br />
2. Station keys 1 to 5<br />
3. Back Button (navigate back)<br />
4. Navigate up<br />
5. Selection<br />
6. Volume lower<br />
7. Volume higher<br />
8. Navigate down<br />
9. Stop<br />
10. Skip Back<br />
11. Skip Forward<br />
12. Play/Pause<br />
47<br />
Deutsch<br />
English
<strong>NOXON</strong> <strong>iRadio</strong> <strong>M110+</strong><br />
Main functions<br />
We would like to start by exciting your imagination a bit and introducing the central features<br />
<strong>of</strong> your new device.<br />
Always online, always something to listen to! The <strong>NOXON</strong> is an ideal complement to<br />
your DSL or other broadband Internet connection. With a flat-rate connection, you can<br />
use the <strong>NOXON</strong> to enjoy the wide selection <strong>of</strong> radio stations on the Internet without any<br />
limitations on time or traffic. The <strong>NOXON</strong> is your key to a completely new radio listening<br />
pleasure—with over 14,000 stations on the Internet! Gone are the days in which you<br />
were compelled to listen to what the programmers <strong>of</strong> FM radio stations <strong>of</strong>fered in their<br />
own broadcast area.<br />
It’s a whole different world <strong>of</strong> radio on the Internet! Your new “broadcast area” is the<br />
whole world—from Albania to the USA and China to Cyprus, and everywhere in between!<br />
Now you can count on the right music at any hour <strong>of</strong> the day or night—the choice is all<br />
yours. The options are virtually limitless. Your <strong>NOXON</strong> and the included vTuner premium<br />
service (more about that later) put the vast and growing world <strong>of</strong> Internet radio at your<br />
fingertips now without any added costs—always up-to-date, and we will keep expanding<br />
it in the future. Each <strong>of</strong> the many presorted categories (rock, pop, hip-hop, alternative,<br />
jazz, blues, classical, news and much more) can contain up to several hundred stations<br />
Stations available from around the world.<br />
And that’s not all. There are even more ways for you to use your <strong>NOXON</strong>: Practice<br />
listening to foreign languages, or take an audio tour to exotic and faraway places. International<br />
news stations have their own category, as do speciality stations for sports,<br />
comedy, weather and much more. Thanks to your <strong>NOXON</strong>, you can feel right at home<br />
while in distant lands—and vice versa. Expand your horizons and keep your finger on<br />
the world’s pulse—put the thrill back into radio! And to make sure that you don’t get lost<br />
in the new, bewildering abundance <strong>of</strong> new radio stations, your <strong>NOXON</strong> arranges and<br />
organises them all for you.<br />
Access your media library! The device integrates into your existing network with ease<br />
using a wireless (called WLAN or Wi-Fi) or cable (Ethernet, LAN) connection. Simply<br />
add a media server (UPnP) to your network (you’ll find out how later in this manual) and<br />
your complete collection <strong>of</strong> audio files (MP3, WMA, AAC+) will be available anywhere in<br />
your home.<br />
48
Internet radio<br />
In the previous section, we already introduced the impressive Internet radio capabilities<br />
<strong>of</strong> your <strong>iRadio</strong>. The big advantage <strong>of</strong> the <strong>iRadio</strong> over the conventional way <strong>of</strong> listening<br />
to Internet radio via your computer’s web browser is that your <strong>iRadio</strong> can tap into the full<br />
variety <strong>of</strong> the Internet WITHOUT relying on your computer—simply by connecting directly<br />
to the router that provides your Internet access.<br />
Caution—transfer volume! Please note that frequently listening to Internet radio stations<br />
will result in an enormous volume <strong>of</strong> data being transferred over the course <strong>of</strong> a month.<br />
If you have a contract with a volume limit, exceeding this limit may result in extra costs.<br />
For that reason, we recommend unlimited rate plans.<br />
The radio station directory<br />
Stations<br />
Local Germany<br />
Location<br />
Genre<br />
Search stations<br />
Best <strong>of</strong> <strong>NOXON</strong><br />
The list <strong>of</strong> Internet radio stations is always kept<br />
up-to-date and continuously expanded. The service<br />
ensures that you always have a fresh, reliable<br />
selection <strong>of</strong> stations despite the continuous<br />
changes in the Internet radio world. When you access<br />
the Internet radio menu, the <strong>iRadio</strong> automatically<br />
retrieves the current version from the Internet,<br />
thus making sure that you always have the<br />
latest version. Simply use the usual controls to navigate through the presorted station<br />
list.<br />
If you happen upon a station that you would like to find again, simply press one <strong>of</strong> the<br />
station keys for approx. 2 seconds during the playback to store the station and press this<br />
same number button to bring it up again later as desired. Then, the bottom line <strong>of</strong> the<br />
display shows a P (for Programme), followed by the respective memory number – for<br />
example, “P1”. Other options for managing your favourites are described later.<br />
Podcast & Radio on demand<br />
Radio On Demand in English is normally used as a synonym for podcasting. Thus for<br />
example, popular shows from a daily radio program are formatted and made available<br />
online so that they can be called up any time as podcasts—even large and well-known<br />
radio stations do this.<br />
As a listener, you are no longer tied to the set broadcast times <strong>of</strong> conventional radio<br />
programs, you can access the contents made available in this way whenever you want.<br />
That’s why it’s called “Radio On Demand”. The variety <strong>of</strong> these contents is vast, and<br />
growing by the day. Possibly even an interesting alternative to classic radio: and it’s not<br />
only broadcast organisations that are providing content like this, more recently live recordings<br />
<strong>of</strong> university lectures, language courses, comedy programs or just plain simple<br />
audio journals have been added to the <strong>of</strong>fering. There’s something for just about any<br />
desire. And the best <strong>of</strong> it is: With your <strong>iRadio</strong> you have easy, free access to the podcast<br />
49<br />
Deutsch<br />
English
<strong>NOXON</strong> <strong>iRadio</strong> <strong>M110+</strong><br />
collection—enormous, well sorted by origin and genre, constantly updated, and completely<br />
independent <strong>of</strong> any computer or iPod!<br />
Digital media player (UPnP)<br />
You can share music files for playback in your network using server s<strong>of</strong>tware running on<br />
a computer or other device. The <strong>iRadio</strong> requires a UPnP-compatible server (UPnP: Universal<br />
Plug and Play) to provide it with files. A simple Windows file share is not readable.<br />
Unlike inflexible static file shares, the <strong>iRadio</strong> <strong>of</strong>fers a flexible sorting via a virtual UPnP<br />
media server that improves the flexibility <strong>of</strong> your collection—a track can be found via the<br />
artist, genre, album or the folder structure. And don’t worry—”setting up a server” is not<br />
as much work as it was just a few short years ago. Just launch the UPnP media server<br />
s<strong>of</strong>tware and you’re ready to go!<br />
One advantage: you can run multiple UPnP servers within the same network—no need<br />
for Dad to listen to Sis’ tunes or vice-versa. Each active UPnP server appears separately<br />
in the <strong>NOXON</strong> menu for fast, easy access.<br />
Windows<br />
data in your library.<br />
50<br />
Windows Media Player<br />
(Version 11 or 12) is the<br />
simplest way to add such<br />
a server, since it already<br />
has this service built in.<br />
Via the “Stream” menu<br />
item, select the “Turn on<br />
media streaming” function.<br />
In the following dialogue<br />
you now have to enable<br />
this service explicitly and<br />
then activate the corresponding<br />
devices, if you<br />
have multiple receivers.<br />
Now the <strong>NOXON</strong> <strong>iRadio</strong><br />
can access the music<br />
Apple<br />
Unfortunately Apple does not supply any UPnP program itself, so it is necessary to rely<br />
on a third-party supplier. Elgato <strong>of</strong>fers a solution with its EyeConnect s<strong>of</strong>tware. This is<br />
available for free as a trial version and can be used with the full range <strong>of</strong> its functions<br />
(including video streaming) for 30 days. Even after this period, however, the Lite version
emains available, which makes audio files in the network available without restrictions.<br />
You will find this s<strong>of</strong>tware at Elgato’s website: www.elgato.com.<br />
<strong>NOXON</strong><br />
In the <strong>NOXON</strong> <strong>iRadio</strong> you will find the released files in the main menu under UPnP:<br />
MyMedia<br />
Serverlist<br />
USB playback<br />
My playlist<br />
Repeat: Off<br />
Shuffle: Off<br />
All UPnP servers found are listed under [Serverlist].<br />
Please note that these servers usually create<br />
a database on the basis <strong>of</strong> ID3 tags. Accordingly,<br />
the quality <strong>of</strong> the list very much depends on how<br />
well-maintained your data is. For example, it can<br />
happen that the name <strong>of</strong> the artist in an album is<br />
written in different ways in the ID3 tags and then<br />
the server identifies multiple artists.<br />
Generally, you can assume that the data is <strong>of</strong>fered with the same sorting in the network<br />
as they also appear in the respective program.<br />
DAB, DAB+ and FM<br />
In addition to numerous Internet radio stations your <strong>iRadio</strong> can receive all stations broadcasted<br />
on DAB, DAB+ and FM! Please note that you need an adequate reception facility<br />
(antenna or cable) for this. DAB and DAB+ might not be broadcasted area-wide or even<br />
not at all in your country.<br />
Connection<br />
Establishing the connection is really easy: Just use a standard antenna cable with coax<br />
plugs (not included) to connect the tuner jack <strong>of</strong> your <strong>iRadio</strong> and your antenna or cable<br />
socket.<br />
DAB/DAB+ reception<br />
Scan stations<br />
Starting from the main menu, use the navigation wheel to locate the submenu “DAB” and<br />
confirm your choice by pressing the navigation wheel once. Choose “Full Scan” as the<br />
next step, which will make the <strong>iRadio</strong> find all DAB and DAB+ stations available in your<br />
area for you.<br />
Station list<br />
In the “DAB” menu you will also find the submenu “Station list”. This list shows all the<br />
stations that have been found by the scan performed earlier. Just press the navigation<br />
wheel to start listening to a selected station. Pressing the wheel further times will show<br />
diverse information about the active station. You can navigate to the next or previous station<br />
with the Skip Back/Skip Forward buttons located on the <strong>iRadio</strong> or the remote control<br />
without the need to return to the station list first.<br />
51<br />
Deutsch<br />
English
<strong>NOXON</strong> <strong>iRadio</strong> <strong>M110+</strong><br />
If you come across a station you especially like, you can save it by pressing one <strong>of</strong> the<br />
favourites buttons on the <strong>iRadio</strong> or the remote control for a longer period. You can recall<br />
saved stations at any time by pressing the corresponding favourites button shortly without<br />
taking the detour via the menus.<br />
Prune invalid<br />
If a station name shows a questions mark in front <strong>of</strong> it, the <strong>iRadio</strong> cannot receive this station<br />
anymore. This can be caused by a loss in reception quality or by a restructuring on<br />
the part <strong>of</strong> the broadcasting companies.<br />
In order to clear the station list <strong>of</strong> such entries which just make it less well-arranged,<br />
choose the submenu “Prune invalid” in the “DAB” menu and confirm the security query<br />
with “Yes”.<br />
Station order<br />
The submenu “Station order” in the “DAB” menu lets you decide whether you would like<br />
to have your stations sorted alphanumerically or by ensembles (these are groups <strong>of</strong> several<br />
stations broadcasted together in one ‚package‘).<br />
FM reception<br />
Scan stations<br />
Starting from the main menu, use the navigation wheel to locate the submenu “FM”<br />
and confirm your choice by pressing the navigation wheel once. Pressing the navigation<br />
wheel another time will automatically find the next available station for you. Your <strong>iRadio</strong><br />
features RDS functionality and can therefore display the stations name (if broadcasted).<br />
Scan setting<br />
If you press the back button <strong>of</strong> your <strong>iRadio</strong> (or the remote) while listening to an FM station,<br />
you can use the “Scan setting” submenu to make the scan process find only strong<br />
stations with a good reception quality.<br />
Audio setting<br />
If your FM reception is rather bad in general, you can use the “Audio setting” submenu<br />
to switch from stereo to mono-only reception. This way you can reduce the noise from a<br />
weak radio signal significantly.<br />
Manual scan<br />
As an alternative to the automatic scan you can use the Skip Back/Skip Forward buttons<br />
on the <strong>iRadio</strong> or your remote in order to navigate to a certain frequency and listen to the<br />
station located there.<br />
Time information via DAB, FM or Internet<br />
There is no need to set the integrated clock <strong>of</strong> the <strong>iRadio</strong> manually, as many stations<br />
provide an additional time code together with their program. This feature will only work<br />
52
on proper reception <strong>of</strong> such a station.<br />
Use the navigation wheel to choose the “System settings” submenu from the main menu,<br />
then “Time/Date” and then “Auto update”. Now you can decide if you want to receive your<br />
time code from stations which broadcast via DAB/DAB+, FM or the Internet.<br />
Playback from USB storage devices<br />
Use the USB port to connect memory devices like external hard discs or memory sticks.<br />
Your <strong>NOXON</strong> supports both USB 1.x and 2.0 devices.<br />
Please note that not all USB devices can be used on this port: Keyboards and mice are<br />
not supported, nor are external MP3 storage devices with additional functions (USB hub,<br />
data encryption, etc.). Some MP3 players encrypt the files stored on them and thus<br />
unfortunately also cannot be read. An entry for USB will appear in the MyMedia folder<br />
whenever a compatible USB storage device is connected.<br />
If you select this playback from USB, the folder structure is displayed in a form that is 1:1<br />
identical to the USB device it is taken from. Next, use the usual navigation to select and<br />
play a track. When connecting a USB hard drive, it may take a short moment to read the<br />
folder tree. After that, the navigation should work as usual. The supported file systems<br />
is FAT.<br />
53<br />
Deutsch<br />
English
<strong>NOXON</strong> <strong>iRadio</strong> <strong>M110+</strong><br />
Display<br />
In this chapter we would like to acquaint you with the <strong>NOXON</strong>’s display so that you always<br />
maintain an overview.<br />
Status line<br />
The status line is located in the upper area <strong>of</strong> the screen. There, you see the directory in<br />
which you are currently located.<br />
54<br />
Main menu<br />
If you have selected a playback mode, the current time is also displayed next to the<br />
mode.<br />
Internet Radio 09:23<br />
In Internet radio mode – if you have saved the station to a station key – the respective<br />
number is shown (e.g. P3). If you are playing back music from the network, the message<br />
“UPNP” appears there. In addition, the currently selected connection type is shown in the<br />
bottom right corner.<br />
P3<br />
1<br />
z 23<br />
Connection type: WLAN (with signal strength)<br />
Connection type: Ethernet<br />
Station on station key 3 selected<br />
Alarm 1 active<br />
Sleep timer active (23 minutes left)<br />
UPNP UPNP mode (music from the network)<br />
Repeat all<br />
Shuffle
List view<br />
Main menu<br />
Internet Radio<br />
UPnP<br />
DAB<br />
FM<br />
Sleep Timer<br />
In all <strong>of</strong> the selection menus you will find the list<br />
view. Other levels <strong>of</strong> navigation can be identified<br />
by an arrow symbol (>). To help you get oriented,<br />
the status bar shows you the name <strong>of</strong> the menu in<br />
which you are at the moment.<br />
Playback view<br />
After you successfully select a source, playback starts and the view changes:<br />
Internet Radio<br />
SWR 3<br />
09:23<br />
German radio network<br />
featuring rock and pop<br />
music.<br />
Now you will find information such as the channel<br />
name, artist and track. You can control the volume<br />
using the navigation dial. If you turn it all the way<br />
down to 0, the message “Muted” appears; the<br />
<strong>NOXON</strong> <strong>iRadio</strong> is completely silent. Of course,<br />
you can also use the remote control to do this.<br />
55<br />
Deutsch<br />
English
<strong>NOXON</strong> <strong>iRadio</strong> <strong>M110+</strong><br />
Main menu & Co<br />
All roads lead to Rome – and thus in our case, to the main menu. This is the starting point<br />
from which you use all other menus.<br />
Main menu<br />
Internet Radio<br />
UPnP<br />
DAB<br />
FM<br />
Sleep Timer<br />
Internet Radio<br />
Internet Radio<br />
Favorits<br />
Stations<br />
Podcasts<br />
my<strong>NOXON</strong><br />
History<br />
56<br />
Use the navigation dial to scroll through the list<br />
and confirm your selection with the push button<br />
From the main menu, you reach the [Internet Radio]<br />
menu. Here, you can select and subscribe to stations<br />
and podcasts.<br />
Favourites<br />
Your <strong>NOXON</strong> <strong>iRadio</strong> has its own favourites list, which you will find on the [Internet Radio]<br />
page. To create favourites, press and hold the navigation dial or the OK button on the<br />
remote control for a few seconds. If a favourite is stored, the <strong>NOXON</strong> acknowledges this<br />
in the display with the message “Favourite added”.<br />
Remove favourite<br />
Remove favourite?<br />
YES NO<br />
To remove a favourite, select it from the [Favourites]<br />
menu (so that it is highlighted in white) and<br />
press and hold the navigation dial or the OK button<br />
<strong>of</strong> the remote control for a few seconds. A<br />
menu appears with “remove favourite”.<br />
Please note that contents <strong>of</strong> UPnP servers cannot be saved as a favourite, since these<br />
are not available at all times.
Stations<br />
This provides you with various options for selecting the station(s) you want from the wide<br />
variety <strong>of</strong> those available.<br />
Stations<br />
Local Germany<br />
Location<br />
Genre<br />
Search stations<br />
Best <strong>of</strong> <strong>NOXON</strong><br />
[Local Germany] lists – as one example – only<br />
German stations. Because there are so many, we<br />
have sorted them by musical style and content.<br />
Thus you can easily switch to a news station or<br />
listen to smooth jazz for a mellow evening at<br />
home.<br />
If you are in Germany and want to go beyond national<br />
boundaries, you can find additional sorted lists in the [Location] and [Genre] categories.<br />
Have you heard about a station that you can’t find in the list? With [Search stations], you<br />
can enter its name manually using the navigation dial and search for it.<br />
New stations are added almost every day. Of course, we don’t expect you to know the<br />
station list by heart and be able to tell immediately which stations are new. Thus the<br />
menu item [New stations] shows you the latest happenings at a glance.<br />
Podcasts<br />
The <strong>NOXON</strong> <strong>iRadio</strong> lets you subscribe to not only radio stations and channels, but also<br />
podcasts from all around the world.<br />
Podcast<br />
Africa<br />
Asia<br />
Caribbean<br />
Central America<br />
Europe<br />
As you can see, the podcasts are sorted by continent.<br />
(Well spotted: OK, the Caribbean isn’t a continent).<br />
However, you can also search for a podcast you<br />
know – as for the radio stations – by entering its<br />
name.<br />
my<strong>NOXON</strong><br />
The [my<strong>NOXON</strong>] item lists an extensive collection <strong>of</strong> services. Some <strong>of</strong> these are free,<br />
while others require a small subscription fee.<br />
For more information about the available services and how to set them up, visit http://<br />
www.my-noxon.net<br />
57<br />
Deutsch<br />
English
<strong>NOXON</strong> <strong>iRadio</strong> <strong>M110+</strong><br />
History<br />
58<br />
History<br />
Station 1<br />
Station 2<br />
Station 3<br />
Station 4<br />
Station 5<br />
Under the [History] menu item is a list <strong>of</strong> the recently<br />
played tracks and radio stations received.<br />
This enables you to find again with ease the stations<br />
you thought you had lost for good due to a<br />
short-term memory loss.<br />
My Media<br />
UPnP enables the user to receive data from the<br />
UPNP<br />
network. If, for example, you have shared your<br />
Serverlist<br />
music collection on your computer using a UPnP<br />
Repeat: Off<br />
program (e.g. Windows Media Player 11 or Elgato<br />
Shuffle: Off<br />
EyeConnect on the Mac), you can access them<br />
Clean serverlist<br />
from your living room or kitchen using the <strong>NOXON</strong><br />
<strong>iRadio</strong> and play back tracks. If the music collection<br />
is stored centrally on a Network Attached Storage<br />
(NAS) drive, this works even without a computer. In this case, your <strong>NOXON</strong> <strong>iRadio</strong> accesses<br />
the pieces <strong>of</strong> music on the drive directly.<br />
Sleep timer<br />
Before waking up, <strong>of</strong> course, you first have to fall asleep. To make the way there as<br />
pleasant as possible, there is a sleep timer. When activated, the sleep timer switches the<br />
<strong>iRadio</strong> <strong>of</strong>f after a predetermined time, which is particularly helpful if you’ve already fallen<br />
asleep in the meantime… Good night!<br />
One more thing: Since the alarm function can be set with a separate volume setting, you<br />
don’t need to worry about sleeping through the <strong>iRadio</strong>, even though you listened to it at<br />
a soothing volume while going to sleep!<br />
Alarm clock<br />
Yes, your <strong>iRadio</strong> also has an integrated alarm clock – more precisely, it has two, so that<br />
you can program two different wake-up times. So waking up in the morning will be a<br />
joyful experience! We’ve really worked hard on this, so you don’t have to greet the new<br />
day with just your usual radio stations, you can choose to be awoken gently from your<br />
slumbers by any <strong>of</strong> the over 14,000 radio stations available via the Internet.<br />
Alarm 1<br />
Enable: Off<br />
Time: 09:25<br />
Mode: Internet Radio<br />
Preset: History<br />
Volume: 24<br />
The alarm can be enabled and the time can be set<br />
in the menu. Available sources for the alarm sound<br />
are a beep, the last station you were listening to or<br />
your favourites. To set the volume, the source is<br />
played and you can use the navigation dial to set<br />
the desired level.
System settings<br />
System settings<br />
Equalizer<br />
Network<br />
Time/Date<br />
Language<br />
Factory reset<br />
In this extensive menu you will find information<br />
about your <strong>NOXON</strong> and can configure and save<br />
settings on the device.<br />
Equalizer<br />
The equalizer enables you to adjust the soundscape <strong>of</strong> the <strong>NOXON</strong> to your liking. The<br />
various presets emphasise the bass, midrange and treble differently, so that everyone<br />
can find a pleasing setting. The line-out connection bypasses the equaliser; the sound is<br />
passed on without any alteration.<br />
The following equalizers are available: OFF, Loudness, Bass Booster, Bass Reducer,<br />
Treble Booster, Treble Reducer, Spoken words and Rock)<br />
Title Bass Treble Loudness<br />
OFF 0 0<br />
Loudness 0 0<br />
Bass Booster +4 0<br />
Bass Reducer -4 0<br />
Treble Booster 0 +4<br />
Treble Reducer 0 -4<br />
Spoken words -4 0<br />
Rock +2 +2<br />
Network<br />
Network<br />
Networkwizard<br />
WPS wizard<br />
View settings<br />
WLAN region<br />
Manual settings<br />
If you are not satisfied with any <strong>of</strong> the<br />
presets, you can also create your own,<br />
customised to your tastes, under [Set<br />
my equalizer]. This allows you to raise<br />
or lower bass and treble levels by up<br />
to 14 dB. “Loudness” is a preset that<br />
gives you a big sound even at very low<br />
volumes.<br />
You can then call up your stored settings<br />
using [My equalizer]<br />
Here, you can configure the network settings <strong>of</strong><br />
your <strong>NOXON</strong> <strong>iRadio</strong>.<br />
59<br />
Deutsch<br />
English
<strong>NOXON</strong> <strong>iRadio</strong> <strong>M110+</strong><br />
Date and time<br />
Time/Date<br />
Set Time/Date<br />
Auto update<br />
Set format<br />
Set timezone<br />
Daylight savings<br />
60<br />
In this menu item, the date and time can be set.<br />
You have already done this in the setup wizard<br />
at the beginning – but perhaps you want to take<br />
the <strong>NOXON</strong> <strong>iRadio</strong> along with you on holiday,<br />
are moving or the switch from standard to summer<br />
(daylight saving) time is around the corner.<br />
Whatever the case, you can change all this under<br />
[Set Time/Date]. The manual setting is accomplished easily using the navigation dial and<br />
push function. After successful entry, the time and the date are set.<br />
If you want even more convenience, you can also obtain the time and date from the<br />
Internet via [Auto update]. How many people have a clock at home that is perfectly accurate?<br />
The <strong>NOXON</strong> <strong>iRadio</strong> automatically uses an NTP server (NTP stands for Network<br />
Time Protocol) to synchronise.<br />
To change the time format, select [Set format]. Please select between the 24 hour clock<br />
or the 12 hour clock here. Please note that if you select the 12 hour display, the clock will<br />
not display AM or PM at the end. But we hope that a simple glance out the window will<br />
prevent any misunderstanding!<br />
Under [Set timezone] you can select the time zone in which you are at the moment. It<br />
starts with CET (Central European Time) and goes once around the world!<br />
Does the place where you live have summer or daylight saving time? Configure this on<br />
your <strong>NOXON</strong> <strong>iRadio</strong> under the menu item [Daylight savings] so that you always have the<br />
correct time – even if you forget the switch in spring and autumn.<br />
The Back button takes you back to the settings.<br />
Select language<br />
This is where the language for the menu in the <strong>NOXON</strong> <strong>iRadio</strong> is selected. A printed version<br />
<strong>of</strong> the manual is available in German, English, Spanish, French, Italian and Dutch.<br />
Language<br />
English<br />
Deutsch<br />
Francaise<br />
Italiano<br />
Espanol<br />
Scroll through the list using the navigation dial and<br />
confirm using the push function.<br />
Then, the Back button takes you back to the settings.
Factory settings<br />
Factory reset<br />
Proceed?<br />
YES NO<br />
There are moments when you just want to reset<br />
everything and start over from the beginning. And<br />
at some point, you may feel the need to do so on<br />
your <strong>NOXON</strong> <strong>iRadio</strong>. However, this is much easier<br />
here than in other areas <strong>of</strong> life. Most importantly,<br />
we provide a security prompt that allows you to<br />
turn back when this window appears after you select<br />
this menu item.<br />
S<strong>of</strong>tware update<br />
Nothing is so good that it can’t be made even better! That is why you can update the<br />
firmware in the <strong>NOXON</strong> <strong>iRadio</strong>.<br />
S<strong>of</strong>tware update<br />
Auto-check setting<br />
Check now<br />
If you call up this menu, the <strong>iRadio</strong> connects to the<br />
update server and checks for any updates. Afterwards,<br />
you can install these or view additional information.<br />
Following successful installation, the<br />
system restarts. If you do not want to always have<br />
to do this manually, select [Auto-check setting]. If<br />
you would rather do it yourself from time to time,<br />
click [Check now].<br />
NOTE: In a firmware update, all the settings you have configured (e.g. network pr<strong>of</strong>iles,<br />
favourite stations, equaliser settings) are lost. Therefore, you have to configure them<br />
again after the update.<br />
Setup wizard<br />
Setup wizard<br />
Start now?<br />
YES NO<br />
Do you want to start again from the beginning and<br />
reset the date and network connections? Just<br />
start the setup wizard again!<br />
Menu interval<br />
Here you adjust the delay time for switching from list to playback view.<br />
Device Info<br />
This menu displays all device-relevant information. There, you find the installed firmware<br />
version and the hardware ID <strong>of</strong> your <strong>NOXON</strong> <strong>iRadio</strong>. The information found here is also<br />
very helpful in a support case. Press the Back button to return to the settings.<br />
61<br />
Deutsch<br />
English
<strong>NOXON</strong> <strong>iRadio</strong> <strong>M110+</strong><br />
Internet radio: Quick start<br />
This Quick Start Guide shows you how to get started using your <strong>NOXON</strong> device. For<br />
detailed descriptions and special configurations, refer to the information further back in<br />
your manual (depending on the scope <strong>of</strong> delivery, available in printed form or on the accompanying<br />
CD and online at www.terratec.com).<br />
Pretest<br />
Like any network device, your <strong>NOXON</strong> needs to be connected to your network before<br />
you can get started.<br />
What do you need?<br />
• A fast Internet connection (for example, DSL, ideally with a flat rate).<br />
• A router for Internet access; for wireless operation, what is called a WLAN (Wireless<br />
LAN) router<br />
• A network cable, if you do not want a wireless Internet connection for your device<br />
• For WLAN integration: your network key (WEP, WPA or WPA2)<br />
This key, just like any key, protects your network from unauthorised access and was<br />
generated when your network was set up. To allow <strong>NOXON</strong> access to a key-protected<br />
network, you will need to enter the network key into <strong>NOXON</strong> in a later step. If your network<br />
does not have a key, the <strong>NOXON</strong> can connect to the Internet without a network key.<br />
Note: If you are not sure whether you are using a key <strong>of</strong> this type in your network, just<br />
give it a try without entering anything! If this does not work, repeat the setup process from<br />
the beginning. However, you will need to know your network key at this point. Please ask<br />
the person who set up your network for assistance.<br />
Setup<br />
Once your <strong>iRadio</strong> has been activated initially, follow these steps to link it to your network<br />
for the first time:<br />
You are greeted by the setup wizard, which asks politely if you want to start it up.<br />
Setup wizard<br />
62<br />
Start now?<br />
YES NO<br />
Then, enter the time format (12/24 hour).<br />
Use the navigation dial to select a language for<br />
the menu and confirm – as in all other menus –<br />
the selection by pressing the navigation dial.
However, we recommend that you set the date and time immediately (Day, Month, Year,<br />
Time), as well as the WLAN region you are located in.<br />
Once you have done so, all that remains to be done is to connect to the network. Don‘t<br />
worry, even this should not be complicated – the network wizard will give you all the help<br />
you need.<br />
We‘ll explain the ins and outs <strong>of</strong> this in the detailed manual later on. For now, we <strong>of</strong>fer<br />
just a brief overview (after all, you are still in the „Overview“ chapter), as we do not want<br />
to bore anybody.<br />
SSID<br />
Your WiFi network<br />
WiFi network <strong>of</strong> your neigh...<br />
[Rescan]<br />
[Wired]<br />
[Manual Config]<br />
The setup wizard gives you the ability to choose<br />
between the cable connection and the wireless<br />
WLAN port.<br />
If you prefer the cable version, select [Wired].<br />
The setup wizard connects to your router automatically<br />
and that‘s it – you‘re in!<br />
However, if the <strong>iRadio</strong> is integrated via WLAN,<br />
please select your WLAN network on the display.<br />
After selecting the desired network, you then have to enter the password to connect to<br />
the WLAN.<br />
Key:<br />
0123456789. _ @,<br />
abcdefghijklmn<br />
opqrstuvwxyzABC<br />
DEFGHIJKLMNOPQR<br />
BKSP<br />
OK<br />
CANCEL<br />
Navigate through the selection in the usual way<br />
using the navigation dial, push function and Back<br />
button.<br />
When you have finished entering the key, confirm<br />
with OK. You likewise reach this field via the navigation<br />
dial.<br />
There, you‘re finished already! Just press the navigation dial again to go to the main<br />
menu – and use your <strong>NOXON</strong> <strong>iRadio</strong> to plunge into the wonderful world <strong>of</strong> Internet radio.<br />
Note: We recommend checking the device‘s firmware from time to time to ensure that<br />
you have the latest version and to update it if necessary – only in this way can you access<br />
the latest functions <strong>of</strong> your device. We‘ll explain how to do so later on in this manual.<br />
63<br />
Deutsch<br />
English
<strong>NOXON</strong> <strong>iRadio</strong> <strong>M110+</strong><br />
Listen and enjoy<br />
After you have set the device up successfully, the (almost) infinite variety <strong>of</strong> Internet radio<br />
is at your fingertips.<br />
Main menu<br />
Internet Radio<br />
UPnP<br />
Sleep Timer<br />
Alarm<br />
System settings<br />
Internet Radio<br />
Favorits<br />
Stations<br />
Podcasts<br />
my<strong>NOXON</strong><br />
History<br />
64<br />
From the main menu, select [Internet Radio] and<br />
confirm the selection.<br />
In the submenu that follows, navigate to the station<br />
<strong>of</strong> your choice according to your personal<br />
taste.<br />
To accommodate the large number <strong>of</strong> stations available from around the world, our database<br />
is conveniently sorted into countries, genres, popular stations etc. and is updated<br />
on an ongoing basis.<br />
Internet radio<br />
SWR 3<br />
09:23<br />
German radio network<br />
featuring rock and pop<br />
music.<br />
Volume<br />
P3<br />
15<br />
After you make your selection, the playback starts.<br />
The playback screen provides information<br />
about the station that is now playing<br />
and – if transmitted – information about the artist<br />
and the title <strong>of</strong> the song that is currently playing.<br />
To adjust the volume during playback, use the<br />
navigation dial or the and keys on the remote<br />
control.
Internet Radio: Setup in detail<br />
One question before starting: Wired or wireless?<br />
The <strong>NOXON</strong> is designed to play files located on a network, either the Internet or your<br />
home network. Two options are available for integrating the device into a network:<br />
Via a wired connection (LAN, Ethernet)<br />
Use a standard network cable to connect the device to a router, switch or hub—to connect<br />
it to your PC directly, use a crossover cable.<br />
Via a wireless connection (WLAN, Wi-Fi)<br />
A wireless connection uses a radio link to an access point, router or computer.<br />
NAS Storage / UPnP Server<br />
Internet<br />
Windows<br />
Mac<br />
Linux<br />
Router / Switch<br />
Here, as an example, the integration via cable or WLAN<br />
RJ45 Ethernet<br />
On routers, SSID, MAC & IPs<br />
You will come across a number <strong>of</strong> the following topics automatically when integrating your<br />
<strong>NOXON</strong>. Together with the glossary in the appendix, these brief explanations will give<br />
you a better understanding for making decisions with regard to your network settings. A<br />
number <strong>of</strong> items are relevant only in connection with wireless networks. We’ll continue<br />
with the actual setup in Chapter “5 – Scenario 1 – the wired network integration”!<br />
Setting up the router options<br />
For this purpose, you must be sufficiently familiar with the router—or its administrator—<br />
to change its configuration and understand its overall handling. Otherwise, you have to<br />
know somebody who is familiar with these things. Normally, these devices use Web interfaces<br />
for their administration. In other words, you only need to enter a specific address<br />
65<br />
Deutsch<br />
English
<strong>NOXON</strong> <strong>iRadio</strong> <strong>M110+</strong><br />
(e.g. 192.168.0.1) in your Web browser for it to display a convenient user interface giving<br />
you access to all <strong>of</strong> the router’s options.<br />
Caution – we are here: SSID broadcast (WLAN)<br />
As explained in the technical glossary, the abbreviation SSID stands for the network<br />
name sent out to all wireless network devices within range, informing them <strong>of</strong> the presence<br />
<strong>of</strong> a network with this identification. Some routers, however, have an option to<br />
suppress the broadcast <strong>of</strong> the network name. The option is a toggle that is usually called<br />
SSID broadcast. If the broadcast is disabled, you must know the name in order to enter<br />
it manually when setting up the <strong>NOXON</strong>.<br />
Device ID: the MAC address<br />
The so-called MAC address is a unique identifier assigned to all network devices. The<br />
MAC address is permanently assigned to the device and cannot be modified. It can<br />
therefore be used to configure routers to permit only devices with specific MAC addresses<br />
to access the network or the Internet. In such a case, it will be necessary to configure<br />
the router with the <strong>NOXON</strong>’s MAC address so that it will be able to establish a network<br />
connection and access data in the network. The address can be found on a label on the<br />
back <strong>of</strong> the <strong>NOXON</strong>.<br />
Sometimes required: a fixed IP<br />
Under certain circumstances, it can be useful for a device to always have the same<br />
address. Most networks these days are set up to assign the so-called IP address - the<br />
identifier for the TCP/IP protocol - dynamically. In other words, the first time a device connects,<br />
the so-called DHCP server assigns it a valid IP address which the device will keep<br />
as long as the address is not needed elsewhere.<br />
This occurs completely automatically, without the user’s knowledge. If a network<br />
is based on static IPs - i.e. fixed addresses, rather than dynamically assigned ones<br />
- there will generally be a precise set <strong>of</strong> rules governing the addresses that can be<br />
assigned. And our friend the <strong>NOXON</strong> also has such an IP address. If the network<br />
requires a fixed address, the rules for assigning them must be known. But once<br />
again, a fixed IP is really the exception; generally, everything happens automatically.<br />
Switching it on for the first time<br />
To start the <strong>NOXON</strong>, press the ON/OFF button on the <strong>NOXON</strong>.<br />
Setup wizard<br />
66<br />
Start now?<br />
YES NO<br />
After switching on the device, you enter the setup<br />
wizard, which helps you set up your <strong>NOXON</strong> <strong>iRadio</strong>.
Then, set the time format (12/24 hour).<br />
The date and time follow. Set each <strong>of</strong> these using the navigation dial and confirm by<br />
pressing the dial or the remote control. By the way, the date format is European – date<br />
first, then month. Then, you can decide on a WLAN region. Unless you are currently in<br />
Spain or France, [Most <strong>of</strong> Europe] is the correct choice for Europeans.<br />
And that’s all the information the setup wizard needs from you. It hands the baton over to<br />
the network configuration wizard automatically.<br />
The network configuration wizard<br />
When switching it on for the first time, the <strong>NOXON</strong> network device does not yet have<br />
any information about the possible network environments from which it will be getting its<br />
content. After switching it on for the first time and selecting a language, the configuration<br />
wizard will be displayed automatically.<br />
As in all other menus <strong>of</strong> the <strong>NOXON</strong>, use the navigation dial to move through the selections.<br />
Confirm your selection by pressing the navigation dial.<br />
The following chapter describes how to configure access, both for wired and wireless<br />
network integration. If you are not satisfied with the way things are working after running<br />
the Wizard, you can run it again by going to the main menu, selecting [Settings] and selecting<br />
[Network] and then the network wizard in the following submenu.<br />
Scenario 1 – the wired connection<br />
If an Ethernet cable <strong>of</strong> a functioning network is plugged in at the time the device is<br />
switched on, follow the steps below to set up the device quickly and easily:<br />
SSID<br />
Your WiFi network<br />
WiFi network <strong>of</strong> your neigh...<br />
[Rescan]<br />
[Wired]<br />
[Manual config]<br />
If a DHCP server is active in your router – which is<br />
the case in almost every current model – please<br />
select [Wired].<br />
The wizard now automatically connects to your<br />
router and gets its network address from the<br />
DHCP server. Every device in the network must<br />
have such an identifier to ensure that the IP packets<br />
arrive in the right place. Normally, that’s all there is to it, and the connection is made.<br />
In rare cases, however, static IP addresses are assigned for certain access settings—for<br />
more information, have a word with your network administrator. See “Sometimes required:<br />
a fixed IP.<br />
67<br />
Deutsch<br />
English
<strong>NOXON</strong> <strong>iRadio</strong> <strong>M110+</strong><br />
68<br />
DHCP<br />
DHCP enable<br />
Set static IP<br />
IP settings<br />
IP adress<br />
192 168 1 2<br />
Subnet mask<br />
255 255 255 0<br />
Gateway adress<br />
Gateway adress<br />
192 168 1 1<br />
DNS<br />
Primary DNS<br />
192 168 1 1<br />
Sekundary DNS<br />
0 0 0 0<br />
Connected<br />
To assign a static IP to the <strong>NOXON</strong>, select [Manual<br />
Config].<br />
In the following menu, please select [Set static IP].<br />
Here you can enter the corresponding values using<br />
the navigation dial. To get to large numbers<br />
(such as 192) more quickly, turn the dial to the left.<br />
To go to the next field, press the dial or the OK<br />
button on your remote control.<br />
Then, you have to specify the gateway address.<br />
Now, just enter the DNS address…<br />
…and you’re done!
Scenario 2 – the wireless connection<br />
We would also like to give you the information necessary to integrate your <strong>NOXON</strong> wirelessly<br />
via a router as an alternative to the wired network connection as described under<br />
“Scenario 1 – the wired connection”.<br />
Not unimportant: the location<br />
A wireless signal always travels along a direct point-to-point, i.e. antenna-to-antenna,<br />
path. The quality <strong>of</strong> a wireless connection thus stands or falls with the obstacles in the<br />
line <strong>of</strong> sight from the <strong>NOXON</strong> to the opposite network device. Setting the device up in<br />
some locations may therefore result in a poorer signal, even if the actual distance is<br />
shorter. For example, if a large amount <strong>of</strong> masonry or sources <strong>of</strong> interference are located<br />
between the devices, the signal quality will decrease despite the short distance.<br />
Note: Use the display <strong>of</strong> your <strong>NOXON</strong> to determine the signal strength at selected locations.<br />
Wireless integration using a router<br />
In comparison to wired networks, a wireless local area network (WLAN) link provides<br />
considerable additional freedom, but also requires a bit more attention—especially if you<br />
do not want to completely neglect security aspects.<br />
In the case <strong>of</strong> wireless, data is transmitted over one or more access points (AP). These<br />
WLAN access points are generally integrated into the broadband router <strong>of</strong> your Internet<br />
access line. While exact figures are not available, one can nevertheless safely assume<br />
that this is currently the most common way to use broadband Internet access and share it<br />
locally among several users. The <strong>NOXON</strong> is also the most fun to use this way, as you can<br />
receive radio from the Internet or music from other computers in your network—without<br />
necessarily having your own computer running at the time.<br />
69<br />
Deutsch<br />
English
<strong>NOXON</strong> <strong>iRadio</strong> <strong>M110+</strong><br />
Setting up the wireless connection on the <strong>NOXON</strong><br />
While still in its factory default state, the <strong>NOXON</strong> will start the configuration wizard to<br />
complete the integration in your network.<br />
SSID<br />
Your WiFi network<br />
WiFi network <strong>of</strong> your neigh...<br />
[Rescan]<br />
[Wired]<br />
[Manual config]<br />
70<br />
It starts listing for you all networks it has found.<br />
Your network should be among them. This looks<br />
something like this.<br />
Please select “your” network now. If the network you are looking for does not appear, you<br />
can repeat the search via the [Rescan] menu item. Perhaps your <strong>NOXON</strong> <strong>iRadio</strong> is simply<br />
too far away from the router, or there are too many walls and other obstacles between<br />
the two devices? Go ahead and place the <strong>NOXON</strong> right next to the router to eliminate<br />
distance as a possible source <strong>of</strong> errors.<br />
If at this point, you decide that you would rather connect your radio to the router, select<br />
the menu item [Wired].<br />
After successfully selecting the network you have to enter the network password. At<br />
least, you have to if you have encrypted your WLAN router properly. We’d like to take this<br />
opportunity to urgently recommend that you do just that. But back to the matter at hand.<br />
Key:<br />
0123456789. _ @,<br />
abcdefghijklmn<br />
opqrstuvwxyzABC<br />
DEFGHIJKLMNOPQR<br />
BKSP<br />
OK<br />
CANCEL<br />
Enter the password for your WLAN router via the<br />
navigation dial: turn the dial to select the letters<br />
and numbers, and press the dial to confirm the<br />
entry. You can find the special characters by<br />
scrolling further using the dial.<br />
If you accidentally type in the wrong thing, use the field [BKSP] (for backspace). When<br />
you have finished entering the password, go to the [OK] field. Please do not confirm each<br />
letter using [OK], as this would cancel the input.<br />
After you confirm using the OK button, the <strong>NOXON</strong> <strong>iRadio</strong> sends the password to the<br />
router (“Please wait” appears on the screen), which – if the password is correct – logs on<br />
the <strong>iRadio</strong> (indicated on the display with “Connected”).
Setup wizard<br />
Setup wizard<br />
completed<br />
Press SELECT to exit<br />
If this is all successful, the network configuration<br />
wizard displays the message “Setup wizard completed.”<br />
Now press the navigation dial to go to the<br />
main menu.<br />
Your entries are thus stored in the device and you do not have to repeat them. The next<br />
time the <strong>iRadio</strong> is switched on, it finds your router automatically and logs into the network<br />
on its own.<br />
Manual configuration<br />
You have to select this entry if your router does not tell you the network name and you<br />
have to enter it manually, or the router has no DHCP server and the IP address is to be<br />
assigned as a fixed address. The setup here is the same as that described under “Scenario<br />
1 – the wired connection”.<br />
WPS (WiFi Protected Setup)<br />
Hidden behind this cryptic name is a standard for simply and securely setting up the<br />
<strong>NOXON</strong> <strong>iRadio</strong> in a network. Please note that your router must also support this protocol<br />
in order for the connection to work.<br />
Push Button Configuration:<br />
WPS Setup<br />
Push WPS<br />
button at the<br />
other end<br />
Press SELECT to<br />
continue<br />
P3<br />
To use this type <strong>of</strong> connection setup, press the<br />
WPS button (PBC) on your router and then “OK”<br />
on your <strong>iRadio</strong>.<br />
To configure your router, consult the corresponding<br />
manual.<br />
71<br />
Deutsch<br />
English
<strong>NOXON</strong> <strong>iRadio</strong> <strong>M110+</strong><br />
Annex<br />
Technical data<br />
Standards:<br />
• WLAN (IEEE 802.11b/g)<br />
• Ethernet 10/100 (IEEE 802.3, IEEE-802.3u)<br />
• UPnP/DLNA compliant<br />
• Micros<strong>of</strong>t Windows Media DRM 10<br />
Data transfer rates:<br />
• 54 Mbps (WLAN)<br />
• 10/100 MBps (Ethernet)<br />
Network security:<br />
• WPS-PBC<br />
• WEP encryption (64/128 bit key)<br />
• WPA/WPA2 encryption<br />
Data formats:<br />
• Internet radio (MP3 streams)<br />
• MP3 (bitrate up to 320 kbps, sample rate up to 48 kHz)<br />
• AAC/AAC+ (bitrate up to 320 kbps, sample rate up to 48 kHz)<br />
• WMA (bitrate up to 320 kbps, sample rate up to 48 kHz)<br />
Ports:<br />
• Line output (3.5 mm stereo jack)<br />
• Headphone socket (3.5 mm jack)<br />
• Network (RJ-45)<br />
• WLAN antenna<br />
• FM antenna<br />
72
Glossary<br />
Access point (AP): An access point is a network component that WLAN clients (terminal<br />
devices) connect to in order to exchange data with the Internet or other clients. It is<br />
identified via its SSID. The <strong>NOXON</strong> can connect with an AP in order to obtain files from<br />
computers in the local network or audio streams from the Internet.<br />
DHCP: The abbreviation for Dynamic Host Configuration Protocol. This protocol permits<br />
IP addresses and configuration parameters to be allocated to computers dynamically.<br />
DHCP permits the integration <strong>of</strong> additional network components without configuration.<br />
The <strong>NOXON</strong> configuration wizard supports DHCP, so no further configuration parameters<br />
need to be specified.<br />
IEEE 802.11b/g: Industry standards for wireless networks issued by the Institute <strong>of</strong> Electrical<br />
and Electronics Engineers. The “b” signifies a maximum data transfer <strong>of</strong> 11 Mbps,<br />
and “g” 54 Mbps. Our <strong>NOXON</strong> supports these two standards.<br />
IP (IP address): (Internet Protocol) refers to a common communication protocol for computer<br />
networks. Each client has its own IP address consisting <strong>of</strong> four groups <strong>of</strong> digits<br />
separated by dots (e.g. 127.80.1.34). IP addresses are allocated automatically when using<br />
DHCP. The IP address can also be entered manually if the <strong>NOXON</strong> is not configured<br />
via DHCP.<br />
LAN: A LAN (Local Area Network) is a computer network in a limited geographical area<br />
(in general a cable-based network).<br />
MAC address: (Media Access Control address) is the hardware address that serves as a<br />
unique identifier for every hardware component in a network. The MAC address is fixed<br />
and can not be modified. As the <strong>NOXON</strong> is a network component, it also has a fixed MAC<br />
address. It can be found on the bottom <strong>of</strong> the device.<br />
Router: A router is a piece <strong>of</strong> communication hardware that ensures that data packets<br />
sent through a network arrive at the correct destination computer (client). In many cases,<br />
routers interconnect networks such as LANs and WLANs. The <strong>NOXON</strong> is also a client<br />
that receives data packets in this manner.<br />
SSID (ESSID): The Service Set Identifier (SSID) or network name is the identifier for<br />
IEEE 802.11-based wireless networks. Every wireless LAN has a configurable SSID or<br />
ESSID (Extended Service Set Identifier) as a unique network ID. In other words, it is the<br />
network’s name. The <strong>NOXON</strong> recognises all found networks automatically and also supports<br />
the manual entry <strong>of</strong> SSIDs.<br />
UPnP: This abbreviation stands for Universal Plug and Play, which is based on a number<br />
<strong>of</strong> standardised network protocols and is designed to provide cross-vendor control <strong>of</strong> devices<br />
(stereos, printers, routers, household systems) via IP-based networks. The NOX-<br />
73<br />
Deutsch<br />
English
<strong>NOXON</strong> <strong>iRadio</strong> <strong>M110+</strong><br />
ON is a UPnP device capable <strong>of</strong> receiving data from a suitable application.<br />
WEP encryption: WEP (Wired Equivalent Privacy) describes a type <strong>of</strong> encryption for<br />
WLANs. Naturally, <strong>NOXON</strong> can also receive and interpret WEP-encrypted data.<br />
WPA encryption: Like WEP, WPA is an encryption and authentication standard. WPA was<br />
developed to eliminate the fundamental weaknesses <strong>of</strong> WEP encryption. WPA can thus<br />
be seen as the secure successor to WEP.<br />
WPS: Wi-Fi Protected Setup is a standard for an easy and secure way <strong>of</strong> connecting to<br />
a wireless network.<br />
WiFi: Certification for WLAN products that comply with IEEE802.11 standards and are<br />
compatible with other products. The <strong>NOXON</strong> also fulfils the technical standards <strong>of</strong> the<br />
Wi-Fi consortium.<br />
WLAN: Also Wireless LAN or Wireless Local Area Network. The <strong>NOXON</strong> connects to<br />
your network via WLAN. It receives data via the local wireless network, processes them<br />
and plays it in the form <strong>of</strong> audio files.<br />
Frequently Asked Questions<br />
The most current version is online at:<br />
http://www.terratec.net/en/drivers-and-support.html<br />
Legal information<br />
The detailed terms and conditions <strong>of</strong> use and the End User Licence Agreement are provided<br />
separately along with the product.<br />
The information in this document is subject to change without notice and shall not be<br />
deemed as a warranty by the seller. No warranties, express or implied, are made with<br />
regard to the quality, suitability or accuracy <strong>of</strong> this document. The manufacturer reserves<br />
the right to change the contents <strong>of</strong> this document and/or the associated products at<br />
any time without the provision <strong>of</strong> prior notice to specific persons or organisations. The<br />
manufacturer shall not be held liable for damages <strong>of</strong> any kind arising from the use, or<br />
the inability to use this product or its documentation, even if the possibility <strong>of</strong> such damage<br />
is known. The information in this document is subject to copyright. All rights are<br />
reserved. No part <strong>of</strong> this manual may be reproduced or transmitted in any form or for any<br />
purpose without the express written permission <strong>of</strong> the copyright holders. Product and<br />
brand names contained in this document are used for identification purposes only. All<br />
registered trademarks, product designations or brand names used in this document are<br />
the registered property <strong>of</strong> their respective owners.<br />
© <strong>TERRATEC</strong>® Electronic GmbH, 1994-2012. All rights reserved (2012-04-01).<br />
74
Copyright notice:<br />
Thomson Licensing - MP3 audio decoder<br />
MPEG Layer-3 audio decoding technology licensed from Fraunh<strong>of</strong>er IIS and Thomson<br />
multimedia.<br />
Micros<strong>of</strong>t - Windows Media Audio decoder<br />
This product is protected by certain intellectual property rights <strong>of</strong> Micros<strong>of</strong>t. Use or distribution<br />
<strong>of</strong> such technology outside <strong>of</strong> this product is prohibited without a license from<br />
Micros<strong>of</strong>t.<br />
Micros<strong>of</strong>t - Windows Media Digital Rights Management (DRM 10)<br />
Content owners use Windows Media digital rights management technology (WMDRM)<br />
to protect their intellectual property, including copyrights. This device uses WMDRM s<strong>of</strong>tware<br />
to access WMDRM-protected content. If the WMDRM s<strong>of</strong>tware fails to protect the<br />
content, content owners may as Micros<strong>of</strong>t to revoke the s<strong>of</strong>tware’s ability to use WMDRM<br />
to play or copy protected content. Revocation does not affect unprotected content. When<br />
you download licenses for protected content, you agree that Micros<strong>of</strong>t may include a<br />
revocation list with the licenses. Content owners may require you to upgrade WMDRM<br />
to access their content. If you decline an upgrade, you will not be able to access content<br />
that requires the upgrade.<br />
75<br />
Deutsch<br />
English