ProAudio-RRMP-6911 - E2 Fachhandels & Reparatur Servicecenter ...
ProAudio-RRMP-6911 - E2 Fachhandels & Reparatur Servicecenter ...
ProAudio-RRMP-6911 - E2 Fachhandels & Reparatur Servicecenter ...

Erfolgreiche ePaper selbst erstellen
Machen Sie aus Ihren PDF Publikationen ein blätterbares Flipbook mit unserer einzigartigen Google optimierten e-Paper Software.
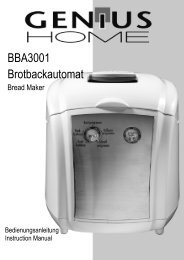
CD-Radio Rekorder<br />
CD Radio Recorder<br />
D<br />
GB<br />
Bedienungsanleitung<br />
User Manual<br />
<strong>ProAudio</strong>-<strong>RRMP</strong>-<strong>6911</strong><br />
<strong>ProAudio</strong>-<strong>RRMP</strong>-<strong>6911</strong>-IM-DE-EN-V2.indb 1 11/08/2009 1:09 PM
DEUTSCH<br />
2<br />
INHALTSVERZEICHNIS<br />
INHALTSVERZEICHNIS ............................................................................................................................2<br />
WICHTIGE SICHERHEITSANWEISUNGEN ..................................................................................................3-4<br />
BEDIENELEMENTE .................................................................................................................................5-7<br />
VORBEREITUNG .....................................................................................................................................8<br />
GRUNDFUNKTIONEN ..............................................................................................................................9<br />
AUDIOEINSTELLUNGEN, ANSCHLÜSSE ....................................................................................................10<br />
RADIOBETRIEB ......................................................................................................................................11<br />
CD-SPIELER ..........................................................................................................................................12-14<br />
USB-SPEICHER UND SD/MMC-KARTEN ...................................................................................................15<br />
KASSETTENREKORDER ..........................................................................................................................16-17<br />
REINIGUNG UND PFLEGE ........................................................................................................................18<br />
PROBLEMLÖSUNG .................................................................................................................................19<br />
TECHNISCHE DATEN ..............................................................................................................................20<br />
GARANTIE .............................................................................................................................................21-22<br />
Korrekte Entsorgung dieses Produktes:<br />
Diese Kennzeichnung weist darauf hin, dass Elektrogeräte in der EU nicht mit dem normalen<br />
Haushaltsmüll entsorgt werden dürfen.<br />
Benutzen Sie bitte die Rückgabe- und Sammelsysteme in Ihrer Gemeinde oder wenden Sie<br />
sich an den Händler, bei dem das Produkt gekauft wurde.<br />
Bitte entsorgen Sie die Batterien umweltgerecht. Werfen Sie Batterien nicht in den Hausmüll.<br />
Benutzen Sie bitte die Rückgabe- und Sammelsysteme in Ihrer Gemeinde oder wenden Sie<br />
sich an den Händler, bei dem das Produkt gekauft wurde.<br />
<strong>ProAudio</strong>-<strong>RRMP</strong>-<strong>6911</strong>-IM-DE-EN-V2.indb 2 11/08/2009 1:09 PM
Erklärung der Warnsymbole<br />
WICHTIGE SICHERHEITSANWEISUNGEN<br />
VORSICHT<br />
Gefahr eines<br />
elektrischen Schlages.<br />
Nicht öffnen!<br />
Warnung: Um die Gefahr eines elektrischen Schlages<br />
zu reduzieren, Gehäuse nicht entfernen. Keine für den<br />
Anwender brauchbaren Teile im Innern.<br />
<strong>Reparatur</strong> qualifiziertem Servicepersonal überlassen.<br />
Dieses Gerät verwendet einen Klasse 1 Laser.<br />
Das Blitzsymbol im gleichseitigen Dreieck<br />
macht den Anwender auf nicht isolierte<br />
“gefährliche Spannung“ in diesem Gerät<br />
aufmerksam, die stark genug sein kann,<br />
einen elektrischen Schlag bei einer Person<br />
zu verursachen.<br />
Das Ausrufezeichen im gleichseitigen<br />
Dreieck macht den Anwender auf wichtige<br />
Bedienungs- und Wartungshinweise in der<br />
Gebrauchsanweisung aufmerksam.<br />
Allgemeines<br />
• Lesen Sie diese Bedienungsanleitung vor dem ersten Gebrauch gründlich durch. Sie enthält wichtige<br />
Informationen für Ihre Sicherheit sowie zum Gebrauch und Pflege des Gerätes. Heben Sie die Anleitung zum<br />
späteren Nachschlagen auf und geben Sie sie mit dem Gerät weiter.<br />
• Benutzen Sie das Gerät nur für den vorgesehenen Zweck. Unsachgemäßer Gebrauch könnte zu<br />
Gefährdungen führen.<br />
• Dieses Gerät ist nur für die Nutzung im Haushalt konzipiert. Es ist nicht für kommerziellen Gebrauch<br />
geeignet. Verwenden Sie das Gerät nur in trockenen Innenräumen, niemals im Freien.<br />
• Öffnen Sie das Gerät nicht. Stecken Sie keine Gegenstände in die Öffnungen.<br />
• Dieses Gerät ist nicht dafür bestimmt, durch Personen (einschließlich Kinder) mit eingeschränkten<br />
physischen, sensorischen oder geistigen Fähigkeiten oder mangels Erfahrung und/oder mangels Wissen<br />
benutzt zu werden, es sei denn, sie werden durch eine für ihre Sicherheit zuständige Person beaufsichtigt<br />
oder erhielten von ihr Anweisungen, wie das Gerät zu benutzen ist.<br />
• Verwenden Sie nur Zubehör, welches vom Hersteller empfohlen wurde.<br />
• Warnung: Extreme Lautstärke führt durch zu hohen Schalldruck zu dauerhaften Hörschäden.<br />
• Im Falle einer Fehlfunktion durch eine elektrostatische Entladung: Trennen Sie das Gerät vom Stromnetz,<br />
indem Sie den Netzstecker ziehen. Warten Sie etwas und stecken Sie den Netzstecker wieder in die<br />
Steckdose. Schalten Sie das Gerät erneut ein, um in den normalen Betriebszustand zurückzukehren.<br />
• Tauchen Sie elektrische Teile des Geräts während des Reinigens oder des Betriebs nie in Wasser oder<br />
andere Flüssigkeiten. Halten Sie das Gerät nie unter fließendes Wasser.<br />
Aufstellort<br />
• Benutzen Sie dieses Gerät nicht in der Nähe von Wasser oder starker Feuchtigkeit, z. B. in einem feuchten<br />
Keller oder neben einem Schwimmbecken oder der Badewanne.<br />
• Betreiben Sie das Gerät nur in gut belüfteter Umgebung. Blockieren Sie die Lüftungsöffnungen nicht.<br />
Stellen Sie das Gerät nur im Einklang mit den Herstelleranweisungen auf. Halten Sie einen Mindestabstand<br />
von 5 cm rings um das Gerät ein, um für genügend Kühlung zu sorgen. Decken Sie das Gerät nicht mit<br />
Zeitungen oder Textilien ab, wie Gardinen, Decken und Kleidung.<br />
<strong>ProAudio</strong>-<strong>RRMP</strong>-<strong>6911</strong>-IM-DE-EN-V2.indb 3 11/08/2009 1:09 PM<br />
3<br />
DEUTSCH
DEUTSCH<br />
4<br />
WICHTIGE SICHERHEITSANWEISUNGEN<br />
• Stellen Sie das Gerät nicht auf Heizkörper, Öfen oder andere Wärme erzeugenden Geräte, einschließlich<br />
Verstärker.<br />
• Um das Risiko von Feuer und elektrischem Schlag zu reduzieren, setzen Sie das Gerät weder Feuer (Kamin,<br />
Grill, Kerzen, Zigaretten, usw.) noch Wasser aus (Tropfwasser, Spritzwasser, Vasen, Wannen, Teiche, usw.).<br />
Netzanschluss<br />
• Die Netzspannung muss mit den Angaben auf dem Typenschild des Gerätes übereinstimmen.<br />
• Der Netzstecker dient als Trennvorrichtung. Achten Sie darauf, dass der Netzstecker immer gut zugänglich<br />
und erreichbar ist.<br />
• Nur der Netzstecker kann das Gerät vollständig vom Stromnetz trennen.<br />
• Ziehen Sie den Netzstecker nur am Stecker selbst aus der Steckdose. Ziehen Sie nicht am Kabel.<br />
• Ziehen Sie den Netzstecker bei Nichtgebrauch, bei Störungen des Betriebes und vor jeder Reinigung.<br />
• Ziehen Sie den Netzstecker bei Gewitter und bei längerer Abwesenheit, um die Elektronik vor Überspannung<br />
und Zerstörung zu schützen.<br />
• Wenn das Netzkabel oder das Gehäuse des Gerätes beschädigt sind oder wenn das Gerät heruntergefallen<br />
ist, darf das Gerät nicht benutzt werden, bevor es von einem Fachmann überprüft worden ist.<br />
• Ein beschädigtes Netzkabel darf nur vom Hersteller, einer von ihm beauftragen Werkstatt oder einer ähnlich<br />
qualifizierten Person ersetzt werden, um Gefährdungen zu vermeiden.<br />
• Schützen Sie das Netzkabel und das Gehäuse vor Beschädigung.<br />
Kondensation<br />
• Wenn das kalte Gerät in eine warme und eventuell leicht feuchte Umgebung gebracht wird, so kann sich<br />
im Inneren Kondenswasser bilden. Kondenswasser könnte die ordnungsgemäße Funktion des Gerätes<br />
beeinflussen. In extremen Fällen könnte Kondenswasser einen Schaden durch Kurzschluss verursachen.<br />
Lassen Sie das Gerät 1-2 Stunden in warmer, trockener Umgebung stehen, um mögliches Kondenswasser<br />
zu trocknen, bzw. entweichen zu lassen, bevor Sie es in Betrieb nehmen.<br />
Batterie<br />
• Achtung: Es besteht Explosionsgefahr bei unsachgemäßem Auswechseln der Batterien. Ersetzen Sie<br />
Batterien nur durch denselben oder einen gleichwertigen Batterietyp.<br />
• Wechseln Sie immer den gesamten Batteriesatz. Mischen Sie keine alten und neuen Batterien, bzw.<br />
Batterien mit unterschiedlichem Ladungszustand.<br />
• Achten Sie darauf die Batterien korrekt einzusetzen. Beachten Sie die Polung (+) Plus / (-) Minus auf der<br />
Batterie und auf dem Gehäuse. Unsachgemäß eingesetzte Batterien können zum Auslaufen führen oder in<br />
extremen Fällen einen Brand oder eine Explosion auslösen.<br />
• Setzen Sie Batterien niemals übermäßiger Hitze (z.B. pralle Sonne, Feuer) aus und werfen Sie sie niemals in<br />
Feuer. Die Batterien könnten explodieren.<br />
• Die Anschlüsse dürfen nicht kurzgeschlossen werden.<br />
• Entfernen Sie verbrauchte Batterien. Entfernen Sie die Batterien, wenn Sie wissen, dass Sie das Gerät für<br />
längere Zeit nicht benutzen. Anderenfalls könnten die Batterien auslaufen und Schäden verursachen.<br />
• Bewahren Sie Batterien außerhalb der Reichweite von Kleinkindern auf. Wurden Batterien verschluckt,<br />
suchen Sie sofort ärztliche Hilfe auf.<br />
• Nicht aufladbare Batterien dürfen nicht wieder aufgeladen werden.<br />
• Wieder aufladbare Batterien müssen vor dem Aufladen aus dem Gerät entnommen werden.<br />
<strong>ProAudio</strong>-<strong>RRMP</strong>-<strong>6911</strong>-IM-DE-EN-V2.indb 4 11/08/2009 1:09 PM
STOP<br />
CD/USB/SD<br />
FM MODE<br />
REPEAT<br />
PROGRAM<br />
MEMORY<br />
MEM. SET<br />
SKIP+10<br />
FOLDER<br />
BEDIENELEMENTE<br />
1 2 3 4 5 6 7 8 9 10 11<br />
12<br />
14<br />
1 Lautsprecher (links) 8 CD-Fach<br />
2 MEM. SET Titel überspringen; 9<br />
Wiedergabe; Pause;<br />
SKIP +10 nächster Ordner; Sender PLAY/PAUSE UKW/MW-Umschalter<br />
FOLDER speichern<br />
BAND(AM/FM)<br />
3 REPEAT Wiederhol-Funktion; 10 NEXT Vorlauf; nächster Titel/Sender;<br />
PROGRAM Titel programmieren;<br />
TUNE-UP Sendersuche vorwärts<br />
MEMORY gespeicherte Sender<br />
anzeigen<br />
4 STOP Stopp; Betriebsart 11 BACK Rücklauf; vorheriger Titel/Sender;<br />
CD/USB/SD auswählen; UKW Mono/ TUNE-DOWN Sendersuche rückwärts<br />
FM MODE Stereo Empfang<br />
5 iR Infrarotsensor 12 Lautsprecher (rechts)<br />
6 Griffmulde zum Öffnen des<br />
CD-Fachs<br />
13 Kassettenfach<br />
7 LCD-Display 14 Batteriefach (Unterseite)<br />
<strong>ProAudio</strong>-<strong>RRMP</strong>-<strong>6911</strong>-IM-DE-EN-V2.indb 5 11/08/2009 1:09 PM<br />
PLAY/PAUSE<br />
BAND(AM/FM)<br />
NEXT<br />
TUNE-UP<br />
BACK<br />
TUNE-DOWN<br />
13<br />
5<br />
DEUTSCH
DEUTSCH<br />
6<br />
BEDIENELEMENTE<br />
29<br />
28<br />
15<br />
16 17 18<br />
STOP<br />
CD/USB/SD<br />
FM MODE<br />
REPEAT<br />
PROGRAM<br />
MEMORY<br />
MEM. SET<br />
SKIP+10<br />
FOLDER<br />
D I G I T A L<br />
15 Netzkabel<br />
(Unterseite)<br />
23 Abspielen (Kassette)<br />
16 Teleskopantenne (UKW) 24 Rückwärts spulen (Kassette)<br />
17 Tragegriff 25 Vorwärts spulen (Kassette)<br />
18 3,5 mm Kopfhörerbuchse<br />
(Rückseite)<br />
26 / Stopp / Auswurf (Kassette)<br />
19 FUNCTION Betriebsart auswählen 27 Pause (Kassette)<br />
20 DBBS Bass Funktion 28 USB-Steckplatz mit Gummiabdeckung<br />
21 VOLUME Lautstärkeregler 29 SD/MMC Speicherkartensteckplatz<br />
22 Aufnahme (Kassette)<br />
PLAY/PAUSE<br />
BAND(AM/FM)<br />
NEXT<br />
TUNE-UP<br />
BACK<br />
TUNE-DOWN<br />
27 26 25 24 23 22<br />
TAPE<br />
(OFF)<br />
RADIO<br />
CD<br />
(CD-MP3)<br />
(USB-MP3)<br />
(SD-MP3)<br />
OFF<br />
ON<br />
MIN. MAX.<br />
<strong>ProAudio</strong>-<strong>RRMP</strong>-<strong>6911</strong>-IM-DE-EN-V2.indb 6 11/08/2009 1:09 PM<br />
19<br />
20<br />
21
MEM. SET<br />
BEDIENELEMENTE<br />
30 Infrarot-LED 35 Batteriefach (Rückseite)<br />
31 STOP Stopp; UKW Mono/Stereo 36<br />
Wiederhol-Funktion; Titel<br />
FM. MODE Empfang<br />
REPEAT<br />
PROG<br />
MEMORY<br />
programmieren; gespeicherte Sender<br />
anzeigen<br />
32 NEXT Vorlauf; nächster Titel/ 37 BACK Rücklauf; vorheriger Titel/Sender;<br />
TUNE + Sender; Sendersuche<br />
vorwärts<br />
TUNE - Sendersuche rückwärts<br />
33<br />
Titel überspringen; nächster 38<br />
Wiedergabe, Pause;<br />
SKIP +10<br />
FOLDER<br />
Ordner; Sender speichern BAND<br />
PLAY/PAUSE<br />
UKW/MW-Umschalter<br />
34 FUNCTION<br />
CD/USB/SD<br />
38<br />
37<br />
36<br />
BAND<br />
PLAY/PAUSE<br />
BACK<br />
TUNE<br />
REPEAT<br />
PROG<br />
MEMORY<br />
Betriebsart auswählen<br />
30<br />
35<br />
STOP<br />
FM. MODE<br />
NEXT<br />
TUNE<br />
SKIP +10<br />
FOLDER<br />
MEM. SET<br />
<strong>ProAudio</strong>-<strong>RRMP</strong>-<strong>6911</strong>-IM-DE-EN-V2.indb 7 11/08/2009 1:09 PM<br />
31<br />
32<br />
33<br />
34<br />
7<br />
DEUTSCH
DEUTSCH<br />
8<br />
VORBEREITUNG<br />
Auspacken und Kontrolle<br />
• Entfernen Sie das Verpackungsmaterial und untersuchen Sie das Gerät auf Transportschäden.<br />
• Nehmen Sie das Gerät nicht in Betrieb, wenn es in irgendeiner Weise beschädigt ist, sondern bringen Sie es<br />
umgehend zum Händler zurück.<br />
• Überprüfen Sie, ob der Lieferumfang vollständig ist.<br />
• Bewahren Sie die Verpackung nach Möglichkeit bis zum Ablauf der Garantiezeit auf.<br />
• Achten Sie auf eine ausreichende Belüftung. Halten Sie einen Mindestabstand von 5 cm rings um das Gerät<br />
ein, um für genügend Kühlung zu sorgen.<br />
• Öffnen Sie das CD Fach (8) und entnehmen Sie die Transportsicherung.<br />
Netzbetrieb<br />
• Stellen Sie sicher, dass der FUNCTION-Schalter (19) auf Position TAPE (OFF) steht.<br />
• Achten Sie darauf, dass die Netzspannung mit den Angaben auf dem Typenschild des Gerätes<br />
übereinstimmt.<br />
• Stecken Sie den Netzstecker in eine geeignete Steckdose. Im Auslieferungszustand kann sich das Netzkabel<br />
im Batteriefach (14) befinden.<br />
• Um das Gerät vollständig vom Netz zu trennen, ziehen Sie den Stecker aus der Steckdose.<br />
• Verwenden Sie das Gerät nicht gleichzeitig im Netz- und Batteriebetrieb.<br />
Batteriebetrieb<br />
• Für den Betrieb des Gerätes mit Batterien benötigen Sie 6 x 1,5V Batterien vom Typ C/UM-2/LR14.<br />
• Öffnen Sie das Batteriefach (14) an der Geräteunterseite und legen Sie die Batterien ein.<br />
• Achten Sie dabei auf die korrekte Polarität (+/-) gemäß dem Aufdruck.<br />
• Schließen Sie nach dem Einlegen der Batterien das Batteriefach.<br />
• Entnehmen Sie alle Batterien, wenn Sie das Gerät über den Netzstecker betreiben.<br />
• Entnehmen Sie alle Batterien, wenn Sie das Gerät für längere Zeit nicht benutzen, um Schäden zu<br />
vermeiden.<br />
• Lesen Sie auch die Sicherheitsanweisungen zum Umgang mit Batterien (siehe Kapitel Wichtige<br />
Sicherheitsanweisungen).<br />
Abb. 1<br />
OPEN OPEN<br />
<strong>ProAudio</strong>-<strong>RRMP</strong>-<strong>6911</strong>-IM-DE-EN-V2.indb 8 11/08/2009 1:09 PM
Fernbedienung<br />
• Entfernen Sie die Transportsicherung am Batteriefach (35) der<br />
Fernbedienung. Ziehen Sie die kleine Folie vorsichtig nach hinten heraus.<br />
• Die Batterie befindet sich bereits im Batteriefach.<br />
• Wechseln Sie die Batterie, wenn sie verbraucht ist.<br />
• Öffnen Sie das Batteriefach an der Unterseite der Fernbedienung. Halten<br />
Sie die seitliche Verriegelung gedrückt und ziehen Sie gleichzeitig den<br />
Batteriehalter heraus.<br />
• Entfernen Sie die verbrauchte Batterie und legen Sie eine neue Batterie<br />
Typs CR2025 ein. Die + Seite muss nach oben zeigen.<br />
• Schieben Sie den Batteriehalter in das Batteriefach zurück.<br />
• Entfernen Sie die Batterie aus dem Batteriefach, wenn Sie die<br />
Fernbedienung über einen längeren Zeitraum nicht verwenden.<br />
• Lesen Sie auch die Sicherheitsanweisungen zum Umgang mit Batterien<br />
(siehe Kapitel Wichtige Sicherheitsanweisungen).<br />
GRUNDFUNKTIONEN<br />
Abb. 2<br />
Hinweise zur Fernbedienung<br />
• Achten Sie darauf, dass sich keine Gegenstände zwischen der Infrarot-LED (30) der Fernbedienung und dem<br />
Infrarotsensor (5) am Gerät befinden.<br />
• Beachten Sie, dass direktes Sonnenlicht oder Raumbeleuchtung die korrekte Funktion der Fernbedienung<br />
beeinflussen kann. Wenn die Fernbedienung nicht richtig funktioniert, versuchen Sie den Raum abzudunkeln<br />
oder den Abstand zwischen Gerät und Fernbedienung zu reduzieren. Wenn das Problem weiterhin besteht,<br />
wechseln Sie die Batterien der Fernbedienung aus.<br />
• Die Tasten auf der Fernbedienung decken sich von ihrer Funktion mit den Tasten auf dem Gerät. Alle<br />
Hauptfunktionen können mit der Fernbedienung gesteuert werden.<br />
• Die Fernbedienung kann nicht für die Kassettenfunktionen genutzt werden.<br />
• Die nachfolgenden Funktionen werden mit der Fernbedienung vorgenommen und erklärt, falls nicht anders<br />
angegeben.<br />
Betriebsart wählen<br />
• Wählen Sie mit dem FUNCTION-Schalter (19) am Gerät die Betriebsart aus.<br />
Betriebsart Erklärung<br />
TAPE (OFF) Kassetten abspielen; Gerät ausgeschaltet<br />
RADIO Radiobetrieb<br />
CD<br />
CD-MP3<br />
USB-MP3<br />
SD-MP3<br />
Audiodateien von CD wiedergeben (z.B. Audio-CD, MP3-CD).<br />
MP3-Dateien von einem USB Speichergerät oder einer<br />
SD/MMC-Speicherkarte wiedergeben.<br />
<strong>ProAudio</strong>-<strong>RRMP</strong>-<strong>6911</strong>-IM-DE-EN-V2.indb 9 11/08/2009 1:09 PM<br />
CR2025<br />
9<br />
DEUTSCH
DEUTSCH<br />
10<br />
AUDIOEINSTELLUNGEN, ANSCHLÜSSE<br />
Lautstärke<br />
• Stellen Sie die gewünschte Lautstärke durch Drehen des Lautstärkereglers (21) am Gerät ein.<br />
• Um die Lautstärke zu verringern, drehen Sie den Lautstärkeregler in Richtung MIN.<br />
• Um die Lautstärke zu erhöhen, drehen Sie den Lautstärkeregler in Richtung MAX.<br />
• Warnung: Extreme Lautstärke führt durch zu hohen Schalldruck zu dauerhaften Hörschäden.<br />
Bass Funktion<br />
• Diese Funktion verstärkt die tiefen Töne (Bässe) unabhängig von der Musikrichtung, so dass sie auch bei<br />
niedriger Lautstärke gut zu hören sind.<br />
• Die Bass Funktion ist nur wirksam beim Abspielen von CDs, USB-Speichern und Speicherkarten.<br />
• Schieben Sie den DBBS-Schalter (20) am Gerät auf Position ON, um die Bass Funktion einzuschalten.<br />
• Schieben Sie den DBBS-Schalter auf Position OFF, um die Bass Funktion wieder auszuschalten.<br />
Anschlüsse<br />
Kopfhörer<br />
• Das Gerät besitzt eine 3,5 mm Kopfhörerbuchse (18), an die Sie die meisten handelsüblichen Kopf- oder<br />
Ohrhörer (nicht im Lieferumfang enthalten) anschließen können.<br />
• Wenn der Kopf- oder Ohrhörer an der Kopfhörerbuchse angeschlossen ist, werden die eingebauten<br />
Lautsprecher automatisch deaktiviert.<br />
• Sobald Sie die Kopf- oder Ohrhörer von der Kopfhörerbuchse trennen, werden die Lautsprecher aktiviert.<br />
USB-Speicher<br />
• Schließen Sie Ihren USB-Speicher am USB-Steckplatz (28) auf der Oberseite des Gerätes an.<br />
SD/MMC-Speicherkarte<br />
• Verbinden Sie Ihre Speicherkarte mit dem Speicherkartensteckplatz (29) auf der Oberseite des Gerätes.<br />
<strong>ProAudio</strong>-<strong>RRMP</strong>-<strong>6911</strong>-IM-DE-EN-V2.indb 10 11/08/2009 1:09 PM
RADIOBETRIEB<br />
• Schieben Sie den FUNCTION-Schalter (19) am Gerät auf RADIO. Das Gerät ist nun im Radiobetrieb.<br />
• Drücken Sie die /BAND-Taste (38), um zwischen UKW (Ultrakurzwelle) und MW (Mittelwelle)<br />
umzuschalten. Im Display wird UKW als FM (Frequenzmodulation) und MW als AM (Amplitudenmodulation)<br />
angezeigt.<br />
• Mit der /STOP/FM. MODE-Taste (31) schalten Sie zwischen Mono und Stereo-Empfang um. Nur UKW-<br />
Sender werden in Stereo ausgestrahlt. Auf dem Display erscheint bei Stereo-Empfang ein Symbol: ((ST)).<br />
Wenn der UKW-Stereoempfang verrauscht oder schwach ist, können Sie in den Monobetrieb umschalten,<br />
um so die Empfangsqualität erhöhen.<br />
Antennen<br />
• Das Gerät ist mit zwei Antennen ausgestattet – einer Teleskopantenne (16) für den UKW-Bereich und einer<br />
internen Ferritantenne für den Mittelwellenbereich.<br />
• Ziehen Sie die Teleskopantenne ganz aus und schwenken Sie sie in die Richtung, in der Sie den besten<br />
Empfang erzielen (bei UKW-Betrieb). Richten Sie das Gerät so aus, dass Sie den Sender in bestmöglicher<br />
Klangqualität empfangen (bei MW-Betrieb).<br />
Sendersuche<br />
• Manuelle Senderwahl<br />
Drücken Sie wiederholt die Tasten (37) oder (32), bis die Anzeige die genaue Frequenz des<br />
gewünschten Radiosenders anzeigt. Verwenden Sie die manuelle Methode zur Feineinstellung von<br />
schwachen oder weit entfernten Sendern, die von der Automatik nicht selbständig erkannt werden.<br />
• Automatische Senderwahl<br />
Halten Sie die Tasten (37) oder (32) gedrückt, bis die Anzeige sich zu bewegen beginnt. Lassen Sie<br />
dann die Taste los. Das Radio sucht sich den nächsten starken Sender. Wiederholen Sie diesen Vorgang,<br />
bis Sie Ihren gewünschten Sender gefunden haben. Beenden Sie den automatischen Sendersuchlauf durch<br />
nochmaliges Drücken auf die Tasten (37) oder (32).<br />
Senderprogrammierung<br />
• Sie können insgesamt 50 Sender abspeichern. Es stehen 30 Speicherplätze für UKW und 20 Speicherplätze<br />
für MW zur Verfügung.<br />
• Wählen Sie einen Sender mit der manuellen oder automatischen Sendersuche.<br />
• Drücken Sie die SKIP+10/FOLDER/MEM.SET-Taste (33). Die Nummer des aktuellen Speicherplatzes blinkt.<br />
Zusätzlich wird im Display (7) MEM angezeigt.<br />
• Wählen Sie den gewünschten Speicherplatz mit (37) oder (32) aus.<br />
• Drücken Sie die SKIP+10/FOLDER/MEM.SET-Taste (33) erneut, um das Abspeichern des angezeigten<br />
Senders auf diesem Speicherplatz zu bestätigen. Gehen Sie bei der Speicherung weiterer Sender analog vor.<br />
• Nachdem Sie einige Sender abgespeichert haben, können Sie diese aufrufen, indem Sie die REPEAT/<br />
PROG/MEMORY-Taste (36) drücken. Drücken Sie auf (37) oder (32), um den gewünschten<br />
abgespeicherten Sender zu wählen. Angezeigt werden die Seicherplatznummer, die Frequenz und MEM.<br />
• Sie löschen einen Sender aus einem Speicherplatz, wenn Sie einen anderen Sender auf diesem<br />
Speicherplatz abspeichern. Der vorher gespeicherte Sender wird gelöscht.<br />
Hinweise:<br />
• Die gespeicherten Sender werden nicht gelöscht, wenn Sie den Netzstecker ziehen.<br />
• Wenn Sie 10 Sekunden lang keine Taste drücken, wird die Senderprogrammierung abgebrochen.<br />
<strong>ProAudio</strong>-<strong>RRMP</strong>-<strong>6911</strong>-IM-DE-EN-V2.indb 11 11/08/2009 1:09 PM<br />
11<br />
DEUTSCH
DEUTSCH<br />
12<br />
CD-SPIELER<br />
• Eine CD kann sowohl eine im Handel erworbene Audio-CD sein, als auch eine Daten CD (CD-R, CD-RW) mit<br />
MP3-Dateien. Während auf einer Audio-CD bis zu 80 Minuten Spielzeit untergebracht ist, kann eine MP3-CD<br />
12 Stunden und mehr enthalten.<br />
• Dieses Gerät unterstützt die CD-Formate Audio-CD, beschreibbare CD-R und CD-RW mit MP3-Dateien.<br />
• Das Gerät unterstützt das Abspielen von beschreibbaren CDs. Die Qualität beim Abspielen hängt von der<br />
Aufnahme und der Qualität des CD-Rohlings ab. Das Abspielen kann nicht immer garantiert werden. Dies ist<br />
kein Mangel dieses Gerätes.<br />
CD einlegen und entnehmen<br />
• Schieben Sie den FUNCTION-Schalter (19) am Gerät auf CD.<br />
• Öffnen Sie das CD-Fach (8), indem Sie die CD-Tür an der Griffmulde (6) hochklappen. Im Display (7) wird<br />
OPEN angezeigt.<br />
• Legen Sie eine CD mit der bedruckten Seite nach oben in das CD-Fach. Drücken Sie auf einen Punkt in der<br />
Mitte der CD bis sie auf der Achse einrastet.<br />
• Schließen Sie das CD-Fach. Die CD kann nun abgespielt werden.<br />
• Bevor Sie das CD-Fach wieder öffnen, vergewissern Sie sich stets, dass die CD sich nicht mehr dreht.<br />
Drücken Sie immer zuerst auf die /STOP/FM. MODE-Taste (31), um die Drehung der CD zu beenden.<br />
• Zum Herausnehmen der CD positionieren Sie einen Finger mittig auf der CD (Mitte der Spindel) und den<br />
anderen Finger am Rand der CD. Ziehen Sie die CD vorsichtig nach oben.<br />
Hinweise:<br />
• Entnehmen Sie die CD nur, nachdem sich das CD-Fach vollständig geöffnet hat.<br />
• Legen Sie nie mehr als eine CD gleichzeitig in das Fach.<br />
• Legen Sie nur CDs in das CD-Fach, keine anderen Objekte.<br />
• Berühren Sie niemals die klare Linse des Lasers.<br />
• Wenn Sie am Gerät anstoßen, kann dies zum Überspringen von Spuren führen.<br />
• Sehr hohe Lautstärke kann durch die Vibrationen auch zum Überspringen von Spuren führen.<br />
• Halten Sie das CD-Fach geschlossen, außer zum CD-Wechsel.<br />
• Öffnen Sie niemals das CD-Fach, wenn gerade eine CD abgespielt wird oder wenn die CD noch rotiert.<br />
CD abspielen<br />
• Schieben Sie den FUNCTION-Schalter (19) am Gerät auf CD.<br />
• Legen Sie eine CD ein und schließen Sie das CD-Fach (8). Im Display (7) wird READ angezeigt.<br />
• Wenn sich keine CD im CD-Fach befindet oder die CD nicht erkannt wird, zeigt das Display NO DISC an.<br />
• Die Wiedergabe der CD beginnt automatisch. Im Display wird CD angezeigt.<br />
• Drücken Sie die /BAND-Taste (38), um das Abspielen zu unterbrechen. Auf dem Display blinkt die Zeit.<br />
• Drücken Sie die /STOP/FM. MODE-Taste (31), um das Abspielen zu beenden.<br />
<strong>ProAudio</strong>-<strong>RRMP</strong>-<strong>6911</strong>-IM-DE-EN-V2.indb 12 11/08/2009 1:09 PM
CD-SPIELER<br />
Titelsuche, Vor- und Rücklauf<br />
• Drücken Sie auf (32), um zum Titelanfang des nächsten Titels zu springen.<br />
• Drücken Sie auf (37), um zum Titelanfang des laufenden Titels zurück zu springen. Durch zweifaches<br />
Drücken springen Sie auf den Anfang des vorherigen Titels zurück.<br />
• Wenn Sie diese Tasten länger gedrückt halten, erhöht sich die Abspielgeschwindigkeit. Sobald Sie die Taste<br />
loslassen, wird die Wiedergabe in normaler Geschwindigkeit wird fortgesetzt.<br />
Sprungfunktion<br />
• Drücken Sie die SKIP+10/FOLDER/MEM.SET-Taste (33), um 10 Titel zu überspringen.<br />
• Diese Funktion ist besonders nützlich beim Abspielen einer MP3-CD, auf der sich in der Regel eine große<br />
Menge von Titeln befindet.<br />
• Benutzen Sie diese Taste, um in die Nähe des gewünschten Titels zu springen und wählen Sie den Titel dann<br />
mit (37) oder (32) aus.<br />
Wiederholungs-Funktion<br />
• Sie können diese Funktion während der Wiedergabe eines Titels einstellen.<br />
• Drücken Sie die REPEAT/PROG/MEMORY-Taste (36) einmal, um den abgespielten Titel zu wiederholen. Im<br />
Display wird angezeigt. Das Symbol blinkt.<br />
• Drücken Sie die REPEAT/PROG/MEMORY-Taste zweimal, um die gesamte CD zu wiederholen. Im Display<br />
wird angezeigt. Das Symbol blinkt nicht.<br />
• Drücken Sie die REPEAT/PROG/MEMORY-Taste dreimal, um die Funktion auszuschalten.<br />
Titelwiedergabe programmieren<br />
• Sie können den CD-Spieler programmieren, eine beliebige Abfolge von bis zu 60 Titeln zu spielen. Drücken<br />
Sie die /STOP/FM. MODE-Taste (31), bevor Sie mit der Programmierung beginnen.<br />
• Drücken Sie die REPEAT/PROG/MEMORY-Taste (36), um in den Programmier-Modus zu wechseln. Im<br />
Display werden PROG und die Programmplatznummer P--01 angezeigt. Die Titelnummer 00 blinkt.<br />
• Wählen Sie einen Titel mit (37) oder (32) und bestätigen Sie Ihre Auswahl mit der REPEAT/PROG/<br />
MEMORY-Taste.<br />
• Im Display wird die nächste Programmplatznummer angezeigt. Gehen Sie wie oben beschrieben vor, um<br />
weitere Titel zu programmieren.<br />
• Drücken Sie die /BAND-Taste (38), um die Wiedergabe der programmierten Titel zu starten. Im Display<br />
wird PROG angezeigt.<br />
• Drücken Sie die /STOP/FM. MODE-Taste (31), um die Programmwiedergabe zu beenden. Starten Sie das<br />
Programm erneut durch Drücken der /BAND-Taste (38).<br />
• Um das Programm zu löschen, drücken Sie zweimal die /STOP/FM. MODE-Taste (31). Das Programm<br />
wird ebenfalls gelöscht, wenn Sie die CD-Klappe öffnen oder den FUNCTION-Schalter (19) am Gerät auf<br />
eine andere Position schieben.<br />
Hinweis:<br />
• Die Wiederholungs-Funktion kann mit dem Abspielen eines Programms kombiniert werden. Lesen Sie dazu<br />
den Abschnitt Wiederholungs-Funktion.<br />
<strong>ProAudio</strong>-<strong>RRMP</strong>-<strong>6911</strong>-IM-DE-EN-V2.indb 13 11/08/2009 1:09 PM<br />
13<br />
DEUTSCH
DEUTSCH<br />
14<br />
CD-SPIELER<br />
MP3-CD abspielen<br />
• Im folgenden Abschnitt werden nur die Unterschiede beim Abspielen eine MP3-CD beschrieben.<br />
• Da MP3-CDs wesentlich mehr Titel enthalten können, kann es länger dauern, bis der CD-Spieler das<br />
gesamte Inhaltsverzeichnis gelesen hat. Auf dem LCD-Display (7) werden die Anzahl der Verzeichnisse und<br />
die Anzahl der Titel angezeigt.<br />
• Wenn auf der MP3-CD Ordner abgespeichert sind, werden die Ordnernummern im Display mit F01, F02, etc<br />
angezeigt.<br />
Ordner-Funktion<br />
• Wenn Ihre MP3-CD mehrere Ordner (engl. folder) enthält, so können Sie mit der SKIP+10/FOLDER/MEM.<br />
SET-Taste (33) in den nächsten Ordner springen.<br />
• Halten Sie die SKIP+10/FOLDER/MEM.SET-Taste (33) während der Wiedergabe gedrückt. Nach etwa zwei<br />
Sekunden wird die Ordnernummer im Display (7) angezeigt, z.B. F02. Der erste Titel in diesem Ordner wird<br />
abgespielt.<br />
• Sie können diese Funktion auch im Stopp-Modus auswählen. Halten Sie die SKIP+10/FOLDER/MEM.<br />
SET-Taste (33) gedrückt. Im Display wird 01 für den ersten Ordner angezeigt. Wählen Sie den gewünschten<br />
Ordner mit (37) oder (32) aus. Drücken Sie auf /BAND (38), um die Wiedergabe zu starten.<br />
Hinweis:<br />
• Wenn Sie die SKIP+10/FOLDER/MEM.SET-Taste (33) nur kurz drücken, werden 10 Titel übersprungen<br />
(siehe Abschnitt Sprungfunktion).<br />
ID3-Tag Informationen<br />
• ID3 ist ein Format, um bestimmte Informationen über die Musik in derselben Datei abzuspeichern (sog.<br />
Metadaten). Dies können sein: der Titel, der Sänger, der Albumname, das Erscheinungsjahr und ein<br />
beliebiger Kommentar.<br />
• Während des Abspielens der Titel werden die ID3-Tag Informationen im Display (7) angezeigt. Falls<br />
die Informationen vollständig in der Audiodatei vorhanden sind, werden Sie als Durchlauftext in dieser<br />
Reihenfolge angezeigt: Titel, Künstler und Album.<br />
• Nachdem die Informationen angezeigt wurden, wechselt die Anzeige. Für ca. 5 Sekunden werden die<br />
Tracknummer/Ordnernummer und die Zeit angezeigt. Dann werden wieder die ID3-Tag Informationen<br />
angezeigt.<br />
<strong>ProAudio</strong>-<strong>RRMP</strong>-<strong>6911</strong>-IM-DE-EN-V2.indb 14 11/08/2009 1:09 PM
USB-SPEICHER UND SD/MMC-KARTEN<br />
• Achten Sie darauf, dass der FUNCTION-Schalter (19) am Gerät auf Position TAPE (OFF) steht.<br />
Stecken Sie den USB-Speicher vorsichtig in den USB-Steckplatz (28), und die SD/MMC-Karte in deren<br />
Kartensteckplatz (29).<br />
• Schieben Sie den FUNCTION-Schalter (19) am Gerät auf CD.<br />
• Wenn sowohl ein USB-Speicher als auch eine Speicherkarte am Gerät angeschlossen sind, drücken Sie<br />
mehrmals die FUNCTION-Taste (34). Damit wechseln Sie die Betriebsart. Im Display (7) wird USB für USB-<br />
Speicher und SD für Speicherkarten angezeigt.<br />
• Die Funktionen für Audio-CD und MP3-CD gelten auch für USB-Speicher und Speicherkarten. Weitere<br />
Informationen finden Sie im Kapitel CD-Spieler.<br />
• Entfernen Sie niemals den USB-Speicher oder die SD/MMC-Karte aus dem Anschluss, wenn Sie gerade<br />
einen Titel abspielen. Stoppen Sie immer den aktuellen Titel mit der /STOP/FM. MODE-Taste (31).<br />
• Ändern Sie den Betriebsmodus oder schalten Sie das Gerät vollständig ab, bevor Sie den USB-Speicher<br />
oder die SD/MMC-Karte vorsichtig aus dem Anschluss ziehen. Dies verhindert die Beschädigung des USB<br />
Speichers, der SD/MMC-Karte oder der Dateien.<br />
Hinweise:<br />
• Der USB-Steckplatz (28) ist mit den Standards 1.1 und 2.0 verwendbar.<br />
• Wenn Sie den USB-Steckplatz nicht verwenden, setzen Sie immer die mitgelieferte Gummiabdeckung auf.<br />
• Das Gerät unterstützt nur USB-Speicher und SD/MMC-Karten mit einer Kapazität von bis zu 2 GB.<br />
• Aufgrund von sich ändernden Technologien kann es vorkommen, dass bestimmte USB-Speicher oder SD/<br />
MMC-Karten nicht kompatibel mit diesem Gerät sind.<br />
• Dieses Gerät unterstützt keine USB-MP3-Player.<br />
• Benutzen Sie keine USB-Verlängerungskabel, um Ihren USB-Speicher mit dem USB-Steckplatz zu verbinden.<br />
Es kann zu Störungen kommen, die die Musikwiedergabe beeinflussen kann. In extremen Fällen könnte der<br />
USB-Speicher beschädigt werden.<br />
<strong>ProAudio</strong>-<strong>RRMP</strong>-<strong>6911</strong>-IM-DE-EN-V2.indb 15 11/08/2009 1:09 PM<br />
15<br />
DEUTSCH
DEUTSCH<br />
16<br />
KASSETTENREKORDER<br />
Einlegen und Entnehmen der Kassette<br />
• Stellen Sie den FUNCTION-Schalter (19) auf TAPE (OFF).<br />
• Öffnen Sie das Kassettenfach (13), indem Sie auf die / -Taste (26) drücken.<br />
• Straffen Sie zunächst das Band etwas und legen Sie die Kassette mit dem Band nach oben ein. Die leere<br />
Spule sollte sich links befinden.<br />
• Schließen Sie das Kassettenfach bis der Deckel hörbar einrastet.<br />
• Starten Sie das Abspielen, indem Sie auf die -Taste (23) drücken.<br />
• Drücken Sie die -Taste (27), um das Abspielen zu unterbrechen.<br />
• Beenden Sie das Abspielen, indem Sie auf die / -Taste (26) drücken.<br />
• Um das Band vor- oder zurückzuspulen, stoppen Sie das Abspielen mit der / -Taste (26). Drücken Sie<br />
dann die Taste (25) oder (24).<br />
• Drücken Sie noch einmal auf die / -Taste (26), um das Kassettenfach zu öffnen und die Kassette zu<br />
entnehmen.<br />
• Kassetten sind zweiseitig benutzbar. Wenn die Kassette am Ende der Spieldauer angekommen ist,<br />
entnehmen Sie die Kassette und drehen sie um 180 Grad um ihre vertikale Achse. Setzen Sie die Kassette<br />
wieder ein, um die andere Seite abzuspielen.<br />
Auto-Stop Funktion<br />
• Wenn die Kassette beim Abspielen am Ende angekommen ist, schaltet sich der Kassettenteil automatisch<br />
ab. Dies gilt auch für die Aufnahme.<br />
Aufnahme auf Kassette<br />
• Sie können vom Radio, einer CD, USB und SD/MMC-Speicherkarte aufnehmen. Bei der Aufnahme und beim<br />
Kopieren sollten Sie das Urheberrecht beachten.<br />
• Aufnahmen auf Chrom- (IEC II) und Metallbänder (IEC IV) sind nicht möglich. Benutzen Sie nur NORMAL<br />
(IEC I) Bänder.<br />
• Legen Sie eine Kassette ein, die Sie überschreiben möchten.<br />
• Drücken Sie die -Taste (27).<br />
• Drücken Sie die -Taste (22). Die -Taste (23) wird gleichzeitig betätigt.<br />
• Wählen Sie die gewünschte Quelle mit dem FUNCTION-Schalter (19) aus.<br />
• Um von Radio aufzunehmen, stellen Sie den FUNCTION-Schalter auf RADIO. Wählen Sie mit (37) oder<br />
(32) den gewünschten Sender aus.<br />
• Um von CD, USB oder SD/MMC-Speicherkarte aufzunehmen, stellen Sie den FUNCTION-Schalter auf CD.<br />
• Um die Aufnahme zu starten, drücken Sie die -Taste (27) noch einmal.<br />
• Um die Aufnahme zu unterbrechen, drücken Sie die -Taste (27).<br />
• Drücken Sie die / -Taste (26), um die Aufnahme zu beenden.<br />
• Die Aufnahme wird nicht durch die eingestellte Lautstärke beeinflusst.<br />
<strong>ProAudio</strong>-<strong>RRMP</strong>-<strong>6911</strong>-IM-DE-EN-V2.indb 16 11/08/2009 1:09 PM
Löschschutz<br />
• Sie können Kassetten gegen unbeabsichtigtes<br />
Löschen bzw. Überschreiben schützen, indem Sie die<br />
Sicherungslasche auf der oberen Stirnseite der Kassette<br />
herausbrechen.<br />
• Falls Sie die Kassette später doch einmal überspielen<br />
wollen, können Sie das Loch mit einem Klebeband<br />
überdecken.<br />
• Halten Sie einen großen Abstand zwischen Kassetten<br />
und Magneten bzw. Elektromagneten. Diese können sich<br />
in Motoren befinden sowie Lautsprechern, Fernsehern,<br />
Verstärkern, Netzgeräten und Transformatoren allgemein.<br />
• Setzen Sie Kassetten nicht hoher Wärme, extremer Kälte<br />
oder Feuchtigkeit aus.<br />
• Bewahren Sie sie staubgeschützt in ihrer Hülle auf.<br />
• Je länger die Abspielzeit der Kassette ist (60, 90,<br />
120 Minuten) desto dünner ist das Band und desto<br />
empfindlicher gegenüber mechanischen Belastungen.<br />
KASSETTENREKORDER<br />
Abb. 3<br />
<strong>ProAudio</strong>-<strong>RRMP</strong>-<strong>6911</strong>-IM-DE-EN-V2.indb 17 11/08/2009 1:09 PM<br />
17<br />
DEUTSCH
DEUTSCH<br />
18<br />
REINIGUNG UND PFLEGE<br />
Reinigung des Kassettenlaufwerks<br />
• Zur Sicherung der Qualität der Aufnahme und Wiedergabe<br />
vom Kassettenlaufwerk säubern Sie die Teile A, B und C.<br />
• Drücken Sie auf die / -Taste (26), um das Kassettenfach<br />
zu öffnen.<br />
• Drücken Sie die -Taste (23) und reinigen Sie die Gummi-<br />
Andruckrolle C.<br />
• Drücken Sie die -Taste (27) und reinigen Sie die<br />
Magnetköpfe A und die Welle B.<br />
• Nach der Reinigung, drücken Sie die / -Taste (26).<br />
Abb. 4<br />
Hinweis: Für die Tonköpfe können Sie auch eine spezielle Reinigungskassette verwenden.<br />
Compact Disc<br />
• Wischen Sie Fingerabdrücke und Staub sorgfältig mit einem weichen Tuch ab. Wischen Sie vom Zentrum<br />
zum Rand (nicht kreisförmig).<br />
• Reinigen Sie die Disc in regelmäßigen Abständen mit einem weichen, fusselfreien, trockenen Tuch.<br />
Verwenden Sie auf keinen Fall Lösungs- oder Scheuermittel.<br />
• Schreiben Sie nicht auf CDs. Bringen Sie auch keine Aufkleber darauf an.<br />
• Schützen Sie CDs vor Staub und Kratzern. Bewahren Sie sie deshalb bei Nichtbenutzung immer in ihrer Hülle<br />
auf.<br />
• Entnehmen Sie die CD aus der Hülle, indem Sie in der Mitte auf die Halterung drücken und dabei die CD<br />
vorsichtig nur am Rand anfassen.<br />
Abb. 5<br />
Pflege des Gehäuses<br />
• Ziehen Sie vor jeder Reinigung den Netzstecker aus der Steckdose.<br />
• Entfernen Sie Staub mit einem weichen Staubtuch.<br />
• Verwenden Sie keinen nassen Schwamm, Wachs, Poliersprays oder Scheuermittel.<br />
• Achtung: In das Innere des Gehäuses darf kein Wasser gelangen. Wenn doch, trennen Sie das Gerät vom<br />
Netz, und lassen es gründlich austrocknen, bevor Sie es wieder in Betrieb nehmen. Stellen Sie das Gerät<br />
zum Trocknen bitte nicht in einen Ofen oder eine Mikrowelle.<br />
<strong>ProAudio</strong>-<strong>RRMP</strong>-<strong>6911</strong>-IM-DE-EN-V2.indb 18 11/08/2009 1:09 PM
PROBLEMLÖSUNG<br />
Wenn ein Fehler auftritt, überprüfen Sie zuerst unten stehende Tabelle, bevor Sie sich an Ihren Händler wenden<br />
oder das Gerät einschicken. Die Adresse und Hotlinenummer finden Sie auf der Garantiekarte. Öffnen Sie das<br />
Gerät nicht und versuchen Sie nicht, es selbst zu reparieren. Sie verlieren die Garantieansprüche und es besteht<br />
Unfallgefahr! Beachten Sie die Garantiebedingungen auf den folgenden Seiten.<br />
Problem Ursache Lösung<br />
Kein Ton. Lautstärke ist zu niedrig eingestellt. Stellen Sie die Lautstärke höher.<br />
Die Anzeige zeigt<br />
nichts an; keine<br />
Reaktion auf<br />
Tastendruck.<br />
Schlechte<br />
Musikqualität beim<br />
Kassettenbetrieb.<br />
Aufnahme funktioniert<br />
nicht.<br />
Die CD überspringt<br />
Spuren.<br />
NO DISC wird<br />
angezeigt.<br />
CD kann nicht<br />
abgespielt werden.<br />
USB-/<br />
Speicherkartenfehler<br />
Der Netzstecker ist nicht richtig<br />
eingesteckt.<br />
Stecken Sie den Netzstecker ein.<br />
Elektrostatische Entladung. Gerät ausschalten und Netzstecker ziehen. Etwas warten<br />
und Netzstecker wieder einstecken.<br />
Staub und Schmutz auf dem Tonkopf. Reinigung<br />
Unverträglicher Kassettentyp<br />
verwendet.<br />
Verwenden Sie nur IEC I Typ Kassetten (NORMAL).<br />
Sicherungslasche evtl. abgebrochen. Bevor Sie das Loch mit einem Klebeband abdecken,<br />
überprüfen Sie, ob Sie diese Kassette wirklich<br />
überschreiben wollen.<br />
Schutzschieber an der SD-Karte<br />
betätigt.<br />
CD verschmutzt oder beschädigt. CD reinigen oder ersetzen.<br />
Schieben Sie den Schieber in Richtung der Anschlüsse,<br />
bevor Sie die Karte einsetzen.<br />
Ein Programm wird gerade abgespielt. Beenden Sie die Wiedergabe des Programms.<br />
Keine CD im CD-Fach eingelegt. Legen Sie eine CD ein.<br />
CD stark zerkratzt oder verschmutzt. Verwenden Sie nur eine unzerkratzte und saubere CD.<br />
Laserlinse verschmutzt oder<br />
angelaufen.<br />
CD-R ist leer oder nicht<br />
„abgeschlossen“.<br />
Reinigen Sie die Linse. Lassen Sie das Gerät 1-2 Stunden<br />
in trockener Umgebung stehen damit Kondenswasser<br />
trocknen kann.<br />
Schließen Sie die CD-R ab.<br />
CD stark zerkratzt oder verschmutzt. Verwenden Sie nur eine unzerkratzte und saubere CD.<br />
Laserlinse verschmutzt oder<br />
angelaufen.<br />
Reinigen Sie die Linse. Lassen Sie das Gerät 1-2 Stunden<br />
in trockener Umgebung stehen damit Kondenswasser<br />
trocknen kann.<br />
Verbindungsfehler. Ziehen Sie die Speicherkarte/USB heraus und stecken Sie<br />
sie wieder hinein.<br />
Keine spielbaren Dateien vorhanden. Verwenden Sie eine Speicherkarte / USB-Speicher mit<br />
MP3-Dateien.<br />
<strong>ProAudio</strong>-<strong>RRMP</strong>-<strong>6911</strong>-IM-DE-EN-V2.indb 19 11/08/2009 1:09 PM<br />
19<br />
DEUTSCH
DEUTSCH<br />
20<br />
TECHNISCHE DATEN<br />
Stromversorgung AC 230-240V~, 50Hz<br />
Batteriebetrieb DC 9V 6 x 1,5V Batterien, Typ C/UM-2/LR14 (nicht im<br />
Lieferumfang enthalten)<br />
Leistungsaufnahme 15 W<br />
Fernbedienung 1 x Batterie, Typ CR2025<br />
Lasertyp Klasse 1<br />
Lautsprecher 2 x 3-Wege Lautsprecher<br />
Abmessungen 240 (L) x 380 (W) x 180 (H) mm<br />
Radio<br />
UKW-Bereich 87,5 - 108 MHz<br />
MW-Bereich 522 - 1620 kHz<br />
Laufwerk für 8 cm und 12 cm Durchmesser; nur kreisförmig, keine<br />
Sonderformen<br />
CD-Formate CD Audio, CD-R, CD-RW<br />
Speicherformate USB Typ 1.1, Typ 2.0; SD/MMC-Speicherkarte<br />
Unterstützte Speichergröße Max. 2 GB<br />
Hergestellt für JGC-Company GmbH<br />
Heckhofweg 146<br />
50739 Köln<br />
Kundendienst <strong>E2</strong> <strong>Servicecenter</strong> GmbH<br />
Telefon<br />
Montag - Freitag 10-18 Uhr<br />
Tragen Sie hier die Seriennummer Ihres<br />
Gerätes ein:<br />
Max-Planck-Strasse 13<br />
50858 Köln-Marsdorf<br />
01805- 22 17 84<br />
(EUR 0,14 /Min. aus dem deutschen Festnetz; ggf. abweichender<br />
Mobilfunktarif)<br />
<strong>ProAudio</strong>-<strong>RRMP</strong>-<strong>6911</strong>-IM-DE-EN-V2.indb 20 11/08/2009 1:09 PM
Kunden Info<br />
Herstellergarantie<br />
Wir freuen uns, dass Sie sich für den Erwerb eines Produktes unseres Hauses entschieden haben<br />
und wünschen Ihnen viel Spaß und Freude mit diesem hochwertigen Produkt. Unsere strenge<br />
Fertigungskontrolle gewährleistet die hohe Qualität unserer Geräte. Für den Fall, dass Sie dennoch<br />
eine berechtigte Beanstandung haben, gewähren wir eine Garantie für die Dauer von<br />
GARANTIE<br />
3 Jahren<br />
ab Kaufdatum zu den nachfolgenden Bedingungen:<br />
AUFBEWAHREN<br />
Die Garantiedauer beträgt 3 Jahre ab Kaufdatum.<br />
JAHRE 3 KAUFNACHWEIS<br />
Service-Telefon: MIT<br />
O18O5 / 22 17 84 (€ 0,14 per Min)<br />
BITTE<br />
E 2 <strong>Servicecenter</strong> GmbH,<br />
Max-Planck-Strasse 13,<br />
50858 Köln-Marsdorf<br />
www.e2service.de<br />
DOKUMENT!<br />
ACHTUNG: Unfrei eingeschickte Sendungen werden nicht angenommen! WICHTIGES<br />
Diese Garantie lässt Ihre gesetzlichen Gewährleistungsansprüche als Verbraucher gegenüber<br />
dem Verkäufer des Gerätes unberührt. Diese Rechte werden durch die von uns gewährte<br />
Herstellergarantie nicht eingeschränkt. Die von uns gewährte Garantie hat nur Gültigkeit für den<br />
privaten Gebrauch des Gerätes und beschränkt sich auf das Gebiet der Bundesrepublik Deutschland.<br />
Es liegt im Ermessen von <strong>ProAudio</strong>, ob die Garantie durch <strong>Reparatur</strong> oder Austausch des Gerätes<br />
bzw. des defekten Teiles erfüllt wird. Weitere Ansprüche sind ausgeschlossen. Sollten Sie Fragen<br />
zu <strong>ProAudio</strong> Produkten haben, sparen Sie sich den zeitraubenden Weg zum Händler und wenden<br />
sich direkt an unsere Servicehotline oder unser <strong>Servicecenter</strong>. Ein Team von hochqualifizierten<br />
Produktberatern und Technikern steht Ihnen Montag bis Freitag von 10 – 18 Uhr zur Verfügung.<br />
Sollten Sie Ihr Gerät einsenden, ist eine kurze Beschreibung Ihrer Beanstandung erforderlich, das<br />
unterstützt die schnelle Abwicklung. Senden Sie Ihr Gerät ausnahmslos nur zu unserem autorisierten<br />
Servicepartner und verwenden Sie bitte hierzu den beiliegenden Retourenzettel. Sollte dieser<br />
Retourenzettel fehlen, wenden Sie sich bitte an die oben genannte Servicehotline.<br />
<strong>ProAudio</strong>-<strong>RRMP</strong>-<strong>6911</strong>-IM-DE-EN-V2.indb 21 11/08/2009 1:09 PM<br />
21<br />
DEUTSCH
DEUTSCH<br />
22<br />
GARANTIE<br />
Kunden Info<br />
Herstellergarantie<br />
Zur Durchführung einer Garantiereparatur benötigt unser Servicepartner unbedingt den<br />
Kaufnachweis, entweder als Originalrechnung oder den vom Händler maschinengedruckten<br />
Kassenbeleg. Weiterhin muss die Seriennummer am Gerät lesbar sein. Ohne Kaufnachweis<br />
können wir leider keine kostenlosen Garantieleistungen erbringen. Wir empfehlen Ihnen, die<br />
Originalverpackung aufzubewahren, um im Garantiefall einen sicheren Transport des Gerätes zu<br />
gewährleisten.<br />
Garantie-<strong>Reparatur</strong>en dürfen ausschließlich von der <strong>E2</strong> <strong>Servicecenter</strong> GmbH oder von dieser<br />
autorisierten Vertragswerkstätten ausgeführt werden. Bei <strong>Reparatur</strong>en, die selbst oder von anderen<br />
Werkstätten ausgeführt werden, entfällt jeglicher Garantieanspruch und es besteht kein Anspruch<br />
auf Kostenerstattung.<br />
Kein Garantieanspruch besteht:<br />
bei unsachgemäßer Behandlung<br />
bei mechanischer Beschädigung des Gerätes von außen<br />
bei Transportschäden<br />
für Verschleißteile<br />
bei Bedienungsfehlern und zweckfremder Benutzung<br />
bei Aufstellung des Gerätes in Feuchträumen oder im Freien<br />
bei Schäden, die auf höhere Gewalt, Krieg, Wasser, Blitzschlag, Überspannung und andere<br />
von <strong>ProAudio</strong> nicht zu verantwortende Gründe zurückzuführen sind<br />
bei übermäßiger Nutzung, insbesondere bei anderer als privater Nutzung<br />
bei Missachtung der Bedienungsanleitung und Installationsfehlern<br />
wenn das Gerät keinen technischen Defekt aufweist<br />
für Transport- und Fahrtkosten sowie durch Auf- und Abbau des Gerätes entstandene Kosten<br />
Die Garantie umfasst keine weitergehende Haftung unsererseits, insbesondere keine Haftung für<br />
Schäden, die nicht am Gerät selbst entstanden sind oder die durch den Ausfall des Gerätes bis zur<br />
Instandsetzung entstehen (z.B. Wegekosten, Handlingkosten, etc.). Hierdurch wird jedoch unsere<br />
gesetzliche Haftung, insbesondere nach dem Produkthaftungsgesetz, nicht eingeschränkt oder<br />
ausgeschlossen. Ebenfalls haftet <strong>ProAudio</strong> nicht für den indirekten bzw. in Folge auftretenden<br />
Verlust von Tonträgern (CD/DVD etc.) oder ähnlichem Material, sowie Zusatzgeräten jeglicher Art<br />
(Netzteile, Lautsprecher etc.).<br />
Von uns erbrachte Garantieleistungen verlängern die Garantiefrist von 3 Jahren ab Kaufdatum nicht,<br />
auch nicht hinsichtlich eventuell ausgetauschter Komponenten.<br />
Wir wünschen Ihnen viel Spaß mit Ihrem neuen Gerät und hoffen, dass auch Ihr Nächstes<br />
wieder ein <strong>ProAudio</strong> Produkt sein wird. WICHTIGES DOKUMENT! BITTE MIT KAUFNACHWEIS 3 JAHRE AUFBEWAHREN<br />
<strong>ProAudio</strong>-<strong>RRMP</strong>-<strong>6911</strong>-IM-DE-EN-V2.indb 22 11/08/2009 1:09 PM
TABLE OF CONTENTS<br />
TABLE OF CONTENTS.............................................................................................................................23<br />
IMPORTANT SAFETY INSTRUCTIONS .......................................................................................................24-25<br />
CONTROL ELEMENTS.............................................................................................................................26-28<br />
PREPARATION ........................................................................................................................................29<br />
BASIC FUNCTIONS .................................................................................................................................30<br />
AUDIO SETTINGS, CONNECTIONS ...........................................................................................................31<br />
RADIO OPERATION .................................................................................................................................32<br />
CD-PLAYER ...........................................................................................................................................33-35<br />
USB STORAGE AND SD/MMC CARDS ......................................................................................................36<br />
CASSETTE RECORDER ...........................................................................................................................37-38<br />
CLEANING AND CARE .............................................................................................................................39<br />
TROUBLESHOOTING ...............................................................................................................................40<br />
TECHNICAL DATA ...................................................................................................................................41<br />
WARRANTY ...........................................................................................................................................42-42<br />
Correct disposal of this product.<br />
This label indicates that, in the EU, electronic devices cannot be disposed of with regular<br />
household waste.<br />
Please use the return or collections systems of your municipality or contact the seller where<br />
you purchased this product.<br />
Please dispose of batteries environmentally friendly. Do not dispose of batteries with regular<br />
household waste. Please use the return or collections systems of your municipality or contact<br />
the seller where you purchased this product.<br />
<strong>ProAudio</strong>-<strong>RRMP</strong>-<strong>6911</strong>-IM-DE-EN-V2.indb 23 11/08/2009 1:09 PM<br />
23<br />
ENGLISH
ENGLISH<br />
24<br />
IMPORTANT SAFETY INSTRUCTIONS<br />
Explanation of warning symbols<br />
CAUTION<br />
Risk of electric shock.<br />
Do not open!<br />
Warning: To reduce the risk of electric shock. Do not<br />
remove cover. No user serviceable parts inside.<br />
Refer servicing to qualified service personnel.<br />
This device uses a Class 1 laser.<br />
The lightning flash with arrowhead<br />
symbol, with in an equilateral triangle, is<br />
intended to alert user to the presence of<br />
uninsulated “dangerous voltage” within the<br />
product enclosure that may be of sufficient<br />
magnitude to constitute a risk of electric<br />
shock to persons.<br />
The exclamation point within an equilateral<br />
triangle is intended to alert the user to<br />
the presence of important operating and<br />
maintenance (servicing) instruction in the<br />
literature accompanying the appliance.<br />
General<br />
• Read this manual before first use thoroughly. It contains important information for your safety as well as for<br />
the use and maintenance of the equipment. Keep these instructions for future reference and pass it on with<br />
the device.<br />
• Use the device only for its intended purpose. Improper use may lead to hazards.<br />
• This device is designed for household use only. It is not suitable for commercial use. Use this device in dry<br />
indoor areas only and never outdoors.<br />
• Do not open the device. Do not insert objects into the openings.<br />
• This device is not intended to be used by persons (including children) with reduced physical, sensory or<br />
mental abilities or lack of experience and / or lack of knowledge unless they are supervised by a person<br />
responsible for their safety or have received instructions on how to use the device.<br />
• Use only equipment, which was recommended by the manufacturer.<br />
• Warning: Extreme volume and high noise leads to permanent hearing loss.<br />
• In the event of a malfunction by an electro-static discharge: Unplug the device from the mains using the<br />
power cord. Wait a bit and plug the power cord back into the outlet. Turn on the device again to resume<br />
normal operation.<br />
• Never immerse electrical parts of the device in water during cleaning or operation. Never hold the device<br />
under running water.<br />
Location<br />
• Do not use this device near water or heavy moisture; e.g. in a damp basement or beside a swimming poor<br />
or bathtub.<br />
• Use this device in well-ventilated areas. Do not block off the air openings. Put the device in a place only in<br />
accordance with the manufacturer’s instructions. Keep a minimum free distance of 5 cm around the device<br />
in order to allow for sufficient cooling. Do not cover the device with newspapers or other textiles such as<br />
drapes, blankets and clothing.<br />
<strong>ProAudio</strong>-<strong>RRMP</strong>-<strong>6911</strong>-IM-DE-EN-V2.indb 24 11/08/2009 1:09 PM
IMPORTANT SAFETY INSTRUCTIONS<br />
• Do not place the device on heating radiators, ovens or other heat-producing devices, including amplifiers.<br />
• In order to reduce the risk of fire and electric shock, do not expose the device to fire (fireplace, grill, candles,<br />
cigarettes and so on) or water (water drops, water splashes, vases, tubs, ponds and so on).<br />
Power Supply<br />
• The mains voltage must match the information on the rating label of the device.<br />
• The power plug is used as the disconnect device. Please be sure that the power plug is in operable<br />
condition.<br />
• Only removing the power plug can separate the device completely from the mains supply.<br />
• Only unplug from the power outlet by the plug itself. Do not pull on the cord.<br />
• Unplug the power cord when not in use, during disruption in operation and before cleaning.<br />
• Unplug the power cord during lightning storms and prolonged absence in order to protect the electronics<br />
against overvoltage and damage.<br />
• If the power cord or the casing of the device is damaged or if the device is dropped, the device may not be<br />
used before it is examined by a professional electrician.<br />
• A damaged power cord may only be replaced by the manufacturer or a workshop commissioned by the<br />
manufacturer or by a similarly qualified person in order to avoid hazards.<br />
• Protect the power cord and the housing from damage.<br />
Condensation<br />
• If the cold device is brought into a warm and perhaps slightly damp surrounding, condensation can build up<br />
inside. Condensation can influence the proper function of the device. In extreme cases, condensation could<br />
cause damage from a short circuit. Let the device stand in a warm and dry surrounding for 1-2 hours in<br />
order to dry the possible condensation or let it leak out before putting into operation.<br />
Battery<br />
• Caution: There is danger of explosion from improper replacement of the batteries. Replace batteries only<br />
with the same or equivalent type of battery.<br />
• Always change the entire battery pack. Do not mix old and new batteries, or batteries with different charge<br />
state.<br />
• Make sure the batteries are correctly inserted. Observe the polarity (+) plus / (-) negative on the battery and<br />
the housing. Improperly inserted batteries can lead to leakage or, in extreme cases, a fire or an explosion.<br />
• Never expose batteries to excessive heat (e.g. bright sun, fire), and never throw them into fire. The batteries<br />
could explode.<br />
• The connections must not be short-circuited.<br />
• Remove used batteries. Remove the batteries if you know that the device will not be used for a longer period<br />
of time. Otherwise, the batteries could leak and cause damage.<br />
• Keep batteries out of reach of small children. If batteries have been swallowed, seek immediate medical<br />
attention.<br />
• Non-rechargeable batteries must not be recharged.<br />
• Rechargeable batteries are to be removed from the device before being charged.<br />
<strong>ProAudio</strong>-<strong>RRMP</strong>-<strong>6911</strong>-IM-DE-EN-V2.indb 25 11/08/2009 1:09 PM<br />
25<br />
ENGLISH
ENGLISH<br />
26<br />
CONTROL ELEMENTS<br />
1 2 3 4 5 6 7 8 9 10 11<br />
12<br />
STOP<br />
CD/USB/SD<br />
FM MODE<br />
REPEAT<br />
PROGRAM<br />
MEMORY<br />
MEM. SET<br />
SKIP+10<br />
FOLDER<br />
14<br />
1 Loudspeaker (left) 8 CD compartment<br />
2 MEM. SET skip tracks; next folder; 9<br />
Playback; pause;<br />
SKIP +10 store station<br />
PLAY/PAUSE FM/AM switch<br />
FOLDER<br />
BAND(AM/FM)<br />
3 REPEAT Repeat function; program 10 NEXT Forward; next track/station;<br />
PROGRAM track; display stored<br />
TUNE-UP station search forward<br />
MEMORY stations<br />
4 STOP Stop; select operating 11 BACK Rewind; previous track/station;<br />
CD/USB/SD mode; FM Mono/Stereo TUNE-DOWN station search backward<br />
FM MODE reception<br />
5 iR Infrared sensor 12 Loudspeaker (right)<br />
6 CD door finger grip 13 Cassette compartment<br />
7 LCD Display 14 Battery compartment (bottom<br />
side)<br />
<strong>ProAudio</strong>-<strong>RRMP</strong>-<strong>6911</strong>-IM-DE-EN-V2.indb 26 11/08/2009 1:09 PM<br />
PLAY/PAUSE<br />
BAND(AM/FM)<br />
NEXT<br />
TUNE-UP<br />
BACK<br />
TUNE-DOWN<br />
13
29<br />
28<br />
15<br />
16 17 18<br />
STOP<br />
CD/USB/SD<br />
FM MODE<br />
REPEAT<br />
PROGRAM<br />
MEMORY<br />
MEM. SET<br />
SKIP+10<br />
FOLDER<br />
D I G I T A L<br />
CONTROL ELEMENTS<br />
15 Power cord<br />
(bottom side)<br />
23 Play (cassette)<br />
16 Telescopic antenna (FM) 24 Rewind (cassette)<br />
17 Handle 25 Fast forward (cassette)<br />
18 3.5 mm headphone jack (back<br />
side)<br />
26 / Stop / eject (cassette)<br />
19 FUNCTION Select operating mode 27 Pause (cassette)<br />
20 DBBS Bass function 28 USB slot with rubber cover<br />
21 VOLUME Volume control 29 SD/MMC memory card slot<br />
22 Record (cassette)<br />
PLAY/PAUSE<br />
BAND(AM/FM)<br />
NEXT<br />
TUNE-UP<br />
TUNE-DOWN<br />
27 26 25 24 23 22<br />
BACK<br />
TAPE<br />
(OFF)<br />
RADIO<br />
CD<br />
(CD-MP3)<br />
(USB-MP3)<br />
(SD-MP3)<br />
OFF<br />
ON<br />
MIN. MAX.<br />
<strong>ProAudio</strong>-<strong>RRMP</strong>-<strong>6911</strong>-IM-DE-EN-V2.indb 27 11/08/2009 1:09 PM<br />
19<br />
20<br />
21<br />
27<br />
ENGLISH
ENGLISH<br />
28<br />
CONTROL ELEMENTS<br />
30 Infrared LED 35 Battery compartment (back side)<br />
31 STOP Stop; FM Mono/Stereo 36<br />
Repeat function; program track;<br />
FM. MODE reception<br />
REPEAT<br />
PROG<br />
MEMORY<br />
display stored stations<br />
32 NEXT Forward; next track/station; 37 BACK Rewind; previous track/station; station<br />
TUNE + station search forward TUNE - search backward<br />
33<br />
skip tracks; next folder; 38<br />
Playback; pause;<br />
SKIP +10<br />
FOLDER<br />
store station<br />
BAND<br />
PLAY/PAUSE<br />
FM/AM switch<br />
MEM. SET<br />
34 FUNCTION<br />
CD/USB/SD<br />
38<br />
37<br />
36<br />
BAND<br />
PLAY/PAUSE<br />
BACK<br />
TUNE<br />
REPEAT<br />
PROG<br />
MEMORY<br />
Select operating mode<br />
30<br />
35<br />
STOP<br />
FM. MODE<br />
NEXT<br />
TUNE<br />
SKIP +10<br />
FOLDER<br />
MEM. SET<br />
<strong>ProAudio</strong>-<strong>RRMP</strong>-<strong>6911</strong>-IM-DE-EN-V2.indb 28 11/08/2009 1:09 PM<br />
31<br />
32<br />
33<br />
34
PREPARATION<br />
Unpacking and checking<br />
• Remove the packing material and examine the unit for shipping damage.<br />
• Do not operate if it is damaged in any way and bring it back to the dealer immediately.<br />
• Check whether the delivery is complete.<br />
• Keep the packaging, if possible, until the expiration of the warranty period.<br />
• Make sure there is adequate ventilation. Keep a minimum distance of 5 cm around the device in order to<br />
ensure sufficient cooling.<br />
• Open the CD compartment (8) and remove the transportation support.<br />
Mains operation<br />
• Make sure that the FUNCTION switch (19) is set to position TAPE (OFF).<br />
• Make sure the mains voltage matches the information on the rating label of the device.<br />
• Plug the power cord into an appropriate outlet. In delivery status the power cord may be located inside the<br />
battery compartment (14).<br />
• To completely disconnect from the mains power, pull the plug from the outlet.<br />
• Do not operate the device by battery and mains power at the same time.<br />
Battery operation<br />
• To operate the device with batteries, you will need 6 x 1.5V batteries type C/UM-2/LR14.<br />
• Open the battery compartment (14) at the bottom of the device and insert the batteries.<br />
• Check carefully for the correct polarity (+/-) according to the imprint.<br />
• Close the battery compartment after the batteries are inserted.<br />
• Remove all batteries, if you operate the device with the power plug.<br />
• Remove the batteries, if you will not use the device for an extended period of time in order to prevent<br />
damage.<br />
• Read the safety instructions for using batteries (see chapter Important Safety Instructions).<br />
Fig. 1<br />
OPEN OPEN<br />
<strong>ProAudio</strong>-<strong>RRMP</strong>-<strong>6911</strong>-IM-DE-EN-V2.indb 29 11/08/2009 1:09 PM<br />
29<br />
ENGLISH
ENGLISH<br />
30<br />
BASIC FUNCTIONS<br />
Remote control<br />
• Remove the plastic tab from the battery compartment (35) of the remote<br />
control. Pull the tab gently out.<br />
• The battery is already inside the battery compartment.<br />
• Change the batteries once they are worn out.<br />
• Open the battery compartment at the bottom of the remote control. Press<br />
and hold the locking mechanism on the side and pull out the battery<br />
holder at the same time.<br />
• Remove the used battery and insert a new battery of the type CR2025.<br />
Make sure that the +symbol on the battery points upwards.<br />
• Push the battery support holder back into the battery compartment.<br />
• Remove the battery from the battery compartment if you know that you<br />
will not use the remote control for a longer period of time.<br />
• Read the safety instructions for using batteries (see chapter Important<br />
Safety Instructions).<br />
Instructions for remote control<br />
• Make sure that no objects are located between the infrared LED (30) of the remote and the infrared<br />
sensor (5) on the device.<br />
• Please note that direct sunlight or room lighting influences the correct function of the remote control. If the<br />
remote control does not work properly, try to darken the area or reduce the distance between the device and<br />
the remote control. If the problem persists, replace the batteries in the remote control.<br />
• The buttons on the remote correspond to their function with the buttons on the device. All main functions<br />
can be performed with the remote control.<br />
• The remote control cannot be used for cassette functions.<br />
• The following functions are carried out and explained with the remote control unless otherwise indicated.<br />
Fig. 2<br />
Select operation mode<br />
• Use the FUNCTION switch (19) on the device in order to select one of the following operation modes.<br />
Operation mode Explanation<br />
TAPE (OFF) Play cassettes; device switched off<br />
RADIO Radio operation<br />
CD<br />
CD-MP3<br />
USB-MP3<br />
SD-MP3<br />
Play back audio files from CD (e.g. Audio-CD, MP3-CD).<br />
Play back MP3 files from a USB storage device or from a<br />
SD/MMC memory card.<br />
<strong>ProAudio</strong>-<strong>RRMP</strong>-<strong>6911</strong>-IM-DE-EN-V2.indb 30 11/08/2009 1:09 PM<br />
CR2025
AUDIO SETTINGS, CONNECTIONS<br />
Volume<br />
• Set the desired volume by turning the volume control (21) on the device.<br />
• To decrease the volume level, turn the volume control in the MIN direction.<br />
• To increase the volume level, turn the volume control in the MAX direction.<br />
• Warning: Extreme volume leads to permanent hearing loss from high acoustic pressure.<br />
Bass function<br />
• Regardless of the music genre this function amplifies the lower sounds (bass) so that they are also audible<br />
at low volume.<br />
• The bass function is only effective when play back audio files from CDs, from a USB storage device or from<br />
a memory card.<br />
• Set the DBBS switch (20) on the device to position ON in order to switch on the bass function.<br />
• Set the DBBS switch to position OFF in order to switch off the bass function.<br />
Connections<br />
Headphone<br />
• The device has a 3.5mm headphone jack (18). You can connect most standard earphones or headphones<br />
(not included).<br />
• If a headphone or earphone plug is connected to the headphone jack, the built-in speakers will automatically<br />
be muted.<br />
• As soon as the headphone or earphone plug is disconnected, the speakers will be activated.<br />
USB memory<br />
• Connect your USB memory stick to the USB slot (28) at the top side of the device.<br />
SD/MMC memory card<br />
• Connect your memory card with the memory card slot (29) at the top side of the device.<br />
<strong>ProAudio</strong>-<strong>RRMP</strong>-<strong>6911</strong>-IM-DE-EN-V2.indb 31 11/08/2009 1:09 PM<br />
31<br />
ENGLISH
ENGLISH<br />
32<br />
RADIO OPERATION<br />
• Set the FUNCTION switch (19) on the device to RADIO. The device is now in radio operation.<br />
• Press the /BAND button (38) to switch between FM (frequency modulation) and AM (amplitude<br />
modulation).<br />
• With the /STOP/FM. MODE button (31), you can switch between mono and stereo reception. Only FM<br />
stations will be broadcast in stereo. On the display, the following symbol is shown for stereo<br />
reception: ((ST)).<br />
If the FM stereo reception is weak or noisy, you can switch into mono operation in order to improve the<br />
reception quality.<br />
Antennas<br />
• The device is equipped with two antennas – a telescopic antenna (16) for the FM area and an internal ferrite<br />
antenna for AM.<br />
• Pull the telescopic antenna fully out and rotate it in the direction with the best reception (for FM band). Find<br />
the optimum position for the device in order to get the best possible reception (for AM band).<br />
Station searching<br />
• Manual search<br />
Repeatedly press the button (37) or (32) until the display shows the desired radio station. Use the<br />
manual method for fine-tuning of weak or distant stations which cannot be recognised independently from<br />
the automatic tuning.<br />
• Automatic search<br />
Hold the button (37) or (32) down until the display begins to move. Then let go of the button. The<br />
radio searches for the next strong signal. Repeat this procedure until you find desired station. End the<br />
automatic station search by pressing the button (37) or (32) again.<br />
Station programming<br />
• You can store up to 50 stations. There is storage space for 30 FM and 20 AM stations available.<br />
• Select a station with the manual or automatic station search.<br />
• Press the SKIP+10/FOLDER/MEM.SET button (33). The number of the current storage space flashes.<br />
Additionally, MEM will be shown on the display (7).<br />
• Select the desired storage space with (37) or (32).<br />
• Press the SKIP+10/FOLDER/MEM.SET button (33) again in order to confirm saving of the shown station in<br />
this storage space. Proceed with saving further stations.<br />
• Once you have saved several stations, you can call them up by pressing the REPEAT/PROG/MEMORY<br />
button (36). Then press (37) or (32) to select the desired stored station. The storage space number<br />
will be shown as well as the frequency and the word MEM.<br />
• You erase a station from the storage space if you save another station on this storage space. The previously<br />
saved station will be erased.<br />
Notes:<br />
• The saved stations will not be erased if you unplug the device.<br />
• If you do not press any buttons for 10 seconds, the station programming will be cancelled.<br />
<strong>ProAudio</strong>-<strong>RRMP</strong>-<strong>6911</strong>-IM-DE-EN-V2.indb 32 11/08/2009 1:09 PM
CD-PLAYER<br />
• A CD can be a commercially purchased audio CD, as well as a data CD (CD-R, CD-RW) with MP3 files. While<br />
on an audio CD of up to 80 minutes of playing is housed an MP3-CD contains 12 hours and more.<br />
• This device supports the CD formats Audio-CD, recordable CD-R and CD-RW with MP3 files.<br />
• This device supports the playback of recordable CDs. The quality of the playback depends on the recording<br />
and quality of the blank CD. Playback cannot always be guaranteed. This is not a shortcoming of this device.<br />
Inserting and removing CD<br />
• Set the FUNCTION switch (19) on the device to CD.<br />
• Open the CD compartment (8) with the CD door. Lift it up by using the finger grip (6). On the display (7)<br />
OPEN will be shown.<br />
• Insert a CD with the printed side facing up in the CD compartment. Click on a spot in the middle of the CD<br />
until it locks into place on the axle.<br />
• Close the CD compartment. The CD can now be played.<br />
• Before opening the CD compartment again, always make sure that the CD has stopped turning. Always<br />
press on the /STOP/FM. MODE button (31) first to end the rotation of the CD.<br />
• To remove the CD, position your middle finger on the CD (in the middle of the spindle) and the other fingers<br />
on the edge of the CD. Drag the CD gently upwards.<br />
Notes:<br />
• Remove the disc only after the disc compartment has completely opened.<br />
• Place no more than one CD simultaneously in the compartment.<br />
• Insert only CDs in the CD compartment and no other objects.<br />
• Do not touch the clear lens of the laser.<br />
• If you have impact with the device, this may lead to skipping tracks.<br />
• Very high volume due to vibrations may also lead to skipping tracks.<br />
• Keep the CD compartment closed, except for changing the CD.<br />
• Never open the CD compartment when a CD is played, or if the CD still rotates.<br />
Playing CD<br />
• Set the FUNCTION switch (19) on the device to CD.<br />
• Insert a CD and close the CD compartment (8). READ will be shown on the display (7).<br />
• If there is no CD in the CD compartment or if the CD is not recognised, the display shows NO DISC.<br />
• The CD playback starts automatically. CD will be shown on the display.<br />
• Press the /BAND button (38) to pause playback. The time then flashes on the display.<br />
• Press the /STOP/FM. MODE button (31) to end playback.<br />
<strong>ProAudio</strong>-<strong>RRMP</strong>-<strong>6911</strong>-IM-DE-EN-V2.indb 33 11/08/2009 1:09 PM<br />
33<br />
ENGLISH
ENGLISH<br />
34<br />
CD-PLAYER<br />
Track search, fast forward and rewind<br />
• Press (32) to go to the beginning of the next track.<br />
• Press (37) to go back to the beginning of the track which is playing. Press twice to go back to the<br />
beginning of the previous track.<br />
• If you press this button for a longer time, the speed will increase. As soon as you let go of the button, the<br />
playback returns to normal speed.<br />
Skip function<br />
• Press the SKIP+10/FOLDER/MEM.SET button (33) to skip 10 tracks.<br />
• This function is particularly useful when playing a MP3-CD that normally contains a large amount of tracks.<br />
• Use this button to skip tracks and get near the desired track. Then select the track with (37) or (32).<br />
Repeat function<br />
• You can set this function during playback of a track.<br />
• Press the REPEAT/PROG/MEMORY button (36) once in order to repeat the track being played. will be<br />
shown on the display. The symbol flashes.<br />
• Press the REPEAT/PROG/MEMORY button twice to replay the entire CD. will be shown on the display.<br />
The symbol does not flash.<br />
• Press the REPEAT/PROG/MEMORY button three times to switch off the function.<br />
Program track playback<br />
• You can program the CD player to play a desired sequence of up to 60 tracks. Press the /STOP/<br />
FM. MODE button (31) before beginning programming.<br />
• Press the REPEAT/PROG/MEMORY button (36) to switch to programming mode. PROG and the program<br />
place number P--01 will be shown on the display. The track number digits 00 flash.<br />
• Select a track with (37) or (32) and confirm your selection with the REPEAT/PROG/MEMORY<br />
button.<br />
• The next program place number will be shown on the display. Proceed as above to program other tracks.<br />
• Press the /BAND button (38) in order to begin the playback of the programmed tracks. PROG will be<br />
shown on the display.<br />
• Press the /STOP/FM. MODE button (31) to end the program playback. Start the program again by<br />
pressing the /BAND button (38).<br />
• To erase this program, press the /STOP/FM. MODE button (31) twice. The program will also be erased if<br />
you open the CD door or set the FUNCTION switch (19) to another position.<br />
Note:<br />
• The repeat function can be combined with playing of a program. Read the Repeat function section.<br />
<strong>ProAudio</strong>-<strong>RRMP</strong>-<strong>6911</strong>-IM-DE-EN-V2.indb 34 11/08/2009 1:09 PM
CD-PLAYER<br />
Play MP3-CD<br />
• In the following section the differences in playing an MP3-CD are described.<br />
• Since the MP3-CDs can contain many more tracks, it could take longer until the CD player has read all of<br />
the contents. On the LCD Display (7) the number of directories and the number of tracks are shown.<br />
• If there are folders on a MP3-CD, they will be displays as F01, F02 and so on.<br />
Folder function<br />
• If the MP3-CD contains folders, use the SKIP+10/FOLDER/MEM.SET button (33) to jump to the next folder.<br />
• During playback, press and hold the SKIP+10/FOLDER/MEM.SET button (33). Wait 2 seconds until the<br />
folder number is shown on the display (7), e.g. F02. The first track inside the folder will start playing.<br />
• You can also set this function during stop mode. Press and hold the SKIP+10/FOLDER/MEM.SET<br />
button (33). 01 for the first folder will be shown on the display. Select the desired folder with (37) or<br />
(32). Press /BAND (38) to start playback.<br />
Note:<br />
• When pressing the SKIP+10/FOLDER/MEM.SET button (33) shortly, the device will skip 10 tracks (refer to<br />
section Skip function).<br />
ID3 tag information<br />
• ID3 is a format for certain information about the music in the same file (called metadata). These can be: the<br />
title, singer, album name, year of publication and any desired comment.<br />
• During playback of tracks, the ID3 tag information will be shown on the display (7). If the information is<br />
complete and available on the audio file, you will see this order as cycle text: track, artist, album.<br />
• After the ID3 tag information has been displayed the device will switch the display. It will show the track/<br />
folder number and the playback time for about 5 seconds. Then the display switches back to show the ID3<br />
tag information.<br />
<strong>ProAudio</strong>-<strong>RRMP</strong>-<strong>6911</strong>-IM-DE-EN-V2.indb 35 11/08/2009 1:09 PM<br />
35<br />
ENGLISH
ENGLISH<br />
36<br />
USB STORAGE AND SD/MMC CARDS<br />
• Make sure that the FUNCTION switch (19) on the device is set to position TAPE (OFF). Insert the USB<br />
memory stick into the USB slot (28), and the SD/MMC card into the card slot (29).<br />
• Set the FUNCTION switch (19) on the device to CD.<br />
• If a USB drive and a memory card are connected to the device, press the FUNCTION button (34) repeatedly<br />
in order to switch the operation mode. USB for USB storage or SD for memory cards will be shown on the<br />
display (7).<br />
• The functions for MP3-CDs also apply to USB drives and memory cards. For more information, see chapter<br />
CD-Player.<br />
• Never remove the USB memory or SD/MMC card from the connector when you are just playing a song.<br />
Always stop the current track with the /STOP/FM. MODE button (31).<br />
• Change the operating mode or switch off the device completely before taking the USB memory or the SD/<br />
MMC card carefully out of the connection. This prevents damage of the USB memory, the SD/MMC card and<br />
files.<br />
Notes:<br />
• The USB memory slot (28) can be used with standards 1.1 and 2.0.<br />
• If you are not using the USB slot, always put on the included rubber cover.<br />
• This device only supports USB storage and SD/MMC cards with a capacity of up to 2 GB.<br />
• Due to changing technologies, it may happen that certain USB storage or SD/MMC cards are not compatible<br />
with this device.<br />
• This device does not support USB MP3 players.<br />
• Do not use USB extension cable to connect your USB memory into the USB slot. It can cause interference<br />
which can affect music playback. In extreme cases, the USB memory may be damaged.<br />
<strong>ProAudio</strong>-<strong>RRMP</strong>-<strong>6911</strong>-IM-DE-EN-V2.indb 36 11/08/2009 1:09 PM
CASSETTE RECORDER<br />
Inserting and removing cassette<br />
• Set the FUNCTION switch (19) to TAPE (OFF).<br />
• Open the cassette compartment (13) by pressing the / button (26).<br />
• Tighten the band slightly and insert the cassette with the band to the top. The empty spool should be on the<br />
left.<br />
• Close the cassette compartment until it audibly locks.<br />
• Start play by pressing the button (23).<br />
• Press the button (27) in order to pause playback.<br />
• Stop playback by pressing the / button (26).<br />
• To fast forward or rewind the band, first stop playback by pressing the / button (26). Then press the<br />
buttons (25) or (24).<br />
• Press the / button (26) again in order to open the cassette compartment and remove the cassette.<br />
• Cassettes can be used on both sides. If the cassette is at the end of its play duration, remove the cassette<br />
and turn it 180 degrees on its vertical axis. Insert the cassette again in order to play the other side.<br />
Auto-Stop function<br />
• If the cassette is finished playing, the cassette part automatically switched off. This is also the case for<br />
recording.<br />
Recording onto cassette<br />
• You can record from radio, a CD, USB or SD/MMC memory card. When recording and copying the copyright<br />
should be observed.<br />
• Recording on chrome (IEC II) and metal bands (IEC IV) is not possible. Use only NORMAL (IEC I) bands.<br />
• Insert the cassette which you want to overwrite.<br />
• Press the button (27).<br />
• Press the button (22). The button (23) will be pressed at the same time.<br />
• Select the desired source with the FUNCTION switch (19).<br />
• To record from radio, set the FUNCTION switch (19) to RADIO. Select the desired station with (37) or<br />
(32)<br />
• To record from CD, USB or SD/MMC memory card, set the FUNCTION switch (19) to CD.<br />
• In order to start recording press the button (27) again.<br />
• To interrupt recording press the button (27).<br />
• Press the / button (26) in order to stop recording.<br />
• The recording is not influenced by the set volume.<br />
<strong>ProAudio</strong>-<strong>RRMP</strong>-<strong>6911</strong>-IM-DE-EN-V2.indb 37 11/08/2009 1:09 PM<br />
37<br />
ENGLISH
ENGLISH<br />
38<br />
CASSETTE RECORDER<br />
Erase protection<br />
• You can protect cassettes against accidental deletion or<br />
overwrite by pulling off the backup tab on the upper face<br />
of the cartridge.<br />
• If you want to overwrite the cassette later you can cover<br />
the hole with adhesive tape.<br />
• Keep a large distance between the cassettes and<br />
magnets or electromagnets. They may be in engines as<br />
well as loudspeakers, TVs, amplifiers, power supply units<br />
and transformers in general.<br />
• Do not expose cassettes to high heat, extreme cold or<br />
moisture.<br />
• Keep in its case for protection from dust.<br />
• The longer the time of the cartridge (60, 90, 120 minutes)<br />
the thinner the band, and more sensitive to mechanical<br />
stress.<br />
<strong>ProAudio</strong>-<strong>RRMP</strong>-<strong>6911</strong>-IM-DE-EN-V2.indb 38 11/08/2009 1:09 PM<br />
Fig. 3
Cleaning the cassette deck<br />
• In order to ensure the quality of the recording and playback<br />
of cassette deck, clean parts A, B and C.<br />
• Press the / button (26) in order to open the cassette<br />
compartment.<br />
• Press the button (23) and clean the rubber imprint roll C.<br />
• Press the button (27) and clean the magnetic heads A<br />
and the wave B.<br />
• After cleaning press the / button (26).<br />
Note: For the heads you can also use a special cleaning cassette.<br />
CLEANING AND CARE<br />
Fig. 4<br />
Compact Disc<br />
• Wipe off fingerprints and dust thoroughly with a soft cloth. Wipe from the center to the edge (not circular).<br />
• Clean the disc periodically with a soft, lint-free cloth. Do not use solvents or abrasives.<br />
• Do not write on CDs. Do not put any stickers on it.<br />
• Protect your CDs against dust and scratches. Always keep it, therefore, in its case when not in use.<br />
• Remove the CD from its case by pressing on the middle of the holder and then touching the edges only of<br />
the CD.<br />
Fig. 5<br />
Cleaning the housing<br />
• Pull the plug out of the wall outlet before every cleaning.<br />
• Remove dust with a soft dusting cloth.<br />
• Do not use a wet sponge, wax, spray polishes, or abrasives.<br />
• Caution: No water must reach the housing. If so, unplug the power cord and let the device dry thoroughly<br />
before operating it again. Please do not dry the device in an oven or microwave oven.<br />
<strong>ProAudio</strong>-<strong>RRMP</strong>-<strong>6911</strong>-IM-DE-EN-V2.indb 39 11/08/2009 1:09 PM<br />
39<br />
ENGLISH
ENGLISH<br />
40<br />
TROUBLESHOOTING<br />
If an error occurs, check the table below first, before you contact your dealer or send in the device. The address<br />
and hotline number can be found on the warranty card. Do not open the device and do not try to repair it yourself.<br />
You will lose the warranty claim and it is dangerous! Refer to the warranty conditions on the following pages.<br />
Problem Cause Solution<br />
No sound. The volume is set too low. Set the volume higher.<br />
The display is blank;<br />
no reaction to pressing<br />
buttons.<br />
Poor music quality with<br />
cassette operation.<br />
Recording does not<br />
function.<br />
The CD is skipping<br />
tracks.<br />
The plug is not plugged in correctly. Plug in.<br />
Electrostatic discharge. Switch off device and pull plug. Wait briefly and plug in<br />
again.<br />
Dust and dirt on the head. Cleaning<br />
Incompatible cassette type used. Use only IEC I type cassettes (NORMAL).<br />
It is possible that safety latch has<br />
broken off.<br />
Protection slider on the SD card in<br />
operation.<br />
CD dirty or damaged. Clean or replace CD.<br />
A program is being played. End program playback.<br />
NO DISC is displayed. No CD in CD compartment. Insert a CD.<br />
Before covering hole with adhesive tape, check whether or<br />
not you really want to overwrite this cassette.<br />
Slide the slider into the direction of the connections before<br />
you insert the card.<br />
CD badly scratched or dirty. Use an unscratched and clean CD only.<br />
Laser lens dirty or scuffed. Clean the lens. Leave the device in a dry surrounding for<br />
1-2 hours where the condensation can dry.<br />
CD-R is empty or not “closed’’. Close the CD-R.<br />
CD cannot play. CD badly scratched or dirty. Use an unscratched and clean CD only.<br />
USB / memory card<br />
error.<br />
Laser lens dirty or scuffed. Clean the lens. Leave the device in a dry surrounding for<br />
1-2 hours where the condensation can dry.<br />
Connection error. Remove the memory card / USB and insert it again.<br />
No playable files available. Use a memory card / USB storage with MP3 files.<br />
<strong>ProAudio</strong>-<strong>RRMP</strong>-<strong>6911</strong>-IM-DE-EN-V2.indb 40 11/08/2009 1:09 PM
Power supply AC 230-240V~, 50Hz<br />
TECHNICAL DATA<br />
Battery operation DC 9V 6 x 1,5V batteries, type C/UM-2/LR14 (not included)<br />
Power consumption 15W<br />
Remote control 1 x battery, type CR2025<br />
Laser type Class 1<br />
Loudspeaker 2 x 3-way loudspeakers<br />
Dimensions 240 (W) x 380 (D) x 180 (H) mm<br />
Radio<br />
FM area 87.5 - 108 MHz<br />
AM area 522 - 1620 kHz<br />
Disc drive for 8cm und 12cm diameter; only circular form, no other forms<br />
CD format CD Audio, CD-R, CD-RW<br />
Memory format USB Type 1.1, Type 2.0; SD/MMC memory card<br />
Supported memory size Max. 2 GB<br />
Manufactured for JGC-Company GmbH<br />
Heckhofweg 146<br />
50739 Köln<br />
Customer Service <strong>E2</strong> <strong>Servicecenter</strong> GmbH<br />
Telephone<br />
Monday-Friday,10:00 - 18:00<br />
Please enter the serial number of your<br />
device here:<br />
Max-Planck-Strasse 13<br />
50858 Köln-Marsdorf<br />
01805- 22 17 84<br />
(Euro 0.14/min from German landline; other charges may apply from<br />
mobile phone)<br />
<strong>ProAudio</strong>-<strong>RRMP</strong>-<strong>6911</strong>-IM-DE-EN-V2.indb 41 11/08/2009 1:09 PM<br />
41<br />
ENGLISH
ENGLISH<br />
42<br />
WARRANTY<br />
Customer Info<br />
Manufacturer’s Warranty<br />
Thank you for your purchase of one of our products. We hope you will enjoy using our high-quality<br />
product. Our strict production control ensures the high quality of our devices. However, in the event<br />
that you wish to submit a qualified claim, we grant a<br />
3 years<br />
warranty as of the date of purchase, subject to the following conditions:<br />
This warranty does not affect your statutory warranty claims as consumer toward the seller of the<br />
device. These rights are not affected by our manufacturer‘s warranty. The warranty granted by us<br />
is valid only for domestic use of the device and is limited to the area of the Federal Republic of<br />
Germany.<br />
The warranty term is 3 years as of the date of purchase.<br />
It is within <strong>ProAudio</strong>’s discretion to fulfil the warranty by repair or replacement of the device or<br />
defect component. Other claims are excluded. In case of questions regarding <strong>ProAudio</strong> products<br />
you no longer need to take the time to go to the seller but may call our service hotline or service<br />
center directly. A team of highly qualified product consultants and technicians is available from<br />
Monday through Friday from 10:00 a.m. to 6:00 p.m.<br />
Service Hotline:<br />
O18O5 / 22 17 84 (€ 0,14 per min)<br />
E 2 <strong>Servicecenter</strong> GmbH,<br />
Max-Planck-Strasse 13,<br />
50858 Köln-Marsdorf<br />
www.e2service.de<br />
When mailing your device, please also include a short description of the problem as this will facilitate<br />
handling. Please mail your device, without exception, only to our authorised service partner and use<br />
only the enclosed return coupon. If the return coupon is missing please contact the above service<br />
hotline.<br />
ATTENTION: Mailings that are not pre-paid will not be accepted!<br />
<strong>ProAudio</strong>-<strong>RRMP</strong>-<strong>6911</strong>-IM-DE-EN-V2.indb 42 11/08/2009 1:09 PM<br />
IMPORTANT DOCUMENT! PLEASE STORE FOR 3 YEARS WITH PROOF OF PURCHASE
Customer Info<br />
Manufacturer’s Warranty<br />
Our service partner requires proof of purchase, either as original receipt or cash receipt printed by<br />
the seller to perform warranty repairs. The serial number on the device must also be readable. We<br />
are unable to perform warranty services free of charge without proof of purchase. We recommend<br />
keeping the original packaging in order to ensure safe transport of the device in case of a warranty<br />
claim.<br />
Warranty repairs may be performed exclusively by <strong>E2</strong> <strong>Servicecenter</strong> GmbH or contractual partners<br />
authorised by it. Repairs performed by the customer or other shops void the warranty; a claim for<br />
cost reimbursement does not exist.<br />
The warranty is void or does not cover:<br />
in case of improper use<br />
in case of mechanical damages to the device from outside forces<br />
in case of transportation damages<br />
for wear parts<br />
in case of operating errors and misuse<br />
when placing the device in wet rooms or outdoors<br />
in case of damages resulting from force, war, water, lightning, excess voltage, and other<br />
reasons not within the scope of <strong>ProAudio</strong>’s responsibility.<br />
in case of excessive use, in particular in case of non-domestic use<br />
in case of disregard of the user instructions and installation errors<br />
if the device does not have a technical defect<br />
for transport and travel costs as well as costs incurred by installing and uninstalling the device<br />
The warranty does not include any subsequent liability on our part, in particular no liability for<br />
damages to the device itself or incurred by the loss of the device until the time of repair (e.g.<br />
travel costs, handling costs, etc.). However, this does not limit or exclude our statutory warranty, in<br />
particular pursuant to the Product Liability Act. Also <strong>ProAudio</strong> is not liable for indirect or subsequent<br />
loss of sound recordings (CD / DVD etc.) or similar material, and ancillary equipment of any kind<br />
(power supplies, speakers, etc.).<br />
Any warranty services provided by us do not extend the warranty term of 3 years as of the date of<br />
purchase, also not in terms of possibly exchanged components.<br />
We wish you much joy with your new device and hope that your next one will be another<br />
<strong>ProAudio</strong> product.<br />
WARRANTY<br />
<strong>ProAudio</strong>-<strong>RRMP</strong>-<strong>6911</strong>-IM-DE-EN-V2.indb 43 11/08/2009 1:09 PM<br />
IMPORTANT DOCUMENT! PLEASE STORE FOR 3 YEARS WITH PROOF OF PURCHASE<br />
43<br />
ENGLISH