Bedienungsanleitung Funk-Zwischenstecker-Schaltaktor ... - eQ-3
Bedienungsanleitung Funk-Zwischenstecker-Schaltaktor ... - eQ-3
Bedienungsanleitung Funk-Zwischenstecker-Schaltaktor ... - eQ-3

Erfolgreiche ePaper selbst erstellen
Machen Sie aus Ihren PDF Publikationen ein blätterbares Flipbook mit unserer einzigartigen Google optimierten e-Paper Software.
D<br />
GB<br />
<strong>Bedienungsanleitung</strong><br />
<strong>Funk</strong>-<strong>Zwischenstecker</strong>-<strong>Schaltaktor</strong> 1fach<br />
HM-LC-Sw1-Pl<br />
<strong>Funk</strong>-<strong>Zwischenstecker</strong>-Dimmaktor 1fach<br />
Phasenanschnitt<br />
HM-LC-Dim1L-Pl Seite 4 - 12<br />
Operating Manual<br />
Radio-controlled socket adapter<br />
switch actuator<br />
1-channel HM-LC-Sw1-Pl<br />
Radio-controlled socket adapter<br />
dimming actuator<br />
1-channel leading edge<br />
HM-LC-Dim1L-Pl Page 14 - 22
1. Ausgabe Deutsch 07/ 007<br />
Dokumentation © 007 <strong>eQ</strong>-3 Ltd., Hong Kong<br />
Alle Rechte vorbehalten. Ohne schriftliche Zustimmung des<br />
Herausgebers darf dieses Handbuch auch nicht auszugsweise<br />
in irgendeiner Form reproduziert werden oder unter Verwendung<br />
elektronischer, mechanischer oder chemischer Verfahren vervielfältigt<br />
oder verarbeitet werden.<br />
Es ist möglich, dass das vorliegende Handbuch noch drucktechnische<br />
Mängel oder Druckfehler aufweist. Die Angaben in diesem<br />
Handbuch werden jedoch regelmäßig überprüft und Korrekturen<br />
in der nächsten Ausgabe vorgenommen. Für Fehler technischer<br />
oder drucktechnischer Art und ihre Folgen übernehmen wir keine<br />
Haftung.<br />
Alle Warenzeichen und Schutzrechte werden anerkannt.<br />
Printed in Hong Kong<br />
Änderungen im Sinne des technischen Fortschritts können ohne<br />
Vorankündigung vorgenommen werden.<br />
74799 / V 1.0
1st English edition 07/ 007<br />
Documentation © 007 <strong>eQ</strong>-3 Ltd. Hong Kong<br />
All rights reserved. No parts of this manual may be reproduced or<br />
processed in any form using electronic, mechanical or chemical<br />
processes in part or in full without the prior explicit written<br />
permission of the publisher.It is quite possible that this manual<br />
has printing errors or defects. The details provided in this manual<br />
are checked regularly and corrections are done in the next<br />
edition. We do not assume any liability for technical or printing<br />
errors.<br />
All registered trade marks and copyrights are acknowledged.<br />
Printed in Hong Kong<br />
We reserve the right to make changes due to technical advancements<br />
without prior notice.<br />
74799 / V 1.0<br />
3
Inhaltsverzeichnis<br />
1 Hinweise zu dieser Anleitung . . . . . . . . . . . . . . . . . . . . . . . .5<br />
4<br />
Gefahrenhinweise . . . . . . . . . . . . . . . . . . . . . . . . . . . . . . . . .5<br />
3 <strong>Funk</strong>tion. . . . . . . . . . . . . . . . . . . . . . . . . . . . . . . . . . . . . . . . .6<br />
4 Allgemeine Systeminformation zu HomeMatic . . . . . . . . . .7<br />
5 Allgemeine Hinweise zum <strong>Funk</strong>betrieb . . . . . . . . . . . . . . . .7<br />
6 Inbetriebnahme . . . . . . . . . . . . . . . . . . . . . . . . . . . . . . . . . . .8<br />
6.1 Einfache Bedienfunktionen am Gerät . . . . . . . . . . . . . . . . .8<br />
6. Anlernen. . . . . . . . . . . . . . . . . . . . . . . . . . . . . . . . . . . . . . . . .8<br />
7 Bedienung . . . . . . . . . . . . . . . . . . . . . . . . . . . . . . . . . . . . . . .9<br />
8 Zurücksetzen in den Auslieferungszustand. . . . . . . . . . . . .9<br />
9 Rückmeldungen der Geräte-LED . . . . . . . . . . . . . . . . . . . . .9<br />
9.1 Blinkcodes. . . . . . . . . . . . . . . . . . . . . . . . . . . . . . . . . . . . . . .9<br />
9. Anzeige des Betriebszustandes . . . . . . . . . . . . . . . . . . . . .10<br />
10 Verhalten nach Spannungswiederkehr. . . . . . . . . . . . . . . .10<br />
11 Wartung und Reinigung . . . . . . . . . . . . . . . . . . . . . . . . . . .11<br />
1 Technische Daten . . . . . . . . . . . . . . . . . . . . . . . . . . . . . . . .1
1 Hinweise zu dieser Anleitung<br />
Lesen Sie diese Anleitung sorgfältig, bevor Sie ihre HomeMatic<br />
Komponenten in Betrieb nehmen.<br />
Bewahren Sie die Anleitung zum späteren Nachschlagen auf!<br />
Wenn Sie das Gerät anderen Personen zur Nutzung überlassen,<br />
übergeben Sie auch diese <strong>Bedienungsanleitung</strong>.<br />
Benutzte Symbole:<br />
Achtung! Hier wird auf eine Gefahr hingewiesen.<br />
Hinweis. Dieser Abschnitt enthält zusätzliche wichtige<br />
Informationen!<br />
2 Gefahrenhinweise<br />
Öffnen Sie das Gerät nicht, es enthält keine durch den<br />
Anwender zu wartenden Teile. Das Öffnen des Gerätes<br />
birgt die Gefahr eines Stromschlages.<br />
Betreiben Sie das Gerät nur in Innenräumen und vermeiden Sie<br />
den Einfluss von Feuchtigkeit, Staub sowie Sonnen- oder andere<br />
Wärmebestrahlung.<br />
Belasten Sie die Geräte nur bis zur angegebenen Leistungsgrenze.<br />
Eine Überlastung kann zur Zerstörung des Gerätes, zu einem<br />
Brand oder elektrischen Unfall führen.<br />
Dimmaktor:<br />
Unbedingt auf die angeschlossene Last achten! Der Dimmer ist<br />
nur für Glühlampen und für NV-Halogenlampen mit konventionellen<br />
Trafos geeignet!<br />
Die Geräte sind nicht zum Freischalten geeignet. Die Last ist<br />
nicht galvanisch vom Netz getrennt.<br />
Bei Betrieb mit konventionellen Trafos jeden Trafo entsprechend<br />
Herstellerangabe primärseitig absichern. Nur Sicherheitstransformatoren<br />
nach DIN EN 61558- -6 (VDE 0570 Teil -6) verwenden.<br />
5
3 <strong>Funk</strong>tion<br />
Die Aktoren steuern angeschlossene Verbraucher aufgrund von<br />
empfangenen <strong>Funk</strong>befehlen. Befehle werden ausgesandt durch<br />
Betätigung von Tastern, Fernbedienungen oder über eine Softwareoberfläche.<br />
Zusätzlich ist es möglich Aktoren über angelernte<br />
Sensoren anzusteuern. Die Sensoren senden (wie ein Taster)<br />
beim Eintreten eines Ereignisses einen Befehl. Genaueres dazu<br />
ist der Anleitung des entsprechenden Sensors zu entnehmen.<br />
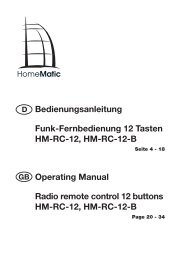
A Geräte-LED<br />
B Kanaltaste<br />
C Sicherungshalter ( nur HM-LC-DimL1-Pl )<br />
6
4 Allgemeine Systeminformation zu<br />
HomeMatic<br />
Dieses Gerät ist Teil des HomeMatic Haussteuersystems und<br />
arbeitet mit dem bidirektionalen BidCoS ® <strong>Funk</strong>protokoll.<br />
Alle Geräte werden mit einer Standardkonfiguration ausgeliefert.<br />
Darüber hinaus ist die <strong>Funk</strong>tion des Gerätes über ein Programmiergerät<br />
und Software konfigurierbar. Welcher weitergehende<br />
<strong>Funk</strong>tionsumfang sich damit ergibt, und welche Zusatzfunktionen<br />
sich im HomeMatic System im Zusammenspiel mit weiteren<br />
Komponenten ergeben, entnehmen Sie bitte der gesonderten<br />
Konfigurationsanleitung oder dem HomeMatic Systemhandbuch.<br />
Alle technischen Dokumente und Updates finden Sie stets aktuell<br />
unter www.HomeMatic.com.<br />
5 Allgemeine Hinweise zum <strong>Funk</strong>betrieb<br />
Die <strong>Funk</strong>-Übertragung wird auf einem nicht exklusiven Übertragungsweg<br />
realisiert weshalb Störungen nicht ausgeschlossen<br />
werden können.<br />
Weitere Störeinflüsse können hervorgerufen werden durch<br />
Schaltvorgänge, Elektromotoren oder defekte Elektrogeräte.<br />
Die Reichweite in Gebäuden kann stark von der im<br />
Freifeld abweichen. Außer der Sendeleistung und den<br />
Empfangseigenschaften der Empfänger spielen Umwelteinflüsse<br />
wie Luftfeuchtigkeit neben baulichen Gegebenheiten<br />
vor Ort eine wichtige Rolle.<br />
Hiermit erklärt die <strong>eQ</strong>-3 Entwicklung GmbH, dass sich dieses<br />
Gerät in Übereinstimmung mit den grundlegenden Anforderungen<br />
und den anderen relevanten Vorschriften der Richtlinie<br />
1999/5/EG befindet.<br />
Die vollständige Konformitätserklärung finden Sie unter<br />
www.HomeMatic.com.<br />
7
6 Inbetriebnahme<br />
6.1 Einfache Bedienfunktionen am Gerät<br />
Über die Kanaltaste können Sie den Aktor sofort bedienen (Anlernen<br />
nicht erforderlich) und die korrekte elektrische Installation<br />
überprüfen. Der Taster verhält sich wie ein AN/AUS Toggle-Taster.<br />
8<br />
Zum Bedienen wird nur der kurze Tastendruck verwendet.<br />
Der lange Tastendruck (länger als 4 Sekunden)<br />
versetzt den Aktor in den Anlernmodus.<br />
6.2 Anlernen<br />
Bitte lesen Sie diesen Abschnitt erst vollständig, bevor sie mit<br />
dem Anlernen beginnen!<br />
Zum Anlernen müssen die beiden zu verknüpfenden Geräte in<br />
den Anlernmodus gebracht werden.<br />
Die Aktoren besitzen keine spezielle Anlerntaste. Zum Anlernen<br />
an den Aktor halten Sie die Kanaltaste für mindestens 4 Sekunden<br />
gedrückt. Dauerhaftes Blinken der Geräte-LED signalisiert<br />
den Anlernmodus.<br />
Wenn kein Anlernen erfolgt, wird der Anlernmodus automatisch<br />
nach 0 Sekunden beendet. Befinden sich andere Geräte im<br />
Anlernmodus, werden diese angelernt.
7 Bedienung<br />
Nach dem Anlernen stehen einfache Bedienfunktionen über die<br />
angelernten Bedienelemente zur Verfügung. Kurzer Tastendruck:<br />
AN/AUS. Beim Dimmer zusätzlich langer Tastendruck: Dimmen.<br />
Dabei ergibt sich folgendes Verhalten:<br />
Taste Verhalten<br />
Kurzer Tastendruck „EIN“-Taste AN<br />
Kurzer Tastendruck „AUS“-Taste AUS<br />
Langer Tastendruck „EIN“-Taste Hoch dimmen<br />
Langer Tastendruck „AUS“-Taste Runter dimmen<br />
8 Zurücksetzen in den<br />
Auslieferungszustand<br />
Um den Aktor in den Auslieferungszustand zurückzusetzen versetzen<br />
Sie das Gerät über die (erste) Kanaltaste in den Anlernmodus<br />
(mindestens 4 Sekunden Taste gedrückt halten). Befindet<br />
sich das Gerät im Anlernmodus, halten Sie erneut die (erste) Kanaltaste<br />
für mindestens 4 Sekunden gedrückt. Schnelles Blinken<br />
der Geräte-LED zeigt das Rücksetzen des Aktors an.<br />
9 Rückmeldungen der Geräte-LED<br />
9.1 Blinkcodes<br />
Verschiedene Zustände des Aktors werden durch Blinken der<br />
Kanal-LED/Kanal-LEDs angezeigt:<br />
Langsames Blinken Anlernmodus<br />
Schnelles Blinken Reset<br />
Einmal lang, n-mal kurz (je nach Fehlerart) Fehler<br />
9
9.2 Anzeige des Betriebszustandes<br />
Sobald der Aktor eingeschaltet ist, leuchtet die Geräte-LED<br />
dauerhaft.<br />
Nach Konfiguration des Aktors über die Zentrale oder über ein<br />
Programmiertool zeigt die Gerät-LED neben den beschriebenen<br />
noch zusätzliche Zustände des Geräts an.<br />
In der Konfigurationsanleitung der Geräte und im Systemhandbuch<br />
wird hierauf näher eingegangen.<br />
10 Verhalten nach Spannungswiederkehr<br />
Nach dem Einschalten der Betriebsspannung (Wiederkehr der<br />
Netzspannung) überprüft der Aktor seine Komponenten. Sollte<br />
dabei ein Fehler festgestellt werden, so wird dieses durch Blinken<br />
der LED dargestellt. Dieses wiederholt sich kontinuierlich<br />
und das Gerät nimmt seine eigentliche <strong>Funk</strong>tion nicht auf.<br />
Sollte der Test ohne Fehler durchlaufen, sendet der Aktor ein<br />
<strong>Funk</strong>telegramm mit seiner Statusinformation aus. Damit bei<br />
Spannungswiederkehr (etwa nach Netzspannungsausfall oder<br />
Abschaltung) nicht alle Aktoren gleichzeitig senden, wartet der<br />
Aktor eine zufällige Verzögerungszeit vor dem Senden. In dieser<br />
Zeit blinkt die Geräte-LED (wie im Anlernmodus). Ist die Verzögerungszeit<br />
sehr kurz, kann es sein, dass das Blinken kaum<br />
wahrnehmbar ist.<br />
10
11 Wartung und Reinigung<br />
Das Produkt ist wartungsfrei. Überlassen Sie eine Reparatur<br />
einer Fachkraft.<br />
Dimmaktor:<br />
Der Dimmer HM-LC-Dim1L-Pl enthält eine interne Gerätesicherung!<br />
Diese Sicherung dient dem Schutz des<br />
Triacs vor zu großer Strombelastung. Sollte das Gerät<br />
überlastet werden und die Sicherung auslösen kann sie ersetzt<br />
werden!<br />
Prüfen Sie vor Wiederinbetriebnahme die Angeschlossene Last<br />
auf einen Defekt!<br />
Sicherung nur durch Sicherungen gleichen Typs<br />
(Feinsicherung 5 x 0 mm, 1, 5 A träge) ersetzen!<br />
11
12 Technische Daten<br />
<strong>Funk</strong>frequenz 868,3 MHz<br />
Typ. Freifeldreichweite: 300 m<br />
Spannungsversorgung: 30 V / 50 Hz<br />
Standby-Verbrauch: 0,5 W<br />
Schutzart: IP 0<br />
Schutzklasse: I<br />
Gehäuse: PBT<br />
Gehäusefarbe: Reinweiß mit silberner Blende<br />
Abmessungen: 1 5 x 63 x 40 mm<br />
(H x B x T, ohne Stecker)<br />
Dimmer:<br />
Anschlussleistung: 5- 50 VA<br />
<strong>Schaltaktor</strong>:<br />
Relais: Schließer<br />
Schaltvermögen: 16 A (ohmsche Last)<br />
Entsorgungshinweis<br />
Gerät nicht im Hausmüll entsorgen! Elektronische Geräte<br />
sind entsprechend der Richtlinie über Elektro- und Elektronik-Altgeräte<br />
über die örtlichen Sammelstellen<br />
für Elektronik-Altgeräte zu entsorgen.<br />
Das CE-Zeichen ist ein Freiverkehrszeichen, das sich<br />
ausschließlich an die Behörden wendet und keine Zusicherung<br />
von Eigenschaften beinhaltet.<br />
1
Table of Contents<br />
1 Information concerning these instructions . . . . . . . . . . . .15<br />
14<br />
Hazard information . . . . . . . . . . . . . . . . . . . . . . . . . . . . . . .15<br />
3 Function. . . . . . . . . . . . . . . . . . . . . . . . . . . . . . . . . . . . . . . .16<br />
4 General system information on HomeMatic . . . . . . . . . . .17<br />
5 General information on radio operation . . . . . . . . . . . . . . .17<br />
6 Start up . . . . . . . . . . . . . . . . . . . . . . . . . . . . . . . . . . . . . . . .18<br />
6.1 Simple operating functions on the device . . . . . . . . . . . . .18<br />
6. Teaching . . . . . . . . . . . . . . . . . . . . . . . . . . . . . . . . . . . . . . .18<br />
7 Operation. . . . . . . . . . . . . . . . . . . . . . . . . . . . . . . . . . . . . . .19<br />
8 Resetting to factory status . . . . . . . . . . . . . . . . . . . . . . . . .19<br />
9 Device LED feedback messages . . . . . . . . . . . . . . . . . . . .19<br />
9.1 Flash codes . . . . . . . . . . . . . . . . . . . . . . . . . . . . . . . . . . . . .19<br />
9. Operational status display . . . . . . . . . . . . . . . . . . . . . . . . . 0<br />
10 Behavior after power restoration . . . . . . . . . . . . . . . . . . . . 0<br />
11 Maintenance and cleaning . . . . . . . . . . . . . . . . . . . . . . . . . 1<br />
1 Technical specifications . . . . . . . . . . . . . . . . . . . . . . . . . . .
1 Information concerning these instructions<br />
Read these instructions carefully before beginning operation with<br />
your HomeMatic components.<br />
Keep the instructions handy for later consultation!<br />
Please hand-over the operating manual as well when you handover<br />
the device to other persons for use.<br />
Symbols used:<br />
Attention! This indicates a hazard.<br />
Note. This section contains additional important information!<br />
2 Hazard information<br />
Do not open the device. It does not contain any parts<br />
to be maintained by the user. There is a risk of electrical<br />
shock by opening the device.<br />
This device is to be operated indoors only and keep away from<br />
the influences of humidity, dust and sunshine or other radiating<br />
heat sources.<br />
Load the devices to the specified limits only. An overload can<br />
cause destroy the device, cause fires or electrical accidents.<br />
Dimming actuator:<br />
Make sure to observe the applied load! The dimmer is only suitable<br />
for light bulbs and for low voltage NV halogen lamps with<br />
conventional transformers!<br />
The devices are not intended to be isolated. The load is not electrically<br />
isolated from the mains.<br />
Fuse every transformer on the primary side according to the<br />
manufacturer's specifications when working with conventional<br />
transformers. Use only safety transformers that conform with DIN<br />
EN 61558- -6 (VDE 0570 part -6).<br />
15
3 Function<br />
The actuators control connected consumers based on the radio<br />
commands received. Commands are sent out by actuating buttons,<br />
remote operations or from a software interface. In addition,<br />
it is possible to control actuators with sensors that are taught.<br />
The sensors send (like a button) a command when an event<br />
occurs. More information is provided in the instructions for the<br />
respective sensor.<br />
A Device LED<br />
B Channel button<br />
C Fuse holder (only HM-LC-DimL1-PI)<br />
16
4 General system information on<br />
HomeMatic<br />
This device is a part of the HomeMatic home control system and<br />
works with the bidirectional BidCoS® wireless protocol.<br />
All devices are delivered in a standard configuration. The<br />
functionality of the device can also be configured with a<br />
programming device and software.<br />
Further resulting functionality and the additional functions provided<br />
in the HomeMatic system combined with other components<br />
are described in the separate Configuration Instructions and in<br />
the HomeMatic System Manual.<br />
All current technical documents and updates are provided under<br />
www.HomeMatic.com.<br />
5 General information on radio operation<br />
The radio transmission is on a non-exclusive transmission path<br />
which means that there is a possibility of interference occurring.<br />
Other interfering sources can be caused by switching operations,<br />
electrical motors or defective electrical devices.<br />
The range of transmission within buildings can greatly<br />
deviate from open air distances. Besides the transmitting<br />
power and the reception characteristics of the receiver,<br />
environmental influences such as humidity in the vicinity and<br />
local structures also play an important role.<br />
Hereby <strong>eQ</strong>-3 Entwicklung GmbH, declares that this device<br />
conforms with the essential requirements and other relevant<br />
regulations of Directive 1999/5/EC.<br />
The full declaration of conformity is provided under<br />
www.HomeMatic.com.<br />
17
6 Start up<br />
6.1 Simple operating functions on the device<br />
You can operate the actuator immediately with the channel<br />
button (teaching is not required) and check for correct electrical<br />
installation. The button is used like an ON/OFF toggle switch.<br />
18<br />
Only the brief button press is used for operation. The<br />
longer button press (longer than 4 seconds) switches the<br />
actuator to teach mode.<br />
6.2 Teaching<br />
Please read this section completely before starting with any<br />
teaching!<br />
Both devices to be connected are set to teach mode for teaching.<br />
The actuators have no special teach button. Hold the channel<br />
button on the actuator for at least 4 seconds for teaching. Teach<br />
mode is indicated by the device LED flashing continuously.<br />
If no teaching occurs, teach mode is automatically ended after<br />
0 seconds. If other devices are in teach mode, these are taught.
7 Operation<br />
After teaching, simple operating functions are available using<br />
the taught control elements. Brief press of the button: ON/OFF.<br />
Additional long button press for dimming: Dim.<br />
The following behavior results in this case:<br />
Button Behavior<br />
Brief button press "ON" button ON<br />
Brief button press "OFF" button OFF<br />
Long button press "ON" button Brighter<br />
Long button press "OFF" button Darker<br />
8 Resetting to factory status<br />
In order to reset the actuator to factory status, switch the device<br />
to teach mode with the (first) channel button (hold button<br />
pressed for at least 4 seconds). If the device is in teach mode,<br />
hold the (first) channel button pressed down for at least 4 seconds.<br />
The actuator reset is indicated by the device LED flashing<br />
quickly.<br />
9 Device LED feedback messages<br />
9.1 Flash codes<br />
Different actuator states are indicated by the channel LED/channel<br />
LEDs flashing:<br />
Slow flashing Teach mode<br />
Fast flashing Reset<br />
One long, x-short (depends on the type of<br />
error)<br />
Error<br />
19
9.2 Operational status display<br />
As soon as the actuator is switched on, the device LED is illuminated<br />
continually.<br />
After configuring the actuator with the center or a programming<br />
tool, the device LED indicates other device states besides those<br />
described.<br />
More relevant information is provided in the configuration instructions<br />
for the devices and in the system manual.<br />
10 Behavior after power restoration<br />
After switching the operating voltage on (mains voltage returned),<br />
the actuator checks the respective components. If an error<br />
is detected during this test, it is indicated by a flashing LED. This<br />
is repeated continually and the device starts to work with the<br />
respective functionality.<br />
If the test runs without any errors, the actuator sends a radio telegram<br />
with the respective status information. The actuator waits<br />
a random delay time before sending so that all actuators are not<br />
sending at the same time when the power returns (after a power<br />
outage or shut-down). During this time, the device LED flashes<br />
(like in teach mode). If the delay time is short, the flashing may<br />
not even be noticeable.<br />
0
11 Maintenance and cleaning<br />
This product is maintenance-free. Repairs are only to be done by<br />
trained professionals.<br />
Dimming actuator:<br />
The dimmer HM-LC-Dim1L-Pl has an internal device<br />
fuse! This fuse protects the Triac from greater current<br />
load. If the device becomes overloaded and the fuse is<br />
blown, it can be replaced!<br />
Test the connected load for a defect before putting back into<br />
operation!<br />
Replace fuses with same type fuses only (micro-fuse 5 x<br />
0 mm, 1. 5 A slow)!<br />
1
12 Technical specifications<br />
Radio frequency 868.3 MHz<br />
Typ. outdoor range: 300 m<br />
Power supply: 30 V / 50 Hz<br />
Standby consumption: 0.5 W<br />
Protection type: IP 0<br />
Protection class: I<br />
Housing: PBT<br />
Housing color: Pure white with silver faceplate<br />
Dimensions: 1 5 x 63 x 40 mm<br />
(H x W x D, without plug)<br />
Dimmer:<br />
Connection power: 5- 50 VA<br />
Switching actuator:<br />
Relay: Normally open<br />
Switching capacity: 16 A (resistive load)<br />
Instructions for disposal<br />
Do not dispose off the device as part of household<br />
garbage!<br />
Electronic devices are to be disposed of in accordance<br />
with the guidelines concerning electrical and electronic devices<br />
via the local collection point for old electronic devices.<br />
The CE sign is a free trade sign addressed exclusively to<br />
the authorities and does not include any warranty of any<br />
properties.
<strong>eQ</strong>-3 AG<br />
Maiburger Straße 9<br />
D- 6789 Leer<br />
www.<strong>eQ</strong>-3.com