

How to Create a Digital Story Using Photo Story - GoNorth ...
How to Create a Digital Story Using Photo Story - GoNorth ...
How to Create a Digital Story Using Photo Story - GoNorth ...

You also want an ePaper? Increase the reach of your titles
YUMPU automatically turns print PDFs into web optimized ePapers that Google loves.
Getting started:<br />
<strong>How</strong> <strong>to</strong> <strong>Create</strong> a <strong>Digital</strong> S<strong>to</strong>ry <strong>Using</strong> Pho<strong>to</strong> S<strong>to</strong>ry<br />
• Download the free software* from http://www.microsoft.com/downloads/details.aspx?FamilyID=92755126-a008-49b3-<br />
b3f4-6f33852af9c1&DisplayLang=en (or just visit www.microsoft.com + downloads) *This program only works with Microsoft XP<br />
• If you want <strong>to</strong> add narration or other sounds, make sure you have a working microphone attached <strong>to</strong> your computer<br />
Collect pho<strong>to</strong>s:<br />
• Use a scanner <strong>to</strong> scan printed pho<strong>to</strong>graphs<br />
• Take pho<strong>to</strong>s using a digital camera<br />
• To use images from <strong>GoNorth</strong>!, visit www.polarhusky.com<br />
• To copy, right-click your mouse over the image, choosing Save Image As<br />
• Save your graphics in a folder that is easy <strong>to</strong> find<br />
• You can also find free pho<strong>to</strong>s at http://office.microsoft.com/en-us/clipart/default.aspx?lc=en-us<br />
Collect sounds:<br />
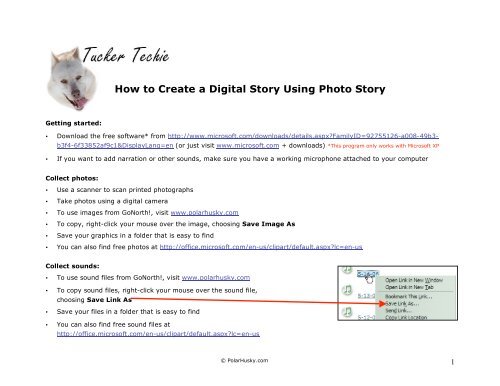
• To use sound files from <strong>GoNorth</strong>!, visit www.polarhusky.com<br />
• To copy sound files, right-click your mouse over the sound file,<br />
choosing Save Link As<br />
• Save your files in a folder that is easy <strong>to</strong> find<br />
• You can also find free sound files at<br />
http://office.microsoft.com/en-us/clipart/default.aspx?lc=en-us<br />
© PolarHusky.com 1
Begin presentation:<br />
• Open the Pho<strong>to</strong> S<strong>to</strong>ry program from your computer’s Start Menu<br />
• Choose Begin a new s<strong>to</strong>ry and Next<br />
Add pho<strong>to</strong>s:<br />
• From the Import and Arrange window, click on Import Pictures<br />
<strong>to</strong> navigate <strong>to</strong> your saved graphics folder<br />
• Hold down the CTRL key on your keyboard with your left pinky finger<br />
(keep holding it down!)<br />
• While holding down the CTRL key, use your mouse <strong>to</strong> click on multiple<br />
pictures <strong>to</strong> import<br />
• Once you have selected all the pictures you want <strong>to</strong> import (you can let<br />
go of the CTRL key now), click OK<br />
• You will see all your pictures in a small filmstrip format at the bot<strong>to</strong>m<br />
of the Import and Arrange window—this is a timeline showing the current<br />
order in which your pictures will display<br />
• To rearrange the order of your pho<strong>to</strong>s in this timeline, click and drag an<br />
image you want <strong>to</strong> move—release your mouse but<strong>to</strong>n <strong>to</strong> drop the picture <strong>to</strong><br />
its new position<br />
• You can also use the Arrange But<strong>to</strong>ns <strong>to</strong> rearrange pho<strong>to</strong>s:<br />
Click once on a picture you want <strong>to</strong> move (it will highlight in<br />
blue), then click the left and right arrows until your image<br />
is in the correct position<br />
(Careful! The X but<strong>to</strong>n will delete your picture!)<br />
© PolarHusky.com 2
Edit pho<strong>to</strong>s:<br />
• To edit a picture, click it once in the film strip—<br />
it will highlight in blue and appear in your main<br />
window (use the arrow but<strong>to</strong>ns <strong>to</strong> navigate<br />
through them all)<br />
• There are several ways <strong>to</strong> edit your pho<strong>to</strong>:<br />
Correct<br />
Color<br />
Levels<br />
Correct<br />
Red<br />
Eye<br />
• Choose any of these options <strong>to</strong> au<strong>to</strong>matically<br />
adjust your picture<br />
Rotate Edit<br />
• To undo any of your edits, simply click the same<br />
editing but<strong>to</strong>n again and your image will go back <strong>to</strong> its original format<br />
• If any of your pho<strong>to</strong>s have a black border, you can remove this by clicking on Remove Black Borders<br />
o Pho<strong>to</strong> S<strong>to</strong>ry will analyze your pictures <strong>to</strong> see if it can effectively remove the black borders<br />
o If you are happy with how your pictures will change (a before and after preview will be provided for each pho<strong>to</strong>),<br />
choose Yes (<strong>to</strong> edit pho<strong>to</strong>s one at a time) or Yes <strong>to</strong> All (<strong>to</strong> edit pho<strong>to</strong>s all at once)<br />
o To cancel the removal of black borders and keep your picture in its original format, click No or click Cancel <strong>to</strong> s<strong>to</strong>p black<br />
border editing completely<br />
o The pho<strong>to</strong>s that have had their black borders removed will have this small<br />
pencil and paper icon appearing below them in the film strip view:<br />
© PolarHusky.com 3
• The Edit but<strong>to</strong>n will open an Edit Picture window that has more editing options:<br />
• Under the Rotate and Crop tab:<br />
o Use the Rotate but<strong>to</strong>ns <strong>to</strong> turn a picture clockwise or counter-clockwise<br />
o To remove unwanted parts of a picture, check the crop box <strong>to</strong> activate a cropping border—move the crop box by clicking<br />
and dragging it in the middle, or resize the crop borders by click and dragging the edges<br />
o Click Save <strong>to</strong> keep your changes or Reset <strong>to</strong> go back <strong>to</strong> your original, unedited picture<br />
• Under the Au<strong>to</strong> Fix tab:<br />
o To au<strong>to</strong>-correct contrast, color levels, and red-eye—click the On or Off but<strong>to</strong>ns <strong>to</strong> see how the image will change<br />
o Click Save <strong>to</strong> keep your changes or Reset <strong>to</strong> go back <strong>to</strong> your original, unedited picture<br />
• Under the Add Effect tab:<br />
o Use your mouse <strong>to</strong> activate the special effects drop-down menu—click on an effect <strong>to</strong> see how the picture will change<br />
o Click Save <strong>to</strong> keep your changes or Reset <strong>to</strong> go back <strong>to</strong> your original, unedited picture<br />
© PolarHusky.com 4
Add titles:<br />
• When you have finished editing your pho<strong>to</strong>s, click Next <strong>to</strong> add titles <strong>to</strong> your pictures<br />
• Click once on a pho<strong>to</strong> <strong>to</strong> select it<br />
(highlighting it in blue)<br />
• Type the title of your image—you will<br />
see it appear on <strong>to</strong>p of your pho<strong>to</strong><br />
• Use the text formatting boxes <strong>to</strong><br />
change how your title will look<br />
© PolarHusky.com 5
Record narration:<br />
• To configure your microphone and set the recording volume, click on the microphone icon:<br />
A wizard will test your sound hardware <strong>to</strong> make sure it can record your voice and play sounds—just follow the instructions<br />
• Click on the slide you want <strong>to</strong> add narration <strong>to</strong>—it will highlight in blue and appear in your main window<br />
• Add any talking notes for<br />
yourself in the Type<br />
Notes Here work box<br />
• To record, push the<br />
red circle but<strong>to</strong>n:<br />
• To s<strong>to</strong>p recording,<br />
push the blue<br />
square but<strong>to</strong>n:<br />
• To delete your<br />
narration, click<br />
this but<strong>to</strong>n:<br />
• The recording length will display in seconds<br />
• Click the next slide you want <strong>to</strong> add narration <strong>to</strong><br />
• When you are done adding narration <strong>to</strong> your<br />
chosen slides, check out your Pho<strong>to</strong> S<strong>to</strong>ry by<br />
clicking the Preview but<strong>to</strong>n<br />
• Here you will be able <strong>to</strong> watch and listen <strong>to</strong> your<br />
new Pho<strong>to</strong> S<strong>to</strong>ry—use the pause, s<strong>to</strong>p, rewind and<br />
fast-<br />
forward<br />
controllers<br />
as you<br />
need<br />
• When<br />
you’re<br />
done<br />
reviewing,<br />
click Next<br />
<strong>to</strong> continue<br />
© PolarHusky.com 6
Cus<strong>to</strong>mize motion:<br />
• Clicking on the Cus<strong>to</strong>mize Motion but<strong>to</strong>n will allow you <strong>to</strong> cus<strong>to</strong>mize motion, duration, and transition<br />
• Do nothing and your picture will appear for an au<strong>to</strong>matic amount of time<br />
• Or, you can specify how long you want the picture <strong>to</strong> show by editing the seconds box<br />
• Click Preview <strong>to</strong> see how your s<strong>to</strong>ry will look<br />
• Click on the Transition tab <strong>to</strong> experiment with different transitions for you pictures as they play during your Pho<strong>to</strong> S<strong>to</strong>ry<br />
• You can also specify how long you want the transition <strong>to</strong> take by editing the seconds box<br />
• Click Preview <strong>to</strong> see how your s<strong>to</strong>ry will look<br />
• When you are happy with your changes <strong>to</strong> a picture, click Save<br />
• Repeat these steps <strong>to</strong> cus<strong>to</strong>mize other pictures in your s<strong>to</strong>ry<br />
Add music:<br />
• You can add background music <strong>to</strong> a set of pictures—using the film strip, click once <strong>to</strong> select the picture where you want the<br />
music <strong>to</strong> start playing (it will highlight in blue)<br />
• Click Select Music and navigate <strong>to</strong> your saved sounds folder<br />
• Double-click on the music you want <strong>to</strong> include in your project<br />
• Click the Preview but<strong>to</strong>n <strong>to</strong> watch and listen <strong>to</strong> your Pho<strong>to</strong> S<strong>to</strong>ry complete with pictures, titles, narration, and music<br />
• Use the pause, s<strong>to</strong>p, rewind and fast-forward controllers as you need<br />
• Choose Delete Music <strong>to</strong> leave the music out<br />
• When you’re done adding music, click Next <strong>to</strong> continue<br />
© PolarHusky.com 7
Save your s<strong>to</strong>ry:<br />
• For the purposes of submitting your Pho<strong>to</strong> S<strong>to</strong>ry <strong>to</strong><br />
the Collaboration Zone, choose the first saving<br />
option:<br />
Save your s<strong>to</strong>ry for playback on your computer<br />
• Save your s<strong>to</strong>ry in a folder that is easy <strong>to</strong> find<br />
• Click Next—Pho<strong>to</strong> S<strong>to</strong>ry will build your s<strong>to</strong>ry<br />
for sharing<br />
• Upload your new Pho<strong>to</strong> S<strong>to</strong>ry digital s<strong>to</strong>ry <strong>to</strong> the<br />
Collaboration Zone<br />
© PolarHusky.com 8