3615 layout Dealer 500701 - Mantis
3615 layout Dealer 500701 - Mantis
3615 layout Dealer 500701 - Mantis

You also want an ePaper? Increase the reach of your titles
YUMPU automatically turns print PDFs into web optimized ePapers that Google loves.
SECTION 3 - ASSEMBLY OF SPRAYPARTNER (continued)<br />
Step 2b: Install the tractor hitch (for Model 7455.) Continued<br />
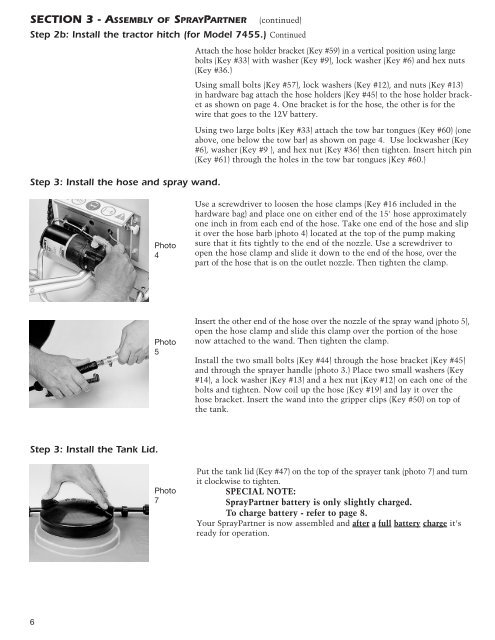
Step 3: Install the hose and spray wand.<br />
Step 3: Install the Tank Lid.<br />
6<br />
Photo<br />
4<br />
Photo<br />
5<br />
Photo<br />
7<br />
Attach the hose holder bracket (Key #59) in a vertical position using large<br />
bolts (Key #33) with washer (Key #9), lock washer (Key #6) and hex nuts<br />
(Key #36.)<br />
Using small bolts (Key #57), lock washers (Key #12), and nuts (Key #13)<br />
in hardware bag attach the hose holders (Key #45) to the hose holder bracket<br />
as shown on page 4. One bracket is for the hose, the other is for the<br />
wire that goes to the 12V battery.<br />
Using two large bolts (Key #33) attach the tow bar tongues (Key #60) (one<br />
above, one below the tow bar) as shown on page 4. Use lockwasher (Key<br />
#6), washer (Key #9 ), and hex nut (Key #36) then tighten. Insert hitch pin<br />
(Key #61) through the holes in the tow bar tongues (Key #60.)<br />
Use a screwdriver to loosen the hose clamps (Key #16 included in the<br />
hardware bag) and place one on either end of the 15' hose approximately<br />
one inch in from each end of the hose. Take one end of the hose and slip<br />
it over the hose barb (photo 4) located at the top of the pump making<br />
sure that it fits tightly to the end of the nozzle. Use a screwdriver to<br />
open the hose clamp and slide it down to the end of the hose, over the<br />
part of the hose that is on the outlet nozzle. Then tighten the clamp.<br />
Insert the other end of the hose over the nozzle of the spray wand (photo 5),<br />
open the hose clamp and slide this clamp over the portion of the hose<br />
now attached to the wand. Then tighten the clamp.<br />
Install the two small bolts (Key #44) through the hose bracket (Key #45)<br />
and through the sprayer handle (photo 3.) Place two small washers (Key<br />
#14), a lock washer (Key #13) and a hex nut (Key #12) on each one of the<br />
bolts and tighten. Now coil up the hose (Key #19) and lay it over the<br />
hose bracket. Insert the wand into the gripper clips (Key #50) on top of<br />
the tank.<br />
Put the tank lid (Key #47) on the top of the sprayer tank (photo 7) and turn<br />
it clockwise to tighten.<br />
SPECIAL NOTE:<br />
SprayPartner battery is only slightly charged.<br />
To charge battery - refer to page 8.<br />
Your SprayPartner is now assembled and after a full battery charge it’s<br />
ready for operation.