3615 layout Dealer 500701 - Mantis
3615 layout Dealer 500701 - Mantis
3615 layout Dealer 500701 - Mantis
Create successful ePaper yourself
Turn your PDF publications into a flip-book with our unique Google optimized e-Paper software.
Congratulations!<br />
®<br />
OWNERS MANUAL<br />
Complete Assembly and Operating Instructions<br />
for Model 7444 and Model 7455 (Tractor Model)<br />
You have purchased a fine piece of<br />
gardening equipment, which, given<br />
proper care, should last for many<br />
years.<br />
Additional attachments can be purchased<br />
through your local authorized<br />
<strong>Mantis</strong> dealer. Optional accessories<br />
can make your SprayPartner even<br />
more useful and time-saving.<br />
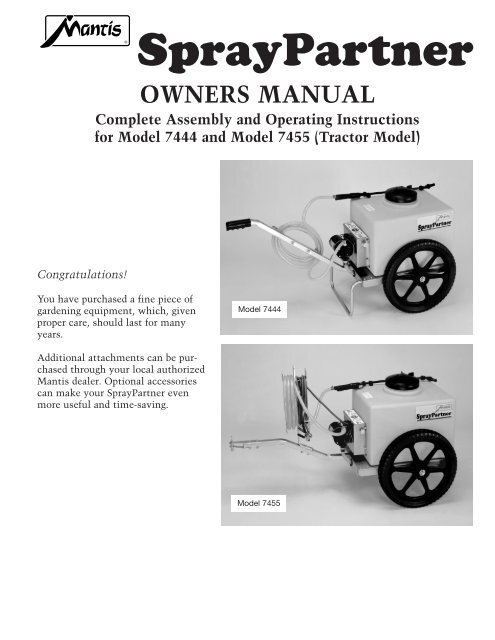
Model 7444<br />
Model 7455
2<br />
TABLE OF CONTENTS<br />
SECTION 1: Warnings & Decals . . . . . . . . . . . . . . . . . . . . . . . . . . . page 3<br />
SECTION 2: Tools Required for Assembly & Contents . . . . . . . . page 4<br />
SECTION 3: SprayPartner Assembly . . . . . . . . . . . . . . . . . . . . . . . pages 5-6<br />
SECTION 4: Operating Instructions . . . . . . . . . . . . . . . . . . . . . . . . page 7<br />
SECTION 5: Recommended Options (Accessories) . . . . . . . . . . . . page 8<br />
SECTION 6: Charging the Battery . . . . . . . . . . . . . . . . . . . . . . . . . . page 8<br />
SECTION 7: Maintenance of SprayPartner . . . . . . . . . . . . . . . . . . page 9<br />
SECTION 8: Parts List for Flojet Pump . . . . . . . . . . . . . . . . . . . . . . page 9<br />
SECTION 9: Parts List for SprayPartner . . . . . . . . . . . . . . . . . . . . . page 10<br />
SECTION 10: Warranty Statement . . . . . . . . . . . . . . . . . . . . . . . . . . Back Cover<br />
Important:<br />
PLEASE TEST YOUR NEW SPRAYPARTNER WITH WATER<br />
If you have any questions about your SprayPartner,<br />
please contact your local authorized <strong>Mantis</strong> dealer<br />
! WARNING • DANGER !<br />
ATTENTION: THIS SYMBOL POINTS OUT OUR IMPORTANT<br />
SAFETY INSTRUCTIONS.<br />
WHEN YOU SEE THIS SYMBOL,<br />
HEED IT’S WARNING! STAY ALERT!<br />
! WARNING • DANGER !<br />
IMPROPER USE OR CARE OF THIS SPRAYER OR FAILURE TO WEAR<br />
PROPER PROTECTION CAN RESULT IN SERIOUS INJURY.<br />
READ AND UNDERSTAND THE RULES FOR SAFE OPERATION AND ALL<br />
INSTRUCTIONS IN THIS MANUAL.<br />
!<br />
ALWAYS WEAR EYE PROTECTION.<br />
WARNING • DANGER<br />
READ AND UNDERSTAND THE WARNINGS, APPLICATIONS, AND USE OF<br />
ANY PRODUCT THAT YOU WISH TO SPRAY.<br />
MANTIS ASSUMES NO RESPONSIBILITY FOR YOUR SPRAYING<br />
PRODUCTS AND THEIR EFFECTS.<br />
!<br />
!
SECTION 1 -<br />
Do’s<br />
! WARNINGS !<br />
A). Read and understand Owners Manual BEFORE using the SprayPartner<br />
B). Always read and follow instructions before servicing your SprayPartner.<br />
C). Always wear eye protection.<br />
D). Always inspect your unit before each use and ensure that all handles, hoses, and hose<br />
connections are secure, operating and in place.<br />
E). Always maintain a firm footing and good balance.<br />
F). Always clean sprayer with water after each use. Do not let chemicals sit in sprayer.<br />
G). Always dress properly. Wear non-skid shoes to ensure secure and proper footing.<br />
H). Always, when spraying, keep area clear of children, pets, and bystanders.<br />
I). Always stay alert. Watch what you are doing and use common sense. Do not operate<br />
unit when fatigued.<br />
J). Keep bystanders at least 10M (30 ft.) away.<br />
Don'ts<br />
A). Do not attempt to pull the sprayer by its hose. It might come loose and cause injury.<br />
B). Do not operate in high winds.<br />
C). Do not over-reach while operating the sprayer.<br />
D). Never direct the spray at any part of the human body or severe injury may result.<br />
E). Don’t drop spray wand to the ground. Dirt may clog the tip. You may also accidentally<br />
hit the trigger and spray an area unintentionally.<br />
F). Do not use flammable or explosive liquids in the Spraypartner.<br />
DECALS<br />
An important part of the safety system incorporated in this SprayPartner are the warning<br />
and information decals found on various parts of the SprayPartner. These decals must be<br />
replaced in time due to abrasion, chemicals, etc. It is your responsibility to replace these<br />
decals when they become hard to read or understand. The location and part numbers<br />
(P/N) of these decals are illustrated on page 10.<br />
P/N M9420<br />
10 M<br />
P/N M9421<br />
3
SECTION 2 - TOOLS REQUIRED FOR ASSEMBLY AND CONTENTS<br />
The only tools you<br />
will need for assembly<br />
are a slotted and a<br />
phillips screwdriver, a<br />
7/16 inch open-end<br />
box wrench or an<br />
adjustable-end<br />
wrench, and a pair of<br />
pliers (or vise-grips).<br />
CHECK YOUR<br />
PARTS;<br />
Your <strong>Mantis</strong><br />
SprayPartner is packaged<br />
with the tank<br />
detached from the<br />
wheels, stand, handle<br />
and spray wand.<br />
Optional accessories<br />
are also separately<br />
packaged. Pressure<br />
hose, hardware bag,<br />
charger, and hose<br />
bracket are packed in<br />
the tank.<br />
4<br />
25<br />
19<br />
Spread out all of the parts on the floor. Make sure that you have:<br />
Description Qty. Key No.<br />
Wheels 2 39<br />
15 ft. Pressure Hose 1 19<br />
Axle 1 41<br />
Tank Assembly 1 49<br />
Hose Holder 1 45<br />
Handle w/grip * 1 43<br />
Spray Wand Assembly 1 25<br />
Front Stand * 1 37<br />
KEY # PART # QTY DESCRIPTION<br />
6 396 6 1/4 Lockwasher<br />
9 328 6 1/4 Flat Washer<br />
12 M9788 2 10-32 Nut<br />
13 M9460 2 #10 Lockwasher<br />
33 M9484 6 1/4-20 x 1 1/2 PHMS<br />
36 175B 6 1/4-20 Nut<br />
45 M9495 2 Hose/Wire Holder<br />
57 M9494 2 #10-32 x 3/4 PHMS<br />
58 M9697 1 Tow Bar<br />
59 M9698 1 Hose/Wire Holder Bracket<br />
60 M9699 2 Tow Bar Tongue<br />
61 M9769 1 Hitch Pin<br />
49<br />
Assemblies include other attached parts<br />
Also included with the SprayPartner is a battery charger.<br />
Hardware Bag for Model 7444<br />
includes:<br />
Description Qty. Key No.<br />
1/4 Lock washer 6 6<br />
1/4 Flat washer 6 9<br />
10-32 nut 2 12<br />
#10 Lock washer 2 13<br />
Hose clamp 2 16<br />
1/4-20 x 1 1/2 HHCS 6 33<br />
1/4-20 nuts 5 36<br />
1/8 x 1 Cotter pin 2 42<br />
10-32 x 1 1/2 PHMS 2 44<br />
* Not included if you purchased SprayPartner Tractor Model 7455. See below for<br />
additional parts that come with the tractor model 7455 For complete description of parts<br />
list and drawings, see page 10.<br />
ADDITIONAL PARTS FOR THE SPRAYPARTNER TOWABLE MODEL 7455 ONLY<br />
60<br />
61<br />
9<br />
6<br />
36<br />
33<br />
37<br />
57<br />
58<br />
59<br />
45 45<br />
13 12<br />
36<br />
9<br />
6<br />
9<br />
6<br />
36<br />
33<br />
45<br />
33<br />
39<br />
41<br />
43
SECTION 3 - ASSEMBLY OF SPRAYPARTNER<br />
(Key #’s referenced from page 10)<br />
Step 1: Install wheels and axle. Turn the tank upside down and insert the axle through the bottom of the<br />
metal frame. Slide one of the wheels onto each side of the axle. Insert the<br />
cotter pins into the holes in the ends of the axle and spread the pins to<br />
keep the wheels affixed on the axle.<br />
STOP - If you purchased a SprayPartner Tractor Model 7455, DO NOT do Step 2a. Proceed with Step 2b.<br />
Step 2a: Install the support stand and handle. (Omit step 2a if you are going to install Optional Tractor Hitch)<br />
Photo<br />
1<br />
Photo<br />
2<br />
Photo<br />
3<br />
With tank upside down (photo 1), insert the stand with the curve facing<br />
up. Install the front stand (Key #37) through the openings in the front of<br />
the frame and line up the holes through the frame with the holes that are<br />
in the support stand. Insert the large bolts (Key #33) with flat washers<br />
(Key #9) through the frame and into the support stand. Add lock washer<br />
(Key #6) and a hex nut (Key #36) into each one of the openings (leave all<br />
the hex nuts loose for now, making sure that all the bolts line up with<br />
the holes. This will be an easier process when the nuts are loose). When<br />
finished, tighten all bolts for the front stand.<br />
Insert the sprayer handle (Key #43) with the end that has holes drilled in<br />
it into the slot on the front of the sprayer frame (Key #35) (photo 2.)<br />
Make sure the handle is angled toward the top of the tank. Line up the<br />
holes on the frame with those on the handle. Insert a large bolt (Key #33)<br />
through the frame and into the handle. Add a washer (Key #9), lock washer<br />
(Key #6), and a hex nut (Key #36). These can be finger tightened.<br />
Next, take the last of the large bolts (Key #33), a large washer (Key #9),<br />
and lock washer (Key #6). Put the bolt through the handle (photo 3) and<br />
the frame plate. Turn it into the nut which is fixed at the bottom of the<br />
sprayer tank (photo 2.) Tighten this and the other nut that is holding the<br />
handle onto the tank and the frame. Now turn the sprayer over (right<br />
side up) and set it on its wheels.<br />
Step 2b: Install the tractor hitch. (Omit step 2b if you do not have the SprayPartner Tractor Model 7455)<br />
Photo B.<br />
Shown with offset up<br />
Install 4 bolts (Key #56) through right and left frame rails and frame plate.<br />
Add Washer (Key #9), Lock Washer (Key #6) and Hex Nut (Key #36.)<br />
Determine if you need the offset of the tow bar (Key #58) up or down.<br />
This is done by measuring the height of your tractor hitch. If your hitch<br />
is 9” or less put the offset down. If more than 9” put the offset up. See<br />
photo B.<br />
Insert the tow bar (Key #58) through the square hole on the front of the<br />
sprayer frame. Line up the holes on the frame with those on the tow bar,<br />
making sure your offset is correct (see step 2.) Insert a large bolt (Key #33)<br />
through the frame and the tow bar (Key #58.) Add a washer (Key #9), lock<br />
washer (Key #6), and a hex nut (Key #36.) These should be loosely tightened.<br />
Next, take a large bolt (Key #33), lock washer (Key #6) and washer (Key<br />
#9), and put the bolt through the tow bar and thread it into the nut which<br />
is fixed at the bottom of the sprayer tank. Tighten this, the other nut that<br />
is holding the handle onto the tank and the frame and all other nuts. Now<br />
turn the sprayer over (right side up) and set it on its own wheels.<br />
5
SECTION 3 - ASSEMBLY OF SPRAYPARTNER (continued)<br />
Step 2b: Install the tractor hitch (for Model 7455.) Continued<br />
Step 3: Install the hose and spray wand.<br />
Step 3: Install the Tank Lid.<br />
6<br />
Photo<br />
4<br />
Photo<br />
5<br />
Photo<br />
7<br />
Attach the hose holder bracket (Key #59) in a vertical position using large<br />
bolts (Key #33) with washer (Key #9), lock washer (Key #6) and hex nuts<br />
(Key #36.)<br />
Using small bolts (Key #57), lock washers (Key #12), and nuts (Key #13)<br />
in hardware bag attach the hose holders (Key #45) to the hose holder bracket<br />
as shown on page 4. One bracket is for the hose, the other is for the<br />
wire that goes to the 12V battery.<br />
Using two large bolts (Key #33) attach the tow bar tongues (Key #60) (one<br />
above, one below the tow bar) as shown on page 4. Use lockwasher (Key<br />
#6), washer (Key #9 ), and hex nut (Key #36) then tighten. Insert hitch pin<br />
(Key #61) through the holes in the tow bar tongues (Key #60.)<br />
Use a screwdriver to loosen the hose clamps (Key #16 included in the<br />
hardware bag) and place one on either end of the 15' hose approximately<br />
one inch in from each end of the hose. Take one end of the hose and slip<br />
it over the hose barb (photo 4) located at the top of the pump making<br />
sure that it fits tightly to the end of the nozzle. Use a screwdriver to<br />
open the hose clamp and slide it down to the end of the hose, over the<br />
part of the hose that is on the outlet nozzle. Then tighten the clamp.<br />
Insert the other end of the hose over the nozzle of the spray wand (photo 5),<br />
open the hose clamp and slide this clamp over the portion of the hose<br />
now attached to the wand. Then tighten the clamp.<br />
Install the two small bolts (Key #44) through the hose bracket (Key #45)<br />
and through the sprayer handle (photo 3.) Place two small washers (Key<br />
#14), a lock washer (Key #13) and a hex nut (Key #12) on each one of the<br />
bolts and tighten. Now coil up the hose (Key #19) and lay it over the<br />
hose bracket. Insert the wand into the gripper clips (Key #50) on top of<br />
the tank.<br />
Put the tank lid (Key #47) on the top of the sprayer tank (photo 7) and turn<br />
it clockwise to tighten.<br />
SPECIAL NOTE:<br />
SprayPartner battery is only slightly charged.<br />
To charge battery - refer to page 8.<br />
Your SprayPartner is now assembled and after a full battery charge it’s<br />
ready for operation.
!<br />
NOTE: The SprayPartner Tractor Model 7455 does not have a battery. Model 7455 has wires<br />
with alligator clips that connect to your tractor battery’s terminals.<br />
When connecting the towable SprayPartner, FIRST make sure the pump switch is off. Then connect the the RED (+)<br />
clip to the positive (+) side of the 12V battery. And the BLACK (-) clip to the negative (-) side of the battery. !<br />
SECTION 4 - OPERATING INSTRUCTIONS<br />
Photo<br />
1<br />
NOTE:<br />
Don’t be surprised if the pump on<br />
your new SprayPartner shuts itself<br />
off while you are spraying.<br />
It’s supposed to!<br />
Photo<br />
2<br />
Before operating your <strong>Mantis</strong> SprayPartner, make sure all bolts, nuts and<br />
hose connections have been properly tightened. Now that this has been<br />
accomplished we are going to take you for a test run.<br />
Loosen the top filler cap (turn it counterclockwise) and remove. Fill up<br />
your SprayPartner tank with water. Easy to read liquid volume levels are<br />
embossed on the side of the tank. Replace the filler cap and tighten securely<br />
(clockwise). Remove the wand from its clamps and hold in your hand.<br />
Aim the wand away from people (and other objects you do not wish to<br />
water!). With your other hand pull the knob (photo 1.) located on the right<br />
side of the electric motor. This knob activates the motor which, in turn,<br />
starts the pump.<br />
To make efficient use of the battery, we’ve equipped the SprayPartner<br />
with a special intermittent pump. This pump will automatically shut off<br />
when the sprayer has the ideal pressure (50 PSI). The pump will start<br />
again when more pressure is needed.<br />
The pump may actually remain off for several minutes at a time (especially<br />
if you are using a fine mist). This special intermittent pump is designed<br />
to give your battery the longest possible life between charges.<br />
The pump is rated at a maximum of 2.2 gallons per minute, but the actual<br />
volume during use will be lower because of the fittings and hose.<br />
With harmless water now spraying from the wand, test out the<br />
adjustable nozzle (photo 2) at the end of the wand to get a sense of the<br />
different types of sprays — from fine, wide misting, to long, far- reaching<br />
streams of water (for hard - to - reach tops of trees). Keep testing the<br />
sprayer until you feel comfortable with its operation. When finished<br />
spraying, push the knob in to turn off the pump. Release the pressure in<br />
the hose by depressing spray wand handle. Stretch the hose out on the<br />
ground. Beginning at the pump end of the hose, wrap the hose onto the<br />
hose bracket.<br />
NOTE: If the SprayPartner will not spray, check the ball valve (key #30)<br />
on the bottom of the tank and make sure it is ‘OPEN.’<br />
How to prime the pump:<br />
Occasionally, during normal use, you may need to prime the pump. To<br />
do this, check to be sure that the filter is clean, that there are several<br />
inches of fluid over the suction hole in the bottom of the tank (full tank<br />
is best), and that the battery has at least an 8 hour charge. Remove the<br />
adjustable nozzle from the spray wand. Point the wand back into the<br />
open tank and hold the handle on the spray wand fully open. Turn on the<br />
pump. (Several minutes may be needed to prime.)<br />
NOTE:<br />
When using wettable powders, it is very important to stir the mixture periodically to prevent the powder<br />
from settling onto the bottom of the tank over the suction hole (this may result in clogged lines).<br />
7
SECTION 5 - USE OF RECOMMENDED OPTIONS (ACCESSORIES)<br />
2-NOZZLE SPRAY BOOM: Item 7411<br />
Allows precise spraying of two garden rows at<br />
one time and for applying fertilizers or weed<br />
killers to lawns.<br />
“BE PREPARED” HANDY<br />
ITEM KIT: Item<br />
7418Provides you with peace<br />
of mind and virtually guarantees<br />
that future spraying jobs<br />
won’t be stopped because you<br />
need a vital part.<br />
SECTION 6 - CHARGING THE BATTERY<br />
(DOES NOT APPLY TO TRACTOR MODEL)<br />
Charging the Battery<br />
Your SprayPartner Battery<br />
should last for many years if<br />
you give it proper care. After<br />
spraying approximately 2 to 5<br />
tanks full (depending on type<br />
of usage, operating temperatures,<br />
etc.) your battery may<br />
need charging.<br />
Note: If your pump runs for 1 1/2 hrs. at a full charge,<br />
your battery is holding it’s charge correctly.<br />
Please follow these instructions:<br />
1.) Insert the metal end of the charger into the battery<br />
charging receptacle located on the side of the stainless<br />
steel battery case. Make sure the plug is inserted<br />
as fully as possible.<br />
2.) Plug the box-like end directly into a standard wall<br />
socket. (Do not use an extension cord.)<br />
3.) Charge your battery for up to 8 hours.<br />
4.) See seperate charging instructions that come with<br />
your charger.<br />
NOTE: If battery is totally discharged (the pump will<br />
not even run), charging may take up to 16 hours. Do<br />
not charge battery more than 16 continuous hours at<br />
any time.<br />
(Extensive charging can harm the battery and will<br />
void the warranty.)<br />
8<br />
TRACTOR HITCH: Item 7413Allows you to pull<br />
your SprayPartner along in total ease and comfort behind<br />
your garden tractor or riding mower.<br />
Accessories are available from your local authorized <strong>Mantis</strong> dealer.<br />
The Handy Item Kit contains:<br />
Spray Nozzle<br />
2 Hose Clamps<br />
‘O’ Ring<br />
Fuse<br />
Filter Bowl<br />
2 Mesh Screens<br />
2 Nylon Elbows<br />
12-VOLT LONGLIFE BATTERY: Fully contained DC power<br />
system (never have to add water) which can take regular<br />
charging for many hours.<br />
PLUG-IN BATTERY CHARGER: Helps guarantee a full<br />
charge at all times (and uses a minimum amount of<br />
power to do so!) Extra batteries and chargers are available<br />
from <strong>Mantis</strong>. If the battery is a replacement, a<br />
new jack assembly is not necessary.<br />
Disconnecting the Battery from Sprayer.<br />
1.) Remove battery case lid.<br />
2.) Carefully remove the black wire going to the<br />
battery at the connection on top of the battery.<br />
This is the negative wire and the battery’s marked<br />
with – (negative) and + (positive) symbols. Repeat<br />
this process with the red wire (positive lead).<br />
3.) Remove the 4 bolts holding the metal battery case<br />
to the tank. Carefully remove battery.<br />
4.) When reconnecting make sure that you connect the<br />
black wire to the negative (–) section and the red<br />
wire to the positive (+) section.<br />
SPECIAL NOTE:<br />
Some customers like to purchase an extra battery to<br />
have on hand “just in case.” You should also purchase<br />
an extra jack assembly in order to charge the battery<br />
without having to place it in the SprayPartner’s battery<br />
box.
SECTION 7 - MAINTENANCE OF SPRAYPARTNER<br />
Cleaning<br />
Your SprayPartner tank should be cleaned after each<br />
use. It should also be cleaned before storage and before<br />
changing chemicals. Use a mild detergent soap and<br />
flush with clean warm water.<br />
How to Drain Tank<br />
Turn off the pump. Locate<br />
the ball valve (key # 30)<br />
under your SprayPartner<br />
(see parts breakdown on<br />
page 10). Close the ball<br />
valve. Unscrew the bowl<br />
(Key # 31C) and remove<br />
the strainer screen (Key #<br />
31B.) Open the ball valve,<br />
and the tank will drain<br />
through the bowl opener.<br />
Flush with clean water if<br />
necessary. Replace the<br />
strainer screen and bowl. Close the ball valve.<br />
IT IS VERY IMPORTANT TO REMEMBER<br />
TO CLEAN THE BOWL AND STRAINER<br />
Cleaning of Bowl and Strainer Screen<br />
Locate the bowl (Key #31C) and Strainer Screen (Key<br />
#31B) under your SprayPartner (see parts breakdown on<br />
page10). Carefully remove the bowl and Strainer<br />
Screen. Clean the bowl and strainer screen as needed<br />
during operation and before storage.<br />
NOTE: When replacing bowl be sure not to over<br />
tighten. This may cause bowl to crack.<br />
*Does not apply with Tractor Model.<br />
SECTION 8 - PARTS LIST (FLOJET PUMP #500100)<br />
If pump fails to turn off - after discharge valves are closed, check:<br />
• Out of spray material • Punctured pump diaphram • Leak in hose<br />
• Defective pressure switch • Insufficient voltage to pump<br />
• Defective pump check valve • Warn pump bearing.<br />
Storage<br />
Before storing for the season, charge the battery. Clean<br />
and dry the tank, pump, and hose. Store in a clean, dry<br />
area.<br />
Winterizing Tips<br />
To assure that your SprayPartner will perform well for<br />
you next spring; there are two very important things<br />
that you must do.<br />
1.) Clean and flush out the tank, hoses, nozzle, etc.<br />
with warm water and a mild detergent and then rinse<br />
with clear water. Run it until it's dry (it won’t hurt the<br />
pump) so that no water is left to freeze.<br />
*2.) The sealed lead acid battery is designed to last for<br />
many years, but it must not be left dormant all winter.<br />
You should charge it once a month. If it’s more convenient,<br />
simply disconnect the battery and put it in a<br />
shed or in a dry cellar and periodically charge it there.<br />
See page 8 for instructions to disconnect the battery.<br />
NOTE: DO NOT LEAVE THE CHARGER<br />
CONNECTED FOR LONG PERIODS OF TIME.<br />
An 8 hour charge is all you need. Over-charging will<br />
cause damage to the battery.<br />
Then store it away where it will be relatively dry and<br />
dust - free. Do this and your SprayPartner will be ready<br />
to serve you next season.<br />
SPECIAL NOTE: If you are in an area with<br />
freezing temperatures, remove bowl when<br />
storing, to avoid cracking the bowl.<br />
Be sure to order any new parts and supplies you may<br />
need for your next spraying season. Order from your<br />
local authorized <strong>Mantis</strong> dealer.<br />
Key Part<br />
No. No. Description<br />
1 500200 12 Volt Motor<br />
2 M9514 Brush Endbell Assy.<br />
4 M9516 Baseplate Assy. (5&6)<br />
5 M9517 Grommets<br />
6 M9518 Baseplate Screws<br />
7 M9721 Cam/Bearing Screws<br />
8 M9722 Cam/Bearing Set Screw<br />
9 500201 Cam Bearing Kit<br />
10 M9724 Bearing Cover<br />
11 M9725 Pistons (Inner & Outer)<br />
12 M9524 Diaphragm Kit (incl 11)<br />
13 M9506 Check Valve Assy. (Santo)<br />
13-1 M9508 Check Valve Assy. (Viton)<br />
14 M9505 Upper Housing/Pressure Switch<br />
15 M9529 Pump Screws<br />
500202 Pump Head Assy. (7 thru 15)<br />
500203 Pump Service Kit (9,11,12,13)<br />
Low flow and pressure:<br />
• Air leak at pump intake • Accumulation of debris inside pump and<br />
hoses • Worn pump bearing (excessive noise) • Punctured pump<br />
diaphragm • Defective motor • Defective pump check valve.<br />
9
SECTION 9 - PARTS LIST (SPRAYPARTNER)<br />
The following is a complete list of replacement parts for the <strong>Mantis</strong> SprayPartner. To order parts or accessories,<br />
please order by Part Number, Part Description, and Quantity desired.<br />
Order from your local authorized <strong>Mantis</strong> dealer.<br />
Key Qty Part<br />
Key Qty Part<br />
No. 7455 7444 No. Description<br />
No. 7455 7444 No. Description<br />
1 - 1 M9448 Battery Charger Jack Assembly* 31A 1 1 M9479 O-Ring<br />
2 1 1 M9449 Battery Box Lid<br />
31B 1 1 M9480 Strainer Screen 80 Mesh<br />
3 4 4 M9450 10-32 x 1 PHMS<br />
31C 1 1 M9481 Bowl<br />
4 1 1 M9451 3/8 Grommet<br />
31D 1 1 M9482 Body<br />
5 8 8 M9452 1/4-20 x 1/2 whiz bolt<br />
32 1 1 M9483 1” Grommet<br />
6 10 6 396 1/4 Lock Washer<br />
33 6 6 M9484 1/4-20 x 1 1/2 PHMS<br />
7 - 1 M0065 12 Volt Battery<br />
34 - 1 M0066 12 Volt Battery Charger<br />
8 1 1 M9455 Battery Box<br />
35 1 1 M9486 Frame Plate<br />
9 10 6 328 1/4 Flat Washer<br />
36 9 5 175B 1/4-20 Nuts<br />
10 1 1 M9457 20 Amp Fuse<br />
37 - 1 M9488 Front Stand<br />
11 1 1 M9458 Push-Pull Switch<br />
39 2 2 M9489 16” Spoke Wheel<br />
12 6 6 M9778 #10-32 Nut<br />
40 1 1 M9490 Frame Rail Right<br />
13 6 6 M9460 #10 Lock Washers<br />
41 1 1 M9446 Axle, For use with plastic wheel<br />
14 4 6 300508 #10 Flat Washers<br />
42 2 2 M9492 1/8 x 1 Cotter Pin<br />
15 1 1 M9462 1/4 MPT x 3/8 HB Nylon Elbow 43 - 1 M9493 Handle<br />
16 2 2 M9463 Hose Clamp<br />
44 2 2 M9494 10-32 x 1 1/2 PHMS<br />
17 1 1 500100 Flojet Pump<br />
45 2 1 M9495 Hose Holder<br />
18 1 1 M9465 1/4 MPT x 1/2 HB Nylon<br />
46 2 2 M9496 8-32 x 1/2 RHSB<br />
19 1 1 M9466 15' Hose<br />
47 1 1 M9497 Tank Lid<br />
20 2 2 M9467 1/2 Spring Clamp<br />
48 - 1 M9498 Handle Grip<br />
21 1 1 M9468 Suction Hose<br />
49 1 1 M9499 Tank<br />
23 1 1 M9791 Wand Assembly<br />
50 2 2 M9500 Gripper Clips<br />
26 1 1 M9473 1/2 FPT x 1/2 HB Nylon<br />
52 4 4 M9517 Rubber Vib. Absorption Grommets<br />
27 1 1 M9474 Frame Rail Left<br />
53 1 1 M9420 Warning Label<br />
28 1 1 M9475 1/2 Nylon Pipe Nipple<br />
54 2 2 M9419 SprayPartner Label<br />
29 1 1 M9476 1/2 pvc st ell<br />
55 1 1 M9421 Customer Notice/Pump Life Label<br />
30 1 1 M9477 1/2 Ball Valve<br />
- 1 Bag 7444 Hardware bag for Model 7444<br />
31 1 1 M9478 1/2 Line Strainer Assy.(inc.<br />
1 - Bag 7455 Hardware bag for Model 7455<br />
31A-D)<br />
56 4 - M9691 1/4-20 x 3/4 PHMS<br />
10<br />
Part Kits for Spray Wand<br />
Part No. Qty. Description<br />
500106 1 Nozzle Repair Kit:<br />
Adjustable Nozzle<br />
Nozzle Cap<br />
Filter<br />
500107 1 Seal Repair Kit:<br />
Spring Cap<br />
Seal<br />
Spring<br />
Plunger<br />
Larger Viton ‘O’ Ring Plunger<br />
Small Viton ‘O’ Ring<br />
500108 1 Handle Repair Kit:<br />
Black Handle for Trigger Valve<br />
Pin for Handle<br />
Locking Latch
Key Part Qty. Description<br />
No. No.<br />
58 M9697 1 Tow Bar<br />
59 M9698 1 Hose/Wire Bracket<br />
60 M9699 2 Tow Bar Tongue<br />
61 M9769 1 Hitch Pin<br />
M9767 1 Strain Relief<br />
M9755 1 12' Cord<br />
SprayPartner<br />
Tractor Model 7455<br />
Additional Parts List<br />
SprayPartner<br />
Spray Wand Repair Kits<br />
(Parts available only in kits)<br />
Nozzle Repair Kit<br />
P/N 500106<br />
Filter<br />
Nozzle Cap<br />
Adjustable Nozzle<br />
60<br />
Handle Repair Kit<br />
P/N 500108<br />
61<br />
Black Handle for Trogger Valve<br />
Pin for Handle<br />
Locking Latch<br />
33<br />
44<br />
9 58<br />
6<br />
36<br />
59<br />
45<br />
36<br />
45<br />
12<br />
9<br />
6<br />
9<br />
6<br />
13<br />
33<br />
36<br />
Seal<br />
33<br />
Seal Repair Kit<br />
P/N 500107<br />
Spring Cap<br />
Spring<br />
Plunger<br />
Lg. Viton ‘O’ Ring Plunger<br />
Small Viton ‘O’ Ring<br />
11
SECTION 9 - WARRANTY STATEMENT<br />
LIMITED WARRANTY INFORMATION<br />
MANTIS SPRAYPARTNER<br />
<strong>Mantis</strong> extends only to the original consumer purchaser a limited warranty against defects in material<br />
and workmanship for a period of two years. This warranty covers all portions of the MANTIS<br />
SprayPartner products.<br />
MANTIS will repair or, at its option, replace any defective part or parts of the product free of charge. In<br />
the event of a defect or malfunction, the purchaser must send the product, postage prepaid, to a local<br />
authorized <strong>Mantis</strong> dealer.<br />
MANTIS assumes no responsibility in the event that the product was assembled or used in contravention<br />
of any assembly, care, safety, or operating instructions contained in the Owners Manual; was not<br />
used with reasonable care; or was used for other than normal and intended purposes.<br />
MANTIS MAKES NO EXPRESS WARRANTIES OR REPRESENTATIONS EXCEPT THOSE CONTAINED<br />
HEREIN. THE DURATION OF ANY IMPLIED WARRANTY, INCLUDING MERCHANTABILITY<br />
AND FITNESS FOR A PARTICULAR PURPOSE, IS LIMITED TO THE DURATION OF THE EXPRESS<br />
WARRANTY. MANTIS DISCLAIMS ALL LIABILITY FOR INDIRECT AND/OR CONSEQUENTIAL<br />
DAMAGES. SOME STATES DO NOT ALLOW LIMITATIONS ON HOW LONG AN IMPLIED<br />
WARRANTY LASTS AND/OR DO NOT ALLOW THE EXCLUSION OR LIMITATION OF INCIDENTAL<br />
OR CONSEQUENTIAL DAMAGES, SO THAT ABOVE LIMITATIONS AND EXCLUSIONS MAY NOT<br />
APPLY TO YOU. THIS WARRANTY GIVES YOU SPECIFIC LEGAL RIGHTS, AND YOU MAY HAVE<br />
OTHER RIGHTS WHICH VARY FROM STATE TO STATE.<br />
®<br />
1028 STREET ROAD<br />
SOUTHAMPTON, PA 18966<br />
Specifications, descriptions, and illustrative material in this literature are as accurate as known at the time of publication, but are subject to change without notice.<br />
P/N <strong>500701</strong> 11/01<br />
© <strong>Mantis</strong> 2000<br />
Printed in USA
SprayPartner
SprayPartner - Pump<br />
SprayPartner - Tractor Hitch


