Manual - PT-PR-300R - Meridian Technologies
Manual - PT-PR-300R - Meridian Technologies
Manual - PT-PR-300R - Meridian Technologies

Create successful ePaper yourself
Turn your PDF publications into a flip-book with our unique Google optimized e-Paper software.
<strong>PT</strong>/<strong>PR</strong>-<strong>300R</strong>-x/x Series<br />
Fiber Optic Video & Data/Audio Transmission System<br />
Installation Instructions<br />
700 Elmont Rd, Elmont, NY 11003, Tel: 516-285-1000; Fax: 516-285-6300<br />
www.<strong>Meridian</strong>-tech.com
Table of Contents<br />
1.0 Product Description...............................................................................................3<br />
2.0 Installation .............................................................................................................3<br />
3.0 Product Signal Format & Specifications ................................................................3<br />
4.0 Optical Connections ..............................................................................................4<br />
5.0 Front Panel Pinout Diagrams ................................................................................6<br />
6.0 Troubleshooting.....................................................................................................7<br />
700 Elmont Rd, Elmont, NY 11003, Tel: 516-285-1000; Fax: 516-285-6300<br />
www.<strong>Meridian</strong>-tech.com
1.0 Product Description<br />
<strong>Meridian</strong>’s product series <strong>PT</strong>-<strong>300R</strong>-x/x and <strong>PR</strong>-<strong>300R</strong>-x/x series products are fiber optic modems<br />
that transmit one channel of uni-directional composite video and one, bi-directional data channel<br />
of either RS-232, RS-422 or RS-485 (2 or 4-wire) or audio signal over two optical fibers using FM<br />
transmission technologies. This product series uses <strong>Meridian</strong>’s standard 1-slot wide chassis<br />
mount card assembly and plugs into the following <strong>Meridian</strong> chassis: SR-500/S, SR-1000/S, SR-<br />
1200/S, SR-1500/S, and SR-2001 & SR-2000 series 19” equipment chassis.<br />
2.0 Installation<br />
Series <strong>PT</strong>-<strong>300R</strong> and <strong>PR</strong>-<strong>300R</strong> products are one-slot wide cards and, as such, occupy only one<br />
slot in <strong>Meridian</strong>’s standard chassis (SR-500/S, SR-1000/S, SR-1200/S, SR-1500/S, and SR-2001<br />
& SR-2000 series 19” equipment chassis). To install in the chassis, orient the card with the<br />
<strong>Meridian</strong> logo at the top of the module and slide onto the top and bottom card guides in the<br />
chassis. Press securely on the top and bottom of the module to ensure that it is fully seated in<br />
the chassis so that the electrical connector mates with the chassis-mounted motherboard. Once<br />
installed, manually tighten the two thumbscrews located at the top and bottom of the card. Do not<br />
use tools to secure these and do not over tighten.<br />
Note: A fully loaded subrack should have forced-air cooling to avoid excessive heat generation<br />
inside the chassis. A fan assembly tray (P/N FA-2000) with three (3) fans is available and should<br />
be installed under the 19" SR-2000/1 whenever possible.<br />
Front Panel Indicators – There is a front panel power indicator on the <strong>PT</strong>/<strong>PR</strong>-300 series<br />
modems. In addition, the modems with audio have additional audio level indications next to the<br />
audio input/output potentiometers.<br />
3.0 Product Signal Format & Specifications<br />
The <strong>PT</strong> & <strong>PR</strong>-<strong>300R</strong> series products transmit and receive the following signals:<br />
Signal Type Channels Transmit Receive<br />
NTSC/PAL video 1 Yes Yes<br />
RS-232 (Tx & Rx data) 1 <strong>PT</strong>-<strong>300R</strong>-V3/3 <strong>PR</strong>-<strong>300R</strong>-V3/3<br />
RS-422 (Tx & Rx data) 1 <strong>PT</strong>-<strong>300R</strong>-V4/4 <strong>PR</strong>-<strong>300R</strong>-V4/4<br />
RS-485 (2 wire) (Tx & Rx data) 1 <strong>PT</strong>-<strong>300R</strong>-V8/8 <strong>PR</strong>-<strong>300R</strong>-V8/8<br />
RS-485 (4 wire) (Tx & Rx data) 1 <strong>PT</strong>-301R-V8/8 <strong>PR</strong>-301R-V8/8<br />
600 ohm Balanced Audio 1 <strong>PT</strong>-<strong>300R</strong>-V5A/5A <strong>PR</strong>-<strong>300R</strong>-V5A/5A<br />
The tables below identify the specifications for the various signals that these modems<br />
transmit/receive.<br />
Video<br />
Format NTSC, PAL, SECAM<br />
Voltage/Impedance 1Vp-p, 75Ω, 1.5Vp-p (max)<br />
Differential Gain 30dB<br />
Field Tilt
Data<br />
Formats RS-232, RS-422, RS-485, bi-phase, Manchester<br />
Date Rate (RS-232) DC to 125Kb/s<br />
Data Rate (RS-422 & RS-485) DC to 300Kb/s<br />
Bit Error Rate (BER) Better than 10 -9<br />
Audio<br />
In/Out Impedance 600Ω, Balanced<br />
Frequency Response 10Hz to 20KHz<br />
SNR >90dB (weighted) @ 1KHz<br />
In/Out Level -6 to +6dBm (4Vp-p, max)<br />
THD
Fiber Type/Size<br />
(um)<br />
Multimode (FP Laser)<br />
62.5/125<br />
Singlemode (FP Laser)<br />
9/125<br />
Singlemode (DFB<br />
Laser)<br />
9/125<br />
Optical<br />
Output<br />
(dBm)<br />
Optical Specifications<br />
Rx<br />
Sensitivity<br />
(dBm)<br />
Optical<br />
Budget<br />
(dB)<br />
Wavelength<br />
(nm)<br />
Optical<br />
connector<br />
Optical Dynamic<br />
Range (dB)<br />
-3 -24 21 1300/850 ST 24<br />
-3 -24 21 1310/1550 ST, FC 24<br />
+3 -24 27 1310/1550 ST, FC 24<br />
Connectors<br />
Video 75Ω BNC w/gold center pin<br />
Data/Audio Two, 3-pin terminal blocks<br />
(see front-panel diagrams for input/output connections)<br />
Optical Singlemode – ST or FC<br />
Multimode - ST<br />
700 Elmont Rd, Elmont, NY 11003, Tel: 516-285-1000; Fax: 516-285-6300<br />
www.<strong>Meridian</strong>-tech.com
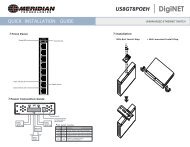
5.0 Front Panel Pinout Diagrams<br />
The figures below show the front panel layout along with the front panel input/output interface<br />
layouts and data/audio pinout information.<br />
I/O Connector #1<br />
I/O Connector #1<br />
I/O Connector #2<br />
I/O Connector #2<br />
700 Elmont Rd, Elmont, NY 11003, Tel: 516-285-1000; Fax: 516-285-6300<br />
www.<strong>Meridian</strong>-tech.com
6.0 Troubleshooting<br />
Below is a listing of several problems that may arise during the installation & operation of the<br />
modules. If you are having difficulty installing or operating the modules please refer to this list<br />
below.<br />
Problem: Module does not fit in chassis slots<br />
Action: Check module orientation. <strong>Meridian</strong> “Globe” must be oriented on the top left<br />
hand side of the module<br />
Make sure the card guides in the chassis are aligned with the extrusion on the<br />
module<br />
Problem: Card power LED does not light when power to the module/subrack is applied or<br />
power indicator turns on and off<br />
Action: Check power supply to ensure that it is plugged in and turned on. If flashing<br />
continues, move module to another chassis or location in the same chassis, if<br />
available.<br />
Problem: No video, data or audio at output of module<br />
Action: Check to ensure that the fibers between the <strong>PT</strong> & <strong>PR</strong> units are connected<br />
properly (see section 4.0)<br />
Problem: No video at output of module<br />
Action: Check to ensure that the video channel-specific LEDs are on (Green). Also,<br />
check to ensure that the optical LEDs are ON. If no video is still present, check<br />
to ensure that the monitor is ON and the video cable is connected to the correct<br />
video port on the Rx module.<br />
Problem: Video image is dark<br />
Action: Check the iris control on the camera to ensure that it is open to the proper<br />
amount for the conditions<br />
Problem: Video image is too bright and appears overexposed<br />
Action: Check the Video overload indicator on the Rx module. If it is Red, the video<br />
signal level is too high and the CCTV iris should be checked to ensure that it is<br />
open properly for the conditions.<br />
Problem: No Data or Audio<br />
Action: Check the data input status indicator light #1 on the transmit module to ensure it<br />
is on (indicating a data input signal). Also check the data output status indicator<br />
light #2 on the corresponding receiver module to ensure that the signal is being<br />
transmitted and received. If not, please check the data input/output and fiber<br />
connections.<br />
If the problem still persists after reviewing the above items, please contact <strong>Meridian</strong> technical<br />
support (516-285-1000).<br />
700 Elmont Rd, Elmont, NY 11003, Tel: 516-285-1000; Fax: 516-285-6300<br />
www.<strong>Meridian</strong>-tech.com