Simple Self-Diagnosis by Malfunction Code - Split & SkyAir ...
Simple Self-Diagnosis by Malfunction Code - Split & SkyAir ...
Simple Self-Diagnosis by Malfunction Code - Split & SkyAir ...

Create successful ePaper yourself
Turn your PDF publications into a flip-book with our unique Google optimized e-Paper software.
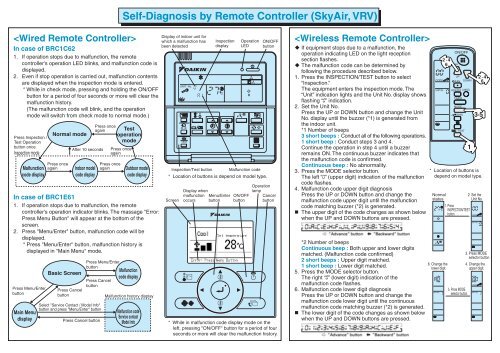
In case of BRC1C62<br />
1. If operation stops due to malfunction, the remote<br />
controller's operation LED blinks, and malfunction code is<br />
displayed.<br />
2. Even if stop operation is carried out, malfunction contents<br />
are displayed when the inspection mode is entered.<br />
* While in check mode, pressing and holding the ON/OFF<br />
button for a period of four seconds or more will clear the<br />
malfunction history.<br />
(The malfunction code will blink, and the operation<br />
mode will switch from check mode to normal mode.)<br />
Press Inspection /<br />
Test Operation<br />
button once.<br />
Inspection mode<br />
<strong>Malfunction</strong><br />
code display<br />
In case of BRC1E61<br />
1. If operation stops due to malfunction, the remote<br />
controller's operation indicator blinks. The massage "Error:<br />
Press Menu Button" will appear at the bottom of the<br />
screen.<br />
2. Press "Menu/Enter" button, malfunction code will be<br />
displayed.<br />
* Press "Menu/Enter" button, malfunction history is<br />
displayed in "Main Menu" mode.<br />
Press Menu/Enter<br />
button<br />
Main Menu<br />
display<br />
Normal mode<br />
Press once<br />
again<br />
Basic Screen<br />
Press Cancel<br />
button<br />
After 10 seconds<br />
Indoor model<br />
code display<br />
Press Menu/Enter<br />
button<br />
Press Cancel<br />
button<br />
Select "Service Contact / Model Info"<br />
button and press "Menu/Enter" button<br />
Press Cancel button<br />
Press once<br />
again<br />
Test<br />
operation<br />
mode<br />
Press once<br />
again<br />
Press once<br />
again<br />
<strong>Self</strong>-<strong>Diagnosis</strong> <strong>by</strong> Remote Controller (<strong>SkyAir</strong>, VRV)<br />
Outdoor model<br />
code display<br />
<strong>Malfunction</strong><br />
code display<br />
<strong>Malfunction</strong> history display<br />
<strong>Malfunction</strong> code<br />
Service contact<br />
Model info<br />
Display of indoor unit for<br />
which a malfunction has<br />
been detected<br />
Inspection<br />
display<br />
Inspection/Test button <strong>Malfunction</strong> code<br />
* Location of buttons is depend on model type.<br />
Screen<br />
Display when<br />
malfunction Menu/Enter<br />
occurs button<br />
Operation ON/OFF<br />
LED button<br />
ON/OFF<br />
button<br />
Operation<br />
lamp<br />
Cancel<br />
button<br />
* While in malfunction code display mode on the<br />
left, pressing "ON/OFF" button for a period of four<br />
seconds or more will clear the malfunction history.<br />
� If equipment stops due to a malfunction, the<br />
operation indicating LED on the light reception<br />
section flashes.<br />
� The malfunction code can be determined <strong>by</strong><br />
following the procedure described below.<br />
1. Press the INSPECTION/TEST button to select<br />
“Inspection.”<br />
The equipment enters the inspection mode. The<br />
“Unit” indication lights and the Unit No. display shows<br />
flashing “0” indication.<br />
2. Set the Unit No.<br />
Press the UP or DOWN button and change the Unit<br />
No. display until the buzzer (*1) is generated from<br />
the indoor unit.<br />
*1 Number of beeps<br />
3 short beeps : Conduct all of the following operations.<br />
1 short beep : Conduct steps 3 and 4.<br />
Continue the operation in step 4 until a buzzer<br />
remains ON. The continuous buzzer indicates that<br />
the malfunction code is confirmed.<br />
Continuous beep : No abnormality.<br />
3. Press the MODE selector button.<br />
The left “0” (upper digit) indication of the malfunction<br />
code flashes.<br />
4. <strong>Malfunction</strong> code upper digit diagnosis<br />
Press the UP or DOWN button and change the<br />
malfunction code upper digit until the malfunction<br />
code matching buzzer (*2) is generated.<br />
� The upper digit of the code changes as shown below<br />
when the UP and DOWN buttons are pressed.<br />
*2 Number of beeps<br />
Continuous beep : Both upper and lower digits<br />
matched. (<strong>Malfunction</strong> code confirmed)<br />
2 short beeps : Upper digit matched.<br />
1 short beep : Lower digit matched.<br />
5. Press the MODE selector button.<br />
The right “0” (lower digit) indication of the<br />
malfunction code flashes.<br />
6. <strong>Malfunction</strong> code lower digit diagnosis<br />
Press the UP or DOWN button and change the<br />
malfunction code lower digit until the continuous<br />
malfunction code matching buzzer (*2) is generated.<br />
� The lower digit of the code changes as shown below<br />
when the UP and DOWN buttons are pressed.<br />
00<br />
CODE<br />
UNIT No<br />
Normal<br />
status<br />
27<br />
6. Change the<br />
lower digit.<br />
A0<br />
UNIT NO.<br />
1<br />
2 · 4<br />
6<br />
0<br />
TEMP<br />
ON/OFF<br />
UP<br />
FAN<br />
DOWN<br />
RESERVE CANCEL<br />
TIMER<br />
MODE<br />
SWING<br />
/ TEST<br />
1. Press<br />
INSPECTION/TEST<br />
button.<br />
5. Press MODE<br />
selector button.<br />
1<br />
3 · 5<br />
2. Set the<br />
Unit No.<br />
00<br />
CODE<br />
UNIT NO.<br />
3. Press MODE<br />
selector button.<br />
4. Change the<br />
upper digit.<br />
00<br />
CODE<br />
2 · 4<br />
6<br />
* Location of buttons is<br />
depend on model type.<br />
0<br />
UNIT NO.<br />
1