
Create successful ePaper yourself
Turn your PDF publications into a flip-book with our unique Google optimized e-Paper software.
1. Thanks…!<br />
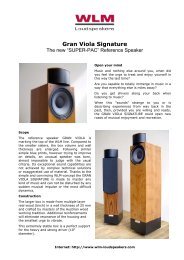
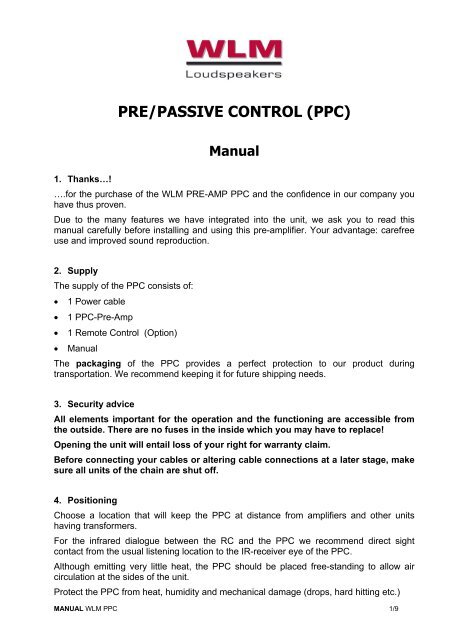
PRE/PASSIVE <strong>CONTROL</strong> (PPC)<br />
Manual<br />
….for the purchase of the <strong>WLM</strong> PRE-AMP PPC and the confidence in our company you<br />
have thus proven.<br />
Due to the many features we have integrated into the unit, we ask you to read this<br />
manual carefully before installing and using this pre-amplifier. Your advantage: carefree<br />
use and improved sound reproduction.<br />
2. Supply<br />
The supply of the PPC consists of:<br />
• 1 Power cable<br />
• 1 PPC-<strong>Pre</strong>-Amp<br />
• 1 Remote Control (Option)<br />
• Manual<br />
The packaging of the PPC provides a perfect protection to our product during<br />
transportation. We recommend keeping it for future shipping needs.<br />
3. Security advice<br />
All elements important for the operation and the functioning are accessible from<br />
the outside. There are no fuses in the inside which you may have to replace!<br />
Opening the unit will entail loss of your right for warranty claim.<br />
Before connecting your cables or altering cable connections at a later stage, make<br />
sure all units of the chain are shut off.<br />
4. Positioning<br />
Choose a location that will keep the PPC at distance from amplifiers and other units<br />
having transformers.<br />
For the infrared dialogue between the RC and the PPC we recommend direct sight<br />
contact from the usual listening location to the IR-receiver eye of the PPC.<br />
Although emitting very little heat, the PPC should be placed free-standing to allow air<br />
circulation at the sides of the unit.<br />
Protect the PPC from heat, humidity and mechanical damage (drops, hard hitting etc.)<br />
MANUAL <strong>WLM</strong> PPC 1/9
5. Description<br />
Front Rear<br />
The PPC can be used between the source players and the amplifier(s) of your chain<br />
either in a passive or part-active pre-amplifier operation. Especially through the separate<br />
active "manipulation" of highs and lows of a signal the ambitious listener will appreciate<br />
the unique possibilities of sound modulation according to the prevailing room acoustics<br />
and/or his personals taste. The sound reproduction thereafter will be felt as being more<br />
pleasant and musical enjoyment as more intensive.<br />
At the front you will find the control lights, the elements for the operation and the IR<br />
receiver of the RC (Option):<br />
• IR Control IR reception eye for the RC<br />
• On/Off LED Control light for IR and STANDBY<br />
• VOLUME Volume adjustment<br />
• BASS Low frequency adjustment<br />
• INPUT 1, 2, 3 Input selection switch 1 to 3<br />
• SAT + WOOFER Switch position for the operation with SUB<br />
• FULL RANGE Switch position for the operation w/o SUB<br />
• HARMONIC WAVE Switch for the harmonic wave adjustment<br />
At the rear are located the connections for the 3 LINE INPUTS, the OUTPUTS to the<br />
amplifier(s) – all as asymmetrical RCA pins, and the main ON/OFF switch including the<br />
port for the power connection, also containing the fuse box:<br />
• POWER ON/OFF ON/OFF switch<br />
• POWER Power connection including fuse box<br />
• INPUT 1, 2, 3 3 Line-Inputs (RCA)<br />
• MAIN OUT / LOW AMP Output full range or medium/low frequencies<br />
(Bi-Wiring) – adjustable<br />
MANUAL <strong>WLM</strong> PPC 2/9
• HIGH AMP Output of the high frequencies - adjustable<br />
• PRE OUT LINE Direct signal output (no adjustment)<br />
5.1 Remote Control (RC)<br />
With the RC (optional) you may put the PPC in STANDBY (the red LED stays lit, the blue<br />
LED will extinguish) and back in the operation mode.<br />
In addition, the RC offers a very comfortable remote volume adjustment of the PPC.<br />
(The same RC can also be used for the external <strong>WLM</strong> cross-over; the CHANGE switch<br />
of the RC will enable you to go from volume to bass control)<br />
The RC is powered by batteries (2 x 1.5 V).<br />
5.2 Switch ON<br />
Manually by the main switch at the rear (Power “ON“) the PPC will be started and is now<br />
ready for operation. Via the RC (optional) you can put the PPC in the STANDBY mode<br />
and back in the operation mode again.<br />
When the PPC is switched on, the blue LED in front is lit; when using the RC, the red<br />
LED will also light up. In STANDBY mode the blue LED will be off, the red will stay on.<br />
Before removing the fuse, make sure the PPC is switched off and the power cable<br />
is pulled out of the plug.<br />
The fuse is placed at the rear, just below the power input. The fuse is defined for 125<br />
mA/T (slow blow). The cover of the fuse box can be opened by means of a pointed tool,<br />
the fuse can then easily be removed.<br />
NOTE: switching in STANDBY mode is only possible via the RC. The main switch at the<br />
rear will simply put the PPC ON and OFF.<br />
5.3 Switch OFF<br />
The switching off can be done in 2 steps; either by the RC in STANDBY mode or OFF by<br />
the main switch at the rear.<br />
In the STANBY mode all important functional elements will stay under current, the warm<br />
up phase at the next start of operation is thus considerably reduced. The consumption of<br />
the current during STANDBY is kept at a minimum.<br />
For listening stops of 2 hours up to 2 days we recommend to keep the PPC in STANDBY<br />
mode (possible only via the RC).<br />
6. Connection of the signal sources (LINE 1 to 3)<br />
Before starting your connections, make sure that the PPC itself and all units of the<br />
chain in front and behind the PPC are shut off!<br />
The PPC allows the connection of up to 3 source players (asymmetrical RCA pins). All<br />
connections are identical and can be allocated to your liking.<br />
The choice of actual LINE input to be played is done via the 3-position switch in front.<br />
MANUAL <strong>WLM</strong> PPC 3/9
7. Outputs<br />
You may choose between 3 outputs:<br />
1 Output w/o adjustment (PRE OUT LINE)<br />
2 Outputs with adjustment (MAIN OUT / LOW AMP und HIGH AMP)<br />
At the output PRE OUT LINE the signal will remain intact in its full frequency width, as<br />
received.<br />
The output MAIN OUT / LOW AMP can be employed either fort he connection of a full<br />
range speaker or the connection of the medium/low driver (e.g. Bi-Amping). In the latter<br />
case the tweeter of the same speaker will be connected to the output HIGH AMP.<br />
The adjustment of the output MAIN OUT / LOW AMP can be done either via the BASS<br />
potentiometer (low frequency adjustment) and/or additionally via HARMONIC WAVE<br />
switch at the front (high frequency adjustment).<br />
The only possible adjustment of the HIGH AMP output is the HARMONIC WAVE switch<br />
at the front (high frequency adjustment).<br />
The amplification of the incoming signal goes from -indefinite to 0 dB. Since this is a<br />
passive pre-amp, there is no active amplification; it is a passive diminuer which is<br />
reducing the signal to –indefinite. Advantage: the signal does not follow an active<br />
amplification path.<br />
8. Why adjustment?<br />
It is a known fact that there is hardly a speaker capable of reproducing the audio signal<br />
across the entire frequency range in a technically correct way; i.e. the passive speakers<br />
have become very fast elements necessitating electronic support due to the high degree<br />
of mechanical dampening and their light structure (quick reacting cones). Only in this way<br />
the full bass signal can be reproduced at the same level of performance and in an<br />
adequate speed.<br />
At the PPC outputs of MAIN OUT the signal can be adjusted in the low and in the high<br />
frequencies to match the prevailing acoustics of the room, taking also into account the<br />
specific characteristics of the speakers.<br />
This way the frequency range delivered by the speaker will be considerably extended<br />
and deepened.<br />
9. SUB WOOFER / FULLRANGE (Switch)<br />
In the FULL RANGE operation the frequency range at the MAIN OUT output is from 10<br />
Hz to 100 kHz, the continuous bass potentiometer is working at 30 Hz, up to +12dB.<br />
For the operation with SUB WOOFER the frequency band width at MAIN OUT is<br />
automatically limited to a range from 80 Hz to 100 kHz, only the frequencies of low<br />
medium upwards are offered. The operating frequency of the bass potentiometer is 80<br />
Hz (0 to +12dB continuous))<br />
The SUB WOOFER will be connected at the PRE OUT LINE of the PPC and adjusted<br />
separately by the <strong>WLM</strong> BC (BASS <strong>CONTROL</strong>).<br />
The HARMONIC WAVE function (adjustment of the high frequencies of a given signal)<br />
can be used in the FULL RANGE and in the SUB WOOFER operation.<br />
MANUAL <strong>WLM</strong> PPC 4/9
10. Examples of connection<br />
The following pictures should explain the various connection possibilities of the PPC and<br />
in a specific case simplify your connection.<br />
In all instances the sources (CD, LP, tuner etc.) are to be connected to the 3 INPUTS (1<br />
to 3).<br />
The shown examples are different by the way the amplifiers and loudspeakers are<br />
operated and connected, passive or part active.<br />
10.1 <strong>Passive</strong> operation (w/o adjustment)<br />
The drawing is showing the (classical)<br />
passive connection of a stereo<br />
amplifier or of 2 mono amps.<br />
The signal is passed 1to1, as<br />
received from the source, directly to<br />
the output of the PPC, without any<br />
intervention. In essence, the signal<br />
remains intact and is given to the<br />
amplifiers without any loss.<br />
An adjustment of the lows and/or the<br />
highs does not take place and is not<br />
possible at this output.<br />
10.2 Part active operation: 1 amp, possibility of adjustment of highs and lows<br />
The amp is to be connected to the<br />
MAIN OUT of the PPC (stereo amp or<br />
2 monos); to the amp is connected a<br />
pair of full range speakers.<br />
Via the PPC the high and/or the low<br />
can now be adjusted.<br />
10.3 Part active operation: 2 amps (Bi-Amping) with separate adjustment<br />
possibility of the high and the low<br />
Connect to the MAIN-OUT LOW the<br />
amp for the medium/low and to the<br />
HIGH the amp for the tweeter of a pair<br />
of speakers.<br />
The low and the high of the 2 amplifier<br />
lines are adjusted separately by the<br />
potentiometer (for low) and the switch<br />
for the (tweeter).<br />
MANUAL <strong>WLM</strong> PPC 5/9
10.4 Part active operation: 1 amp for medium/high (main speaker) plus 1 amp for<br />
Sub-Woofer (via <strong>WLM</strong> BC)<br />
Connect to MAIN OUT the amp<br />
(stereo amp or 2 monos) for the<br />
medium/high portion of the signal fed<br />
to the main speaker.<br />
By switching to SAT + SUB at the<br />
front of the PPC the high and the<br />
medium are adjusted as before,<br />
however now the latter at 80 Hz<br />
(instead of 30 Hz).<br />
To operate the SUB WOOFER<br />
connect the <strong>WLM</strong> BASS <strong>CONTROL</strong><br />
(BC) plus adequate amp and subwoofer<br />
to the direct exit of the PPC.<br />
Via the BC the extension of the bass<br />
performance can then be adjusted.<br />
10.5 Part active operation: 1 amp each for high and medium plus 1 amp for low (via<br />
BC)<br />
11. General remarks to the choice of the amplifiers<br />
This example of a bi-amp operation of<br />
the main speaker plus sub-woofer is<br />
showing the widest configuration possible<br />
with the PPC.<br />
Connect the amp for the medium to<br />
MAIN OUT LOW, the amp for the tweeter<br />
of the main speaker to the HIGH output.<br />
At the direct output of the PPC connect<br />
the <strong>WLM</strong> BC, plus amp and sub-woofer.<br />
Via the MAIN-OUT high and medium can<br />
be adjusted separately; via the BC the<br />
low can be adjusted.<br />
It is up to your personal preference and budgetary allowance which amp you want to use.<br />
You may choose amps based on tubes or transistors, or both; however not in a mix<br />
within highs or medium. To power the sub-woofer we recommend a transistor amp<br />
because of its higher dampening capability. Even if only a twin signal is given to the amp<br />
of the sub, you will nevertheless need a stereo amp for the sub-woofer. Please connect<br />
the red end of the connecting cable to the plus/red pole of the right channel and the black<br />
end to the plus/red pole of the left channel.<br />
Keep in mind that a weak amp will lower the performance level of the entire chain, even if<br />
the other amps are working at a much higher level of performance. The same comment<br />
will apply to connecting and loudspeaker cables. They should all be of a similar level of<br />
quality and performance.<br />
MANUAL <strong>WLM</strong> PPC 6/9
11. Specification<br />
<strong>Pre</strong>-amplifier with filters of third degree<br />
Double Mono-Structure<br />
Asymmetrical in- and outputs (RCA)<br />
3 LINE-inputs<br />
3 outputs<br />
- 2 outputs MAIN OUT (adjustment is possible):<br />
- LOW AMP (for medium/low or full range)<br />
- HIGH AMP (for high)<br />
- 1 output PRE OUT LINE (direct output w/o adjustment)<br />
THD 0,001% at 20 Hz to 20 kHz<br />
Frequency range PRE OUT LINE: 0 Hz to 100 kHz (w/o adjustment)<br />
Frequency range MAIN OUT: 10 Hz to 100 kHz (adjustment is possible)<br />
Cut-off frequency (overlapping) at MAIN OUT:<br />
- Low, Full Range from 10 Hz to 100 kHz<br />
- High from 1 kHz to 100 kHz<br />
Low adjustment FULL RANGE operation: at 30 Hz, 0 -12 dB (continuous)<br />
High adjustment 10 kHz, +3dB (by switch)<br />
SUB WOOFER operation: at 80 Hz, -6 to +6dB (continuous)<br />
Power: 50Hz/230V (not to be switched to 60Hz/110V)<br />
Power consumption : max. 15 Watt (normal operation)<br />
max. 1 Watt (STANDBY)<br />
Fuse: 125mA/T (accessible from the outside).<br />
MANUAL <strong>WLM</strong> PPC 7/9
11. Warranty<br />
Limited Warranty<br />
During the warranty period the company <strong>WLM</strong> will guarantee that their products are well<br />
functioning and free of flaws.<br />
The warranty period is: PRE / PASSIVE <strong>CONTROL</strong> - 2 years (counted from the date of<br />
purchase from an authorized <strong>WLM</strong>-Dealer).<br />
Condition for the warranty service is that the products are operated in accordance with<br />
this manual.<br />
During the warranty period <strong>WLM</strong> will replace or repair the defect parts free of charge to<br />
the customer.<br />
Condition is however:<br />
• The warranty registration card is received by <strong>WLM</strong> within 30 days after the date of<br />
purchase.<br />
• The unit is not showing any traces of physical damage and inside there are no<br />
signs of overheating due to wrong installation/operation resulting in an overloading<br />
of certain parts.<br />
• The PCBs and components thereof are not showing any signs of undue handling,<br />
regardless whether the intention was to repair or to modify the unit under claim.<br />
• There is no indication what-so-ever that the <strong>WLM</strong> products have been operated<br />
differently as specified by the manual.<br />
In addition, the customer will loose his right for a warranty claim when the serial-Nr. of the<br />
unit in question has been modified, removed or manipulated in any way. <strong>WLM</strong> will not be<br />
held responsible for damages resulting from repairs executed by un-authorized<br />
personnel.<br />
Collateral Damage<br />
During the duration of this limited warranty period (and there-after) <strong>WLM</strong> will not be<br />
responsible for collateral damage, directly or indirectly linked to the operation of the <strong>WLM</strong><br />
product.<br />
Warranty Claim<br />
The customer may on the basis of this limited warranty claim the repair or replacement of<br />
the defective part by the manufacturer or the authorized dealer with no charge to him. For<br />
the claim please contact either <strong>WLM</strong> directly or the <strong>WLM</strong> distributor in your country. After<br />
receipt of the claim confirmation please send the unit under claim to the shown address.<br />
The defect will be examined and, when justified, will be repaired at no cost to the<br />
customer. The customer will have to bear the cost of shipment. Without a corresponding<br />
warranty claim (received within 30 days after the date of purchase at the address below)<br />
no warranty claim will be accepted or processed.<br />
<strong>WLM</strong> Loudspeakers<br />
Treietstrasse 56<br />
6832 Sulz<br />
AUSTRIA<br />
Phone: +43 (0)5522 44 641 (Customer Service)<br />
e-Mail: info@wlm-loudspeakers.com<br />
Web: www.wlm-loudspeakers.com<br />
MANUAL <strong>WLM</strong> PPC 8/9
Warranty Registration<br />
Please ask your dealer to fill in this form at the time of the purchase.<br />
This registration will entitle you to call on <strong>WLM</strong> for technical support and it is<br />
a prerequisite for an eventual warranty claim against <strong>WLM</strong>.<br />
Please send your<br />
registration to:<br />
<strong>WLM</strong> Loudspeakers<br />
Treietstrasse 56<br />
A-6832 Sulz<br />
Austria<br />
Customer Service:<br />
Phone : +43 (0)5522 44641<br />
Fax : +43 (0)5522 44641-74<br />
Web : www.wlm-loudspeakers.com<br />
Unit/Model: PPC (PRE/PASSIVE <strong>CONTROL</strong>) Serial-Nr:........................................<br />
BC (BassControl) Serial-Nr:........................................<br />
PC (PASSIVE <strong>CONTROL</strong>) Serial-Nr:….....................................<br />
Date of Purchase:.............................Dealer Name:....................................................<br />
Dealer Address:..........................................................................................................<br />
First/last name of customer: ...................................................................................<br />
Address Street: ...................................................................................<br />
Postal Code/Town: ...….............................................................................<br />
Customer Contact Phone: ...................................................................................<br />
Your comments are always appreciated:<br />
Fax: ...................................................................................<br />
E-Mail: ...................................................................................<br />
MANUAL <strong>WLM</strong> PPC 9/9