Side-pull roller blind - Liedeco
Side-pull roller blind - Liedeco
Side-pull roller blind - Liedeco

You also want an ePaper? Increase the reach of your titles
YUMPU automatically turns print PDFs into web optimized ePapers that Google loves.
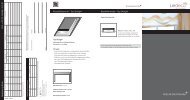
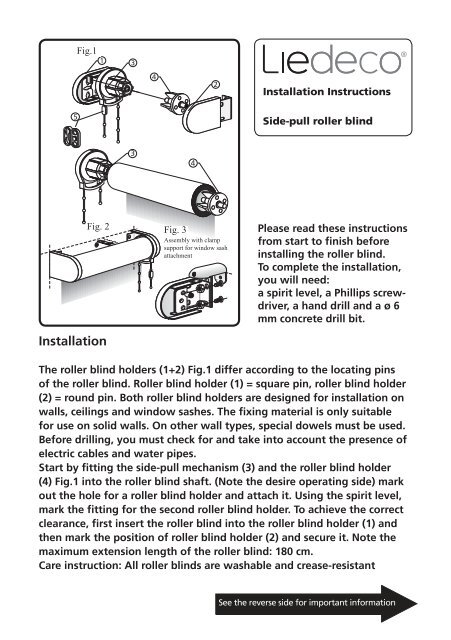
Fig.1<br />
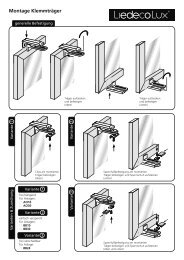
Installation<br />
Fig. 2 Fig. 3<br />
Assembly with clamp<br />
support for window sash<br />
attachment<br />
Installation Instructions<br />
<strong>Side</strong>-<strong>pull</strong> <strong>roller</strong> <strong>blind</strong><br />
Please read these instructions<br />
from start to finish before<br />
installing the <strong>roller</strong> <strong>blind</strong>.<br />
To complete the installation,<br />
you will need:<br />
a spirit level, a Phillips screwdriver,<br />
a hand drill and a ø 6<br />
mm concrete drill bit.<br />
The <strong>roller</strong> <strong>blind</strong> holders (1+2) Fig.1 differ according to the locating pins<br />
of the <strong>roller</strong> <strong>blind</strong>. Roller <strong>blind</strong> holder (1) = square pin, <strong>roller</strong> <strong>blind</strong> holder<br />
(2) = round pin. Both <strong>roller</strong> <strong>blind</strong> holders are designed for installation on<br />
walls, ceilings and window sashes. The fixing material is only suitable<br />
for use on solid walls. On other wall types, special dowels must be used.<br />
Before drilling, you must check for and take into account the presence of<br />
electric cables and water pipes.<br />
Start by fitting the side-<strong>pull</strong> mechanism (3) and the <strong>roller</strong> <strong>blind</strong> holder<br />
(4) Fig.1 into the <strong>roller</strong> <strong>blind</strong> shaft. (Note the desire operating side) mark<br />
out the hole for a <strong>roller</strong> <strong>blind</strong> holder and attach it. Using the spirit level,<br />
mark the fitting for the second <strong>roller</strong> <strong>blind</strong> holder. To achieve the correct<br />
clearance, first insert the <strong>roller</strong> <strong>blind</strong> into the <strong>roller</strong> <strong>blind</strong> holder (1) and<br />
then mark the position of <strong>roller</strong> <strong>blind</strong> holder (2) and secure it. Note the<br />
maximum extension length of the <strong>roller</strong> <strong>blind</strong>: 180 cm.<br />
Care instruction: All <strong>roller</strong> <strong>blind</strong>s are washable and crease-resistant<br />
See the reverse side for important information
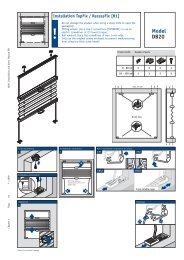
Attention, important!<br />
Attaching the chain stopper (5).<br />
After fitting the <strong>roller</strong> <strong>blind</strong>, unroll it until at least one winding of<br />
fabric remains on the shaft. Then fit the chain stopper (5) directly<br />
beneath the mechanism on the front part of the chain to prevent<br />
the fabric detaching from the shaft when the <strong>roller</strong> <strong>blind</strong> is fully<br />
unrolled.<br />
Attention!<br />
Small children can be strangled in the loops of cords, chains or belts used<br />
to and operate window <strong>blind</strong>s. Children can also wrap cords around their<br />
necks. Cords must be kept out of reach of children to prevent the possibility<br />
of entanglement and strangulation. Beds, children‘s cots and furniture<br />
should be positioned well away from window <strong>blind</strong> cords.<br />
Fitting the chain holder<br />
Step 1<br />
Step 2<br />
Hang the ball chain into the chain<br />
holder.<br />
Now remove the protective foil from<br />
the double-sided adhesive tape (1)<br />
and use the adhesive tape to fix the<br />
chain holder in the desired position<br />
on the window frame. (2)