BB 20 - Liedeco
BB 20 - Liedeco
BB 20 - Liedeco

Create successful ePaper yourself
Turn your PDF publications into a flip-book with our unique Google optimized e-Paper software.
© - <strong>20</strong>09 <strong>20</strong>09 Installation and Users’ Manual PB<br />
24<br />
Chapter 1 Page<br />
Clip installation<br />
1<br />
Wedge (11º) for slanting window frames<br />
1A<br />
Footplate 4 Bedieninginstallation<br />
2<br />
Wedge 4 Bediening (11º) for slanting window frames<br />
2A<br />
Subject to technical changes<br />
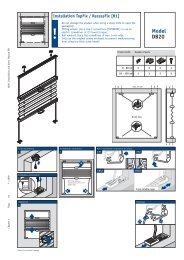
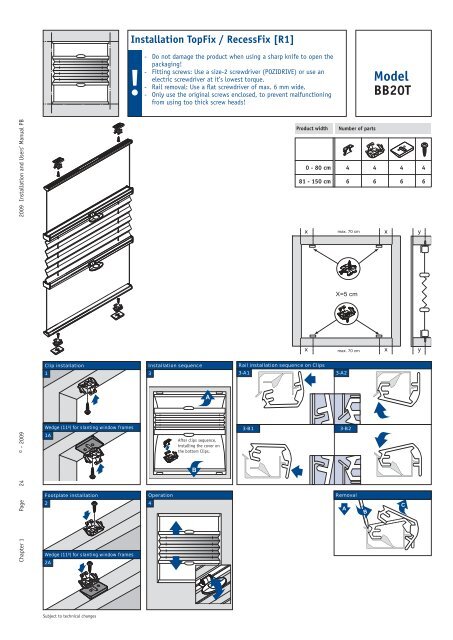
Installation TopFix / RecessFix [R1]<br />
- Do not damage the product when using a sharp knife to open the<br />
packaging!<br />
- Fitting screws: Use a size-2 screwdriver (POZIDRIVE) or use an<br />
electric screwdriver at it’s lowest torque.<br />
- Rail removal: Use a fl at screwdriver of max. 6 mm wide.<br />
- Only use the original screws enclosed, to prevent malfunctioning<br />
from using too thick screw heads!<br />
Installation sequence<br />
3<br />
Operation<br />
4<br />
B<br />
A<br />
After clips sequence,<br />
installing the cover on<br />
the bottom Clips.<br />
Product width Number of parts<br />
0 - 80 cm<br />
81 - 150 cm<br />
Rail installation sequence on Clips<br />
x max. 70 cm x<br />
X=5 cm<br />
x x<br />
3-A1 3-A2<br />
max. 70 cm<br />
3-B1 3-B2<br />
Removal<br />
A<br />
Model<br />
<strong>BB</strong><strong>20</strong>T<br />
4 4 4 4<br />
6 6 6 6<br />
B C<br />
y<br />
y
Page 25 © - <strong>20</strong>09<br />
<strong>20</strong>09 Installation and Users’ Manual PB<br />
Chapter 1<br />
FaceFix installation (top rail)<br />
1<br />
FaceFix 4 Bediening installation (bottom rail)<br />
2<br />
Fitting the top covers<br />
3<br />
Fitting the lower covers<br />
4<br />
Subject to technical changes<br />
FaceFix installation to a window frame / wall [F1]<br />
- Do not damage the product when using a sharp knife to open the<br />
packaging!<br />
- Fitting screws: Use a size-2 screwdriver (POZIDRIVE) or use an<br />
electric screwdriver at it’s lowest torque.<br />
- Rail removal: Use a fl at screwdriver of max. 6 mm wide.<br />
- Only use the original screws enclosed, to prevent malfunctioning<br />
from using too thick screw heads!<br />
Installation sequence<br />
5<br />
B<br />
Operation<br />
6<br />
A<br />
After clips sequence,<br />
installing the cover on the<br />
bottom Clips.<br />
Product width Number of parts<br />
0 - 80 cm<br />
81 - 150 cm<br />
Rail installation sequence on Clips<br />
x max. 70 cm<br />
x<br />
X=5 cm<br />
x x<br />
max. 70 cm<br />
5-A1 5-A2<br />
5-B1 5-B2<br />
Removal<br />
A<br />
Model<br />
<strong>BB</strong><strong>20</strong>T<br />
4 4 4 4 8 4<br />
6 6 6 6 12 6<br />
B C