
Create successful ePaper yourself
Turn your PDF publications into a flip-book with our unique Google optimized e-Paper software.
|<br />
HORECA GASTRO GRINDER<br />
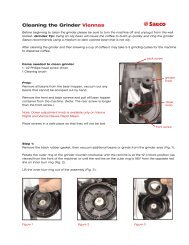
Never rotate the grinding discs clockwise further<br />
then the red mark 1, as the grinding discs<br />
may otherwise be damaged.<br />
7.4 Cleaning of the Grinding Mechanism<br />
After opening the grinder cover the grinding mechanism with the<br />
discs can be vacuumed. Check for foreign objects in the grinding<br />
gear.<br />
Do not change any grinder settings. The discs<br />
could be damaged when re-assembling the<br />
grinder.<br />
Carefully vacuum the grinder casing. Take care no to damage any<br />
cables.<br />
7.5 Grinding Disc Exchange<br />
Grinding disc replacement should only be carried out by authorised<br />
specialists or a customer service centre. The „Repair manual<br />
<strong>K30</strong> <strong>TWIN</strong> grinding disc replacement and basic adjustment“ can be<br />
downloaded for replacing grinding discs.<br />
Grinding disc replacement may also be carried out using a replacement<br />
(AT) integrated grinder. To do this, order an AT integrated<br />
grinder. On receipt of the AT integrated grinder, remove your integrated<br />
grinder from the K 30 <strong>TWIN</strong> according to chapter 7.6 and<br />
install the AT integrated grinder into the K 30 <strong>TWIN</strong>. Return your old<br />
integrated grinder in the packaging.<br />
7.6 Removal of The Integrated <strong>Grinder</strong><br />
For safety reasons the interior grinders are fi xed to the casing’s<br />
ground plate.<br />
7.6.1 Disconnect the main plug. Close and remove the hoppers. Place<br />
the grinder on its back and unscrew the hex nuts of the motors<br />
(three each). Store the nuts and washers in a safe place. Re-position<br />
the grinder on its rubber feet<br />
7.6.2 Take off the grinder cover (see chapter 7.2)<br />
7.6.3 Release the motors‘ plug-in connectors. Carefully pull the integrated<br />
grinder out of the casing.<br />
Do not change any grinder settings. The discs<br />
could be damaged when re-assembling the<br />
grinder.<br />
8. Trouble Shooting For Operating Faults<br />
8.1 Safety Devices of the <strong>Grinder</strong><br />
Thermal overload circuit breaker<br />
The motor of the grinder is protected by a thermal overload circuit<br />
breaker which interrupts the motor‘s electric circuit in the event of<br />
electric overload. The display shows an alarm signal. Pressing the<br />
PROG-button or the right single shot button releases the grinder<br />
back to operation mode.