Create successful ePaper yourself
Turn your PDF publications into a flip-book with our unique Google optimized e-Paper software.
|<br />
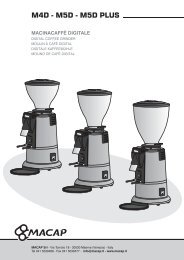
HORECA GASTRO GRINDER<br />
Operating Instructions<br />
<strong>K30</strong> <strong>TWIN</strong> <strong>Espresso</strong> <strong>Grinder</strong><br />
” Grind-on-Demand“<br />
The professional art of grinding<br />
since 1924
|<br />
HORECA GASTRO GRINDER<br />
Dear customer / service personnel<br />
the Double <strong>Espresso</strong> <strong>Grinder</strong> „<strong>K30</strong> <strong>TWIN</strong>” is a fully automatic espresso<br />
coffee grinder of the proven MAHLKÖNIG quality.<br />
We have developed this product with over 80 years of experience<br />
in the manufacture of coffee grinders assuring you of high quality<br />
grinding of all kinds of espresso and other types of coffee beans.<br />
<strong>Espresso</strong> as the base of various coffee specialities requires a very<br />
precise grind. With the „<strong>K30</strong> <strong>TWIN</strong>“ you can now grind two different<br />
kinds of espresso (like decaf and regular) simultaneously in one<br />
machine.<br />
Read through and observe the operating instructions, so you and<br />
your customers will thoroughly enjoy the ”<strong>K30</strong> <strong>TWIN</strong>”. Follow the<br />
safety instructions at all time and also advise your personell.<br />
Please store the instructions in a safe place. If anything is unclear or<br />
additional information is required, please contact your authorized<br />
dealer or us as the manufacturer. We will be pleased to advise you<br />
further.<br />
We wish you unlimited pleasure and success with our product<br />
MAHLKÖNIG GmbH & Co. KG
|<br />
HORECA GASTRO GRINDER<br />
Table of Contents<br />
1. Safety<br />
1.1 Symbols<br />
1.2 Safety Instructions<br />
1.3 Purpose of Use<br />
1.4 User Requirements<br />
2. Technical Data<br />
3. Description<br />
4. Set-up and Initial Adjustments<br />
4.1 Place of installation<br />
4.2 Locking in the hoppers<br />
4.3 Electrical Installation<br />
4.4 Adjustment of the port-a-fi lter rests<br />
4.5 Adjustment of the cleaning alarm<br />
5. Operation<br />
5.1 Instructions for the fi rst grinding steps<br />
5.2 Operating the grinder<br />
5.3 Interruption of grinding (break-function)<br />
5.4 Software Menu<br />
5.5 Describtion of the software chapters<br />
6. Cleaning<br />
6.1 Cleaning with GRINDZ TM <strong>Grinder</strong> Cleaner<br />
6.2 Cleaning the Drip Tray and the Hoppers<br />
6.3 Cleaning the <strong>Grinder</strong> Placement Surface<br />
6.4 Cleaning the <strong>Grinder</strong> Casing<br />
7. Maintenance and Repair<br />
7.1 Grinding fi neness adjustment with the grinder switched ON<br />
7.2 Taking off the grinder cover<br />
7.3 Basic Adjustment of The Interior <strong>Grinder</strong>s<br />
7.4 Cleaning of the Grinding Mechanism<br />
7.5 Grinding Disc Exchange<br />
7.6 Removal of The Integrated <strong>Grinder</strong><br />
8. Trouble Shooting For Operating Faults<br />
8.1 Safety Devices of the <strong>Grinder</strong><br />
8.2 Operating Fault<br />
8.3 Alarm Signals Showing in The Display<br />
9. Spare Parts<br />
10. Wiring Diagram<br />
11. Certifi cate<br />
12. Warranty Conditions
|<br />
HORECA GASTRO GRINDER<br />
1. Safety<br />
Please read carefully and observe the following<br />
safety instructions. Failure to do so can result in<br />
damage to the grinder and danger to the user.<br />
1.1 Symbols<br />
The following two symbols are used in these operating instructions:<br />
1.2 Safety Instructions<br />
Safety Instruction:<br />
Imminent accident danger if you fail to observe.<br />
General Instruction:<br />
Failure to observe can result in damage to the<br />
grinder and optimum operation cannot be guaranteed.<br />
Only whole roasted coffee beans may be ground in the <strong>K30</strong> <strong>TWIN</strong>!<br />
When unpacking please inspect whether the power supply (voltage)<br />
complies with the grinder voltage on the manufacturer’s<br />
name plate at the bottom of the grinder.<br />
Always remove the electrical plug from the outlet prior to removing<br />
the hopper or conducting maintenance or cleaning work on the<br />
grinder.<br />
Never operate a grinder with a damaged electrical cord. Inspect the<br />
grinder regularly for damages of the electrical cord, plug, etc.<br />
Any required repairs may only be conducted by authorized service<br />
personell. For this reason, please contact a customer service repair<br />
facility, your dealer or us directly as the manufacturer.<br />
Do not exceed the maximum allowable continuous grinding time<br />
of 20 min. Afterwards, allow the grinder to cool off before the next<br />
operation. Do not exceed the maximum allowable running cycle of<br />
4 sec. ON, 6 sec. OFF (6 double shots per minute, S3 40%) for 230V /<br />
50Hz, and 6 sec. ON, 15 sec. OFF (4 double shots per minute, S3 25%)<br />
for 115V / 60Hz.<br />
Do not make any modifi cations or alterations to the grinder. The<br />
manufacturer assumes absolutely no liability for damages occurring<br />
from failure to observe these instructions.<br />
Children cannot appreciate the dangers that can exist in the operation<br />
of electrical grinders. For this reason never leave children unsupervised<br />
with electronic appliances such as this grinder.<br />
Never operate the grinder in damp or wet surroundings.<br />
Never operate with wet hands
|<br />
HORECA GASTRO GRINDER<br />
1.3 Purpose of Use<br />
Only whole roasted coffee beans may be ground in the <strong>K30</strong> <strong>TWIN</strong><br />
grinder. Pay attention to use only clean and unground coffee. Never<br />
use the grinder to grind other products or objects.<br />
1.4 User Requirements<br />
No special requirements are necessary for the user of this grinder.<br />
It is nevertheless a prerequisite that these operating instructions<br />
have been carefully read and understood and that all instructions<br />
provided are observed. In addition safety-conscious operation is expected.<br />
2. Technical Data<br />
Type <strong>K30</strong> <strong>TWIN</strong><br />
Voltage/Frequency 200-230V / 50/60Hz<br />
240V / 50Hz<br />
100-115V / 50/60Hz<br />
Rotation<br />
230-240V 1420 rpm<br />
110-115V 1640 rpm<br />
Sound Emission<br />
Idle Operation 65 dB<br />
Operation 85 dB<br />
Pre-Fuse 16 A-slow<br />
Motor Fuse 5x20 10A slow<br />
Overload Circuit Breaker<br />
200-240V 4A T<br />
110-115V 7A T<br />
Max. Permissible Running 230V: 4 sec ON, 6 sec OFF<br />
Time of the <strong>Grinder</strong> 115V: 6 sec. ON, 15 sec. OFF<br />
Dimensions in mm B 368, H 590, T 300<br />
Weight 26 kg (57.3 lbs)<br />
Hopper Capacity 2 x 750 g (2 x 1.65 lbs.)<br />
(Please request technical data for other voltages and frequencies from the manufacturer<br />
or dealer)
|<br />
HORECA GASTRO GRINDER<br />
3. Description<br />
The main components and operating elements are pictured in the<br />
illustration.<br />
Pos. 1 Hopper with lid and fi nger protection<br />
Pos. 2 Lock screw for hopper<br />
Pos. 3 Grinding fi neness adjustment<br />
Pos. 4 Brake for grind adjustment<br />
Pos. 5 <strong>Grinder</strong> cover with lock screw<br />
Pos. 6 Display<br />
Pos. 7 Pre-selection button „single espresso“<br />
Pos. 8 Pre-selection button „double espresso“<br />
Pos. 9 „Program“-button<br />
Pos. 10 Spout<br />
Pos. 11 Port-a-fi lter mounting<br />
Pos. 12 Port-a-fi lter rest<br />
Pos. 13 Fastening screw for port-a-fi lter rest<br />
Pos. 14 Start / Stop switch<br />
Pos. 15 Drip tray (with hopper slides underneath)<br />
Pos. 16 Main switch (at the back of the grinder)<br />
1<br />
4<br />
5<br />
6<br />
7<br />
14<br />
12<br />
15<br />
2<br />
3<br />
9<br />
8<br />
10<br />
11<br />
13<br />
16
|<br />
HORECA GASTRO GRINDER<br />
4. Set-up and Initial Adjustments<br />
You have received your grinder in operating condition. Now you only<br />
need to place it in a safe place and connect it to the main power<br />
socket. Proceed as follows:<br />
4.1 Place of Installation<br />
Place the grinder on a level, vibration-free surface.<br />
Never operate the grinder in moist, or even<br />
worse, in wet surroundings!<br />
4.2 Locking in the hoppers<br />
Set the hopper into the bayonet socket. Grab the hopper with both<br />
hands and turn it carefully in clockwise direction, until the bayonet<br />
locks in.<br />
Always loosen the grind adjustment brakes and<br />
turn both adjustments to fi ne (setting 0) when<br />
locking in the hoppers. Turning the grind adjustment<br />
ring repeatedly without loosening the<br />
brake could damage the interlock.<br />
Fasten the lock screw for the hopper (pos. 2) to prevent the hoppers<br />
from unauthorized removal.<br />
4.3 Electrical Installation<br />
Prior to plugging in observe the following safety instructions:<br />
Protect your device with separate pre-fuses (not<br />
included in the scope of delivery) according to<br />
the information provided under point 2 „Technical<br />
Data“<br />
Make sure that the pre-fuse is not overloaded<br />
by other devices (e.g. fan heaters, deep freezers,<br />
etc)<br />
Check whether the main voltage and frequency<br />
correspond to the information on the rating<br />
plate underneath the grinder.<br />
Insert the plug into the corresponding grounded outlet.<br />
4.4 Adjustment of the port-a-fi lter rests<br />
The grinder is designed so that all different port-a-fi lters from various<br />
espresso machines fi t into the rest for hands-free grinding operation.<br />
4.4.1 Keep the grinder switched off. Slightly loosen the allen screws<br />
(pos. 13) with the included allen screw driver size 3mm and pull<br />
down the port-a-fi lter rest (pos. 12).<br />
4.4.2 Push the port-a-fi lter of your espresso machine onto the start/<br />
stop switch between the port-a-fi lter mounting (pos. 11) and the<br />
rest (pos 12). Now push up the port-a-fi lter rest until the port-afi<br />
lter holds on its own. Now refasten the screws.
|<br />
HORECA GASTRO GRINDER<br />
The adjustment is correct when the port-a-fi lter independently remains<br />
in the mounting.<br />
In case the port-a-fi lter rests does not fi t your<br />
espresso machine’s port-a-fi lter, please contact<br />
us or your local dealer. We will be happy to send<br />
you a different rest.<br />
4.5 Adjustment of the cleaning alarm<br />
The software of the <strong>K30</strong> <strong>TWIN</strong> has an integrated cleaning alarm<br />
which is activated at a pre-set amount of shots taken. This alarm<br />
should remind you of cleaning the grinder regularly in order to increase<br />
the discs‘ lifetime.<br />
MAHLKÖNIG recommends: The cleaning limit<br />
should be set to the amount of shots that are<br />
ground per week. (For the set-up of the limit<br />
and for resetting the counter after cleaning see<br />
chapter 5.5.9)<br />
5. Operation<br />
Once the grinder is set up and ready to operate a grinding test<br />
should be carried out.<br />
5.1 Instructions for the fi rst grinding steps<br />
Only use the <strong>K30</strong> <strong>TWIN</strong> espresso grinder for<br />
whole roasted coffee beans.<br />
5.2 Operating the grinder<br />
Observe the safety instructions under 1.2!<br />
Never exceed the maximum permissible continuous<br />
operating cycle of 4 sec ON, 6 sec OFF<br />
(S3 40%). Also do not exceed the maximum allowable<br />
continuous grinding time of 20 min. Afterwards,<br />
allow the grinder to cool down before<br />
the next operation.<br />
5.2.1 Switch on the grinder at the back of the casing (pos. 16).<br />
5.2.2 Open the hopper and pour whole roasted espresso beans into<br />
the hopper.<br />
Never pour in coffee powder which would result<br />
into immediate blocking of the discs.<br />
5.2.3 Adjust the grinding fi neness by pulling the grind adjustment<br />
interlock (pos. 4) and turning the ring (pos. 3) including the hopper<br />
to the desired position. Note that „0“ is the fi nest setting and „10“ is<br />
the coarsest. Let go and re-lock the brake to fi x the setting.<br />
coarse<br />
fi ne
|<br />
HORECA GASTRO GRINDER<br />
Test runs have proved grind adjustments 1 – 4<br />
to be the most common settings for espresso<br />
depending on the origin, roast and blend. This<br />
should be taken into account when adjusting<br />
the grinder for the fi rst time.<br />
5.2.4 For the fi rst test run the grinding time settings are pre-programmed<br />
for single shots to 2.0 sec and for double shots 4.0 sec.<br />
For changing these settings please see chapter 5.3.<br />
5.2.5 Choose the single or double pre-select-button according to<br />
your portafi lter. The LED shows which button is selected.<br />
Single espresso left grinder Single espresso right grinder<br />
Double espresso left grinder Double espresso right grinder<br />
5.2.6 Push your espresso machine’s portafi lter into the partafi lter<br />
mounting (pos. 11/12) so that the grinding process starts.<br />
The fi rst operation will not result in the desired<br />
amount of espresso because the grinder has<br />
to fi ll up with ground coffee. The second shot<br />
should give the correct result.<br />
5.2.7 Now brew a test portion of espresso using your machine. If the<br />
result is unsatisfactory, alter the adjustment again by varying the<br />
grinding time and grinding fi neness until the best coffee results<br />
have been achieved.<br />
5.3 Interruption of grinding (break-function)<br />
If the grinding process is interrupted before the set grinding time<br />
has expired, the LED in the active pre-selection button fl ashes. The<br />
grinding process can be re-started by pushing the port-a-fi lter back<br />
into the mounting. The missing quantity is ground. If this is not<br />
desired push the pre-selection button and the entire set grinding<br />
quantity or grinding time is available once again.<br />
5.4 Software Menu<br />
The following overview shows the handling of the <strong>K30</strong> <strong>TWIN</strong>’s software.
|<br />
HORECA GASTRO GRINDER<br />
PROG. Enter (go into a lower software menu level) P5<br />
right<br />
right<br />
left<br />
left<br />
go foreward in menu P8<br />
go back in menu P9<br />
decrease values in menu ( - button) P6<br />
increase values in menu ( + button) P7<br />
Display
|<br />
HORECA GASTRO GRINDER<br />
MAHLKOENIG<br />
GRINDER READY<br />
press<br />
PROG.<br />
Main Menu Sub Menu<br />
1) PROGRAM<br />
DOSE<br />
press<br />
right<br />
2) DOSE COUNTER<br />
press<br />
right<br />
press<br />
PROG.<br />
press<br />
PROG.<br />
GRINDER N° 1<br />
DOSE N° 1 2.000s<br />
(left grinder - single shot)<br />
press<br />
PROG.<br />
time blinking<br />
left<br />
left<br />
press<br />
PROG.<br />
save<br />
Sec.<br />
Sec.<br />
GR1: SHOTS1<br />
0000002<br />
(left grinder - 2 single shots)<br />
press<br />
right<br />
press<br />
right<br />
counter volumes represent examples<br />
press<br />
3) ALARM / RECORDS NO RECORDS<br />
PROG.<br />
or ALARM RECORDS e.g.<br />
GRINDER 1<br />
BLOCKED<br />
press<br />
right<br />
press<br />
right<br />
GRINDER N° 1<br />
DOSE N° 2 4.000s<br />
(left grinder - double shot)<br />
press<br />
PROG.<br />
time blinking<br />
left<br />
left<br />
press<br />
PROG.<br />
save<br />
Sec.<br />
Sec.<br />
GR1: SHOTS2<br />
0000120<br />
(left grinder - 120 double shots)<br />
GRINDER 1<br />
FAN TOO SLOW<br />
press<br />
right<br />
press<br />
right<br />
press<br />
right<br />
GRINDER N° 2<br />
DOSE N° 1 2.000s<br />
(right grinder - single shot)<br />
press<br />
PROG.<br />
time blinking<br />
left<br />
left<br />
press<br />
PROG.<br />
save<br />
Sec.<br />
Sec.<br />
GR2: SHOTS1<br />
0002123<br />
(right grinder - 2123 single shots)<br />
press<br />
right<br />
press<br />
right<br />
GRINDER N° 2<br />
DOS N° 2 4.000s<br />
(right grinder - double shot)<br />
press<br />
PROG.<br />
time blinking<br />
left<br />
left<br />
press<br />
PROG.<br />
save<br />
Sec.<br />
Sec.<br />
GR2: SHOTS2<br />
0000020<br />
(right grinder - 20 double shots)<br />
press<br />
right<br />
press<br />
right
|<br />
HORECA GASTRO GRINDER<br />
only service menu<br />
Main Menu Sub Menu<br />
4) LANGUAGE, REL<br />
SW, SERIAL N°<br />
press<br />
right<br />
press<br />
PROG.<br />
4-1) LANGUAGE<br />
ENGLISH<br />
press<br />
PROG.<br />
LANGUAGE BLINKING<br />
left<br />
left<br />
press<br />
PROG.<br />
SAVE<br />
press<br />
5) RESET RESET<br />
PROG. GRINDER N° 1<br />
press<br />
right<br />
press<br />
right<br />
CHANGE LANGUAGE<br />
CHANGE LANGUAGE<br />
press<br />
PROG.<br />
RESETTING<br />
GRINDER N° 1<br />
set dose counter<br />
of left grinder back to 0<br />
press<br />
right<br />
4-2) SW RELEASE<br />
0.07<br />
RESET<br />
GRINDER N° 2<br />
press<br />
PROG.<br />
RESETTING<br />
GRINDER N° 2<br />
set dose counter<br />
of right grinder back to 0<br />
press<br />
right<br />
press<br />
right<br />
4-3) SERIAL N°<br />
1234<br />
RESET<br />
ALARM RECORDS<br />
press<br />
PROG.<br />
RESETTING<br />
ALARM RECORDS<br />
delete all<br />
alarm records<br />
press<br />
right<br />
press<br />
right<br />
RESET<br />
CLEANING COUNTER<br />
press<br />
PROG.<br />
RESETTING<br />
CLEANING COUNTER<br />
set cleaning counter<br />
back to 0<br />
press<br />
right
|<br />
HORECA GASTRO GRINDER<br />
only service menu<br />
Main Menu Sub Menu<br />
press<br />
6) SETUP 6-1) CLEANING AL.<br />
PROG.<br />
NO<br />
press<br />
right<br />
6-1) CLEANING AL.<br />
NO YES<br />
left<br />
left<br />
press<br />
PROG.<br />
press<br />
PROG.<br />
SAVE<br />
YES<br />
or<br />
NO<br />
press<br />
right<br />
6-2) CLEANING AL.<br />
1000<br />
press<br />
PROG.<br />
NUMBER blinking<br />
left<br />
left<br />
SAVE<br />
press<br />
PROG.<br />
press<br />
right<br />
6-3) SERIAL N°<br />
1234<br />
only changable<br />
in factory with super pin<br />
press<br />
right
|<br />
HORECA GASTRO GRINDER<br />
only service menu<br />
Main Menu Sub Menu<br />
press<br />
7) TEST 7-1) INPUT, DIP<br />
PROG.<br />
SWITCH, FAN<br />
press<br />
right<br />
press<br />
PROG.<br />
SIC SW1 SW2 MC1<br />
OFF OFF OFF OFF<br />
SIC: Lid safety switch<br />
SW1: switch left grinder<br />
SW2: switch right grinder<br />
MC1: 230V / 115V<br />
ON: Contact closed<br />
press<br />
right<br />
F1 (HZ) F2 (HZ)<br />
ON 120 OFF 0<br />
F1: FAN 1<br />
(HZ): Frequency of F1<br />
F2: FAN 2<br />
(HZ): Frequency of F2<br />
press<br />
right<br />
7-5) POWER<br />
SUPPLY<br />
press<br />
PROG.<br />
right<br />
press<br />
right<br />
press<br />
right<br />
7-2) TRIAK, RELAY<br />
CURRNET<br />
press<br />
PROG.<br />
GR1=OFF RL=ON<br />
I = 4.89A<br />
press<br />
left<br />
activates / deactivates<br />
the triak of the grinder<br />
left<br />
activates / deactivates<br />
the relayof the grinder<br />
right<br />
right<br />
press<br />
for grinder 1<br />
7-6) RS232<br />
INTERFACE<br />
press<br />
PROG.<br />
V-SUPPLY = 27.3V testing the RS 232<br />
Interface<br />
or<br />
for grinder 2<br />
right<br />
press<br />
right<br />
press<br />
right<br />
press<br />
7-3) BUTTONS 7-4) DISPLAY<br />
press<br />
PROG.<br />
KEYB=<br />
(checking the function of the<br />
buttons with numbers)<br />
press<br />
left<br />
press<br />
left<br />
press<br />
right<br />
press<br />
right<br />
END<br />
for P5<br />
for P6<br />
for P7<br />
for P9<br />
for P8<br />
right<br />
press<br />
PROG.<br />
LCD<br />
(testing all display dots)<br />
press<br />
right<br />
LCD<br />
press<br />
right<br />
LED<br />
(testing all LED’s)<br />
press<br />
right<br />
BUZZ<br />
(testing the alarm)<br />
press<br />
right<br />
press<br />
right
|<br />
HORECA GASTRO GRINDER<br />
only service menu<br />
Main Menu Sub Menu<br />
8) CHANGE<br />
PASSWORD<br />
press<br />
right<br />
9) CLEANING COUNT.<br />
RESET<br />
press<br />
right<br />
MAHLKOENIG<br />
GRINDER READY<br />
END MENU<br />
press<br />
PROG.<br />
press<br />
PROG.<br />
PASSWORD<br />
XXXXXX<br />
the first X blinking<br />
left<br />
left<br />
press<br />
right<br />
for next number<br />
and<br />
for saving in the end<br />
SAVE<br />
9-1) CLEANING AT<br />
1000<br />
press<br />
PROG.<br />
NUMBER blinking<br />
left<br />
left<br />
press<br />
PROG.<br />
SAVE<br />
press<br />
right<br />
press<br />
right<br />
9-2) RESET<br />
press<br />
PROG.<br />
RESETTING<br />
CLEANING COUNTER<br />
press<br />
right
|<br />
HORECA GASTRO GRINDER<br />
Pressing the PROG-button once enters the user<br />
menu (menu chapters 1-4 and 9).<br />
Pressing the PROG-button for appr. 5 seconds<br />
and typing in the password enters the service<br />
menu (menu chapters 1-8).<br />
Password:<br />
Until serial number 18571: „666 666“ (software version V0.12)<br />
From serial number 18572: „000 000“ (software version V0.13)<br />
5.5 Describtion of the software chapters<br />
5.5.1 Program Dose<br />
Adjust and change the grinding time for single and double dosing<br />
for both grinders.<br />
GRINDER N°1 = left grinder<br />
GRINDER N°2 = right grinder<br />
DOS N°1 = single espresso<br />
DOS N°2 = double espresso<br />
The time can be set in 0.005 sec steps. A change of 0.1 seconds adds<br />
or takes away approximately 0.5 gram of coffee. (This reference value<br />
can vary for different coffees and roasting degrees.)<br />
Press and hold the PROG-button after changing the time to quickexit<br />
the menu. The display will show „MAHLKOENIG GRINDER<br />
READY“.<br />
5.5.2 Dose Counter<br />
Read the counters for single and double shots for both grinders.<br />
5.5.3 Alarm Records<br />
Alarms are saved in the order of appearance (the last one to appear<br />
fi rst in line). 20 alarms can be saved, the 2<strong>1st</strong> overwrites the oldest.<br />
For a detailed describtion of all alarms with causes and remedies<br />
please see chapter 8.3.<br />
5.5.4 Language, Software Release, Serial Number<br />
Change the language of the menu (Italian, English, French, German,<br />
Spanish). Read the software release number and serial number of<br />
the grinder.<br />
5.5.5 Reset (only in the service menu)<br />
All counters and alarm records can be set back to Zero or deleated<br />
respectively.<br />
5.5.6 Setup (only in the service menu)<br />
Set up the cleaning alarm:<br />
• Switch ON or OFF the cleaning alarm.<br />
• Set the Cleaning Alarm Limit, which is the max. allowable limit<br />
that can be set in menu point 9.<br />
5.5.7 Test (only in the service menu)<br />
Check the functionality of the different electrical components and<br />
functions in the grinder. This menu point should help service partners<br />
to locate potential malfunctions.<br />
5.5.8 Change Passwort (only in the service menu)<br />
Change the passwort to your individual 6-digit number. (see chapter<br />
5.4)
|<br />
HORECA GASTRO GRINDER<br />
5.5.9 Cleaning Counter Reset<br />
Set the cleaning counter to the appropriate amount of shots so<br />
that the alarm reminds the user to clean the discs on a regular basis.<br />
(see chapter 4.5)<br />
Set the counter back to Zero after cleaning the grinder.<br />
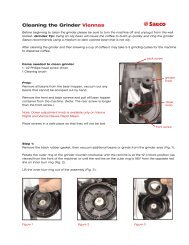
6. Cleaning<br />
We recommend cleaning your espresso grinder regularly. Only use<br />
food-safe cleaning detergents.<br />
Always pull the main plug from the socket before<br />
carrying out maintenance or cleaning work<br />
on the grinder.<br />
Observe the safety instructions under 1.2.<br />
Do not let any foreign object fall into the grinding<br />
mechanism.<br />
6.1 Cleaning with GRINDZ TM <strong>Grinder</strong> Cleaner<br />
We recommend cleaning your espresso grinder once a week with<br />
our GRINDZ <strong>Grinder</strong> Cleaner.<br />
MAHLKÖNIG recommends: The cleaning limit<br />
should be set to the amount of shots that are<br />
ground per week. (For the set-up of the limit<br />
and for resetting the counter after cleaning see<br />
chapter 5.5.9)<br />
Remove all beans from the hopper or take the hopper slides from<br />
under the drip tray and push them into the slots in the bayonet<br />
adapter. Remove the lock screw. Now you can take off the hopper.<br />
When taking off the hopper ALWAYS release the<br />
grind adjustment brakes and turn both rings to<br />
coarse. This will block the adjustment. Turning<br />
the grind adjustment ring repeatedly without<br />
loosening the brake could damage the interlock.<br />
Grab the hopper with both hands and turn it anti-clockwise until<br />
it is released by the bayonet. Empty the input chute of all espresso<br />
beans and vacuum out the disc casing.<br />
Also empty the hopper and relock it onto the grinder. Take off the<br />
hopper slide.<br />
When engaging the hopper into the bayonet<br />
ALWAYS release the grind adjustment brakes<br />
and turn both rings to fi ne. This will block the<br />
adjustment. Turning the grind adjustment ring<br />
repeatedly without loosening the brake could<br />
damage the interlock.<br />
Drop the recommended dose of GRINDZ (35 - 40g) into the empty<br />
grinder hopper. You can also use the cap of the jar for dosing. A full<br />
cap will yield between 35 - 40 grams.<br />
Turn the fi neness adjustment to medium and operate as if grinding<br />
coffee beans.<br />
Once complete, we recommend passing twice as much coffee<br />
through to purge any residue.
|<br />
HORECA GASTRO GRINDER<br />
Set the cleaning counter back to Zero, if the<br />
grinder was cleaned due to the cleaning alarm.<br />
(see chapter 5.5.9)<br />
6.2 Cleaning the Drip Tray and the Hoppers<br />
The hoppers, their lids and the drip tray (without hopper slides) can<br />
be cleaned in a dishwasher or in a bath of water with dish detergent.<br />
Depending on the dish washing detergent the<br />
transparent plastic parts of the hopper can<br />
slightly fade out.<br />
6.3 Cleaning the <strong>Grinder</strong> Placement Surface<br />
6.3.1 Pull out the main plug.<br />
6.3.2 Take off the drip tray.<br />
6.3.3 Tilt the grinder to one side and clean the area on which it<br />
stands and the bottom of its base. Both surfaces must be dry and<br />
free of oil and grease.<br />
6.3.4 Reposition the grinder and re-insert the drip tray.<br />
6.4 Cleaning the <strong>Grinder</strong> Casing<br />
Clean the outside of the casing from time to time using a damp<br />
cloth.<br />
Be carefull of sharp edges when cleaning. There<br />
is a risk of injury.<br />
7. Maintenance and Repair<br />
Any required repairs may only be conducted by<br />
authorized specialist personnel. For this reason,<br />
please contact a customer service repair facility,<br />
your dealer or us directly as the manufacturer.<br />
Always pull the main plug from the socket before<br />
carrying out maintenance or cleaning<br />
work on the device!<br />
Inspect the grinder regularly for damage, particularly<br />
to the electrical cable, plug,<br />
etc.<br />
7.1 Grinding fi neness adjustment with the grinder switched ON<br />
Depending on the wear and tear of the grinding discs or after opening<br />
the interior grinder the setting of the fi nest grind adjustment<br />
has to be checked. Proceed as follows:<br />
7.1.1 Set the grinding fi neness adjustment to „0“.<br />
7.1.2 Close and remove the hopper.<br />
7.1.3 Remove the remaining beans from the fi ller shaft and vacuum<br />
out the grinder casing.<br />
7.1.4 Remove the sealing ring from the fi ller shaft.<br />
7.1.5 Loosen – do not unscrew – the adjusting screws with the allen<br />
key size 2.5mm.
|<br />
HORECA GASTRO GRINDER<br />
7.1.6 Insert the adjusting handle (service tool) into the fi ller shaft.<br />
The adjusting handle must engage in the slot into fi ller shaft’s<br />
transverse bar.<br />
7.1.7 Hold the adjusting handle fi rmly and push the port-a-fi lter into<br />
the port-a-fi lter mounting until the grinder switches on.<br />
7.1.8 Whilst the grinder is running, turn the adjusting handle clockwise<br />
until a slight ringing sound becomes audible. Now turn the<br />
adjusting handle slightly anti-clockwise until no further ringing<br />
sound can be heard.<br />
It is important to ensure that no grinding disk<br />
„rattling“ can be heard at the fi nest setting!<br />
Otherwise the service life of the discs will be<br />
signifi cantly reduced.<br />
7.1.9 Tighten the adjusting screws and remove the adjusting handle<br />
from the fi ller shaft.<br />
7.1.10 Insert the sealing ring again. If the sealing ring is damaged it<br />
must be replaced.<br />
7.1.11 Replace the hopper and allow it to engage in the bayonet and<br />
replace the lock screw. Open the hopper slide.<br />
7.1.12 Reset the desired grinding fi neness.<br />
7.1.13 Push your espresso machine’s port-a-fi lter into the port-a-fi lter<br />
mounting (pos. 11/12) until the grinding process is switched on.<br />
7.1.14 Only remove the port-a-fi lter once the grinding process has<br />
been completed. Repeat approximately twice in order to fi ll the<br />
grinder casing with the re-adjusted ground coffee.<br />
7.2 Taking off the grinder cover<br />
Grind or take out all coffee bean residues. Switch off the grinder<br />
and pull the main plug. Turn both grind adjustment rings to coarse<br />
and fi x the brakes. Loosen the lock screw in the front with the allen<br />
screw driver size 2mm. Carefully lift the grinder cover upwards.<br />
7.3 Basic Adjustment of The Interior <strong>Grinder</strong>s<br />
The basic adjustment to a moderately fi ne setting has been carried<br />
out in the factory using espresso beans. The following markings<br />
have been made on the grinding mechanism (interior):<br />
Red mark 1: Basic adjustment 0, fi nest setting and minimum grinding<br />
disc spacing<br />
Red mark 2: Basic factory setting and also the position for installing<br />
and removing the lid, in order to achieve the fi nest setting after<br />
positioning the lid.<br />
Red mark 1<br />
Red mark 2
|<br />
HORECA GASTRO GRINDER<br />
Never rotate the grinding discs clockwise further<br />
then the red mark 1, as the grinding discs<br />
may otherwise be damaged.<br />
7.4 Cleaning of the Grinding Mechanism<br />
After opening the grinder cover the grinding mechanism with the<br />
discs can be vacuumed. Check for foreign objects in the grinding<br />
gear.<br />
Do not change any grinder settings. The discs<br />
could be damaged when re-assembling the<br />
grinder.<br />
Carefully vacuum the grinder casing. Take care no to damage any<br />
cables.<br />
7.5 Grinding Disc Exchange<br />
Grinding disc replacement should only be carried out by authorised<br />
specialists or a customer service centre. The „Repair manual<br />
<strong>K30</strong> <strong>TWIN</strong> grinding disc replacement and basic adjustment“ can be<br />
downloaded for replacing grinding discs.<br />
Grinding disc replacement may also be carried out using a replacement<br />
(AT) integrated grinder. To do this, order an AT integrated<br />
grinder. On receipt of the AT integrated grinder, remove your integrated<br />
grinder from the K 30 <strong>TWIN</strong> according to chapter 7.6 and<br />
install the AT integrated grinder into the K 30 <strong>TWIN</strong>. Return your old<br />
integrated grinder in the packaging.<br />
7.6 Removal of The Integrated <strong>Grinder</strong><br />
For safety reasons the interior grinders are fi xed to the casing’s<br />
ground plate.<br />
7.6.1 Disconnect the main plug. Close and remove the hoppers. Place<br />
the grinder on its back and unscrew the hex nuts of the motors<br />
(three each). Store the nuts and washers in a safe place. Re-position<br />
the grinder on its rubber feet<br />
7.6.2 Take off the grinder cover (see chapter 7.2)<br />
7.6.3 Release the motors‘ plug-in connectors. Carefully pull the integrated<br />
grinder out of the casing.<br />
Do not change any grinder settings. The discs<br />
could be damaged when re-assembling the<br />
grinder.<br />
8. Trouble Shooting For Operating Faults<br />
8.1 Safety Devices of the <strong>Grinder</strong><br />
Thermal overload circuit breaker<br />
The motor of the grinder is protected by a thermal overload circuit<br />
breaker which interrupts the motor‘s electric circuit in the event of<br />
electric overload. The display shows an alarm signal. Pressing the<br />
PROG-button or the right single shot button releases the grinder<br />
back to operation mode.
|<br />
HORECA GASTRO GRINDER<br />
The user has no infl uence whatsoever on this<br />
circuit breaker. If the circuit breaker trips repeatedly<br />
an authorised service partner must be<br />
consulted as the motor‘s winding may be damaged.<br />
Motor protector<br />
A thermo switch is built into the motor’s winding to block the motor<br />
in case of overheating. The display shows an alarm signal. Let<br />
the motor cool down for approx. 30 minutes. The switch will connect<br />
automatically when the winding is functional again.<br />
Magnetic switch in the grinder’s lid<br />
The lid of the grinder is secured with a magnetical switch. The<br />
grinder only operates with the lid closed. In case the grinder cover<br />
is opened with the main switch ON there will be an alarm signal<br />
in the display (chapter 8.3). Only closing the cover and pressing the<br />
PROG-button will clear the alarm.<br />
8.2 Operating Fault<br />
Defect<br />
Cause<br />
The grinder hums<br />
but does not<br />
grind.<br />
The spout is<br />
clogged.<br />
Grinding is set too<br />
fi ne.<br />
A foreign object<br />
is in the grinding<br />
mechanism.<br />
The grinder does The grinding time<br />
not grind, the dis- is set to 0.<br />
play is lit, single<br />
cup is pre-selected.<br />
Remedy<br />
Set grinding fi neness to<br />
„coarse“ and trigger the<br />
grinding process. The grinder<br />
will then grind itself free.<br />
Afterwards, return the setting<br />
to the desired grinding<br />
fi neness.<br />
Turn the grinding fi neness<br />
setting to the right,<br />
to „coarse“, and trigger the<br />
grinding process. The grinder<br />
will then grind itself free.<br />
Afterwards, return the setting<br />
to the desired grinding<br />
fi neness.<br />
Clean the grinding mechanism<br />
as described and remove<br />
the foreign object.<br />
Observe the safety instructions!<br />
Reset the grinding time.
|<br />
HORECA GASTRO GRINDER<br />
Defect<br />
The grinder does<br />
not start, the<br />
display is not lit.<br />
Cause<br />
The main plug is<br />
not inserted.<br />
The pre-fuse has<br />
tripped.<br />
Remedy<br />
Insert the main plug into<br />
the socket.<br />
Check the pre-fuse. Restore<br />
the pre-fuse to its initial<br />
state or replace it. Determine<br />
whether other devices<br />
are connected to this<br />
fuse.<br />
In the case of other malfunctions or continued faults, please contact<br />
your dealer or your authorised customer service centre.<br />
8.3 Alarm Signals Showing in The Display<br />
Several sensors have been built into the grinder in order to control<br />
operation and to protect the motor and the grinding gear. The following<br />
alarm signals can show in the display:<br />
Alarm Record<br />
LOSS DATA<br />
GRINDER X<br />
BLOCKED<br />
Cause<br />
• Saved data was<br />
lost.<br />
Correction<br />
Press PROG-button. Grind-<br />
• ers are not blocked.<br />
• Current User:<br />
consumption • Press PROG-button. The<br />
higher than other grinder can be used<br />
limit.<br />
again.<br />
• Motor blocked. • Turn grind adjustment of<br />
• Foreign object/ blocked grinder to coarse.<br />
beans blocking Switch off and back on<br />
the grinder. the grinder, start grind-<br />
• Jammed spout. ing, the grinder grinds<br />
• Exploring coil itself free. Reset the grind<br />
on power board adjustment to the desired<br />
malfunction- espresso setting.<br />
ing.<br />
• Clean the spout. Take off<br />
the cover and check the<br />
interior grinder’s spout<br />
(position of fl at spring).<br />
• Interchange the grinders‘<br />
plugs at the power board<br />
to determine the cause of<br />
the malfunction. (grinder<br />
or board)<br />
• Check current consumption<br />
in service-menu point<br />
7. (desired value at idle<br />
operation: I < 3,5A
|<br />
HORECA GASTRO GRINDER<br />
Alarm Record<br />
TRIAC GRIND-<br />
ER X OUT OF<br />
WORK<br />
GRINDER X<br />
FAN BLOCKED<br />
Cause<br />
• Triac not User:<br />
interconnected • Press PROG-button. The<br />
(optical coupler other grinder can be used<br />
defective). again.<br />
• <strong>Grinder</strong>’s plug • Check grinder’s plug for<br />
not connected. correct position.<br />
• Fuse defective. • Check capacitors‘ connec-<br />
• Triac defective. tions and correct position.<br />
• Capacitor • Interchange the grinders‘<br />
defective. plugs at the power board<br />
• Temperature to determine the cause of<br />
sensor in the the malfunction. (grinder<br />
motor winding or board)<br />
defective (0A) Service technician:<br />
• Circuit board • Interchange capacitors<br />
failure.<br />
and test<br />
• Check optical coupler (disassemble<br />
power board)<br />
• Check triac (disassemble<br />
power board)<br />
• Foreign object<br />
is blocking the<br />
fan.<br />
• Plug at processor<br />
board not<br />
connected.<br />
• Fan defective.<br />
Correction<br />
Service technician:<br />
• Test exploring coil on<br />
power board. If applicable<br />
change power board.<br />
• Check fan for foreign<br />
objects.<br />
• Interchange the fans‘<br />
plugs at the processor<br />
board to determine the<br />
cause of the malfunction.<br />
(fan or socket)<br />
• Exchange fan.<br />
Alarm Record<br />
GRINDER X<br />
FAN TOO SLOW<br />
CLEAN GRIND-<br />
ER X<br />
Cause<br />
• Fan runs<br />
with reduced<br />
frequency for<br />
more than<br />
three seconds.<br />
• Foreign object<br />
is blocking the<br />
fan.<br />
Correction<br />
• Check fan for foreign<br />
objects.<br />
• Interchange the fans‘<br />
plugs at the processor<br />
board to determine the<br />
cause of the malfunction.<br />
(fan or socket)<br />
• Exchange fan.<br />
• Cleaning coun- • Press PROG-button. Grindter<br />
has reached ers are not blocked.<br />
the pre-set • Clean the grinder (with<br />
alarm limit. GRINDZ or unscrew,<br />
• Counter was vakuum, brush)<br />
not reset after • Reset cleaning counter in<br />
last cleaning software user menu (chap-<br />
process.<br />
ter 9) or<br />
• Set cleaning limit higher<br />
in software service menu<br />
(chapter 6) or<br />
• Switch off the cleaning<br />
alarm in software service<br />
menu (chapter 6).<br />
• Recommendation: adjust<br />
the cleaning alarm to the<br />
weekly amount of shots<br />
taken for a regular reminder<br />
to clean the grinder.
|<br />
HORECA GASTRO GRINDER<br />
Alarm Record<br />
COVER OPEN<br />
LOW VOLTAGE<br />
Cause<br />
• Magnet switch<br />
open.<br />
• <strong>Grinder</strong>’s cover<br />
open.<br />
• Switch’s plug<br />
not connected<br />
at the processor<br />
board.<br />
• Strand of<br />
switch defective.<br />
• Magnet switch<br />
defective.<br />
• Contact magnet<br />
in cover<br />
missing.<br />
Correction<br />
• After closing the magnet<br />
switch press PROG-button.<br />
<strong>Grinder</strong>s are not blocked.<br />
• Check the plug/socket<br />
of the switch for correct<br />
position.<br />
• Bridge the contact in order<br />
to rule out defective processor<br />
board.<br />
• Test new magnet switch<br />
• Glue in a new contact<br />
magnet into the cover.<br />
• Main power • Switch off and on the<br />
board runs at grinder.<br />
35% under nor- • Check mains voltage.<br />
mal operation. Check junction box.<br />
• Power consumption<br />
at<br />
outlet too high.<br />
• Mains voltage<br />
too low.<br />
9. Spare Parts<br />
Spare parts are usually ordered from your customer service centre<br />
or your local dealer. To ensure quick and correct processing of your<br />
order, the following information is absolutely essential:<br />
1. Type designation, serial number and voltage of the grinder (on<br />
the rating plate underneath the grinder).<br />
2. An exact description of the part to be replaced or the article<br />
number.
|<br />
HORECA GASTRO GRINDER<br />
10. Wiring Diagram 100 - 115V 50/60Hz
|<br />
HORECA GASTRO GRINDER<br />
10. Wiring Diagram 230V 50Hz
|<br />
HORECA GASTRO GRINDER<br />
10. Wiring Diagram 240V 50Hz
|<br />
HORECA GASTRO GRINDER<br />
11. Certifi cate<br />
EC Declaration Conformity<br />
As defined by EMC-directive 89/392/EWG<br />
Name of the manufacturer or in the EU residential authorized person:<br />
HEMRO AG<br />
Address of the manufacturer or the authorized person:<br />
Bramenstrasse 11 – CH-8184 Bachenbülach<br />
announce, that the machine below<br />
product type : commercial device for food processing<br />
machine description : Coffee grinder<br />
machine typ : <strong>K30</strong> <strong>TWIN</strong><br />
MAHLKÖNIG GmbH & Co.KG<br />
Tilsiter Straße 142, 22047 Hamburg<br />
Telefon : 040 - 69 69 40 - 0<br />
Telefax : 040 - 69 39 721<br />
is in compliance with the conditions of the Directive of Machines 98/37/EG<br />
and with the main standards stipulated in the Directive concerning low tension<br />
73/23/EWG and applies to the national laws that transpose it.<br />
Issued in Bachenbülach : 01.01.2008<br />
Function of subscriber : Managing Director<br />
Name of subscriber : Nils Erichsen<br />
Signature<br />
MAHLKÖNIG GmbH & Co. KG, Amtsgericht Hamburg HR A 85 074; Persönlich haftende Gesellschafterin:<br />
Beteiligungsgesellschaft MAHLKÖNIG mbH, Eingetragen Amtsgericht Hamburg HR B 45 324, Geschäftsführer: Nils Erichsen<br />
Dresdner Bank AG (BLZ 200 800 00) Kto. 383 780 400 Postbank Hamburg (BLZ 200 100 20) Kto. 253 89-203<br />
Commerzbank AG (BLZ 200 400 00) Kto. 21 10 294 Ust. Id. Nr.: DE 118 37 22 65<br />
12. Warranty Conditions<br />
1. The warranty period is 1 year from the date of purchase.<br />
2. The warranty covers all damages that can be attributed to inferior<br />
materials or defective workmanship. Corresponding grinders<br />
will be repaired or replaced free-of-charge, with the exception<br />
of transport or freight charges. Transport is the responsibility of<br />
the customer. Therefore, avoid damages with all returns by correct<br />
packing.<br />
3. The grinder may only be opened for cleaning purposes in accordance<br />
with the Operating Instructions.<br />
4. This warranty does not cover damages which have occurred<br />
through: Improper usage, improper maintenance, lack of servicing,<br />
usage for purposes other than those intended, incorrect<br />
installation, incorrect voltage, breakage, natural wear or for reasons<br />
beyond our sphere of infl uence.<br />
5. In order to maintain the warranty, only original spare parts and<br />
accessory parts may be used.<br />
6. Observe in addition our General Delivery Conditions in their respective<br />
current version.<br />
7. The manufacturer is in no way liable for consecutive or secondary<br />
damages.<br />
8. The warranty does not cover costs resulting from repairs conducted<br />
by non-authorized personnel.
|<br />
HORECA GASTRO GRINDER<br />
The professional art of grinding<br />
since 1924<br />
MAHLKÖNIG GmbH & Co. KG<br />
Tilsiter Straße 142<br />
D- 22047 Hamburg, Germany<br />
Tel.: 040 / 69 69 40-0<br />
Fax: 040 / 69 39 721<br />
offi ce@mahlkoenig.de ; www.mahlkoenig.de<br />
December 2008<br />
Subject to change without prior notice!!