PrepSEQ™ Mycoplasma Nucleic Acid Extraction Kit - Invitrogen
PrepSEQ™ Mycoplasma Nucleic Acid Extraction Kit - Invitrogen
PrepSEQ™ Mycoplasma Nucleic Acid Extraction Kit - Invitrogen

Create successful ePaper yourself
Turn your PDF publications into a flip-book with our unique Google optimized e-Paper software.
PrepSEQ Sample Preparation <strong>Kit</strong>s<br />
Protocol<br />
For use with:<br />
PrepSEQ <strong>Mycoplasma</strong> <strong>Nucleic</strong> <strong>Acid</strong> <strong>Extraction</strong> <strong>Kit</strong><br />
PrepSEQ 1-2-3 <strong>Nucleic</strong> <strong>Acid</strong> <strong>Extraction</strong> <strong>Kit</strong>
© 2010, Life Technologies Corporation. All rights reserved.<br />
For Research Use Only. Not intended for any animal or human therapeutic or diagnostic use.<br />
Information in this document is subject to change without notice. Life Technologies Corporation assumes no responsibility for any errors that may appear in<br />
this document. This document is believed to be complete and accurate at the time of publication. In no event shall Life Technologies Corporation be liable<br />
for incidental, special, multiple, or consequential damages in connection with or arising from the use of this document.<br />
APPLIED BIOSYSTEMS DISCLAIMS ALL WARRANTIES WITH RESPECT TO THIS DOCUMENT, EXPRESSED OR IMPLIED, INCLUDING<br />
BUT NOT LIMITED TO THOSE OF MERCHANTABILITY OR FITNESS FOR A PARTICULAR PURPOSE. IN NO EVENT SHALL APPLIED<br />
BIOSYSTEMS BE LIABLE, WHETHER IN CONTRACT, TORT, WARRANTY, OR UNDER ANY STATUTE OR ON ANY OTHER BASIS FOR<br />
SPECIAL, INCIDENTAL, INDIRECT, PUNITIVE, MULTIPLE OR CONSEQUENTIAL DAMAGES IN CONNECTION WITH OR ARISING FROM<br />
THIS DOCUMENT, INCLUDING BUT NOT LIMITED TO THE USE THEREOF.<br />
NOTICE TO PURCHASER: LIMITED LICENSE<br />
This product or portions thereof is manufactured and sold under license from GE Healthcare under U.S. Patent Nos. 5,523,231 and 5,681,946 and other<br />
foreign patents. End Users are specifically not authorized to and are forbidden from reselling, transferring or distributing any products either as a stand<br />
alone product or as a component of another product.<br />
NOTICE TO PURCHASER: License Disclaimer<br />
This product conveys no patent rights, expressly or by implication, under any patent or patent application owned by or licensable by Applied Biosystems that<br />
covers any thermal cycling instrument, apparatus or system, any composition, reagent, or kit, or any process. Specifically, but without limitation, no right,<br />
immunity, authorization, or license is granted, expressly or by implication, for the processes of PCR, real-time PCR, reverse-transcription PCR, or the 5'<br />
nuclease assay.<br />
Further information regarding 5′ nuclease licensing program and commercial service licenses may be obtained by contacting the Director of Licensing,<br />
Applied Biosystems, 850 Lincoln Centre Drive, Foster City, California 94404, USA.<br />
TRADEMARKS:<br />
The trademarks mentioned herein are the property of Life Technologies Corporation or their respective owners.<br />
Part Number 4401253 Rev. C<br />
02/2010
PrepSEQ Sample Preparation <strong>Kit</strong>s Protocol<br />
Contents<br />
Preface . . . . . . . . . . . . . . . . . . . . . . . . . . . . . . . . . . . . . . . . . . . . . 5<br />
Safety information . . . . . . . . . . . . . . . . . . . . . . . . . . . . . . . . . . . . . . . . . . . . . . . . . . . . 5<br />
How to use this guide . . . . . . . . . . . . . . . . . . . . . . . . . . . . . . . . . . . . . . . . . . . . . . . . . 6<br />
How to obtain support . . . . . . . . . . . . . . . . . . . . . . . . . . . . . . . . . . . . . . . . . . . . . . . . 6<br />
Protocol PrepSEQ Sample Preparation <strong>Kit</strong>s . . . . . . . . . . . . . . . . . . . . . . 7<br />
About the kits . . . . . . . . . . . . . . . . . . . . . . . . . . . . . . . . . . . . . . . . . . . . . . . . . . . . . . . 7<br />
Preparation of sample lysates that contain target DNA . . . . . . . . . . . . . . . . . . . . . . . 9<br />
Sample preparation considerations . . . . . . . . . . . . . . . . . . . . . . . . . . . . . . . . . . . 9<br />
Before you begin . . . . . . . . . . . . . . . . . . . . . . . . . . . . . . . . . . . . . . . . . . . . . . . . 10<br />
PrepSEQ 1-2-3 protocol for <strong>Mycoplasma</strong> or MMV detection . . . . . . . . . . . . . . 12<br />
Prepare small-scale (100 to 2000 µL) lysate (<strong>Mycoplasma</strong> detection only) . . . . 14<br />
Prepare large-scale (2 to 10 mL) lysate (<strong>Mycoplasma</strong> detection only) . . . . . . . . 17<br />
<strong>Extraction</strong> of <strong>Mycoplasma</strong> or Mouse Minute Virus DNA from lysate . . . . . . . . . . . . 20<br />
Double DNA extraction . . . . . . . . . . . . . . . . . . . . . . . . . . . . . . . . . . . . . . . . . . . . 22<br />
Single DNA extraction . . . . . . . . . . . . . . . . . . . . . . . . . . . . . . . . . . . . . . . . . . . . 27<br />
Troubleshooting . . . . . . . . . . . . . . . . . . . . . . . . . . . . . . . . . . . . . . . . . . . . . . . . . . . . 30<br />
Appendix A Background and Ordering Information . . . . . . . . . . . . . . . . . . . 31<br />
Product overview . . . . . . . . . . . . . . . . . . . . . . . . . . . . . . . . . . . . . . . . . . . . . . . . . . . 31<br />
Required materials . . . . . . . . . . . . . . . . . . . . . . . . . . . . . . . . . . . . . . . . . . . . . . . . . . 31<br />
Appendix B Safety . . . . . . . . . . . . . . . . . . . . . . . . . . . . . . . . . . . . . . . . . . . . . 35<br />
Chemical safety . . . . . . . . . . . . . . . . . . . . . . . . . . . . . . . . . . . . . . . . . . . . . . . . . . . . 36<br />
Chemical waste safety . . . . . . . . . . . . . . . . . . . . . . . . . . . . . . . . . . . . . . . . . . . . . . . 37<br />
Biological hazard safety . . . . . . . . . . . . . . . . . . . . . . . . . . . . . . . . . . . . . . . . . . . . . . 39<br />
Chemical alerts . . . . . . . . . . . . . . . . . . . . . . . . . . . . . . . . . . . . . . . . . . . . . . . . . . . . . 39<br />
Documentation . . . . . . . . . . . . . . . . . . . . . . . . . . . . . . . . . . . . . . 41<br />
Index . . . . . . . . . . . . . . . . . . . . . . . . . . . . . . . . . . . . . . . . . . . . . 43<br />
3
Contents<br />
4<br />
PrepSEQ Sample Preparation <strong>Kit</strong>s Protocol
Safety information<br />
PrepSEQ Sample Preparation <strong>Kit</strong>s Protocol<br />
About this Protocol<br />
Preface<br />
Note: For general safety information, see this section and Appendix B, “Safety”<br />
on page 35. When a hazard symbol and hazard type appear by a chemical name or<br />
instrument hazard, see the “Safety” Appendix for the complete alert on the<br />
chemical or instrument.<br />
Safety alert words Four safety alert words appear in Applied Biosystems user documentation at<br />
points in the document where you need to be aware of relevant hazards. Each alert<br />
word—IMPORTANT, CAUTION, WARNING, DANGER—implies a<br />
particular level of observation or action, as defined below:<br />
IMPORTANT! – Indicates information that is necessary for proper instrument<br />
operation, accurate chemistry kit use, or safe use of a chemical.<br />
CAUTION! – Indicates a potentially hazardous situation that, if not<br />
avoided, may result in minor or moderate injury. It may also be used to alert<br />
against unsafe practices.<br />
WARNING! – Indicates a potentially hazardous situation that, if not<br />
avoided, could result in death or serious injury.<br />
DANGER! – Indicates an imminently hazardous situation that, if not<br />
avoided, will result in death or serious injury. This signal word is to be<br />
limited to the most extreme situations.<br />
SDSs The Safety Data Sheets (SDSs) for any chemicals supplied by<br />
Applied Biosystems or Ambion are available to you free 24 hours a day. For<br />
instructions on obtaining SDSs, see Appendix B on page 37.<br />
IMPORTANT! For the SDSs of chemicals not distributed by Applied Biosystems<br />
or Ambion contact the chemical manufacturer.<br />
5
Preface<br />
How to use this guide<br />
How to use this guide<br />
Text conventions This guide uses the following conventions:<br />
6<br />
Bold text indicates user action. For example:<br />
Type 0, then press Enter for each of the remaining fields.<br />
Italic text indicates new or important words and is also used for emphasis.<br />
For example:<br />
Before analyzing, always prepare fresh matrix.<br />
A right arrow symbol () separates successive commands you select from a<br />
drop-down or shortcut menu. For example:<br />
Select FileOpenSpot Set.<br />
Right-click the sample row, then select View Filter View All Runs.<br />
User attention words Two user attention words appear in Applied Biosystems user documentation. Each<br />
word implies a particular level of observation or action as described below:<br />
How to obtain support<br />
Note: – Provides information that may be of interest or help but is not critical to<br />
the use of the product.<br />
IMPORTANT! – Provides information that is necessary for proper instrument<br />
operation, accurate chemistry kit use, or safe use of a chemical.<br />
For the latest services and support information for all locations, go to<br />
www.appliedbiosystems.com.<br />
At the Applied Biosystems web site, you can:<br />
Access worldwide telephone and fax numbers to contact Applied Biosystems<br />
Technical Support and Sales facilities<br />
Search through frequently asked questions (FAQs)<br />
Submit a question directly to Technical Support<br />
Order Applied Biosystems user documents, SDSs, certificates of analysis,<br />
and other related documents<br />
Download PDF documents<br />
Obtain information about customer training<br />
Download software updates and patches<br />
PrepSEQ Sample Preparation <strong>Kit</strong>s Protocol
About the kits<br />
PrepSEQ Sample Preparation <strong>Kit</strong>s Protocol<br />
Protocol<br />
PrepSEQ Sample Preparation <strong>Kit</strong>s<br />
Purpose of the kits The PrepSEQ Sample Preparation <strong>Kit</strong>s use magnetic particle-based separation<br />
technology to extract DNA from <strong>Mycoplasma</strong> cells or Mouse Minute Virus<br />
(MMV) isolated from a variety of starting material, such as infected cell cultures<br />
or <strong>Mycoplasma</strong> liquid cultures.<br />
Choosing a preparation<br />
protocol<br />
Using this kit, you prepare lysates of samples before you extract the target DNA.<br />
For samples that contain <strong>Mycoplasma</strong>, the lysates contain <strong>Mycoplasma</strong> DNA<br />
from the free organisms in the culture media and from organisms released from<br />
the infected host cells. For additional information on kit content, see Appendix A,<br />
“Background and Ordering Information” on page 31.<br />
Figure 1 on page 8 shows the process for DNA isolation and detection from<br />
different types of samples and detection tasks.<br />
For isolation and purification of <strong>Mycoplasma</strong> DNA from liquid samples,<br />
Applied Biosystems recommends that the liquid volume vary from 2 to 10 mL for<br />
large-scale (final cell number < 10 8 ) extractions and 100 to 2000 µL for smallscale<br />
(final cell number < 10 7 ) extractions.<br />
For routine screening and preventive maintenance of cell lines, Applied<br />
Biosystems recommends using:<br />
The PrepSEQ 1-2-3 <strong>Mycoplasma</strong> <strong>Nucleic</strong> <strong>Acid</strong> <strong>Extraction</strong> <strong>Kit</strong> (PN<br />
4443789) for samples with a starting volume of 100 µL and cell number of<br />
≤106 .<br />
The PrepSEQ <strong>Mycoplasma</strong> <strong>Nucleic</strong> <strong>Acid</strong> <strong>Extraction</strong> <strong>Kit</strong> (PN 4409733) for<br />
samples with a starting volume > 100 µL or a final cell number > 106 .<br />
For isolation and purification of Mouse Minute Virus DNA from liquid samples,<br />
Applied Biosystems recommends using the PrepSEQ 1-2-3 <strong>Mycoplasma</strong><br />
<strong>Nucleic</strong> <strong>Acid</strong> <strong>Extraction</strong> <strong>Kit</strong>.<br />
7<br />
PrepSEQ Sample Preparation <strong>Kit</strong>s Protocol
PrepSEQ Sample Preparation <strong>Kit</strong>s<br />
About the kits<br />
8<br />
Task: Detection of MMV or <strong>Mycoplasma</strong><br />
(Cell lines, cell cultures, or in-process<br />
samples)<br />
Prepare samples using<br />
PrepSEQ 1-2-3 protocol<br />
(page 11)<br />
Perform single DNA extraction<br />
(page 26)<br />
Sample size:<br />
2 to 10 mL<br />
Prepare samples<br />
using PrepSEQ<br />
small-scale<br />
protocol<br />
(page 13)<br />
Low cell number<br />
or<br />
High viability<br />
Figure 1 Sample preparation workflows<br />
Task: Detection of <strong>Mycoplasma</strong><br />
(Production harvest)<br />
Sample size:<br />
100 to 2,000 µL<br />
Prepare samples<br />
using PrepSEQ<br />
large-scale<br />
protocol<br />
(page 16)<br />
Cell number and cell viability<br />
High cell number<br />
or<br />
Low viability<br />
Perform double DNA<br />
extraction (page 21)<br />
Perform assay using appropriate <strong>Mycoplasma</strong>, Myco Scan, or MMV PCR detection kit protocol<br />
PrepSEQ Sample Preparation <strong>Kit</strong>s Protocol
PrepSEQ Sample Preparation <strong>Kit</strong>s Protocol<br />
PrepSEQ Sample Preparation <strong>Kit</strong>s Protocol<br />
Preparation of sample lysates that contain target DNA<br />
Preparation of sample lysates that contain target DNA<br />
Sample preparation considerations<br />
Minimizing cellular DNA and/or RNA in the final extracted DNA is critical to<br />
<strong>Mycoplasma</strong> DNA detection. High amounts of cellular DNA and/or RNA cause<br />
PCR inhibition and high background of the SYBR ® Green I dye signal, reducing<br />
detection of low copy numbers of targets. Factors that affect levels of cellular<br />
DNA and/or RNA include:<br />
Viability of cell culture sample – Use of fresh culture samples increases the<br />
purity of your extracted target DNA. Avoid conditions such as long-term<br />
storage at 4 °C (or freezing temperatures). Such temperatures cause<br />
increased death or lysis of cells, which in turn contributes to additional<br />
background DNA in samples.<br />
Cell culture sampling – Avoid taking mucous aggregate material from the<br />
culture into the sample preparation. This material is very likely chromosomal<br />
DNA released as a result of cell lysis.<br />
Cell lysate handling – Treat cells as gently as possible. Be sure to perform<br />
certain steps at 4 °C where indicated in the procedure.<br />
9<br />
PrepSEQ Sample Preparation <strong>Kit</strong>s Protocol
PrepSEQ Sample Preparation <strong>Kit</strong>s<br />
Preparation of sample lysates that contain target DNA<br />
Before you begin<br />
10<br />
Before starting your sample extraction:<br />
Prepare the following reagents before their first-time use:<br />
– Binding Solution – Add 30 mL of 100% isopropanol to the empty<br />
Binding Solution bottle. Mark the bottle label to indicate that<br />
isopropanol has been added.<br />
– Wash Buffer – Add 74 mL of 95% ethanol to the Wash Buffer<br />
Concentrate bottle, mix well, then mark the bottle label to indicate that<br />
ethanol has been added.<br />
– Mixture of 95% ethanol and Lysis Buffer – Prepare 25 mL of a 3:2<br />
mixture of 95% ethanol and Lysis Buffer (15 mL of 95% ethanol, 10 mL<br />
of Lysis Buffer) in a 50-mL polypropylene tube. The mixture can be<br />
stored at room temperature for 6 months.<br />
Magnetic Particles – Before using, incubate the Magnetic Particles at 37 °C<br />
for 10 minutes, then vortex the tube at setting #7 until the resuspension is<br />
complete.<br />
IMPORTANT! White precipitate occasionally forms in the magnetic particles<br />
tube. <strong>Extraction</strong> experiments show that formation of precipitate does not<br />
affect performance. However, if precipitate forms, incubate the tube at 37 °C<br />
for 10 minutes, then vortex to completely resuspend the particles.<br />
Place aliquots of 1✕ PBS on ice. For exact aliquot volumes, refer to the scale<br />
(large or small) of the extraction. When not in use, store 1✕ PBS at 2 to 8 °C.<br />
Power on the refrigerated centrifuge to allow it to cool down before use.<br />
Block heaters: Three incubations are required. Use the procedure shown<br />
below for the number of heaters available.<br />
Number of block<br />
heaters available<br />
Procedure<br />
1 1. Set the first heater to 56 °C.<br />
2. After cellular RNA digestion at 56 °C, reset the heater to<br />
70 °C.<br />
3. After cell lysis at 70 °C, reset the heater to 37 °C.<br />
2 1. Set the first heater to 56 °C. Set the second heater to 70 °C.<br />
2. After cellular RNA digestion at 56 °C, reset the heater to<br />
37 °C.<br />
3 1. Set the first heater to 56 °C.<br />
2. Set the second heater to 70 °C.<br />
3. Set the third heater to 37 °C.<br />
PrepSEQ Sample Preparation <strong>Kit</strong>s Protocol
PrepSEQ 1-2-3<br />
workflow<br />
PrepSEQ Sample Preparation <strong>Kit</strong>s Protocol<br />
PrepSEQ Sample Preparation <strong>Kit</strong>s Protocol<br />
Preparation of sample lysates that contain target DNA<br />
The PrepSEQ 1-2-3 workflow for routine screening and preventive maintenance<br />
of cell lines with a starting volume of 100 µl and a cell number of up to 10 6 is<br />
shown below. For details, see page 12.<br />
Step 1: Place 100 µL of sample into a 2-mL tube.<br />
Step 2: Add 1 µL of 10% SDS, 1 µL of 0.5 M EDTA, and 5 µL of RNase<br />
Cocktail to 100 µl of the starting sample. For multiple samples, prepare a<br />
master mix and add 7 µl of the mix to 100 µl of the starting sample. Mix<br />
well by brief vortexing followed by a brief spin.<br />
Step 3: Incubate at 56 °C for 15 min.<br />
Step 4: Add 2 µL of Proteinase K. Mix well by brief vortexing<br />
followed by a brief spin.<br />
Step 5: Incubate the tube at 56 °C for 5 min.<br />
Step 6: Add 240 µL of Lysis Buffer. Vortex for 5 sec,<br />
then quick-spin for 5 sec.<br />
Step 7: Incubate at room temperature for 5 min.<br />
Step 8: Incubate the Magnetic Particles Suspension at 37 °C for 10 min<br />
followed by vortexing until completely resuspended before use.<br />
Step 9: Add 30 µL of Magnetic Particles and 200 µL of Binding Solution<br />
to the sample lysate, and vortex for 5 min at setting #7.<br />
Quick-spin for 15 sec.<br />
” Proceed to Step 5 & 6 of the Bind DNA section of the “Single DNA<br />
extraction workflow” on page 26.<br />
Figure 1 Sample preparation from 100 µL and cell densities of up to 10 6 using<br />
the PrepSEQ 1-2-3 <strong>Mycoplasma</strong> <strong>Nucleic</strong> <strong>Acid</strong> <strong>Extraction</strong> <strong>Kit</strong>.<br />
11<br />
PrepSEQ Sample Preparation <strong>Kit</strong>s Protocol
PrepSEQ Sample Preparation <strong>Kit</strong>s<br />
Preparation of sample lysates that contain target DNA<br />
PrepSEQ 1-2-3 protocol for <strong>Mycoplasma</strong> or MMV detection<br />
12<br />
IMPORTANT! Treat cells as gently as possible throughout the procedure. Do not<br />
freeze the cell culture samples before processing.<br />
1. Place 100 µL of sample (final cell number: ≤ 10 6 ) into a 2-mL<br />
microcentrifuge tube.<br />
2. Add 1 µL of 10% SDS, 1 µL of 0.5 M EDTA, and 5 µL of RNase Cocktail to<br />
100 µl of the starting sample. For multiple samples, prepare a master mix and<br />
add 7 µl of the mix to 100 µl of the starting sample. Mix well by brief<br />
vortexing followed by a brief spin.<br />
3. Incubate at 56 °C for 15 minutes.<br />
4. Add 2 µL of Proteinase K. Mix well by brief vortexing followed by a brief<br />
spin.<br />
5. Incubate the tube at 56 °C for 5 minutes to digest the cellular RNA.<br />
6. Add 240 µL of Lysis Buffer. Vortex for 5 seconds, then quick-spin for 5<br />
seconds.<br />
7. Incubate the tube at room temperature for 5 minutes.<br />
8. Incubate the Magnetic Particles Suspension at 37 °C for 10 minutes followed<br />
by vortexing until completely resuspended before use.<br />
9. Add 30 µL of Magnetic Particles and 200 µL of Binding Solution to the<br />
sample lysate, and vortex for 5 minutes at setting #7. Quick-spin for 15<br />
seconds.<br />
Next step Proceed to single DNA extraction, step 5 of the Bind DNA section on page 27.<br />
PrepSEQ Sample Preparation <strong>Kit</strong>s Protocol
Small-scale lysate<br />
preparation workflow<br />
PrepSEQ Sample Preparation <strong>Kit</strong>s Protocol<br />
PrepSEQ Sample Preparation <strong>Kit</strong>s Protocol<br />
Preparation of sample lysates that contain target DNA<br />
A small-scale lysate preparation workflow for 100- to 2000-µL samples is shown<br />
below. For details, see page 14.<br />
Step 1: Place 100 to 2000 µL of sample into a 2-mL tube.<br />
Process supernatant: keep on ice<br />
Step 3: Transfer supernatant to a 2-mL<br />
tube. Keep on ice.<br />
Step 6: Centrifuge at 16,000 × g for 15 min.<br />
Step 7a: Carefully aspirate and discard the<br />
supernatant. Do not disturb the<br />
<strong>Mycoplasma</strong> pellet.<br />
Step 7b: Transfer the cell fractionation<br />
lysate from Step 5 to the <strong>Mycoplasma</strong><br />
pellet, then resuspend by pipetting using<br />
a P1000. Transfer to a new 2-mL tube.<br />
Step 8: Add 2 µL of 0.5 M EDTA and<br />
18 µL of RNase Cocktail. Vortex briefly,<br />
then quick-spin.<br />
Step 9: Incubate at 56 °C for 30 min.<br />
Vortex twice during incubation.<br />
Step 10: Add 5 µL of Proteinase K. Vortex<br />
briefly, then quick-spin. Incubate at 56 °C<br />
for 10 min.<br />
Step 11: Add 700 µL of Lysis Buffer. Vortex<br />
for 5 sec at setting #7.<br />
Total 1 mL of lysate for DNA extraction<br />
Step 2: Centrifuge at 1000 × g for 3 min.<br />
Process cell pellet: keep on ice<br />
Step 4a: Add 1 mL of ice-cold 1✕ PBS.<br />
Use a P1000 to gently resuspend the cells.<br />
Step 4b: Centrifuge at 500 × g for 5 min at<br />
4 °C. Discard the supernatant.<br />
Step 4c: Add 400 µL of ice-cold Cell<br />
Fractionation Buffer to the cell pellet. Use a<br />
P1000 to gently resuspend the cells. Avoid<br />
cell lysis.<br />
Step 4d: Incubate on ice for up to 5 min.<br />
Step 5: Centrifuge at 1000 × g for 3 min at<br />
4 °C. Transfer 300 µL to a 2-mL tube. Avoid<br />
the pellet, which contains nuclei and<br />
mucous aggregate material. Recentrifuge<br />
as necessary. Keep on ice.<br />
Figure 2 Preparation of lysate from 100 to 2000 µL of sample using the<br />
PrepSEQ <strong>Mycoplasma</strong> <strong>Nucleic</strong> <strong>Acid</strong> <strong>Extraction</strong> <strong>Kit</strong>; final sample cell<br />
number ≤10 7 cells. Critical steps are indicated in bold font.<br />
13<br />
PrepSEQ Sample Preparation <strong>Kit</strong>s Protocol
PrepSEQ Sample Preparation <strong>Kit</strong>s<br />
Preparation of sample lysates that contain target DNA<br />
Prepare small-scale (100 to 2000 µL) lysate (<strong>Mycoplasma</strong> detection only)<br />
14<br />
IMPORTANT! Treat cells as gently as possible throughout the procedure. Do not<br />
freeze the cell culture samples before processing.<br />
1. Place 100 to 2000 µL of the cell culture sample (final cell number: ≤ 10 7 ) into<br />
a 2-mL microcentrifuge tube.<br />
2. Centrifuge the tube at 1000 × g for 3 minutes to pellet the cells. Place the<br />
cell pellet on ice to reduce cell lysis.<br />
3. Transfer the supernatant to a new 2-mL tube. The supernatant contains free<br />
<strong>Mycoplasma</strong> organisms in the culture. Keep the supernatant on ice while<br />
working on the cell pellet; the supernatant is processed at step 6 on page 15..<br />
IMPORTANT! If two centrifuges are available, you can centrifuge the<br />
supernatant at this step while you process the cell pellet in steps 4 through 5.<br />
4. Process the cell pellet from step 2.<br />
a. Critical step – Gently resuspend the cell pellet with 1 mL of ice-cold<br />
1✕ PBS by gentle pipetting with a P1000.<br />
IMPORTANT! Avoid cell lysis as much as possible. Keep the cells at<br />
4 °C and treat very gently. Higher temperature increases lysis of the host<br />
cell nuclei, leading to increased host DNA in the final extracted DNA,<br />
which causes PCR inhibition.<br />
b. Critical step – Centrifuge the tube at 500 × g for 5 minutes to pellet the<br />
cells. Discard the supernatant.<br />
c. Critical step – Add 400 µL of ice-cold Cell Fractionation Buffer to the<br />
cell pellet. Very gently pipette up and down several times with a P1000<br />
to resuspend the cells.<br />
IMPORTANT! You must perform this step at 4 °C. Room temperature<br />
increases lysis of the host cell nuclei leading to increased host DNA in<br />
the final extracted DNA, which causes PCR inhibition.<br />
d. Critical step – Incubate the cell suspension on ice for 5 minutes. Do not<br />
exceed 5 minutes.<br />
IMPORTANT! You must perform this step at 4 °C. Room temperature<br />
increases lysis of the nuclei and host DNA in the final extracted DNA<br />
and causes PCR inhibition.<br />
PrepSEQ Sample Preparation <strong>Kit</strong>s Protocol
PrepSEQ Sample Preparation <strong>Kit</strong>s Protocol<br />
PrepSEQ Sample Preparation <strong>Kit</strong>s Protocol<br />
Preparation of sample lysates that contain target DNA<br />
5. Critical step – Centrifuge the 2-mL tube from step 4d at 1000 × g for 3<br />
minutes at 4 °C to pellet the residual nuclei. Examine the supernatant for any<br />
mucous aggregate material. Hold the tube at a 30° angle and, using a P200,<br />
transfer two 150-µL aliquots of the cell fractionation supernatant to a new 2mL<br />
microcentrifuge tube (a total of 300 µL). Keep the tube on ice.<br />
IMPORTANT! Avoid contact with or transfer of the mucous aggregate<br />
material. If necessary, recentrifuge the tube at 1000 × g for 3 minutes at 4 °C,<br />
then very carefully transfer 300 µL with a P200.<br />
6. Centrifuge the supernatant tube from step 3 at 16,000 × g for 15 minutes to<br />
pellet the <strong>Mycoplasma</strong> organisms.<br />
IMPORTANT! If two centrifuges are available, you can centrifuge the<br />
supernatant while you process the cell pellet from steps 4 through 5.<br />
7. Process the pellet containing <strong>Mycoplasma</strong> organisms from step 6<br />
immediately above:<br />
a. Using a P1000, carefully aspirate, then discard the supernatant. Take<br />
care not to touch the pellet.<br />
b. Transfer the 300 µL of cell fractionation lysate from step 5 above to the<br />
pellet from step 6, then resuspend the pellet using a P1000. Transfer<br />
resuspension to a new 2-mL tube.<br />
8. Critical step – Add 2 µL of 0.5 M EDTA and 18 µL of RNase Cocktail.<br />
Vortex the 2-mL tube briefly, then quick-spin the solution to bring it down<br />
from off of the tube wall.<br />
9. Incubate the tube at 56 °C for 30 minutes to digest the cellular RNA. The<br />
solution becomes turbid. Vortex twice during incubation.<br />
Note: The solution becomes clear after addition of Lysis Buffer in step 11<br />
below.<br />
10. Add 5 µL of Proteinase K. Vortex briefly, then quick-spin to bring down the<br />
solution from the tube wall. Incubate at 56 °C for 10 minutes. After<br />
incubation, set the block heater to 70 °C.<br />
11. Add 700 µL of Lysis Buffer. Vortex for 5 seconds at setting #7. The total<br />
lysate is 1 mL.<br />
Next step Proceed to “<strong>Extraction</strong> of <strong>Mycoplasma</strong> or Mouse Minute Virus DNA from lysate”<br />
on page 20.<br />
15<br />
PrepSEQ Sample Preparation <strong>Kit</strong>s Protocol
PrepSEQ Sample Preparation <strong>Kit</strong>s<br />
Preparation of sample lysates that contain target DNA<br />
Large-scale lysate<br />
preparation workflow<br />
16<br />
A large-scale lysate preparation workflow for 2- to 10-mL samples is shown<br />
below. For details, see page 17.<br />
Step 1: Place 2 to 10 mL of sample into a 50-mL tube.<br />
Process supernatant: keep on ice<br />
Step 3: Transfer the supernatant to a<br />
50-mL tube. Keep on ice.<br />
Step 5: Centrifuge at 16,000 × g for 30 min.<br />
Step 8a: Carefully aspirate and discard the<br />
supernatant. Do not disturb the<br />
<strong>Mycoplasma</strong> pellet.<br />
Step 8b: Transfer the cell fractionation<br />
lysate from Step 7 to the <strong>Mycoplasma</strong><br />
pellet, then resuspend by pipetting using<br />
a P1000. Transfer to a new 2-mL tube.<br />
Step 9: Add 2 µL of 0.5 M EDTA and 18<br />
µL of RNase Cocktail. Vortex briefly, then<br />
quick-spin.<br />
Step 10: Incubate at 56 °C for 30 min.<br />
Vortex twice during incubation.<br />
Step 11: Add 5 µL of Proteinase K. Vortex<br />
briefly, then quick-spin. Incubate at 56 °C<br />
for 10 min.<br />
Step 12: Add 700 µL of Lysis Buffer. Vortex<br />
for 5 sec at setting #7.<br />
Total 1 mL of lysate for DNA extraction<br />
Step 2: Centrifuge at 1000 × g for 5 min.<br />
Process cell pellet: keep on ice<br />
Step 4a: Add 5 mL of ice-cold 1✕ PBS.<br />
Use a Pasteur pipette to gently resuspend<br />
the cells.<br />
Step 4b: Centrifuge at 500 × g for 5 min.<br />
DIscard the supernatant.<br />
Step 4c: Add 550 µL of ice-cold Cell<br />
Fractionation Buffer to the cell pellet. Use a<br />
P1000 to gently resuspend the cells. Avoid<br />
cell lysis.<br />
Step 4d: Transfer to a 2-mL tube. Incubate<br />
on ice for up to 5 min.<br />
Step 6: Centrifuge at 1000 × g for 5 min at<br />
4 °C. Transfer 400 µL to a 2-mL tube. Avoid<br />
the pellet, which contains nuclei and<br />
mucous aggregate material.<br />
Step 7: Centrifuge the 2-mL tube at<br />
1000 × g for 3 min at 4 °C. Use a P200 to<br />
carefully transfer 300 µL to a 2-mL tube (to<br />
be processed in Step 8b). Avoid the pellet,<br />
which contains nuclei and mucous<br />
aggregate material. Recentrifuge as<br />
necessary. Keep on ice.<br />
Figure 3 Preparation of lysate from 2 to 10 mL of sample using the<br />
PrepSEQ <strong>Mycoplasma</strong> <strong>Nucleic</strong> <strong>Acid</strong> <strong>Extraction</strong> <strong>Kit</strong>; final sample cell<br />
number ≤10 8 . Critical steps are indicated in bold font.<br />
PrepSEQ Sample Preparation <strong>Kit</strong>s Protocol
PrepSEQ Sample Preparation <strong>Kit</strong>s Protocol<br />
Preparation of sample lysates that contain target DNA<br />
Prepare large-scale (2 to 10 mL) lysate (<strong>Mycoplasma</strong> detection only)<br />
PrepSEQ Sample Preparation <strong>Kit</strong>s Protocol<br />
IMPORTANT! Treat cells as gently as possible throughout the procedure. Do not<br />
freeze the cell culture samples before processing.<br />
1. Place 2 to 10 mL of the cell culture sample (final cell number ≤10 8 ) into a<br />
50-mL conical tube.<br />
2. Centrifuge the tube at 1,000 × g for 5 minutes to pellet the cells. Place the<br />
cell pellet on ice.<br />
IMPORTANT! Keep the cell pellet on ice to reduce risk of cell lysis.<br />
3. Transfer the supernatant to a new 50-mL conical tube. The supernatant<br />
contains free <strong>Mycoplasma</strong> organisms in the culture. Keep the supernatant on<br />
ice while working on the cell pellet; the supernatant is processed at step 5 on<br />
the next page.<br />
IMPORTANT! If two ultracentrifuges are available, you can centrifuge the<br />
supernatant at this step while the cell pellet is processed in the following<br />
steps 4 through 7.<br />
4. Process the cell pellet from step 2:<br />
a. Critical step – Gently resuspend the cell pellet in 5 mL of ice-cold<br />
1✕ PBS by gentle pipetting with a Pasteur pipette.<br />
IMPORTANT! Avoid cell lysis as much as possible. Use only ice-cold<br />
1✕ PBS and treat the cells very gently. Room temperature increases<br />
lysis of nuclei and host DNA in the final extracted DNA, and causes<br />
PCR inhibition. In some cases, the cell pellet is large and sticky and<br />
cannot be resuspended easily. Never vortex to resuspend the cells.<br />
b. Critical step – Centrifuge the tube at 500 × g for 5 minutes to pellet the<br />
cells. Completely discard the supernatant.<br />
c. Critical step – Add 550 µL of ice-cold Cell Fractionation Buffer to the<br />
cell pellet. Very gently pipette up and down several times with a P1000<br />
to completely resuspend the cells.<br />
IMPORTANT! You must perform this step at 4 °C. Room temperature<br />
increases lysis of the host cell nuclei leading to increased host DNA in<br />
the final extracted DNA, which causes PCR inhibition.<br />
17<br />
PrepSEQ Sample Preparation <strong>Kit</strong>s Protocol
PrepSEQ Sample Preparation <strong>Kit</strong>s<br />
Preparation of sample lysates that contain target DNA<br />
18<br />
d. Critical step – Transfer the cell suspension to a 2-mL microcentrifuge<br />
tube, then incubate the cell suspension on ice for 5 minutes. Do not<br />
exceed 5 minutes.<br />
IMPORTANT! You must perform this step at 4 °C. Room temperature<br />
increases lysis of the host cell nuclei, leading to increased host DNA in<br />
the final extracted DNA, which causes PCR inhibition.<br />
5. Meanwhile, centrifuge the 50-mL conical tube containing the supernatant<br />
from step 3 on previous page at 16,000 × g for 30 minutes to pellet the<br />
<strong>Mycoplasma</strong> organisms. The <strong>Mycoplasma</strong> pellet is processed in step 8.<br />
IMPORTANT! If two ultracentrifuges are available, you can centrifuge the<br />
supernatant at step 3 while you process the cell pellet from steps 4 through 7.<br />
6. Critical step – Centrifuge the 2-mL tube from step 4d at 1000 × g for<br />
5 minutes at 4 °C to pellet the nuclei. Hold the tube at a 30° angle and, using<br />
a P200, transfer 400 µL of the supernatant to a new 2-mL microcentrifuge<br />
tube.<br />
IMPORTANT! Avoid touching the pellet, which contains nuclei and mucous<br />
aggregate material that may be generated from lysis of nuclei. If necessary,<br />
use a P200 to perform the transfer.<br />
7. Critical step – Centrifuge the 2-mL tube from step 6 above at 1,000 × g for 3<br />
minutes at 4 °C to pellet the residual nuclei. Examine the supernatant for any<br />
mucous aggregate material. Hold the tube at a 30° angle and, using a P200,<br />
transfer two 150-µL aliquots of the cell fractionation supernatant to a new<br />
2-mL microcentrifuge tube (a total of 300 µL). Keep the tube on ice.<br />
IMPORTANT! Avoid contact with or transfer of the mucous aggregate<br />
material. If necessary, recentrifuge the tube at 1000 × g for 3 minutes at 4 °C,<br />
then very carefully transfer 300 µL with a P200.<br />
IMPORTANT! Keep the microcentrifuge tube on ice.<br />
8. Process the pellet containing <strong>Mycoplasma</strong> organisms from step 5:<br />
a. Using a 10-mL pipette, carefully aspirate, then discard the supernatant.<br />
Take care not to touch the pellet. Leave approximately 1 mL in the tube.<br />
Use a P1000 to carefully aspirate the remaining supernatant.<br />
b. Transfer the 300 µL of cell fractionation lysate from step 7 to the pellet,<br />
then resuspend using a P1000. Transfer to a new 2-mL tube.<br />
9. Critical step – Add 2 µL of 0.5 M EDTA and 18 µL of RNase Cocktail.<br />
Vortex the 2-mL tube briefly, then quick-spin to detach the solution from the<br />
tube wall.<br />
PrepSEQ Sample Preparation <strong>Kit</strong>s Protocol
PrepSEQ Sample Preparation <strong>Kit</strong>s Protocol<br />
PrepSEQ Sample Preparation <strong>Kit</strong>s Protocol<br />
Preparation of sample lysates that contain target DNA<br />
10. Incubate the tube at 56 °C for 30 minutes to digest the cellular RNA. The<br />
solution becomes turbid. Vortex twice during incubation.<br />
Note: The solution becomes clear after addition of Lysis Buffer in step 12<br />
below.<br />
11. Add 5 µL of Proteinase K. Vortex briefly, then quick-spin to bring down the<br />
solution from the tube wall. Incubate at 56 °C for 10 minutes. After<br />
incubation, set the block heater to 70 °C.<br />
12. Add 700 µL of Lysis Buffer. Vortex for 5 seconds at setting #7. The total<br />
lysate is 1 mL.<br />
Next step Proceed to “<strong>Extraction</strong> of <strong>Mycoplasma</strong> or Mouse Minute Virus DNA from lysate”<br />
on page 20.<br />
19<br />
PrepSEQ Sample Preparation <strong>Kit</strong>s Protocol
PrepSEQ Sample Preparation <strong>Kit</strong>s<br />
<strong>Extraction</strong> of <strong>Mycoplasma</strong> or Mouse Minute Virus DNA from lysate<br />
<strong>Extraction</strong> of <strong>Mycoplasma</strong> or Mouse Minute Virus DNA from<br />
lysate<br />
20<br />
You can perform either of two DNA extraction procedures, depending on cell<br />
numbers and cell viability:<br />
Double DNA extraction – Samples with high cell numbers or low viability<br />
are likely to contribute proportionally high levels of DNA into the lysate. To<br />
ensure that the target DNA can be captured, two extractions are performed for<br />
these samples, and the PCR reactions are set up for both samples of extracted<br />
DNA. The original sample is considered positive if one of the two PCRs<br />
shows a positive result.<br />
Single DNA extraction – A single extraction is typically sufficient to capture<br />
all targets from samples with low cell numbers or high viability. Applied<br />
Biosystems recommends a single DNA extraction when you use the<br />
PrepSEQ 1-2-3 <strong>Mycoplasma</strong> <strong>Nucleic</strong> <strong>Acid</strong> <strong>Extraction</strong> <strong>Kit</strong>.<br />
Use the following table to select the DNA extraction procedure that is<br />
recommended for your cell culture sample. Due to variations among cell lines and<br />
culture conditions, the double DNA extraction procedure is recommended for the<br />
initial extraction.<br />
Total cell number Sample type DNA extraction procedure<br />
≤ 106 (All samples) Single<br />
106 to 108 >75% viability Single<br />
106 to 108
Double DNA extraction<br />
workflow<br />
First DNA extraction<br />
Step 1a: Incubate the Magnetic Particles at 37 °C for<br />
10 min, then vortex the tube at setting #7 until the<br />
resuspension is complete.<br />
Steps 1b – 1c: Add 30 µL of Magnetic Particles. Add 525 µL<br />
of Binding Solution, then vortex for 5 min at setting #7.<br />
Steps 1d – 1e: Spin for 15 sec, then place the tube into a<br />
magnetic stand.<br />
Step 1f: Transfer the solution to a new 2-mL tube for use<br />
in step 4a. Save the tube with the magnetic particles pellet<br />
(first extraction) at room temp; for use in Wash DNA step 1.<br />
Step 1: Add 300 µL of a 3:2 mixture of 95% ethanol and<br />
Lysis Buffer to each extraction tube. Invert the tubes back<br />
and forth three times. Avoid incubation of particles in this<br />
wash solution for longer than 3 min.<br />
Steps 2 – 4: Spin for 15 sec, place the tubes into a<br />
magnetic stand, then aspirate and discard the liquid.<br />
Step 5: Add 300 µL of Wash Solution, invert the tubes back<br />
and forth twice, then vortex for 5 sec at setting #7.<br />
Steps 6 – 8: Spin for 15 sec, place the tubes into a<br />
magnetic stand, then aspirate and discard the liquid.<br />
Step 1: Add 100 µL of Elution Buffer to the first extraction<br />
tube and 50 µL of Elution Buffer to the second extraction<br />
tube. See the first elution note on page 17.<br />
Step 2: Vortex for 10 sec at high speed.<br />
Step 3: Incubate at 70 °C for 7 min. Vortex three times<br />
during incubation.<br />
Step 4: Spin for 15 sec.<br />
PrepSEQ Sample Preparation <strong>Kit</strong>s Protocol<br />
PrepSEQ Sample Preparation <strong>Kit</strong>s Protocol<br />
<strong>Extraction</strong> of <strong>Mycoplasma</strong> or Mouse Minute Virus DNA from lysate<br />
A double DNA extraction workflow is shown below. For details, see page 22.<br />
1 mL of sample lysate<br />
Bind DNA<br />
Wash DNA<br />
Elute DNA<br />
Second DNA extraction<br />
Steps 2a: Add 30 µL of Magnetic Particles to the solution<br />
from step 2f.<br />
Step 2b: Vortex for 5 min at setting #7.<br />
Steps 2c – 2e: Spin for 15 sec, then place the tube into a<br />
magnetic stand and aspirate and discard liquid. The<br />
Magnetic Particles pellet contains the second extraction;<br />
for use in Wash DNA step 1.<br />
Step 9: Add 300 µL of Wash Solution, invert the tubes<br />
back and forth twice, then vortex for 5 sec at setting #7.<br />
Steps 10 – 11: Spin for 15 sec, then place the tubes into a<br />
magnetic stand.<br />
Step 12: Aspirate and discard the supernatant using<br />
a P1000 to remove residual liquid at the bottom of<br />
the tubes.<br />
Step 13: Use a P200 to aspirate residual solution.<br />
Step 14: Leave the tube lids open for 5 min to air dry.<br />
Steps 5– 6: Place the tubes into a magnetic stand.<br />
Transfer the eluate to a non-stick 1.5-mL tube.<br />
Steps 7 – 8: Spin for 3 min at top speed, then place the<br />
tubes into a magnetic stand.<br />
Step 9: Transfer the eluate to a non-stick 1.5-mL tube.<br />
Avoid the magnetic particles.<br />
Step 10: Store both eluates separately at –20 °C.<br />
Figure 4 Double DNA extraction using the PrepSEQ <strong>Mycoplasma</strong> <strong>Nucleic</strong><br />
<strong>Acid</strong> <strong>Extraction</strong> <strong>Kit</strong>.<br />
21<br />
PrepSEQ Sample Preparation <strong>Kit</strong>s Protocol
PrepSEQ Sample Preparation <strong>Kit</strong>s<br />
<strong>Extraction</strong> of <strong>Mycoplasma</strong> or Mouse Minute Virus DNA from lysate<br />
Double DNA extraction<br />
22<br />
In a double DNA extraction, you perform two DNA extractions. Keep the eluates<br />
of both extractions separate from each other (for later use in separate PCRs).<br />
Bind DNA 1. Perform the first DNA extraction:<br />
a. Incubate the Magnetic Particles at 37 °C for 10 minutes, then vortex the<br />
tube at setting #7 until the resuspension is complete.<br />
b. Add 30 µL of the Magnetic Particles to the sample.<br />
c. Add 525 µL of the Binding Solution to the sample.<br />
d. Incubate with shaking for 5 minutes at setting #7 on the vortexer to<br />
capture the DNA.<br />
e. Quick-spin the tube on a benchtop microcentrifuge for 15 seconds. This<br />
step spins down the solution from the tube wall and cap, and pellets<br />
most of the magnetic particles.<br />
f. Place the tube in the magnetic stand with the magnetic particles pellet<br />
oriented toward the magnet.<br />
Note: Capture of the magnetic particles with the bound DNA is<br />
complete after approximately 1 minute.<br />
g. Transfer the solution to a new 2-mL tube. Close the lid of the tube<br />
containing the magnetic particles. This is the first extraction. Remove<br />
the tube from the reagent stand and store the tube at room temperature;<br />
it is processed together with the second extraction at the Wash DNA<br />
step 1 on page 23.<br />
2. Perform the second DNA extraction:<br />
a. Add 30 µL of Magnetic Particles to the solution from step 1g above.<br />
(There is no need to add Binding Solution.)<br />
b. Incubate with shaking for 5 minutes at setting #7 on the vortexer to<br />
capture DNA.<br />
c. Quick-spin the tube on a benchtop microcentrifuge for 15 seconds. This<br />
step spins down the solution from the tube wall and cap, and pellets<br />
most of the magnetic particles.<br />
d. Place the tube in the magnetic stand with the magnetic particles pellet<br />
oriented toward the magnet.<br />
Note: Capture of the magnetic particles with the bound DNA is<br />
complete after approximately 1 minute.<br />
e. Aspirate and discard the supernatant carefully without disturbing the<br />
magnetic particles pellet. Remove the tubes from the magnetic stand.<br />
This is the second extraction.<br />
PrepSEQ Sample Preparation <strong>Kit</strong>s Protocol
PrepSEQ Sample Preparation <strong>Kit</strong>s Protocol<br />
<strong>Extraction</strong> of <strong>Mycoplasma</strong> or Mouse Minute Virus DNA from lysate<br />
Wash DNA 1. To each of the extraction tubes from Bind DNA steps 1g and 2e, add 300 µL<br />
of the 95% ethanol:Lysis Buffer (3:2 v/v). Invert the tubes back and forth<br />
three times, then proceed immediately to the next step.<br />
PrepSEQ Sample Preparation <strong>Kit</strong>s Protocol<br />
IMPORTANT! Do not vortex. Do not incubate the samples in this wash<br />
solution for more than 3 minutes.<br />
2. Quick-spin the tubes on a benchtop microcentrifuge for 15 seconds.<br />
3. Place the tubes in the magnetic stand with the magnetic particles pellet<br />
oriented toward the magnet.<br />
Note: Capture of the magnetic particles with the bound DNA is complete<br />
after approximately 1 minute.<br />
4. Carefully aspirate then discard as much of the supernatant without disturbing<br />
the magnetic particles pellet.<br />
5. Add 300 µL of Wash Solution to the tubes. Invert the tubes back and forth<br />
twice. Vortex tubes for 5 seconds at setting #7 on the vortexer.<br />
Note: Flushing the magnetic particles gently with the Wash Solution helps<br />
detach them from the tube wall.<br />
6. Quick-spin the tubes on a benchtop microcentrifuge for 15 seconds.<br />
7. Place the tubes in the magnetic stand with the magnetic particles pellet<br />
oriented toward the magnet.<br />
Note: Capture of the magnetic particles with the bound DNA is complete<br />
after approximately 1 minute.<br />
8. Aspirate and discard the supernatant carefully without disturbing the<br />
magnetic particles pellet.<br />
9. Add 300 µL of Wash Solution to the tubes. Invert the tubes back and forth<br />
twice. Vortex the tubes for 5 seconds at setting #7 on the vortexer.<br />
Note: Flush the magnetic particles gently with the Wash Solution to detach<br />
the particles from the tube wall.<br />
10. Quick-spin the tubes on a benchtop microcentrifuge for 15 seconds.<br />
23<br />
PrepSEQ Sample Preparation <strong>Kit</strong>s Protocol
PrepSEQ Sample Preparation <strong>Kit</strong>s<br />
<strong>Extraction</strong> of <strong>Mycoplasma</strong> or Mouse Minute Virus DNA from lysate<br />
24<br />
11. Place tubes in the magnetic stand with the magnetic particles pellet oriented<br />
toward the magnet.<br />
Note: Capture of the magnetic particles with the bound DNA is complete<br />
after approximately 1 minute.<br />
12. Aspirate and discard the supernatant carefully with a P1000 without<br />
disturbing the magnetic particles pellet containing the bound DNA.<br />
13. Use a P200 to aspirate and discard the residual solution at the bottom of the<br />
tube.<br />
14. With the tube lids open, air-dry the magnetic particles pellet for 5 minutes at<br />
room temperature.<br />
Note: Ethanol in the Wash Solution decreases recovery and causes PCR<br />
inhibition.<br />
Elute DNA 1. Add 100 µL of Elution Buffer to the first extraction pellet and 50 µL of<br />
Elution Buffer to the second extraction pellet.<br />
IMPORTANT! The magnetic particles may be difficult to detach from the<br />
tube wall. Place the tubes in the benchtop microcentrifuge with the magnetic<br />
particles pellet oriented toward the center, then spin the tube for 30 seconds<br />
to detach the magnetic particles into the Elution Buffer. If the magnetic<br />
particles are difficult to resuspend, use a P200 to gently pipette up-and-down<br />
several times. Be careful not to let the magnetic particles pellet stick inside<br />
the pipette tip.<br />
2. Vortex the tubes for 10 seconds at high speed on the vortexer.<br />
3. Incubate the tubes at 70 °C for 7 minutes; vortex three times during the<br />
incubation to help resuspension.<br />
4. Quick-spin the tubes on a benchtop microcentrifuge for 15 seconds.<br />
5. Place the tubes in the magnetic stand with the magnetic particles pellet<br />
oriented toward the magnet.<br />
Note: Capture of the magnetic particles is complete after approximately<br />
1 minute. DNA is in the eluate.<br />
6. Transfer the liquid phase containing the eluted DNA to a new non-stick<br />
1.5-mL microcentrifuge tube.<br />
7. Centrifuge the tube for 3 minutes at top speed to pellet the residual magnetic<br />
particles.<br />
PrepSEQ Sample Preparation <strong>Kit</strong>s Protocol
PrepSEQ Sample Preparation <strong>Kit</strong>s Protocol<br />
PrepSEQ Sample Preparation <strong>Kit</strong>s Protocol<br />
<strong>Extraction</strong> of <strong>Mycoplasma</strong> or Mouse Minute Virus DNA from lysate<br />
8. Place tube in the magnetic stand with the magnetic particles pellet oriented<br />
toward the magnet.<br />
9. Transfer the liquid phase containing the eluted DNA to a new non-stick<br />
1.5-mL microcentrifuge tube without disturbing the magnetic particles.<br />
Note: Magnetic particles can be PCR inhibitory.<br />
10. Store both eluates separately at –20 °C.<br />
Note: Set up separate PCR for each sample.<br />
25<br />
PrepSEQ Sample Preparation <strong>Kit</strong>s Protocol
PrepSEQ Sample Preparation <strong>Kit</strong>s<br />
<strong>Extraction</strong> of <strong>Mycoplasma</strong> or Mouse Minute Virus DNA from lysate<br />
Single DNA extraction<br />
workflow<br />
26<br />
A single DNA extraction workflow is shown below. For details, see page 27.<br />
Steps 3 & 4: Add 525 µL of Binding Solution, then vortex for 5 min at setting #7.<br />
Steps 5 & 6: Spin for 15 sec, then place the tube into a magnetic stand and aspirate and discard the liquid.<br />
Step 1: Add 300 µL of a 3:2 mixture of 95% ethanol and<br />
Lysis Buffer to each extraction tube. Invert the tubes back<br />
and forth three times. Avoid incubation of particles in this<br />
solution.<br />
Steps 2 – 4: Spin for 15 sec, then place the tubes into<br />
magnetic stand to aspirate and discard the liquid.<br />
Step 5: Add 300 µL of Wash Solution. Invert the tubes<br />
back and forth twice. Vortex for 5 sec at setting #7.<br />
Steps 6 – 8: Spin for 15 sec. Place the tubes into a<br />
magnetic stand to aspirate and discard the liquid.<br />
Step 1: Add 100 µL of Elution Buffer to the tube. See the<br />
first elution note on page 22.<br />
Step 2: Vortex for 10 sec at high speed.<br />
Step 3: Incubate at 70 °C for 7 min. Vortex three times<br />
during incubation.<br />
Steps 4 – 5: Spin for 15 sec. Place the tubes into a<br />
magnetic stand to aspirate and transfer the liquid.<br />
1 mL of sample lysate<br />
Bind DNA<br />
Step 1: Incubate the Magnetic Particles at 37 °C for 10 min, then vortex the tube at setting #7 until the resuspension is<br />
complete.<br />
Step 2: Add 30 µL of Magnetic Particles.<br />
Wash DNA<br />
Elute DNA<br />
Step 9: Add 300 µL of Wash Solution. Invert the tubes<br />
back and forth twice. Vortex for 5 sec at setting #7.<br />
Steps 10 – 11: Spin for 15 sec. Place the tubes into a<br />
magnetic stand.<br />
Step 12: Aspirate and discard the supernatant using a<br />
P1000 to remove residual liquid at the bottom of the<br />
tubes.1<br />
Step 13: Use a P200 to aspirate residual solution.<br />
Step 14: Leave the tube lids open for 5 min to air dry.<br />
Step 6: Transfer the eluate to a non-stick 1.5-mL tube.<br />
Steps 7 – 8: Spin for 3 min at top speed. Place the<br />
tubes into magnetic stand.<br />
Step 9: Transfer the eluate to a non-stick 1.5-mL tube.<br />
Avoid the magnetic particles.<br />
Step 10: Store at –20 °C.<br />
Figure 5 Single DNA extraction using the PrepSEQ <strong>Mycoplasma</strong> <strong>Nucleic</strong> <strong>Acid</strong><br />
<strong>Extraction</strong> <strong>Kit</strong> or the PrepSEQ 1-2-3 <strong>Mycoplasma</strong> <strong>Nucleic</strong> <strong>Acid</strong> <strong>Extraction</strong> <strong>Kit</strong>.<br />
PrepSEQ Sample Preparation <strong>Kit</strong>s Protocol
Single DNA extraction<br />
PrepSEQ Sample Preparation <strong>Kit</strong>s Protocol<br />
PrepSEQ Sample Preparation <strong>Kit</strong>s Protocol<br />
<strong>Extraction</strong> of <strong>Mycoplasma</strong> or Mouse Minute Virus DNA from lysate<br />
Bind DNA 1. Incubate the Magnetic Particles at 37 °C for 10 minutes, then vortex the tube<br />
at setting #7 until the resuspension is complete.<br />
2. Add 30 µL of the Magnetic Particles to the sample.<br />
3. Add 525 µL of the Binding Solution to the sample.<br />
4. Incubate with shaking for 5 minutes at setting #7 on the vortexer to capture<br />
DNA.<br />
5. Quick-spin the tube on a benchtop microcentrifuge for 15 seconds. This step<br />
spins down the solution from the tube wall and cap and pellets most of the<br />
magnetic particles.<br />
6. Place tube in the magnetic stand with the magnetic particles pellet oriented<br />
toward the magnet.<br />
Note: Capture of the magnetic particles with the bound DNA is complete<br />
after approximately 1 minute.<br />
7. Aspirate and discard the supernatant carefully without disturbing the<br />
magnetic particles pellet.<br />
Wash DNA 1. Add 300 µL of the 3:2 mixture of Ethanol and Lysis Buffer. Invert the tube<br />
back and forth three times, then go immediately to the next step.<br />
IMPORTANT! Do not vortex. Do not incubate the samples in this wash<br />
solution for more than 3 minutes.<br />
2. Quick-spin the tube on a benchtop microcentrifuge for 15 seconds.<br />
3. Place the tube in the magnetic stand with the magnetic particles pellet<br />
oriented toward the magnet.<br />
Note: Capture of the magnetic particles with the bound DNA is complete<br />
after approximately 1 minute.<br />
4. Aspirate and discard the supernatant carefully without disturbing the<br />
magnetic particles pellet.<br />
27<br />
PrepSEQ Sample Preparation <strong>Kit</strong>s Protocol
PrepSEQ Sample Preparation <strong>Kit</strong>s<br />
<strong>Extraction</strong> of <strong>Mycoplasma</strong> or Mouse Minute Virus DNA from lysate<br />
28<br />
5. Add 300 µL of Wash Solution to the tube. Invert the tubes back and forth<br />
twice. Vortex the tube for 5 seconds at setting #7 on the vortexer.<br />
Note: Flush the magnetic particles gently with the Wash Solution to detach<br />
the particles from the tube wall.<br />
6. Quick-spin the tube on a benchtop microcentrifuge for 15 seconds.<br />
7. Place the tube in the magnetic stand with the magnetic particles pellet<br />
oriented toward the magnet.<br />
Note: Capture of the magnetic particles with the bound DNA is complete<br />
after approximately 1 minute.<br />
8. Aspirate, then discard the supernatant carefully without disturbing the<br />
magnetic particles pellet.<br />
9. Add 300 µL of the Wash Solution to the tube. Invert the tubes back and forth<br />
twice. Vortex the tubes for 5 seconds at setting #7 on the vortexer.<br />
Note: Flushing the magnetic particles gently with the Wash Solution helps<br />
detach them from the tube wall.<br />
10. Quick-spin the tube on a benchtop microcentrifuge for 15 seconds.<br />
11. Place the tube in the magnetic stand with the magnetic particles pellet<br />
oriented toward the magnet.<br />
Note: Capture of the magnetic particles with the bound DNA is complete<br />
after approximately 1 minute.<br />
12. Aspirate, then discard the supernatant carefully with a P1000 without<br />
disturbing the magnetic particles pellet containing the bound DNA.<br />
13. Use a P200 to aspirate and discard the residual solution at the bottom of the<br />
tube.<br />
14. With the tube lid open, air-dry the magnetic particles pellet in the magnetic<br />
stand for 5 minutes at room temperature.<br />
IMPORTANT! Ethanol in the Wash Solution decreases recovery and causes<br />
PCR inhibition.<br />
PrepSEQ Sample Preparation <strong>Kit</strong>s Protocol
Elute DNA 1. Add 100 µL of Elution Buffer to the tube.<br />
PrepSEQ Sample Preparation <strong>Kit</strong>s Protocol<br />
PrepSEQ Sample Preparation <strong>Kit</strong>s Protocol<br />
<strong>Extraction</strong> of <strong>Mycoplasma</strong> or Mouse Minute Virus DNA from lysate<br />
IMPORTANT! The magnetic particles may be difficult to detach from the<br />
tube wall. Place the tube in the benchtop microcentrifuge with the magnetic<br />
particles pellet oriented toward the center, then spin the tube for 30 seconds<br />
to detach the magnetic particles into the Elution Buffer. If the magnetic<br />
particles are difficult to resuspend, use a P200 to gently pipette up-and-down<br />
several times. Be careful not to let the magnetic particles pellet stick inside<br />
the pipette tip.<br />
2. Vortex the tube for 10 seconds at high speed.<br />
3. Incubate the tube at 70 °C for 7 minutes; vortex the tube three times during<br />
the incubation to help resuspension.<br />
4. Centrifuge the tube on a benchtop microcentrifuge for 15 seconds.<br />
5. Place the tube in the magnetic stand with the magnetic particles pellet<br />
oriented toward the magnet.<br />
Note: Complete capture of the magnetic particles occurs in approximately<br />
1 minute. DNA is in the eluate.<br />
6. Transfer the liquid phase containing the eluted DNA to a new non-stick<br />
1.5-mL microcentrifuge tube.<br />
7. Centrifuge the tube for 3 minutes at top speed to pellet the residual magnetic<br />
particles.<br />
8. Place the tube in the magnetic stand with the magnetic particles pellet<br />
oriented toward the magnet.<br />
9. Transfer the liquid phase containing the eluted DNA to a new non-stick<br />
1.5-mL microcentrifuge tube without disturbing the magnetic particles.<br />
Note: Magnetic particles can be PCR inhibitory.<br />
10. Store the tube at –20 °C.<br />
29<br />
PrepSEQ Sample Preparation <strong>Kit</strong>s Protocol
PrepSEQ Sample Preparation <strong>Kit</strong>s<br />
Troubleshooting<br />
Troubleshooting<br />
30<br />
Observation Possible cause Recommended action<br />
Poor extraction efficiency<br />
(low yields)<br />
Ethanol is in the Wash Solution<br />
(step 14 on page 24 or step 14 on<br />
page 28).<br />
Magnetic particles are attached too<br />
tightly to the tube wall during the<br />
Elution (step 1 on page 24 or step 1<br />
on page 29).<br />
Magnetic particles are difficult to<br />
resuspend during the Elution (step 2<br />
on page 24 or step 2 on page 29).<br />
Thoroughly air-dry the magnetic particles pellet in<br />
the magnetic stand for 5 minutes at room<br />
temperature.<br />
Place the tube in the benchtop microcentrifuge with<br />
the magnetic particles pellet oriented toward the<br />
center. Spin the tube for 30 seconds to detach the<br />
magnetic particles into the Elution Buffer.<br />
Incubate the pellets at 70 °C for 7 minutes. Vortex<br />
the tubes three times during incubation to help<br />
resuspension.<br />
PrepSEQ Sample Preparation <strong>Kit</strong>s Protocol
Product overview<br />
Required materials<br />
PrepSEQ Sample Preparation <strong>Kit</strong>s Protocol<br />
Appendix A<br />
Background and Ordering Information<br />
The PrepSEQ Sample Preparation <strong>Kit</strong>s use magnetic particle-based separation<br />
technology to extract DNA from <strong>Mycoplasma</strong> cells and virus particles that are<br />
isolated from a variety of starting material, such as infected cell cultures or<br />
<strong>Mycoplasma</strong> liquid cultures.<br />
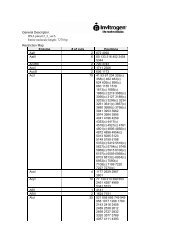
<strong>Kit</strong> contents The PrepSEQ 1-2-3 <strong>Mycoplasma</strong> <strong>Nucleic</strong> <strong>Acid</strong> <strong>Extraction</strong> <strong>Kit</strong> (PN 4443789)<br />
contains reagents for 100 small-scale (100 µL) cell culture extractions. <strong>Kit</strong><br />
components are shown in Table 1.<br />
Table 1 PrepSEQ 1-2-3 <strong>Mycoplasma</strong> <strong>Nucleic</strong> <strong>Acid</strong> <strong>Extraction</strong> <strong>Kit</strong> (PN<br />
4443789)<br />
Part number Description Volume Storage<br />
AM2286 RNase Cocktail, 1 tube 1.0 mL – 20 °C<br />
4400793 PrepSEQ <strong>Nucleic</strong> <strong>Acid</strong> <strong>Extraction</strong> <strong>Kit</strong> (Box 1)<br />
4400659<br />
Lysis Buffer, 2 bottles<br />
50 mL/bottle Room temp.<br />
4400789<br />
Binding Solution (Isopropanol), 1 empty bottle NA<br />
Room temp.<br />
4400783<br />
Wash Buffer Concentrate, 2 bottles<br />
26 mL/bottle Room temp.<br />
4400784<br />
Elution Buffer, 1 bottle<br />
25 mL<br />
Room temp.<br />
4400787<br />
Proteinase K (PK) Buffer, 1 bottle<br />
50 mL<br />
Room temp.<br />
4400795 PrepSEQ <strong>Nucleic</strong> <strong>Acid</strong> <strong>Extraction</strong> <strong>Kit</strong> (Box 2)<br />
4401405 Magnetic Particles, 2 tubes 1.5 mL/tube 2 to 8 °C<br />
4400675 PrepSEQ <strong>Nucleic</strong> <strong>Acid</strong> <strong>Extraction</strong> <strong>Kit</strong> (Box 3)<br />
4403958 Proteinase K (20 mg/mL), 1 tube 1.25 mL − 20 °C<br />
Note: Parts may ship separately depending on configuration and storage<br />
conditions.<br />
31
PrepSEQ Sample Preparation <strong>Kit</strong>s<br />
Required materials<br />
32<br />
The PrepSEQ <strong>Mycoplasma</strong> <strong>Nucleic</strong> <strong>Acid</strong> <strong>Extraction</strong> <strong>Kit</strong> (PN 4409733) contains<br />
reagents for 100 small-scale (100 to 2000 µL) or 100 large-scale (2 to 10 mL) cell<br />
culture extractions. <strong>Kit</strong> components are shown in Table 2.<br />
Note: The PrepSEQ <strong>Mycoplasma</strong> <strong>Nucleic</strong> <strong>Acid</strong> <strong>Extraction</strong> <strong>Kit</strong> (PN 4409733)<br />
must be ordered as part of the complete <strong>Mycoplasma</strong> kit (PN 4407876 or PN<br />
4409732).<br />
Table 2 PrepSEQ <strong>Mycoplasma</strong> <strong>Nucleic</strong> <strong>Acid</strong> <strong>Extraction</strong> <strong>Kit</strong> (PN 4409733)<br />
Part number Description Volume Storage<br />
4409733 PrepSEQ <strong>Mycoplasma</strong> <strong>Nucleic</strong> <strong>Acid</strong> <strong>Extraction</strong> <strong>Kit</strong><br />
4401238 PrepSEQ <strong>Mycoplasma</strong> <strong>Nucleic</strong> <strong>Acid</strong> <strong>Extraction</strong> <strong>Kit</strong> (Module M)<br />
4403461 Cell Fractionation Buffer,, 1 bag containing 3 bottles (1<br />
bottle: PN 4405889)<br />
25 mL/bottle 2 to 8 °C<br />
4404256 RNase Cocktail, 1 box containing 2 tubes (1<br />
tube: 4405890 )<br />
1.0 mL/tube – 20 °C<br />
4400793 PrepSEQ <strong>Nucleic</strong> <strong>Acid</strong> <strong>Extraction</strong> <strong>Kit</strong> (Box 1)<br />
4400659 Lysis Buffer, 2 bottles 50 mL/bottle Room temperature<br />
4400789 Binding Solution (Isopropanol), 1 empty bottle NA Room temperature<br />
4400783 Wash Buffer Concentrate, 2 bottles 26 mL/bottle Room temperature<br />
4400784 Elution Buffer, 1 bottle 25 mL Room temperature<br />
4400787 Proteinase K (PK) Buffer, 1 bottle 50 mL Room temperature<br />
4400795 PrepSEQ <strong>Nucleic</strong> <strong>Acid</strong> <strong>Extraction</strong> <strong>Kit</strong> (Box 2)<br />
4401405 Magnetic Particles, 2 tubes 1.5 mL/tube 2 to 8 °C<br />
4400675 PrepSEQ <strong>Nucleic</strong> <strong>Acid</strong> <strong>Extraction</strong> <strong>Kit</strong> (Box 3)<br />
4403958 Proteinase K (20 mg/mL), 1 tube 1.25 mL – 20 °C<br />
Note: Parts may ship separately depending on configuration and storage<br />
conditions.<br />
PrepSEQ Sample Preparation <strong>Kit</strong>s Protocol
Materials not included<br />
in the kit<br />
PrepSEQ Sample Preparation <strong>Kit</strong>s Protocol<br />
PrepSEQ Sample Preparation <strong>Kit</strong>s Protocol<br />
Required materials<br />
Table 3 includes materials and equipment that are required for using (but not<br />
included in) the PrepSEQ <strong>Mycoplasma</strong> <strong>Nucleic</strong> <strong>Acid</strong> <strong>Extraction</strong> <strong>Kit</strong>. Unless<br />
otherwise indicated, many of the listed items are available from major laboratory<br />
suppliers (MLS).<br />
Table 3 Materials not included<br />
Item Source ‡<br />
Equipment<br />
Three block heaters for use with 2 mL tubes: 2 set at 37 °C, and 1 MLS<br />
set at 56 °C<br />
Ice bucket MLS<br />
Magnetic stand, 6-tube Applied Biosystems PN AM10055<br />
Refrigerated benchtop microcentrifuge for 1.5- and 2-mL tubes,<br />
2to8°C<br />
MLS<br />
Vortex-Genie 2T Mixer VWR Scientific#14216-188 or VWR Scientific<br />
#14216-186<br />
Vortex Adapter-60, for use with Vortex-Genie Applied Biosystems PN AM10014<br />
Ultracentrifuge, for use with 50-mL tubes MLS<br />
Consumables<br />
Disposable gloves MLS<br />
Aerosol-resistant micropipette tips MLS<br />
Pipettors, P1000 and P200:<br />
MLS<br />
Positive-displacement<br />
Air-displacement<br />
Multichannel<br />
Pipettes MLS<br />
Tubes, conical, 50-mL Applied Biosystems PN AM12502<br />
Microcentrifuge tubes, non-stick RNase-free, 1.5-mL, 1 box (250<br />
tubes/box)<br />
Applied Biosystems PN AM12450<br />
Safe-Lock PCR clean microcentrifuge tubes, round-bottom, 2mL,<br />
1 bag (100 tubes/bag)<br />
VWR Scientific #62111-754<br />
Reagents<br />
SDS, 10% MLS<br />
1✕ PBS<br />
MLS<br />
IMPORTANT! Prepare fresh reagent before using kit.<br />
EDTA, 0.5 M MLS<br />
Ethanol, 95%<br />
IMPORTANT! Do not use denatured ethanol because it contains<br />
components not compatible with the protocol.<br />
MLS<br />
Isopropanol, 100% MLS<br />
DNase-free, sterile-filtered water MLS<br />
‡ For the SDS of any chemical not distributed by Applied Biosystems, contact the chemical manufacturer. Before handling any chemicals,<br />
refer to the SDS provided by the manufacturer, and observe all relevant precautions.<br />
33<br />
PrepSEQ Sample Preparation <strong>Kit</strong>s Protocol
PrepSEQ Sample Preparation <strong>Kit</strong>s<br />
Required materials<br />
34<br />
PrepSEQ Sample Preparation <strong>Kit</strong>s Protocol
PrepSEQ Sample Preparation <strong>Kit</strong>s Protocol<br />
This appendix covers:<br />
Appendix B<br />
Safety<br />
■ Chemical safety. . . . . . . . . . . . . . . . . . . . . . . . . . . . . . . . . . . . . . . . . . . . . . 36<br />
■ Chemical waste safety. . . . . . . . . . . . . . . . . . . . . . . . . . . . . . . . . . . . . . . . . 37<br />
■ Biological hazard safety . . . . . . . . . . . . . . . . . . . . . . . . . . . . . . . . . . . . . . . 39<br />
■ Chemical alerts . . . . . . . . . . . . . . . . . . . . . . . . . . . . . . . . . . . . . . . . . . . . . . 39<br />
35
Appendix B Safety<br />
Chemical safety<br />
Chemical safety<br />
Chemical hazard<br />
warning<br />
Chemical safety<br />
guidelines<br />
36<br />
WARNING! CHEMICAL HAZARD. Before handling any chemicals,<br />
refer to the Safety Data Sheet (SDS) provided by the manufacturer, and<br />
observe all relevant precautions.<br />
WARNING! CHEMICAL HAZARD. All chemicals in the instrument,<br />
including liquid in the lines, are potentially hazardous. Always determine<br />
what chemicals have been used in the instrument before changing reagents<br />
or instrument components. Wear appropriate eyewear, protective clothing,<br />
and gloves when working on the instrument.<br />
WARNING! CHEMICAL HAZARD. Four-liter reagent and waste bottles<br />
can crack and leak. Each 4-liter bottle should be secured in a low-density<br />
polyethylene safety container with the cover fastened and the handles<br />
locked in the upright position. Wear appropriate eyewear, clothing, and<br />
gloves when handling reagent and waste bottles.<br />
WARNING! CHEMICAL STORAGE HAZARD. Never collect or store<br />
waste in a glass container because of the risk of breaking or shattering.<br />
Reagent and waste bottles can crack and leak. Each waste bottle should be<br />
secured in a low-density polyethylene safety container with the cover<br />
fastened and the handles locked in the upright position. Wear appropriate<br />
eyewear, clothing, and gloves when handling reagent and waste bottles.<br />
To minimize the hazards of chemicals:<br />
Read and understand the Safety Data Sheets (SDSs) provided by the<br />
chemical manufacturer before you store, handle, or work with any chemicals<br />
or hazardous materials. (See “About SDSs” on page 37.)<br />
Minimize contact with chemicals. Wear appropriate personal protective<br />
equipment when handling chemicals (for example, safety glasses, gloves, or<br />
protective clothing). For additional safety guidelines, consult the SDS.<br />
Minimize the inhalation of chemicals. Do not leave chemical containers<br />
open. Use only with adequate ventilation (for example, fume hood). For<br />
additional safety guidelines, consult the SDS.<br />
Check regularly for chemical leaks or spills. If a leak or spill occurs, follow<br />
the manufacturer’s cleanup procedures as recommended in the SDS.<br />
Comply with all local, state/provincial, or national laws and regulations<br />
related to chemical storage, handling, and disposal.<br />
PrepSEQ Sample Preparation <strong>Kit</strong>s Protocol
Appendix B Safety<br />
Chemical waste safety<br />
About SDSs Chemical manufacturers supply current Safety Data Sheets (SDSs) with<br />
shipments of hazardous chemicals to new customers. They also provide SDSs<br />
with the first shipment of a hazardous chemical to a customer after an SDS has<br />
been updated. SDSs provide the safety information you need to store, handle,<br />
transport, and dispose of the chemicals safely.<br />
Obtaining<br />
SDSs<br />
Chemical waste safety<br />
Chemical waste<br />
hazards<br />
PrepSEQ Sample Preparation <strong>Kit</strong>s Protocol<br />
Each time you receive a new SDS packaged with a hazardous chemical, be sure to<br />
replace the appropriate SDS in your files.<br />
The SDS for any chemical supplied by Applied Biosystems is available to you free<br />
24 hours a day. To obtain SDSs:<br />
1. Go to www.appliedbiosystems.com, click Support, then select SDS.<br />
2. In the Keyword Search field, enter the chemical name, product name, SDS<br />
part number, or other information that appears in the SDS of interest. Select<br />
the language of your choice, then click Search.<br />
3. Find the document of interest, right-click the document title, then select any<br />
of the following:<br />
Open – To view the document<br />
Print Target – To print the document<br />
Save Target As – To download a PDF version of the document to a<br />
destination that you select<br />
Note: For the SDSs of chemicals not distributed by Applied Biosystems, contact<br />
the chemical manufacturer.<br />
CAUTION! HAZARDOUS WASTE. Refer to Safety Data Sheets (SDSs)<br />
and local regulations for handling and disposal.<br />
WARNING! CHEMICAL WASTE HAZARD. Wastes produced by<br />
Applied Biosystems instruments are potentially hazardous and can cause<br />
injury, illness, or death.<br />
WARNING! CHEMICAL STORAGE HAZARD. Never collect or store<br />
waste in a glass container because of the risk of breaking or shattering.<br />
Reagent and waste bottles can crack and leak. Each waste bottle should be<br />
secured in a low-density polyethylene safety container with the cover<br />
fastened and the handles locked in the upright position. Wear appropriate<br />
eyewear, clothing, and gloves when handling reagent and waste bottles.<br />
37
Appendix B Safety<br />
Chemical waste safety<br />
Chemical waste safety<br />
guidelines<br />
38<br />
To minimize the hazards of chemical waste:<br />
Read and understand the Safety Data Sheets (SDSs) provided by the<br />
manufacturers of the chemicals in the waste container before you store,<br />
handle, or dispose of chemical waste.<br />
Provide primary and secondary waste containers. (A primary waste container<br />
holds the immediate waste. A secondary container contains spills or leaks<br />
from the primary container. Both containers must be compatible with the<br />
waste material and meet federal, state, and local requirements for container<br />
storage.)<br />
Minimize contact with chemicals. Wear appropriate personal protective<br />
equipment when handling chemicals (for example, safety glasses, gloves, or<br />
protective clothing). For additional safety guidelines, consult the SDS.<br />
Minimize the inhalation of chemicals. Do not leave chemical containers<br />
open. Use only with adequate ventilation (for example, fume hood). For<br />
additional safety guidelines, consult the SDS.<br />
Handle chemical wastes in a fume hood.<br />
After emptying a waste container, seal it with the cap provided.<br />
Dispose of the contents of the waste tray and waste bottle in accordance with<br />
good laboratory practices and local, state/provincial, or national<br />
environmental and health regulations.<br />
Waste disposal If potentially hazardous waste is generated when you operate the instrument, you<br />
must:<br />
Characterize (by analysis if necessary) the waste generated by the particular<br />
applications, reagents, and substrates used in your laboratory.<br />
Ensure the health and safety of all personnel in your laboratory.<br />
Ensure that the instrument waste is stored, transferred, transported, and<br />
disposed of according to all local, state/provincial, and/or national<br />
regulations.<br />
IMPORTANT! Radioactive or biohazardous materials may require special<br />
handling, and disposal limitations may apply.<br />
PrepSEQ Sample Preparation <strong>Kit</strong>s Protocol
Biological hazard safety<br />
PrepSEQ Sample Preparation <strong>Kit</strong>s Protocol<br />
Appendix B Safety<br />
Biological hazard safety<br />
General biohazard WARNING! BIOHAZARD. Biological samples such as tissues, body<br />
fluids, infectious agents, and blood of humans and other animals have the<br />
potential to transmit infectious diseases. Follow all applicable local,<br />
state/provincial, and/or national regulations. Wear appropriate protective<br />
equipment, which includes but is not limited to: protective eyewear, face<br />
shield, clothing/lab coat, and gloves. All work should be conducted in<br />
properly equipped facilities using the appropriate safety equipment (for<br />
example, physical containment devices). Individuals should be trained<br />
according to applicable regulatory and company/institution requirements<br />
before working with potentially infectious materials. Read and follow the<br />
applicable guidelines and/or regulatory requirements in the following:<br />
– U.S. Department of Health and Human Services guidelines published in<br />
Biosafety in Microbiological and Biomedical Laboratories (stock no.<br />
017-040-00547-4;<br />
http://www.cdc.gov/OD/ohs/biosfty/bmbl4/bmbl4toc.htm )<br />
– Occupational Safety and Health Standards, Bloodborne Pathogens<br />
(29 CFR§1910.1030; www.access.gpo.gov/<br />
nara/cfr/waisidx_01/29cfr1910a_01.html)<br />
– Your company’s/institution’s Biosafety Program protocols for working<br />
with/handling potentially infectious materials.<br />
Additional information about biohazard guidelines is available at:<br />
www.cdc.gov.<br />
Chemical alerts<br />
General alerts for all<br />
chemicals<br />
Avoid contact with skin, eyes, and/or clothing. Read the SDS, and follow the<br />
handling instructions. Wear appropriate protective eyewear, clothing, and gloves.<br />
39
Appendix B Safety<br />
Chemical alerts<br />
40<br />
PrepSEQ Sample Preparation <strong>Kit</strong>s Protocol
PrepSEQ Sample Preparation <strong>Kit</strong>s Protocol<br />
Documentation<br />
Documentation<br />
For additional documentation, see “How to obtain support” on page 6.<br />
For information on new assays and updated product documentation, go to<br />
www.microseq.com.<br />
Document PN<br />
PrepSEQ Sample Preparation <strong>Kit</strong>s Protocol 4401253<br />
PrepSEQ Sample Preparation <strong>Kit</strong>s Quick Reference Card 4406304<br />
PrepSEQ <strong>Mycoplasma</strong> <strong>Nucleic</strong> <strong>Acid</strong> <strong>Extraction</strong> <strong>Kit</strong>s Quick Reference<br />
Card<br />
MycoSEQ <strong>Mycoplasma</strong> Detection <strong>Kit</strong>s Protocol (for Real-Time PCR<br />
Detection <strong>Kit</strong> and <strong>Mycoplasma</strong> Detection <strong>Kit</strong>)<br />
4406304<br />
4393111<br />
MycoSEQ <strong>Mycoplasma</strong> Detection <strong>Kit</strong>s Quick Reference Card (for the<br />
Real-Time PCR Detection <strong>Kit</strong> and Myco Scan <strong>Mycoplasma</strong> Detection <strong>Kit</strong>)<br />
4393471<br />
ViralSEQ Mouse Minute Virus Detection <strong>Kit</strong> Protocol 4445235<br />
ViralSEQ Mouse Minute Virus Detection <strong>Kit</strong> Quick Reference Card 4445236<br />
Portable document format (PDF) versions of this guide and the documents listed<br />
above are available at www.appliedbiosystems.com.<br />
Note: To open the documentation available from the Applied Biosystems web<br />
site, use the Adobe ® Acrobat ® Reader ® software available at www.adobe.com.<br />
41
Documentation<br />
42<br />
PrepSEQ Sample Preparation <strong>Kit</strong>s Protocol
B<br />
biohazardous waste, handling 39<br />
bold text, when to use 6<br />
C<br />
CAUTION, description 5<br />
chemical safety 36<br />
chemical waste safety 37, 38<br />
conventions<br />
bold text 6<br />
for describing menu commands 6<br />
IMPORTANTS! 6<br />
italic text 6<br />
Notes 6<br />
user attention words 6<br />
D<br />
DANGER, description 5<br />
DNA extraction<br />
double 20<br />
single 20<br />
double DNA extraction<br />
elute DNA 24<br />
wash DNA 23<br />
E<br />
elute DNA 24<br />
extraction<br />
double-DNA 20<br />
single-DNA 20<br />
G<br />
guidelines<br />
chemical safety 36<br />
chemical waste disposal 37<br />
chemical waste safety 38<br />
PrepSEQ Sample Preparation <strong>Kit</strong>s Protocol<br />
H<br />
hazards. See safety<br />
I<br />
IMPORTANT, description 5<br />
italic text, when to use 6<br />
K<br />
kit choice<br />
MMV and <strong>Mycoplasma</strong> detection 7<br />
<strong>Mycoplasma</strong> detection 7<br />
kit contents 31, 32<br />
L<br />
large-scale preprocessing 11, 13, 16<br />
lysate preparation<br />
large-scale 17<br />
small-scale 12<br />
small-scale lysate 14<br />
M<br />
Index<br />
magnetic particles precipitate 10<br />
menu commands, conventions for describing 6<br />
MMV detection 7<br />
P<br />
preprocessing, large-scale 11, 13, 16<br />
product description 31<br />
R<br />
radioactive waste, handling 38<br />
reagent and equipment preparation 10<br />
recommendation, DNA extraction procedure 20<br />
S<br />
safety<br />
43
Index<br />
biological hazards 39<br />
chemical 36<br />
chemical waste 37<br />
guidelines 36, 37, 38<br />
sample prep<br />
considerations 9<br />
<strong>Mycoplasma</strong> DNA 7<br />
sample size<br />
cell line screening and maintenance 7<br />
<strong>Mycoplasma</strong> detection 7<br />
SDSs<br />
about 5<br />
description 37<br />
obtaining 6, 37<br />
single DNA extraction 20<br />
bind DNA 27<br />
elute DNA 29<br />
wash DNA 27<br />
T<br />
training, information on 6<br />
troubleshooting 30<br />
U<br />
user attention words, described 6<br />
W<br />
WARNING, description 5<br />
wash DNA 23<br />
waste disposal, guidelines 38<br />
waste profiles, description 38<br />
44<br />
PrepSEQ Sample Preparation <strong>Kit</strong>s Protocol
Part Number 4401253 Rev. C 02/2010<br />
Applied Biosystems<br />
850 Lincoln Centre Drive | Foster City, CA 94404 USA<br />
Phone 650.638.5800 | Toll Free 800.345.5224<br />
www.appliedbiosystems.com<br />
Technical Resources and Support<br />
For the latest technical resources and support information<br />
for all locations, please refer to our Web site at<br />
www.appliedbiosystems.com/support