TISSOT TWOTIMER SETTING INSTRUCTIONS - Digital Watch Library
TISSOT TWOTIMER SETTING INSTRUCTIONS - Digital Watch Library
TISSOT TWOTIMER SETTING INSTRUCTIONS - Digital Watch Library

You also want an ePaper? Increase the reach of your titles
YUMPU automatically turns print PDFs into web optimized ePapers that Google loves.
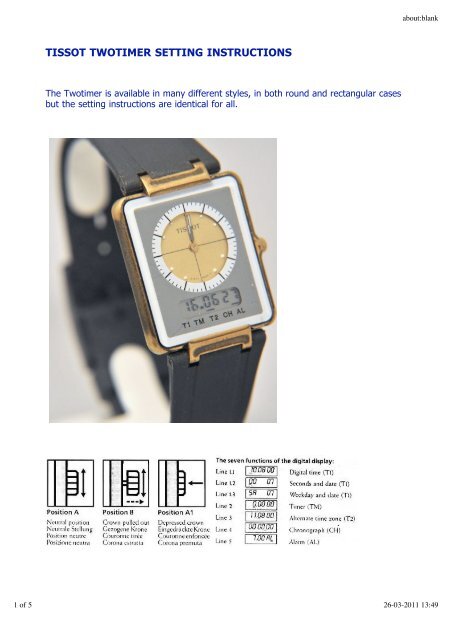
<strong>TISSOT</strong> <strong>TWOTIMER</strong> <strong>SETTING</strong> <strong>INSTRUCTIONS</strong><br />
The Twotimer is available in many different styles, in both round and rectangular cases<br />
but the setting instructions are identical for all.<br />
about:blank<br />
1 of 5 26-03-2011 13:49
Analog Display<br />
Dial and hands indicate local time.<br />
Local time is indicated in the dial's digital display. (Not on the watch above).<br />
The Various Functions of The <strong>Digital</strong> Display<br />
As well as local time, you may select six additional functions whilst the crown is in<br />
position A (see diagram above). The selected function is indicated by a flashing line at<br />
the base of the digital display. The marker line which appears in the digital display<br />
without flashing, indicates the function currently in use.<br />
All Functions Are Crown Selected.<br />
Pushing or pulling the crown selects one of three positions (see diagram above).<br />
Neutral Position (position A)<br />
In this position, the various functions are selected by turning the crown clockwise or<br />
counter-clockwise.<br />
Crown Pulled Out (Position B)<br />
This position permits corrections or settings to be made by turning the crown clockwise<br />
or counter-clockwise.<br />
Crown in Depressed Position (Position A1)<br />
In this position, the alarm is turned on or off, the chronograph is operated, the 12 or<br />
24 hour time indication is selected or the alarm tested.<br />
<strong>SETTING</strong> THE VARIOUS FUNCTIONS<br />
1. Synchronising Analog and <strong>Digital</strong> Time<br />
Turn the crown when in position A to put the digital display into neutral (display<br />
turned off).<br />
Pull the crown to position B (digital display turned on).<br />
Turn the crown in either direction until analog and digital time are synchronised.<br />
Push the crown back to position A.<br />
2. Setting Exact Time (T1)<br />
Select digital display T1 (line 1.1 flashes) by turning the crown when in position<br />
A.<br />
Pull crown out to position B and the hours and minutes flash.<br />
Set local time by turning the crown when in position B. Analog and digital times<br />
are set simultaneously.<br />
about:blank<br />
2 of 5 26-03-2011 13:49
Push the crown back into position A. The seconds display will continue flashing<br />
for another minute to permit synchronisation of the watch with a time signal.<br />
At the time signal, press the crown briefly to position A1 (fully depressed) and the<br />
seconds will set to 00.<br />
3. Date Correction (T1)<br />
Select seconds and date display by turning the crown when in position A. Line<br />
1.2 will flash, seconds are displayed to the left and the date to the right.<br />
Pull the crown to position B. The seconds display will disappear and the month<br />
will be displayed in the centre (month and date will be flashing).<br />
Adjust month and date by turning the crown when in position B. A fast turn<br />
adjusts the months, a slow turn adjusts the date.<br />
Push the crown back to position A.<br />
4. Weekday Correction (T1)<br />
Select the day and date display (T1) by turning the crown when in position A.<br />
Line 1.3 will flash, the weekdays will appear to the left, and the date to the right.<br />
Pull the crown into position B. The weekday display will flash and a letter will<br />
appear in place of the date. This indicates the language used in the weekday<br />
display. E for English, F for French and S for Spanish.<br />
Turn the crown when in position B to set the desired language and day.<br />
Push the crown back to position A.<br />
5. Using the Timer<br />
Turn the crown when in position A to select the timer function (TM), line 2 will be<br />
flashing.<br />
Pull the crown into position B which will cause zero markings for hour and<br />
minutes to flash.<br />
Set the desired timing interval by turning the crown whilst in position B. Fast turn<br />
sets the hours, slow turn sets the minutes.<br />
Push the crown back to position A and the countdown commences. When the<br />
display counts down to 00.00, the alarm will sound.<br />
To stop the alarm, push the crown into position A1. You may do this regardless of<br />
the setting of the digital display.<br />
6. Interrupting the Timer (TM) and Re-setting it to Zero<br />
Select the timer function (TM) by turning the crown when in position A and line 2<br />
will flash.<br />
about:blank<br />
3 of 5 26-03-2011 13:49
Push the crown to position A1 for about 2 seconds. The countdown will be<br />
interrupted and the timer will re-set to zero.<br />
7. Setting the Second Time Zone (T2)<br />
Select function T2 by turning the crown whilst in position A and line 3 will flash.<br />
Pull the crown out to position B and the hour display will flash.<br />
Turn the crown whilst in position B until the desired hour is reached.<br />
Push the crown back to position A.<br />
8. Using the Chronograph (CH)<br />
Select function CH by turning the crown whilst in position A and line 4 will flash.<br />
Push the crown to position A1 at the desired moment and the time count will<br />
begin.<br />
Push the crown back to position A1 and timing stops.<br />
Push the crown to position A1 again and the time count will continue.<br />
When timing is stopped after more than one hour of elapsed time, the minutes,<br />
seconds and 1/100th seconds are displayed and then, after an 8 second interval,<br />
the hours are displayed.<br />
Push the crown to position A1 and hold for at least 3 seconds to re-set the<br />
chronograph to zero.<br />
9. Using the Alarm (AL)<br />
Select function AL by turning the crown in position A and line 5 will flash.<br />
Pull the crown to position B and the hour and minutes will flash.<br />
Turn the crown whilst in position B until the desired time is indicated. A fast turn<br />
sets the hours and a slow turn sets the minutes.<br />
Push the crown back to position A. The letters AL will appear next to the time<br />
programmed, indicating that the alarm is set.<br />
Push the crown to position A1 to stop the alarm sounding. This may be done<br />
regardless of the setting of the digital display.<br />
10. Selecting and Cancelling the Alarm Function (AL)<br />
Select function AL by turning the crown whilst in position A and line 5 will flash.<br />
Push the crown to position A1. If the letters AL appear, the alarm is primed. If the<br />
letters OF appear, the alarm function is cancelled.<br />
about:blank<br />
4 of 5 26-03-2011 13:49
11. Testing the Alarm (AL)<br />
Select function AL by turning the crown whilst in position A and line 5 will flash.<br />
Push the crown to position A1 for more than 2 seconds and the alarm will sound.<br />
Check that the alarm ON (AL) or OFF (OF) is selected as required.<br />
12. Selecting the Time Zone (Winter or Summer Time)<br />
Select digital display T1 by turning the crown whilst in position A and line 1.1 will<br />
flash.<br />
Pull the crown to position B and the hours andd minutes will flash.<br />
By giving the crown a fast turn, the time is adjusted in hourly increments. Analog<br />
and digital times are adjusted simultaneously.<br />
Important: Shifts in minutes are corrected automatically during this procedure.<br />
Never make adjustments using the crown after turning it quickly.<br />
Push the crown back into position A.<br />
13. Changing From 24 Hr to 12 Hr Display and Back Again<br />
Select function T2 by turning the crown whilst in position A and line 3 will flash.<br />
Push the crown to position A1 once, and the letters A or P will appear, indicating<br />
that all digital time displays are on 12-hour mode. If no letter appears, the digital<br />
display is in the 24-hour mode.<br />
Push the crown to position A1 twice and the operating mode changes from 24<br />
hours to 12 hours or vice-versa. During the PM part of the day, a lower case P will<br />
appear on the 12-hour digital display.<br />
about:blank<br />
5 of 5 26-03-2011 13:49