DG-1000S - DG Flugzeugbau
DG-1000S - DG Flugzeugbau
DG-1000S - DG Flugzeugbau

Create successful ePaper yourself
Turn your PDF publications into a flip-book with our unique Google optimized e-Paper software.
Flight manual <strong>DG</strong>-<strong>1000S</strong><br />
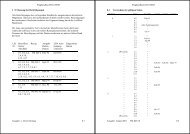
4. Rigging of the stabilizer<br />
Install the battery Z110 or a ballast weight of 5.5kg (12.1 lbs.) in the battery<br />
box in the fin, connect the battery. Exemption for extremely light pilots, see<br />
section 6.8.4.<br />
Caution: Rigging of the horizontal tailplane is only permitted with nose<br />
down trim-setting. Therefore operate the trim release lever and push the<br />
control stick forward, then release the lever to engage the trim (don’t operate<br />
the trim control knob, the trim should not be pushed to the most nose down<br />
position).<br />
Screw the tool W 38/2 into the securing plate (near the top of the left surface<br />
of the fin). Pull out the securing plate with the tool, move it downwards to<br />
engage in the rigging position. Set the stabilizer on, so that the roller at the<br />
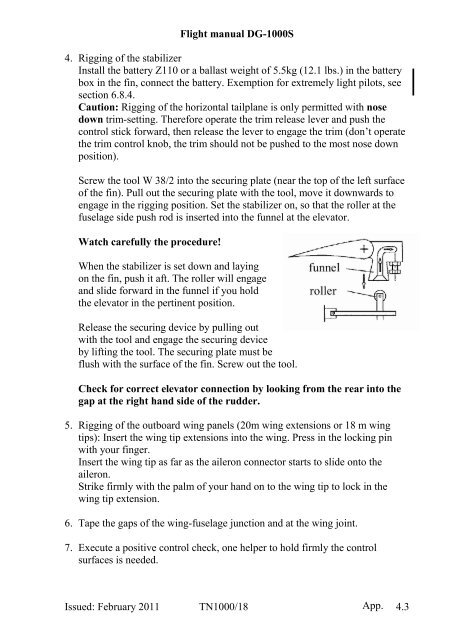
fuselage side push rod is inserted into the funnel at the elevator.<br />
Watch carefully the procedure!<br />
When the stabilizer is set down and laying<br />
on the fin, push it aft. The roller will engage<br />
and slide forward in the funnel if you hold<br />
the elevator in the pertinent position.<br />
Release the securing device by pulling out<br />
with the tool and engage the securing device<br />
by lifting the tool. The securing plate must be<br />
flush with the surface of the fin. Screw out the tool.<br />
Check for correct elevator connection by looking from the rear into the<br />
gap at the right hand side of the rudder.<br />
5. Rigging of the outboard wing panels (20m wing extensions or 18 m wing<br />
tips): Insert the wing tip extensions into the wing. Press in the locking pin<br />
with your finger.<br />
Insert the wing tip as far as the aileron connector starts to slide onto the<br />
aileron.<br />
Strike firmly with the palm of your hand on to the wing tip to lock in the<br />
wing tip extension.<br />
6. Tape the gaps of the wing-fuselage junction and at the wing joint.<br />
7. Execute a positive control check, one helper to hold firmly the control<br />
surfaces is needed.<br />
Issued: February 2011 TN1000/18 App. 4.3