Light oil pressure jet burner SL 400/2, SL 410/2, SL 420/2 ... - Intercal
Light oil pressure jet burner SL 400/2, SL 410/2, SL 420/2 ... - Intercal
Light oil pressure jet burner SL 400/2, SL 410/2, SL 420/2 ... - Intercal

You also want an ePaper? Increase the reach of your titles
YUMPU automatically turns print PDFs into web optimized ePapers that Google loves.
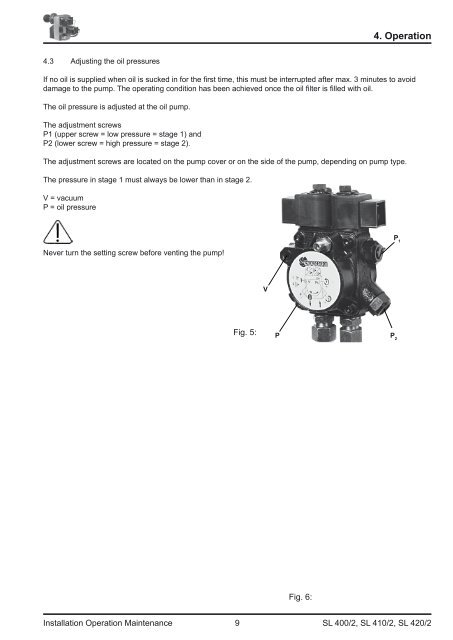
4.3 Adjusting the <strong>oil</strong> <strong>pressure</strong>s<br />
4. Operation<br />
If no <strong>oil</strong> is supplied when <strong>oil</strong> is sucked in for the fi rst time, this must be interrupted after max. 3 minutes to avoid<br />
damage to the pump. The operating condition has been achieved once the <strong>oil</strong> fi lter is fi lled with <strong>oil</strong>.<br />
The <strong>oil</strong> <strong>pressure</strong> is adjusted at the <strong>oil</strong> pump.<br />
The adjustment screws<br />
P1 (upper screw = low <strong>pressure</strong> = stage 1) and<br />
P2 (lower screw = high <strong>pressure</strong> = stage 2).<br />
The adjustment screws are located on the pump cover or on the side of the pump, depending on pump type.<br />
The <strong>pressure</strong> in stage 1 must always be lower than in stage 2.<br />
V = vacuum<br />
P = <strong>oil</strong> <strong>pressure</strong><br />
Never turn the setting screw before venting the pump!<br />
Fig. 5:<br />
Fig. 6:<br />
Installation Operation Maintenance 9<br />
<strong>SL</strong> <strong>400</strong>/2, <strong>SL</strong> <strong>410</strong>/2, <strong>SL</strong> <strong>420</strong>/2<br />
V<br />
P P 2<br />
P 1