You also want an ePaper? Increase the reach of your titles
YUMPU automatically turns print PDFs into web optimized ePapers that Google loves.
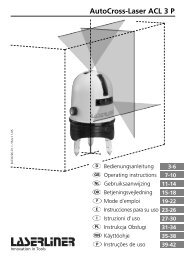
029.020A / Rev 0508-GB<br />
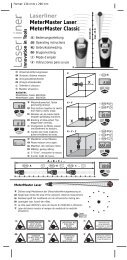
<strong>ZipLevel</strong><br />
GB Operation manual
<strong>ZipLevel</strong><br />
ENGLISH
ENGLISH<br />
<strong>ZipLevel</strong><br />
Professional precision altimeter<br />
The <strong>ZipLevel</strong> is a professional altimeter which enables you to scale and level<br />
on your own also around corners with accuracy within 3 mm. You have<br />
a working area up to + 6 m vertical and up to 70 m, respectively 50 m<br />
(with <strong>ZipLevel</strong> 25) in diameter. The digital measuring module shows all your<br />
measurements and is easy to operate. The extremely sturdy measurement<br />
cable with patented gas-liquid-system reliably works from -30 °C up to<br />
+70 °C.<br />
Warranty<br />
The warranty period is 2 years from the date of purchase. The warranty<br />
covers all material or manufacturing defects occurring during this time. The<br />
following are excluded from warranty: Damage due to improper use (e.g.<br />
operation with wrong type of current/voltage, connection to unsuitable<br />
power source, fall onto hard surface, etc.) or improper storage, normal<br />
wear and tear, and defects which only insignificantly impair the value or<br />
suitability for use. Any tampering by unauthorised persons will render this<br />
warranty void. In the event that you need to claim warranty, please take<br />
the complete device together with all information and the invoice to one<br />
of our dealers or send it in to Umarex-Laserliner.<br />
Accessories: Only with the <strong>ZipLevel</strong> Pro 5 sensing device, cover and<br />
ground spikes are included. For the <strong>ZipLevel</strong> 5 these accessories are also<br />
available!
<strong>ZipLevel</strong><br />
A<br />
B<br />
J<br />
I<br />
C<br />
H<br />
G<br />
F<br />
A Cable reel<br />
B Securing points<br />
C Measurement line<br />
D Measuring module<br />
E Battery compartment (back)<br />
F Room for measuring module<br />
G Pocket for operation manual<br />
H Protective cap<br />
Backside:<br />
I Sensing device (<strong>ZipLevel</strong> Pro 35)<br />
J Ground spikes (<strong>ZipLevel</strong> Pro 35)<br />
Inserting batteries into the measuring module:<br />
• Open the battery compartment (E) and insert the batteries according to<br />
the installation symbol. Pay attention to the correct polarity. Close the<br />
battery compartment again. Remove the protective cover (with <strong>ZipLevel</strong><br />
Pro 35 only).<br />
Advice: Do not put used batteries into the household rubbish. They can<br />
be handed in at a collecting point for old batteries respectively hazardous<br />
waste<br />
ENGLISH<br />
E<br />
D
<strong>Co</strong>nsole:<br />
The keys HOLD and ON/OFF react instantaneously, all the other keys have<br />
to be pressed for 2 seconds in order to activate or deactivate the particular<br />
function. The functions are also fitted with audible signals (clicking and<br />
bleeping) which makes it easier to work overhead or in non visible areas.<br />
Important:<br />
The <strong>ZipLevel</strong> memorizes the last accomplished function. When you turn the<br />
instrument on again and intend to leave the function, press the accordant<br />
key for seconds.<br />
Hold the<br />
Function keys<br />
for seconds!!!<br />
ENGLISH<br />
<strong>ZipLevel</strong><br />
5
<strong>ZipLevel</strong><br />
Quick start of the <strong>ZipLevel</strong><br />
Open the bottom protective cap of the basic unit and remove the measuring<br />
module. Lay the basic unit on the floor with the back facing down.<br />
Slowly pull a sufficient length of line off the cable reel. The altitude will be<br />
transferred from the basic unit to the measuring module.<br />
Switch the measuring module on with the ON/OFF-key and put the unit<br />
with its back or base on the required place of reference. When the display<br />
is ready, you will hear 2 short audible bleeps. Press the ZERO-key for 2<br />
seconds. Keep the measuring module steady until the figure zero appears<br />
on the display. The appliance has now been set.<br />
ADVICE: If the basic unit gets moved, the measuring module needs to be<br />
set at the place of reference again.<br />
Back facing<br />
down!<br />
ENGLISH<br />
Base<br />
Back
Quick start of the <strong>ZipLevel</strong><br />
Give a place of reference to the measuring module (press ZERO-key) and<br />
move it to a different height. The appliance shows the difference in height<br />
between the place of reference and the measuring point. Now you can<br />
hold the appliance against any point and it always shows you the current<br />
height towards the place of reference.<br />
Always use the measuring module with the side, which was used to set<br />
ZERO. Do not change from one locating side to another without setting to<br />
ZERO again.<br />
If you want to find out the height between floor and ceiling set the appliance<br />
to ZERO with its back or bottom side on the floor. Then hold the<br />
top, base or back to the ceiling in order to measure. Manually add the<br />
height (8,8 cm) or thickness (5,0 cm) of the measuring module to the<br />
shown data. Take into account whether you are working with protective<br />
cover or not! This feature can also be done automatically with the ADDERfunction<br />
(pp. 16-17).<br />
Typical uses:<br />
ENGLISH<br />
<strong>ZipLevel</strong><br />
measuring point<br />
reference point
<strong>ZipLevel</strong><br />
Keys and functions<br />
ON/OFF<br />
With this key you switch the unit on and off. If no key has been pressed or<br />
the measuring module has not been moved within 4 minutes, the unit will<br />
switch itself off automatically. After 3 minutes without any activity the unit<br />
will sound a warning by giving 2 long bleeps.<br />
HOLD<br />
The HOLD-function is used where you have problems reading the display<br />
or where you intend to keep the measured data. The function can be<br />
switched on and off by shortly pressing the HOLD-key.<br />
Measuring and keeping of the data (see drawing p. 7):<br />
1) First you set the unit at the required point with the ZERO-key.<br />
2) Shortly press the HOLD-key as long as the measuring module is still<br />
being moved. The unit will then give a series of bleeps.<br />
3) Move the measuring module to the place where you intend to measure.<br />
4) Wait until the unit has stabilized and therefore no more bleeps are<br />
audible.<br />
5) Retrieve the measuring module. The data of the remote point will be<br />
kept on the display. Shortly press HOLD again to leave this function.<br />
ENGLISH
Examples for the HOLD-function:<br />
ZERO<br />
ENGLISH<br />
<strong>ZipLevel</strong><br />
Press the ZERO-key for 2 seconds in order to make the present height<br />
(location of the measuring module) the point of reference. The unit must<br />
not be moved in this process!<br />
m<br />
New level of reference<br />
Level of reference<br />
. Press HOLD<br />
1. ZERO<br />
When set zo zero<br />
at the top<br />
- m will be shown<br />
at the bottom
<strong>ZipLevel</strong><br />
SCALE<br />
With this you choose the required measurements in millimetres, centimetres<br />
or meters. Press the SCALE-key for seconds and hold. Now the<br />
gauges the bottom right of the display will change. Release the key once<br />
the required measurement appears. The measurement for millimetres is not<br />
indicated, cm and m appear on the display.<br />
RES<br />
The <strong>ZipLevel</strong> is featured with a choice of 3 display accuracies. Press the<br />
RES-key for seconds and keep it pressed in order to choose the required<br />
resolution. Release the RES-key once the required resolution is shown.<br />
Your choice is stored now up to next accuracy change.<br />
10 ENGLISH<br />
0, cm: for highest accuracy<br />
needs more time to stabilize<br />
0,5 cm: for medium accuracy<br />
needs less time for stabilization<br />
1 cm: for rough measuring<br />
quick stabilizing of the results
REC<br />
The <strong>ZipLevel</strong> can also be used for different calculations and shows an<br />
average, minimum and maximum.<br />
1) Press the REC-key for seconds. The word ‘REC’ appears on the left<br />
side of the display.<br />
2) Stabilize the measuring module on the first measuring point and shortly<br />
press HOLD to keep the data. After that you hear a series of bleeps.<br />
Wait until these are finished before you move the module to the next<br />
measuring point.<br />
3) Shortly press the REC-key to show the average as well as the highest<br />
and bottom rate of the series of measurements. After shortly pressing<br />
the REC-key the letters ’AVG’ (average), ‘MIN’ and ‘MAX’ will be shown<br />
on the display.<br />
4) Press the REC-key for seconds to leave this function. The calculated<br />
figures remain saved until you press the HOLD-key after recalling the<br />
REC-function.<br />
Value display<br />
ENGLISH<br />
<strong>ZipLevel</strong><br />
11
<strong>ZipLevel</strong><br />
MARK<br />
With the MARK-function you can produce tones to indicate the following<br />
states: a) a chosen height, b) height within a defined scope or c) height<br />
beyond a defined scope.<br />
1) Start of this function: Get the measuring module into the required<br />
height and press the MARK-key for seconds. Keep the unit steady<br />
until double lines for the scope are blinking on the display and choose<br />
a), b) or c).<br />
a) Produce a tone at a chosen height:<br />
Shortly press MARK and keep the unit steady to set up the tone.<br />
b) Produce a tone within a defined scope:<br />
Move the measuring module half a scope under the chosen height.<br />
Shortly press MARK and hold the unit steady to set up the tone.<br />
c) Produce a sound beyond a defined scope:<br />
Move the measuring module half a scope above the chosen height.<br />
Shortly press MARK and hold the unit steady to set up the tone.<br />
Advice: If you want to leave the MARK-function early, shortly press MARK<br />
and ON/OFF at the same time.<br />
1 ENGLISH
Define scopes:<br />
a) Tone at a certain height: for accurate levelling<br />
MARK<br />
b) Tone within a scope: for less accurate levelling<br />
MARK<br />
c) Tone beyoned a scope:<br />
for rough levelling<br />
MARK<br />
Scope<br />
Scope<br />
ENGLISH<br />
<strong>ZipLevel</strong><br />
Tone<br />
No tone<br />
Tone<br />
No tone<br />
<strong>Co</strong>ntinuous<br />
tone<br />
No tone<br />
Bleeping tone<br />
1
<strong>ZipLevel</strong><br />
CAL<br />
The appliance has been calibrated at the factory. Please only calibrate, in<br />
case the measuring results are wrong or the letters ‘CAL’ are blinking on<br />
the display. A benchmark of 1.219 m above the base unit is important for<br />
the gauging. It will be best to use the sensing device to gauge the appliance<br />
(only with <strong>ZipLevel</strong> Pro 35).<br />
Calibrating the <strong>ZipLevel</strong>:<br />
1) Put the basic unit on its back onto a level surface and switch the<br />
measuring module on.<br />
2) Lay the measuring module on its base or back next to the basic unit.<br />
Press the CAL-key for seconds.<br />
3) When (0) is blinking on the display, shortly press CAL.<br />
4) When (1.219) is blinking on the display, raise the measuring module<br />
to a height of 1. 1 m above the basic unit and press CAL again. The<br />
measuring module has to be held stable during the process. The sensing<br />
device (only with <strong>ZipLevel</strong> Pro 35) or a measuring marking should<br />
be used as a calibration device.<br />
5) When the display stops blinking and shows 1.219 m the appliance is<br />
recalibrated.<br />
Advice: You can leave the calibration function at any time without calibrating!<br />
For that you press the CAL-key for seconds.<br />
1 ENGLISH
Calibration in steps:<br />
ENGLISH<br />
<strong>ZipLevel</strong><br />
Step 1: Lay the measuring module on its base or back next to the basic<br />
unit and press the CAL-key again. (0) is blinking on the display.<br />
Step : Press CAL again. (1 1. ) is blinking on the display.<br />
Step : Lift to a height of 1.219 m and press CAL again. Hold steadily<br />
during the process. Then (1 1. ) is shown on the display.<br />
Step 1 Step Step<br />
1, 1 m<br />
15
<strong>ZipLevel</strong><br />
ADDER (add):<br />
To carry out accurate measurements indoors, the ADDER-function automatically<br />
adds the height, respectively thickness of the measuring module on<br />
the measured data.<br />
Advice about the protective cover (only with <strong>ZipLevel</strong> Pro 5):<br />
You need to state whether you are working with or without protective<br />
cover (‘Boot on’/’Boot off’). Press HOLD to keep the data.<br />
Then press CAL-key for seconds and hold. Display alternately shows<br />
‘bon’ and ‘boff’. Release at either ‘Boot on’ or ‘Boot off’. Press HOLD<br />
again to leave this function. This choice is saved for further measuring!<br />
Access to the ADDER-funktion:<br />
1) Set the required point of reference with the ZERO-key.<br />
) Press HOLD and move the measuring module to the required measuring<br />
point (e.g. from the floor to the ceiling). You hear short bleeps.<br />
Keep the measuring module stable on the measuring point. The bleeps<br />
will stop when the figure is configured.<br />
) Now press the MARK-key to add the height of the measuring module<br />
or press the REC-key for seconds to add the thickness of the measuring<br />
module.<br />
Press the HOLD-key to leave the function.<br />
1 ENGLISH
„Boot on“ / „Boot off“:<br />
HOLD<br />
ADDER-function:<br />
.<br />
HOLD<br />
ZERO<br />
CAL<br />
, cm or<br />
, cm with cover<br />
ENGLISH<br />
Choose „Boot on“<br />
or „Boot off“!<br />
MARK + Height REC + Thickness<br />
.<br />
1.<br />
seconds<br />
+ +<br />
HOLD<br />
ZERO<br />
<strong>ZipLevel</strong><br />
5 cm or<br />
5, cm with cover<br />
Base Back Base Back<br />
.<br />
.<br />
1.<br />
1
<strong>ZipLevel</strong><br />
TIPS FOR USERS<br />
1) Check the point of reference often when carrying out critical/serious<br />
levelling jobs or press ZERO often at the point of reference. (CAL is not<br />
necessary for levelling!) Hold the height differences between line, basic<br />
unit and measuring module as low as possible.<br />
2) If possible, avoid high differences in temperature between line and<br />
measuring module (e.g. sun and shade).<br />
3) Avoid unnecessary kinks over objects.<br />
4) Avoid pulling hard, whipping or stepping on the line without checking<br />
the point of reference or setting to zero.<br />
5) The display blinks ‘ ‘ at use beyond the specified altitude range.<br />
Beyond the temperature range under -30 °C or over +70 °C ‘CAL’ is<br />
continuously shown.<br />
6) As the <strong>ZipLevel</strong> shows the last carried out function when switched on,<br />
please make sure that you leave the function after every measuring.<br />
Hold the relevant key for seconds and you leave the function.<br />
7) Wischen Sie bei matschigen Bedingungen die Messleitung vor dem<br />
Aufwickeln mit einem Tuch ab.<br />
8) Does --0-- respectively „CAL“ show up, press the ZERO-key as soon as<br />
possible respectively calibrate the appliance.<br />
1 ENGLISH
Technical facts<br />
Vertical measuring range<br />
ENGLISH<br />
<strong>ZipLevel</strong><br />
12 m (6 m over and under the<br />
basic unit)<br />
Horizontal measuring range + 35 m <strong>ZipLevel</strong> Pro 35 (70 m Ø)<br />
Levelling precision 3 mm<br />
+ 25 m <strong>ZipLevel</strong> 25 (50 m Ø)<br />
Height-measuring accuracy 0,2 % of the shown data up to<br />
3 m, resp. 0,35 % of the shown<br />
data over 3 m<br />
Scale/measurements mm, cm, m<br />
Saving of data and setting<br />
Shock-resistance<br />
dropping test on concrete<br />
unlimited, even without battery<br />
Measuring module 1,5 m<br />
Basic unit 0,9 m<br />
Water resistance Rain proof; must not be immersed<br />
Operating time 9 V Block 60 operating hours<br />
Weight 3,5 kg<br />
Working an storing temperature -30°C ... + 70°C<br />
1
<strong>ZipLevel</strong><br />
Service- and shipping address:<br />
<strong>UMAREX</strong> <strong>GmbH</strong> & <strong>Co</strong>. <strong>KG</strong><br />
– Laserliner –<br />
Möhnestraße 1 ,<br />
D-5 55 Arnsberg, Germany<br />
Tel.: + - 00, Fax: -<br />
laserliner@umarex.com<br />
<strong>UMAREX</strong> <strong>GmbH</strong> & <strong>Co</strong>. <strong>KG</strong><br />
– Laserliner –<br />
Donnerfeld<br />
D-5 5 Arnsberg, Germany<br />
Tel.: + - 00, Fax: -<br />
www.laserliner.com