
You also want an ePaper? Increase the reach of your titles
YUMPU automatically turns print PDFs into web optimized ePapers that Google loves.
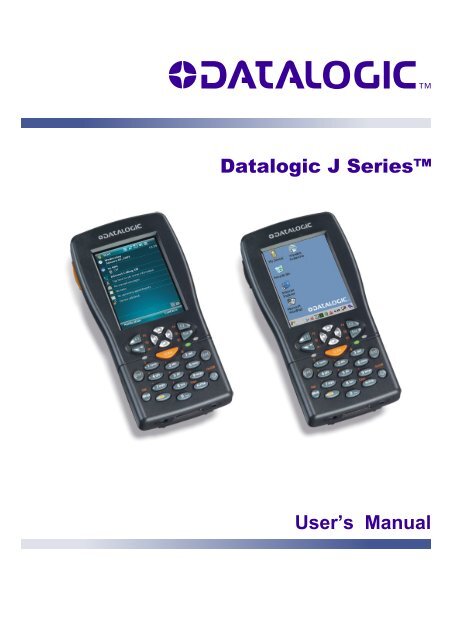
<strong>Datalogic</strong> J Series<br />
User’s Manual
<strong>Datalogic</strong> Mobile S.r.l.<br />
Via S. Vitalino 13<br />
40012 - Lippo di Calderara di Reno<br />
Bologna - Italy<br />
<strong>Datalogic</strong> J Series - User's Manual<br />
Software Version: 3.10<br />
Ed.: 12/2009<br />
© 2004-2009 <strong>Datalogic</strong> Mobile S.r.l. • ALL RIGHTS RESERVED • Protected to the fullest extent under U.S.<br />
and international laws. • Copying, or altering of this document is prohibited without express written consent<br />
from <strong>Datalogic</strong> Mobile S.r.l.<br />
<strong>Datalogic</strong> and the <strong>Datalogic</strong> logo are registered trademarks of <strong>Datalogic</strong> S.p.A. in many countries, including<br />
the U.S.A. and the E.U.<br />
DATALOGIC J Series is a registered trademark of <strong>Datalogic</strong> Mobile S.r.l. in E.U.<br />
All other brand and product names mentioned herein are for identification purposes only and may be<br />
trademarks or registered trademarks of their respective owners.<br />
<strong>Datalogic</strong> reserves the right to make modifications and improvements without prior notification.<br />
<strong>Datalogic</strong> shall not be liable for technical or editorial errors or omissions contained herein, nor for incidental or<br />
consequential damages resulting from the use of this material.
CONTENTS<br />
REFERENCES ............................................................................................. v<br />
Conventions.................................................................................................. v<br />
Reference Documentation ............................................................................ v<br />
Services and Support.................................................................................... v<br />
SAFETY REGULATIONS............................................................................ vi<br />
General Safety Rules....................................................................................vi<br />
Bluetooth ® Approval......................................................................................vi<br />
Power Supply................................................................................................vi<br />
Laser Safety.................................................................................................vii<br />
Radio Compliance......................................................................................... x<br />
SAR Compliance..........................................................................................xii<br />
Patents.........................................................................................................xii<br />
WEEE Compliance ..................................................................................... xiii<br />
GENERAL VIEW ........................................................................................ xv<br />
1 INTRODUCTION .......................................................................................... 1<br />
1.1 <strong>Datalogic</strong> J Series PDA Description ..........................................................1<br />
1.2 Available Models...........................................................................................2<br />
1.3 Package Contents.........................................................................................2<br />
1.4 Inserting Mini SD Card..................................................................................4<br />
1.5 Installing the SIM Card..................................................................................6<br />
1.5.1 Removing the SIM Card................................................................................ 8<br />
1.6 Accessories...................................................................................................9<br />
1.7 Operating System ....................................................................................... 10<br />
2 CONNECTIONS ......................................................................................... 11<br />
2.1 RS232/USB Direct Connection ................................................................... 11<br />
2.2 WLAN Connection ...................................................................................... 12<br />
2.3 WPAN Connection ...................................................................................... 14<br />
2.4 WWAN Connection ..................................................................................... 16<br />
2.5 GPS Connection ......................................................................................... 18<br />
2.6 Cradle Connections .................................................................................... 22<br />
2.7 Connection Cables...................................................................................... 23<br />
3 USE AND FUNCTIONING.......................................................................... 24<br />
3.1 PDA Startup................................................................................................ 24<br />
3.2 Windows Mobile Welcome Wizard.............................................................. 26<br />
3.3 Using the Stylus .......................................................................................... 27<br />
3.4 Data Capture............................................................................................... 28<br />
3.4.1 Laser Data Capture..................................................................................... 28<br />
3.4.2 Imager Data Capture .................................................................................. 29<br />
3.4.3 RFID Data Capture ..................................................................................... 30<br />
iii
3.5 Description of the Keys ............................................................................... 31<br />
3.5.1 System Control and Navigation Keys.......................................................... 31<br />
3.5.2 Key Selection .............................................................................................. 32<br />
3.5.3 Resetting the J Series................................................................................. 34<br />
3.6 Status Indicators ......................................................................................... 37<br />
3.6.1 LED Status.................................................................................................. 37<br />
3.6.2 Taskbar....................................................................................................... 38<br />
3.7 Data Capture Configuration ........................................................................ 40<br />
3.7.1 Configure .................................................................................................... 40<br />
3.7.2 Capture ....................................................................................................... 46<br />
3.8 Control Panel .............................................................................................. 47<br />
3.8.1 Buttons........................................................................................................ 48<br />
3.8.2 Registry....................................................................................................... 50<br />
3.8.3 Files Admin ................................................................................................. 51<br />
3.8.4 Wireless Communications........................................................................... 53<br />
3.8.5 GPS Settings .............................................................................................. 55<br />
3.8.6 Ethernet Settings ........................................................................................ 61<br />
3.8.7 Stylus Calibration ........................................................................................ 64<br />
3.8.8 Volume Settings.......................................................................................... 67<br />
3.9 Windows Connections ................................................................................ 71<br />
3.9.1 Microsoft® ActiveSync® ............................................................................. 71<br />
3.9.2 Bluetooth® Manager Device Setup............................................................. 73<br />
3.9.3 FTP Server Setup ....................................................................................... 81<br />
3.10 Backup Directory File Management ............................................................ 82<br />
3.11 Firmware Update For Windows CE............................................................. 83<br />
4 MAINTENANCE ......................................................................................... 84<br />
4.1 Charging the Battery Pack .......................................................................... 84<br />
4.2 Replacing the Battery Pack......................................................................... 85<br />
4.3 Cleaning the PDA ....................................................................................... 88<br />
5 TECHNICAL FEATURES........................................................................... 89<br />
5.1 Technical Data ............................................................................................ 89<br />
5.2 Reading Diagrams ...................................................................................... 93<br />
6 TEST CODES............................................................................................. 94<br />
iv<br />
GLOSSARY................................................................................................ 97<br />
INDEX....................................................................................................... 100
REFERENCES<br />
CONVENTIONS<br />
This manual uses the following conventions:<br />
“User” refers to anyone using a <strong>Datalogic</strong> J Series PDA.<br />
“Mobile computer”, “PDA” and " <strong>Datalogic</strong> J Series" refer to <strong>Datalogic</strong> J Series<br />
PDA.<br />
“You” refers to the System Administrator or Technical Support person using this<br />
manual to install, configure, operate, maintain or troubleshoot a <strong>Datalogic</strong> J Series<br />
PDA.<br />
REFERENCE DOCUMENTATION<br />
For further information regarding <strong>Datalogic</strong> J Series refer to the SDK Help on-Line.<br />
SERVICES AND SUPPORT<br />
<strong>Datalogic</strong> provides several services as well as technical support through its website.<br />
Log on to www.mobile.datalogic.com and click on the links indicated for further<br />
information including:<br />
- PRODUCTS<br />
Search through the links to arrive at your product page where you can download<br />
specific Manuals and Software & Utilities<br />
- SERVICES & SUPPORT<br />
- <strong>Datalogic</strong> Services Warranty Extensions and Maintenance Agreements<br />
- Authorised Repair Centres<br />
- CONTACT US<br />
E-mail form and listing of <strong>Datalogic</strong> Subsidiaries<br />
v
SAFETY REGULATIONS<br />
NOTE<br />
Read this manual carefully before performing any type of connection<br />
to the <strong>Datalogic</strong> J Series PDA.<br />
The user is responsible for any damages caused by incorrect use of<br />
the equipment or by inobservance of the indication supplied in this<br />
manual.<br />
GENERAL SAFETY RULES<br />
− Use only the components supplied by the manufacturer for the specific <strong>Datalogic</strong><br />
J Series PDA being used.<br />
− Do not attempt to disassemble the <strong>Datalogic</strong> J Series PDA, as it does not<br />
contain parts that can be repaired by the user. Any tampering will invalidate the<br />
warranty.<br />
− When replacing the battery pack or at the end of the operative life of the<br />
<strong>Datalogic</strong> J Series PDA, disposal must be performed in compliance with the<br />
laws in force. See also par. 4.2.<br />
− Do not submerge the <strong>Datalogic</strong> J Series PDA in liquid products.<br />
BLUETOOTH ® APPROVAL<br />
This product is equipped with the following certified Bluetooth® module:<br />
Product Name: <strong>Datalogic</strong> CE BLUETOOTH SUBSYSTEM<br />
Bluetooth ID: B03071<br />
Product ID: DLBTCE-02<br />
POWER SUPPLY<br />
This device is intended to be supplied by a UL Listed/CSA Certified Power Unit<br />
marked "Class 2" or LPS power source rated 12-14 V DC, minimum 1 A which<br />
supplies power directly to the PDA.<br />
vi
LASER SAFETY<br />
The laser light is visible to the human eye and is emitted from the window indicated in<br />
the figure.<br />
This information applies to both Laser models and the <strong>Datalogic</strong> J Series Imager<br />
Aiming System.<br />
Laser output window<br />
I D F E<br />
La luce laser è visibile<br />
all'occhio umano e<br />
viene emessa dalla<br />
finestra indicata nella<br />
figura.<br />
LUCE LASER<br />
NON FISSARE IL FASCIO<br />
APPARECCHIO LASER DI<br />
CLASSE 2<br />
MASSIMA POTENZA DI<br />
USCITA: 1,4 mW<br />
LUNGHEZZA D'ONDA<br />
EMESSA: 630 ~ 680 nm<br />
CONFORME A EN 60825-1<br />
(2001)<br />
Die Laserstrahlung ist für<br />
das menschliche Auge<br />
sichtbar und wird am<br />
Strahlaustrittsfenster<br />
ausgesendet (siehe Bild).<br />
LASERSTRAHLUNG<br />
NICHT IN DER STRAHL<br />
BLINKEN<br />
PRODUKT DER<br />
LASERKLASSE 2<br />
MAXIMALE<br />
AUSGANGSLEISTUNG: 1,4<br />
mW<br />
WELLENLÄNGE: 630 ~ 680<br />
nm<br />
ENTSPR. EN 60825-1<br />
(2001)<br />
Le rayon laser est visible<br />
à l'œil nu et il est émis<br />
par la fenêtre désignée<br />
sur l'illustration dans la<br />
figure.<br />
RAYON LASER<br />
EVITER DE REGARDER<br />
LE RAYON<br />
APPAREIL LASER DE<br />
CLASSE 2<br />
PUISSANCE DE SORTIE:<br />
1,4 mW<br />
LONGUER D'ONDE EMISE:<br />
630 ~ 680 nm<br />
CONFORME A EN 60825-1<br />
(2001)<br />
La luz láser es visible al<br />
ojo humano y es emitida<br />
por la ventana indicada<br />
en la figura.<br />
RAYO LÁSER<br />
NO MIRAR FIJO EL RAYO<br />
APARATO LÁSER DE<br />
CLASE 2<br />
MÁXIMA POTENCIA DE<br />
SALIDA: 1,4 mW<br />
LONGITUD DE ONDA<br />
EMITIDA: 630 ~ 680 nm<br />
CONFORME A EN 60825-1<br />
(2001)<br />
vii
ENGLISH<br />
The following information is provided to comply with the rules imposed by<br />
international authorities and refers to the correct use of your PDA.<br />
STANDARD LASER SAFETY REGULATIONS<br />
This product conforms to the applicable requirements of both CDRH 21 CFR 1040<br />
and EN 60825-1 at the date of manufacture.<br />
For installation, use and maintenance, it is not necessary to open the device.<br />
WARNING<br />
Use of controls or adjustments or performance of procedures other<br />
than those specified herein may result in exposure to hazardous<br />
visible laser light.<br />
The product utilizes a low-power laser diode. Although staring directly at the laser<br />
beam momentarily causes no known biological damage, avoid staring at the beam as<br />
one would with any very strong light source, such as the sun. Avoid that the laser<br />
beam hits the eye of an observer, even through reflective surfaces such as mirrors,<br />
etc.<br />
ITALIANO<br />
Le seguenti informazioni vengono fornite dietro direttive delle autorità internazionali e<br />
si riferiscono all’uso corretto del PDA.<br />
NORMATIVE STANDARD PER LA SICUREZZA LASER<br />
Questo prodotto risulta conforme alle normative vigenti sulla sicurezza laser alla data<br />
di produzione: CDRH 21 CFR 1040 e EN 60825-1.<br />
Non si rende mai necessario aprire l’apparecchio per motivi di installazione, utilizzo o<br />
manutenzione.<br />
ATTENZIONE<br />
L'utilizzo di procedure o regolazioni differenti da quelle descritte<br />
nella documentazione può provocare un'esposizione pericolosa<br />
a luce laser visibile.<br />
Il prodotto utilizza un diodo laser a bassa potenza. Sebbene non siano noti danni<br />
riportati dall’occhio umano in seguito ad una esposizione di breve durata, evitare di<br />
fissare il raggio laser così come si eviterebbe qualsiasi altra sorgente di luminosità<br />
intensa, ad esempio il sole. Evitare inoltre di dirigere il raggio laser negli occhi di un<br />
osservatore, anche attraverso superfici riflettenti come gli specchi.<br />
viii
DEUTSCH<br />
Die folgenden Informationen stimmen mit den Sicherheitshinweisen überein, die von<br />
internationalen Behörden auferlegt wurden, und sie beziehen sich auf den korrekten<br />
Gebrauch vom PDA.<br />
NORM FÜR DIE LASERSICHERHEIT<br />
Dies Produkt entspricht am Tag der Herstellung den gültigen EN 60825-1 und CDRH<br />
21 CFR 1040 Normen für die Lasersicherheit.<br />
Es ist nicht notwendig, das Gerät wegen Betrieb oder Installations-, und Wartungs-<br />
Arbeiten zu öffnen.<br />
ACHTUNG<br />
Jegliche Änderungen am Gerät sowie Vorgehensweisen, die nicht<br />
in dieser Betriebsanleitung beschrieben werden, können ein<br />
gefährliches Laserlicht verursachen.<br />
Der Produkt benutzt eine Laserdiode. Obwohl zur Zeit keine Augenschäden von<br />
kurzen Einstrahlungen bekannt sind, sollten Sie es vermeiden für längere Zeit in den<br />
Laserstrahl zu schauen, genauso wenig wie in starke Lichtquellen (z.B. die Sonne).<br />
Vermeiden Sie es, den Laserstrahl weder gegen die Augen eines Beobachters, noch<br />
gegen reflektierende Oberflächen zu richten.<br />
FRANÇAIS<br />
Les informations suivantes sont fournies selon les règles fixées par les autorités<br />
internationales et se réfèrent à une correcte utilisation du PDA.<br />
NORMES DE SECURITE LASER<br />
Ce produit est conforme aux normes de sécurité laser en vigueur à sa date de<br />
fabrication: CDRH 21 CFR 1040 et EN 60825-1.<br />
Il n’est pas nécessaire d’ouvrir l’appareil pour l’installation, l’utilisation ou l’entretien.<br />
ATTENTION<br />
L'utilisation de procédures ou réglages différents de ceux donnés<br />
ici peut entraîner une dangereuse exposition à lumière laser<br />
visible.<br />
Le produit utilise une diode laser. Aucun dommage aux yeux humains n’a été<br />
constaté à la suite d’une exposition au rayon laser. Eviter de regarder fixement le<br />
rayon, comme toute autre source lumineuse intense telle que le soleil. Eviter aussi<br />
de diriger le rayon vers les yeux d’un observateur, même à travers des surfaces<br />
réfléchissantes (miroirs, par exemple).<br />
ix
ESPAÑOL<br />
Las informaciones siguientes son presentadas en conformidad con las disposiciones<br />
de las autoridades internacionales y se refieren al uso correcto del PDA.<br />
NORMATIVAS ESTÁNDAR PARA LA SEGURIDAD LÁSER<br />
Este aparato resulta conforme a las normativas vigentes de seguridad láser a la<br />
fecha de producción: CDRH 21 CFR 1040 y EN 60825-1.<br />
No es necesario abrir el aparato para la instalación, la utilización o la manutención.<br />
ATENCIÓN<br />
La utilización de procedimientos o regulaciones diferentes de<br />
aquellas describidas en la documentación puede causar una<br />
exposición peligrosa a la luz láser visible.<br />
El aparato utiliza un diodo láser a baja potencia. No son notorios daños a los ojos<br />
humanos a consecuencia de una exposición de corta duración. Eviten de mirar fijo el<br />
rayo láser así como evitarían cualquiera otra fuente de luminosidad intensa, por<br />
ejemplo el sol. Además, eviten de dirigir el rayo láser hacia los ojos de un<br />
observador, también a través de superficies reflectantes como los espejos.<br />
LED Illuminator<br />
The use of an illuminator in the <strong>Datalogic</strong> J Series Imager is a Class 1 LED<br />
product:<br />
CLASS 1 LED PRODUCT<br />
ILLUMINATORE LED CLASSE 1<br />
AUSLEUCHTER LED KLASSE 1<br />
ILLUMINATEUR A LED DE CLASSE 1<br />
ILUMINADOR LED DE CLASE 1<br />
RADIO COMPLIANCE<br />
In radio systems configured with PDAs and access points, the frequencies to be used<br />
must be allowed by the spectrum authorities of the specific country in which the<br />
installation takes place. Be absolutely sure that the system frequencies are correctly<br />
set to be compliant with the spectrum requirements of the country.<br />
The Radio modules used in this product automatically adapt to the frequencies set by<br />
the system and do not require any parameter settings.<br />
x
The following shows the correspondence between the <strong>Datalogic</strong> J Series models<br />
and the Radio modules:<br />
� DLJS 5XX-XXX-XXX 802.11b (Wi-Fi) radio card<br />
� DLJS 7XX-XXX-XXX 802.11b/g (Wi-Fi) radio card<br />
� DLJS X1X-XXX-XXX GSM/GPRS Tri-band (900, 1800, 1900 MHz) module<br />
� DLJS 741-904-555 WIFI+GPRS+GP+BT,HP,WM module<br />
Information for the User<br />
ENGLISH<br />
Contact the competent authority responsible for the management of radio frequency<br />
devices of your country to verify any possible restrictions or licenses required. Refer<br />
to the web site http://europa.eu.int/comm/enterprise/rtte/spectr.htm for further<br />
information.<br />
ITALIANO<br />
Contatta l'autorità competente per la gestione degli apparati a radio frequenza del tuo<br />
paese, per verificare eventuali restrizioni o licenze. Ulteriori informazioni sono<br />
disponibili sul sito:<br />
http://europa.eu.int/comm/enterprise/rtte/spectr.htm.<br />
FRANÇAIS<br />
Contactez l'autorité compétente en la gestion des appareils à radio fréquence de<br />
votre pays pour vérifier d'éventuelles restrictions ou licences. Pour tout<br />
renseignement vous pouvez vous adresser au site web:<br />
http://europa.eu.int/comm/enterprise/rtte/spectr.htm.<br />
DEUTSCH<br />
Wenden Sie sich an die für Radiofrequenzgeräte zuständige Behörde Ihres Landes,<br />
um zu prüfen ob es Einschränkungen gibt, oder eine Lizenz erforderlich ist. Weitere<br />
Informationen finden Sie auf der Web Seite:<br />
http://europa.eu.int/comm/enterprise/rtte/spectr.htm.<br />
ESPAÑOL<br />
Contacta la autoridad competente para la gestión de los dispositivos de radio<br />
frecuencia de tu país, para verificar cualesquiera restricciones o licencias posibles<br />
requerida. Además se puede encontrar mas información en el sitio web:<br />
http://europa.eu.int/comm/enterprise/rtte/spectr.htm.<br />
xi
SAR COMPLIANCE<br />
This product has been tested and found to comply with the following standards:<br />
- EN50360: product standard to demonstrate the compliance of mobile phones with the<br />
basic restrictions related to human exposure to electromagnetic fields (300 MHz – 3 GHz).<br />
- EN50361: basic standard for the measurement of specific absorption rate related to<br />
human exposure to electromagnetic fields from mobile phones (300 MHz – 3 GHz).<br />
- Australian Radiation Protection And Nuclear Safety Agency (ARPANSA): radiation<br />
protection series publication No. 3: maximum exposure levels to radio frequency<br />
fields 3 KHz TO 300 GHz.<br />
PATENTS<br />
This product is covered by one or more of the following patents:<br />
U.S. Pat. Nos: 5,992,740; 6,512,218 B1; 6,877,664 B1; 7,102,116 B2; 7,282,688 B2;<br />
7,468,499 B2<br />
European Pat. Nos: 681,257 B1; 789,315 B1; 999,514 B1; EP 1 172 756 B1<br />
Additional patents pending.<br />
xii
WEEE COMPLIANCE<br />
Informazione degli utenti ai sensi della Direttiva Europea 2002/96/EC<br />
L’apparecchiatura che riporta il simbolo del bidone barrato deve essere smaltita, alla fine della<br />
sua vita utile, separatamente dai rifiuti urbani.<br />
Smaltire l’apparecchiatura in conformità alla presente Direttiva consente di:<br />
� evitare possibili conseguenze negative per l’ambiente e per la salute umana che<br />
potrebbero invece essere causati dall’errato smaltimento dello stesso;<br />
� recuperare materiali di cui è composto al fine di ottenere un importante risparmio di<br />
energia e di risorse.<br />
Per maggiori dettagli sulle modalità di smaltimento, contattare il Fornitore dal quale è stata<br />
acquistata l’apparecchiatura o consultare la sezione dedicata sul sito<br />
www.mobile.datalogic.com.<br />
Information for the user in accordance with the European Commission Directive<br />
2002/96/EC<br />
At the end of its useful life, the product marked with the crossed out wheeled wastebin must be<br />
disposed of separately from urban waste.<br />
Disposing of the product according to this Directive:<br />
� avoids potentially negative consequences to the environment and human health<br />
which otherwise could be caused by incorrect disposal<br />
� enables the recovery of materials to obtain a significant savings of energy and<br />
resources.<br />
For more detailed information about disposal, contact the supplier that provided you with the<br />
product in question or consult the dedicated section at the website www.mobile.datalogic.com.<br />
Information aux utilisateurs concernant la Directive Européenne 2002/96/EC<br />
Au terme de sa vie utile, le produit qui porte le symbole d'un caisson à ordures barré ne doit pas<br />
être éliminé avec les déchets urbains.<br />
Éliminer ce produit selon cette Directive permet de:<br />
xiii
� éviter les retombées négatives pour l'environnement et la santé dérivant d'une<br />
élimination incorrecte<br />
� récupérer les matériaux dans le but d'une économie importante en termes d'énergie<br />
et de ressources<br />
Pour obtenir des informations complémentaires concernant l'élimination, veuillez contacter le<br />
fournisseur auprès duquel vous avez acheté le produit ou consulter la section consacrée au site<br />
Web www.mobile.datalogic.com.<br />
Información para el usuario de accuerdo con la Directiva Europea 2002/96/CE<br />
Al final de su vida útil, el producto marcado con un simbolo de contenedor de bassura móvil<br />
tachado no debe eliminarse junto a los desechos urbanos.<br />
Eliminar este producto de accuerdo con la Directiva permite de:<br />
� evitar posibles consecuencias negativas para el medio ambiente y la salud derivadas<br />
de una eliminación inadecuada<br />
� recuperar los materiales obteniendo así un ahorro importante de energía y recursos<br />
Para obtener una información más detallada sobre la eliminación, por favor, póngase en<br />
contacto con el proveedor donde lo compró o consultar la sección dedicada en el Web site<br />
www.mobile.datalogic.com.<br />
Benutzerinformation bezüglich Richtlinie 2002/96/EC der europäischen Kommission<br />
Am Ende des Gerätelebenszyklus darf das Produkt nicht über den städtischen Hausmüll<br />
entsorgt werden. Eine entsprechende Mülltrennung ist erforderlich.<br />
Beseitigung des Produkts entsprechend der Richtlinie:<br />
� verhindert negative Auswirkungen für die Umwelt und die Gesundheit der Menschen<br />
� ermöglicht die Wiederverwendung der Materialien und spart somit Energie und<br />
Resourcen<br />
Weitere Informationen zu dieser Richtlinie erhalten sie von ihrem Lieferanten über den sie das<br />
Produkt erworben haben, oder besuchen sie unsere Hompage unter<br />
www.mobile.datalogic.com.<br />
xiv
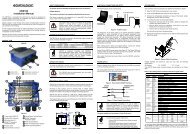
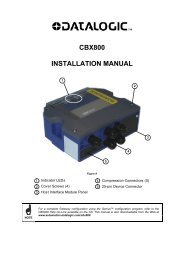
GENERAL VIEW<br />
I<br />
J<br />
H<br />
G<br />
A) Data capture/Laser output window<br />
B) Scan key(s) (3)<br />
F<br />
C) Bluetooth® LED<br />
E<br />
D) Charging status LED<br />
E) Backlit keyboard<br />
F) External power supply connector<br />
G) Communication/Charger connector<br />
H) Headset jack<br />
A<br />
D<br />
C<br />
B<br />
P<br />
O<br />
N<br />
Figure A – General View<br />
M L<br />
I) User programmable LED<br />
J) Backlit display<br />
K) Mini SD card SLOT<br />
L) Microphone<br />
M) Latch release button<br />
N) Battery latch<br />
O) Battery pack<br />
P) Speaker<br />
K<br />
xv
xvi
INTRODUCTION<br />
1 INTRODUCTION<br />
1.1 DATALOGIC J SERIES PDA DESCRIPTION<br />
The <strong>Datalogic</strong> J Series, is the powerful <strong>Datalogic</strong> PDA.<br />
Thanks to the state-of the-art architecture and the most advanced technologies, it<br />
can provide the most suitable levels for capturing, computing and communicating<br />
data faster and easier.<br />
In addition to the highest robustness and reliability in its class, other key features of<br />
the <strong>Datalogic</strong> J Series include fully integrated automatic data capture (barcodes,<br />
RFID tags and images) and superior wireless communication capabilities (WLAN,<br />
WWAN and WPAN). The PDA is equipped with a function-based keyboard for direct<br />
ERP transactions and with a web-based layout for HTML needs as well. These key<br />
requirements make the <strong>Datalogic</strong> J Series perfect for use in field force automation,<br />
in-store and logistics applications.<br />
The <strong>Datalogic</strong> J Series is also equipped with the integrated Global Positioning<br />
System (GPS) technology. Combined with its advanced wireless and data collection<br />
technologies, the result is a single comprehensive mobile solution that eliminates the<br />
need for deploying multiple devices to the field.<br />
The <strong>Datalogic</strong> J Series enables companies and organizations worldwide to make<br />
more effective use of people and tools for receiving, storage, and shipping activities.<br />
For example, extended mobility allows simultaneous real-time inventory management<br />
and control of all stock movements to increase precision while minimizing operating<br />
costs. Data on store shelves, inventory levels and storage bins are immediately<br />
available to permit greater coordination and cut flow times.<br />
The <strong>Datalogic</strong> J Series provides mobile professionals with the most relevant<br />
features needed to operate in demanding environments: reliability, ruggedness, drop<br />
resistance, long lasting batteries, flexible communication and efficient data capture.<br />
To optimize mobile applications, a user-accessible memory slot is also present to<br />
backup data, extend databases, etc.<br />
Thanks to a set of accessories, such as a vehicle cradle (standard and loud<br />
speaker), cigarette lighter power adapter, dashboard mounting kit, with state-of-theart<br />
technology inside the PDA, the <strong>Datalogic</strong> J Series is the right answer for all data<br />
management needs on the move.<br />
1<br />
1
1<br />
1.2 AVAILABLE MODELS<br />
DATALOGIC J SERIES<br />
The <strong>Datalogic</strong> J Series PDA is available in different models depending on the<br />
options it is equipped with. All options are listed below:<br />
• communication options: Wi-Fi 802.11b, Wi-Fi 802.11b/g, GSM/GPRS, Bluetooth®;<br />
GPS<br />
• capture options: laser, imager, laser + RFID<br />
• compute options (fixed): O.S. version, microprocessor type/speed, memory size<br />
For further details about the <strong>Datalogic</strong> J Series PDA models refer to the web site:<br />
www.mobile.datalogic.com.<br />
1.3 PACKAGE CONTENTS<br />
The <strong>Datalogic</strong> J Series PDA package contains:<br />
− 1 <strong>Datalogic</strong> J Series PDA<br />
− 1 CD-ROM <strong>Datalogic</strong> SDK<br />
− 1 CD-ROM Getting Started Disk only for Windows Mobile<br />
− 2 styluses<br />
− 3 adhesive pull tabs for Mini SD card<br />
− 1 user’s manual<br />
− 1 rechargeable battery pack<br />
− 1 adjustable elastic strap with stylus holder<br />
− 1 belt clip<br />
− 1 belt clip pivot<br />
Any other packages will contain the accessories necessary for the <strong>Datalogic</strong> J<br />
Series PDA connection to the host computer and to the network: the cradle, power<br />
supply, and one or more connection cables. Remove all the components from their<br />
packaging; check their integrity and congruity with the packing documents.<br />
2<br />
CAUTION<br />
Keep the original packaging for use when sending products to the<br />
technical assistance center. Damage caused by improper<br />
packaging is not covered under the warranty.
INTRODUCTION<br />
NOTE<br />
Rechargeable battery packs are not initially charged. Therefore the<br />
first operation to perform is to charge them. See paragraph 4.1.<br />
1<br />
3
1<br />
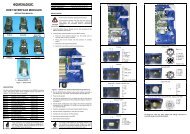
1.4 INSERTING MINI SD CARD<br />
DATALOGIC J SERIES<br />
With <strong>Datalogic</strong> J Series PDA, it is possible to add a Mini SD Card for additional<br />
storage capacity. To access the Mini SD card slot, unscrew the cover at the side of<br />
<strong>Datalogic</strong> J Series (see Figure A) and then proceed as follows:<br />
1. Before inserting the Mini SD card, peel the adhesive pull tab and stick it onto to<br />
the Mini SD card as shown in the picture below:<br />
2. Open the Mini SD card slot by unscrewing the two screws:<br />
3. Insert the card with the written part upward and push it until it clicks into place:<br />
To remove the Mini SD card slightly push it toward the inside until it clicks; the card is<br />
released, pull it out using the adhesive pull tab.<br />
4
INTRODUCTION<br />
CAUTION<br />
Follow proper ESD precautions to avoid damaging the SD. Proper ESD<br />
precautions include, but are not limited to, working on an ESD mat and<br />
ensuring that the operator is properly grounded.<br />
Do not force the card. If you feel resistance, remove the card, check<br />
the orientation, and reinsert it.<br />
Do not use the SD card slot for any other accessories.<br />
1<br />
5
1<br />
1.5 INSTALLING THE SIM CARD<br />
To correctly insert the SIM Card, proceed as follows:<br />
1- Turn off the <strong>Datalogic</strong> J Series PDA.<br />
DATALOGIC J SERIES<br />
2- Press the latch release button and pull the battery latch down as indicated in the<br />
figures below:<br />
3- Remove the battery pack to have access to the SIM card slot:<br />
6<br />
SIM Card Slot<br />
Locking Plate
INTRODUCTION<br />
4- Open the Sim Card slot by pulling up the locking plate.<br />
5- Pull up the cardholder and insert the Sim Card with its contacts downward and<br />
its round corner at the bottom.<br />
6- Lock the card into place by pushing the cardholder down and then pulling the<br />
locking plate down.<br />
CAUTION<br />
Follow proper ESD precautions to avoid damaging the SIM card.<br />
Proper ESD precautions include, but are not limited to, working on an<br />
ESD mat and ensuring that the operator is properly grounded.<br />
Do not force the card. If you feel resistance, remove the card, check<br />
the orientation, and reinsert it.<br />
Do not use the SIM card slot for any other accessories.<br />
1<br />
7
1<br />
1.5.1 Removing the SIM Card<br />
DATALOGIC J SERIES<br />
To remove the SIM card, follow the steps above to access the SIM area, and remove<br />
it from its slot.<br />
8<br />
NOTE<br />
All the basic functionalities normally associated to the SIM card are<br />
managed by the terminal (GPRS connectivity, phone calls, SMS<br />
handling).<br />
It is possible that not all the services connected to the SIM card can<br />
be used or can be managed by the terminal.
INTRODUCTION<br />
1.6 ACCESSORIES<br />
� Cradles<br />
94A151096 DLJS Single Cradle Desk (includes slot for spare battery pack recharge;<br />
RS232 and USB communications)<br />
94A151097 DLJS Single Cradle Vehicle Loudspeaker<br />
94A151100 DLJS Single Cradle Vehicle Standard<br />
94A151109 DLJS Ethernet Desk Multi Cradle<br />
� Charger<br />
94A151098 DLJS Multi Battery Charger (4 slots)<br />
� Batteries<br />
94ACC1293 DLJS Standard Battery (Li-Ion battery pack 1070 mAh@7.4 V)<br />
94ACC1294 DLJS Large Capacity Battery (Li-Ion battery pack 1800 mAh@7.4 V)<br />
� Power Supply<br />
94ACC1286 PG12-10P35 AC/DC Power Supply without cord for <strong>Datalogic</strong> J Series<br />
94ACC1296 PG12-10P35 AC/DC Power supply EU KIT<br />
94ACC1297 PG12-10P35 AC/DC Power supply UK KIT<br />
94ACC1298 PG12-10P35 AC/DC Power supply US KIT<br />
94ACC1299 PG12-10P35 AC/DC Power supply AUS KIT<br />
94ACC4595 FPS18 Power Supply without cord for DLJS Single Cradle Desk and for DLJS<br />
Multi Battery Charger<br />
94ACC1150 Power cord EU 3-pin<br />
� Cables<br />
94A051008 WIN-NET SERIAL CABLE (HRS 3500-16P-CV) cable for RS232 direct<br />
connection between the PDA and the PC<br />
94A051009 WIN-NET USB CABLE (HRS 3500-16P-CV) cable for USB direct connection<br />
between the PDA and the PC<br />
94A051012 WIN-NET VEHICLE PWR CAB (HRS 3500-16P-CV) cable for powering J<br />
Series from the car cigarette lighter<br />
� Various<br />
94ACC1331 vo-CE® Headset<br />
94ACC1333 vo-CE® Headset Adapter For <strong>Datalogic</strong> J Series<br />
94ACC1287 DLJS Belt Holster<br />
94ACC1288 DLJS Functional Case<br />
94ACC1307 DLJS Functional Case Plus<br />
94ACC1344 DLJS Backstrap Kit<br />
94ACC1308 Safe Shoulderstrap (5 pcs)<br />
94ACC1301 Stylus Pen (20 pcs)<br />
1<br />
9
1<br />
NOTE<br />
DATALOGIC J SERIES<br />
Use only a <strong>Datalogic</strong> Mobile-approved power supply and cables. Use<br />
of an alternative power supply will invalidate any approval given to<br />
this device and may be dangerous.<br />
1.7 OPERATING SYSTEM<br />
<strong>Datalogic</strong> J Series comes in two different models, respectively supporting Windows<br />
CE and Windows Mobile.<br />
For further information regarding Windows Mobile refer to the website:<br />
http://www.microsoft.com/windowsmobile.<br />
10
CONNECTIONS<br />
2 CONNECTIONS<br />
2.1 RS232/USB DIRECT CONNECTION<br />
You can use a cable to connect the <strong>Datalogic</strong> J Series PDA to a host computer to<br />
transfer data.<br />
Key:<br />
A Host computer C RS232 cable or USB cable<br />
B <strong>Datalogic</strong> J Series<br />
PDA<br />
D *Power Supply (only necessary for battery charging)<br />
* Recommended Power Supply: PG12-10P35 AC/DC Power Supply<br />
CAUTION<br />
CAUTION<br />
If the PDA supports Windows Mobile, before plugging the RS232<br />
cable you have to check the 'COM1 Enable' option on the 'System<br />
Configuration' window. (Start -> Programs -> System<br />
Configuration).<br />
USB communication may not be completely guaranteed while<br />
batteries are simultaneously in charge. Avoid the power supply<br />
connection when the USB link is active.<br />
2<br />
11
2<br />
2.2 WLAN CONNECTION<br />
DATALOGIC J SERIES<br />
<strong>Datalogic</strong> J Series Wi-Fi 802.11b and Wi-Fi 802.11b/g 1 models can communicate<br />
with the host using the on-board radio frequency module and an Access Point<br />
connected to the host computer.<br />
For models using the WiFi7 radio (7xx-xxx-xxx models), you can find information<br />
about the applet for radio configuration: http://www.summitdatacom.com/SCU.htm.<br />
To launch this utility you can tap the specific icon if it’s visible on the taskbar or:<br />
1. On Windows CE device, you can open Connections folder or Control Panel from<br />
desktop and select the ‘Summit Client Utility’ icon.<br />
2. On Windows Mobile device, you can select the menu item: Start->Programs-<br />
>Summit and tap the ‘Summit Client Utility’ icon.<br />
Key:<br />
A) <strong>Datalogic</strong> J Series PDA<br />
A<br />
B) Access point<br />
B<br />
C) Host – Application Server<br />
1 Note: unless otherwise specified, the Wi-Fi term is used both for the 802.11b and the 802.11b/g cards.<br />
12<br />
C
CONNECTIONS<br />
NOTE<br />
NOTE<br />
NOTE<br />
Wi-Fi module is on by default. In order to avoid wasting energy, you can<br />
switch it off using the Wireless Communications applet (see par. 3.8.4).<br />
To start configuring your WLAN connection, tap the Wi-Fi icon at the<br />
bottom of the screen.<br />
Suspending the terminal powers off the 802.11b/g radio and drops<br />
the radio connection. When the terminal resumes, depending on the<br />
radio power mode and security protocol selected, it takes<br />
approximately from 10 to 30 seconds for the 802.11b/g radio driver to<br />
re-associate the radio to the network.<br />
Area coverage and radio performance may vary, due to<br />
environmental conditions, access points types or interference caused<br />
by other devices (microwave ovens, radio transmitters, etc.)<br />
2<br />
13
2<br />
2.3 WPAN CONNECTION<br />
DATALOGIC J SERIES<br />
<strong>Datalogic</strong> J Series PDAs can communicate with a Bluetooth ® device, such as a<br />
printer, within a range of 10 m, using the on-board Bluetooth ® module.<br />
Key:<br />
A B<br />
A) <strong>Datalogic</strong> J Series PDA<br />
B) Bluetooth® printer<br />
NOTE<br />
In order to avoid wasting energy, the Bluetooth® module is off by<br />
default. If you need to have Bluetooth® working, the module must be<br />
powered on using the Wireless Communications applet (see par.<br />
3.8.4), and perform the Discovery procedure (see par. 3.9.2).<br />
The Blue LED flashing signals that the Bluetooth® module is on.<br />
14<br />
NOTE<br />
Suspending the terminal powers off the Bluetooth® radio and drops<br />
the piconet (Bluetooth® connection). When the terminal resumes, it<br />
takes approximately 10 seconds for the Bluetooth® radio driver to reinitialize<br />
the radio.
CONNECTIONS<br />
NOTE<br />
Area coverage and Bluetooth® radio performance may vary, due to<br />
environmental conditions or interference caused by other devices<br />
(microwave ovens, radio transmitters, etc.), etc.<br />
2<br />
15
2<br />
2.4 WWAN CONNECTION<br />
DATALOGIC J SERIES<br />
<strong>Datalogic</strong> J Series GSM/GPRS models enhance your connectivity solutions giving<br />
you an opening to an international wireless infrastructure that is the standard in<br />
Europe and Asia.<br />
GSM (Global System for Mobile communications) is a digital mobile phone system<br />
based on TDMA; it utilizes the 900, 1800 and 1900 MHz bands.<br />
GPRS supports IP (Internet Protocol) and allows accessing Internet and Intranet<br />
services, such as sending and receiving e-mail or Web browsing.<br />
In order to use a WWAN Connection you have to install a SIM Card (see instructions<br />
on par. 1.5).<br />
16<br />
NOTE<br />
NOTE<br />
In order to avoid wasting energy, the GSM/GPRS module is off by<br />
default. If you need to have GSM/GPRS working, the module must<br />
be powered on using the Wireless Communications applet<br />
(see par. 3.8.4).<br />
Suspending the terminal powers off the GSM/GPRS radio and drops<br />
the connection. When the terminal resumes, if the connection was<br />
managed by Microsoft Internet Explorer, it is automatically restored,<br />
otherwise, the radio connection must be manually re-initialized.
CONNECTIONS<br />
NOTE<br />
The GSM voice capability of this mobile computer has to be addressed<br />
to occasional use, in well covered areas.<br />
If the coverage is poor, the voice quality can be highly affected.<br />
In case of vehicle cradle installations, a good habit is to install the<br />
external microphone to minimize the risk of noises and echoes.<br />
If the coverage is poor, in case of continuous communication, some<br />
degradation of the barcode reading capabilities can be experienced.<br />
2<br />
17
2<br />
2.5 GPS CONNECTION<br />
DATALOGIC J SERIES<br />
<strong>Datalogic</strong> J Series GPS model provides a GPS Connection to allow for both<br />
satellite communications (if equipped) and geolocating abilities.<br />
The Global Positioning System (GPS) is a satellite-based navigation system made up<br />
of a network of 24 satellites that provides location and timing information around the<br />
globe. GPS works in any weather conditions, anywhere in the world, 24 hours a day.<br />
There are no subscription fees or setup charges to use GPS.<br />
To use the GPS Connection you have the following options:<br />
− install the SD Card provided by the navigation software with pre-installed country<br />
or regional maps (see instructions on par. 1.4);<br />
− access to a free web mapping service via a GPRS/Wi-Fi connection;<br />
− design a navigation software following the instructions on the Help SDK .<br />
<strong>Datalogic</strong> J Series GPS model only supports Windows Mobile operating system.<br />
18
CONNECTIONS<br />
To locate a position, the <strong>Datalogic</strong> J Series GPS must be outdoors to obtain the<br />
best possible reception. First-time initialisation of GPS can take several minutes<br />
depending on the environment and quality of the reception of GPS satellite signals. If<br />
it takes longer than 5 minutes to locate a position, the user has to make sure to be in<br />
an open place without tall buildings or trees all around.<br />
In the future, the time required for GPS acquisition will vary depending on when the<br />
device was last used:<br />
− if the <strong>Datalogic</strong> J Series GPS is switched on after it has been switched off for<br />
several minutes, satellite positioning is almost instantaneous (“hot start”);<br />
− if the <strong>Datalogic</strong> J Series GPS device has been switched off for more than 4<br />
hours, the GPS could take up to five minutes (“warm start”);<br />
− if the <strong>Datalogic</strong> J Series GPS is only used occasionally, and has been<br />
switched off for more than 24 hours, GPS initialisation could take from between<br />
10 to 15 minutes (“cold start”).<br />
The time required for GPS acquisition also varies according to the surroundings:<br />
− if the vehicle is equipped with an athermic windscreen, GPS reception may be<br />
slower;<br />
− if there are high buildings, narrow streets or many trees, reception will be slower.<br />
Move to an area clear of obstructions to improve reception;<br />
− in bad weather GPS reception may take a be slower;<br />
− if the <strong>Datalogic</strong> J Series GPS is in a building, parking lot, or a tunnel, the user<br />
will not receive any GPS signals.<br />
NOTE<br />
NOTE<br />
In order to avoid wasting energy, the GPS module is off by default. If<br />
you need to have GPS working, the module must be powered on using<br />
the External GPS applet (see par. 3.8.5).<br />
Suspending the terminal powers off the GPS and drops the<br />
connection. When the terminal resumes, if the check box “Enable GPS<br />
at reboot” was checked, the GPS connection it is automatically<br />
restored, otherwise, it must be manually re-initialized (see par. 3.8.5).<br />
2<br />
19
20<br />
2<br />
NOTE<br />
NOTE<br />
NOTE<br />
CAUTION<br />
DATALOGIC J SERIES<br />
The user must ensure that the <strong>Datalogic</strong> J Series GPS is placed<br />
correctly for optimal GPS signal reception and stays in place. The GPS<br />
receiver can be tested in a stationary situation.<br />
Many modern vehicles have a heat reflective shield embedded in the<br />
windshield preventing good reception when the GPS receiver is placed<br />
on the dashboard. To improve GPS signal strength, the <strong>Datalogic</strong> J<br />
Series GPS should be placed as close as possible to the<br />
windscreen, where there is a clear view of the sky.<br />
GPS is operated and controlled under the sole responsibility of the<br />
Government of the United States of America which is responsible for<br />
its availability and accuracy. Any changes in GPS availability and<br />
accuracy, or in environmental conditions, may impact the operation of<br />
GPS. <strong>Datalogic</strong> Mobile cannot accept any liability for the availability<br />
and accuracy of GPS.<br />
The user is entirely responsible for the positioning and use of the<br />
portable navigation system and its accessories so that it neither<br />
obstructs the driver’s visibility nor hinders operation of the vehicle’s<br />
security systems to avoid any risk of accident, injury or damage.
CONNECTIONS<br />
CAUTION<br />
Before using the <strong>Datalogic</strong> J Series GPS, the user should become<br />
familiar with the laws and regulations relating to satellite positioning in<br />
effect in the country in which he is driving.<br />
The distances indicated by the <strong>Datalogic</strong> J Series GPS can differ<br />
slightly from those indicated on the road signs. In the event of a<br />
discrepancy, the user must always follow the directions displayed on<br />
the road signs.<br />
Data (maps, routes, fixed speed cameras, traffic information, points of<br />
interest, etc.) are provided for information purposes, and are subject to<br />
modification at any time.<br />
We recommend to use these data taking into consideration the real<br />
context of travelling: the general condition of the vehicle, its<br />
equipment, the speed, the road surface, weather conditions, etc.<br />
The user is expected to check road signs when using satellite<br />
positioning, in particular for one-way streets and speed-limit signs. The<br />
user must also follow the Highway Code and road safety rules<br />
applicable in the country in which he is driving.<br />
Non-compliance with these warnings could lead to accidents or<br />
damage. <strong>Datalogic</strong> Mobile and/or suppliers accept no responsibility<br />
for any use of products likely to provoke accidents, cause damage or<br />
infringe on any laws or for any other consequences, whether direct or<br />
indirect.<br />
2<br />
21
2<br />
2.6 CRADLE CONNECTIONS<br />
DATALOGIC J SERIES<br />
The <strong>Datalogic</strong> J Series can also communicate via RS232, USB and Ethernet, using<br />
various cradle models.<br />
For further details, refer to the specific cradle model User’s Manual.<br />
22
CONNECTIONS<br />
2.7 CONNECTION CABLES<br />
The following cables are listed with their order number.<br />
� RS232 Direct Connection:<br />
94A051008 WIN-NET SERIAL CABLE (HRS 3500-16P-CV)<br />
<strong>Datalogic</strong> J Series<br />
side<br />
HOST/PC side<br />
9-pin (female)<br />
5<br />
RX<br />
3<br />
TX<br />
6<br />
CTS<br />
2<br />
7<br />
RTS<br />
7<br />
8<br />
8<br />
DSR<br />
9<br />
4<br />
11<br />
10<br />
13<br />
� USB Direct Connection:<br />
DTR<br />
GND<br />
94A051009 WIN-NET USB CABLE (HRS 3500-16P-CV)<br />
<strong>Datalogic</strong> J Series<br />
side<br />
13<br />
14<br />
15<br />
16<br />
� Power Supply Polarity:<br />
GND<br />
V+<br />
D+<br />
D-<br />
VEXT<br />
GND<br />
1<br />
6<br />
5<br />
HOST/PC side<br />
9-pin (female)<br />
4<br />
1<br />
3<br />
2<br />
2<br />
23
3<br />
3 USE AND FUNCTIONING<br />
DATALOGIC J SERIES<br />
The use of the <strong>Datalogic</strong> J Series PDA depends on the application software<br />
loaded. However there are several parameters that can be set and utilities that can<br />
be used to perform some basic functions such as data capture, communications, file<br />
management, etc.<br />
3.1 PDA STARTUP<br />
The <strong>Datalogic</strong> J Series PDA turns on when the battery pack or the external supply<br />
is inserted.<br />
After the battery pack is installed, use the [ON/OFF] key to turn the PDA on and off.<br />
As soon as the PDA is on, the Windows CE/ Windows Mobile desktop screen will<br />
appear. Wait a few seconds before starting any activity so that the PDA completes its<br />
startup procedure.<br />
LEFT<br />
SOFT<br />
KEY<br />
START MENU<br />
Windows CE Desktop Windows MobileToday Screen<br />
LEFT SOFT KEY<br />
Use the stylus as suggested in paragraph 3.3 to select icons and options.<br />
For the use of Left and Right Soft Keys, refer to par. 3.8.1.<br />
24<br />
RIGHT<br />
SOFT<br />
KEY
USE AND FUNCTIONING<br />
When it is no longer used for more than a programmable timeout, which is defined in<br />
the POWER applet of the Control Panel, the PDA goes into power-off (low power<br />
with display and keyboard backlight off). In this mode it can be awakened (resuming<br />
operation) by the [ON/OFF] key.<br />
NOTE<br />
The PDA can also be awakened or turned off by the application<br />
program.<br />
3<br />
25
3<br />
3.2 WINDOWS MOBILE WELCOME WIZARD<br />
DATALOGIC J SERIES<br />
In Windows Mobile, at the very first J Series startup, following a cold boot or<br />
following a registry restore to default values, the PDA startup (see par. 3.1) is<br />
preceded by the Welcome Wizard.<br />
Welcome Wizard Screen<br />
The Welcome Wizard allows the user to calibrate the touch screen (see par. 3.8.7)<br />
and to configure an email account and a password to protect the terminal.<br />
26<br />
Touch Screen Calibration Screen
USE AND FUNCTIONING<br />
3.3 USING THE STYLUS<br />
The stylus selects items and enters information. The stylus functions like a mouse.<br />
Tap:<br />
Double Tap:<br />
Drag:<br />
Tap-and-hold:<br />
Touch the screen once with the stylus to open items and select<br />
options (Windows Mobile only).<br />
Touch the screen twice with the stylus to open items and select<br />
options (Windows CE only).<br />
Hold the stylus on the screen and drag across the screen to<br />
select text and images. Drag in a list to select multiple items.<br />
Tap and hold the stylus on an item to see a list of actions<br />
available for that item. On the pop-up menu that appears, tap the<br />
action you want to perform.<br />
To recalibrate the touch screen use the Stylus Applet (see par. 3.8.7)<br />
CAUTION<br />
Use only original <strong>Datalogic</strong> styluses supplied with the product itself.<br />
In harsh applications, use of screen protectors<br />
should be taken into consideration, in order to extend the<br />
touch screen operating life.<br />
To prevent damage to the screen, do not use sharp devices or any<br />
device other than the <strong>Datalogic</strong> Mobile-provided stylus.<br />
Do not apply not necessary high pressures on the screen.<br />
For applications where an intensive use of the touch screen is<br />
foreseen, please consider that touch screen components are subject to<br />
progressive wear.<br />
3<br />
27
3<br />
3.4 DATA CAPTURE<br />
DATALOGIC J SERIES<br />
To capture data, first of all select the barcode icon on the bottom-right side of the<br />
display and tap the 'Capture' menu item, then proceed with the following directions.<br />
To configure and enable data capture parameters refer to par. 3.7.<br />
3.4.1 Laser Data Capture<br />
To scan barcodes, point the <strong>Datalogic</strong> J Series PDA laser model onto the code<br />
from a distance within the reading range while pressing one of the three SCAN Keys.<br />
See the reading diagrams in par. 5.2 for the reading range of your model.<br />
The lighted band emitted by the laser must completely intercept the barcode as<br />
shown in the figure below. If enabled, the emission of an acoustic signal will indicate<br />
that the scan has taken place correctly.<br />
28
USE AND FUNCTIONING<br />
3.4.2 Imager Data Capture<br />
To read a 1D or 2D code, simply point the <strong>Datalogic</strong> J Series Imager model onto<br />
the code from a distance within the reading range (see par. 5.1, section <strong>Datalogic</strong> J<br />
Series Imager Optical Features) and press one of the three SCAN Keys.<br />
The <strong>Datalogic</strong> J Series Imager uses an intelligent aiming system pattern, similar to<br />
those on cameras, indicating the field of view, which should be positioned over the<br />
code:<br />
Aiming System<br />
If the aiming system pattern is centered over the entire symbology as shown in the<br />
following figure, either wait for the timeout or release the Scan key to capture the<br />
image.<br />
A red beam illuminates the code, which is captured and decoded. You will get a good<br />
read.<br />
3<br />
29
3<br />
Linear barcode 2D Matrix symbol<br />
ÌBX3ÉÎ<br />
Relative Size and Location of Aiming System Pattern<br />
DATALOGIC J SERIES<br />
The field of view changes its size as you move the reader closer or farther away from<br />
the code. The field of view indicated by the aiming system pattern will be smaller<br />
when the <strong>Datalogic</strong> J Series Imager is closer to the code and larger when it is<br />
farther from the code.<br />
Symbologies with smaller bars or elements (mil size) should be read closer to the<br />
unit. Symbologies with larger bars or elements (mil size) should be read farther from<br />
the unit. (See par. 5.1 for further details).<br />
3.4.3 RFID Data Capture<br />
To read or write a tag, place the <strong>Datalogic</strong> J Series PDA so that the RFID emission<br />
window is in front of and almost in contact with the tag, then press one of the three<br />
SCAN Keys or the application-defined key.<br />
30
USE AND FUNCTIONING<br />
3.5 DESCRIPTION OF THE KEYS<br />
The <strong>Datalogic</strong> J Series PDA provides a function-oriented keyboard having a total of<br />
27 keys.<br />
The keyboard can be divided as follows:<br />
General keys<br />
2 Lateral<br />
SCAN keys<br />
(1 per side)<br />
System Control<br />
and Navigation<br />
Keys<br />
Power Key<br />
3.5.1 System Control and Navigation Keys<br />
Powers the PDA ON or OFF.<br />
They let you move forwards or backwards within<br />
the Internet Explorer browser pages.<br />
They let you move forwards, backwards, upwards<br />
or downwards within Text fields, scroll through a<br />
Menu list or browse among folder files.<br />
Switches on/off the keyboard backlight. The<br />
backlight automatically turns off after a set<br />
timeout.<br />
3<br />
31
3<br />
3.5.2 Key Selection<br />
The following figure shows the <strong>Datalogic</strong> J Series PDA keyboard:<br />
DATALOGIC J SERIES<br />
Some of these keys carry extra symbols and are logically divided in up to 3 sections<br />
according to the following figure:<br />
A<br />
B<br />
Each section corresponds to a symbol that can be obtained using the corresponding<br />
keyboard method according to the following scheme:<br />
32<br />
A) function of the key when simultaneously pressed along with the Orange key;<br />
B) function of the key when directly pressed;<br />
C) function of the key when in Alpha mode, in order to digit all the alphabetic<br />
characters positioned over the keys.<br />
C
USE AND FUNCTIONING<br />
NOTE<br />
It starts Data capture.<br />
The ORANGE key pressed simultaneously along with any<br />
other keyboard key enables the character positioned<br />
above or at its right/left side (in case of keys displayed at<br />
the top of keyboard).<br />
Ex: ORANGE key + [5 jkl] key corresponds to the<br />
character.<br />
When in alphanumeric mode, by pressing repeatedly the<br />
key, you can scroll through a list of punctuation signs and<br />
symbols and select the desired one by a timeout.<br />
It enters a special mode through which it is possible to<br />
digit all the alphabetic characters positioned over the keys.<br />
Ex: [7pqrs] in alphanumeric mode: press once for ‘p’, twice<br />
for ‘q’, three times for ‘r’, four times for ‘s’. To exit the<br />
Alpha mode and return to the keyboard normal functioning<br />
it is necessary to press the Alpha key again.<br />
It locks and unlocks the Keyboard.<br />
It corresponds to pressing ALT-F on a standard PC<br />
running Windows that is it opens the first entry of a<br />
drop-down Menu.<br />
Switches on/off the keyboard backlight. Both display and<br />
keyboard backlight automatically turn off after a timeout,<br />
depending on Control Panel settings.<br />
The backlights automatically turn off after a set timeout.<br />
Once the Alpha mode has been entered, press the Alpha key again<br />
to exit this mode.<br />
3<br />
33
3<br />
3.5.3 Resetting the J Series<br />
Windows CE<br />
DATALOGIC J SERIES<br />
There are several reset methods for the J Series.<br />
A warm boot terminates an unresponsive application and clears the working RAM,<br />
but preserves both the file system and the registry.<br />
A cold boot forces all applications to close and clears the working RAM and the files<br />
not resident on the persistent flash memory. Registry is restored from persistent<br />
memory if available or returned to factory default.<br />
A Clean Boot restores the J Series to factory configuration: both the registry and the<br />
file system return to factory default.<br />
Warm Boot<br />
A warm boot closes all applications and clears the working RAM, but preserves both<br />
the file system and the registry. If an application hangs, initiate a warm boot to<br />
terminate the application.<br />
To perform a warm boot, press the following keys simultaneously:<br />
Cold Boot<br />
A cold boot is a complete reset of the J Series in which all applications are forcibly<br />
closed and the RAM is completely cleared. Registry is restored from persistent<br />
memory if a saved copy is available (see 3.8.2) and RAM file system is completely<br />
erased. You will lose any applications and data (included registry) which are not<br />
stored in persistent flash memory.<br />
A cold boot is necessary when the Windows CE operating system locks up and the<br />
warm boot command does not work.<br />
To perform a cold boot, press and hold the following keys simultaneously:<br />
Clean Boot<br />
A clean boot is a cold boot that causes the device to be restored to factory<br />
configuration. The J Series will reset to its factory configuration, clear the working<br />
RAM and initialize the file system. You will lose any applications and data stored in<br />
persistent flash memory. At the next startup the system will ask to recalibrate the<br />
touch screen.<br />
34
USE AND FUNCTIONING<br />
To perform a clean boot, follow these steps:<br />
1. Perform a Cold Boot (see Cold Boot).<br />
2. Quickly release all the keys when the screen goes black.<br />
3. Within 1 second press and hold down the Esc and 0 keys until the left orange led<br />
starts blinking.<br />
4. Release the Esc and 0 keys.<br />
5. Enter 1 to proceed with the Clean Boot sequence. Enter 0 to cancel the Clean<br />
Boot and proceed with a Cold Boot.<br />
Warm<br />
Boot<br />
Cold Boot Clean Boot<br />
Registry Preserved Restored from flash (if Factory<br />
available)<br />
default<br />
Flash<br />
Folder)<br />
Disk (Backup Preserved Preserved Clean disk<br />
RAM File System Preserved Reinitialized (factory default) Factory<br />
default<br />
Windows Mobile<br />
There are several reset methods for the J Series.<br />
A warm boot terminates an unresponsive application and clears the working RAM,<br />
but preserves the file system. Registry are restored from persistent memory if<br />
available or returned to factory default.<br />
A cold boot forces all applications to close reinitializing completely the system. It<br />
clears the working RAM, but the file system is preserved. Registry are restored from<br />
persistent memory if available or returned to factory default.<br />
A clean boot restores the J Series to a clean configuration: both the registry and the<br />
file system return to a clean status that conform to factory default, unless the user<br />
has installed an additional package.<br />
Warm Boot<br />
A warm boot closes all applications and clears the working RAM, but preserves the<br />
file system. Registry are restored from persistent memory if a saved copy is available<br />
(see Registry Applet, par. 3.8.2) or returned to factory default. If an application<br />
hangs, initiate a warm boot to terminate the application.<br />
To perform a warm boot, press and hold the following keys simultaneously:<br />
3<br />
35
3<br />
DATALOGIC J SERIES<br />
Cold Boot<br />
A cold boot is a complete reset of the J Series in which all applications are forcibly<br />
closed and the RAM is completely cleared. Registry is restored from persistent<br />
memory if a saved copy is available (see Registry Applet, par. 3.8.2). Applications<br />
and data stored on file system are preserved. A cold boot is necessary when the<br />
Windows Mobile operating system locks up and the warm boot command does not<br />
work.<br />
To perform a cold boot, press and hold the following keys simultaneously:<br />
Clean Boot<br />
A clean boot is a cold boot that causes the device to be restored to a clean<br />
configuration. The J Series will be reset to its factory configuration only if the user<br />
has not installed any additional package. Please note that you will lose any<br />
applications and data stored in persistent flash memory.<br />
To perform a clean boot, follow these steps:<br />
1. Perform a Cold Boot (see Cold Boot).<br />
2. Quickly release all the keys when the screen goes black.<br />
3. Within 1 second press and hold down the Esc and 0 keys until the left orange led<br />
starts blinking.<br />
4. Release the Esc and 0 keys.<br />
5. Enter 1 to proceed with the Clean Boot sequence. Enter 0 to cancel the Clean<br />
Boot and proceed with a Cold Boot.<br />
Warm Boot Cold Boot Clean Boot<br />
Registry Restored from Restored from Clean configuration (no user<br />
flash<br />
flash<br />
config)<br />
File<br />
System<br />
Preserved Preserved Clean Installation (no user files)<br />
36
USE AND FUNCTIONING<br />
3.6 STATUS INDICATORS<br />
3.6.1 LED Status<br />
The <strong>Datalogic</strong> J Series provides three different LEDs signaling the PDA status.<br />
LED STATUS<br />
General Purpose<br />
(left-side)<br />
Bluetooth®<br />
(extreme right -side)<br />
Charging Status<br />
(right side)<br />
Green/Red This LED is available to the application<br />
program.<br />
Blue blinking It blinks when the Bluetooth® module is<br />
on.<br />
Green constant It is constant once the charging process<br />
has been completed.<br />
Red blinking It blinks when the battery pack is running<br />
down.<br />
Red constant It is constant while charging.<br />
Green/Red They turn on alternatively while<br />
discharging.<br />
Orange blinking It blinks when a charging error has<br />
occurred, for example when the external<br />
power is connected but no battery is<br />
inserted.<br />
3<br />
37
3<br />
3.6.2 Taskbar<br />
DATALOGIC J SERIES<br />
As well as tasks opened in Windows, the Taskbar provides several status icons that<br />
report information about the time, the battery level, the keyboard function, and the<br />
decoding status.<br />
ICONS DESCRIPTION<br />
Time and Battery Icons<br />
Keyboard Status Icons<br />
Decoding Status Icons<br />
38<br />
It shows the time.<br />
In Windows CE, they are representative of five<br />
different icons indicating the battery level. The icon is<br />
green or red colored according to the power left (green<br />
when >20%, red when
USE AND FUNCTIONING<br />
Windows CE Taskbar<br />
Windows Mobile Taskbars<br />
3<br />
39
3<br />
3.7 DATA CAPTURE CONFIGURATION<br />
DATALOGIC J SERIES<br />
From the Windows CE Taskbar, tap the "Decoding" icon to open a drop–down menu.<br />
Decoding can also be accessed from the Control Panel.<br />
By selecting the Info item from this drop-down menu you can access information<br />
about the <strong>Scanner</strong> and the Software; the Configure item opens the configuration<br />
applet (Data Capture Configuration Window), while Capture accesses the data<br />
capture applet (Data Capture Window), which enables code reading.<br />
The last menu item (Wedge) enables Wedge Emulation.<br />
From the Windows Mobile Start menu, tap Settings -> System -> Data Capture. The<br />
"Data Capture" icon opens the configuration applet (Data Capture Configuration<br />
Window).<br />
3.7.1 Configure<br />
Windows CE Windows Mobile<br />
The Configuration applet contains the barcode scanning configuration parameters in<br />
a directory tree structure. The available barcode parameters are divided into two<br />
groups: Reader Parameters and Scan Parameters.<br />
The Reader Parameters depend on the type of scanner module installed on the PDA<br />
and allow barcode configuration (i.e. enable/disable Code 39, check digit control,<br />
etc.).<br />
40
USE AND FUNCTIONING<br />
The Scan Parameters are common to all scanner modules and allow control of the<br />
scanning device (i.e. beeper control, LED control, laser timeout, etc.).<br />
Each Data Capture screen window corresponds to a branch of the tree, and the<br />
name of the current branch is displayed at the bottom of each screen window.<br />
Data Capture Configuration Window<br />
The screen format shows two columns where the left column indicates branches or<br />
parameters. Branches have three dots in the right column (...). You can navigate<br />
through the tree structure using the stylus or keyboard arrows directly on the item<br />
field or from the menu.<br />
Parameters have their corresponding current values in the right column. You can edit<br />
parameter values using the stylus or keyboard arrows directly on the item field or<br />
from the menu. To change a value for example, select the line of the value to be<br />
changed, choose Edit from the Parameter Menu then choose a new value from the<br />
values listed in the box (see following figures).<br />
3<br />
41
3<br />
Selecting Data Capture Setup Parameters<br />
DATALOGIC J SERIES<br />
Alternatively using the stylus, you can tap once directly on the value on the right<br />
column; continue tapping until the desired value is reached.<br />
To activate a new configuration select the File ->Save Menu to send the new<br />
configuration to the barcode decoding software and save the new configuration. This<br />
will save the configuration to non-volatile memory preventing loss at the next system<br />
reset.<br />
Reader Parameters<br />
The barcode reading parameters and values are dependent upon the type of scanner<br />
module mounted in your PDA. For a detailed list of parameters and of their<br />
configuration procedures, please refer to the SDK Help file on the CD.<br />
Scan Parameters<br />
The Scan Parameters are common to all scanner modules and allow control of the<br />
scanning device. The Scan parameters are described as follows:<br />
ScanTimeout: the maximum time, in milliseconds, during which the scanner remains<br />
on without decoding any barcode.<br />
GoodReadSound: is the filename of a .wav file played when the scanner reads a<br />
code.<br />
LedDuration: the length of the good-read led pulse, in milliseconds.<br />
LedPulses: the number of times the good-read led pulse is emitted when the<br />
scanner reads a barcode.<br />
42
USE AND FUNCTIONING<br />
ContinuousMode: when enabled, the scanner can only be turned off by releasing<br />
the SCAN key, or if Soft Trigger is enabled, by the application program. Continuous<br />
Mode overrides Scan Timeout.<br />
KeyboardEmulation: if enabled all scanned data are transformed into keyboard<br />
events and can therefore be displayed and saved to a file as if input from the PDA<br />
keyboard. If set to “Yes (Clipboard)”, it copies the scanned data to the system<br />
clipboard.<br />
SoftTrigger: when enabled, the laser can be turned on/off by the application<br />
software.<br />
ScanAlwaysOn: enables the scanner for barcode reading independently from the<br />
application software. If set to “Disabled after read”, it disables the reading after a<br />
reading attempt. In case the scan button is accidentally pressed, this selection<br />
prevents the driver from decoding new data while the application is still elaborating<br />
previous data.<br />
NotPrintableChar: if set to “Remove”, all not printable characters included in the<br />
scanned data are deleted and the final barcode will include only printable characters.<br />
ScanButton: enables/disables the scan button. If the scan button is disabled, the<br />
reader can be triggered under software control.<br />
3<br />
43
3<br />
Default Settings<br />
DATALOGIC J SERIES<br />
The following tables contain the default values for the major barcode setup<br />
parameters, according to the type of scan engine mounted on the PDA. For a<br />
complete list of parameters and of their configuration procedures, please refer to the<br />
SDK Help file on the CD.<br />
SCAN PARAMETERS HP Laser Imager RFID+Laser<br />
ScanTimeout 5000 Not available 5000<br />
GoodReadSound Beep.wav Beep.wav Beep.wav<br />
LedDuration 200 ms 200 ms 200 ms<br />
LedPulses 1 1 1<br />
ContinuousMode Disabled Disabled Disabled<br />
KeyboardEmulation Enabled Enabled Enabled<br />
SoftTrigger Enabled Enabled Enabled<br />
ScanAlwaysOn Disabled Disabled Disabled<br />
NotPrintableChar Leave Leave Leave<br />
ScanButton Enabled Enabled Enabled<br />
BARCODE SYMBOLOGY<br />
SPECIFIC<br />
READER PARAMETERS<br />
HP Laser Imager RFID+Laser<br />
UPC A Enabled Enabled<br />
UPC E<br />
EAN 8<br />
Enabled<br />
Enabled<br />
*<br />
Enabled<br />
Enabled<br />
EAN 13 Enabled<br />
Enabled<br />
UPC E1 Disabled<br />
EAN Bookland Disabled<br />
UPC/EAN/JAN Enabled<br />
Code 39 Enabled Enabled Enabled<br />
Code 39 Full ASCII Disabled Disabled Disabled<br />
Code 32 Disabled Disabled<br />
Code 39 Trioptic Disabled<br />
2/5: Interleaved Enabled Enabled Enabled<br />
2/5: Industrial Disabled Disabled<br />
2/5: Matrix Disabled<br />
Code 128 Enabled Enabled Enabled<br />
EAN 128 Enabled Disabled Enabled<br />
ISBT 128 Disabled<br />
Codabar Enabled Enabled Disabled<br />
RSS Disabled<br />
* In the Imager models these codes may only be enabled or disabled as a group by the<br />
UPC/EAN/JAN family selection (see a few lines below).<br />
44
USE AND FUNCTIONING<br />
BARCODE SYMBOLOGY<br />
SPECIFIC<br />
READER PARAMETERS<br />
HP Laser Imager RFID+Laser<br />
MSI Enabled Disabled<br />
Plessey Disabled<br />
Code 93 Disabled Enabled Disabled<br />
Code 11 Disabled<br />
PDF - 417 Enabled<br />
Data Matrix Enabled<br />
QR<br />
POSTNET<br />
PLANET<br />
Enabled<br />
Japan Post<br />
Australia Post<br />
KIX Code<br />
Royal Mail Code (RM4SCC)<br />
Disabled*<br />
*These codes may be enabled individually but are disabled as a group.<br />
RFID SYMBOLOGY PARAMETERS RFID+Laser<br />
Data Type I.CODE Iso-15693<br />
Read Type Identifier<br />
3<br />
45
3<br />
3.7.2 Capture<br />
The Data Capture applet (Capture) enables code reading.<br />
Data Capture Window<br />
DATALOGIC J SERIES<br />
Data Capture can also be enabled through the Configuration applet by selecting File<br />
-><strong>Scanner</strong> from the main menu, or by enabling the parameter Scan Always On in the<br />
Scan Parameters branch.<br />
46<br />
Enabling the Data Capture
USE AND FUNCTIONING<br />
3.8 CONTROL PANEL<br />
From the Windows CE Desktop, double tap on the "My Device" icon and then double<br />
tap on the "Control Panel" icon to open the Windows CE control panel main window.<br />
The Control Panel can also be launched from Start ->Settings ->Control Panel.<br />
APPLET programs are displayed as icons; one icon corresponds to each APPLET.<br />
Windows CE Control Panel<br />
From the Windows Mobile Start menu, tap Settings. A three tab dialog opens:<br />
Personal, System, Connections.<br />
APPLET programs are displayed as icons; one icon corresponds to each APPLET.<br />
Windows Mobile Control Panel<br />
3<br />
47
3<br />
3.8.1 Buttons<br />
DATALOGIC J SERIES<br />
The BUTTONS Applet allows assigning desired applications to be launched by one<br />
of the function keys (F1, F2, F3, F4).<br />
Windows CE Buttons Icon Windows Mobile Buttons Icon<br />
On a Windows Mobile unit the user is also able to assign a shortcut to a function key.<br />
The default programs/shortcut assigned to the function keys on Windows Mobile are<br />
the following:<br />
F1 : select the Left Soft Key<br />
F2 : select the Right Soft Key<br />
F3 : open the Start Menu<br />
F4 : open the Today Screen<br />
To configure the way up/down and the rest of keys control repeats, use the Up/Down<br />
Control applet (Start -> Settings -> Personal -> Buttons -> Up/Down Control).<br />
48
USE AND FUNCTIONING<br />
Select the “Enable Multipress” check box to enable multipress text input mode.<br />
To enables F5, F6, F7, F8, F9, F10 function keys, you need to change the<br />
ORANGE key mapping. Select the “F5-F10” check box:<br />
Windows CE Windows Mobile<br />
If pressed along with keys [5 jkl], [6 mno], [7 pqrs], [8 tuv], [9 wxyz], [0 ], the<br />
ORANGE key now enables F5, F6, F7, F8, F9, F10 function keys.<br />
3<br />
49
3<br />
3.8.2 Registry<br />
DATALOGIC J SERIES<br />
The REGISTRY ADMIN applet provides management of Windows CE/ Windows<br />
Mobile registry.<br />
From the Windows CE control panel main window, select the REGISTRY ADMIN<br />
applet by double tapping the Registry Admin icon.<br />
From the Windows Mobile Start menu, tap Settings -> System ->Registry. Select the<br />
REGISTRY ADMIN applet by tapping the Registry Admin icon.<br />
The Registry Administration Main window appears. Two functions are available:<br />
- Save Registry allows permanently saving the Windows configuration (example:<br />
custom configuration of screen desktop background color, or network adapter<br />
configuration) to non-volatile memory (SAVE button).<br />
- Restore Default Registry allows restoring the initial factory default configuration<br />
(Restore Default button). After restoring the factory default configuration, you<br />
must perform a warm boot (see par. 3.5.3).<br />
Saving the registry to non-volatile memory guarantees the persistence of the<br />
Windows configuration in case of battery pack replacement, cold boot or warm boot<br />
on Windows Mobile.<br />
50<br />
Registry Administration Window
USE AND FUNCTIONING<br />
3.8.3 Files Admin<br />
The FILES ADMIN applet enables control of the permanence of files in the Windows<br />
CE System Folder.<br />
Because Windows Mobile mounts the entire file system in persistent store (rather<br />
than using RAM), it provides both users and applications with a reliable storage<br />
platform even in the absence of battery power. The FILES ADMIN applet is therefore<br />
not necessary.<br />
Two functions are available on the Files Admin Main window by means of two<br />
buttons:<br />
Files Admin Main Window<br />
Save Session: with this button all files will be permanently saved in the \Windows<br />
directory in non-volatile memory. This function guarantees the steady maintenance of<br />
every file produced during the current working session - even of sub-directories and<br />
relevant files - with the exception of the files belonging to the FLASH image.<br />
These current working session files will be backed-up in the \Backup\Windows<br />
directory.<br />
At the next cold boot, the files previously saved in the \Backup\Windows directory will<br />
be restored to the Windows directory (see par. 3.10).<br />
Safe Setup: with this button, the installation of software programs will be saved to<br />
non-volatile memory (Backup directory). Before doing this, it will be checked that the<br />
Backup directory has enough space to save the files. If the directory space is not<br />
enough, an error message will be shown and the program will exit the Safe Setup<br />
function.<br />
Two activating procedures are available for Safe Setup:<br />
3<br />
51
3<br />
DATALOGIC J SERIES<br />
- Select an installation file (for example, a .CAB cabinet file) from the Safe Setup<br />
mask.<br />
Safe Setup First Mask<br />
− Then select \Windows or a relevant sub-directory in the path box. Then, Safe<br />
Setup will recognize the new files and directories present in the \Windows<br />
directory, and will copy them to the \Backup\Windows directory. At the next cold<br />
boot, these files will be restored (see par. 3.10).<br />
- Simply skip the first mask either by closing it or by pressing the ESC key. When<br />
it closes, a new mask will pop up: it will enable any type of installation (even<br />
remote ones like ActiveSync ® installations). Make sure the installation directory<br />
is \Windows or one of its sub-directories. After installation, tap OK: Safe Setup<br />
will save the new files in the \Backup\Windows directory.<br />
52<br />
Safe Setup Second Mask
USE AND FUNCTIONING<br />
3.8.4 Wireless Communications<br />
The WIRELESS COMMUNICATIONS applet provides management of the Wi-Fi<br />
Card, the Bluetooth ® and GSM/GPRS modules.<br />
Windows CE Wireless Communications<br />
Icon<br />
Windows Mobile Connectivity Icon<br />
If the PDA supports Windows CE, select the WIRELESS COMMUNICATIONS applet<br />
by double tapping the Wireless Communications icon from the Windows CE control<br />
panel main window. The following window will appear:<br />
Windows CE Wireless Communications Window<br />
3<br />
53
3<br />
DATALOGIC J SERIES<br />
If the PDA supports Windows Mobile, the Wireless Manager application manages<br />
access to wireless connections.<br />
The 'Wireless Manager' is a sort of 'Control Panel' for bluetooth® and phone<br />
modules. From here it's possible to turn on or off bluetooth® and phone radio stacks.<br />
Open the Wireless Manager by tapping Start -> Settings -> Wireless Manager, or by<br />
tapping the Connectivity icon located at the top of the screen. The following window<br />
will appear:<br />
Windows Mobile Wireless Communications Window<br />
To turn on/off the WiFi radio open the Wi-Fi power applet by tapping Start -> Settings<br />
-> System -> Power -> Wi-Fi:<br />
54
USE AND FUNCTIONING<br />
3.8.5 GPS Settings<br />
To access to GPS connection, you have to install a commercial GPS navigation<br />
software, which is available from various suppliers.<br />
Before purchasing, downloading or installing any GPS navigation software check with<br />
the software supplier that the application is compatible with the <strong>Datalogic</strong> J Series TM .<br />
Refer to the application’s user guide for application installation and setup information.<br />
The <strong>Datalogic</strong> J Series TM GPS is provided with a free sample software which is<br />
intended to be used as a very simple interface to the GPS enabled PDA. As such,<br />
this software cannot be used to navigate.<br />
<strong>Datalogic</strong> J Series GPS model only supports Windows Mobile operating system.<br />
GPS Startup<br />
To show the GPS Settings dialog box, do the following steps:<br />
tap Start -> Settings -> System -> External GPS:<br />
3<br />
55
3<br />
Tap Programs to choose the program port to be used to obtain GPS data:<br />
56<br />
DATALOGIC J SERIES
USE AND FUNCTIONING<br />
Tap Hardware to select the hardware port to which the GPS device is connected:<br />
Tap Access to manage access to the GPS device.<br />
Select the “Manage GPS automatically” check box to prevent some programs from<br />
obtain GPS data:<br />
3<br />
57
3<br />
DATALOGIC J SERIES<br />
Tap Advanced and select the “Enable GPS” check box to enable GPS.<br />
Select the “Enable GPS at reboot” check box to re-enable GPS after warm and cold<br />
boots:<br />
58
USE AND FUNCTIONING<br />
GPS Sample<br />
To start the GPS Sample, do the following steps:<br />
tap Start -> Programs -> GPS Sample:<br />
3<br />
59
3<br />
Tap GPS and select Start GPS to start the sample:<br />
DATALOGIC J SERIES<br />
As soon as the GPS receiver locates a position, all the GPS data will appear on the<br />
screen:<br />
To stop the sample, tap GPS and select Stop GPS.<br />
60
USE AND FUNCTIONING<br />
3.8.6 Ethernet Settings<br />
Windows CE Ethernet Cradle<br />
<strong>Datalogic</strong> J Series can be connected to an Ethernet network by inserting it into the<br />
<strong>Datalogic</strong> J Series Ethernet Multi Cradle.<br />
NOTE<br />
Ethernet communication requires <strong>Datalogic</strong> J Series SW version<br />
5.41 or later. Verify the software version by tapping on Software –<br />
Version in the <strong>Datalogic</strong> default home page. Otherwise, search for<br />
the file version.htm under the Windows folder.<br />
When correctly inserted into the Ethernet Multi Cradle, the Ethernet driver installed<br />
on the mobile computer will automatically run, and using the DHCP service, will<br />
dynamically assign the IP Address.<br />
1. From the <strong>Datalogic</strong> J Series open Internet Explorer>Internet Options and<br />
check use LAN no autodial then OK.<br />
2. From the <strong>Datalogic</strong> J Series > Explorer, enter the IP address or the PC<br />
name in the address bar. You may be required to enter your network<br />
username and password. The LAN connection will take place and you will<br />
be able to see the PC shared folders and exchange files.<br />
If your network provides Internet Service and does not use a proxy server you can<br />
directly access the Internet. Otherwise set the internet proxy parameters according to<br />
your network settings.<br />
3<br />
61
3<br />
DATALOGIC J SERIES<br />
The LAN icon will appear on the Taskbar indicating the LAN connection status.<br />
By double tapping on the LAN icon in the<br />
Taskbar, the LANNDS1 applet allows<br />
visualizing the TCP/IP information. Other<br />
information such as the MAC Address is<br />
available by tapping the Details... button.<br />
LAN icon<br />
Ethernet LANNDS1 Communications Window<br />
If it is necessary to set static TCP/IP<br />
parameters, you must open the<br />
LANNDS1 applet from the Network and<br />
Dial-up Connections applet in the<br />
Control Panel. This applet is only visible<br />
when the mobile computer is correctly<br />
inserted into the Ethernet Multi Cradle.<br />
The IP Address belongs to <strong>Datalogic</strong> J Series while the MAC address is specific to<br />
each cradle slot.<br />
62
USE AND FUNCTIONING<br />
Windows Mobile Ethernet Cradle<br />
Before using the ethernet cradle you have to un-check the 'COM1 Enable' option on<br />
the 'System Configuration' window (Start -> Programs -> System Configuration) and<br />
re-boot the unit.<br />
For internet browsing through the ethernet cradle ensure that programs that<br />
automatically connect to the internet should connect using 'My Work Network' -> go<br />
to Start -> Settings -> Connections -> Connections -> Advanced -> Select Networks:<br />
then ensure that the USB/Ethernet Adapter card connects to Work -> go to Start -><br />
Settings -> Connections -> Connections -> Advanced -> Network Cards:<br />
3<br />
63
3<br />
3.8.7 Stylus Calibration<br />
DATALOGIC J SERIES<br />
You might need to recalibrate the touch screen (i.e. when you attempt to select one<br />
item with the stylus, another item is erroneously selected).<br />
To recalibrate the touch screen on Windows CE, complete the following steps:<br />
1. Select Start > Settings > Control Panel > Stylus to open the Stylus<br />
Properties dialog as shown in Figure 1.<br />
2. Adjust Double-Tap sensitivity if needed or desired.<br />
3. Select the Calibration tab to open the Calibration application.<br />
Figure 1<br />
4. Tap Recalibrate to open the Calibration screen shown in Figure 2.<br />
5. Carefully press and briefly hold stylus on the center of the target. Repeat as the<br />
target moves around the screen. Press the key to cancel the stylus<br />
calibration.<br />
6. Press the key or tap the screen to accept the new calibration settings.<br />
7. Press the key to keep the old settings.<br />
8. New calibration settings are persistently saved in registry.<br />
64
USE AND FUNCTIONING<br />
Figura 2<br />
To recalibrate the touch screen on Windows Mobile, complete the following steps:<br />
1. Select Start > Settings > System > Screen to open the Screen<br />
Settings dialog as shown in Figure 3.<br />
Figure 3<br />
3<br />
65
3<br />
DATALOGIC J SERIES<br />
2. Tap Align Screen to open the Calibration screen shown in Figure 4.<br />
3. Carefully press and briefly hold stylus on the center of the target. Repeat as the<br />
target moves around the screen. Press the key at any time to cancel the<br />
stylus calibration.<br />
4. By completing the calibration procedure you implicitly accept the new calibration<br />
settings.<br />
5. New calibration settings are persistently saved in registry.<br />
Figure 4<br />
Startup stylus calibration on Windows CE<br />
When starting the terminal, a stylus calibration screen comes up if valid calibration<br />
settings are not available. This happens in the following circumstances:<br />
1. At the first startup of the terminal.<br />
2. After restoring registry default settings using the applet Registry Admin and<br />
performing a warm boot.<br />
3. After a Clean Boot.<br />
4. After a Firmware Update (see par. 3.11).<br />
Startup stylus calibration on Windows Mobile<br />
When starting the terminal, a Welcome Wizard (with Stylus Calibration) comes up if<br />
valid calibration settings are not available. This happens in the following<br />
circumstances:<br />
1. At the first startup of the terminal.<br />
2. After restoring registry default settings using the applet Registry Admin and<br />
performing a boot.<br />
3. After a Clean Boot.<br />
66
USE AND FUNCTIONING<br />
3.8.8 Volume Settings<br />
From the Windows CE control panel main window, select the VOLUME SETTINGS<br />
applet by double tapping the Volume Settings icon.<br />
From the Windows Mobile Start Menu, tap Settings -> System -> Volume Settings.<br />
Select the VOLUME SETTINGS applet by tapping the Volume Settings icon.<br />
The Volume Settings applet allows managing the audio features and appears as<br />
follows:<br />
The window is divided into three tabs:<br />
Volume Settings Window<br />
- Output tab: allows setting the volume for each audio profile;<br />
- Input tab: allows setting the microphone recording volume;<br />
- Cradle tab: allows selecting the cradle type and managing the vehicle cradle<br />
headset functioning.<br />
The Taskbar always displays the current audio profile, which is activated<br />
automatically (by the device) or manually (by the user). Available profiles are:<br />
− Speaker: it is the typical profile reproducing audio through the mobile computer<br />
speaker;<br />
− Cradle: it is automatically activated as soon as the mobile computer is inserted<br />
into the vehicle cradle. Audio is reproduced by the vehicle cradle loudspeaker.<br />
− Headset: it is automatically activated as soon as a headset is directly connected<br />
to the mobile computer. In case the device is inserted into the vehicle cradle and<br />
the headset is connected to the cradle, this profile must be manually activated<br />
through the dedicated button (refer to “Cradle Tab” paragraph). When this profile<br />
is active, the speaker does not work;<br />
3<br />
67
3<br />
DATALOGIC J SERIES<br />
− GSM: it is automatically activated each time a phone-call is started. It is not<br />
available when using the cradle loudspeaker (in this case<br />
Current Profile = Cradle).<br />
Output Tab<br />
It allows setting the volume for each audio profile:<br />
The “Master Volume” slider allows setting<br />
the volume used by all audio profiles. In<br />
addition, it is possible to attenuate the<br />
volume for each single profile through the<br />
dedicated slider.<br />
Input Tab<br />
It allows setting the microphone recording volume:<br />
The “Record Gain” slider allows setting<br />
the recording volume, while the “Enable<br />
Preamplifier” check box enables/disables<br />
the preamplifier (this option is not<br />
selectable when Current Profile = Cradle<br />
or GSM).<br />
68
USE AND FUNCTIONING<br />
Cradle Tab<br />
It allows selecting the cradle type and managing the vehicle cradle headset<br />
functioning:<br />
Two radio buttons allow selecting the type of cradle to be used.<br />
Check the “Cradle desk, AC plug or none” radio button, if using a cradle different<br />
from the vehicle cradle or an AC adapter plug.<br />
If using a vehicle cradle, check the related radio button.<br />
NOTE<br />
By inserting the mobile computer into the cradle when the “Cradle<br />
vehicle” radio button is checked, the mobile computer speaker is<br />
deactivated and audio will be reproduced through the vehicle cradle<br />
speaker or headset.<br />
By selecting the “Cradle Vehicle” check box, a further button will appear allowing to<br />
enable the headset profile when using the vehicle cradle. If pressed, the button<br />
displays the headset icon in gray until the device is inserted into the vehicle cradle.<br />
Once inserted, the headset icon turns to green and the device activates the headset<br />
profile (refer to the following figures). Actually, the headset is ready to reproduce<br />
audio as soon as it is connected to the cradle jack:<br />
3<br />
69
3<br />
WARNING<br />
70<br />
DATALOGIC J SERIES<br />
Do not use the vehicle cradle headset if the headset button is<br />
disabled, since it may cause hearing damage.
USE AND FUNCTIONING<br />
3.9 WINDOWS CONNECTIONS<br />
To connect the PDA to another device (i.e. Host PC) from Windows, several<br />
programs are available. These programs require specific electrical connections in<br />
order to function properly.<br />
3.9.1 Microsoft® ActiveSync®<br />
Microsoft ® ActiveSync ® gives you the possibility to connect your desktop computer to<br />
your <strong>Datalogic</strong> J Series PDA and synchronize the information on them.<br />
Synchronization compares the data on the <strong>Datalogic</strong> J Series PDA with that on the<br />
desktop computer and updates both computers with the most recent information.<br />
With ActiveSync ® , it is possible to:<br />
- Back up and restore <strong>Datalogic</strong> J Series PDA data.<br />
- Copy files between <strong>Datalogic</strong> J Series PDA and desktop computer.<br />
- Synchronize files by selecting a synchronization mode.<br />
You can establish an ActiveSync ® connection to your <strong>Datalogic</strong> J Series through<br />
the following electrical interfaces:<br />
RS232 either directly or through the <strong>Datalogic</strong> J Series Single Cradle<br />
USB either directly or through the <strong>Datalogic</strong> J Series Single Cradle<br />
Bluetooth® (see par. 3.9.2)<br />
It is possible to constantly synchronize while connected to a desktop computer or,<br />
alternatively, synchronization can be performed only when the synchronize command<br />
is chosen. You can select which information types are synchronized and control how<br />
much data is synchronized.<br />
NOTE<br />
By default, ActiveSync ® does not automatically synchronize all types<br />
of information. Use ActiveSync ® options to turn synchronization on<br />
and off for specific information types.<br />
For example:<br />
Synchronize Microsoft Word and Microsoft Excel files between the <strong>Datalogic</strong> J<br />
Series PDA and the desktop computer. The files will automatically be converted to<br />
the correct format.<br />
3<br />
71
3<br />
NOTE<br />
NOTE<br />
DATALOGIC J SERIES<br />
In Windows Mobile before using the ActiveSync follow the directions<br />
described in 2.1<br />
Visit the following Microsoft Web site for the latest in updates and<br />
technical information:<br />
http://www.microsoft.com/windowsmobile/activesync/default.mspx<br />
ActiveSync® Remote<br />
72<br />
NOTE<br />
Microsoft® ActiveSync ® Remote is no longer supported in Windows<br />
CE. For backward compatibility you can download it from the internet.<br />
We suggest enabling the FTP Server and connecting to an FTP Client.<br />
See par. 3.9.3.
USE AND FUNCTIONING<br />
3.9.2 Bluetooth® Manager Device Setup<br />
Windows CE Bluetooth® Manager Device Setup<br />
In order to enable a Bluetooth ® device for communication with the <strong>Datalogic</strong> J<br />
Series PDA you must perform the discovery procedure and enable the device as<br />
follows:<br />
1. Place the Bluetooth ® device within the range of the <strong>Datalogic</strong> J Series PDA<br />
(10 meters).<br />
2. From the “Control Panel” main window double tap on the “Bluetooth” applet to<br />
open the Bluetooth ® Manager Device window:<br />
3<br />
73
3<br />
DATALOGIC J SERIES<br />
3. Tap on the “Me” button to enter the related window; then, tap on the “ON” button<br />
to activate the Bluetooth ® module. The module activation may be also performed<br />
by using the WIRELESS COMMUNICATION applet as described in par. 3.8.4.<br />
By tapping on the “HW Details” and “SW Details” buttons, information about the<br />
PDA Bluetooth ® hardware and software will be displayed, while the “Enable<br />
Encryption” button starts encryption of the Bluetooth ® communication data. If<br />
tapping on the “Close” button the Bluetooth ® Manager Device window will be<br />
closed.<br />
4. Tap on the “Discovery” button to enter the related window; then, tap on the<br />
“Scan” button to run the Discovery procedure:<br />
74
USE AND FUNCTIONING<br />
Once the Discovery procedure has been completed, select the desired<br />
Bluetooth ® device from the list. It is also possible to digit (12 hexadecimal digits)<br />
the Bluetooth ® address of the desired device by tapping on the “Add” button.<br />
The “Clear” button deletes all discovered devices from the list.<br />
5. Once the desired Bluetooth ® device has been selected, tap on the “Connection<br />
Wizard” button to enter the related window where selecting the connection type<br />
to be used for communication with the Bluetooth ® device:<br />
The “Serial Port” button starts communication through the Bluetooth ® serial port<br />
COM 5 (typically used for connection with GPS devices).<br />
The “Printer” button starts communication with a printer through the Bluetooth ®<br />
serial port COM 5.<br />
The “Kbd Emulation” button allows connection with a barcode reader using the<br />
keyboard emulation.<br />
The “ActiveSync” button starts communication with a PC equipped with a<br />
Bluetooth ® antenna and the related ActiveSync.<br />
6. Hide the Bluetooth ® Manager Device window by tapping on the icon<br />
available on each window or close it through the “Close” button available in the<br />
“Me” window (see step 3 of this procedure).<br />
3<br />
75
3<br />
Windows Mobile Bluetooth® Manager Device Setup<br />
DATALOGIC J SERIES<br />
Before turning on Bluetooth®, ensure that the two devices are within close range and<br />
that both Bluetooth-enabled devices are discoverable.<br />
1. Tap Start -> Settings -> Connections tab.<br />
2. Tap Bluetooth > Mode<br />
3. Select or clear the “Turn on Bluetooth” check box:<br />
NOTE<br />
By default, Bluetooth® is turned off. If you turn it on, and then turn off<br />
your device, Bluetooth® also turns off. When you turn on your device<br />
again, Bluetooth® turns on automatically.<br />
To create a Bluetooth® partnership between your device and another device that has<br />
Bluetooth® capabilities, ensure that the two devices are turned on, discoverable, and<br />
within close range.<br />
1. Tap Start -> Settings -> Connections tab.<br />
2. Tap Bluetooth -> Devices tab -> Add new devices. Your device searches for<br />
other devices with Bluetooth® capabilities, and displays them in the list:<br />
76
USE AND FUNCTIONING<br />
3. Tap the name of the other device, and tap Next:<br />
4. In Passkey, if you want to use a passkey (recommended for enhanced security),<br />
enter a alphanumeric passkey between 1 and 16 characters, and tap Next.<br />
Otherwise, leave the passkey blank, and tap Next:<br />
3<br />
77
3<br />
5. Enter the same passkey on the other device.<br />
DATALOGIC J SERIES<br />
6. To give the partnership a more meaningful name, change the name of the<br />
device in Name.<br />
7. Tap Finish.<br />
You can give a more meaningful name to a Bluetooth® partnership to help you<br />
recognize it when selecting from a list of partnerships.<br />
1. Tap Start -> Settings -> Connections tab.<br />
2. Tap Bluetooth > Devices tab.<br />
3. Tap the partnership to rename.<br />
4. In Name, enter a new name for the partnership.<br />
5. Tap Finish.<br />
To end a Bluetooth® partnership:<br />
1. Tap Start -> Settings -> Connections tab.<br />
2. Tap Bluetooth > Devices tab.<br />
3. Tap and hold the partnership you want to end.<br />
4. Tap Delete:<br />
78
USE AND FUNCTIONING<br />
Other devices with Bluetooth® capabilities can detect your device and attempt to<br />
beam information to it, establish a partnership, or use a Bluetooth® service. To make<br />
a device discoverable:<br />
1. Tap Start -> Settings -> Connections tab.<br />
2. Tap Bluetooth > Mode Tab.<br />
3. Select the “Turn on Bluetooth” check box, and then select the “Make this device<br />
visible to other devices” check box:<br />
Other Bluetooth®-enabled devices can now detect your phone and attempt to beam<br />
information to it, establish a Bluetooth® partnership, or use a Bluetooth® service.<br />
3<br />
79
3<br />
DATALOGIC J SERIES<br />
If you no longer want your device to be discoverable, clear the “Make this device<br />
visible to other devices” check box.<br />
Your device will not detect and notify you of incoming Bluetooth® beams unless you<br />
set it up to do this. To receive a Bluetooth® beam:<br />
1. Tap Start -> Settings -> Connections tab -> Beam:<br />
2. Select the “Receive all incoming beams” check box:<br />
3. Ensure that your device is turned on, discoverable, and within close range of the<br />
device that is beaming the information.<br />
4. When prompted to receive an incoming beam, tap “Yes” to receive the beamed<br />
information.<br />
80
USE AND FUNCTIONING<br />
3.9.3 FTP Server Setup<br />
The <strong>Datalogic</strong> J Series Windows CE Operating System includes a sample File<br />
Transfer Protocol (FTP) server. FTP is used for copying files to and from remote<br />
computer systems over a network using TCP/IP. You can establish a connection to<br />
your <strong>Datalogic</strong> J Series using its FTP Server through the following interfaces:<br />
WLAN using the Wi-Fi radio<br />
LAN through the <strong>Datalogic</strong> J Series Ethernet Multi Cradle (see par. 3.8.5)<br />
Proceed as follows:<br />
1. Create a registry file (extension .reg) to setup and enable FTP Server<br />
communication. A simple example file for anonymous logon is given below:<br />
REGEDIT4<br />
[HKEY_LOCAL_MACHINE\Comm\FTPD]<br />
"DefaultDir"="\\"<br />
"AllowAnonymousUpload"=dword:00000001<br />
"UseAuthentication"=dword:00000000<br />
"BaseDir"="\\"<br />
"IsEnabled"=dword:00000001<br />
"LogSize"=dword:00001000<br />
"DebugOutputMask"=dword:00000017<br />
"DebugOutputChannels"=dword:00000002<br />
"IdleTimeout"=dword:0000012c<br />
"AllowAnonymous"=dword:00000001<br />
"AllowAnonymousVroots"=dword:00000001<br />
2. Copy this file to the <strong>Datalogic</strong> J Series using ActiveSync ® .<br />
3. Launch the .reg file from the <strong>Datalogic</strong> J Series.<br />
4. Perform a warm boot on the <strong>Datalogic</strong> J Series.<br />
5. From the PC > Explorer address bar (or running an FTP Client from the PC),<br />
enter the <strong>Datalogic</strong> J Series IP address.<br />
NOTE<br />
For more information on FTP Client/Server connections refer to the<br />
following web page:<br />
http://msdn2.microsoft.com/en-us/library/aa922316.aspx.<br />
3<br />
81
3<br />
3.10 BACKUP DIRECTORY FILE MANAGEMENT<br />
DATALOGIC J SERIES<br />
All of the Windows CE system files reside in RAM (volatile memory) except for the<br />
Backup directory, which resides in FLASH (non-volatile memory). Therefore the<br />
contents of the Backup directory are persistent even if the PDA is re-booted or the<br />
battery pack is changed.<br />
You can save your more important files that you don't want to lose due to PDA reboot,<br />
in the Backup directory or create a sub-directory within Backup.<br />
Even though the Windows Directory resides in RAM, it often contains files or subdirectories<br />
created by the user or by installation programs that you don't want to lose<br />
at re-boot. To keep these files persistent it is necessary to copy them to the directory<br />
\Backup\Windows. This directory doesn't exist originally (only Backup exists), and<br />
therefore it must be created. At the next cold boot, before activating the shell,<br />
Windows CE will copy the contents including all sub-directories of \Backup\Windows<br />
to \Windows.<br />
Likewise, to maintain files that must be run at Windows CE startup, (i.e. .exe, .lnk,<br />
.vb, .htm, etc.), it is necessary to copy them to the directory \Backup\Startup. This<br />
directory does not exist originally (only Backup exists), and therefore it must be<br />
created. The application programs will be run after any type of re-boot (both software<br />
and cold boot).<br />
As an alternative to the Safe Setup function, it is possible to copy the .cab files to the<br />
directory \Backup\Cabfiles (the Cabfiles sub-directory doesn't exists originally and<br />
must therefore be created) and perform a PDA cold boot to have the application<br />
installed. Once these files are copied to the directory \Backup\Cabfiles, the<br />
application will be run after each re-boot.<br />
From the second cold boot on, a message may be displayed such as " is already installed. Re-install?". This message blocks the boot process.<br />
Press the [Enter] key to continue the system initialization.<br />
Even if the entire Windows Mobile file system reside in FLASH (non-volatile<br />
memory), the mechanism described above is supported also on Windows Mobile for<br />
backward compatibility.<br />
82
USE AND FUNCTIONING<br />
3.11 FIRMWARE UPDATE FOR WINDOWS CE<br />
The <strong>Datalogic</strong> J Series is equipped with a tool that implements a firmware update<br />
service.<br />
For further information, refer to DFU Reference Guide.<br />
3<br />
83
4<br />
4 MAINTENANCE<br />
NOTE<br />
DATALOGIC J SERIES<br />
Rechargeable battery packs are not initially charged. Therefore the<br />
first operation to perform is to charge them. See below.<br />
4.1 CHARGING THE BATTERY PACK<br />
It is possible to recharge the battery pack by using the PG12-10P35 AC/DC external<br />
power supply directly connected to the <strong>Datalogic</strong> J Series PDA, see par. 2.1.<br />
Alternatively, it is also possible to recharge the battery pack by using the <strong>Datalogic</strong> J<br />
Series Single Cradle Desk or the <strong>Datalogic</strong> J Series Vehicle Cradle.<br />
The charging process is signaled by a bi-colored charging status LED positioned at<br />
the right side of the display (see par. 3.6).<br />
When the battery pack is low, the red LED positioned at the left side of the display<br />
blinks.<br />
If the battery pack is removed from the PDA, it can be recharged by inserting it into<br />
the <strong>Datalogic</strong> J Series Multi-Battery pack Charger.<br />
84<br />
NOTE<br />
CAUTION<br />
NOTE<br />
The battery pack autonomy varies according to many factors, such as<br />
the frequency of barcode scanning, RF usage, battery life, storage,<br />
environmental conditions, etc.<br />
If the battery pack is new or has not been recharged for a long time,<br />
it is necessary to perform two or three charging and discharging<br />
cycles (complete use) before it can reach its maximum charge<br />
capability.<br />
The maximum time required to recharge a completely run-down<br />
battery pack is about 2.5 hours for Li-Ion batteries.<br />
Even if the storage temperature range is wider, In order to achieve<br />
the longest battery life, store the terminal and the spare batteries<br />
between 20 to 30 ºC (68 to 86 ºF).<br />
The Batteries must be charged at a temperature ranging from 0° to<br />
+45 °C (+32° to +113 °F).
MAINTENANCE<br />
4.2 REPLACING THE BATTERY PACK<br />
To correctly replace the battery pack, proceed as follows:<br />
1. Turn off the <strong>Datalogic</strong> J Series PDA.<br />
2. Press the latch release button and pull the battery latch down as indicated in the<br />
figures below:<br />
3. Remove the battery pack:<br />
4<br />
85
4<br />
DATALOGIC J SERIES<br />
4. Replace the battery pack by pressing the latch release button and pulling the<br />
battery latch down, and then by inserting it towards the speaker and pressing it<br />
into the <strong>Datalogic</strong> J Series PDA until the battery latch is automatically closed:<br />
86<br />
CAUTION<br />
When the latch release button is pressed, the PDA automatically<br />
shuts off, in order to retain data during the pack substitution. After<br />
the new pack insertion, be sure that the battery latch has<br />
completely slid over the pack so that the latch release button is<br />
released.
MAINTENANCE<br />
WARNING<br />
Use only a <strong>Datalogic</strong> Mobile approved power supply. Use of an<br />
alternative power supply will void the product warranty and may cause<br />
product damage. Do not apply voltages to the batteries contacts.<br />
Risk of explosion if the battery is replaced by an incorrect type.<br />
Do not use the batteries of this terminal to power devices different from<br />
this mobile computer.<br />
Do not place the battery in or near a fire or heat as they may explode.<br />
Do not place the battery in direct sunlight, or use or store the battery<br />
inside unventilated areas in hot weather. Doing so may cause the<br />
battery to generate heat, explode or ignite. Using the battery in this<br />
manner may also result in a loss of performance and a shortened life<br />
expectancy.<br />
Do not place the battery in microwave ovens, high pressure containers,<br />
or on induction cookware.<br />
Immediately discontinue use of battery if, while using, charging or<br />
storing the battery, the battery emits an unusual smell, feels hot,<br />
changes colour or shape, or appears abnormal in any other way.<br />
Do not short-circuit the battery contacts. Accidental short-circuiting can<br />
occur when a metallic object such as a coin, clip, or pen causes direct<br />
connection of the contacts of the battery (these look like metal strips on<br />
the battery).<br />
Do not carry or store battery pack together with metal<br />
objects (this might happen, for example, when you<br />
carry a spare battery in your pocket or purse). Shortcircuiting<br />
the terminals may damage the battery or the<br />
connecting object.<br />
Do not pierce the battery pack with nails, strike it with a hammer, step<br />
on it or otherwise subject it to strong impacts or shocks.<br />
Do not solder directly onto the battery pack.<br />
Do not disassemble or modify the battery. The battery contains safety<br />
and protection devices, which, if damaged, may cause the battery to<br />
generate heat, explode or ignite.<br />
Do not expose the battery pack to liquids.<br />
4<br />
87
4<br />
NOTE<br />
NOTE<br />
DATALOGIC J SERIES<br />
In order to guarantee an adequate operating autonomy, when<br />
replacing the battery pack the PDA checks the battery energy level.<br />
If the battery is not sufficiently charged, <strong>Datalogic</strong> J Series does<br />
not turn on (when pressing the ON button).<br />
In this case, either substitute the battery pack with a charged one<br />
(sufficiently charged) or insert <strong>Datalogic</strong> J Series into a powered<br />
cradle or plug it into the direct power supply.<br />
To achieve the best battery life, turn off the radios not in use.<br />
4.3 CLEANING THE PDA<br />
Periodically clean the <strong>Datalogic</strong> J Series PDA with a slightly dampened cloth.<br />
Do not use alcohol, corrosive products or solvents.<br />
88
TECHNICAL FEATURES<br />
5 TECHNICAL FEATURES<br />
5.1 TECHNICAL DATA<br />
<strong>Datalogic</strong> J Series Common Features<br />
Electrical Features<br />
Power<br />
DC supply 12 to 14 V ± 5%<br />
Battery pack 2 cell Li-Ion 1070 mAh@ 7.4 V (nominal)<br />
Large capacity pack 2 cell Li-Ion 1800 mAh@ 7.4 V (nominal)<br />
Internal backup battery Rechargeable Li-Ion 30 mAh<br />
Communication Features<br />
Windows CE COM Port<br />
Windows Mobile COM<br />
Port<br />
Bluetooth®<br />
interface<br />
COM5 COM5<br />
Serial interface RS232 COM1<br />
COM1<br />
USB 1.1 COM6<br />
COM6<br />
GPS COM7<br />
Wireless Features<br />
WLAN IEEE 802.11b DSSS<br />
WPAN Bluetooth® IEEE 802.15, Class 2, Version 1.2<br />
WWAN GSM/GPRS Tri-band (900, 1800, 1900 MHz)<br />
Radio with accessible SIM card interface*<br />
GPS<br />
Hardware Features<br />
20 channel all-in-view tracking; tracking sensitivity –<br />
159dBm; cold start 2 mins typical; warm start 30 secs<br />
typical; hot start 10 secs typical<br />
FLASH 128 MB<br />
DRAM 128 MB<br />
Microprocessor Intel XScale PXA-270 520 MHz<br />
Accessible card socket Mini SD<br />
Audio Speaker, Microphone, Headset Jack<br />
LED Two-color Programmable LED<br />
Charging Status (two-color LED)<br />
Bluetooth® (blue LED)<br />
Display 64K Color TFT LCD with 320 x 240 pixel resolution, with<br />
LED backlight and touch screen<br />
Keyboard 25 Plastic Top Backlit Keys plus Power Button plus 2<br />
Lateral Push-buttons<br />
* 3,3 V compatible<br />
5<br />
89
5<br />
DATALOGIC J SERIES<br />
Environmental Features<br />
Working temperature ** -10° to + 50 °C / +14° to +122 °F<br />
Storage temperature -20° to +70 °C / -4° to +158 °F<br />
Humidity *** 90% non condensing for temperatures
TECHNICAL FEATURES<br />
Optical Features<br />
<strong>Datalogic</strong> J Series HP Laser / RFID +Laser Optical Features<br />
<strong>Datalogic</strong> J Series <strong>Datalogic</strong> J Series<br />
HP Laser<br />
XXX-9XX-XXX<br />
Maximum resolution 0.13 mm / 5 mils 0.10 mm / 4 mils<br />
Skew angle ± 55 ° ± 50°<br />
Pitch angle ± 65° ± 65°<br />
Scan rate 35 ± 5 scan/sec 105 ± 12 scan/sec<br />
Depth of field See reading diagrams on the next page<br />
Light source laser scanner VLD, wavelength 630~680 nm<br />
Safety class Class II EN 60825-1/CDRH<br />
5<br />
91
5<br />
Optical Features<br />
Max. resolution<br />
1D Codes 0.10 mm / 4 mils<br />
2D Codes 0.17 mm / 6.6 mils<br />
Skew angle ± 40 °<br />
Pitch angle ± 35°<br />
Depth of field*<br />
1D (linear): X-dimension<br />
mm (mils)<br />
<strong>Datalogic</strong> J Series Imager Optical Features<br />
Symbol size<br />
cm (in)<br />
DATALOGIC J SERIES<br />
DOF<br />
cm (in)<br />
Code39 0.13 (5) 1.2 (0.47) 8.0 to 15.0 (3.15 to 5.90)<br />
0.50 (20) 3.2 (1.26) 8.0 to 33.0 (3.15 to 12.99)<br />
EAN13 0.33 (13) 3.1 (1.22) 7.5 to 24.5 (2.95 to 9.65)<br />
2D: X-dimension<br />
mm (mils)<br />
Symbol size<br />
cm (in)<br />
DOF<br />
cm (in)<br />
POSTNET 0.5 (20) 4.0 x 0.4 (1.57 x 0.16) 11.5 to 30.0 (4.53 to<br />
11.81)<br />
PDF417 0.13 (5) 1.1 x 0.9 (0.43 x 0.35) 8.5 to 15.5 (3.35 to 6.10)<br />
0.17 (6.6) 1.4 x 1.2 (0.55 x 0.47) 7.0 to 19.0 (2.76 to 7.48)<br />
0.25 (10) 2.2 x 1.8 (0.86 x 0.71) 4.5 to 24.0 (1.77 to 9.45)<br />
QR 0.25 (10) 0.7 x 0.7 (0.28 x 0.28) 7.0 to 15.5 (2.76 to 6.10)<br />
0.38 (15) 1.1 x 1.1 (0.43 x 0.43) 4.5 to 21.0 (1.77 to 8.27)<br />
DataMatrix 0.19 (7.5) 0.8 x 0.8 (0.31 x0.31) 9.0 to 13.0 (3.54 to 5.12)<br />
0.25 (10) 0.8 x 0.8 (0.31 x 0.31) 7.5 to 16.5 (2.95 to 6.50)<br />
0.38 (15) 1.0 x 1.0 (0.39 x 0.39) 6.0 to 22.0 (2.36 to 8.66)<br />
Sensor 640 x 480 pixel element, 2D CMOS array<br />
Illuminator LED array<br />
Wavelength 630~670 nm<br />
LED Safety class Class 1 to EN 60825-1<br />
Aiming System Visible Laser Diode<br />
Wavelength 650 nm<br />
Laser Safety<br />
Class<br />
Class 2 EN 60825-1; Class II CDRH<br />
*Reading distances are measured from the nose of the reader using the test codes. The reading<br />
performances may vary depending on the code printing quality.<br />
92
TECHNICAL FEATURES<br />
5.2 READING DIAGRAMS<br />
300<br />
200<br />
100<br />
0<br />
100<br />
200<br />
300<br />
mm<br />
300<br />
200<br />
100<br />
0<br />
100<br />
200<br />
300<br />
mm<br />
0.13 mm<br />
(5 mils)<br />
DLJS HP Laser (XXX-1XX-XXX models)<br />
Reading Zones (10° skew angle)<br />
0.19 mm<br />
(7.5 mils)<br />
EAN<br />
0.33 mm<br />
(13 mils)<br />
0.25 mm<br />
(10 mils)<br />
0.38 mm<br />
(15 mils)<br />
0.50 mm<br />
(20 mils)<br />
1.00 mm<br />
(40 mils)<br />
100 200 300 400 500 600 700 800 mm<br />
DLJS SE950 Laser (XXX-9XX-XXX models)<br />
0.10 mm<br />
(3.8 mils)<br />
0.13 mm<br />
(5 mils)<br />
Reading Zones (10° skew angle)<br />
0.19 mm<br />
(7.5 mils)<br />
EAN<br />
0.33 mm<br />
(13 mils)<br />
0.25 mm<br />
(10 mils)<br />
0.38 mm<br />
(15 mils)<br />
0.50 mm<br />
(20 mils)<br />
1.00 mm<br />
(40 mils)<br />
100 200 300 400 500 600 700 800 mm<br />
5<br />
93
6<br />
6 TEST CODES<br />
0.25 mm (10 mils)<br />
Code 39<br />
2/5 Interleaved<br />
High Density Codes<br />
!17162H!<br />
17162<br />
Ë"8NduÌ<br />
0123456784<br />
Code 128 ÌtestwÎ<br />
EAN 13<br />
EAN 8<br />
94<br />
test<br />
80%<br />
x(0B2DE5*KKKKLM(<br />
80%<br />
(6450*TRMN(<br />
DATALOGIC J SERIES
TEST CODES<br />
0.38 mm (15 mils)<br />
Code 39<br />
Interleaved 2/5<br />
Code 128<br />
EAN 13<br />
EAN 8<br />
Medium Density Codes<br />
!17162H!<br />
17162<br />
Ë"8NduÌ<br />
0123456784<br />
ÌtestwÎ<br />
test<br />
100%<br />
x(0B2DE5*KKKKLM(<br />
100%<br />
(6450*TRMN(<br />
6<br />
95
6<br />
0.50 mm (20 mils)<br />
Code 39<br />
Interleaved 2/5<br />
Code 128<br />
EAN 13<br />
EAN 8<br />
96<br />
Low Density Codes<br />
!17162H!<br />
17162<br />
0123456784 Ë"8NduÌ<br />
ÌtestwÎ<br />
test<br />
120%<br />
x(0B2DE5*KKKKLM(<br />
120%<br />
(6450*TRMN(<br />
DATALOGIC J SERIES
GLOSSARY<br />
Access Point<br />
A device that provides transparent access between Ethernet wired networks and<br />
IEEE 802.11 interoperable radio-equipped mobile units. Hand-held terminals, PDAs<br />
or other devices equipped with radio cards, communicate with wired networks using<br />
Access Points (AP). The mobile unit (PDA), may roam among the APs in the same<br />
subnet while maintaining a continuous, seamless connection to the wired network.<br />
<strong>Barcode</strong><br />
A pattern of variable-width bars and spaces which represents numeric or<br />
alphanumeric data in binary form. The general format of a barcode symbol consists<br />
of a leading margin, start character, data or message character, check character (if<br />
any), stop character, and trailing margin. Within this framework, each recognizable<br />
symbology uses its own unique format.<br />
Baud Rate<br />
A measure for data transmission speed.<br />
Bit<br />
Binary digit. One bit is the basic unit of binary information. Generally, eight<br />
consecutive bits compose one byte of data. The pattern of 0 and 1 values within the<br />
byte determines its meaning.<br />
Bits per Second (bps)<br />
Number of bits transmitted or received per second.<br />
Bluetooth®<br />
A standard radio technology using a proprietary protocol. The onboard Bluetooth®<br />
module in the PDA is compatible with the 1.2 protocol.<br />
Byte<br />
On an addressable boundary, eight adjacent binary digits (0 and 1) combined in a<br />
pattern to represent a specific character or numeric value. Bits are numbered from<br />
the right, 0 through 7, with bit 0 the low-order bit. One byte in memory can be used to<br />
store one ASCII character.<br />
Decode<br />
To recognize a bar code symbology (e.g., Codabar, Code 128, Code 3 of 9,<br />
UPC/EAN, etc.) and analyze the content of the bar code scanned.<br />
97
EEPROM<br />
Electrically Erasable Programmable Read-Only Memory. An on-board non-volatile<br />
memory chip.<br />
Flash Disk<br />
Non-volatile memory for storing application and configuration files.<br />
GSM<br />
Global System for Mobile communication. It is a standard for digital cellular<br />
communications, currently used in the 900 MHz and 1800 MHz bands.<br />
GPRS<br />
General Packet Radio Service. GPRS is a wireless packet-based communication<br />
service based on GSM. Its data transfer is rated between 56 Kbps to 114 Kbps. It<br />
makes very efficient use of available radio spectrum, and users pay only for the<br />
volume of data sent and received.<br />
GPS<br />
Global Positioning System. GPS is the only fully functional Global Navigation Satellite<br />
System (GNSS). Utilizing a constellation of at least 24 Medium Earth Orbit satellites<br />
that transmit precise microwave signals, the system enables a GPS receiver to<br />
determine its location, speed, direction, and time. Developed by the United States<br />
Department of Defense, GPS is officially named NAVSTAR GPS. The satellite<br />
constellation is managed by the United States Air Force 50th Space Wing.<br />
Host<br />
A computer that serves other terminals in a network, providing services such as<br />
network control, database access, special programs, supervisory programs, or<br />
programming languages.<br />
Liquid Crystal Display (LCD)<br />
A display that uses liquid crystal sealed between two glass plates. The crystals are<br />
excited by precise electrical charges, causing them to reflect light outside according<br />
to their bias. They use little electricity and react relatively quickly. They require<br />
external light to reflect their information to the user.<br />
Light Emitting Diode (LED)<br />
A low power electronic light source commonly used as an indicator light. It uses less<br />
power than an incandescent light bulb but more than a Liquid Crystal Display (LCD).<br />
PDA<br />
Personal Digital Assistant. PDA is a term for any small mobile hand-held device that<br />
provides computing and information storage and retrieval capabilities for personal or<br />
98
usiness use, often for keeping schedule calendars and address book information<br />
handy.<br />
RAM<br />
Random Access Memory. Data in RAM can be accessed in random order, and<br />
quickly written and read.<br />
RF<br />
Radio Frequency.<br />
RFID (Radio frequency identification)<br />
A technology that incorporates the use of electromagnetic or electrostatic coupling in<br />
the radio frequency (RF) portion of the electromagnetic spectrum to uniquely identify<br />
an object, animal, or person. RFID is coming into increasing use in industry as an<br />
alternative to the barcode identification.<br />
99
INDEX<br />
A<br />
Accessories; 9<br />
Available Models; 2<br />
B<br />
Backup Directory File Management;<br />
82<br />
Bluetooth® Approval; vi<br />
Bluetooth® Manager Device Setup;<br />
73<br />
Buttons; 48<br />
C<br />
Charging the Batteries; 84<br />
Cleaning the PDA; 88<br />
Connection Cables; 23<br />
RS232 Direct Connection; 23<br />
USB Direct Connection; 23<br />
Connections; 11<br />
RS232/USB Direct Connection; 11<br />
WLAN Connection; 12<br />
WPAN Connection; 14<br />
WWAN Connection; 16<br />
Control Panel; 47<br />
Conventions; v<br />
Cradle Connections; 22<br />
D<br />
Data Capture; 28<br />
Imager Data Capture; 29<br />
Laser Data Capture; 28<br />
RFID Data Capture; 30<br />
Data Capture Configuration; 40<br />
<strong>Datalogic</strong> J Series PDA<br />
Description; 1<br />
Default Settings; 44<br />
Description of the Keys; 31<br />
100<br />
E<br />
Ethernet Cradle Settings; 61<br />
F<br />
Files Admin; 51<br />
Firmware Update; 83<br />
FTP Server Setup; 81<br />
G<br />
General View; xv<br />
Glossary; 97<br />
GPS Connection; 18<br />
GPS Settings; 55<br />
K<br />
Key Selection; 32<br />
M<br />
Maintenance; 84<br />
Microsoft® ActiveSync®; 71<br />
O<br />
Operating System; 10<br />
P<br />
Package Contents; 2<br />
Patents; xii<br />
PDA Startup; 24<br />
Power Supply; vi<br />
R<br />
Reader Parameters; 42<br />
Reading Diagrams; 93<br />
Reference Documentation; v<br />
References; v<br />
Registry; 50
Replacing the Batteries; 85<br />
Resetting the J Series; 34<br />
S<br />
Safe Setup; 51<br />
Safety Regulations; vi<br />
Laser Safety; vii<br />
Radio Compliance; x<br />
SAR Compliance; xii<br />
WEEE Compliance; xiii<br />
Save Session; 51<br />
Scan Parameters; 42<br />
Services and Support; v<br />
SIM Card; 6<br />
Status Indicators; 37<br />
Stylus Calibration; 64<br />
System Control and Navigation Keys;<br />
31<br />
T<br />
Taskbar; 38<br />
Technical Features; 89<br />
Test Codes; 94<br />
U<br />
Using the Stylus; 27<br />
V<br />
Vocal Communication; 67<br />
Volume Settings; 67<br />
W<br />
Windows CE Bluetooth® Manager<br />
Device Setup; 73<br />
Windows CE Ethernet cradle; 61<br />
Windows Mobile Bluetooth® Manager<br />
Device Setup; 76<br />
Windows Mobile Ethernet cradle; 63<br />
Windows Mobile Welcome Wizard; 26<br />
Wireless Communication; 53<br />
101
dichiara che<br />
declares that the<br />
déclare que le<br />
bescheinigt, daß das Gerät<br />
declare que el<br />
DLJS XXX-YYY-ZZZ<br />
<strong>Datalogic</strong> Mobile S.r.l.<br />
Via San Vitalino 13<br />
40012 - Lippo di Calderara<br />
Bologna - Italy<br />
e tutti i suoi modelli<br />
and all its models<br />
et tous ses modèles<br />
und seine modelle<br />
y todos sus modelos<br />
sono conformi alle Direttive del Consiglio Europeo sottoelencate:<br />
are in conformity with the requirements of the European Council Directives listed below<br />
sont conformes aux spécifications des Directives de l’Union Européenne ci-dessous:<br />
der nachstehend angeführten Direktiven des Europäischen Rats:<br />
cumple con los requisitos de las Directivas del Consejo Europeo, según la lista siguiente:<br />
1999/5/EEC R&TTE<br />
Questa dichiarazione è basata sulla conformità dei prodotti alle norme seguenti:<br />
This declaration is based upon compliance of the products to the following standards:<br />
Cette déclaration repose sur la conformité des produits aux normes suivantes:<br />
Diese Erklärung basiert darauf, daß das Produkt den folgenden Normen entspricht:<br />
Esta declaración se basa en el cumplimiento de los productos con las siguientes normas:<br />
ETSI EN 301 489-3 V1.4.1, AUGUST 2002 : ELECTROMAGNETIC COMPATIBILITY AND RADIO SPECTRUM<br />
MATTERS (ERM); ELECTROMAGNETIC COMPATIBILITY (EMC)<br />
STANDARD FOR RADIO EQUIPMENT AND SERVICES; PART 3:<br />
SPECIFIC CONDITIONS FOR SHORT-RANGE DEVICES (SRD)<br />
OPERATING ON FREQUENCIES BETWEEN 9KHZ AND 40GHZ<br />
ETSI EN 301 489-7 V1.3.1, NOVEMBER 2005 : ELECTROMAGNETIC COMPATIBILITY AND RADIO SPECTRUM<br />
MATTERS (ERM); ELECTROMAGNETIC COMPATIBILITY (EMC)<br />
STANDARD FOR RADIO EQUIPMENT AND SERVICES; PART 7:<br />
SPECIFIC CONDITIONS FOR MOBILE AND PORTABLE RADIO AND<br />
ANCILLARY EQUIPMENT OF DIGITAL CELLULAR RADIO<br />
TELECOMMUNICATIONS SYSTEMS (GSM AND DCS)<br />
ETSI EN 301 489-17 V1.2.1, AUGUST 2002 : ELECTROMAGNETIC COMPATIBILITY AND RADIO SPECTRUM<br />
MATTERS (ERM); ELECTROMAGNETIC COMPATIBILITY (EMC)<br />
STANDARD FOR RADIO EQUIPMENT AND SERVICES; PART 17:<br />
SPECIFIC CONDITIONS FOR 2,4GHZ WIDEBAND TRANSMISSION<br />
SYSTEMS AND 5GHZ HIGH PERFORMANCE RLAN EQUIPMENT<br />
ETSI EN 301 511 V9.0.2, MARCH 2003 : GLOBAL SYSTEM FOR MOBILE COMMUNICATIONS<br />
(GSM);HARMONIZED EN FOR MOBILE STATIONS IN THE GSM<br />
900 AND GSM 1800 BANDS COVERING ESSENTIAL<br />
REQUIREMENTS UNDER ARTICLE 3.2 OF THE R&TTE DIRECTIVE<br />
(1999/5/EC)<br />
09
ETSI EN 300 328 V1.7.1, OCTOBER 2006 : ELECTROMAGNETIC COMPATIBILITY AND RADIO SPECTRUM<br />
MATTERS (ERM); WIDEBAND TRANSMISSION SYSTEMS; DATA<br />
TRANSMISSION EQUIPMENT OPERATING IN THE 2,4GHZ ISM BAND<br />
AND USING WIDE BAND MODULATION TECHNIQUES; HARMONIZED<br />
EN COVERING ESSENTIAL REQUIREMENTS UNDER ARTICLE 3.2 OF<br />
THE R&TTE DIRECTIVE<br />
ETSI EN 300 330-2 V1.3.1, APRIL 2006 : ELECTROMAGNETIC COMPATIBILITY AND RADIO SPECTRUM<br />
MATTERS (ERM); SHORT RANGE DEVICES (SRD); RADIO<br />
EQUIPMENT IN THE FREQUENCY RANGE 9 KHZ TO 25 MHZ AND<br />
INDUCTIVE LOOP SYSTEMS IN THE FREQUENCY RANGE 9 KHZ TO<br />
30 MHZ; PART 2: HARMONIZED EN UNDER ARTICLE 3.2 OF THE<br />
R&TTE DIRECTIVE<br />
EN 60950-1, DECEMBER 2001 : INFORMATION TECHNOLOGY EQUIPMENT - SAFETY -<br />
PART 1 : GENERAL REQUIREMENTS<br />
EN 50360, NOVEMBER 2001 : PRODUCT STANDARD TO DEMONSTRATE THE COMPLIANCE OF<br />
MOBILE PHONES WITH THE BASIC RESTRICTIONS RELATED TO<br />
HUMAN EXPOSURE TO ELECTROMAGNETIC FIELDS ( 300MHZ -<br />
3GHZ )<br />
Lippo di Calderara, December 11th , 2009<br />
Paola Chientaroli<br />
Quality Assurance Manager
www.mobile.datalogic.com<br />
World wide Sales Network<br />
available from: www.mobile.datalogic.com/contacts<br />
<strong>Datalogic</strong> Mobile S.r.l.<br />
Via S. Vitalino, 13<br />
40012 Lippo di Calderara di Reno<br />
Bologna - Italy<br />
Telephone: (+39) 051-3147011<br />
Fax: (+39) 051-3147561<br />
©2004-2009 <strong>Datalogic</strong> Mobile S.r.l. 822000648 (Rev. I) 12/09